

Configuring the web server plug-in
In this chapter, we describe how we built a web server plug-in configuration file and deployed the plug-in to a web server to load balance requests across a set of Liberty servers. For more information about the workload management options available with Liberty in CICS, see Chapter 4, “Security options” on page 57.
This chapter describes the following topics:
7.1 Configuring the web server plug-in
The web server plug-in is configured by generating a plugin-cfg.xml file on the Liberty server that is then copied to the machine hosting the web server. This configuration file can be generated by calling the generateDefaultPluginConfig or the generatePluginConfig MBean operation that is provided by Liberty. This JMX MBean can either be invoked remotely, by using the JConsole utility supplied with the IBM Java SDK in combination with the Liberty server restConnector-1.0 feature. Or, the JMX MBean can be invoked by developing a custom JMX application to invoke the required operation on the MBean.
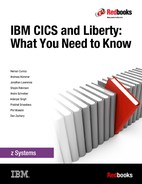
The plug-in must be installed into each web server that redirects requests to the target Liberty servers. See Figure 7-1.
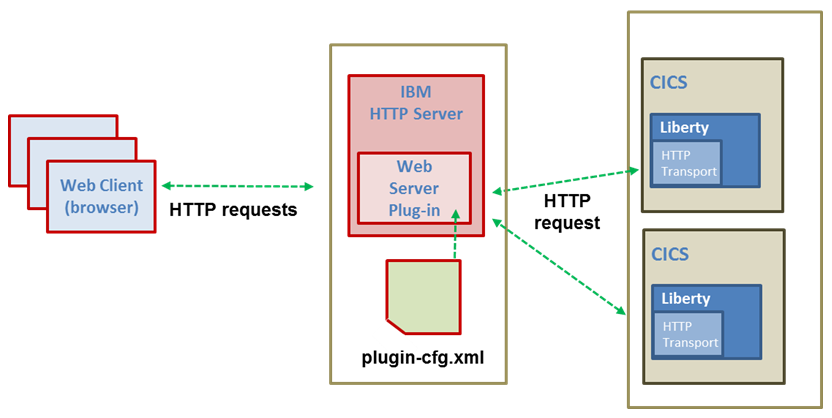
Figure 7-1 Web server plug-in configuration
Several steps are needed to configure the IBM HTTP Server to forward HTTP requests to the Liberty JVM server running in CICS. In this scenario, we set up a remote web server on a Microsoft Windows PC and configure it to route requests to the CICS region running on z/OS. These are the high-level steps:
1. Install the IBM HTTP Server and the plug-in
2. Configure the Liberty server
3. Configure the plug-in configuration file
4. Test the configuration
7.2 Install the HTTP Server and plug-in
You can install a web server and web server plug-in by using IBM Installation Manager. You can perform the installation by using the graphical user interface (GUI), command-line interface (CLI), console mode, or silently. To install the IBM HTTP Server and web server plug-in, complete the following steps:
1. Using IBM Installation Manager, configure the Installation Manager repository to point to the WebSphere supplements package:
a. The IBM HTTP web server and the web server plug-in are provided as part of the WebSphere Application Server supplements to the WebSphere Application Server. You can download the fixes for WebSphere Application Server V8.5.5 at:
2. Click the Install wizard and select the following packages:
a. IBM HTTP Server for WebSphere Application Server
b. Web server plug-ins for IBM WebSphere Application Server
3. Click Next.
4. Read and accept the license agreement, and click Next.
5. Specify the installation directory for each package.
6. Ensure the “Create a new package group” option is selected, then click Next.
7. In the Features window, verify the selected packages, and click Next.
8. Configure a port number for the IBM HTTP Server to communicate. By default, it listens on ports 80 and 443. Click Next.
9. Review the settings in the Summary window and click Install.
10. When the installation is complete, review the summary and click Finish.
Now that everything is installed, we need to configure the web server plug-in. Because the Liberty profile is running in CICS, we generate the plugin-cfg.xml file for the Liberty profile server by calling the WebSphere:name=com.ibm.ws.jmx.mbeans.generatePluginConfig MBean using a remote Representational State Transfer (REST) connection from the JConsole tool running on our workstation.
Remote access through the REST connection is protected by a single administrator role. Also, Secure Sockets Layer (SSL) is required in order to keep the communication confidential.
7.3 Liberty server configuration
The first step is to configure the ports to be used by the plug-in to communicate with the Liberty server:
1. Specify the web server HTTP and HTTPS ports in the server.xml file. By default, the values are 80 and 443:
<pluginConfiguration webserverPort=”80” webserverSecurePort=”443”/>
2. In the server.xml file, make the following changes:
a. Ensure that the httpEndpoint element specifies host=”*”
b. Enable the REST connector in the server.xml file
<featureManager>
<feature>restConnector-1.0</feature>
</featureManager>
c. Enable SSL communication for the Liberty profile
d. Enable the SSL Liberty feature in server.xml
<featureManager>
<feature>ssl-1.0</feature>
</featureManager>
i. Add the keystore service object entry to the server.xml file. If you let CICS autoconfigure the server.xml file, this element has been added for you. Note the keystore password:
<keyStore id=”defaultKeyStore” password=”defaultPassword”/>
e. Map a user to the administrator role for Liberty. Because we are mapping a z/OS user to an administrator role, we must configure the SSL definitions with SAF and define the administrator in IBM Resource Access Control Facility (RACF):
i. Configure SSL definitions with SAF:
<safRegistry id="saf"/>
<safCredentials profilePrefix="CREDS10A"/>
<safAuthorization id="saf"/>
<ssl id="defaultSSLConfig" keyStoreRef="defaultKeyStore" sslProtocol="TLS"/>
<keyStore id="defaultKeyStore" password="defaultPassword"/>
<trustStore id="defaultTrustKeyStore" password="defaultTrustPassword"/>
f. Configure the administrator role through RACF authorization. By default, the SAF profile name for the administrator role is as follows: BBGZDFLT.com.ibm.ws.management.security.resource.Administrator.
That profile must exist in the EJBROLE SAF class, and the admin user must be granted READ access to it. For example:
RDEFINE EJBROLE BBGZDFLT.com.ibm.ws.management.security.resource.Administrator UACC(NONE)
PERMIT BBGZDFLT.com.ibm.ws.management.security.resource.Administrator ID(MSTONE1) ACCESS(READ) CLASS(EJBROLE)
g. Start the Liberty JVM server in CICS by installing the JVMSERVER resource definition.
h. Access the REST connector.
i. Start the Liberty JVM server in CICS. In the messages.log file, you see the following messages:
j. Go to this URL in a browser to verify that you have set up a successful connection to the REST connector. You need to input your z/OS user ID and password.
7.4 Configure the plug-in
To configure the plugin-cfg.xml file, we will be calling the generatePluginConfig MBean. We use the jconsole utility that is provided with Java to generate this plug-in. However, we must set some environment variables when we call this utility on the command line:
1. In the messages.log file, look for the following message and note the URL:
CWWKX0103I: The JMX REST connector is running and is available at the following service URL:
service:jmx:rest://<hostname>:53104/IBMJMXConnectorREST
2. Create the C:
estclient directory on your workstation:
a. In the CICS region on z/OS:
i. Use FTP to transfer $USSHOME/clients/restConnector.jar to C:
estClient
ii. Use FTP to transfer <WLP_USER_DIR>/resources/security/key.jks to C:
estClient
b. On your workstation:
i. Copy <IBM_JDK_root>/jre/lib/security/java.policy to C:
estClient
ii. Replace the ssl.SocketFactory.provider and ssl.ServerSocketFactory.provider with the following, if they exist:
ssl.SocketFactory.provider=
ssl.ServerSocketFactory.provider=
3. In a command window, type SET JAVA_HOME=<IBM_JDK_root>java on your workstation. This is the directory where you install the WebSphere Customization Toolbox in step 2 above.
4. Change to the java directory: CD %JAVA_HOME%in
5. From the command window, run the jconsole Java utility. The full command follows:
jconsole -J-Djava.security.properties=C:
estClientjava.policy
-J-Djava.class.path=%JAVA_HOME%libjconsole.jar";%JAVA_HOME%lib ools.jar";
"C:
estClient
estConnector.jar"
-J-Djavax.net.ssl.trustStore=C:
estClientkey.jks
-J-Djavax.net.ssl.trustStorePassword=defaultPassword
-J-Djavax.net.ssl.trustStoreType=jks
-J-Dcom.ibm.ws.jmx.connector.client.disableURLHostnameVerification=true
|
Note: This command must be all on one line.
•The trustStorePassword is the password specified on the keystore element in server.xml.
•If jconsole fails to connect over SSL, add the following line to open a diagnostic window when trying to connect:
-J-Djavax.net.debug=ssl
-J-Djava.util.logging.config.file=C: emplogging.properties
|
6. In the jconsole window, do a remote connection to the CICS system on z/OS:
a. Enter the service:jmx:rest://<hostname>:53104/IBMJMXConnectorREST you noted in Step 2 on page 134 for the remote process.
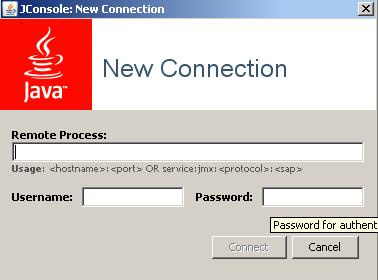
Figure 7-2 Establishing a remote connection
7. In the MBeans tab, go to WebSphere → com.ibm.ws.jmx.mbeans.generatePluginConfig → Operations → generatePluginConfig.
8. Under Operation Invocation, click the generatePluginConfig button:
This creates a plugin-cfg.xml file on z/OS within the ${server.output.dir} directory.
9. Use FTP to transfer this plugin-cfg.xml file to the machine where the web server resides.
7.4.1 Configure the plug-in to forward requests
Plug-in properties used for mapping HTTP requests within the configuration file are:
1. Route: Identifies the server for the plug-in to send a request to. The plug-in checks each route to find the appropriate route for the request.
2. VirtualHost: Contains multiple defined host:port pairs for the web servers and application servers.
3. URIGroup: Specifies a group of URIs that are indicated on the HTTP request line. The route compares the incoming URI with the URIs in the group to determine if the request should be forwarded to the application server for handling.
4. Transport: Provides the information that is necessary to determine the location of the application server to which the request is sent. If the server has multiple transports that are defined to use the same protocol, the first one is used.
5. Log: Is useful for identifying where the web server log is written.
Example 7-1 on page 139 shows what the plugin-cfg.xml file contains.
Example 7-1 plugin-cfg.xml
<?xml version="1.0" encoding="UTF-8"?><!--HTTP server plugin config file for String generated on 2015.11.12 at 23:23:56 GMT-->
<Config ASDisableNagle="false" AcceptAllContent="false" AppServerPortPreference="HostHeader" ChunkedResponse="false" FIPSEnable="false" IISDisableNagle="false" IISPluginPriority="High" IgnoreDNSFailures="false" RefreshInterval="60" Re-sponseChunkSize="64" SSLConsolidate="false" TrustedProxyEnable="false" VHostMatchingCompat="false">
<Log LogLevel="Error" Name="String/logs/String/http_plugin.log"/>
<Property Name="ESIEnable" Value="true"/>
<Property Name="ESIMaxCacheSize" Value="1024"/>
<Property Name="ESIInvalidationMonitor" Value="false"/>
<Property Name="ESIEnableToPassCookies" Value="false"/>
<Property Name="PluginInstallRoot" Value="String"/>
<!-- Configuration generated using httpEndpointRef=defaultHttpEndpoint-->
<!-- The default_host contained only aliases for endpoint defaultHttpEndpoint.
The generated VirtualHostGroup will contain only configured web server ports:
webserverPort=8080
webserverSecurePort=443 -->
<VirtualHostGroup Name="default_host">
<VirtualHost Name="*:8080"/>
<VirtualHost Name="*:443"/>
</VirtualHostGroup>
<ServerCluster CloneSeparatorChange="false" GetDWLMTable="false" IgnoreAffinityRequests="true" LoadBalance="Round Robin" Name="String_default_node_Cluster" PostBufferSize="0" PostSizeLimit="-1" RemoveSpecialHeaders="true" RetryInter-val="60">
<Server CloneID="a33546e6-6399-4fea-a865-2546d224fe44" ConnectTimeout="5" ExtendedHandshake="false" MaxConnec-tions="-1" Name="default_node_String" ServerIOTimeout="900" WaitForContinue="false">
<Transport Hostname="<hostname>" Port="53103" Protocol="http"/>
<Transport Hostname="<hostname>" Port="53104" Protocol="https">
<Property Name="keyring" Value="keyring.kdb"/>
<Property Name="stashfile" Value="keyring.sth"/>
<Property Name="certLabel" Value="LibertyCert"/>
</Transport>
</Server>
<PrimaryServers>
<Server Name="default_node_String"/>
</PrimaryServers>
</ServerCluster>
<UriGroup Name="default_host_String_default_node_Cluster_URIs">
<Uri AffinityCookie="JSESSIONID" AffinityURLIdentifier="jsessionid" Name="/com.ibm.cics.wlp.defaultapp/*"/>
<Uri AffinityCookie="JSESSIONID" AffinityURLIdentifier="jsessionid" Name="/IBMJMXConnectorREST/*"/>
</UriGroup>
<Route ServerCluster="String_default_node_Cluster" UriGroup="default_host_String_default_node_Cluster_URIs" Virtu-alHostGroup="default_host"/>
</Config>
Notice the CICS com.ibm.cics.wlp.defaultapp is included within the URIGroup. We use this application to test this scenario.
6. Enable the plug-in in the httpd.conf file of the web server using the LoadModule phrase, and specify the location of the plugin-cfg.xml file using the WebspherePluginConfig phrase.
For example, on a Microsoft Windows system, see Example 7-2.
Example 7-2 LoadModule excerpt from httpd.conf
LoadModule was_ap22_module "C:UsersIBM_ADMINIBMWebSpherePlugins2in32bitsmod_w
as_ap22_http.dll"
WebSpherePluginConfig "c:Program FilesIBMHTTPServerconfplugin-cfg.xml"
7.4.2 Merging plug-in configuration files
In an environment where you have more than one CICS region each running a Liberty JVM server, you might want to use the same HTTP server to send and receive HTTP and HTTPS requests to each region. To accomplish this, you must merge the web server plug-in configuration files that are used for each Liberty JVM server into a single web server plug-in configuration file.
Use the preceding steps to generate a separate plug-in configuration file for each Liberty profile. Then, combine all of these files into a single configuration. Install the generated merged plugin-cfg file on the web server. Typically, you have to enable the plug-in in the httpd.conf file of the web server. Use the LoadModule phrase to enable the plug-in, and specify the location of the configuration file using the WebSpherePluginConfig phrase.
7.5 Test the configuration
As a first step in testing the plug-in, you can test that the web server is active:
1. Go to the web server host name and port number it is listening to in a browser (for example, enter http://localhost:8080.
2. In Figure 7-3, you can see the default welcome page for the IBM HTTP Server.
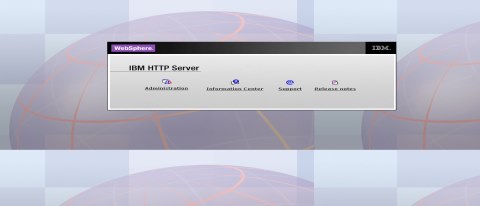
Figure 7-3 IBM HTTP Server welcome page
As the next step, you create a static web page hosted on the Microsoft Windows PC that will be serviced by the IBM HTTP Server.
SSL between the plug-in and the Liberty server might not be necessary, especially if the plug-in is running on the same machine as the application server. However, in this case it is not, and so we removed the following security features from the server.xml file:
<feature>cicsts:security-1.0</feature>
<feature>ssl-1.0</feature>
Now you can test the plug-in configuration. There are three ways to validate the configuration. Choose one of the following options:
•Send an HTTP request to the Liberty JVM server port to validate that the server is up and the application is running:
•Send an HTTP request to the IBM HTTP Server to validate the web server is listening on the post and capable of handling requests:
•Test the application URL at the IBM HTTP Server to validate the service statement and plugin-cfg.xml statements:
In this section, you successfully configured the web server plug-in to forward requests sent to the IBM HTTP Server on Microsoft Windows to the Liberty profile running in CICS on z/OS.
..................Content has been hidden....................
You can't read the all page of ebook, please click here login for view all page.