

Creating a business logic application
In Chapter 9, “Porting a web application” on page 161, you saw how to take an existing Java application using Java EE Connector Architecture (JCA) to access CICS programs, migrate, and deploy it into Liberty in CICS. This is the first stage in exploiting the capability of Liberty in CICS for Java EE applications. The chapter that followed, Chapter 10, “Creating an integration logic application” on page 179, showed how to develop a new service-based interface into an existing CICS application by building a JavaScript Object Notation (JSON) Representational State Transfer (REST) web service for the Java business logic interface.
In this chapter, we show how to further exploit Liberty in CICS to extend the flexibility and function of an application by using more of the capabilities of the Liberty server. We first cover conversion of the existing application to Open Services Gateway initiative (OSGi) and then show how to extend the function in two ways:
•Adding a new custom COBOL program to implement a new business function and invoking it from the Liberty application via JCA.
•Using JCICS to implement another new business function, directly accessing a Virtual Storage Access Method (VSAM) key sequenced data set (KSDS) from Java.
There are many other ways in which the Liberty server capabilities can be used to enhance and extend an application and in the conclusion of this chapter, we give a brief summary of a few of these.
The following topics are covered in this chapter:
11.1 Using OSGi with Liberty in CICS
In previous chapters, the applications have been developed and deployed as Java EE applications, using non-OSGi Java or dynamic web projects. In this section, we show how to take a non-OSGi web application, and convert and deploy it as an assembly of OSGi bundles by creating a shared OSGi bundle and an enterprise bundle archive (EBA).
Liberty in CICS is an OSGi-enabled Java EE application server environment. There are a number of advantages to deployed applications as OSGi bundles, including improved encapsulation of separate components, a clear version management capability, and easy sharing of common components between applications.
In this section, we show how to take the existing GenApp Java EE projects, convert them to OSGi bundles, and deploy them to Liberty in CICS.
There are four main stages of this conversion:
1. Copying the original Eclipse project to create a new version (optional, though strongly suggested).
2. Removal of the existing build path entries and utility JARs.
3. Conversion of the projects to OSGi bundles using the Eclipse tooling.
4. Editing of the OSGi manifests to correct errors and ensure correct runtime resolution of dependencies.
First, we need to create an OSGi bundle to contain the ibmjzos.jar utility JAR.
11.1.1 Create an OSGi bundle project for ibmjzos.jar
The GenAppBli Java project, which provides the Java business logic interface used by the web and service front end modules, interacts with the GenApp base COBOL programs using JZOS record-generated classes to marshall the records to pass to the CICS programs.
These JZOS-generated classes depend on utility classes in the com.ibm.jzos.fields package from the ibmjzos.jar file included with the IBM JRE on z/OS. In previous chapters, the classes were simply added to the build path for the GenAppBli project because they are automatically available in the z/OS Java environment. When the application projects are converted to OSGi, however, they can only access packages from other OSGi bundles, so ibmjzos.jar needs to be converted to an OSGi bundle.
This process is achieved by creating a wrapper project containing the required JAR and exposing the com.ibm.jzos.fields package for use by other OSGi bundles as follows:
1. Download the ibmjzos.jar file from the JRE on z/OS. The JAR file is in the /lib/ext directory of the Java runtime installation, for example:
/java/J7.0_64/lib/ext/ibmjzos.jar
2. Download the JAR file as a binary file using FTP or another mechanism to a suitable directory on your workstation.
3. Create a new OSGi bundle to contain ibmjzos.jar. In the Eclipse development environment, click File → New → OSGi Bundle Project. The New OSGi Bundle Project dialog opens.
4. Enter a name for the new bundle, for example ibmjzosgi. Accept the default location for the project, but clear the check box to “Add bundle to application”. Click Next → to continue.
5. This OSGi bundle project does not contain any source or built classes because it is just a holder for ibmjzos.jar. Therefore, you can remove the src folder from the build path if you want. Select the src source folder and click Remove.

Figure 11-1 Remove the source folder from the OSGi bundle project
6. On the final dialog to create the OSGi bundle, you can remove the .qualifier element from the bundle version. Again, this is optional because it does not affect the use of the bundle.

Figure 11-2 Finalize the creation of the OSGi bundle
7. Click Finish to complete creating the new OSGi bundle. The new bundle project is created in the workspace.
8. The next stage is to import ibmjzos.jar into the bundle, and then export the com.ibm.jzos.fields package. Right-click the ibmjzosgi project and click Import. The import dialog opens. Expand the OSGi section and select Java Archive into an OSGi Bundle as shown in Figure 11-3.

Figure 11-3 Import a Java archive into an OSGi bundle
9. Click Next to continue. The Java Archive Import dialog is displayed.
10. Click Browse and select the ibmjzos.jar file that you downloaded in step 1 above, then click Next to continue.

Figure 11-4 Import the JAR file into the OSGi project
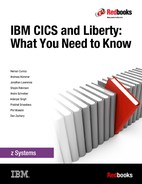
11. The final dialog for the import (Figure 11-5 on page 195) allows the selection of the packages to be exported by the OSGi bundle. Only the com.ibm.jzos.fields package needs to be visible, so clear the boxes for the others and then click Finish to complete.
Figure 11-5 Selection of packages to export
The ibmjzos.jar file is now imported into the OSGi bundle and the bundle manifest is updated to export the com.ibm.jzos.fields package from the bundle. The final MANIFEST.MF file for the bundle contains the content as shown in Example 11-1.
Example 11-1 OSGi bundle manifest
Manifest-Version: 1.0
Bundle-ManifestVersion: 2
Bundle-Name: ibmjzosgi
Bundle-SymbolicName: ibmjzosgi
Bundle-Version: 1.0.0
Bundle-RequiredExecutionEnvironment: JavaSE-1.7
Bundle-ClassPath: ibmjzos.jar
Export-Package: com.ibm.jzos.fields
11.1.2 Convert the existing Java projects to OSGI
Next, we need to convert the existing Java projects to use OSGi.
Complete the following steps to convert the GenAppBli project to use OSGI:
1. In your Eclipse development environment with the GenApp projects imported and correctly building, right-click the GenAppBli project and select Copy (or use Ctrl-C). Then, click Edit → Paste (or Ctrl-V). A Copy Project dialog is displayed with a suggested new project name.
2. In the Copy Project dialog, replace the suggested name (Copy of GenAppBli) with a new name GenAppBliV2 as shown in Figure 11-6.
3. Click OK and the new project is created as a copy of the original.

Figure 11-6 Copying the GenAppBli project to GenAppBliV2
4. Right-click the new GenAppBliV2 project and select Configure → Convert to OSGi Bundle Project. The “Project conversion to OSGi” dialog window appears.
5. Because the project contains no binary files, which might have hidden dependencies, you can clear the check box to search binary files. Click OK as shown in Figure 11-7.

Figure 11-7 The Project conversion to OSGi dialog window
A progress bar might appear for a few seconds while the OSGi project facet is installed. Then, the project is converted and it might now contain errors because the classpath has been updated and no longer includes all required dependencies. These errors now need to be repaired.
The errors should be confined to the OSGi manifest MANIFEST.MF for the bundle project, as shown in Figure 11-8 on page 197 because not all the import dependencies can be found.

Figure 11-8 Source tab of the manifest editor
To fix the error in the MANIFEST.MF, perform the following steps:
1. Expand the project GenAppBliV2 and open Manifest: GenAppBliV2.
3. Delete the Import-Package entry for package com.ibm.jzos.fields, highlighted in Figure 11-8. This entry is not required because this package is one of the platform extensions in the CICS Liberty server.
4. Also, delete the Export-Package entry for com.ibm.cics.genapp.records. This package is internal to the GenAppBli implementation and does not need to be exported.
5. Remove .qualifier from Bundle-Version and add ;version="1.0.0" to the exported package. See Example 11-2 on page 198. These changes simplify some of the later steps, and allow version dependence to be specified for users of this bundle.
Your OSGi manifest should now look like as shown in Example 11-2 on page 198. The entry Import-Package: com.ibm.cics.server is needed for the JCICS API used later in this chapter so it is included now for convenience.
Example 11-2 Final OSGi manifest
Manifest-Version: 1.0
Bundle-ManifestVersion: 2
Bundle-Name: GenAppBliV2
Bundle-SymbolicName: GenAppBliV2
Bundle-Version: 1.0.0
Bundle-RequiredExecutionEnvironment: JavaSE-1.7
Import-Package: com.ibm.cics.server,
com.ibm.connector2.cics,
javax.naming,
javax.resource,
javax.resource.cci
Export-Package: com.ibm.cics.genapp.bli;version="1.0.0"
6. Save the changes and close the manifest editor.
Next, we need to perform a similar process for the GenAppWeb dynamic web project:
1. Copy the GenAppWeb project to a new project GenAppWebV2 and convert to an OSGi bundle in the same way as for GenAppBli. Errors will again appear in the project, which will be corrected by editing the manifest.
2. Expand project GenAppWebV2 and open the OSGi manifest for the bundle in the manifest editor and select the MANIFEST.MF tab.
3. Remove the entry WEB-INF/lib/GenAppBli.jar from the Bundle-Classpath. This is not needed because the dependency will instead be satisfied by using OSGi import from the shared bundle.
11.1.3 Deploying the OSGi version to Liberty in CICS
The original projects comprising the GenAppWeb application have now been converted to OSGi bundles. We now show you how to package and deploy these to the Liberty JVM server in CICS to allow you to test whether the conversion was successful.
The common business logic component GenAppBli will be deployed as a shared OSGi bundle, while the application-specific web component GenAppWeb will be deployed as an enterprise bundle archive (EBA) embedded in a CICS bundle:
1. In the Eclipse development environment, right-click project GenAppBliV2 and select Export → OSGi Bundle or Fragment. The Export dialog appears.
2. Use the Browse option to select an appropriate directory and file name for the OSGi JAR file as in Figure 11-9.
3. Click Finish and the OSGi bundle is packaged and placed in the designated location.

Figure 11-9 Export dialog for the OSGi shared bundle
4. Transfer the packaged OSGi bundle as a binary file to a suitable location in zFS via FTP or another mechanism.
5. Edit the server.xml configuration file for the target Liberty JVM server and add a <bundleRepository> element for the OSGI bundle transferred in Step 4, for example:
<bundleRepository>
<fileset dir="/u/redg11/cicsts53/OSGi" include="GenAppBliV2_1.0.0.jar"/>
</bundleRepository>
This makes the exported packages from the bundle available to all installed OSGi applications in the Liberty server runtime.
The OSGi version of the GenAppWeb application is packaged as an OSGi application and deployed as a CICS bundle. We start by creating a new OSGi application project as follows:
1. In the Eclipse development environment, click File → New → OSGi Application Project. A New OSGi Application Project dialog is displayed.
2. Enter a name for the new project, such as GenAppWebV2App and click Next.
3. Select the check box for the OSGi project for the GenAppWeb OSGi version created earlier, but not for the shared OSGI bundle, as shown in Figure 11-10.

Figure 11-10 Adding the web OSGi bundle to the OSGi application project
4. Click Finish and the new OSGi application project is created in the workspace.
Create a CICS bundle project to deploy the OSGi application as follows:
1. Click File → New → Other. A new project dialog opens.
2. Expand CICS Resources and select CICS Bundle Project and click Next. A new CICS Bundle Project dialog opens as shown in Figure 11-11.

Figure 11-11 CICS Bundle Project dialog window
3. In the CICS bundle project dialog, enter a name for the new CICS bundle, such as GenAppWebV2Bundle.
4. Click Finish and the new CICS bundle project is created in the workspace and opened in a CICS Bundle Manifest editor.
5. On the Overview tab in the CICS Bundle Manifest editor, click New next to the Defined Resources list and select OSGi Application Project Include. An OSGi Application Project Include dialog window opens, as shown in Figure 11-12.

Figure 11-12 OSGI Application Project Include dialog window
6. In the OSGi Application Project Include dialog, select the OSGi project for the GenApp web application, GenAppWebV2App, and enter the name of the JVM server for the target Liberty instance.
7. Click Finish to confirm, and the GenApp web-enabled OSGi application project is displayed in the Defined Resources list in the CICS Bundle Manifest. You can now close the Bundle Manifest editor.
8. Export the CICS bundle project to the zFS by right-clicking the project and selecting Export Bundle Project to z/OS UNIX File System.
Your CICS bundle project containing the EBA archive is now ready for installation into CICS for testing. This requires the installation of a CICS BUNDLE that refers to the zFS location of the exported bundle in the BUNDLEDIR attribute. For more information, see Chapter 6, “Configuring a Liberty server in CICS” on page 103.
In this section, you learned how to convert a regular Java Platform, Enterprise Edition web application with an embedded utility JAR to OSGi, using a shared OSGi bundle for the common component and an EBA for the web application.
We now build on this infrastructure to extend the Java business logic with new functions, adding a new COBOL program for one new function, and using JCICS for another.
11.2 Extending the business logic application
So far in this chapter, we repackaged and redeployed the existing GenApp web application by using the OSGi tooling in Eclipse, and deployed it into a Liberty server in CICS. Now we look at a couple of options available to extend the business logic with new functions.
There are two techniques to be considered:
•Adding a COBOL program to implement the function and linking to it using JCA.
•Implementing the new function directly in Java using the JCICS API.
11.2.1 Adding new custom CICS programs
Perhaps the most obvious way to add new function to the Java business logic API is to create a new CICS program to perform the required function and invoke it by the same method as for the base application, that is via the JCA local CICS external call interface (ECI) adapter.
In this section, we give an example of creating a new COBOL program to implement a function to return a list of customers for the GenApp Insurance application, using a channel and container interface and invoked using JCA. The results of invoking this program are then made available through a new method on the Java business logic interface.
Writing a new CICS COBOL program to provide the listCustomers function is outside of the scope of this book, but we give an overview of the process and some code snippets.
Add the new wanted method declaration to the GenAppInterface Java interface:
public Customer[] listCustomers(int startCustomer, int maxCount)
throws GenAppException;
where:
•startCustomer is the customer number to start the list of returned customers.
•maxCount is the maximum number of customers to return from the call.
•These allow the client to page through many customers, for example, to display on a web page.
•The returned Customer[] is an array of Customer objects. Each includes the customer number and first and surname, for summary purposes, not the full details for each customer.
For the new COBOL program intended to implement this function, we decided to use the channel and container interface, using CHAR type containers. We also decided to implement the marshalling of the container contents using hand coded Java rather than the JZOS record-generated classes.
The channel interface to the new program uses three containers as shown in Table 11-1.
Table 11-1 Interface details
|
Name
|
I/O
|
Content
|
|
REQUEST
|
Input
|
StartCustomer, maxCount as character string.
|
|
RESPONSE
|
Output (success)
|
Customer count, then count * (custnum, firstname, lastname) as CHAR string.
|
|
ERROR
|
Output (failure)
|
Error message as character string.
|
After the COBOL program that implements the new business function has been written, we know the format and content of the containers that it uses, so the Java code to implement the listCustomers() method can be completed. The skeleton method created by the Eclipse source tool is replaced with the implementation outlined below.
The method signature, which matches the Java interface declaration, was created by the Eclipse source tool:
public CustomerData[] listCustomers(int startCustomer, int maxCount)
throws GenAppException {
Create a StringBuffer to build the request container contents, and insert the input parameters startCustomer and maxCount converted to strings (these also need to be padded with zeros to the correct length. The details of this are omitted for brevity).
Example 11-3 StringBuffer sample
StringBuffer request = new StringBuffer(12);
String cstring = Integer.toString(startCustomer);
request.append(cstring);
String cmaxstr = Integer.toString(maxCount);
request.append(cmaxstr);
// Create a channel to pass to the JCA adapter:
ECIChannelRecord channel;
try {
channel = new ECIChannelRecord("GENAPP");
} catch (ResourceException e) { throw new GenAppException(e); }
// Create and populate the request container in the channel.
channel.put("REQUEST", request.toString());
// Invoke the target program passing the channel as input.
invokeChannelProgram(ListCustomersPgm, channel);
If an error container has been returned, throw an exception with the contents of the error message.
Example 11-4 Sample to handle exception
if (channel.containsKey("ERROR")) // Error container exists.
{
throw new GenAppException((String) channel.get("ERROR"));
}
Otherwise, there is no error container so the RESPONSE container is valid. Extract the contents into a String:
String response = (String) channel.get("RESPONSE");
Extract the customer count from the first two characters of the response. Then, iterate to extract each customer’s detail from the response, and add to a new array CustomerData[] of the required size. See Example 11-5.
Example 11-5 Sample to extract customer count
int ccount = Integer.parseInt(response.substring(0, 2));
CustomerData[] carray = new CustomerData[ccount];
int coffset = 2; // Start offset for customer data.
for (int cindex = 0; cindex < ccount; cindex++) {
CustomerData cdata = new CustomerData();
int cnumber = Integer.parseInt(response.substring(coffset, coffset + 10));
cdata.setCustomerNumber(cnumber);
cdata.setFirstName(response.substring(coffset + 10, coffset + 20));
cdata.setLastName(response.substring(coffset + 20, coffset + 30));
carray[cindex] = cdata; // Store new CustomerData in array.
coffset += 30; // Shift forward by length of each customer data.
}
Finally, return the completed array of CustomerData:
return carray; // Return full CustomerData[] to caller.
The private method invokeChannelProgram(), which uses JCA to invoke the target CICS COBOL program, passing the channel containing the request container, is outlined in Example 11-6. The input parameters are the name of the target CICS program, and the channel, which has been created by the caller.
Example 11-6 invokeChannelProgram() method
private void invokeChannelProgram(String program, ECIChannelRecord channel)
throws GenAppException {
Create a new ECIInteractionSpec to define the JCA interaction to be performed, and set the name of the target program. The interaction will be a synchronous send and receive.
Example 11-7 ECIInteractionSpec sample
ECIInteractionSpec eSpec = new ECIInteractionSpec();
eSpec.setFunctionName(program); // Name of target COBOL program
eSpec.setInteractionVerb(ECIInteractionSpec.SYNC_SEND_RECEIVE);
// Create a new ECI Interaction to execute the call
Interaction eciInt = eciConn.createInteraction();
Execute the interaction using the interaction spec, and passing the channel as input. The same channel object is used to receive the response channel content from the CICS program call:
eciInt.execute(eSpec, channel, channel);
eciInt.close();
The Java implementations outlined above have been condensed from the complete code, which is available in the additional materials supplied with this Redbooks publication at the following URL:
These two new Java methods, listCustomers() and invokeChannelProgram(), when added to the existing business logic interface class, complete the implementation of the new function to provide a list of known customers. This function can then be used by the GenApp web front end to display a list of customers on a web page, or exposed as a web service (such as a JSON REST web service) as described in Chapter 10, “Creating an integration logic application” on page 179.
11.2.2 Using the JCICS API
The Liberty server in CICS is fully integrated with its host CICS environment and this allows you to use the native CICS Java programming capability, including JCICS. In this section, we show how JCICS can be used to extend the functions of the Java business logic interface very quickly and easily.
To demonstrate this, we choose to add another new method on the GenAppBli interface, in this case to obtain a list of all the policies for a given customer.
Add the following method declaration to the GenAppInterface Java interface:
public PolicyData[] listPolicies(int custNumber) throws GenAppException;
where,
custNumber is the customer number for which the list of policies is required.
The returned PolicyData[] is an array of PolicyData objects. Each contains the policy number and an enumerated type indicating the type of policy represented, for example, house or car.
Saving the new method declaration in the Java interface definition causes the implementation class to be invalidated because it no longer fully implements its declared interface. The Eclipse coding assist tools can be used to create a new skeleton implementation method.
Edit the implementation class GenAppJCAImpl and position the cursor at an appropriate point in the source where the new method skeleton should be added.
Right-click and select Source → Override/Implement Methods. A dialog is displayed as shown in Figure 11-13. After checking details, click OK to finish and add the new method.

Figure 11-13 Override/Implement Methods dialog after adding listPolicies()
Now the actual implementation for the method has to be added. The following is the condensed and annotated Java source code for the listPolicies() method. The method signature matches the declaration in the interface:
public PolicyData[] listPolicies(int custNumber) throws GenAppException {
The main JCICS class used to implement listPolicies() is the KSDS class, which is used to browse the "KSDSPOLY" VSAM file to obtain a list of policies that match the input customer number. The key length for this file is 21 so we declare a byte array of size 21 to contain the key:
KSDS ksdspoly = new KSDS();
ksdspoly.setName("KSDSPOLY");
byte[] key = new byte[21]; // Null value array, key length = 21.
Create a new ArrayList to hold the list of PolicyData objects as they are created from matching file records. Declare and start a browse of the KSDS file, starting with the low valued key so that all records are seen:
ArrayList<PolicyData> policyList = new ArrayList<PolicyData>();
KeyedFileBrowse policyBrowse;
try {
policyBrowse = ksdspoly.startBrowse(key); // Start with low values.
Create RecordHolder and KeyHolder objects to use as holders for the returned file record and key respectively during the browse:
RecordHolder recordholder = new RecordHolder();
KeyHolder keyholder = new KeyHolder(key);
Loop indefinitely (until an exception is thrown), obtaining the next file record and key from the browse:
while (true) { // Browse until end of file (EndOfFileException)
try {
policyBrowse.next(recordholder, keyholder);
If this point in the method is reached, no exception was thrown, so the next record was found. Extract the key from its holder and convert it to a string for subsequent processing.
Example 11-8 Extract keys
key = keyholder.getValue();
String keystring = new String(key, ccsid);
// If the key matches the requested customer number,
// process the key to extract policy number & type.
PolicyData pdata = null;
If the key represents a file record for the requested customer, check the type of policy to see if it is one of the types that we are interested in, that is a house or a car policy. If so, create a PolicyData object of the appropriate type.
Example 11-9 Create a PolicyData object
if (Integer.parseInt(keystring.substring(1, 11)) == custNumber) {
switch (keystring.charAt(0)) {
case 'M':
pdata = new PolicyData(PolicyType.Car);
break;
case 'H':
pdata = new PolicyData(PolicyType.House);
break;
default: // other
break; // Just ignore other policy types
} // switch()
If pdata has been created, extract the policy number from the key string and store it in pdata. Then, add it to the list of policies in policyList. Continue browsing to inspect the next file record. See Example 11-10.
Example 11-10 Extract policy data
if (pdata != null) { // Correct customer *and* accepted type.
pdata.setPolicyNumber(Integer.parseInt(keystring.substring(11)));
policyList.add(pdata);
}
}
When EndOfFileException is caught and terminates the loop normally, this is an expected exception. See Example 11-11.
Example 11-11 Exiting the loop as expected
} catch (EndOfFileException endfile) {
break; // End browse loop normally - expected.
}
} // while()
policyBrowse.end(); // End the file browse normally at end of file.
Any other exception also terminates the loop, but it will be an error resulting in an exception to the caller:
} catch (CicsException e) { throw new GenAppException(e); }
Finally, convert the ArrayList to an array of the correct type, PolicyData[], and return it to the caller:
return policyList.toArray(new PolicyData[0]);
The single short Java method above is all that is needed to implement the new business logic function using JCICS to obtain a list of active policies for a given customer. This function can then be used by a dynamic web page or exposed as a web service in the same way as for the listCustomers() function. The full source is available with the additional materials for this IBM Redbooks publication at the following URL.
11.3 Summary
In this chapter, we have shown you how to convert an existing Java Platform, Enterprise Edition application to exploit OSGi, and given examples of two different approaches to extending the business logic interface for a CICS Java Platform, Enterprise Edition application: JCA with an auxiliary COBOL program, versus JCICS. Consider the following factors when deciding between these two alternatives:
•Portability
•Implementation
•Performance
Following are the main advantages and disadvantages of the two approaches, which are equivalent from a functional perspective:
•Using the JCICS APIs to extend the business logic of an application prevents the application from being deployed in a non CICS environment. Therefore, if you ever want to port the application to another server, these would have to be changed to use a different implementation such as COBOL via JCA as for the listCustomers() method.
•The JCA/COBOL approach requires a new additional COBOL program to be written, compiled, and installed in CICS alongside existing programs.
•The JCICS implementation requires (in this case) much less code because it is a single short Java method as opposed to a COBOL program plus a more extended Java method.
•The JCA/COBOL is likely to have better performance because it requires only a single interaction across the Liberty CICS interface, versus many interactions (in this case) for the JCICS performing the file browse. However, the performance gains have not been measured during this project.
..................Content has been hidden....................
You can't read the all page of ebook, please click here login for view all page.