CHAPTER 4
ROPES AND KNOT TYING
It is not surprising that the proper handling of ropes is very important in stagehand work, considering that sailors were the originators of our craft. Rope handling and the quick, accurate tying of knots are skills you should learn early on in your training. Poorly executed knots can lead to serious injury for anyone unfortunate enough to be underneath a falling piece of scenery or lighting equipment. Rope lines should be selected with an understanding of the capabilities of the line itself and the use to which it will be put. Knots should be tied with the same understanding. There are literally hundreds of different kinds of knots. It is best to begin with a few of the most common, so that they can be appropriately mastered.

THIS IS A TWO-COLOR NYLON ROPE THAT HAS A BRAIDED EXTEROIOR LAID OVER INTERIOR STRANDS. THE END HAS BEEN MELTED TO KEEP IT FROM FRAYING.
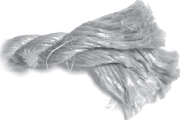
A TRADITIONAL HEMP ROPE MADE BY TWISTING FIBERS TOGETHER. THE END HAS BEEN FRAYED OPEN TO EXPOSE THE INDIVIDUAL YARNS
A good knot should be easy to tie, hold well, be easy to untie, and should not place undue stress on the line. Some types of knots, especially if misused, may dangerously reduce the load limit of a rope. When overstressed, ropes almost always break at the point where a knot has been tied or some other kink has disturbed the straight passage of the line.
![]()
A SIMPLE OVERHAND KNOT CAN DERATE THE BREAKING STRENGTH OF A LINE BY AS MUCH AS 50%
There are two basic types of cordage used in the theatre, those made by stranding fibers into twisted yarns, and those manufactured with a braiding process. Stranded ropes are made from fibers that are spun into loose strands known as yarns, which are then twisted together to form the line. The size and weight rating of the rope depends upon the number and size of the yarns, as well as the material used in making the rope. Yarns are usually twisted together in a right-handed orientation (clockwise as you look toward the end), making it easiest to coil ropes in a clockwise direction. Rope fibers of this type may consist of sisal, Manila hemp, or a synthetic like polypropylene.
Braided lines are formed by braiding together many very small yarns to form a cover, or sheath, that fits over an interior group of strands. Since they are not twisted together, these ropes are easier to work with and less likely to become kinked. Nylon rigging ropes are made in this way, and so are cotton sash cord and tie line. Sash cord gets its name from its original and intended use as a line meant to connect counter-balancing weights used in old-style windows. The sash is the part of a window that moves up and down when it opens and closes. The same properties that make sash cord bend well around a small diameter window pulley also make it an excellent choice for tying knots. It is very supple and is often used where great strength in a line is not required, but tie line is not enough.

Number 4 black or white tie line is really just a smaller version of sash cord and is the most popular choice for tying cable to an electric, or for the ties on top of a curtain. Jute tie line is also used, but it is so loosely put together that it does not last very long and is not at all suitable for use on drapes or other goods that must be frequently tied and untied.
Manila is a variety of the hemp plant and is the best choice for a hemp line used to carry weight over the stage. The grade-one type is easily spotted by the blue fiber that runs through it. Polypropylene and/or nylon ropes have become much more common in recent years. These synthetics are more easily manufactured into rope, and are somewhat stronger and rot resistant in most situations. Hemp is rapidly loosing favor for rigging applications.
There are some basic terms used in tying knots that you should learn in order to understand the descriptions in this chapter.
The free end of a line is called the tail. It is the part that you actually manipulate to tie the knot. The standing part is the long length of a rope that may be formed into a coil, or be tied to the grid, or laid out in some other fashion. It is important to visualize which is which, especially if you are using a short length of cord to learn how to tie the knots in this chapter. Anything used for tying can be called a line, but rope indicates something large enough to rig with. Most knots begin with a loop of some sort.

THE BOW KNOT
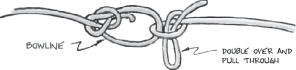
OK, so you already know how to tie your shoe. But if we start off with an easy one, it will build confidence for the harder knots ahead. The bow is actually the most often used knot in theatre because it is used to hang drops and curtains. Drapes are traditionally manufactured with a tie every twelve inches, so a forty-foot long border has forty-one knots to tie. Multiply this number by however many curtains are being hung and the importance of the bow knot becomes clear. The bow contains the same basic building blocks that are used in all knots. It is essentially a square knot in which the two tails are doubled over before making the final half hitch. Pulling on the very end of the tails slides the two loops back through the knot and the bow is untied. If you can visualize that process, it will make it much easier for you to understand more complex knots.

The bow knot requires two tails, or ends. The first part of the knot involves tying a half hitch, which is simply wrapping the two tails around one another, and tightening. The friction of the two lines rubbing against one another tends to make them stay tightly together. But a half hitch will not stay tied on its own; the friction is not great enough. Double over the two tails so that they are about half of their original length. Now tie a second half hitch using the doubled over tails. This completes the knot. It is easy to tie, and it is very easy to untie, by pulling on one of the tails. When untying curtains from a batten, if you pull one tail all the way straight up, it will untie the entire knot in one easy motion.
DOUBLE OVER AND PULL THROUGH
THE CHOKE
This is a very simple knot that is quite useful for attaching a piece of tie line to a pipe or lighting cable so that it grips with holding force and will not slide down. It is one of a family of knots that use a double wrap around a pipe for extra gripping power. It is also the most common manner of attaching a sling. Slings, or spansets, are endless nylon bands often used in rigging.

CHOKING AROUND A PIPE
As an example, a choke works well if you want to tie up some lighting cable onto a boom so that it is up off the deck. Apply the choke so that it is about chest high off the floor. Then coil the cable and secure it with a bow knot.
The greater the force exerted on the choke, the tighter its grip will become, preventing it from sliding down the pipe and lowering the coil to the deck. This method also works for tying cable (or any other reasonable object) to a truss, handrail, rope, or other tubular item.
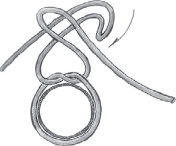
THE SLIP KNOT
The slip knot can be used to make a loop in the end of a line that will tighten when force is exerted. It has many useful applications for attaching tie line when speed is essential. The slip knot is also used in tying another knot, the trucker's hitch. For anyone who is a knitter, you may recognize it as the same knot that is used to start yarn onto a knitting needle.
TWO STEPS IN FORMING A SLIP KNOT
Make a small loop in the tail near its end. Double the standing part and draw it through the loop. (The standing part is the long end.) Hold the doubled over loop and pull on the tail to secure the knot. If the knot has been properly tied, pulling on the standing part makes the loop smaller, while pulling on the loop itself makes it larger. If you tug on the loop and the tail pulls through and the knot is lost, you have tied the knot backward and it will not work properly. An easy way to avoid this problem is to make sure that your first loop is formed very close to the end of the tail. Then there will not be enough of the tail sticking out to make the mistake of pulling it rather than the standing part through the loop.
THE CLOVE HITCH
The clove hitch is used to fasten a line around a pipe, handrail, or other rounded object. It is an important theatrical knot that every stagehand should know and be able to tie without thinking. Like the choke we looked at earlier, this knot grips more tightly when force is applied. Unlike the choke, the clove is meant for use with a long line, and especially one that is under load while the knot is tied. One example of this might be while dead hanging a drape or a piece of scenery. There is weight on the line as you haul it up into the air, and a clove hitch is easy to tie under these circumstances because you can take a wrap around the pipe to safety the line while you tie the knot.
The actual tying of a clove hitch is a very simple procedure. The line is draped over the pipe, then wrapped around the right side of itself. Next you pass the line around the left side and slip it under the first wrap that was taken. That's all there is to the clove hitch. However, a common practice is to add an extra half hitch around the standing part to ensure that the line will not accidentally untie itself under stress, especially when the load is repeatedly shifted.

TYING THE CLOVE HITCH
There is often a great deal of excess rope on the floor after hauling something into the air for a dead hang. When this happens, the clove hitch can be tied by doubling over a few feet of the line and using this doubled over part as though it were the end. That will avoid pulling many feet of excess line through the knot. It is a common practice with many different kinds of knots and is similar to what happens when tying a bow.
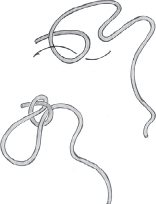
THE BOWLINE
This knot is pronounced “bolyn” and not “bow line.” If you mispronounce it, you run the risk of becoming an object of ridicule by your fellow stagehands and/or climbing enthusiasts. The bowline is used to create a fixed loop in the end of a rope. It is another of the quintessential stagehand knots that everyone must know. It is the basic knot used by rock and roll riggers to hang chain motors. The bowline's popularity stems from the fact that it is easy to tie, it is very safe, and it is also easy to untie, which are all essential elements of a good knot.
It will be much easier to tie the bowline if you keep these two ideas in mind: Make the first loop small. Make the second loop (the one you want to keep) large.
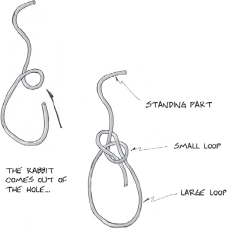
STEPS IN TYING THE BOWLINE
The following method of tying a bowline is probably the easiest, although there are others. These instructions are intended for a right-handed person. If you are left-handed it is probably best to try the right-handed method first, and then adapt it to your own style later. Basically, the left-handed approach is a mirror image of the right and will work just as well.
Hold the line across your left palm so that the long, standing part is lying away from you and the tail is several feet long. The length of the rope used for the tail dictates the size of the loop in the bowline. For some rigging jobs, the size of the loop is critical.
Coil the rope counterclockwise so that there is one small loop in your hand. Pass the tail through the loop from back to front, then around the back of the standing part and then through the small loop passing back against itself. Tighten the knot by pulling on the tail in opposition to the standing part.

A LEFT-HANDED BOWLING
There is a story that goes with the tying of this knot that may make it easier to remember the steps. “There is a hole in the ground (the small loop). A rabbit (the tail) comes up out of the hole and runs behind a tree (the standing part). The rabbit circles the tree and runs back down into the hole.” This is a silly story, but I didn't make it up, and it is the traditional method of teaching the bowline. Feel free to adapt it to any animals and/or objects you feel are appropriate.
The left-handed approach is really just a mirror image of the instructions that were just given for a regular bowline. Notice that in either version, the tail should wind up to the inside of the large loop rather than to the outside. If you are a left-handed person, you are already aware that lefties are generally shafted by tool manufacturers, so enjoy something that works just as well left-handed.
THE SQUARE KNOT
The square knot is another very basic knot used in a variety of different situations such as tying two lines together, tying a bundle, or in combination with other knots.
Tying the square knot requires two tails. Holding one tail in either hand, lay the right tail over the left and twist it around to make a half hitch. Then take the left tail and pass it over the right making another half hitch. Right over left, left over right, as the saying goes. Tighten this up and you will have a square knot. Right over left twice, or left over right twice will make a granny knot that is harder to untie and is prone to slipping. A true square knot appears as two loops choked over one another and is easily recognizable.

THE SQUARE KNOT

A GRANNY KNOT
THE TRUCKER'S HITCH OR SNUB AND LOOP
The most complicated has been saved for last. The trucker's hitch is a popular knot to use when you need to put a great deal of tension on a line. It is often used to tie down loads for trucking, hence its name. Of course in a modern trailer used for touring, straps and load bars are the preferred method, but there are still plenty of other uses for the trucker's hitch. This knot is excellent for stretching cycs, holding scenery tight to a wall, and for making small changes in the trim of a dead hung piece. There are methods of tying the trucker's hitch with either one piece of rope or with two, depending on the situation at hand.
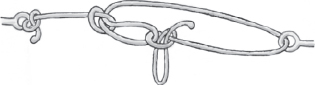
USING TWO LINES FOR A TRUCKER'S HITCH
It is easiest to learn the two-rope method first. A practical illustration may make it easier to understand how the trucker's hitch is used. Visualize a cyclorama that needs to be stretched to remove its wrinkles. First clamps must be fastened to the edges of the cyc so that lines can be tied between the clamps and the offstage wall of the theatre. By applying tension to the lines, you can stretch the wrinkles out of the fabric.
First attach a piece of tie line to the clamp with a bowline. At a convenient distance from the clamp, tie another bowline in the other end of the line. Tie the second piece of tie line to whatever point is available on the wall of the theatre. Bring the two lines together and pass the tail of the second line through the loop of the first. If you then pull this tail back in the direction of the wall, tension will be placed on the line, and the friction of the tie line doubling back through the loop will keep it from slipping as long as tension is kept on the tail you are holding.
Finish the knot by tying off to the loop. Hold the doubled back line with two fingers where it is kinked through the bowline loop. The friction of the two lines and the pressure from just your two fingers should be plenty to keep the line from slipping. If you try to hold it with more than that, your hand will be in the way of tying the rest of the knot. Double a small portion of the tail and wrap it through just as you would if tying a bow. It will take some practice to get this to work without losing tension on the line.
Untie the knot by pulling on the tail. The doubled-over section will pull through just as it does when untying a bow knot.
To tie the one-line trucker's hitch, fasten the line at one end with a suitable knot and then tie a slip knot in the middle of the line an easy distance away from the second tie-off point. The slip knot should be tied so that the loop size is dependent on the tail rather than the standing part. If you do this backward, the loop will shrink to nothing when tension is applied, and it will be obvious that something is wrong. The line should be able to pass easily around the second tie-off point without jamming, or the one-line method won't work.
ONE-LINE MEATHOD TYING THE TRUCKER'S HITCH
It is possible to make the first small loop by doubling over the line and making a half hitch rather than using a slip knot, but it is very hard to remove this alternate knot later on down the road.
Pass the line around the second tie-off point and run it back through the loop, making it fast in the same manner as used in method one. Using the trucker's hitch to tension the line provides a two-to-one mechanical advantage and will allow you to pull the line really tight. This is to say that for every pound of force on the tail, the standing part will be two pounds tighter. But it also doubles the load on the line and increases the possibility that it will break.
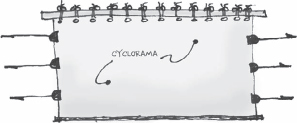
STRETCHING CLAMPS AND LINES ON A CYCLORAMA