
CHAPTER 18
WORKING WITH POLYSTYRENE FOAM
The trade name Styrofoam is used in the vernacular to indicate a number of different plastic products. These foam products are useful in building scenery because they are so lightweight and easy to shape. One of the drawbacks of foam construction is that the foam is also easily torn up. There are ways of coating the foam to give it a tougher exterior, hence making it more useful to us. Foam is at its best when used to construct large, oddly-shaped structures like rocks, geometric forms, or perhaps cornice pieces. It is fairly easy to create very textural surfaces with foam.
In recent years a method of coating foam with a super-strong epoxy material has made it possible to use it on the outsides of commercial buildings. In construction work, foam is often used as a cheaper substitute for large cornices and other exterior trim. Foam has been used to build scenery like that for many years, and for the same reasons. The foam adds a lot of bulk, cheaply, and without making the unit too heavy.

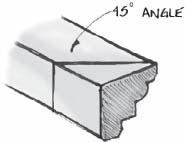
CORNICE MADE FROM EXTRUDED POLYSTYRENE
FOAM PRODUCTS
Styrofoam is a polystyrene product made by the Dow Chemical Company. Like Kleenex, or Masonite, or Plexiglas, there is a tendency to call any similar foam product by the same name. Actual Styrofoam is an extruded polystyrene product that is bluish in color. “Extruded” means that the polystyrene material is forced through a die, and the shape of the die determines the shape of the sheet of foam. A cutter slices off the sheet after eight feet of it has been extruded through the die. Styrofoam is an open-cell foam, and it has a spongy texture on the inside. Usually it is sold in 4x8 sheets of varying thickness, most often ¾", 1", and 2". In construction, it is used for insulation purposes.
Most Styrofoam is sold as “Score Board,” meaning that there are score marks at certain intervals that make it possible to break the foam into 16"- or 24"-wide strips without using a saw. Sometimes this scoring is problematic when cutting the foam to other sizes. This type of polystyrene has a fairly smooth texture when cut, and tends to retain sharp corners. It is easy to cut with a saw, but not as easy to carve as other types of foam. It is at its best when a smooth texture is required.

DOW CHEMICAL COMPANY STYROFOAM IS BLUISH, AND HAS A SPONGY OPEN CELL TEXTURE
Expanded polystyrene is a similar yet different product. Expanded foam is manufactured by putting tiny polystyrene pellets into a cooker. The pellets are exposed to steam heat, swell in size, and stick together. The size of the vat determines the size of the foam blank that is produced. Many different local companies produce expanded polystyrene through this process. The ones in my area make an original blank of foam that is two feet thick, four feet wide, and sixteen feet long, much larger than the extruded product. If you go directly to a factory (which may well be a more approachable operation than you think), it is possible to purchase these large chunks and/or smaller sections that have already been cut up. Sometimes this type of foam is sold in fairly large pieces for use as flotation units for docks or houseboats. Large blocks can be easier to use for sculptural projects, but most often, thinner sheets are more practical.
At the factory, the large sections of foam are sliced into a more usable size with a hot wire machine. A hot wire is just that, a special type of wire with enough direct current passing through it to make it hot enough to slice the foam by melting its way through it. Quite often it is possible to see the slightly curved striations from the cutting process on the face of a sheet of foam.
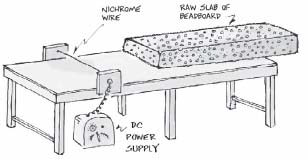
HOT WIRE FOAM CUTTER
Expanded polystyrene is easily recognized by its white color and pebble-like texture. As the explanation of its manufacture indicates, it is comprised of small, 1/8" diameter beads of foam that are stuck together. When carving this type of foam, the beads separate from one another, and this makes expanded foam quite easy to carve, especially for large, rounded shapes. The residue from the carving process looks like the stuffing used for beanbag chairs.

BEADBOARD IS EASIER TO CARVE INTO LARGE ROUNDED SHAPES
Carved polystyrene is a great way to simulate stone work for arches, columns, and cornices. These structures normally have a somewhat rough texture in the real world, so the naturally nubby texture of the foam is not a distraction. It is generally better to build a framing support structure and to cover that with a thin layer of polystyrene than to make the entire unit from solid foam. But it is certainly possible to use foam in a structural way, especially if a coating material is used to reinforce the structure. Sometimes foam can be used to make very nice stucco when a really rough textural quality is required. The same foam techniques are very successful when used to make tombstones and other funereal monuments, which for some reason tend to be required in a large number of plays.
Foam is easily cut with a variety of woodworking saws and can be shaped with conventional carving and smoothing tools. You may wish to avoid cutting the foam with a “hot wire” technique, using a torch or chemicals to melt the surface, or any other method that causes the foam to deteriorate chemically. Although there is not any well-known serious discussion of extraordinary danger involved in working with the material in this way, burning plastic of any kind releases fumes that may at best be described as unhealthy. If it gives you a headache, it cannot be good for you. You can avoid the issue by avoiding the process.

AVOID RELEASING TOXIC GASES FROM FOAM AND OTHER PLASTIC PRODUCTS
Use a respirator when cutting the foam on a table saw, because the heat of the blade rubbing against the foam tends to make it melt just a bit. You should always wear at least a dust mask to screen out the ever-present bits of foam that are in the air, even when carving by hand. The particles are very large, so an ordinary dust mask will work for them.
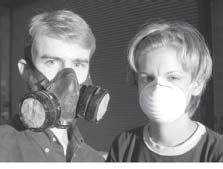
RESPIRATOR OR DUST MASK
CHOOSE THE RIGHT PROTECTION
Most safety in the shop is really just a matter of common sense. Although there is no obvious danger in working with foam, it only makes sense to take at least minimal precautions. If you must break down the foam chemically, be sure to wear an approved respirator, not just a dust mask. Do it outside, or in an area with good exhaust fans.
PORTAL PROJECT EXAMPLE
Let us say that you will be building a large portal that must frame the entire stage. The design calls for an arched opening bordered with a stone trim. The portal should be constructed in small segments that can be bolted together and hung from a batten. You must then develop a manner of adhering the stone relief shape to the inside, curved edge of the portal. Of course, the stone work should be very light, as the entire portal is meant to fly on a batten. Since the bottom of the arch is well within reach of actors and stagehands, it is best to give the stone a protective coating that is strong enough to withstand the occasional bump and scratch.

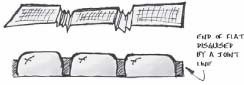
Of course the portal must be designed around transportable panels. You should construct the stone work so that the transitions between panels do not show any more than absolutely necessary. Proportion the stones in the arch so that a mortar joint line appears wherever there are two panels joined together. This is fairly easy to do since the stones are of somewhat random size anyway.
In this example, the wooden parts of the portal are made as hardcovered flats, and are easiest to build in 4x8 chunks. Softcovered flats would work just as well, or even something framed with metal tubing. This particular design was for a rather small proscenium opening, so the hardcovered flat approach was the most appealing.
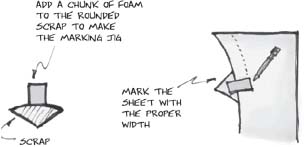
Once the framing structure is completed, rip expanded polystyrene strips to the proper size. This width is, of course, dependent upon the design and the size of the finished product. Keep in mind that the larger the pieces, the harder they will be to bend. For our project, the diameter of the curve is large enough, and the width of the facing strip of foam narrow enough, that there should be no problem in bending the foam around the curve. If the foam cannot be bent without breaking, it is possible to make it bend by kerfing it, or you could simply cut the curve into the foam by marking it against the wooden portal structure and cutting the arc with a jigsaw. It is not necessary to be incredibly accurate in cutting the parts since they will be carved into a rounded profile and covered with cheesecloth. Even so, this does not mean that you can have inch-wide cracks everywhere.

TRANSFER THE CURVE FROM THE WOODEN PORTAL PIECES TO A SHEET OF FOAM

USE A JIGSAW TO CUT THE CURVE. SAVE A PIECE OF THE SCRAP FOR THE NEXT STEP
If it is necessary to kerf the foam, lay several of the sections together side by side and cut notches about halfway through the foam at regular intervals. The notches will make the foam bend much more easily. It is important that the spaces between cuts be even, or the foam will not bend evenly and will tend to break at the irregular spot. The spacing of the cuts, and their depth, are both a function of how flexible the foam slat will need to be when completed. It is best not to go overboard in cutting the notches, or they may be visible in the finished product.

KERFING WORKS WELL ON FOAM BECAUSE IT IS SO EASILY STRETCHED AND COMPRESSED
It would seem that the path of least resistance might be to just bend the foam with no cutting at all. Sometimes it is best to use two thin layers of foam rather than one thicker layer, because the thin pieces are more easily bent. Not all expanded polystyrene is of the same quality. Some manufacturers grind up old trimmings and mix them back into the mixture for new foam. This is fine up to a point, but if too much is used, the foam becomes brittle and will not bend very far without breaking.

CONNECT TWO BOARDS AT A 90 DEGREE ANGLE. CLAMP TO TABLE TO TABLE TO MAKE A RIP FENCE.
You will need to rip a large number of relatively narrow strips of foam material. The foam is very light in comparison to plywood, so it is easy to handle when you carry it around the shop and feed it into the table saw. This free way of manipulating the sheet foam will make you think that it will be easy to rip on the table saw. Just the opposite is true. You should use extreme caution when using the table saw with foam products. It will tend to jump around in the saw, and get kickbacks. It is much easier to rip the foam on a bandsaw that has a rip fence. If your bandsaw does not have a fence, it may be possible to clamp a board on the table so that it produces the same effect.
Attach the foam using Liquid Nails and pins. The pins (usually largish nails) will be removed after the adhesive has had time to set up. Liquid Nails is a mastic, or highly viscous liquid adhesive, which has been around for decades. It is commonly used as a construction adhesive for gluing panels to floor joists and walls. It comes in a tube and is applied using a standard caulking gun. It works well for foam work because its thick, gooey texture tends to make the foam want to stick together from the moment the pieces touch. Yellow carpenter's glue and/or white polyvinyl glue will stick foam to wood, but the drying time is greatly extended because the foam prevents ventilation of the joint. Woodworking glues don't work well when joining foam with foam. Water-based contact cement is also a possibility, but the drying time required and the “instant stick” nature of that adhesive are definitely negative qualities for this project.
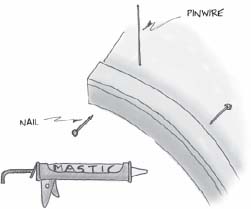
GLUE THE FOAM ON TO THE WOODEN FRAME
USE NAILS AND WIRE AS PINS TO HOLD IT IN PLACE
The major problem involved in using any petroleum-based adhesive on foam is that the adhesive tends to melt the foam on contact. Liquid Nails is no exception, but usually the melting effect is not enough to prevent the foam from bonding. The company that manufactures Liquid Nails has recently come out with a new line of special formulas, and one of them purports to be designed especially for use on foam. It takes much longer to set up and does not stick nearly as well as the original formula, although it is less detrimental to the foam. Other companies make similar products that may work just as well. Mastics are also available in bucket containers, so that you can apply them with a knife. It is generally easier just to stick with the caulking tube approach. Use this product in a well-ventilated area.
You need not be too particular when applying the foam to the wooden structure. Most of the time it is better for the foam to over run the joint a bit. Any tiny amount of extra foam is easily removed with a carving tool. Do not try to trim the ends of the slats until after they are attached to the wood and the adhesive has had time to set up. They can be quite easily trimmed with an ordinary handsaw after the unit is stable. The pins may be pushed through two different layers of foam or may be driven through a slat of foam and then slightly into the wooden structure. Do not drive the nail in any further than is absolutely required, or it will be difficult to remove later on.
As indicated earlier, the ends of the foam pieces may be cut off with a handsaw. There are few occasions in the modern world when a hand tool is actually better than a power tool, but working with expanded polystyrene is one of them.
Expanded polystyrene is often called “bead board” because of the way the particles flake off when you cut it with a saw or carve it with other tools.

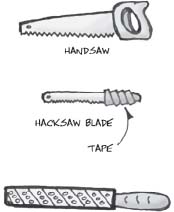
Use the handsaw to rough out sections of a carving. You will get much better control with a handsaw because it cuts more slowly than a power tool. A loose hacksaw blade with gaffer's tape on one end is also good for smaller cuts. Use the fastest cutting tool that you can without endangering yourself or the foam. It is hard to make really small cuts with a full-sized handsaw.
The all-time champion bead board carving tool is the Surform. It greatly resembles a cheese grater. Surforms are made by the Stanley Tool Company in a variety of types. Some are long and flat, some long and curved, and some are short and either flat or curved.
CARVING TOOLS
The Surform you select for a particular job is largely a matter of personal taste, but the longer ones seem to work the best. Like its relative the file and/or the wood rasp, there is a handle part and a cutter part. This tool was originally intended to shape wood by peeling it away just like a cheese grater grates cheese. It is highly effective at pulling apart the small beads that make up the foam, and with a little practice you will easily be able to round over the edges of the foam.
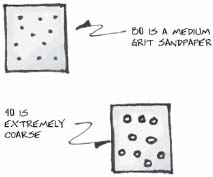
Sandpaper is another useful tool for carving foam. In this case rougher is better, and 80 grit is about the smallest that is aggressive enough to work efficiently. You can use it to finish off the project after the carving is complete. If you can locate some 30 or 40 grit paper, it is rough enough to actually be used for carving. A sanding block is good for the rough carving paper. Sanding blocks can be made in a variety of shapes, and the foam will assume the negative shape of the block.
Begin carving the stone archway by laying out the joint lines. A regular Sharpie marker is the best tool for writing on foam. Mark the joints an appropriate distance apart, making sure that one falls at each junction between two panels. Use the Surform or a rounded-over sheet of sandpaper to carve away the indentation.

FOLD SANDPAPER INTO QUARTERS FOR EASIER HANDLING
When using sandpaper by hand, never tear the sheet. Fold it into fourths and use it that way. This will give you a semi-stiff pad to work with. When one quarter of the paper is exhausted, turn or refold the pad so that a new surface is exposed. This makes the sandpaper much easier to hold and to use. Sometimes folding the already quartered paper one more time can make the perfect tool for carving the joint lines.
Rounding the edges of the foam is best done with the Surform. Begin by trimming off any excess foam where a facing piece overlaps a side piece. Work on the project with the unit lying face up. Hold the tool so that the grater is cutting on the downstroke. This will prevent the facing foam from being accidentally being pulled away from the face of the flat. Keep the Surform at a slight angle and lightly work the entire surface. Hold it flat against the edge. Move the tool around to different areas in an even pattern. A little here, a little there. Don't try to take too much off in any one pass with the Surform. It is much better to use a light touch, because the carving will go really fast anyway. If you go too fast you will not be able to tell when you are getting a nicely smoothed profile.

MOVE THE TOOL DOWN AND TO THE SIDE. HOLDING THE SURFORM TIGHT TO THE BOTTOM PIECE OF FOAM WILL TRIM THE OVERHANDING PIECE TO THE SAME SIZE.
To shape the outside corner of the foam, hold the Surform so that the length of it is running the same direction as the corner to be rounded over. Lightly run it up and down the length of the corner. Begin by chamfering off a 45-degree bevel and then slowly alternate the angle of the Surform between 90 and 0 degrees. Do not press too hard with the tool, but rather just skim the surface, rotating back and forth until the desired curvature is obtained. The inside corner is shaped in a similar manner, but the Surform must be held at a slight angle in order for it to fit into the curve. Use some 80-grit to finish smoothing the curve and any touching up that must be done. Sometimes it is helpful to lay the various pieces of the portal together so that there is a means of judging that the same amount of curvature is maintained throughout. Once you have the hang of it, this is really an easy and fun process. The actual carving of a portal like this should take no more than half an hour to complete. The cutting and fitting of the parts would take several times that.

CARVING THE FOAM
Since this foam is well within reach of the stage, the surface should be coated with something to toughen it up and prevent damage. The most effective method is to coat the foam with a layer or two of cheesecloth. When sealed in place with paint, the cheesecloth forms a tough “skin” that is both flexible and resistant to abrasion. It will not offer much protection from sharp punctures or being repeatedly stepped on.
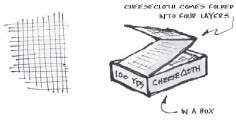
The flexible nature of the cheesecloth coating makes it work well with the compressible and resilient polystyrene. On occasion, when a smoother texture is required, it is possible to substitute muslin for the cheesecloth, but the muslin is much harder to apply. Cheesecloth is a gauze-like material that was at one time used in draining cheese. (And it still is as far as I know, which isn't far at all.) It has a very loosely woven appearance much like a very fine net. The variety required for this technique is 100% cotton. Synthetic fibers will not work, as the sealer will not adhere properly to them.
Cotton cheesecloth is commonly available from large fabric stores in boxes of 100 yards. Buying the cheesecloth by the box is a good idea because it is cheaper that way, and it often takes more of the fabric for any given project than you would think. Theatrical fabric suppliers sell a gauze material that they often refer to as cheesecloth. It comes in wider widths and has a finer weave. It is much more difficult to work with than the fabric store variety and is not recommended unless you need a fine texture.
The sealer used in sticking the cheesecloth to the foam is usually leftover paint, but just about any waterbased liquid with glue in it will work. You can gather all the remaining paint that is still usable from recent projects and mix it together in one or more five-gallon buckets. Avoid spoiled casein paint and runny washes. Thick paint is a better gap filler, and no one will want to work in the shop if you use really stinky old rotten casein. It is imperative to use water-based paints. A gallon or two of flat black latex and the proper ratio of flame retardant additive will produce an excellent all-around gray basecoat, backpaint, and cheesecloth sealer all in one. The mixture should be left slightly thick for use with the cheesecloth, several steps more viscous than is normal for backpaint. If you don't have any paint that you would like to get rid of, or would like to use a specific color, you can use straight latex out of the can. It takes quite a bit of paint to get the cheesecloth to stick properly.
Begin with the foam unit on sawhorses at a comfortable height. When pulled from the box, cheesecloth is about 9" wide and is folded over so that it is four layers thick. Sometimes it is appropriate to use the cloth with that many layers, but it is usually easier to work with one or two. One layer is fine for some projects, but generally the more layers, the more protection the coating will provide.
The key to making the application job run smoothly is to start by properly draping the cheesecloth. It is helpful to put down a coat of paint first, then to lay the cheesecloth down onto the paint while it is still wet. This will keep the cloth in place while you are draping it. Lay the cloth so that it extends onto the surface of the plywood at least an inch or so, and leave enough hanging down to wrap around to the wood on the back of the flat. This will ensure that the foam remains securely fixed to the flat.
Leave a fold of the cheesecloth at each joint depression so that there will be enough slack in the material for it to be forced down into the crack with a wet paintbrush. You needn't be too picky about this procedure. By the end of it, paint will be all over your hands and arms up to the elbow, so get used to it. If the cheesecloth is not positioned exactly, pick it up and move it around. It is far better to leave a bit of extra slack in the cloth than to have it wind up stretched tight over a joint line. That would effectively wipe out the carved detail. For a project like this, it matters little if the cloth is overlapped or folded over itself in places; indeed this can sometimes create a desired amount of extra texture.
100 % COTTON CHEESECLOTH
DRAPE THE CHEESECLOTH SO THAT THERE IS PLENTY OF SLACK TO PROJECT DOWN INTO THE JOINTS. IT IS BETTER TO HAVE TOO MUCH THAN TOO LITTLE
Don't be too stingy with the paint. The gauze should be completely saturated with paint in order to adhere properly to the foam. When dry, the foam/cheesecloth combination is incredibly tough, much like a hide, and the extension of the cloth onto the surrounding wood makes it very difficult for the foam to become dislodged from the wooden structure.

EXTEND THE CLOTH AROUND TO THE BACK FAR ENOUGH TO MAKE A GOOD CONNECTION TO THE WOODEN STRUCTURE SO THAT THE FOAM WILL NOT PULL OFF EASILY
MAKING A CORNICE
Another common use for foam is to make large, built-up cornices. A cornice is used at the top of a wall and is theoretically less likely to be damaged. It is better not to use cheesecloth on a cornice because of the rough texture the cloth creates. A cornice is usually a smoother piece of work. It is problematic to use foam for trims that are within reach of the stage floor because it is just too fragile. The relative seclusion of the cornice and its bulky form make it a natural for foam construction. Quite often the blue Dow Styrofoam or some other extruded polystyrene type is the best material for this job because it is so much smoother than bead board.
The design for a cornice of this type must take into consideration the materials that are used to construct it. Put the cornice together from strips of foam that have been ripped down on the band saw or table saw. It is fairly easy to glue together a number of 8-foot or longer sections and then cut these to the proper length and angle. That makes cutting the angles less problematic than trying to miter each piece individually. Instead, put together stock parts that are long enough to cut the needed pieces. Avoid having a butt joint between two pieces on the same wall by laminating together sections long enough to reach from corner to corner.
Here is an example of a cornice that is designed for polystyrene construction.
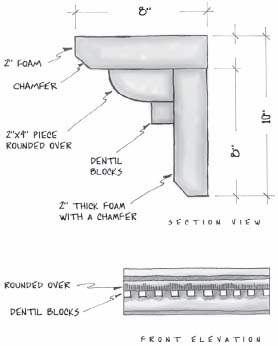
The section view reveals the size and shape of each trim member. You also need to know the total length of trim required for all of the wall sections. Estimate the lengths from your ground plan. Some of the walls may be longer than eight feet in length and thus will require the construction of an extra-long section of trim. It is possible to connect the foam pieces with offsetting joints so that the finished product extends to virtually any length, but at some point the length of the cornice will make it simply too cumbersome to deal with effectively. Remember that outside corners require an extra amount of material, and that cutting miters in general tends to use up the trim faster than expected. It is much easier to make a few extra lengths of cornice from the outset than to be forced to replicate a section of trim at the last moment. This particular molding includes a dentil type of detail, which is essentially a series of blocks glued on with a space between each one.

The first task is to determine the widths of all the parts and the number of strips required of each size. It is best to rip down all of the foam parts on the bandsaw. You can use a table saw, but the foam is so light it tends to jump around in the saw and get kicked back. Be cautious if you do decide to use a table saw.
If you are clever, you can cut out the parts so that the scoring indentations are either hidden inside the cornice or wind up as scrap on the shop floor.
Sometimes there are 45-degree angle chamfers that must be ripped along one or more of the pieces. It is best to cut the strips to size first, reset the saw, and then cut all of the chamfers at the same time. Use a hold down or finger board to keep the foam in place. Start the foam through the saw by pushing, and then have an assistant pull the strip through the rest of the way. This will greatly reduce the tendency of the foam to kick back. The same techniques work well on the bandsaw, even though there isn't much danger of a kick-back on that saw.

PULL THROUGH DON'T PUSH
Once the foam has been ripped into strips, it is time to cut the sections to length. If you are making nothing but 8-foot long units, the job is already done. A 10-foot section requires 8-foot and 2-foot lengths. You may need to also use 4 and 6 or 5 and 5 if the molding needs extra stiffening. When making longer sections, remember to stagger the location of the joints.

LAMINATE 4'-0" AND 8'-0" PIECES TO CREATE A 12'-0" LENGTH
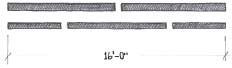
USE THE SAME LENGTH PARTS TO CREATE A 16'-0" SECTION OF TRIM
Connect the strips of foam together to form the cornice. Apply a zigzag pattern of Liquid Nails to the edge of the back section and attach this piece to the top section. Use the adhesive on any surfaces that are to be glued together.
A zigzag pattern spreads the adhesive out over a larger area, increasing the holding power of the glue. Bring the parts together and squish them back and forth a few times to further spread the glue. This will also have the advantage of using suction power to hold the parts together while they bond. Use nails, pin wire, stage weights, or whatever is necessary to hold the parts together as they dry. When all of the trims are together, go back and check the connections several times, as they may tend to pull apart. Use stage weights or template blocks to make sure that the assemblies remain straight and true while they dry. If there is enough wall space, a straight wall is excellent for this purpose.

Once all of the parts have bonded along a curved line, no amount of tugging and pulling can straighten them out again. Do not hurry the curing period. It is best to assemble these parts in the late afternoon and come back to them the next morning.
Save the dentil molding until last. Use the radial arm saw to cut a strip of foam into the necessary cubes. It would be really time consuming to measure the placement of each cube, so consider using the cubes themselves to do the spacing. It is common for the space in between the blocks to be the same distance as the size of the blocks themselves. You can use unattached blocks to set the spaces between the cubes you are gluing on.
The dentil mold does not have to fit with any other parts, so it is only necessary to make sure that the measurements are close enough to look good. It is common to have to pull some of them off and re-space them to accommodate the miter joints. Since the blocks are very small, air can get around the edges, and it is much easier to use regular carpenter's glue to attach the dentil mold than to use a mastic.
Now comes the task of cutting the cornice parts to length and mitering the ends to fit around the wall angles. You can compute the sizes on paper with measurements taken from the actual walls. If the walls are straight, plumb, and the angles involved are true, then it is a fairly straightforward process. Measure along each of the walls to verify the length of each. Sometimes there is a discrepancy (gasp) between the plans and the actual construction. Since you are cutting the cornice to fit on the wall and not on the printed plan, it is best to go right to the source for your measurements.
Make a small sketch of each piece of trim as you include it on your cut list. Show the angle that must be cut and the direction that it runs. Dimension the sketch with the size you measure from the wall. Indicate which part of the angle the dimesion relates to. This will reduce confusion when you begin cutting.
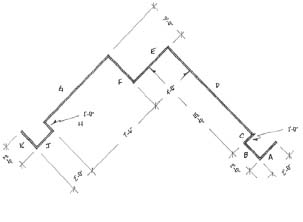
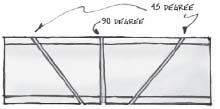
SKETCH OF GROUND PLAN
ALL ANGLES 90 DEGREES

MAKE A CUT LIST WITH SKETCHES OF THE PARTS SO THAT IT WILL BE EASIER TO TELL WHICH WAY TO CUT THE MITERS
If there is an unknown angle, use a scrap board and the power miter saw to determine the angle by trial and error. Cut the board and hold both halves in the corner. If the joint is open, reduce the number of degrees. If the points do not meet, make the angle more acute. After all of the sizes and degree angles are known, it is time to cut the cornice pieces.
There are two ways of cutting the mitered angles. One method is to use a very large bandsaw. It must have a guard that you can raise high enough to accommodate the 8" height of the trim. That can be a problem. The other is to construct an old-style wooden miter box large enough to house the 8" depth of the cornice. I have tried several times to cut the foam trim one segment at a time first and then glue the cornice together, but it takes too much time and does not fit together well. It is much more expedient to cut the entire cornice at once.

A bandsaw that is large enough to accommodate an 8" tall item will most likely have a miter guide. The stock miter guide is a bit small to handle such a large piece. Instead, you can add a wooden jig to the guide. The jig is merely two pieces of plywood glued and nailed together and then bolted to the miter guide. Make it as large as will comfortably fit on your bandsaw. The wooden section will be easier to use if there is an equal amount of wood, and hence weight, on either side of the miter guide. If you put the jig together and use the bandsaw itself to cut the 45-degree angle notch out of the base, the resulting V will be usable as a reference point in lining up the cornice on the jig. Most of your cuts will be either 45 or 90 degrees. This jig will not cut angles greater than 45 degrees.

USE THE JIG TO CUT LARGE CORNICE TRIM ON A BANDSAW
Cutting the foam is somewhat of a balancing act, but the cornice is very light and, of course, there is almost no resistance to the blade cutting through the piece. A second person may be required to aid in holding up the far end. Make sure there are no pins left in the foam that can damage the saw. It is advisable to begin by cutting the longest pieces first. The cut list was made so that there is a diagram of each section to better define the angle directions. All of the measurements are from the wall surface, and so must be marked to the backside of the cornice. It takes a bit of practice to learn to visualize the placement of the pieces and the direction that the angles run. Making the cut list with diagrams of this sort will help.
Begin by trimming off one end to the proper angle. Use the same (left or right) end first for each section of the cor-nice so that they stay in order. Turn this first section of cor-nice right side up and measure the proper length across the backside. Use a speed square to mark the angle all the way across the top if the angle is either 45 or 90 degrees. If the angle is an intermediate number of degrees, use the scrap boards you cut earlier on the power miter box to define that angle. Once the top of the cornice has been laid out, extend the marking around the sides. On the front of the cornice, the mark can only carry on an inch or so before it hits the profile of the individual sections. On the back, the mark can be scribed all the way to the bottom of the cornice. It is advisable to extend the marking around as much of the foam as possible because that will help you visualize how to angle the cut through the cornice when you get to the saw. The more time you spend marking, the less likely you will be to make a mistake at the saw.
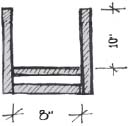
If it is not possible to cut the trim on a bandsaw, a large miter box will work just as well, perhaps better. The miter box is definitely more accurate, and the only downside is the time required to put it together. The box will be easier to use if it is the same size as the trim you are cutting. A tight fit will prevent the piece from moving around while you are cutting it. The cornice in the example is 8" across the top, and 10" tall, so these are the dimensions of the inside of the jig.
SECTION THROUGH A MITER BOX
You could make a box from just three boards, but the structure would be really weak to cut such large and cumbersome trim. It is better to have more strength in the bottom of the jig, which you can easily get by using two pieces across the bottom span. Leave a small space in between them. Make the side boards wide enough so that they will stick up 10" even after the bottom part is taken into consideration.
The length doesn't matter so much, but it is nice if the box is at least 3' long so that it is stable enough to work well. Glue and staple the boards together so that you have a U-shaped box that is 8" wide and 10" high on the inside. Slots cut into the sides of the box are used to guide the hand-saw that will cut the actual cornice. The slots must be cut so that they accurately represent the angles you need. The table saw can be used to begin the cuts by using its miter guide and running the box through the saw upside-down. The saw will not be able to cut all of the way through the sides of the box, so use a circular saw or a jigsaw to complete the cut. For this project, you would need a 90-degree cut and two 45-degree cuts, one going in each direction. In real life, you would also need some other odd angles if required for your project. The directions for marking the individual pieces of cornice are the same as for the method that used the bandsaw. Making the miter box is time consuming, but it is much easier to cut a cornice in a miter box than it is on the bandsaw.
PLAN VIEW OF A MITER BOX

YOU CAN USE THE TABLE SAW TO ACCURATELY START THE SLOTS
Cut all of the sections of cornice in turn and check each against the wall flats to verify that all is well. Use some 80-grit sandpaper to finish off any rough spots on the foam. If there are dentil blocks, it may be necessary to remove a few of them and fudge the spacing a bit to make them look right. Sometimes it is easier to wait until now to put the dentil blocks on the trim. Use latex caulk on the rough spots. It is pliable enough to work well with the bendable foam.
There is an easy way to attach the cornice to the wall using some ¼" plywood strips adhered to the top of the cornice with Liquid Nails. If the tops of the walls will show from a balcony, it may be worth your time to miter all of these plywood pieces so that they fit very tightly, but if not, just make sure that the strips run to within a few inches of the end so that they provide enough support. The strips need to extend off the rear of the cornice molding far enough so that they can be screwed to the tops of the flats. For a softcovered flat this might be only ¾", while for hardcovered flats you may wish to leave as much as 3". There should be enough extension onto the top of the foam so that the adhesive can get good purchase. The exact amount depends on the amount of stress placed on the joint. The only thing holding the cornice is the glue, so make sure the bond is good. Of course the foam is very light, and about 6" of coverage would seem plenty for this project. Just make sure to test the grip before hanging the cornice.
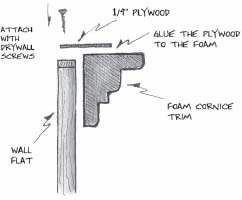
ATTACHING THE CORNICE TO THE WALL FLATS
The cornice will be hung at a height that should be well out of the way of stage action so there is generally no need to go so far as to coat it with cheesecloth. It is nice to give the surface a coating of some kind of heavy sealer for protection as well as to give it a slicker looking finish. Products like Bin or Sculpt or Coat are excellent for this purpose. It is imperative that you determine that any sealer used is compatible with the chemical nature of the foam. Oil-base-paint or fiberglass resin will reduce the polystyrene to a heap of mush.
TOMBSTONE PROJECT

TOMBSTONE PROJECT
Creating a tombstone is a really fun student project. Perhaps I've built too many versions of Tom Sawyer and Christmas Carol, but it seems that the theatrical demand for tomb-stones is quite high. At any rate, this graveyard monument uses all of the skills you've learned so far. Here are some construction sketches for the piece:

DIMENSIONS FOR THE PROJECT

SECTION THRU A

SECTION THRU B
It would be possible to carve this piece from one solid chunk of foam, but it makes more sense to use readily available sheet goods instead. The exterior of this unit will give the appearance of being massive and sturdy, but inside the tombstone is hollow. This reduces the amount of product used, and hence the cost. Start by cutting out the front and back pieces of the vertical slab. The layout consists of a rectangle and half a circle, which are easily laid out using a dry-wall square, a compass, and a Sharpie marker. Cut the pieces out with a jigsaw, and use the first one as a pattern for the second.

MAKE THESE PARTS
The edging around the vertical portion of the tomb-stone is made of the same 2" thick foam. Rip an 8 foot long section of this foam to use as stock. The straight sections are easily cut to length, and it matters little which way the joints overlap. The edging for the rounded top will need to be kerfed in order for it to bend enough to fit the diameter of this curve. The radius is small, so the kerfing must be quite severe and will require an extra technique.

USE THE RADIAL ARM SAW TO KERF THE FOAM
Set the radial arm saw so that the blade is ¾" above the table. Make a mark on the wooden guide that is 1" to the right of the kerf where the blade passes through the fence. Each time the blade passes through the foam, move the stock 1" to the right as indicated by the mark on the fence. When you have prepared a long enough section to cover the distance around the semicircle, reset the blade ½" higher than it was. Repeat the kerfing operation, but this time cut away foam just to the side of the previous pass. Repeat again with a shallower cut if necessary. This will form a kind of “digital” looking dart or V shape in the foam that will close up as the foam is bent around its circle.

USE SCRAP PIECES AS SPACERS
You are now ready to assemble the top section. Use two or three pieces of scrap foam as spacers and join the vertical slab sections (which were the first parts you cut out) using Liquid Nails. The spacers are used to keep the sections 2" apart, and to give the total thickness of 6". Glue on the 8" wide top strip you kerfed earlier, leaving about an inch of overhang on either side. It will be difficult to gauge the exact length of this piece because it fits on a circle. Just remember that it is easier to trim a bit more off the kerfed section than it will be to make a new one. Glue on the two flanking pieces to help keep the curve in place while the Liquid Nails sets up. Attach the remaining trim pieces and set the entire assembly aside until the mastic has bonded sufficiently to hold while you work on rounding over the corners.

Cut out pieces for the top and bottom of the base. Rip enough of the 2"x 2" stock to fit around the perimeter of the hollow structure. Cut the 2x2 strips to length, and glue all of the parts together. Set this section aside to dry.

It is easiest to work on carving and finishing these two subassemblies while they are apart, and then to join them before the cheesecloth is put on. Use the Surform to even any parts that are sticking out, and round over all the corners. Most builders agree that the more you round over, the older and more weathered the finished product will appear. You may wish to add a few cracks and some lettering. Use a Sharpie to mark the lettering and a pointy X-acto Knife to cut them out. Normally a large handled utility knife is better for any type of cutting, but in this instance a long and thin blade is the best. Cut straight in around the outside edges and rake out the center like a chiseled mortise. Smooth all surfaces with a piece of 80-grit sandpaper.

The final step before painting is to cover with cheesecloth. This project is a bit more challenging to cover than the stonework was. It is best to cut the cloth into 12" or 18" squares of single thickness before beginning, because large sections are too hard to control. Bunch up the cloth where it must fit down into crevices like the letter carving. If the cheesecloth does not go down into the cracks properly, your hard work creating texture will tend to disappear.
A very quick, but messy way to carve any kind of polystyrene foam is to use a drill and a wire wheel. Some wire wheels are intended to be used to remove rust and old paint from wrought iron railings and the like. These wheels are perfect for carving because they are mounted on a shaft and can easily be inserted into a drill.
There are two main types. One of these is two or three inches in diameter with a brush of wire around its outside edge. The other has what looks like short lengths of wire rope sticking straight ahead out of a central hub. Both of these types of wire wheels are used to carve by inserting them in a variable speed drill and simply gouging and shredding the foam from the surface of the block. This technique can be used to create a number of really rough textures like stucco, bark, or rock. The hub with the wire rope sticking straight out is the easiest to control, while the other wheel is more aggressive about removing the foam. They both spew out an unbelievable amount of foam chips. Safety glasses and a respirator are a must, and you can expect to be completely covered from head to toe with small bits of foam. A good shop vac is essential for clean up. I have found that anytime foam is involved in a project it is best to sweep and vacuum up the leavings right away so that they are not tracked all over the theatre.
