
13. Layers

In This Chapter
Getting to know the Layers panel
Selecting listings on the Layers panel
Selecting objects via the Layers panel
Duplicating layers and objects
Collecting objects into a new layer
Until this point (unless you snuck ahead to this chapter!), you’ve been creating objects on a single, default layer that was created automatically when you created your document, and each new path was stacked above the last one automatically. In this chapter, you’ll learn how to purposely change the stacking order of objects via the Layers panel. ![]() A You will use the panel to create top-level layers and sublayers; delete layers and objects; select layer listings; select objects; restack, duplicate, lock, unlock, hide, and show layers; collect objects onto a new layer; release objects to layers; and finally, merge and flatten layers.
A You will use the panel to create top-level layers and sublayers; delete layers and objects; select layer listings; select objects; restack, duplicate, lock, unlock, hide, and show layers; collect objects onto a new layer; release objects to layers; and finally, merge and flatten layers.

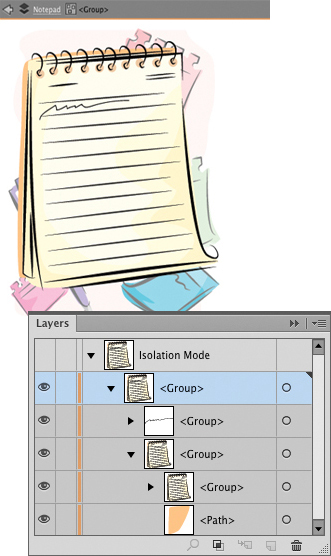
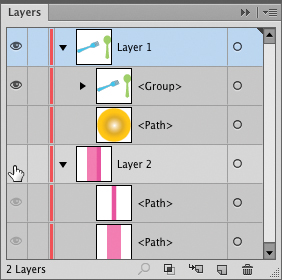
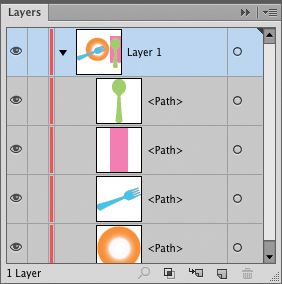
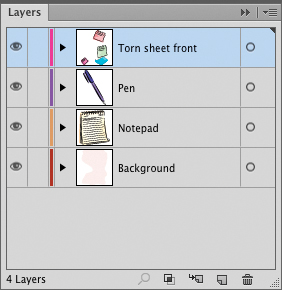
A The objects in this document are nested within top-level layers and sublayers, at various stacking levels (the artwork is shown at the top of the page).
Getting to know the Layers panel
With a document open, click the Layer 1 arrowhead on the Layers panel to expand the list of objects on that layer. Layer 1 is a top-level layer, meaning it isn’t nested within another layer.
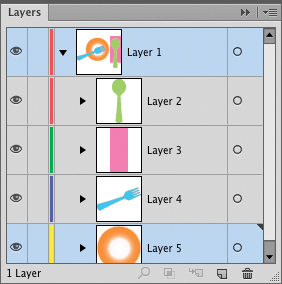
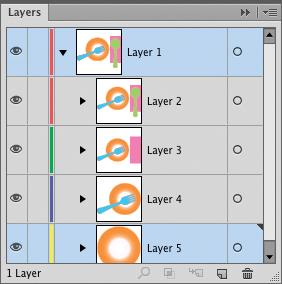
You can add as many layers as you like to a document, depending on available system memory, and you can also create sublayers (nested layers) within any top-level layer. The actual objects that make up your artwork — paths, type, images, etc. — are nested within one or more top-level layers, or in groups or sublayers within top-level layers. The backmost layer in the document is listed last on the Layers panel.
When you create an object, it appears on the currently selected layer, but it can be moved to a different layer at any time, either individually or by restacking the whole layer or sublayer it resides in. The stacking order of objects in a document is unaffected by the number and the arrangement of artboards.
The Layers panel also has other important functions beyond enabling you to restack objects. You can use it to select, target (for appearance changes), show or hide, and lock or unlock any layer, sublayer, group, or individual object.
By default, each new vector object you create is listed as <Path> on the Layers panel, each placed raster image or rasterized object is listed as <Image> or by the name of the image file, each individual symbol instance is listed by the symbol name, each symbol set is listed as a generic <Symbol Set>, and each type object is listed by characters in the object. Similarly, object groups are listed by such names as Live Paint, Compound Path, etc.
Although you may say, “Whoa!” when you first see the number of listings on the Layers panel, once you become accustomed to working with it, you will appreciate how much easier it makes even the simplest tasks, such as selecting and locking objects.
Different Layers panel options can be chosen for each Illustrator document.
To choose Layers panel options
1. Choose Panel Options from the Layers panel menu. The Layers Panel Options dialog opens.A
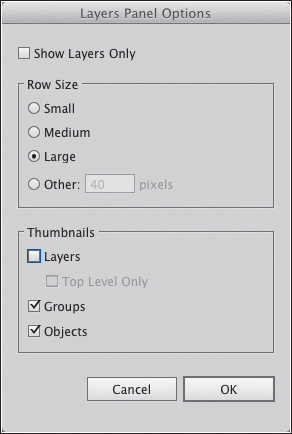
A Via the Layers Panel Options dialog, you can customize the Layers panel for each file.
2. Keep Show Layers Only unchecked; otherwise the panel will list only top-level layers and sublayers, not individual objects.
3. For the size of the layer and object thumbnails, click a Row Size of Small (12 pixels), Medium (20 pixels), or Large (32 pixels), or click Other and enter a custom size (12–100 pixels).B
B For this Layers panel, we chose the Row Size of Large and turned Thumbnails off for Layers.
4. Check the kinds of listings you want the panel to display as Thumbnails: Layers, Groups, or Objects. If you check Top Level Only for layers, thumbnails will display for top-level layers but not for sublayers.
5. Click OK.
Creating layers
In these instructions, you’ll learn how to create the granddaddy of layers — top-level layers.
To create a new top-level layer
Method 1 (without choosing options)
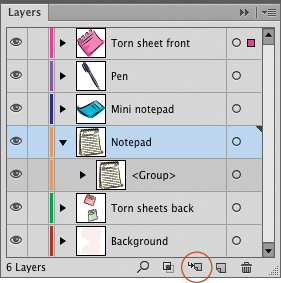
1. On the Layers panel, ![]() click the listing for a top-level layer. The new layer is going to appear above the one you click.
click the listing for a top-level layer. The new layer is going to appear above the one you click.
2. Click the New Layer button ![]() at the bottom of the panel. To the new layer, Illustrator will assign the next number in sequence and the next available color, as listed on the Color menu in the Layer Options dialog.
at the bottom of the panel. To the new layer, Illustrator will assign the next number in sequence and the next available color, as listed on the Color menu in the Layer Options dialog.
Method 2 (choosing options)
1. On the Layers panel, click the listing for a top-level layer. The new layer is going to appear above the one you click.
2. Option-click/Alt-click the New Layer button. ![]() A The Layer Options dialog opens.
A The Layer Options dialog opens.
A Click a layer, then Option-click/Alt-click the New Layer button. When the Layer Options dialog opens, choose options for, or rename, the new layer.
3. Do any of the following:
Change the layer Name.
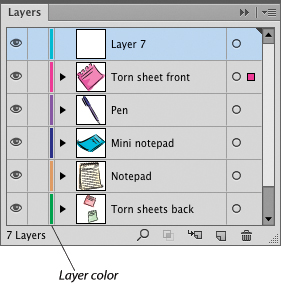
Via the Color menu, choose a highlight color for selection borders on the layer and for the vertical bar in the listing on the Layers panel. Colors are assigned to new top-level layers automatically based on their order on this menu, from the top color down.
![]() If the fill or stroke colors of objects on the layer are similar to the selection color, consider choosing a contrasting selection color.
If the fill or stroke colors of objects on the layer are similar to the selection color, consider choosing a contrasting selection color.
Choose other layer options (see the sidebar on page 191).
4. Click OK.B
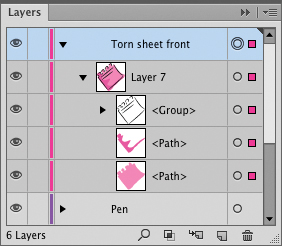
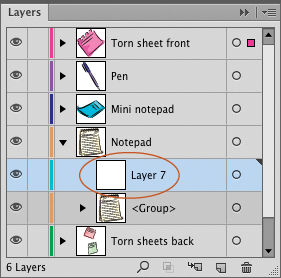
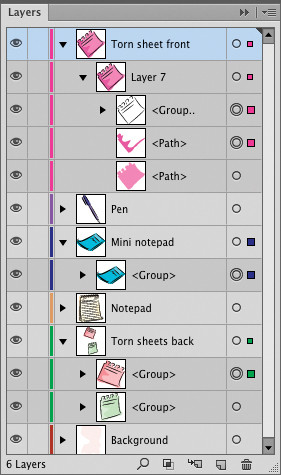
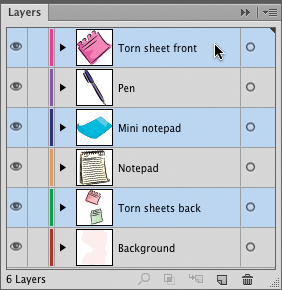
B The new layer (Layer 7) appears above the “Torn sheet front” layer, which was previously selected.
![]() Objects always reside in a top-level layer or sublayer (or in a group within either of the above) — they can’t float around unassigned.
Objects always reside in a top-level layer or sublayer (or in a group within either of the above) — they can’t float around unassigned.
![]() To create a new top-level layer in the topmost position on the panel, regardless of which layer listing is currently selected, Cmd-click/Ctrl-click the New Layer button on the Layers panel. (Or if your document is in Draw Behind mode,
To create a new top-level layer in the topmost position on the panel, regardless of which layer listing is currently selected, Cmd-click/Ctrl-click the New Layer button on the Layers panel. (Or if your document is in Draw Behind mode, ![]() the same shortcut will create a new top-level layer at the bottom of the stack.)
the same shortcut will create a new top-level layer at the bottom of the stack.)
Adding Layers Below Existing Ones
If your document is in Draw Behind mode ![]() (Tools panel) when you create a new layer, the new layer will appear directly below the currently active one.
(Tools panel) when you create a new layer, the new layer will appear directly below the currently active one.
![]() To rename a layer listing, double-click the name, type the desired name, then click elsewhere.
To rename a layer listing, double-click the name, type the desired name, then click elsewhere.
![]() Layers and sublayers are numbered in the order in which they’re created, regardless of their indent level or their position in the stacking order.
Layers and sublayers are numbered in the order in which they’re created, regardless of their indent level or their position in the stacking order.
Once you become accustomed to adding and using top-level layers, you’ll be ready to add another tier to the hierarchy: sublayers. Every sublayer is nested within (indented within) either a top-level layer or another sublayer. If you create a new object or group of objects when a sublayer is selected, the new object or group will be nested within that sublayer. You don’t necessarily have to create or use sublayers, but you may find they help you keep the panel organized, especially for complex documents.
By default, every sublayer is given the generic name “Layer,” but as with layers, you can rename them so they will be easier to identify (e.g., “green logo” or “saxophone” or “tyrannosaurus”).
To create a sublayer
1. On the Layers panel ![]() click the top-level layer (or sublayer) in which the new sublayer is to appear.
click the top-level layer (or sublayer) in which the new sublayer is to appear.
2. Do either of the following:
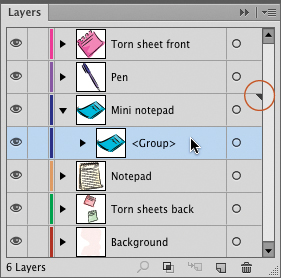
To create a new sublayer without choosing options for it, click the New Sublayer button.![]() A–B
A–B
A Click a layer listing, then click the New Sublayer button.
B A new sublayer listing (in this case, Layer 7) appeared within our “Notepad” layer.
To choose options as you create a new sublayer, Option-click/Alt-click the New Sublayer button. ![]() In the Layer Options dialog, enter a Name, check or uncheck any of the options (see the sidebar on page 191), then click OK.
In the Layer Options dialog, enter a Name, check or uncheck any of the options (see the sidebar on page 191), then click OK.
Beware! When you delete a top-level layer or sublayer, all the objects that were residing in that layer are removed from the document.
To delete a layer, sublayer, group, or object
1. On the Layers panel, ![]() click the layer, sublayer, group, or object to be deleted, or Cmd-click/Ctrl-click multiple listings.
click the layer, sublayer, group, or object to be deleted, or Cmd-click/Ctrl-click multiple listings.
Note: Multiple selected objects must be in the same layer, sublayer, or group; selected sublayers or groups must be in the same top-level layer. You may click multiple listings at the same indent level (e.g., all top-level layers or all groups), but not listings from different indent levels (e.g., not ungrouped objects plus objects in a group).
2. Do either of the following:
Click the Delete Selection button ![]() at the bottom of the Layers panel.A–C If you are deleting a layer or sublayer that contains objects, an alert dialog will appear; click Yes to proceed.
at the bottom of the Layers panel.A–C If you are deleting a layer or sublayer that contains objects, an alert dialog will appear; click Yes to proceed.

A This is the original artwork.
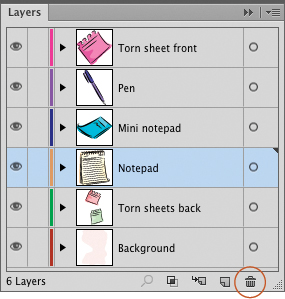
B We highlighted the “Notepad” layer, then clicked the Delete Selection button.

C This is the artwork after we deleted the “Notepad” layer.
To bypass the prompt, Option-click/Alt-click the Delete Selection button.![]()
![]() To retrieve a deleted layer and the objects it contained, use the Undo command immediately.
To retrieve a deleted layer and the objects it contained, use the Undo command immediately.
Selecting listings on the Layers panel
If you want to control the stacking level at which a new object will appear in a document, before drawing the object, in addition to being aware of the current drawing mode of your document and whether any objects are selected, you need to click a top-level layer, sublayer, group, or object listing on the Layers panel. The same holds true for objects that you paste, drag and drop, or place into a document.
If you select an object, the listing for its top-level layer or sublayer becomes selected automatically on the Layers panel, but the converse isn’t true: Simply clicking a listing doesn’t cause objects to become selected in the document window. Think of selecting layer listings (which is discussed on this page and the next) as a layer management technique, and of selecting the objects themselves (making their anchor points, and possibly their bounding box, appear) or targeting objects for appearance changes, as an essential first step in the editing process.
Note: To learn how to select objects via the Layers panel, see pages 186–188. To learn how to target objects for appearance changes, see the sidebar on page 186 and Chapter 14.
If your document is in Draw Normal mode ![]() (Tools panel) and you create a new object (or place, paste, or drag and drop an object into your document), you will get different results depending on what you select first on the Layers panel:
(Tools panel) and you create a new object (or place, paste, or drag and drop an object into your document), you will get different results depending on what you select first on the Layers panel:
![]() If you click a top-level layer or group listing first (but not a sublayer in that layer), the new object will be listed at the top of that top-level layer.
If you click a top-level layer or group listing first (but not a sublayer in that layer), the new object will be listed at the top of that top-level layer.
![]() If you click a sublayer listing first (and no objects are selected), the new object will appear within that sublayer.
If you click a sublayer listing first (and no objects are selected), the new object will appear within that sublayer.
![]() If you select an object first, the new object will appear at the top of the same layer or sublayer as the selected object, but outside any group on that layer or sublayer.
If you select an object first, the new object will appear at the top of the same layer or sublayer as the selected object, but outside any group on that layer or sublayer.
To select a layer, sublayer, group, or object listing on the Layers panel
Click the name (or to the right of the name) of a top-level layer, sublayer, group, or object — not the circle or the selection area at the far right side of the panel. The Current Layer indicator (black triangle) A moves to the layer or sublayer in which the item you clicked resides.
A When a group is clicked, the Current Layer indicator moves to the top-level layer that the group resides in.
Using Draw Behind Mode
If your document is in Draw Behind mode ![]() (Tools panel), the following will occur:
(Tools panel), the following will occur:
![]() If an object is selected when you create a new object, the new object will appear behind (and will be listed below) the selected object on the current layer.
If an object is selected when you create a new object, the new object will appear behind (and will be listed below) the selected object on the current layer.
![]() If no objects are selected when you create a new object, the new object will appear behind (and be listed below) all the artwork on the layer that has the Current Layer indicator.
If no objects are selected when you create a new object, the new object will appear behind (and be listed below) all the artwork on the layer that has the Current Layer indicator.
You can press Shift-D to cycle through the available drawing modes.
To learn about Draw Inside mode, see page 365.
If multiple layer listings (layers, sublayers, groups, or objects) are selected, you can restack them on the panel simultaneously or apply the same layer options to them. There are some rules to remember for this as well:
![]() You can select multiple sublayer listings within the same top-level layer, provided they’re at the same nesting level, but you can’t select multiple sublayer listings in different top-level layers.
You can select multiple sublayer listings within the same top-level layer, provided they’re at the same nesting level, but you can’t select multiple sublayer listings in different top-level layers.
![]() You can select multiple listings of the same category (e.g., multiple top-level layers) and nesting level, but you can’t select multiple listings from different nesting levels (e.g., not both top-level layers and objects on another layer).
You can select multiple listings of the same category (e.g., multiple top-level layers) and nesting level, but you can’t select multiple listings from different nesting levels (e.g., not both top-level layers and objects on another layer).
![]() You can select multiple object listings (such as a path and type) in the same top-level layer, but not from different top-level layers.
You can select multiple object listings (such as a path and type) in the same top-level layer, but not from different top-level layers.
To select multiple layer listings
1. On the Layers panel, click the listing for a top-level layer, sublayer, or object.
2. Do either of the following:
Shift-click the name of another top-level layer, sublayer, or object. The listings you click, plus any items of a similar kind that are stacked between them, will become selected.
Cmd-click/Ctrl-click the names of other contiguous or noncontiguous top-level layers, sublayers, or objects.A
A Two noncontiguous top-level layer listings are selected.
![]() Cmd-click/Ctrl-click to deselect any individual listings when multiple listings are selected.
Cmd-click/Ctrl-click to deselect any individual listings when multiple listings are selected.
![]() Although you can select multiple layer or sublayer listings, the Current Layer indicator displays for only one top-level layer or sublayer at a time.
Although you can select multiple layer or sublayer listings, the Current Layer indicator displays for only one top-level layer or sublayer at a time.
Selecting objects via the Layers panel
In Chapter 8, you learned how to select objects using tools and commands. Here you will learn how to select paths or groups via the Layers panel. The result is the same — the object’s anchor points (and its bounding box, if that feature is on) become visible in the document window, and the object is ready for editing.
To select all the objects in a layer
At the far right side of the Layers panel, click the selection area A for a top-level layer or sublayer. A colored selection square appears for every sublayer, group, and object on that layer (if the layer list is expanded), and every object on the layer, regardless of its indent level, becomes selected in the document window. The bounding box for the objects will also display, if that feature is on (View menu).B And unless the items are in a group, the target circle for each path and group will also become selected.
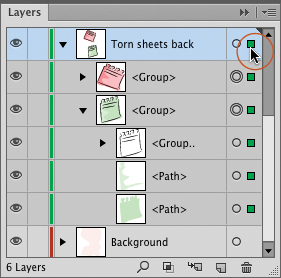
A If you click the selection area for a layer, all the paths and groups within it become selected in the document. The selection squares appear in the color that is currently assigned to that layer.
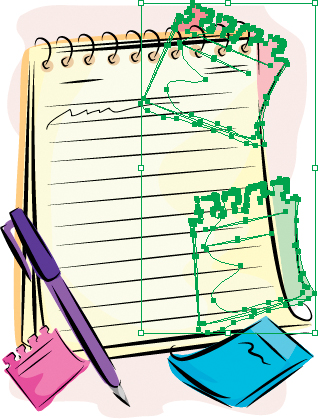
B All the paths and path groups on the “Torn sheets back” layer became selected in this artwork.
![]() To deselect an individual object, expand the list for its top-level layer or sublayer, then Shift-click the object’s selection square.
To deselect an individual object, expand the list for its top-level layer or sublayer, then Shift-click the object’s selection square.
To deselect all the objects in a layer
Shift-click the selection square for the layer containing the objects you want to deselect. All the objects in the layer will be deselected, including the objects in any nested sublayers or groups.
The Circle or the Square?
The difference between selecting and targeting should become clearer to you by the end of the next chapter. Here is an introduction:
![]() If you click either the target circle
If you click either the target circle ![]() on the right side of the Layers panel for an object or group or the selection area next to the circle, that object or group becomes selected and targeted and its generic name (e.g., “Path,” “Type,” or “Group”) is listed at the top of the Appearance panel.
on the right side of the Layers panel for an object or group or the selection area next to the circle, that object or group becomes selected and targeted and its generic name (e.g., “Path,” “Type,” or “Group”) is listed at the top of the Appearance panel.![]()
![]() If you click the selection area for a top-level layer, all the objects or groups on the layer become selected and targeted for appearance changes, and its generic name (e.g., “Mixed Objects”) is listed on the Appearance panel. If you click the target circle for a top-level layer, all the objects on the layer become selected, but only the top-level layer is targeted, and “Layer” is listed at the top of the Appearance panel.
If you click the selection area for a top-level layer, all the objects or groups on the layer become selected and targeted for appearance changes, and its generic name (e.g., “Mixed Objects”) is listed on the Appearance panel. If you click the target circle for a top-level layer, all the objects on the layer become selected, but only the top-level layer is targeted, and “Layer” is listed at the top of the Appearance panel.
To select an object via the Layers panel
1. On the Layers panel, expand the top-level layer, sublayer, or group for the object to be selected.
2. At the far right side of the panel, click the selection area or target circle for the entity you want to select.
Via the Layers panel, you can select multiple groups or objects on different top-level layers or sublayers.
To select multiple objects on different layers
1. On the Layers panel, make sure the listings for all the nested objects to be selected are visible (expand any layer or group lists, if necessary).
2. Click the selection area or target circle for any object, then Shift-click any other individual groups or objects to add them to the selection. The items don’t have to be listed consecutively.A–B
A Objects from nonconsecutive stacking levels are selected (note the colored selection squares on the far right).

B Objects that we selected from different stacking levels are shown selected in the artwork.
![]() To deselect any selected object individually, Shift-click its selection square or target circle.
To deselect any selected object individually, Shift-click its selection square or target circle.
Locating a Listing on the Layers Panel for a Selected Object
When the number of listings on the Layers panel grows long, it can be hard to locate a particular object listing. Organizing them into sublayers can help, as does the Locate Object button. With the Selection tool, select an object, then click the Locate Object button ![]() on the Layers panel. The list for that object’s layer expands, if it’s not already expanded, and its listing is highlighted.
on the Layers panel. The list for that object’s layer expands, if it’s not already expanded, and its listing is highlighted.
On pages 94–95, you learned how to create, isolate, add a new object to (and ungroup) a group. Here you will select objects in a group via the Layers panel.
To select a whole group via the Layers panel
1. Optional: To put the group in isolation mode, double-click it in the document with the Selection tool ![]() (V).A Note: If this doesn’t work, make sure Double Click to Isolate is checked in Illustrator/Edit > Preferences > General.
(V).A Note: If this doesn’t work, make sure Double Click to Isolate is checked in Illustrator/Edit > Preferences > General.
A When a group is in isolation mode, the Layers panel lists only that group and its objects.
2. To select all the objects in the group (including any groups nested within it), click the selection area or the target circle ![]() for the group listing on the right side of the Layers panel.
for the group listing on the right side of the Layers panel.
![]() When a document isn’t in isolation mode, you can also select a whole group by clicking any object in the group with the Selection tool (V). If you want to display the bounding box (which appears around the current selection), press Cmd-Shift-B/Ctrl-Shift-B.
When a document isn’t in isolation mode, you can also select a whole group by clicking any object in the group with the Selection tool (V). If you want to display the bounding box (which appears around the current selection), press Cmd-Shift-B/Ctrl-Shift-B.
![]() To select an object in a deselected group (or to select individual anchor points or segments), use the Direct Selection tool (A).
To select an object in a deselected group (or to select individual anchor points or segments), use the Direct Selection tool (A).
To select two or more objects in a group
1. Deselect all (Cmd-Shift-A/Ctrl-Shift-A).
2. Do either of the following:
The group can be in isolation mode for this method, or not. Expand the group list on the Layers panel, then Shift-click the selection area or the target circle ![]() at the far right side of the panel for each object in the group that you want to select.B
at the far right side of the panel for each object in the group that you want to select.B
B To select some objects in a group, expand the group list, then Shift-click the selection area for those objects.
With the group in isolation mode, choose the Selection tool ![]() (V), click an object, then Shift-click additional objects.
(V), click an object, then Shift-click additional objects.
![]() To deselect any selected item, Shift-click the object or the selection square again.
To deselect any selected item, Shift-click the object or the selection square again.
Restacking layers and objects
The order of objects (and layers) on the Layers panel matches the front-to-back order of objects (and layers) in the artwork. If you move a group, object, sublayer, or top-level layer upward or downward on the list, the artwork will redraw accordingly. You can restack objects and layers by dragging (see below) or by using a command (see the next page).
To restack a layer, group, or object via the Layers panel
Drag a top-level layer, sublayer, group, or object upward or downward on the Layers panel, either within the same indent level (say, to restack a group within its own top-level layer) A–C or to a different group or layer. The document will redraw according to the new stacking position.D

A This is the original artwork.
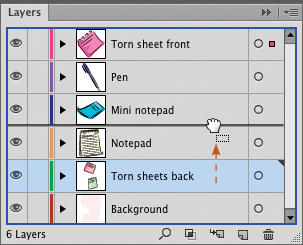
B We are dragging a layer listing upward to a new stacking position (note the dotted rectangle next to the hand icon).
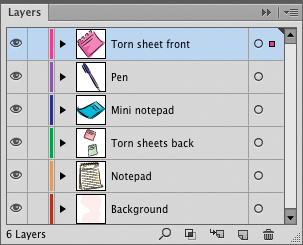
C The “Torn sheets back” layer is now in front of the Notepad layer.

D This is the result.
![]() On page 95, you learned how to add an existing object to a group via the Cut and Paste commands. You can also move an existing object into (or out of) a group by restacking the listing, as described above.
On page 95, you learned how to add an existing object to a group via the Cut and Paste commands. You can also move an existing object into (or out of) a group by restacking the listing, as described above.
![]() If you move an object that’s part of a group or clipping mask to a different top-level layer, the object will be released from that group or mask.
If you move an object that’s part of a group or clipping mask to a different top-level layer, the object will be released from that group or mask.
When the Layers panel contains many layers and a long list of objects, it can be tedious to expand and collapse layers each time you need to restack an object. For a faster method, use the Send to Current Layer command.
To move an object to a layer via a command
1. Select one or more objects.
2. On the Layers panel, click the layer to which you want to move the selected object(s).
3. Right-click one of the selected objects in the document and choose Arrange > Send to Current Layer (or choose the command from the Object > Arrange submenu). Note: If the selected object was in a group, the entire group will be moved to the selected layer.
![]() To reverse the order of specific layers, groups, and objects on the Layers panel, Cmd-click/Ctrl-click nonconsecutive listings (or click and then Shift-click a series of consecutive listings), then choose Reverse Order from the panel menu.
To reverse the order of specific layers, groups, and objects on the Layers panel, Cmd-click/Ctrl-click nonconsecutive listings (or click and then Shift-click a series of consecutive listings), then choose Reverse Order from the panel menu.
Duplicating layers and objects
Duplicate objects appear in the same x/y location as, and directly on top of, the objects from which they are duplicated. If you duplicate a layer or sublayer, the word “copy” is appended to the duplicate name.
To duplicate a layer, sublayer, group, or object
Do one of the following:
Hold down Option/Alt and drag a layer, sublayer, group, or object listing upward or downward to the desired top-level layer or sublayer, or within a group.A–B

A To duplicate an object, we are dragging its listing with Option/Alt held down.
B A copy of the object appears.
Drag a layer, sublayer, group, or object listing over the New Layer button.![]()
On the Layers panel, click the layer, sublayer, group, or object to be duplicated, then choose Duplicate [layer or object name] from the Layers panel menu.
Locking layers and objects
Locked objects can’t be selected or modified, but they do remain visible. When a whole layer is locked, none of the objects within it can be edited. When you save, close, and reopen a file that contains locked objects, the objects remain locked.
Note: As an alternative way to make some objects uneditable temporarily, you can isolate an object or group without locking it.
To lock or unlock layers or objects
Do one of the following:
On the Layers panel, click in the edit (second) column for a layer,A sublayer, group, or object. The lock icon ![]() appears. Click the icon to unlock the item.
appears. Click the icon to unlock the item.
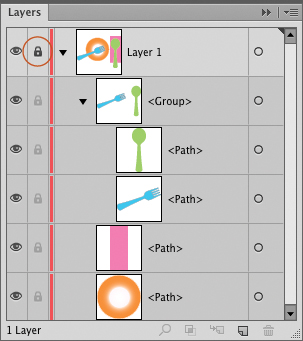
A When a layer is locked, none of the objects within it can be selected or edited. You can also lock groups or individual objects.
To lock multiple layers, sublayers, groups, or objects, drag upward or downward in the edit column. Drag back over the lock icons to unlock the items.
Option-click/Alt-click in the edit column for a top-level layer to lock or unlock all the other top-level layers except the one you click.
![]() If you lock an object and then lock its top-level layer, but later decide to unlock the object, you will have to unlock the top-level layer first.
If you lock an object and then lock its top-level layer, but later decide to unlock the object, you will have to unlock the top-level layer first.
One-Stop Shopping for Layer Options
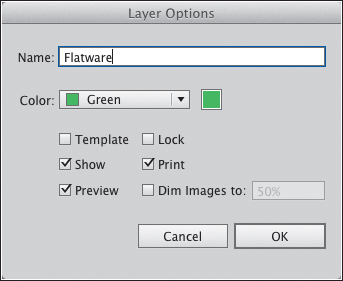
![]() To open the Layer Options dialog, in which you can choose multiple options, double-click a top-level layer or a sublayer (not the layer name). You can choose a different Color for selections on the layer (say, if you want to differentiate the selection color from similar colors in the artwork); and check or uncheck any options, such as Lock, Show, Print, or Preview (view). Options chosen for a top-level layer apply to all the sublayers, groups, and objects within it. Layers for which printing is turned off are listed in italics on the panel.
To open the Layer Options dialog, in which you can choose multiple options, double-click a top-level layer or a sublayer (not the layer name). You can choose a different Color for selections on the layer (say, if you want to differentiate the selection color from similar colors in the artwork); and check or uncheck any options, such as Lock, Show, Print, or Preview (view). Options chosen for a top-level layer apply to all the sublayers, groups, and objects within it. Layers for which printing is turned off are listed in italics on the panel.
Note: The Template option, in conjunction with the Dim Images To option, makes a layer that contains a placed image or object uneditable and dimmed to make it easier to trace manually. For a much easier tracing method, see Chapter 17.
![]() You can double-click a group or object to access the Name, Show, and Lock options in a simpler Options dialog.
You can double-click a group or object to access the Name, Show, and Lock options in a simpler Options dialog.
Hiding layers and objects
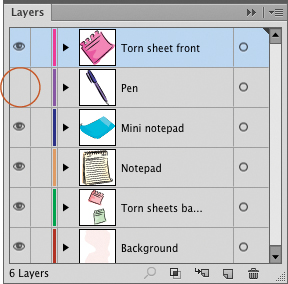
When you hide the objects you’re not working on, your artwork looks less complex temporarily, and the screen redraws faster. You can hide a top-level layer (with all its nested layers), a group, or an individual object. Hidden objects are invisible in both Outline and Preview views. When you save, close, and reopen a file that contains hidden objects, they remain hidden.
To hide or show layers or objects
Do one of the following:
Click the visibility icon ![]() for a top-level layer, sublayer, group, or object.A–D To redisplay the hidden items, click in the same slot.
for a top-level layer, sublayer, group, or object.A–D To redisplay the hidden items, click in the same slot.
A You can hide or show an individual object or group.

B The plate layer is hidden.
C You can also hide or show an entire layer.

D The napkin layer is hidden.
Drag upward or downward in the visibility column to hide multiple, consecutive top-level layers, sublayers, groups, or objects. To redisplay the hidden items, drag again.
Display all layers, then Option-click/Alt-click in the visibility column for a top-level layer to hide or show all the top-level layers except the one you click.
Note: If you want to redisplay a hidden object but its top-level layer is also hidden, you must redisplay its top-level layer first.
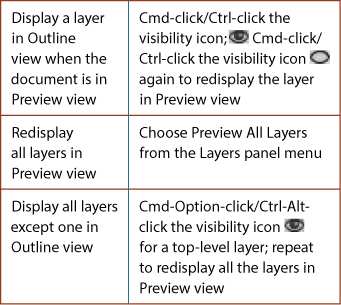
![]() To hide layers via a command, make sure all layers are visible (choose Show All Layers from the Layers panel menu if they’re not), click a top-level layer or layers to remain visible, then choose Hide Others from the panel menu.
To hide layers via a command, make sure all layers are visible (choose Show All Layers from the Layers panel menu if they’re not), click a top-level layer or layers to remain visible, then choose Hide Others from the panel menu.
![]() To learn more about printing layers, see page 416.
To learn more about printing layers, see page 416.
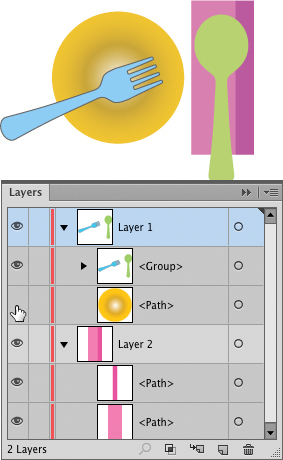
Collecting objects into a new layer
The Collect in New Layer command moves all the currently highlighted top-level layers, sublayers, groups, or objects to a brand new layer.
To collect multiple layers, sublayers, groups, or objects into a new layer
1. Deselect all objects.
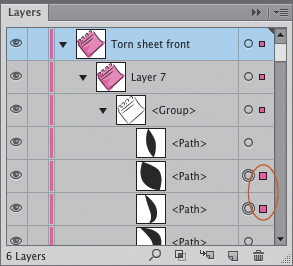
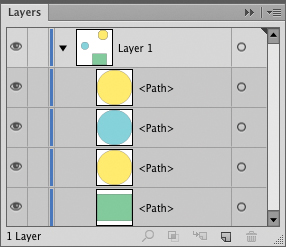
2. Cmd-click/Ctrl-click the listings for the layers, groups, or objects to be put on a new layer.A They must all be at the same indent level (e.g., all objects from the same sublayer or on consecutive sublayers). Don’t click the selection area.
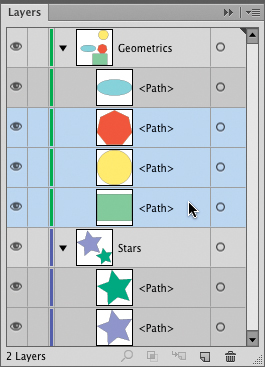
A We selected three path listings.
3. From the Layers panel menu, choose Collect in New Layer. If you selected sublayers, groups, or objects in the preceding step, they will now reside in a new sublayer within the same top-level layer;B or if you selected top-level layers, they will now be nested as sublayers within a newly named top-level layer.
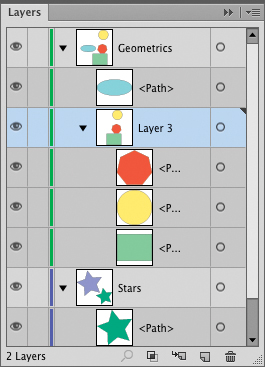
B The Collect in New Layer command gathered the selected listings into a new sublayer (and labeled it Layer 3).
Shortcuts for Changing the Layer View
When you choose a view option for a top-level layer, all the nested layers and objects within the layer display in that view.
Releasing objects to layers
The two Release to Layers commands are useful when you need to prepare an Illustrator file for export to Adobe Flash Professional to be used as the contents of an object, frame, or Web animation. The commands disperse all objects or groups residing within the currently selected top-level layer to new, separate layers within the same layer. After placing the file in Flash, you can convert the layers into separate objects or into a sequence.
Read step 2 carefully before deciding which command to use.
To move objects to new, separate layers
1. On the Layers panel, click a top-level layer, sublayer, or group (not an object).A
A We selected a top-level layer on the Layers panel.
2. From the Layers panel menu, choose either of the following:
Release to Layers (Sequence) to nest each object from the selected layer or group in a separate new layer within the original top-level layer.B Any former groups are nested in a new layer or sublayer. The original stacking order of the objects is preserved.
B These are the results we got from the Release to Layers (Sequence) command...
Release to Layers (Build) if you’re going to build a cumulative frame sequence in an animation program by adding objects in succession.C The bottommost layer will contain just the bottommost object; the next layer above that will contain the bottommost object plus the next object above it; the next layer above that will contain the two previous objects plus the next object above it, and so on.
C ...versus the Release to Layers (Build) command.
![]() If you release a layer or sublayer that contains a clipping mask that you created via the Layers panel, the clipping mask will remain in effect.
If you release a layer or sublayer that contains a clipping mask that you created via the Layers panel, the clipping mask will remain in effect.
Merging layers and groups
If the layers and sublayers on your Layers panel grow to an unwieldy number, you can consolidate them at any time by using the Merge Selected command. Unlike the Flatten Artwork command, which flattens an entire document (see the next page), the Merge Selected command merges just the listings that you select.
In addition to merging layers (or sublayers) with one another, you can merge two or more groups, or merge a group with a sublayer, provided the selected listings reside within the same top-level layer. In the case of a group being merged with a sublayer, the objects will be ungrouped and will be placed on the selected sublayer. You can’t merge objects with one another.
To merge layers, sublayers, or groups
1. Optional: Use File > Save As to preserve a copy of your file, with its layers.
2. As you Cmd-click/Ctrl-click the listings for two or more layers, sublayers, or groups, click last on the listing that you want the selected items to merge into.A You can merge locked and/or hidden layers.
A As you select the layers (or sublayers or groups) to be merged, click last on the layer you want the items to merge into.
3. Choose Merge Selected from the Layers panel menu.B
B The Merge Selected command merged the three selected layers into one.
Flattening layers
The Flatten Artwork command moves all the sub-layers, groups, and objects in a document to just one top-level layer, and discards all other top-level layers. Objects remain fully editable. If your document contains any hidden top-level layers when you choose this command, you can opt via an alert dialog to either preserve the hidden artwork (by clicking No) or allow Illustrator to discard the hidden layers (by clicking Yes).
To flatten all the layers in a document
1. Optional: Use File > Save As to preserve a copy of your file, with its layers.
2. Display any hidden top-level layers that you want to preserve.
Note: Any object that you hide by clicking its individual visibility icon will be preserved by the Flatten Artwork command, and will remain hidden.
3. By default, if no layers are selected, the Flatten Artwork command merges all the currently visible layers into whichever top-level layer is displaying the Current Layer indicator. If you prefer to flatten the document into a layer of your choosing, click that layer now.
4. Choose Flatten Artwork from the Layers panel menu.
5. If the document contains artwork on hidden top-level layers, an alert dialog will appear.A–C Click Yes to discard the hidden artwork, or click No to preserve it. If you click No, all the artwork on hidden top-level layers will become visible. Regardless of which button you click, the result will be a flattened file.
A One of the layers in this file is hidden.
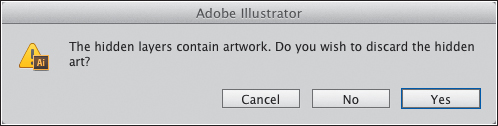
B Because the hidden layer contains artwork, this alert dialog appeared when we chose the Flatten Artwork command (it’s always nice to be given a second chance).
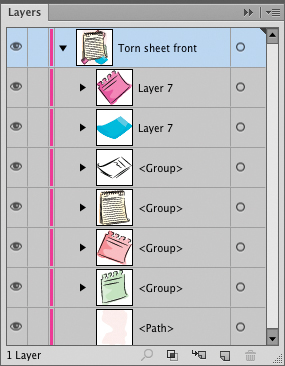
C Because we clicked Yes, the Flatten Artwork command flattened the artwork into the selected layer (“Torn sheet front”) and completely discarded the hidden layer.
![]() The Flatten Artwork command can be undone if you choose Undo immediately.
The Flatten Artwork command can be undone if you choose Undo immediately.