
1. Create & Save Files

In This Chapter
Adding artboards to a document
Aligning and rearranging artboards
Saving a document in the Adobe Illustrator (.ai) format
In this chapter, we’ll show you how to get up and running in Adobe Illustrator. After learning how to launch the program, you’ll learn how to create a new document; preview, open, and create document templates; create and modify multiple artboards; save and close your document; and quit/exit Illustrator.
Launching Illustrator
Note: To create a document after launching Illustrator, see the following page.
To launch Illustrator in Macintosh
Do one of the following:
On the startup drive, open the Applications > Adobe Illustrator CC folder, then double-click the Adobe Illustrator CC application icon.![]()
Click the Illustrator application icon ![]() in the Dock. (To create an icon, drag the application icon from the application folder to the Dock.)
in the Dock. (To create an icon, drag the application icon from the application folder to the Dock.)
To launch Illustrator by opening a file, double-click an Illustrator file icon or drag an Illustrator file icon over the application icon in the Dock.
To launch Illustrator in Windows
Do one of the following:
In a 64-bit version of Windows 7, click the Start button, choose All Programs, then click Adobe Illustrator CC (64-bit) or Adobe Illustrator CC.
In Windows 8, display the Start screen, then click the tile for Adobe Illustrator CC (64-bit) or Adobe Illustrator CC.
Double-click an Illustrator file icon (the file will open and Illustrator will launch).
![]() In Windows 8, to enable Illustrator to be launched from the Desktop, right-click the Illustrator tile in the Start screen, then choose Pin to Taskbar.
In Windows 8, to enable Illustrator to be launched from the Desktop, right-click the Illustrator tile in the Start screen, then choose Pin to Taskbar.
Finding the New Stuff in This Book
This symbol ![]() identifies Illustrator features that are new or improved.
identifies Illustrator features that are new or improved.
2. The New Document dialog opens.A Type a Name for the new document.
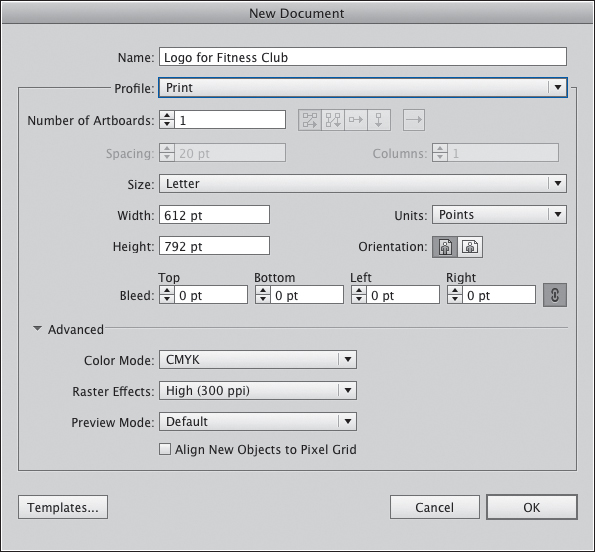
A In the New Document dialog, type a name, then choose either a preset or custom settings.
3. From the Profile menu, choose a preset for the medium in which you plan to output the file.
4. Each artboard in a document defines a separate printable area (see pages 7–12). Do either of the following:
For your first document, set the Number of Artboards value to 1 (A, next page).

A This document contains one artboard.
For multiple artboards, choose the desired Number of Artboards, click a Grid order icon, choose a Spacing value for the spacing between artboards, and choose a number of Columns (B, next page).

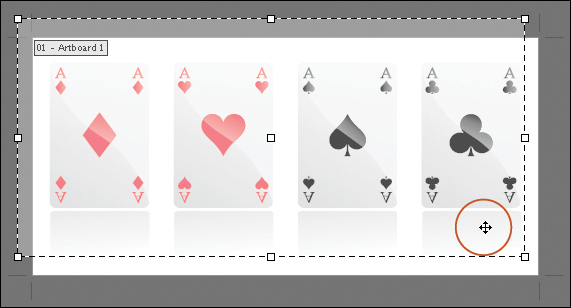
B This document contains four artboards. Each artboard defines a separate printable area.
5. Do either of the following:
From the Size menu, choose a preset that matches your output device.
Enter Width and Height values (if desired, you can change the measurement unit via the Units menu).
6. For the document Orientation, click the Portrait ![]() or Landscape
or Landscape ![]() button.
button.
7. The Bleed values control the width of the print area for items that extend beyond the artboard. Ask your print shop what values to enter. Note: If you don’t enter Bleed values here, you can do so later in the File > Document Setup or Print dialog.
8. If the Advanced options aren’t showing, click the arrowhead, then do the following:
Choose a Color Mode for the document: CMYK for print output; RGB for Web, devices, or video output.
Choose a resolution for Raster Effects, depending on your output requirements (effects are covered in Chapter 15). For high-end print output, choose High (300 ppi).
If you chose the Video And Film document profile, choose a Transparency Grid option.
Leave the Preview Mode setting as Default.
For Web output, to have the horizontal and vertical segments of objects align to the pixel grid so they look as crisp as possible, check Align New Objects to Pixel Grid.
9. Click OK. A new document window opens.
Using templates
A template is an Illustrator document that opens automatically as a new, unsaved copy. Illustrator supplies a few industry-standard templates that you can use as a starting point for creating custom projects; we show you how to access them in the steps below. Following that, we show you how to open a standard Illustrator document as a template, then how to create a custom template.
To preview and open an Illustrator template
1. Launch Bridge by clicking the Go to Bridge button ![]() on the Application bar in the Mac OS or to the right of the Help menu in Windows.
on the Application bar in the Mac OS or to the right of the Help menu in Windows.
2. Click the Folders tab in the left panel. In the Mac OS, navigate to and open the Adobe Illustrator CC/Cool Extras/en_US/Templates folder; in Windows, navigate to and open Program FilesAdobeAdobe Illustrator CC (64 Bit)Cool Extrasen_USTemplates.
3. Double-click the Blank Templates folder in the Templates folder. Find a template that interests you, then double-click it.
4. A copy of the template opens as a new, untitled document. The original file is left intact. Save the new file (see page 13).
You’re not limited to using the templates that ship with Illustrator. One alternative is to open any existing Illustrator file as an untitled, unsaved document.
To open an existing Illustrator file as an untitled document
1. Choose File > New from Template (Cmd-Shift-N/Ctrl-Shift-N).
2. The New from Template dialog opens. Locate and select an existing Illustrator file, then click New to open the file as an untitled document.
3. If the Font Problems dialog or a missing profile alert dialog appears, see the sidebar on page 63.
4. Save the new file (see page 13).
You can also save your own Illustrator files as templates. Regardless of what kind of project you’re working on — CD label, business card, book cover, Web graphic, package design, etc. — you will find templates to be great timesavers.
When setting up a file to be saved as a template, you can choose document settings, layout aids such as guides, and multiple artboards, and you can also incorporate many Illustrator features, such as brushes, swatches, symbols, graphic styles on panels, and, of course, paths and type objects. Note: You’ll probably want to revisit these instructions later, when you’re better acquainted with Illustrator and have some experience in creating artwork under your belt.
To create a document template
1. Create a new file or open an existing file.
2. Do any or all of the following — or anything else you can think of that might be useful to save in your template:
Create Illustrator objects, such as paths and type.
Create solid-color, gradient, or pattern swatches; brushes; graphic styles; character and paragraph styles; symbols; etc. Delete any of the above that won’t be needed. You could also load or drag and drop objects containing those elements into the current document from another Illustrator document.
Choose specifications for one or more artboards.
Set the zoom level.
Create ruler or object guides, choose ruler units (see page 407), and choose View menu options.
Create and save custom views.
Choose default settings for tools.
Create layers and choose Layers panel options.
Create crop or trim marks.
Create transparency flattener, PDF, and print presets.
Create text boxes containing instructions for users of the template.
3. Choose File > Save as Template. In the dialog, enter a name, keep the format as Illustrator Template (ait), keep the default location for templates (the folder that we listed in step 2 on the facing page) or choose a folder, then click Save.
The Anatomy of an Illustrator Document
Artwork that you want to export or print from Illustrator must be on an artboard (see the next page). To compare the currently active artboard to the paper size for the currently chosen printer, choose View > Fit Artboard in Window or press Cmd-0/Ctrl-0 (zero), then choose View > Show Print Tiling (the page size can be larger than the artboard size). To display the artboard boundaries if they are hidden, choose View > Show Artboards (Cmd-Shift-H/Ctrl-Shift-H). To learn more about the Illustrator workspace, see Chapter 3.
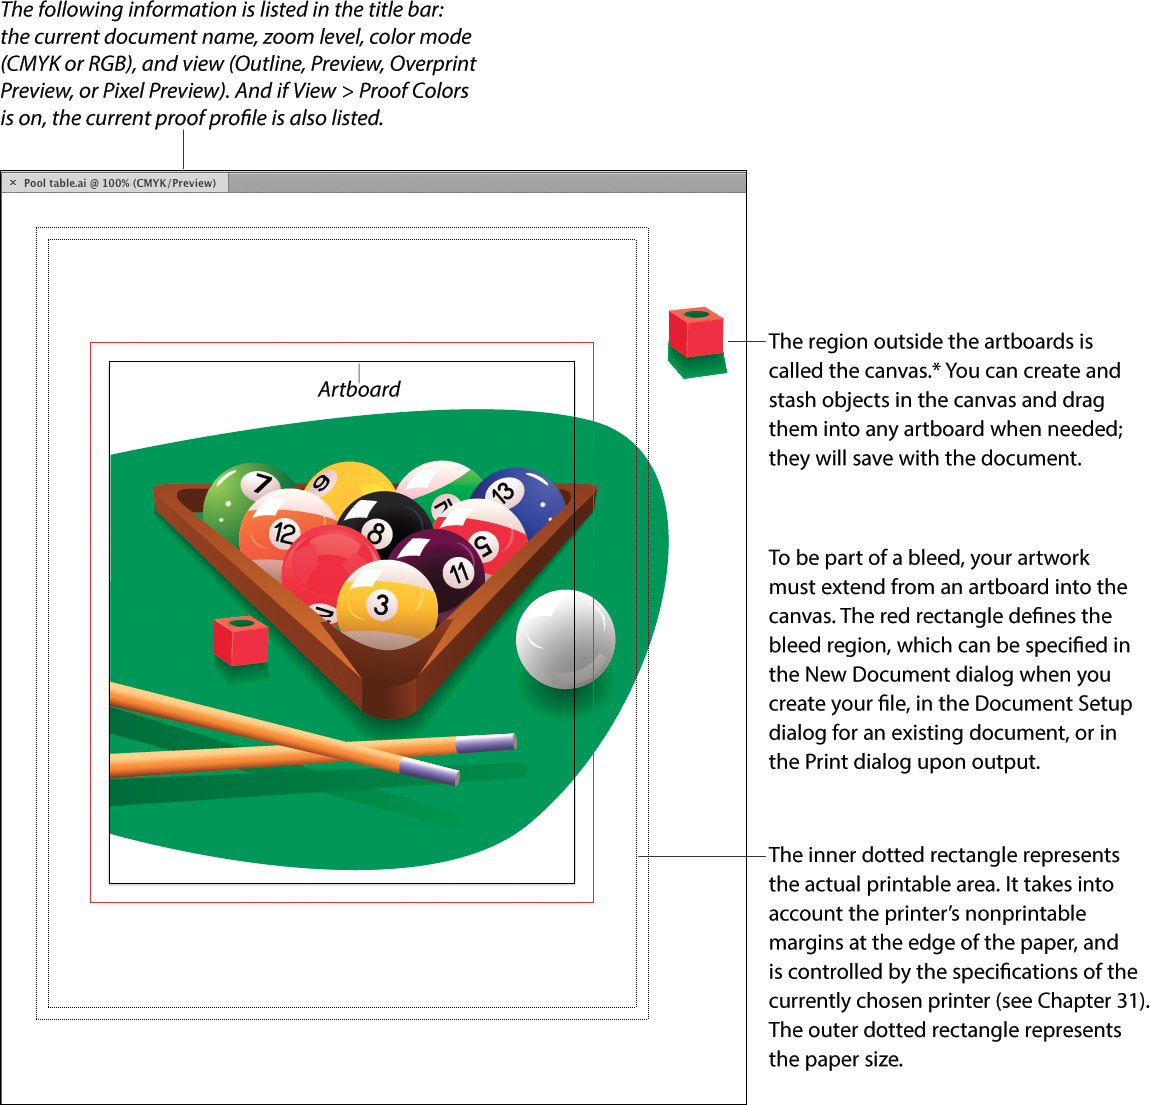
*In Illustrator, the artboard is called the “live” area, and the “nonlive” area surrounding it is called the canvas. In Adobe Photoshop, the image is contained in what is called the canvas.
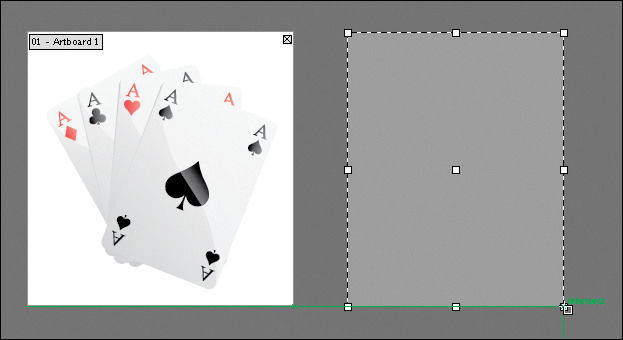
Adding artboards to a document
By default, every Illustrator document contains one artboard, and its dimensions are chosen in the New Document dialog. Using the Artboard tool, you can add more artboards to your document, scale them individually, change their orientation, and reposition them within the canvas area. Only one artboard can be active at a time. Artboards can be printed and exported individually or sequentially.
If you were to create an identity package for a client, for example, you could create a business card, stationery, and a brochure on separate artboards within the same document. Or you could create a series of separate but related graphics for the same website or animation project, a multipage PDF file, or components of a package design — all within one document. Any colors or graphic, paragraph, or character style definitions that you create will be available for all the artboards in the document.
To add an artboard with the Artboard tool
1. Choose the Artboard tool ![]() (Shift-O).
(Shift-O).
2. Do either of the following:
To create an artboard of a preset size, from the Presets menu on the Control panel, choose an option that fits your output medium (some of the presets are new).![]()
If you don’t see sufficient blank canvas area in the document to accommodate the new artboard, press Cmd- –/Ctrl- – (minus) to zoom out. You can also hold down the Spacebar and drag the canvas area in the document window to make room. Drag to create an artboard.
![]() On the View menu, check Smart Guides and uncheck Pixel Preview and Snap to Grid, then align the new artboard via alignment guides as you drag (read about Smart Guides on pages 100–101 and 408).A To scale or reposition an artboard, see page 10.
On the View menu, check Smart Guides and uncheck Pixel Preview and Snap to Grid, then align the new artboard via alignment guides as you drag (read about Smart Guides on pages 100–101 and 408).A To scale or reposition an artboard, see page 10.
A With the Artboard tool, drag to create a new artboard. Here, we are using a Smart Guide to align a new artboard with an existing one (see pages 100–101).
3. To exit artboard-editing mode, either press Esc (the last selected tool reselects) or click a different tool.
![]() Artboards are assigned numbers automatically based on the sequence in which they are created.
Artboards are assigned numbers automatically based on the sequence in which they are created.
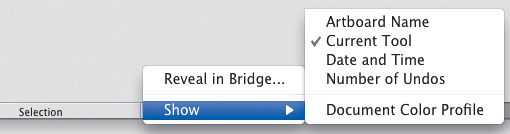
Using the Status Bar
Depending on which category you select from the Show submenu on the Status bar menu at the bottom of the document window, the bar will list the current Artboard Name, Current Tool, Date and Time, Number of [available] Undos, or Document Color Profile.
On the Artboards panel, ![]() A drag an artboard listing to the New Artboard button.
A drag an artboard listing to the New Artboard button. ![]() In the document, the duplicate artboard will appear to the right of the existing ones.
In the document, the duplicate artboard will appear to the right of the existing ones.
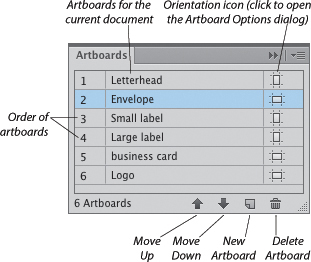
A Via the Artboards panel, you can create, select, duplicate, rename, and delete artboards; change their sequence; and open the Artboard Options dialog.
Choose the Artboard tool ![]() (Shift-O), activate the Move/Copy Artwork with Artboard button
(Shift-O), activate the Move/Copy Artwork with Artboard button ![]() on the Control panel, then Option-drag/Alt-drag an artboard.B–C (To use Smart Guides for alignment, see the first tip on the prior page). Press Esc.
on the Control panel, then Option-drag/Alt-drag an artboard.B–C (To use Smart Guides for alignment, see the first tip on the prior page). Press Esc.
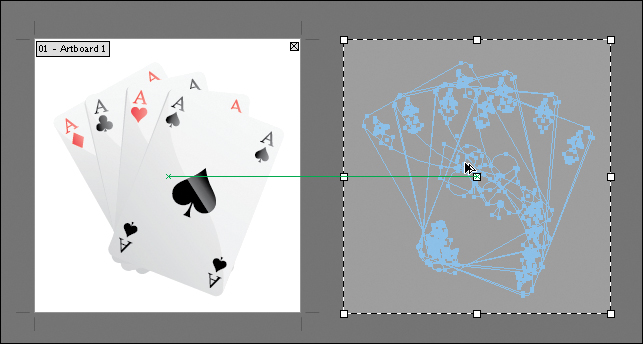
B To copy an artboard and its contents, activate the Move/Copy Artwork with Artboard button on the Control panel, then with the Artboard tool, Option-drag/Alt-drag the artboard.
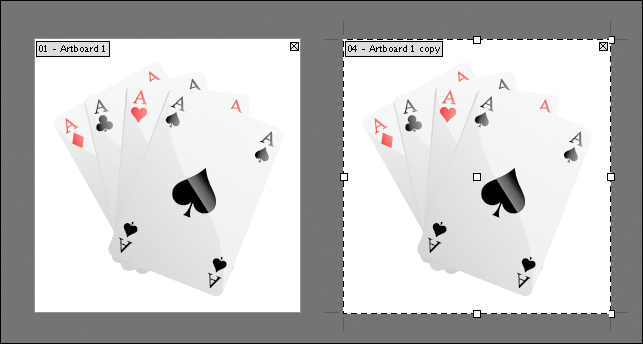
C The duplicate artboard and its contents appear.
![]() To rename an artboard, double-click the artboard name on the Artboards panel, enter a name, then click outside the name field or press Return/Enter. Another option is to click the Artboard tool, click an artboard in the document, then change the name in the Name field on the Control panel.
To rename an artboard, double-click the artboard name on the Artboards panel, enter a name, then click outside the name field or press Return/Enter. Another option is to click the Artboard tool, click an artboard in the document, then change the name in the Name field on the Control panel.
On the Artboards panel, ![]() click the artboard to be duplicated, then click the New Artboard button.
click the artboard to be duplicated, then click the New Artboard button. ![]() A The duplicate artboard will appear to the right of all the existing ones.
A The duplicate artboard will appear to the right of all the existing ones.
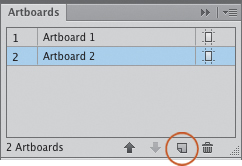

A We clicked an artboard, then clicked the New Artboard button on the Artboards panel. A new blank artboard appeared, the same size as the original.
Choose the Artboard tool ![]() (Shift-O), deactivate the Move/Copy Artwork with Artboard button
(Shift-O), deactivate the Move/Copy Artwork with Artboard button ![]() on the Control panel, then Option-drag/Alt-drag an artboard (to use Smart Guides for alignment, see the first tip on page 7). Press Esc to exit artboard-editing mode.
on the Control panel, then Option-drag/Alt-drag an artboard (to use Smart Guides for alignment, see the first tip on page 7). Press Esc to exit artboard-editing mode.
Choose the Artboard tool, ![]() click in an existing artboard, click the New Artboard button
click in an existing artboard, click the New Artboard button ![]() on the Control panel, position the artboard preview rectangle in the document window, then click to make the artboard appear (or hold down Option/Alt and click to produce multiple copies). Press Esc to exit artboard-editing mode.
on the Control panel, position the artboard preview rectangle in the document window, then click to make the artboard appear (or hold down Option/Alt and click to produce multiple copies). Press Esc to exit artboard-editing mode.
![]() To create an artboard from a rectangular path, select the path, then choose Convert to Artboards from the Artboards panel menu.
To create an artboard from a rectangular path, select the path, then choose Convert to Artboards from the Artboards panel menu.
Deleting artboards
To delete an artboard but not its contents
Do either of the following:
Choose the Artboard tool ![]() (Shift-O), then click the Delete icon
(Shift-O), then click the Delete icon ![]() in the upper right corner of the artboard to be deleted. You could also click the artboard to be deleted, then press Delete/Backspace or click the Delete Artboard button
in the upper right corner of the artboard to be deleted. You could also click the artboard to be deleted, then press Delete/Backspace or click the Delete Artboard button ![]() on the Control panel. Press Esc.
on the Control panel. Press Esc.
On the Artboards panel, click the listing for the artboard to be deleted (or Cmd-click/Ctrl-click multiple listings), then click the Delete Artboard button. ![]()
![]() To delete all the empty artboards in a document (except for the original artboard, which must remain) from the Artboards panel menu, choose Delete Empty Artboards.
To delete all the empty artboards in a document (except for the original artboard, which must remain) from the Artboards panel menu, choose Delete Empty Artboards.
Fitting an Artboard to Artwork
![]() To fit the currently selected artboard to all the artwork in your document, choose Object > Artboards > Fit to Artwork Bounds. Note: If your document contains multiple artboards, after choosing the command, you will probably want to delete any extraneous artboards or reposition any overlapping ones.
To fit the currently selected artboard to all the artwork in your document, choose Object > Artboards > Fit to Artwork Bounds. Note: If your document contains multiple artboards, after choosing the command, you will probably want to delete any extraneous artboards or reposition any overlapping ones.
![]() To fit an artboard around specific artwork, choose the Selection tool
To fit an artboard around specific artwork, choose the Selection tool ![]() (V), then drag a marquee around (or Shift-click) that artwork. Activate the artboard by clicking its listing on the Artboards panel, then choose Object > Artboards > Fit to Selected Art.
(V), then drag a marquee around (or Shift-click) that artwork. Activate the artboard by clicking its listing on the Artboards panel, then choose Object > Artboards > Fit to Selected Art.
The two commands mentioned above are also available on the Presets menu on the Control panel when the Artboard tool is selected.

With a group of objects selected, we chose Object > Fit to Selected Art.
Modifying artboards
To change the location, scale, or orientation of an artboard
1. To display all the artboards in the document window, choose View > Fit All in Window or press Cmd-Option-0/Ctrl-Alt-0 (zero).
2. Choose the Artboard tool ![]() (Shift-O), then click an artboard to select it.
(Shift-O), then click an artboard to select it.
3. To reposition the artboard and its contents, activate the Move/Copy Artwork with Artboard button ![]() on the Control panel, then drag the artboard. Or, to reposition the artboard but not the artwork, deactivate the Move/Copy Artwork with Artboard button before dragging A (reactivate the button when you’re done).
on the Control panel, then drag the artboard. Or, to reposition the artboard but not the artwork, deactivate the Move/Copy Artwork with Artboard button before dragging A (reactivate the button when you’re done).
A To move an artboard while keeping its contents stationary, deactivate the Move/Copy Artwork with Artboard button on the Control panel; then, with the Artboard tool, drag the artboard.
4. To scale the artboard, do any of the following:
From the Preset menu on the Control panel, choose a predefined size.
Drag a side or corner handle of the artboard.B To scale the artboard proportionally, hold down Shift while dragging.
B To scale an artboard manually, drag one of its handles with the Artboard tool.
![]() When you scale an artboard manually, the exact dimensions are listed in a label next to the pointer. If the readouts aren’t displaying, turn on View > Smart Guides, and in Illustrator/Edit > Preferences > Smart Guides, make sure Measurement Labels is checked.
When you scale an artboard manually, the exact dimensions are listed in a label next to the pointer. If the readouts aren’t displaying, turn on View > Smart Guides, and in Illustrator/Edit > Preferences > Smart Guides, make sure Measurement Labels is checked.
Enter new values in the W and/or H fields on the Control panel (check the Constrain Width and Height Proportions button first, if desired).
5. To change the orientation of the artboard, click the Portrait ![]() or Landscape
or Landscape ![]() button on the Control panel. Or to rotate the artboard on a touchscreen device or touchpad, rotate two spread-out fingers, such as your thumb and forefinger. (You can also pan the document by dragging with two fingers, or zoom by pinching two fingers.)
button on the Control panel. Or to rotate the artboard on a touchscreen device or touchpad, rotate two spread-out fingers, such as your thumb and forefinger. (You can also pan the document by dragging with two fingers, or zoom by pinching two fingers.)![]()
6. Press Esc.
![]() You can also change the size and orientation of an artboard in the Artboard Options dialog (see page 12).
You can also change the size and orientation of an artboard in the Artboard Options dialog (see page 12).
Aligning and rearranging artboards
If you prefer not to align your artboards manually, you can use the Rearrange Artboards dialog to quickly arrange them in neat rows or columns. If you change the order of the artboard listings on the Artboards panel before opening the dialog, the artboards will be rearranged automatically based on that new sequence.
To rearrange or realign multiple artboards
1. Optional: To control the order in which the dialog will arrange the artboards, change the order of any artboard listing on the Artboards panel by dragging it upward or downward (or by clicking a listing, then clicking the Move Up ![]() or Move Down
or Move Down ![]() button on the panel).
button on the panel).
2. From the Artboards panel menu, choose Rearrange Artboards.
3. In the dialog,A–B click a Layout icon: Grid by Row, Grid by Column, Arrange by Row, or Arrange by Column.

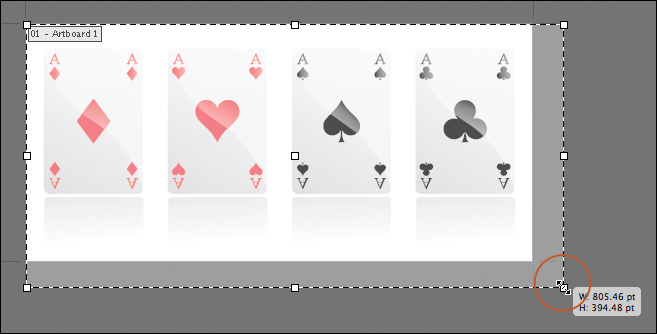
A The original document contains four artboards in a row.
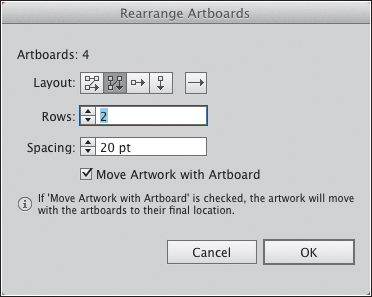
B You can use the Rearrange Artboards dialog to realign the artboards in your document, or to rearrange them based on the current order of listings on the Artboards panel. We clicked the second Layout button and chose a Rows value of 2.
If desired (and depending on which options are available), change the number of Rows or Columns, or change the Spacing value for the distance between the rows and columns.
Check Move Artwork with Artboard to have your artwork stick with the artboards as they’re moved (unless for some reason you want the artboards to move and the art to remain stationary).
4. Click OK.C All the artboards will display in the document window in their new configuration (and also in a new order, if you followed step 1).

C Now the artboards are arranged in two columns and two rows.
![]() To cycle among multiple artboards when the Artboard tool is selected, hold down Option/Alt and press an arrow key on your keyboard. To fit an artboard in the document window, see page 28.
To cycle among multiple artboards when the Artboard tool is selected, hold down Option/Alt and press an arrow key on your keyboard. To fit an artboard in the document window, see page 28.
Choosing artboard options
Note: The options provided in the Artboard Options dialog are also available on the Control panel when the Artboard tool is selected.
To choose artboard options
1. To open the Artboard Options dialog,A do either of the following:
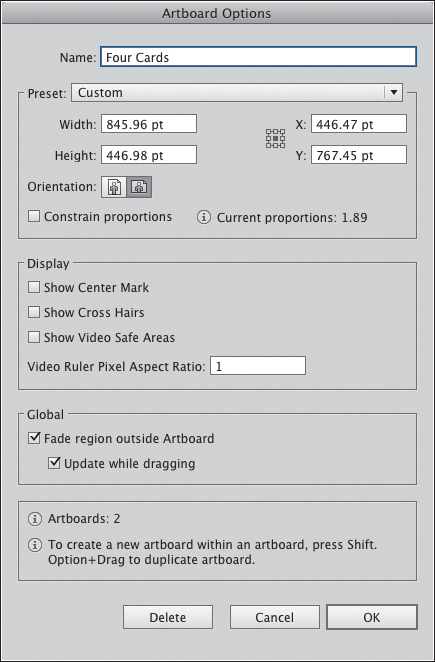
A Use the Artboard Options dialog to scale, and choose display options for, the current artboard.
On the Artboards panel, ![]() double-click the orientation icon
double-click the orientation icon ![]()
![]() for an artboard listing.
for an artboard listing.
Choose the Artboard tool, ![]() click an artboard in the document, then click the Artboard Options button
click an artboard in the document, then click the Artboard Options button ![]() on the Control panel.
on the Control panel.
2. For the currently selected artboard, you can change the artboard Name, choose a Preset size or enter new Width and/or Height values (check Constrain Proportions if you want to preserve the current aspect ratio), change the artboard Orientation, or change its x/y location.
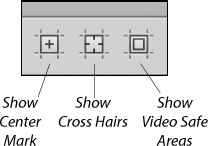
3. For video output, check which guides you want to Display: Show Center Mark displays crosshairs in the center of the artboard; Show Cross Hairs displays a line at each of the four midpoints of the artboard; and Show Video Safe Areas displays guides that mark the viewable area of the artboard. (See also the sidebar on this page.)
4. Check Fade Region Outside Artboard to have the area outside all the artboards display as dark gray (not white) when the Artboard tool is selected. Check Update While Dragging to have the artboard area display as a medium gray while an artboard is being dragged.
5. Click OK. If the Artboard tool is selected, press Esc.
![]() Beware! The Delete button in the Artboard Options dialog deletes the currently selected artboard, not the current values in the dialog.
Beware! The Delete button in the Artboard Options dialog deletes the currently selected artboard, not the current values in the dialog.
Enabling Guide Marks via the Control Panel
When the Artboard tool is selected, you can quickly turn guide (Display) marks on or off for the currently selected artboard via buttons on the Control panel.
Saving a document in the Adobe Illustrator (.ai) format
An Illustrator file can be saved in these seven formats: Adobe Illustrator (.ai), Illustrator EPS (.eps), Illustrator Template (.ait), Adobe PDF (.pdf), Adobe FXG (.fxg), SVG Compressed (.svgz), or SVG (.svg). Files in these formats can be reopened and edited in Illustrator.
You should keep your file in the Adobe Illustrator (.ai) format if you’re going to print it directly from Illustrator or if you’re going to import it into a program that reads this format, such as InDesign. If you’re going to display the file online or export it to an application that doesn’t read Illustrator (.ai) files, you will need to save a copy of it in a different format, such as Adobe PDF (see Chapter 31).
To save a file in the Adobe Illustrator (.ai) format
1. If the file has never been saved, choose File > Save (Cmd-S/Ctrl-S). If the file has already been saved, choose File > Save As. In either case, the Save As dialog opens.
2. Enter a name in the Save As/File Name field.
3. Navigate to the desired drive and folder.
4. From the Format/Save as Type menu, choose Adobe Illustrator (ai)/Adobe Illustrator (*AI).
5. Click Save. The Illustrator Options dialog opens.A Keep Illustrator CC [version number] as the choice on the Version menu. (For legacy formats, see the sidebar on the next page.)

A When saving a file in the Illustrator (.ai) format, choose settings in the Illustrator Options dialog.
6. Under Options, check any or all of the following:
Create PDF Compatible File to save a PDF representation along with the file, to enable the file to be read by other applications that support the PDF format (e.g., Photoshop, InDesign), to enable Bridge to preview individual artboards, and to activate the Fonts option in this dialog. We recommend checking this option, despite the fact that it increases the file size.
Include Linked Files (if available) to save a copy of any linked files with the document (see Chapter 22).
If you chose a profile in the Edit > Assign Profile dialog, check Embed ICC Profiles to embed those profiles in the file, for better color management.
Use Compression to compress vector data (and PDF data, if included) to help reduce the file size. With this option checked, the Save command may process more slowly.
Save Each Artboard to a Separate File, then click All or enter a Range. With this option off, multiple artboards will be saved in one file.
7. If you checked Create PDF Compatible File, under Fonts, enter a percentage in the Subset Fonts When Percent of Characters Used Is Less Than field to specify what percentage of the fonts used in the artwork will be embedded in the document. If not all the characters in a particular font are being used, you can have Illustrator embed just a subset of the font characters, as opposed to the whole font, to help reduce the file size. For example, at a setting of 50%, the entire font will be embedded only if more than 50% of its characters are used in the file, or just a subset of fonts if fewer than 50% of the font characters are used in the file. Characters in embedded fonts will display and print on any system, even those in which they aren’t installed. Note that the higher the Subset Fonts percentage, the more characters will be embedded, increasing the file size. At a setting of 100%, all the characters in a font are embedded.
8. Click OK. The file with the new name remains open onscreen; the file with the original name closes but is preserved on disk.
The prior version of your document is overwritten each time you use the Save command. Do yourself a favor and save often — don’t be shy about it! And be sure to create backups of your work frequently, too.
To resave a file
Choose File > Save (Cmd-S/Ctrl-S).
When you use the Save a Copy command, the original version of the file stays open onscreen and a copy of it is saved to disk (the opposite of the Save As command).
To save a copy of a file
1. Choose File > Save a Copy (Cmd-Option-S/Ctrl-Alt-S). The Save a Copy dialog opens.
2. To save the file in the Illustrator (.ai) format, follow steps 2–8 on the preceding page. Or for other formats, see Chapter 31.
To revert to the last saved version of a file
1. Choose File > Revert.
2. When the alert dialog appears, click Revert.
Ending a work session
To close a document
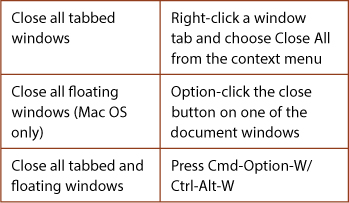
1. To close a tabbed document, click the ![]() on the window tab or press Cmd-W/Ctrl-W.
on the window tab or press Cmd-W/Ctrl-W.
To close a floating document in the Mac OS, click the close (red) button in the upper left corner of the document window.
To close a floating document in Windows, click the close box in the upper right corner of the document window.
2. If the file contains unsaved changes, an alert dialog will appear.A Click Don’t Save to close the file without saving your edits, or click Save to resave the file before closing it (or click Cancel).
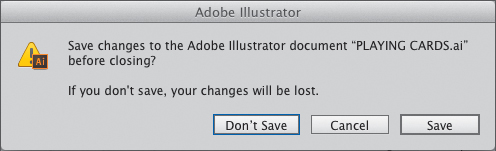
A If you try to close a file that contains unsaved changes, this alert will appear.
![]() To learn the difference between tabbed and floating windows, see page 25.
To learn the difference between tabbed and floating windows, see page 25.
To quit/exit Illustrator
1. In the Mac OS, choose Illustrator > Quit Illustrator (Cmd-Q).
In Windows, choose File > Exit (Ctrl-Q) or click the close box for the application window.
2. All open Illustrator files will close. If any of the open files contain unsaved changes, an alert will appear. To resave the file(s), click Save, or to quit/exit Illustrator without saving your edits, click Don’t Save.
Shortcuts for the Save Dialogs

Closing Open Files Quickly
Saving Files in Earlier CS Versions
To save a CC file in an Illustrator CS format, in the Illustrator Options dialog, choose the desired format from the Version menu (see step 5 on the preceding page). Note that saving to a CS version can cause unexpected text reflows. Avoid saving a file in a pre-CS version of Illustrator, as those versions can’t save such document features as multiple artboards, live effects, Live Paint groups, and transparency.
If you save a document that contains multiple artboards to an earlier version of Illustrator (such as CS3) and check Save Each Artboard as a Separate File in the Illustrator Options dialog, the result will be a separate file for each artboard, along with a master file in which each artboard has been converted to a guide.