
19. Create Type

In This Chapter
Choosing a font and font size for a type tool
Copying or moving type characters
Importing text into Illustrator
Converting point type to area type and vice versa
Exercise: Putting type on a circle
The type controls in Illustrator are extensive, and worthy of the two chapters that we have devoted to them. You will create three kinds of type in this chapter: point type, area type (inside an object), and type along a path. You will also copy type between objects, import type from another application, thread overflow type between objects, convert point type to area type (and vice versa), rotate type, and put type on a circle. In the next chapter, you will learn how to select type and change its attributes.
The type tools
There are three horizontal type tools: the Type tool, Area Type tool, and Type on a Path tool; and three vertical type tools: the Vertical Type tool, Vertical Area Type tool, and Vertical Type on a Path tool. With the exception of the versatile Type and Vertical Type tools, each tool has a specialized function.
![]() With the Type tool,
With the Type tool, ![]() you can create a free-floating block of type that isn’t associated with a path,A draw a rectangle with the tool and enter type inside the rectangle, enter type along the edge of an open path, or enter type inside a closed path.
you can create a free-floating block of type that isn’t associated with a path,A draw a rectangle with the tool and enter type inside the rectangle, enter type along the edge of an open path, or enter type inside a closed path.

A Type tool
![]() The Area Type tool
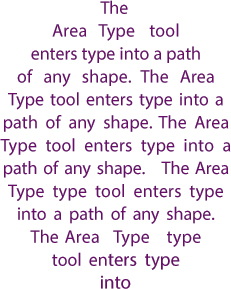
The Area Type tool ![]() creates type inside an open or closed path. The lines of type that are created with this tool automatically wrap inside the path.B
creates type inside an open or closed path. The lines of type that are created with this tool automatically wrap inside the path.B
B Area Type tool
![]() The Type on a Path tool
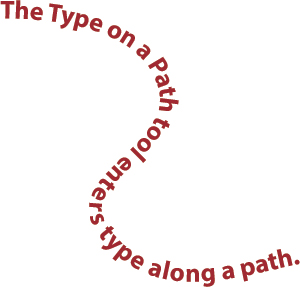
The Type on a Path tool ![]() creates a line of type along the outer edge of an open or closed path.C
creates a line of type along the outer edge of an open or closed path.C
C Type on a Path tool
![]() The Vertical Type tool
The Vertical Type tool ![]() has the same function as the Type tool, except that it creates vertical type.
has the same function as the Type tool, except that it creates vertical type.
![]() The Vertical Area Type tool
The Vertical Area Type tool ![]() creates vertical type inside an open or closed path.
creates vertical type inside an open or closed path.
![]() The Vertical Type on a Path tool
The Vertical Type on a Path tool ![]() creates vertical type along the outer edge of an open or closed path.D
creates vertical type along the outer edge of an open or closed path.D

D Vertical Type on a Path tool
Choosing a font and font size for a type tool
In the next chapter, we’ll show you how to use the extensive typographic controls in Illustrator to change the attributes of existing type. Here we offer the basic steps for choosing a font family and font size for the type tools that you will use in this chapter.
To choose two basic attributes for a type tool
1. Choose the Type ![]() (T), Area Type,
(T), Area Type, ![]() Type on a Path,
Type on a Path, ![]() Vertical Type,
Vertical Type, ![]() Vertical Area Type,
Vertical Area Type, ![]() or Vertical Type on a Path
or Vertical Type on a Path ![]() tool.
tool.
2. Do either or both of the following:
On the Control panel,A choose a font family from the Font menu and a style from the Font Style menu.
A From the menus on the Control panel, choose a Font Family, Font Style, and Font Size.
On the Control panel, enter the desired size in the Font Size field (you don’t need to reenter the unit of measure), or choose a preset size from the Font Size menu, or click the up or down arrow.
Is It Point Type or Area Type?
To distinguish between a point type object and an area type object, look for these clues:
![]() As you enter point type, the only way to produce line breaks is by pressing Return/Enter, whereas when you enter area type, Illustrator creates line breaks automatically to fit the type within the object.
As you enter point type, the only way to produce line breaks is by pressing Return/Enter, whereas when you enter area type, Illustrator creates line breaks automatically to fit the type within the object.
![]() If the View > Bounding Box feature is on and you select a point type object with the Selection tool, the annotator on the right side of the object is hollow, whereas if you select an area type object with the same tool, the annotator is filled (see page 260).
If the View > Bounding Box feature is on and you select a point type object with the Selection tool, the annotator on the right side of the object is hollow, whereas if you select an area type object with the same tool, the annotator is filled (see page 260).![]()
![]() If you scale a point type object, the type also scales, whereas if you scale an area type object, the object scales but the type does not.
If you scale a point type object, the type also scales, whereas if you scale an area type object, the object scales but the type does not.
Creating point type
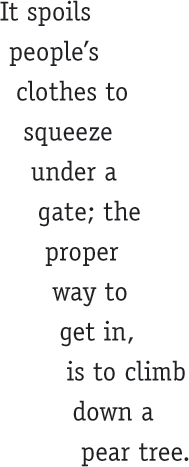
Point type stands by itself — it’s neither inside an object nor along a path. This kind of type is most suitable for short passages, such as headlines, titles, or labels for Web buttons. For point type, line breaks are created manually.
To create point type
1. Choose the Type tool ![]() (T) or Vertical Type
(T) or Vertical Type ![]() tool.
tool.
2. Choose a font family, font style, and font size (see the steps at left).
3. Click a blank area of an artboard where you want the type to start (don’t click an object). A flashing insertion marker appears.
4. Optional: By default, Illustrator applies a fill color of black and a stroke color of None to the characters in a new type object. If desired, before you begin to type characters, you can choose a different fill color. If the Stroke square happens to be selected and set to a color of None when you choose your type tool, Illustrator will select the Fill square automatically.![]()
5. Enter type. Press Return/Enter each time you want to start a new line.
6. To complete the type object, do either of the following: B

B This point type was created with the Type tool.
Click a selection tool on the Tools panel (don’t use the tool shortcut), then click outside the type block to deselect it.
To keep the type tool selected (so you can continue using it), either click the type tool or Cmd-click/Ctrl-click outside the type block to deselect it (the shortcut gives you a temporary selection tool).
![]() To recolor type, see the sidebar on page 269.
To recolor type, see the sidebar on page 269.
![]() To align multiple separate blocks of point type, use the align buttons on the Control panel or the Align panel (see pages 105–106).
To align multiple separate blocks of point type, use the align buttons on the Control panel or the Align panel (see pages 105–106).
Inserting and Deleting Characters
![]() To add characters to an existing type object, choose a type tool, click to create an insertion point, then type.
To add characters to an existing type object, choose a type tool, click to create an insertion point, then type.
![]() To delete one character at a time, choose a type tool, click to the right of the character to be deleted, then press Delete/Backspace. Or to delete multiple characters, select them with a type tool before pressing Delete/Backspace.
To delete one character at a time, choose a type tool, click to the right of the character to be deleted, then press Delete/Backspace. Or to delete multiple characters, select them with a type tool before pressing Delete/Backspace.
Creating area type
In this task, you’ll draw a rectangle, then enter type inside it. The type will wrap within the edges of the object automatically. On the next page, you’ll learn how to enter type inside an existing object of any shape.
To create type in a rectangle
1. Choose the Type tool ![]() (T) or Vertical Type
(T) or Vertical Type ![]() tool.
tool.
2. Choose a font family, font style, and font size (see the preceding page).
3. Drag to create a rectangle. When you release the mouse, a flashing insertion marker will appear. Optional: Change the fill color.
4. Enter type.A The type will wrap automatically to fit into the rectangle. Press Return/Enter only when you need to create a new paragraph.
A Drag with the Type tool to create a rectangle, then enter type. To reveal the edges of the rectangle, either display the document in Outline view or use the Object Highlighting feature of Smart Guides.
5. Do either of the following:
Choose a selection tool on the Tools panel (don’t use a keyboard shortcut to select the tool), then click outside the type block to deselect it.
To keep the type tool selected (so you can continue using it), either click the type tool or Cmd-click/Ctrl-click outside the type block to deselect it.
Note: An Out port (overflow symbol) ![]() on the edge of a type rectangle indicates that the rectangle isn’t large enough to display all the type. If you want to reveal the hidden type, click the object with the Selection tool, then drag a handle on its bounding box (View > Show Bounding Box). The type will reflow to fit the new shape. A second option is to reshape the object with the Direct Selection tool.B A third option is to thread the overflow type into another object, as described on page 258.
on the edge of a type rectangle indicates that the rectangle isn’t large enough to display all the type. If you want to reveal the hidden type, click the object with the Selection tool, then drag a handle on its bounding box (View > Show Bounding Box). The type will reflow to fit the new shape. A second option is to reshape the object with the Direct Selection tool.B A third option is to thread the overflow type into another object, as described on page 258.
B We reshaped the type rectangle with the Direct Selection tool.
![]() To recolor type or a type object, see the sidebar on page 269.
To recolor type or a type object, see the sidebar on page 269.
![]() If you drag to define an area with the Vertical Type tool before entering type, the type will flow from top to bottom and from right to left.
If you drag to define an area with the Vertical Type tool before entering type, the type will flow from top to bottom and from right to left.
![]() If you click in your document with a type tool unintentionally, an empty type object will be created, which you can delete via the Layers panel. To delete the results of all such clicks, choose Object > Path > Clean Up. In the dialog, check just the Empty Text Paths option, then click OK.
If you click in your document with a type tool unintentionally, an empty type object will be created, which you can delete via the Layers panel. To delete the results of all such clicks, choose Object > Path > Clean Up. In the dialog, check just the Empty Text Paths option, then click OK.
Using a Temporary Hand Tool While Editing Text ![]()
To access a temporary Hand tool when a type tool is selected and your pointer is in text-editing mode, hold down Option/Alt and drag the document in the window. Release Option/Alt to resume text editing. Note: Don’t use the Spacebar to access the Hand tool, or you’ll add spaces to your text (or replace selected text with spaces) instead of moving the document in its window. (The Option/Alt shortcut replaces the former — cumbersome — Cmd/Ctrl and Spacebar combo.)
![]() When editing type, keep track of the pointer location. If the pointer is in a panel field, you will edit the panel values instead of the type characters.
When editing type, keep track of the pointer location. If the pointer is in a panel field, you will edit the panel values instead of the type characters.
When you use the Area Type or Vertical Area Type tool to place type inside a path of any shape or inside an open path, the object is converted to a type object. The type will wrap within the edges of the object automatically.
To enter type inside an existing object
1. Optional: Once you place type inside or along a graphic object, it becomes a type object permanently. To preserve a copy of the original graphic object, hold down Option/Alt and drag its selection square upward or downward on the Layers panel.
2. To enter type inside a closed path, choose the Area Type, ![]() Vertical Area Type,
Vertical Area Type, ![]() Type
Type ![]() (T), or Vertical Type
(T), or Vertical Type ![]() tool; or to enter type inside an open path, choose either one of the Area Type tools.
tool; or to enter type inside an open path, choose either one of the Area Type tools.
3. Choose a font family, font style, and font size (see page 250).
4. Click precisely on the edge of a path. A flashing insertion marker appears, and any fill, stroke, or brush stroke on the object is removed. The former path object is now a type object. Optional: Change the fill color.
5. Enter type inside the path, or copy and paste some type from a text-editing application into the path. The type will wrap within the object.A–B Note that the Layers panel is now listing the first few words in the type object instead of the path.
![]() To make the type fit symmetrically within the object, give it a relatively small point size. Also, on the Paragraph panel, check Hyphenate and click either the Align Center button or one of the Justify alignment buttons (see page 278).
To make the type fit symmetrically within the object, give it a relatively small point size. Also, on the Paragraph panel, check Hyphenate and click either the Align Center button or one of the Justify alignment buttons (see page 278).
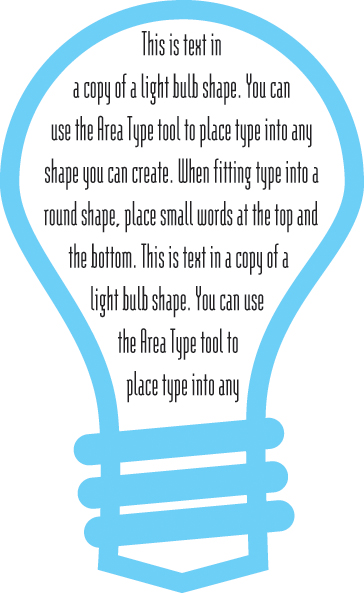
A Area type

B Type in a circle
6. Do either of the following:
Choose a selection tool, then click outside the type object to deselect it.
To keep the type tool selected (so you can continue using it), Cmd-click/Ctrl-click away from the type block to deselect it.
![]() To adjust the spacing between area type and the object that contains it, see the next page.
To adjust the spacing between area type and the object that contains it, see the next page.
![]() To recolor type or a type object, see the sidebar on page 269.
To recolor type or a type object, see the sidebar on page 269.
![]() Type can’t be entered into a compound path, an object in a clipping mask, a mesh object, or a blend.
Type can’t be entered into a compound path, an object in a clipping mask, a mesh object, or a blend.
![]() When you edit area type in Illustrator CC, it updates more quickly than in prior versions of Illustrator.
When you edit area type in Illustrator CC, it updates more quickly than in prior versions of Illustrator.![]()
To adjust the spacing between area type and the edge of its object, change the Inset Spacing value in the Area Type Options dialog. To reposition the first line of type, change the First Baseline value.
To choose Inset Spacing and First Baseline options for area type
1. Select an area type object with a selection tool, a type tool, or the Layers panel.A

A The type is touching the edges of this object.
2. Choose Type > Area Type Options. In the Area Type Options dialog,B check Preview.
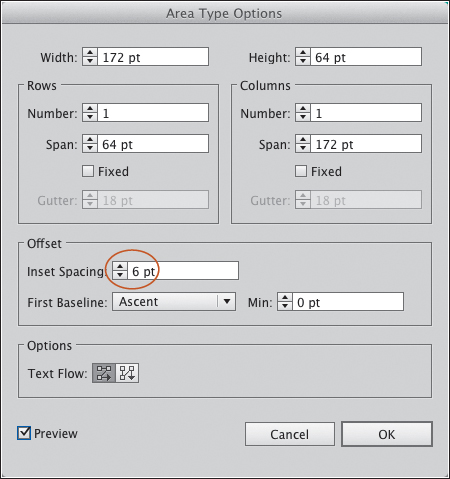
B We used the Inset Spacing control in the Area Type Options dialog to adjust the spacing between the type and the edge of the object.
3. In the Offset area, choose an Inset Spacing value to adjust the spacing between the type and the type object.C

C Now this area type object has an Inset Spacing value of 6 pt. The type looks better with some “breathing room” around it.
4. To control the distance between the first line of type and the top of the object (or the current inset, if the Inset Spacing value is greater than 0), choose a First Baseline option (try Ascent or Cap Height, or for the most control, use the Fixed option):
Ascent to have the top of the tallest characters in the line touch the top of the object.
Cap Height to have the top of uppercase letters touch the top of the object.
Leading to make the distance between the first baseline of text and the top of the object equal to the leading value of the type.
x Height to have the top of the “x” character in the current font sit flush with the top of the object.
Em Box Height to have the top of the em box in an Asian font touch the top of the object.
Fixed, then enter a Min (minimum) value for the location of the baseline of the first line of text.
Legacy to use the method from previous versions of Illustrator.
Note: If you choose a Min (minimum baseline offset) value above 0, Illustrator will use either that value or the current First Baseline value, whichever is greater.
5. Click OK.
![]() You can select an area type object and then reopen the Area Type Options dialog to view or edit the current settings.
You can select an area type object and then reopen the Area Type Options dialog to view or edit the current settings.
Creating path type
Follow these steps to place type in a single line along the inner or outer edge of a path.
To place type along an object’s path
1. Do either of the following (the path doesn’t have to be selected):
Choose the Type on a Path ![]() or Vertical Type on a Path tool,
or Vertical Type on a Path tool, ![]() choose a font family, font style, and font size (see page 250), then click the edge of an open or closed path.A
choose a font family, font style, and font size (see page 250), then click the edge of an open or closed path.A

A To help prevent the letters from scrunching together when adding horizontal type to a path, use an object that has gentle curves rather than sharp corners.
Choose the Type ![]() or Vertical Type
or Vertical Type ![]() tool, choose a font family, font style, and font size (see page 250). Click an open path, or hold down Option/Alt and click the edge of a closed path.
tool, choose a font family, font style, and font size (see page 250). Click an open path, or hold down Option/Alt and click the edge of a closed path.
2. The flashing insertion marker appears. If desired, change the fill color. Enter type, without pressing Return/Enter. The type will appear along the edge of the object. The object now has a fill and stroke of None, and any brush stroke was removed.B

B This is vertical type on a path.
3. Do either of the following:
Choose a selection tool, then click outside the type object to deselect it.
To keep the type tool selected (so you can continue using it), hold down Cmd/Ctrl and click outside the type object.
To reposition type on a path
1. Choose the Selection tool ![]() or Direct Selection tool.
or Direct Selection tool.![]()
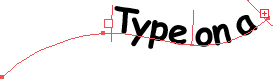
2. Click the type (not the path). Center, left, and right brackets appear.C
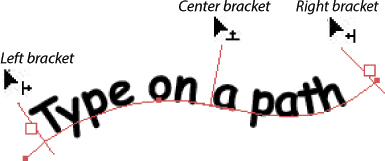
C A left, center, and right bracket will display for path type when it’s selected with the Selection or Direct Selection tool.
3. As you do any of the following, be sure to drag the bracket (the vertical bar) — not the little square. If your tool switches to a type tool, choose a selection tool and try again.
To reposition the type block along the path, drag the center bracket to the left or right.
To reposition the starting point of the type on the path, drag the left bracket.D–E You could also drag the right bracket back across the existing type (this will shorten the amount of type that’s visible on the path and may produce a type overflow). For right-aligned type, do the opposite of the above.
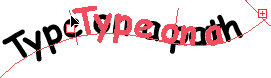
D We dragged the left bracket to the right.
E We released the mouse.
To flip the type to the opposite side of the path, drag the center bracket perpendicularly across the path (see also the Flip option on the next page).
Via the Type on a Path Options dialog, you can quickly change the shape, orientation, and alignment of type on a path. The more curvy the path, the more obvious the changes. The dialog settings are editable and reversible.
To apply options to path type
1. Do either of the following:
Choose the Selection tool, ![]() then click the type on a path.
then click the type on a path.
On the Layers panel, click the selection area for a path type object.
2. Choose Type > Type on a Path > Type on a Path Options. Check Preview in the dialog.A
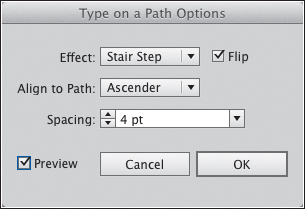
A Use the Type on a Path Options dialog to apply a type effect.
3. Do any of the following:
From the Effect menu, choose Rainbow, Skew, 3D Ribbon, Stair Step, or Gravity.B
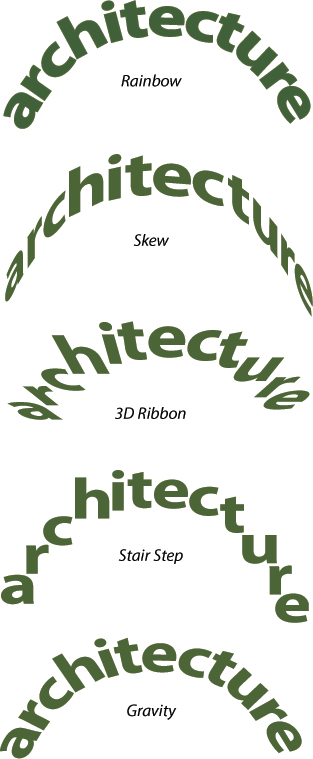
B The Effect choices in the Type on a Path Options dialog change the shape and spacing of characters on a path.
Choose Align to Path: Ascender, Descender, Center, or Baseline (the default setting) to control which part of the type touches the path.C
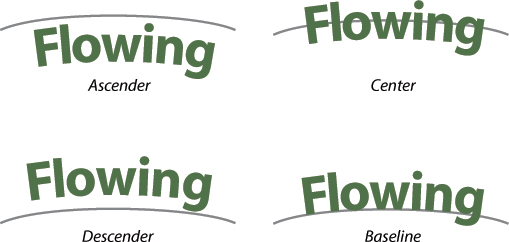
C The Align to Path options affect the position of the baseline of path type relative to the path.
Check (or uncheck) Flip.
Choose a positive or negative letter Spacing value. Change this value in small increments at first.
4. Click OK. To change or reverse any of the option settings at any time, reselect the object and reopen the dialog.
![]() To shift type upward or downward from its baseline by a specific value, see page 286. To adjust the spacing between a pair of characters, see page 272.
To shift type upward or downward from its baseline by a specific value, see page 286. To adjust the spacing between a pair of characters, see page 272.
![]() The type effects can also be applied individually via the Type > Type on a Path submenu.
The type effects can also be applied individually via the Type > Type on a Path submenu.
Copying or moving type characters
To copy or move type from one object to another
1. Choose the Type tool ![]() (T) or Vertical Type
(T) or Vertical Type ![]() tool.
tool.
2. Do either of the following:
Select (drag across) the type characters to be moved.
To move all the type from one or more threaded objects, click in one of the objects, then choose Select > All (Cmd-A/Ctrl-A).
3. Do either of the following:
Choose Edit > Cut (Cmd-X/Ctrl-X).A
A We selected type, then chose Edit > Cut to put it onto the Clipboard.
Choose Edit > Copy (Cmd-C/Ctrl-C).
4. To create a text insertion point in an object, do one of the following (for the first three options, the object doesn’t have to be selected):
To put the type into an existing closed path (area type), click the edge of the object.
To put the type along the outside of a closed path (path type), hold down Option/Alt and click the edge of the object.
To put the type along an open path (path type), click the edge of the object.B

B We clicked a path.
To create a new type rectangle to contain the type, hold down Cmd/Ctrl and click a blank area of the artwork to deselect, then drag to create a rectangle.
5. Choose Edit > Paste (Cmd-V/Ctrl-V).C

C We pressed Cmd-V/Ctrl-V. The contents of the Clipboard appeared on the path.
Copying a Whole Type Object
![]() To copy a type object within the same document, use any method you would use to copy a path object: Option/Alt drag the object with the Selection tool, or Option/Alt drag the object’s selection square upward or downward on the Layers panel (for the latter method, move the copy away from the original afterward).
To copy a type object within the same document, use any method you would use to copy a path object: Option/Alt drag the object with the Selection tool, or Option/Alt drag the object’s selection square upward or downward on the Layers panel (for the latter method, move the copy away from the original afterward).
![]() To copy a type object between Illustrator documents, use the drag-and-drop method (see page 102) or Clipboard commands (see page 103).
To copy a type object between Illustrator documents, use the drag-and-drop method (see page 102) or Clipboard commands (see page 103).
Note: When you copy a threaded text object, only that single object and the visible text within it are copied.
Importing text into Illustrator
The Place command lets you import text files in the following formats into an Illustrator document: plain text (.txt); Rich Text Format (.rtf); or Microsoft Word (.doc or .docx). The text will appear in a new rectangle.
Note: To enter text onto or into a custom path, first place it into an Illustrator document by following the steps below, then copy and paste it onto or into the path (see the steps on the preceding page).
To import text into an Illustrator document
1. Open or create an Illustrator document. Click an artboard in the document or on the Artboards panel.
2. Choose File > Place.
3. In the Place dialog, locate and click the text file to be imported, then click Place.
4. For a file in Microsoft Word or RTF format, the Microsoft Word Options dialog opens.A Decide which options you want Illustrator to include. If you want to preserve any text styling, be sure to leave Remove Text Formatting unchecked.

A For text in Microsoft Word or RTF format, you will choose settings in the Microsoft Word Options dialog.
For a file in the plain text (.txt) format, the Text Import Options dialog opens.B Formatting and styling are removed from text in this format.
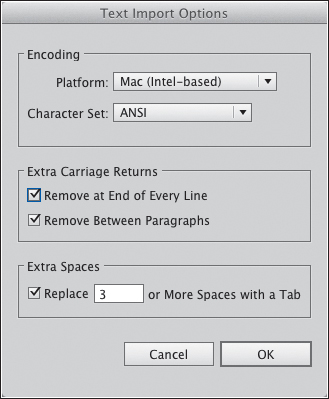
B For text in the plain text format, choose settings in the Text Import Options dialog.
5. Click OK. The imported text will appear in a large rectangle in the center of the current artboard; you can use the Selection tool to resize it. To restyle it, see the next chapter. If the overflow symbol appears in the lower right corner of the rectangle C and you want to thread the type to another type object, see the next page.
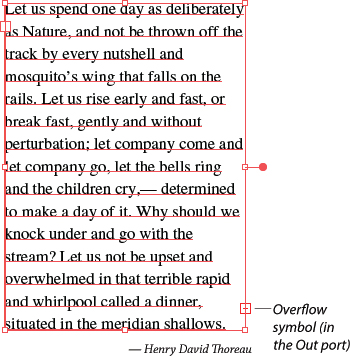
C The placed text appears in a rectangle.
Threading type objects
To reveal overflow (overset) text, you can either thread the type object to another object (see the next task), or simply enlarge the type object via one of these two methods:
![]() Click the type block with the Selection tool. If the bounding box isn’t visible, choose View > Show Bounding Box. Drag a handle on the bounding box (the handles on a bounding box are hollow).
Click the type block with the Selection tool. If the bounding box isn’t visible, choose View > Show Bounding Box. Drag a handle on the bounding box (the handles on a bounding box are hollow).
![]() Deselect the type object, click the edge of the rectangle — not the type — with the Direct Selection tool (use the Object Highlighting feature of Smart Guides to locate the rectangle), then Shift-drag a segment.
Deselect the type object, click the edge of the rectangle — not the type — with the Direct Selection tool (use the Object Highlighting feature of Smart Guides to locate the rectangle), then Shift-drag a segment.
If your type overfloweth, you can spill, or thread, it into a different object or into a copy of the same object.
To thread a type object to another object
Method 1 (by clicking)
1. With the Selection tool ![]() (V), select the original type object.
(V), select the original type object.
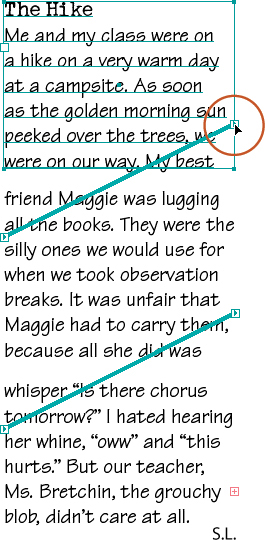
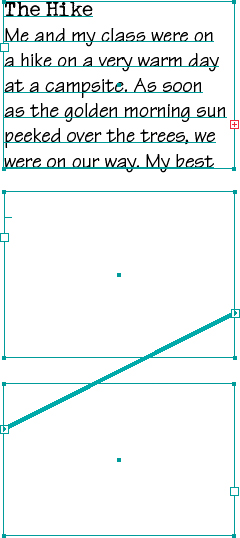
2. Click the Out port ![]() on the selected object. The pointer becomes a Loaded Text pointer.
on the selected object. The pointer becomes a Loaded Text pointer.![]() A
A
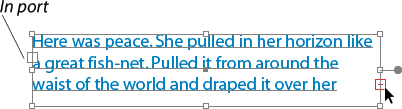
A To thread text, click the Out port with the Selection tool first...
3. Do either of the following:
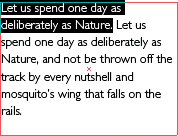
To create a new object to contain the overflow type, either click where you want a duplicate of the currently selected object to appear, or drag to create a rectangular type object.B–C
B ...then with the Loaded Text pointer, drag (or click) elsewhere on the artboard.
C The overflow type spills from the first object into the second one, in the direction indicated by the thread arrowheads.
Position the pointer over the edge of a second object (the pointer changes to ![]() ), then click that object’s path. A fill and stroke of None will be applied to the path.
), then click that object’s path. A fill and stroke of None will be applied to the path.
4. Overflow type flows from the first object into the second one. Cmd-click/Ctrl-click to deselect the objects.
![]() If you double-click an Out port with the Selection tool, the first object will be threaded to a linked copy of that object.
If you double-click an Out port with the Selection tool, the first object will be threaded to a linked copy of that object.
Method 2 (using a command)
1. Via the Selection tool ![]() or the Layers panel, select the original type object and a second object.
or the Layers panel, select the original type object and a second object.
2. Choose Type > Threaded Text > Create.
![]() If you edit threaded type in Illustrator CC, it will update more quickly than in previous versions.
If you edit threaded type in Illustrator CC, it will update more quickly than in previous versions.![]()
Are you curious to see what’s threaded to what? Display the text threads (the nonprinting lines that reveal the links between text objects).
To reveal the text threads
Select a linked type object via a selection tool or the Layers panel. If the thread lines aren’t visible, choose View > Show Text Threads or press Cmd-Shift-Y/Ctrl-Shift-Y.
![]() The stacking order of type objects on the Layers panel has no effect on the direction in which text flows between objects.
The stacking order of type objects on the Layers panel has no effect on the direction in which text flows between objects.
When you unthread two objects, the chain is broken and the overflow text gets sucked back into the first object of the two. The path objects are preserved.
To unthread two type objects
1. Choose the Selection tool ![]() (V), then click a threaded type object.
(V), then click a threaded type object.
2. Do either of the following:
Double-click the object’s In port or Out port.A–B
A When the Out port is double-clicked...
B ...that type object becomes unthreaded.
Click an In port or Out port, move the pointer slightly if you want to verify that it has become an unthreading cursor,![]() then click the same port a second time to cut the thread.
then click the same port a second time to cut the thread.
Follow these steps if you want to keep the remaining links intact as you release just one object from a series of threaded objects. The type will reflow into the remaining objects.
To release an object from a thread while preserving the remaining threads
1. Choose the Selection tool ![]() (V), then click the type object to be released.C
(V), then click the type object to be released.C
C Here the middle type object is selected...
2. Do either of the following:
To unthread the object while preserving it, choose Type > Threaded Text > Release Selection.D

D ...and then released from the thread via the Type > Threaded Text > Release Selection command.
To unthread the type object by deleting it, press Delete/Backspace. (Too simple, right?)
![]() To disconnect all the objects in a text thread while keeping the type in its present objects, click one of the objects with the Selection tool, then choose Type > Threaded Text > Remove Threading. The threads disappear, but the type stays where it is.
To disconnect all the objects in a text thread while keeping the type in its present objects, click one of the objects with the Selection tool, then choose Type > Threaded Text > Remove Threading. The threads disappear, but the type stays where it is.
Converting point type to area type, and vice versa
You’re not stuck with point type remaining as point type or area type remaining as area type — you can convert one to the other. The conversion works for both horizontal and vertical type. (Path type can’t be converted to point or area type.)
Note: For the tasks on this page and the next page, make sure the Bounding Box feature is on (View > Show Bounding Box or Cmd-Shift-B/Ctrl-Shift-B).
If you convert point type to area type, the text will wrap within the contour of a new rectangle instead of remaining on separate, noncontinuous lines.
To convert point type to area type 
1. With the Selection tool ![]() (V), select a point type object.
(V), select a point type object.
2. Do either of the following:
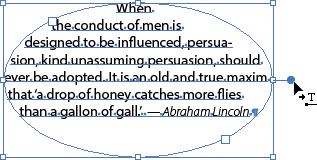
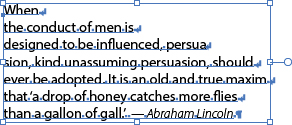
Double-click the annotator at the right end of the type object.A–B
A The pointer is positioned over the annotator on a point type object. Note that the annotator is hollow.

B When we double-clicked the annotator, it became filled and the object was converted to area type. We reshaped the type object, and the type conformed to the new contour (we deleted some unwanted paragraph returns).
Choose Type > Convert to Area Type.
3. Optional: Reshape the object by dragging a handle on its bounding box. To delete any unwanted paragraph returns, click at the left edge of a line of type, then press Backspace/Delete. (If you want to view the return characters, choose Type > Show Hidden Characters.)
To convert multiple point type objects to one area type object
1. Do either of the following:
To select all the point type objects in your document, choose Select > Object > Point Type Objects.
To select two or more point type objects, either use the Layers panel or Shift-click or drag across them with the Selection tool ![]() (V).
(V).
2. Double-click the annotator at the right end of the type objects.C–D Keep the resulting area type objects selected.

C We selected three point type objects, then positioned the pointer over the annotator.

D We double-clicked the annotator to convert all the selected objects to area type objects.
3. Choose Type > Threaded Text > Create (A, next page).
A We threaded the three objects together.
4. Click the artboard to deselect. With the Selection tool, Shift-click to select all the objects except the last one, then press Backspace/Delete.
5. To reveal all the type, click the remaining object, then enlarge it by dragging a handle on the bounding box (B, next page).
B We deleted the first two objects, then enlarged the last object.
To select all the area type objects in your document, choose Select > Object > Area Type Objects.
Select one or more area type objects via the Layers panel or the Selection tool ![]() (V).
(V).
Note: If you convert a nonrectangular area type object to point type, the type will be preserved but the object will be deleted. If you want to preserve the original object, duplicate it now.
2. Make sure all the text that you want to display in the area type object is now visible, because all overflow text will be deleted during the conversion. If you need to reveal more text, drag a handle on the object.
3. Do either of the following:
Double-click the annotator at the right end of the type object.C
C The pointer is positioned over the annotator on an area type object.
Choose Type > Convert to Point Type.
Note: If the original object contained overflow text, an alert will appear, warning you that the overset (hidden) text will be deleted during the conversion. If want to let Illustrator delete the overflow text, click Yes; or if you want to preserve all the text, click No, then repeat step 2, making sure to reveal all the type in the object.
4. Optional: If you turn on Type > Show Hidden Characters, you will see that Illustrator inserted a soft return after every line of the new point type.D
D We double-clicked the annotator; the object converted to point type. Illustrator inserted a soft return after each line (we turned on Type > Show Hidden Characters).
![]() If you convert a threaded area type object to a point type object, that object will be unthreaded from the other objects.
If you convert a threaded area type object to a point type object, that object will be unthreaded from the other objects.
Rotating type
To rotate type characters at a custom angle
1. Select a type object with the Selection tool or via the Layers panel, or select one or more type characters with a type tool.
2. Show the Character panel ![]() (Cmd-T/Ctrl-T). If the full options aren’t showing, click the double arrowheads
(Cmd-T/Ctrl-T). If the full options aren’t showing, click the double arrowheads ![]() on the panel tab.
on the panel tab.
3. Choose or enter a positive or negative Character Rotation value. ![]() A
A

A We rotated the orange letter by 15°.
![]() After rotating type, you may need to adjust the spacing between the characters (see page 272).
After rotating type, you may need to adjust the spacing between the characters (see page 272).
To make a whole horizontal type block vertical, or vice versa
1. Select a type object with the Selection tool or via the Layers panel.
2. Choose Type > Type Orientation > Horizontal or Vertical.
![]() To rotate vertical area type characters, select just the characters to be rotated. From the Character panel menu, choose Standard Vertical Roman Alignment (to uncheck it).
To rotate vertical area type characters, select just the characters to be rotated. From the Character panel menu, choose Standard Vertical Roman Alignment (to uncheck it).
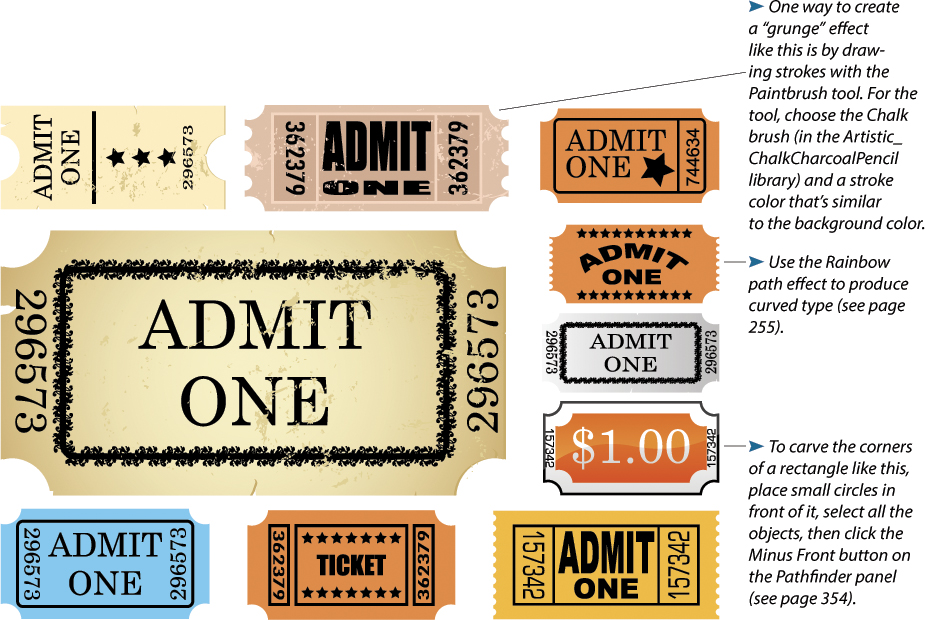
Transforming Type
To rotate type, as in the numbers on the tickets below, use one of the rotation tricks you learned in Chapter 11 (e.g., manipulate the object’s bounding box or use the Free Transform tool).
Exercise: Putting type on a circle
Create the type
1. Deselect all, click Document Setup on the Control panel, choose Units: Inches, then click OK.
2. Using the Control panel, choose a fill color of None and a dark green as the stroke color.
3. Choose the Ellipse tool ![]() (L), then click on an artboard to open the Ellipse dialog.
(L), then click on an artboard to open the Ellipse dialog.
4. Click the Constrain Width and Height Proportions button, enter “3” in the Width field, then click OK.A
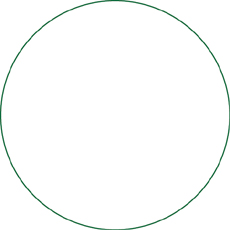
A Create a circle.
5. Double-click the Scale tool. ![]() Enter “68” in the Scale: Uniform field, then click Copy. Cmd-click/Ctrl-click to deselect.
Enter “68” in the Scale: Uniform field, then click Copy. Cmd-click/Ctrl-click to deselect.
6. Choose the Type on a Path tool.![]()
7. On the Control panel, click Character to open a temporary Character panel. Enter “28” in the Font Size field and choose the Stencil font from the Font menu. (Note: If you need to use the Stencil Std Bold font instead of the Stencil font, choose a Font Size of 25 pt.)
8. Click the top of the inner circle, then type the desired text (to copy our example, type “RECYCLED 100%”; press the Spacebar; to type an en dash in the Mac OS, press Option- – (hyphen), or in Windows, hold down Alt and enter 0150 on the number pad; then press the Spacebar again. Finally, enter the same type and dash again without the last space).B Don’t deselect.

B Create a smaller copy of the circle using the Scale dialog, then add path type along the edge of the circle (the circle now has a stroke of None).
9. Click the Selection tool. ![]() Drag the center bracket (look for it near the bottom of the circle) along the outside of the small circle to reposition the type, so the dashes are positioned at the top and bottom of the circle.C
Drag the center bracket (look for it near the bottom of the circle) along the outside of the small circle to reposition the type, so the dashes are positioned at the top and bottom of the circle.C
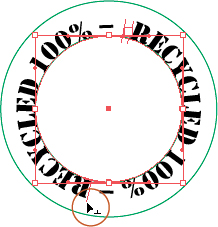
C Drag the center bracket of the path type to position the dashes at the top and bottom of the circle.
Note that the left and right brackets are practically on top of each other near the starting point of the type. To avoid causing a text overflow, don’t move the left bracket over the right one.
Refine the type
1. Choose the Direct Selection tool. ![]() Click the path for the larger circle. On the Appearance panel, click the Stroke listing, then click the up arrow to set the stroke weight to 3 pt.
Click the path for the larger circle. On the Appearance panel, click the Stroke listing, then click the up arrow to set the stroke weight to 3 pt.
2. Click the path of the smaller circle. On the Appearance panel, click the Stroke listing, then click the Stroke color square. On the temporary Swatches panel that opens, choose the same dark green as on the large circle. Click the up arrow to set the stroke weight to 3 pt.A

A Apply the same green color and stroke weight to the smaller circle.
3. Choose the Selection tool and click the type. Display the Character panel. ![]() Increase the Baseline Shift value to center the type in the space between the circles (we used a value of 8 pt).
Increase the Baseline Shift value to center the type in the space between the circles (we used a value of 8 pt).
4. If necessary, increase the Tracking value to space the type and the two dashes evenly (see page 272),B then repeat step 9 from the preceding page to reposition the type on the circle.

B Use the Baseline Shift and Tracking controls to adjust the type, and apply the same green color to it.
5. Via the Control panel, apply the same dark green to the type. (Keep the stroke color as None.)
6. Optional: To add the trees shown in figure C, do as follows:

C For the inner graphic, we dragged the Trees 1 symbol from the Nature library panel into the small circle, then scaled it to fit.
On the Layers panel, ![]() click the New Layer button to create a new layer.
click the New Layer button to create a new layer.
Display the Symbols panel. ![]() From the Symbol Libraries menu at the bottom of the panel, choose Nature. From the library panel, drag the Trees 1 symbol into the center of the two circles.
From the Symbol Libraries menu at the bottom of the panel, choose Nature. From the library panel, drag the Trees 1 symbol into the center of the two circles.
To scale the symbol to fit within the small circle, with the Selection tool, Shift-drag a corner handle of the bounding box for the symbol (if you don’t see the bounding box, which has hollow handles, choose View > Show Bounding Box).
7. Choose the Selection tool, marquee the two circles and the symbol instance, then choose Object > Group (Cmd-G/Ctrl-G).
8. Cmd-click/Ctrl-click to deselect, then choose Reset Panel from the Character panel menu to restore the default settings to the panel.