
17. Image Trace
In This Chapter
Tracing a raster image using a preset
Applying custom tracing settings
Expanding a tracing into paths
Using the new Image Trace panel, you can easily convert any digital or scanned photo to editable vector art. The results can range from a close simulation of the shapes and colors in the photo to black-and-white shapes or line work. The tracing features do an impressive job, and produce more accurate, cleaner paths and more accurate color than in previous versions of Illustrator. You may still need to do some cleanup or editing work on the resulting vector shapes afterward, but less so than before.
You can use a built-in preset (a set of presaved settings) from the Image Trace panel as a starting point for a tracing and/or choose from a wide array of options. And because traced objects are live, you can also use the panel to refine the results. Among the numerous settings that you can specify are the number of colors used, a color palette, and the precision with which the image is traced.
In this chapter, you will learn how to apply preset and custom tracing settings, as well as create custom tracing presets. After tracing an image, you will use the Expand command to convert the results to editable paths.
Tracing a raster image using a preset
In these steps, you’ll trace a raster image using a tracing preset and a few basic controls. Because the results of a tracing are live, you can alter settings on the panel to modify the tracing at any time — even after you close and reopen your document. When you’re satisfied with the tracing results, the final step is to convert the tracing to vector paths (see pages 235–236).
To trace a raster image using a tracing preset
1. With an Illustrator document open, use File > Place (with the Link option unchecked) to place a raster image (A, next page). It can be a Photoshop EPS, TIFF, JPEG, or PSD image file, or scanned artwork. Note: To learn how to use the Place command, see page 303.
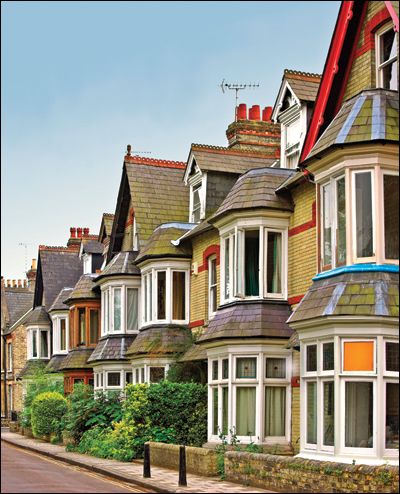
A A raster image was placed into an Illustrator document.
Note: If the Photoshop Import Options dialog opens, click Flatten Layers to a Single Image to import the image as just one flattened layer.
![]() For faster tracing, use an image that has a resolution of 150 ppi or less.
For faster tracing, use an image that has a resolution of 150 ppi or less.
2. Select the image to be traced via the Selection tool ![]() or the Layers panel.
or the Layers panel.
3. Choose the Tracing workspace or open the Image Trace panel.![]()
4. When you do either of the following, the Preview box is checked automatically:
Click one of the six preset buttons at the top of the panel.
Choose a preset from the Preset menu.B–C
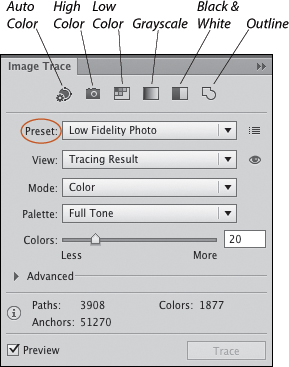
B We chose the Low Fidelity Photo preset from the Preset menu on the Image Trace panel.
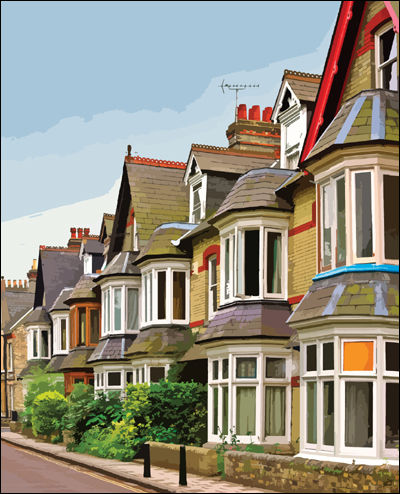
C This is the result.
Note: An alert dialog may appear, informing you that the tracing may proceed slowly. If you want to make it run faster, click Cancel, then reduce the resolution of the image in Photoshop or via Object > Rasterize in Illustrator. Click OK in the alert.
5. A progress bar appears onscreen while Illustrator traces the image, then an “Image Tracing” listing for the traced object appears on the Layers panel.
From the View menu, choose an option to view the tracing result, the tracing result with outlines, the source image, or a combination thereof (A–B, next page).
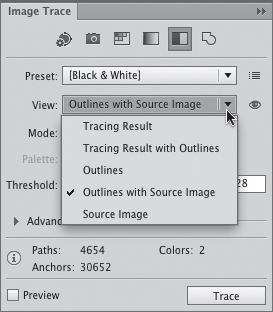
A Choose a view option for the tracing from the View menu.
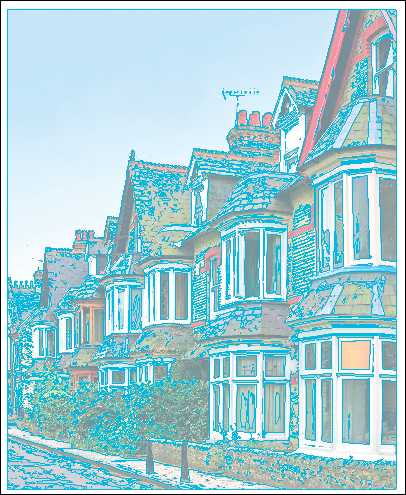
B This is Outlines with Source Image view.
6. Optional: To change the preset, repeat step 4 (C–D, next page).
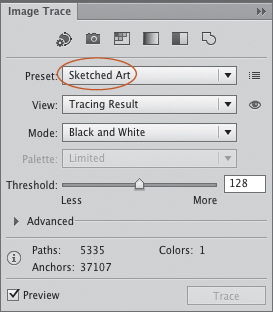
C We changed the preset to Sketched Art.
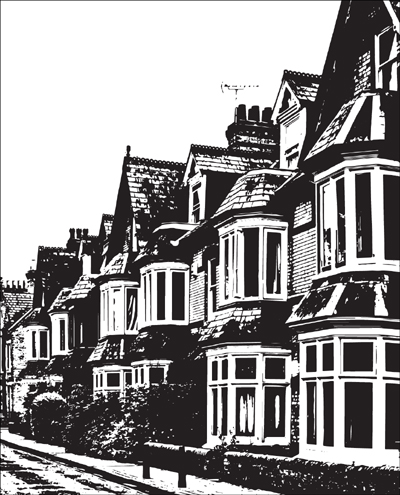
D This is the result.
Tracing Options on the Control Panel
You can also produce a tracing via the Control panel. Select a raster image, then click Image Trace or choose a preset from the Tracing Presets menu.![]()
Applying custom tracing settings
Here you will learn how to modify a tracing using custom options on the Image Trace panel, beginning with the options for controlling colors.
To produce a custom tracing
1. Open a raster image for tracing (see step 1 on page 227).A
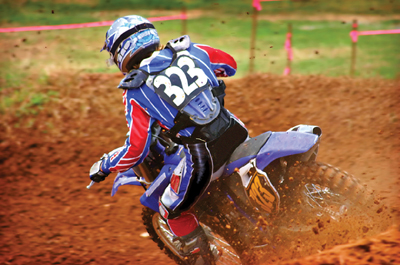
A We were curious to see how Illustrator would interpret the bright colors of the cyclist’s clothing in this photo, relative to the earthy colors of the dirt and grass.
2. Via the Selection tool ![]() or the Layers panel, select an image object to be traced or an existing tracing.
or the Layers panel, select an image object to be traced or an existing tracing.
3. Choose the Tracing workspace or open the Image Trace panel ![]() . On the panel, uncheck Preview.
. On the panel, uncheck Preview.
Choose color settings
1. To control the color of the tracing, from the Mode menu on the Image Trace panel, choose Color, Grayscale, or Black and White.
2. If you chose Color in the preceding step, do one of the following:
Choose Automatic or Full Tone from the Palette menu to generate tracing colors from colors in the photo. Use the Colors slider or enter a percentage to control the fidelity of the colors — whether they closely (More) or loosely (Less) match the colors in the image (A–B, next page).
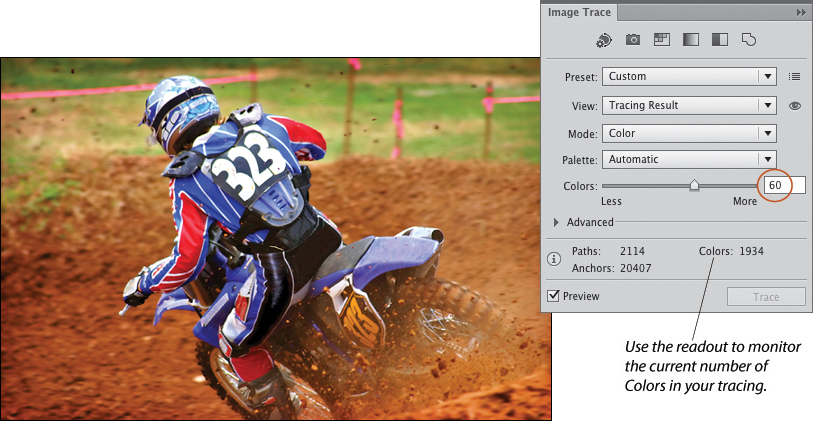
A To have the colors in the tracing closely match those in the photo, we set the Mode menu to Color and the Palette menu to Automatic. Even at a moderate Colors setting of 60, the tracing contains 1,934 colors, enough for a lot of details from the photo to be translated into vector artwork.
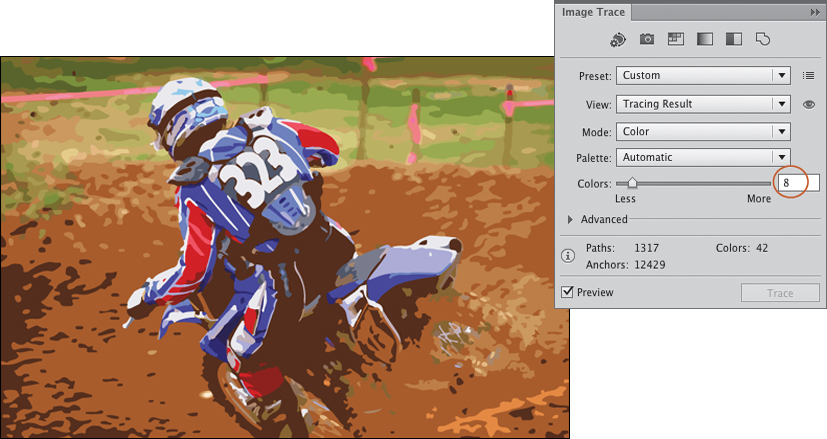
B Next, we lowered the Colors value to 8. Although this reduced the number of colors in the tracing significantly, the Palette setting of Automatic preserved the distinct reds and blues in the cyclist’s clothing. This version has broader blocks of color and fewer small details than figure A (which had a higher Colors setting).
Choose Limited from the Palette menu to use a very reduced palette of image colors. Use the Colors slider to set the exact number of colors to appear in the tracing (A, page 232).
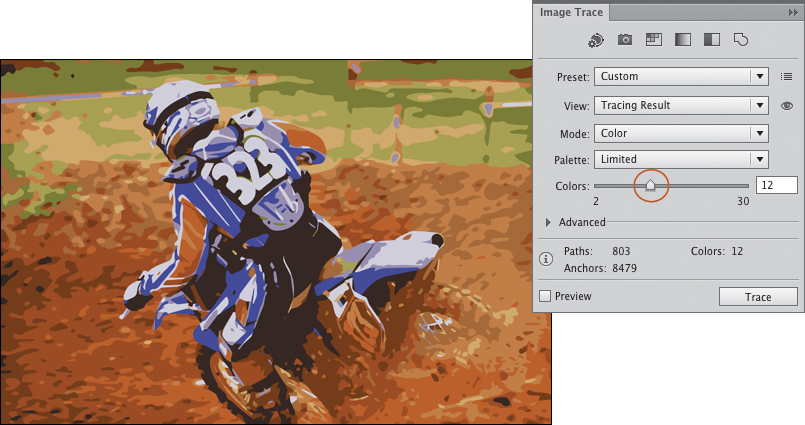
A For another variation, we tried limiting the colors further by choosing the Palette option of Limited and a Colors value of 12. Although this produced an adequate amount of detail in the dirt track, it eliminated the bright reds and blues in the cyclist’s clothing, which are the focal point of the artwork. For this image, these were the least successful settings.
To control specifically which colors are used for the tracing, create one or more color groups on the Swatches panel, then choose Document Library from the Palette menu on the Image Trace panel. If you want to further limit the colors to one color group, click to open the Colors menu, then click a color group (B, page 232).
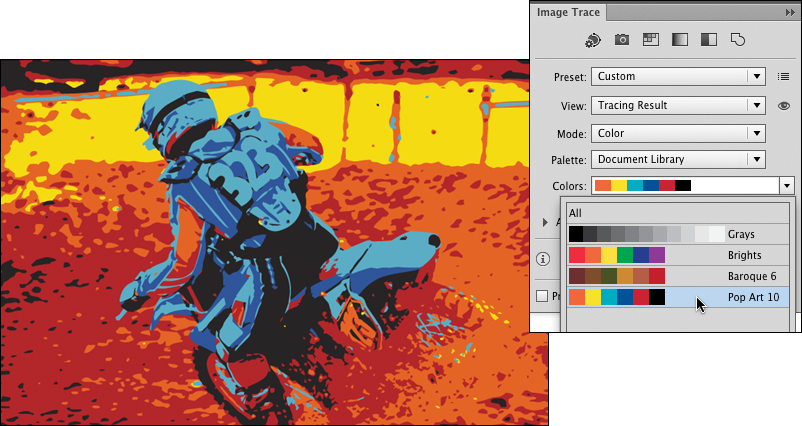
B To experiment with a very different color palette, we added a color group from the Art History > Pop Art swatch library to our Swatches panel. On the Image Trace panel, we chose Document Library from the Palette menu, then clicked the Pop Art 10 color group on the Colors menu. The dominant color areas in the photo were redefined using just the six colors in the color group.
To have Illustrator use colors in a swatch library for the tracing, open a library via the Swatch Libraries menu ![]() on the Swatches panel, then choose the library name from the Palette menu on the Image Trace panel.
on the Swatches panel, then choose the library name from the Palette menu on the Image Trace panel.
3. To view your settings in the tracing, click Trace or check Preview. When the updating is finished, uncheck Preview.
4. If you chose the Mode setting of Grayscale, set the Grays value to control how closely each color in the image is matched to one of 256 levels of gray.
If you chose the Mode setting of Black and White, set the Threshold value (the default value is 128). All pixels darker than this value will be converted to black, and all pixels lighter than this value will be converted to white.
Control the amount of detail
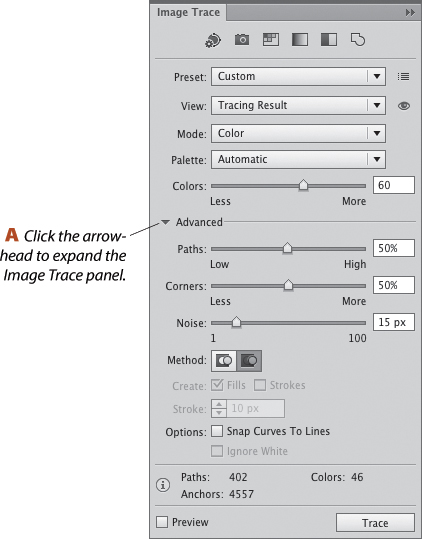
1. If the Advanced options aren’t showing on the Image Trace panel, click the arrowhead.A
2. To control how closely the traced paths follow the edges of shapes in the image, do the following:
Set the Paths percentage to control how closely the tracing translates image details into paths. The lower the Paths value, the fewer paths are generated, and the less precise the detail.
Set the Corners percentage to control the extent to which Illustrator uses corners (More) to define areas in the image versus curves (Less). The higher the Corners value, the more closely the resulting paths will fit details in the image.
Set the Noise value (pixel size) to control the threshold above which small details in the image are traced. The lower the Noise value, the greater the number of resulting paths.
Click the Method: Abutting button ![]() to generate adjacent shapes that don’t overlap, or click the Overlapping button
to generate adjacent shapes that don’t overlap, or click the Overlapping button ![]() to allow smaller shapes to overlap and be stacked above larger shapes (smaller shapes won’t knock out any larger ones below them).
to allow smaller shapes to overlap and be stacked above larger shapes (smaller shapes won’t knock out any larger ones below them).
3. To judge your settings thus far, click Trace or Preview to generate a tracing, then uncheck Preview when the updating process is complete.
4. If the Mode setting is Black and White, you can check Create: Fills to produce filled paths and/or Strokes to produce stroked paths. If you check Strokes, also specify the maximum Stroke width (in pixels) an image area must have to become a stroke; areas wider than this value will become a fill. Also, if you want Illustrator to apply a fill of None to any white areas in the tracing, check Ignore White; those areas will become transparent.
5. Optional: Check Snap Curves to Lines to have Illustrator create straight edges from slightly curved lines. (Uncheck this option if small white gaps appear in your tracing.)
6. Check Preview again, and make any needed adjustments to the settings (A–B, next page).
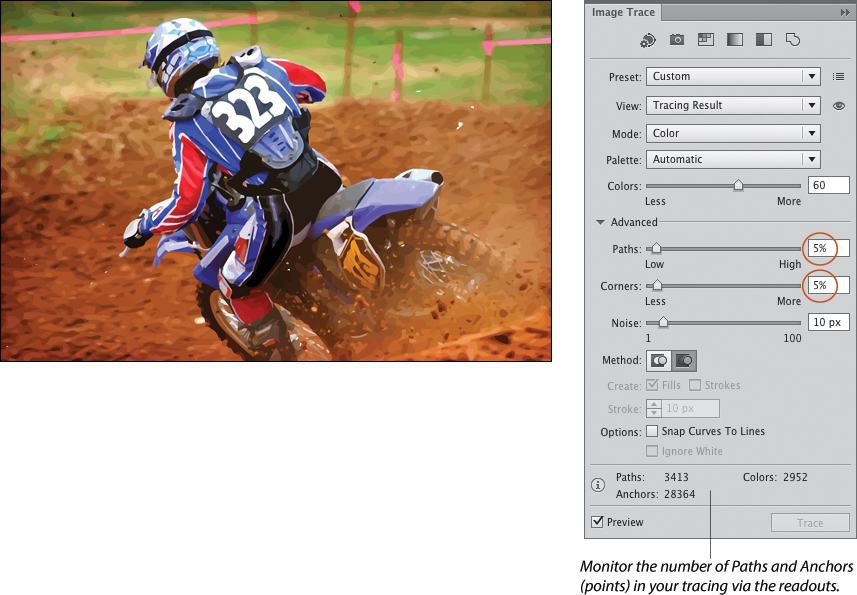
A We reset the Palette menu to Automatic and the Colors value to 60. In the Advanced area, we lowered both the Paths and Corners values to 5%. Even at these reduced settings, the tracing contains plenty of detail. (Compare with figure A on page 231, for which both the Paths and Corners options were set to the default value of 50%.)
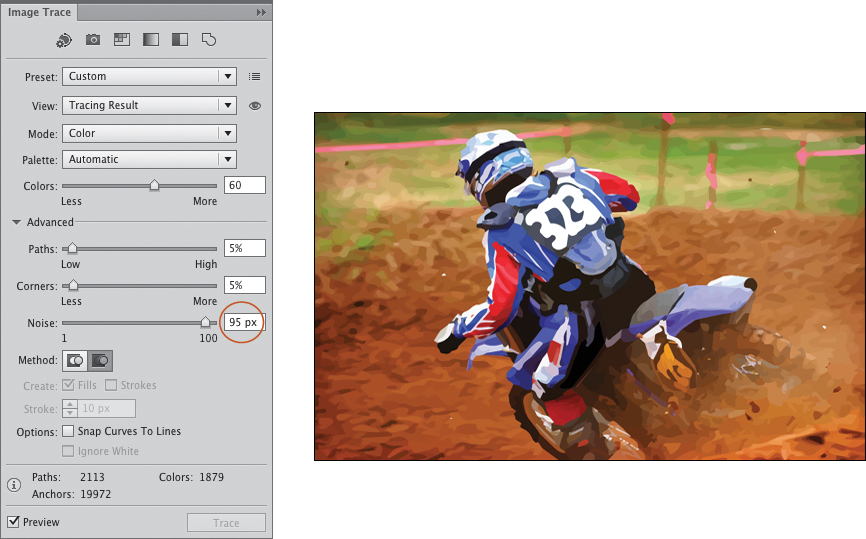
B Finally, we raised the Noise value to 95 px to eliminate minor extraneous details. We like this tracing version the best because of its loose, hand-painted look (it contains the fewest number of paths, anchor points, and colors, but we don’t consider that to be a drawback).
The Method Options
![]() If you choose Method: Abutting, expand the tracing (see page 235), then move or delete a shape, the result will be a knockout (blank white) area.
If you choose Method: Abutting, expand the tracing (see page 235), then move or delete a shape, the result will be a knockout (blank white) area.
![]() If you choose the Method: Overlapping option, shapes may be stacked on top of one another, depending on the location of shapes that Illustrator detects in the original image. Smaller shapes (generated from small color areas in the image) will be stacked on top of larger shapes (generated from large color areas). If you expand the tracing results, then move or delete one of the smaller shapes, you’ll reveal more of the underlying path. If a smaller path is completely within the boundary of a larger path, no knockout will be produced.
If you choose the Method: Overlapping option, shapes may be stacked on top of one another, depending on the location of shapes that Illustrator detects in the original image. Smaller shapes (generated from small color areas in the image) will be stacked on top of larger shapes (generated from large color areas). If you expand the tracing results, then move or delete one of the smaller shapes, you’ll reveal more of the underlying path. If a smaller path is completely within the boundary of a larger path, no knockout will be produced.
7. Optional: To save your Image Trace settings as a preset, so you can apply them easily to any image, from the Manage Presets menu, ![]() choose Save as New Preset. In the Save Image Trace Preset dialog, type a name for the preset, then click OK. Saved presets are available on the Preset menu on the Image Trace and Control panels.
choose Save as New Preset. In the Save Image Trace Preset dialog, type a name for the preset, then click OK. Saved presets are available on the Preset menu on the Image Trace and Control panels.
![]() Press and hold the visibility icon
Press and hold the visibility icon ![]() on the Image Trace panel to display just the source image temporarily and hide the tracing.
on the Image Trace panel to display just the source image temporarily and hide the tracing.
Expanding a tracing into paths
The Expand command converts a tracing to standard paths, which can then be selected and recolored, reshaped, or transformed like any other paths in Illustrator. Be aware, however, that once a tracing object is expanded, you can no longer change its settings via the Image Trace panel.
To expand and edit the tracing results
1. Trace a placed image in your document (see pages 227–234).
2. Via the Layers panel, duplicate the Image Tracing object to preserve its live features, and keep the duplicate object selected.
3. On the Control panel, click Expand. When the command is done, a group of paths appears on the Layers panel.
4. Deselect. To locate individual paths, turn on View > Smart Guides (with the Object Highlighting option checked in Illustrator/Edit > Preferences > Smart Guides) and pass the Selection tool over areas in the artwork.
5. Click the group, then press Cmd-Shift-G/Ctrl-Shift-G twice to ungroup it.
6. You can edit the objects any way you like. Here are some suggestions:
Select or isolate, then recolor or reshape any of the objects.A
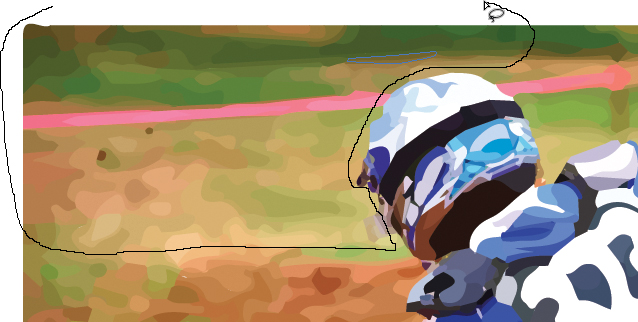
A After expanding the Image Tracing object, we ungrouped the resulting paths, then deselected them. With the Lasso tool, we selected some of the objects in the upper left area of the artwork.
To simplify color areas, unite multiple selected paths via the Unite button on the Pathfinder panel (under Shape Modes); see page 354.B (See also A–C, next page.)
B We clicked the Unite button (Pathfinder panel) to unite the selected objects, then applied a fill color.
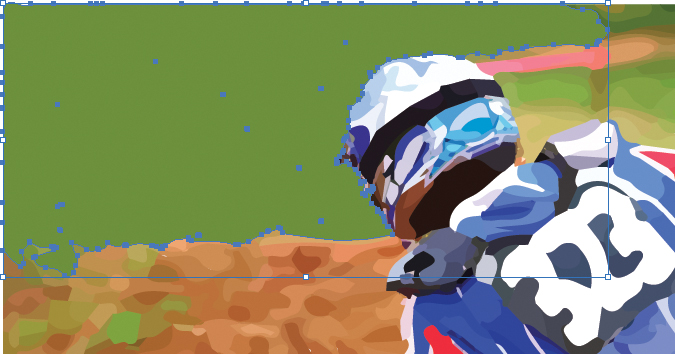
A We used the Lasso tool and the Unite command to select and combine the expanded objects on the right side of the background, then united the two large objects into one.

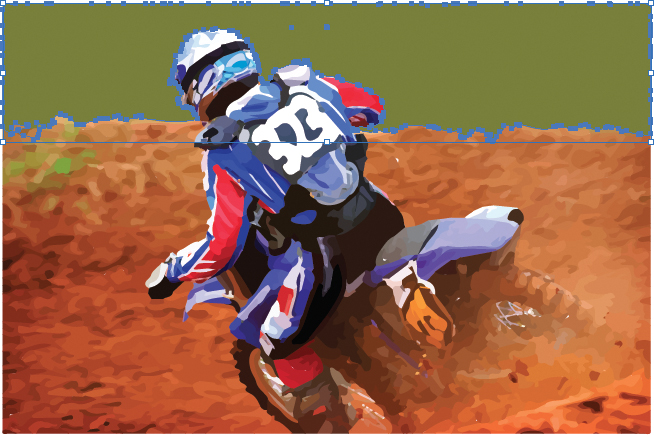
B Finally, we applied a gradient to the unified background object. Compare this expanded tracing with the original photo, below.

C This is the original photo.
To delete extraneous paths, select them with the Selection tool, then press Delete/Backspace; or multiple-select their listings on the Layers panel, then click the Delete Selection button. ![]() Be patient; this can be painstaking work.
Be patient; this can be painstaking work.
![]() To create a color group from the expanded results, select either the whole group or some objects, then click the New Color Group button
To create a color group from the expanded results, select either the whole group or some objects, then click the New Color Group button ![]() on the Swatches panel. In the New Color Group dialog, enter a name, click Selected Artwork, then click OK.
on the Swatches panel. In the New Color Group dialog, enter a name, click Selected Artwork, then click OK.