Chapter 4
Managing HyperFlex
With Cisco HyperFlex, you get simplified hyperconverged infrastructure management and a choice of tools to best fit your needs. You can manage HyperFlex through HyperFlex Connect, through hypervisor management plug-ins, or with the Cisco Intersight cloud-based platform. This chapter covers management through HyperFlex Connect.
The HX Connect user interface provides a view of the HX storage cluster status, components, and features, such as encryption and replication. HyperFlex Connect is an HTML5 web-based GUI tool that runs on all the HX nodes and is accessible via the cluster management IP address.
Logging In to HyperFlex Connect
Each login to HX Connect is a session, which is the period of activity between the time when you log in to HX Connect and when you log out.
Local Access
Predefined local accounts can log in to HyperFlex Connect. The password for the default account is set during cluster creation as the cluster password. Using local access is recommended only when vCenter or SSO credentials are not available. WithHyperFlex 3.5 and higher, the HX Connect GUI does not allow root user access; you can log in as an admin user only.
Role-Based Access Control
HyperFlex Connect provides role-based access control (RBAC) via integrated authentication with the vCenter server managing the HyperFlex cluster. Cisco HyperFlex Connect supports two types of RBAC login:
Administrator: Users with administrator rights in the managing vCenter server have read and modified rights within HyperFlex Connect. These users can make changes to the cluster settings and configuration.
Read-Only: Users with read-only rights in the managing vCenter server have read rights within HyperFlex Connect. These users cannot make changes to the cluster settings and configuration.
Users can log in to HyperFlex Connect by using vCenter credentials, such as administrator@ vsphere.local, or by using vCenter single sign-on (SSO) credentials, such as domainuser for an Active Directory user.
Creation and management of RBAC users and rights must be done via vCenter Web Client or vCenter 6.5 HTML5 vSphere Client.
Figure 4-1 shows the Cisco HyperFlex Connect login page.
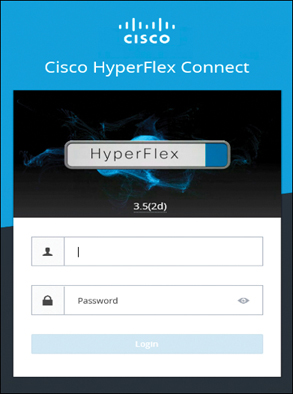
Figure 4-1 Cisco HyperFlex Connect Login Page
To manage a HyperFlex cluster using HyperFlex Connect, follow these steps:
Step 1. Enter the HX storage cluster management IP address or FQDN in a browser.
Step 2. Enter local credentials, such as admin or vCenter RBAC credentials.
Step 3. Click the eye icon to view or hide the password field text.
Step 4. To log out of HX Connect and properly close the session, select User > Logout.
After a successful login, you see a Dashboard page. You must have administrative privileges to see all the options. Also, it is important to sync the time between vCenter and the controller VMs to avoid AAA authentication failure.
Figure 4-2 shows a summary of the pages in Cisco HyperFlex Connect.
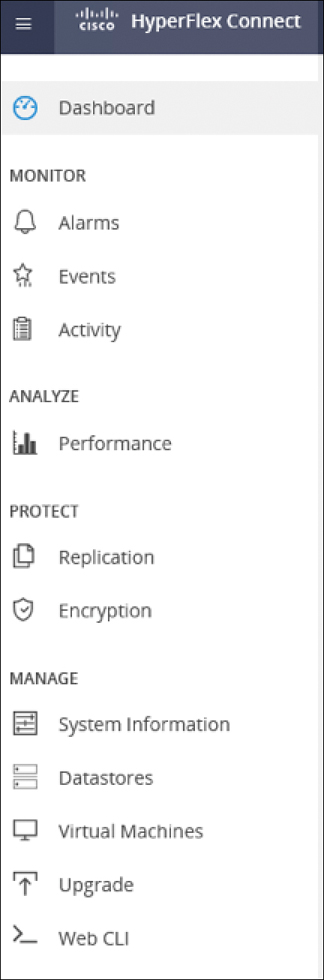
Figure 4-2 Summary of Pages in Cisco HyperFlex Connect
Key monitoring pages include information about the local HX storage cluster:
Dashboard: Overall HX storage cluster status.
Alarms, Events, Activity: See the Cisco HyperFlex Systems Troubleshooting Guide for details.
Performance: Charts for IOPS, throughput, latency, and replication network bandwidth.
System Information: System overview, plus status and tasks for nodes and disks.
Datastores: Status and tasks related to datastores.
Virtual Machines: Status and tasks related to protecting virtual machines.
Additional HX Connect pages provide management access:
Encryption: For data at rest disk and node encryption tasks.
Replication: For disaster recovery VM protection tasks.
Upgrade: Provides access to HX Data Platform and Cisco UCS Manager firmware upgrade tasks.
The following sections provide detailed information about these pages.
Dashboard Page
The Dashboard page, which is the first page that you see when you log in to Cisco HyperFlex Connect, shows a status summary of the HX storage cluster. Figure 4-3 shows the Dashboard page.

Figure 4-3 Cisco Hyperflex Connect Dashboard Page
The key parts of this page to understand are as follows:
Operational status: Provides the functional status of the HX storage cluster and application performance.
Resiliency health: Provides the data health status and ability of the HX storage cluster to tolerate failures.
Capacity: Displays a breakdown of the total storage compared to how much storage is used or free, along with storage optimization, compression savings, and deduplication percentages, based on the data stored in the cluster.
Nodes: Displays the number of nodes in the HX storage cluster and the division of converged and compute nodes. Hovering over a node icon displays that node’s name, IP address, node type, and an interactive display of disks with access to capacity, usage, serial number, and disk type data.
Virtual machines: Displays the total number of virtual machines on this HX storage cluster. This does not include the virtual machines that reside on a remote HX storage cluster.
Performance: Displays an HX storage cluster performance snapshot for a configurable amount of time, showing IOPS, throughput, and latency data. For full details, see the section “Performance Page,” later in this chapter.
Settings Page
The Settings page allows users to configure support, notification, integration, and connection with Cisco Intersight. Figure 4-4 shows the available settings, and the following sections describe the various options.
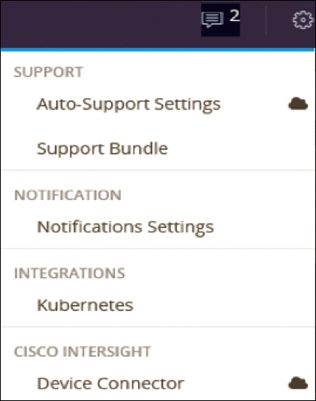
Figure 4-4 Cisco Hyperflex Connect Settings
Auto-Support Settings
Auto-Support is the alert notification service provided through HX Data Platform. If you enable Auto-Support, notifications are sent from HX Data Platform to designated email addresses or email aliases that you want to receive the notifications. Figure 4-5 shows the Auto-Support Settings page.

Figure 4-5 Cisco Hyperflex Connect Auto-Support Settings Page
The key options to understand are as follows:
Enable Auto-Support (Recommended): Allows you to enable Auto-Support if it is not enabled during initial configuration.
Send service ticket notifications to: Allows you to enter the email address to which notifications should be sent.
Enable Remote Support: Allows Cisco Technical Assistance Center (TAC) to collect information from this cluster to accelerate troubleshooting on reported anomalies.
Use Proxy Server: Allows you to provide a web proxy server URL, port, username, and password.
Figure 4-6 shows the Web Proxy Settings section of the Auto-Support Settings page.

Figure 4-6 Cisco HyperFlex Connect Web Proxy Settings
Support Bundle Settings
The Support Bundle Settings page lists the already-generated Cisco HX Data Platform support bundles and contains an option to generate a new support bundle.
A support bundle is a collection of logs from components within and used by HX Data Platform. (The VMware vCenter logs are not collected through HX Connect.) After you generate a support bundle, you can upload it to the HX Data Platform FTP server for use by Cisco TAC.
Figure 4-7 shows the Support Bundle page.

Figure 4-7 Cisco Hyperflex Connect Support Bundle Page
On this page, the Generate section enables you to create a support bundle from the logs of every controller VM and ESXi host in the HX storage cluster.
You can download an already-generated support bundle up to midnight local controller VM time. After midnight, the system deletes the support bundle. Details include the filename, size, and date the bundle was generated.
Notifications Settings
The Notification Settings page shows the settings needed to send email notifications for HX storage cluster and ESXi alarms from the Cisco HX Data Platform to Auto-Support. Figure 4-8 shows the Notifications Settings page.
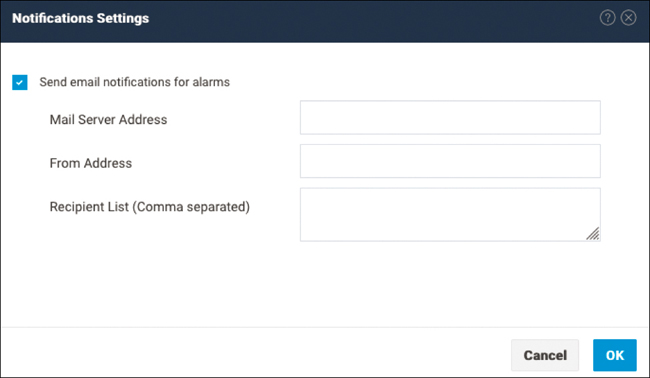
Figure 4-8 Cisco HyperFlex Connect Notifications Settings Page
To send email notifications for alarms, you need to provide the following information on this page:
Mail server address
From address (that is, an email address used to identify your HX storage cluster in support service tickets and as the sender for Auto-Support notifications)
Recipient list (comma separated)
Kubernetes
The Kubernetes page displays data about Cisco Container Platform Kubernetes clusters.
The Cisco HyperFlex Kubernetes storage integration allows HyperFlex to dynamically provide persistent storage to Kubernetes pods running on HyperFlex. The integration enables orchestration of the entire persistent volume object life cycle to be offloaded and managed by HyperFlex, while being driven (initiated) by developers and users through standard Kubernetes persistent volume claim objects.
Figure 4-9 shows the Kubernetes settings.

Figure 4-9 Cisco HyperFlex Connect Kubernetes Settings
Kubernetes storage provisioning and management has three status options:
Enabled: The HyperFlex cluster can provision and manage Kubernetes storage.
Partially Enabled: In certain circumstances, a previously enabled cluster may show the status Partially Enabled. This status typically appears when either of these options is set: Expansion of the HyperFlex cluster or Change to required ESXi networking for iSCSI.
Not Enabled: The HyperFlex cluster cannot provision Kubernetes storage.
Device Connector
Device Connector connects Cisco HyperFlex Connect to Cisco Intersight, a cloud-hosted server management system. It enables Cisco HyperFlex systems to be managed and monitored through Cisco Intersight.
Device Connector does not mandate the format of the login credentials; rather, they are passed as is to the configured HTTP proxy server. Whether the username must be qualified with a domain name depends on the configuration of the HTTP proxy server.
Figure 4-10 shows the Device Connector page.
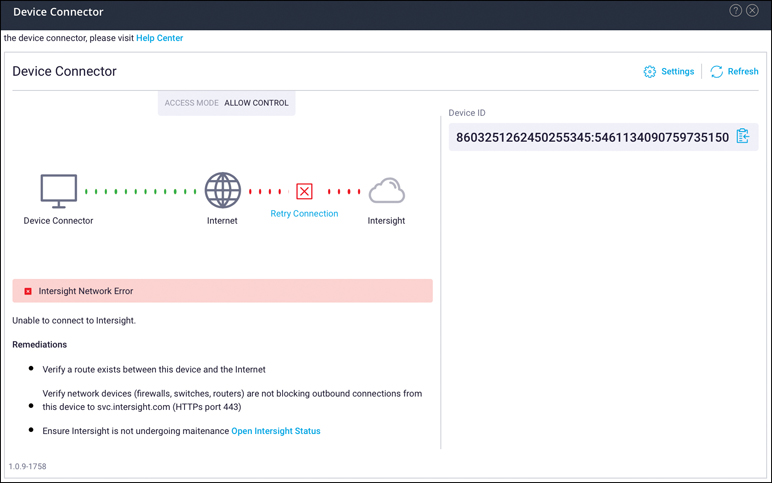
Figure 4-10 Cisco HyperFlex Connect Device Connector Settings
To register a device with Cisco Intersight in the cloud, you must connect Cisco HyperFlex Connect with Cisco Intersight by configuring the device connector proxy settings, if they are required. You can then use the device ID and claim code to validate your access to the device from Cisco Intersight and claim the device. By default, Intersight management is enabled.
By clicking the HTTPS Proxy Settings button on the Device Connector page, you reach the Settings page shown in Figure 4-11.

Figure 4-11 Cisco HyperFlex Connect Proxy Settings for Device Connector
To connect with Intersight, HyperFlex needs Internet connectivity. If your devices don’t have a direct connection, you might need to provide proxy details.
In the Settings page shown in Figure 4-11, you enter HTTPS proxy details manually:
Off: Select this option if you want to disable the HTTPS proxy settings configuration. This is the default HTTPS proxy setting.
Manual: Select this option if you want to enable the HTTPS proxy settings configuration.
Proxy Hostname/IP: Enter the proxy hostname or IP address.
Proxy Port: Enter the proxy port number.
Authentication: Enable this option to authenticate access to the proxy server. Enter the username and password to authenticate access.
Alarms Page
The Alarms page displays a list of HX storage cluster and ESXi alarms raised by HyperFlex Data Platform. You can acknowledge an alarm and reset it to green.
Figure 4-12 shows the Alarms page, which includes the following information:
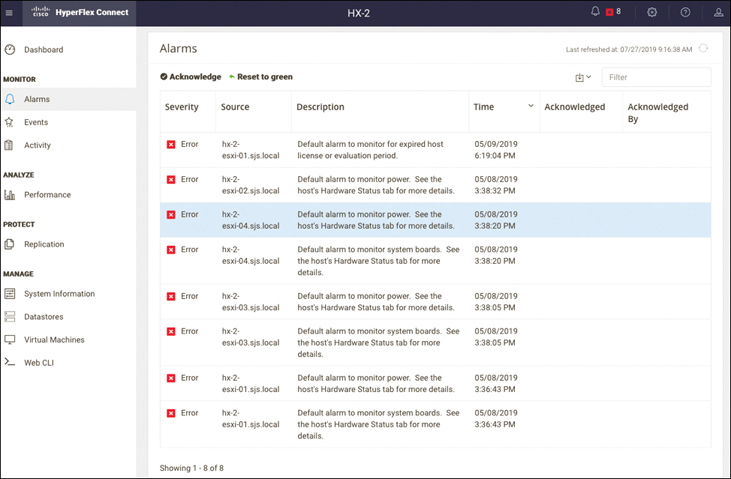
Figure 4-12 Cisco HyperFlex Connect Alarms
Severity: The options in this column are Warning, Error, Information, and Critical.
Source: The component where the alarm is triggered.
Description: Details about the alarm.
Time: The time when the alarm was triggered.
Acknowledged: The time when the alarm was acknowledged.
Acknowledged By: The username of the person who acknowledged the alarm.
When you select an alarm from the Alarms page, the following at the top of the list are enabled:
Acknowledge: If you want to take ownership of an issue and work on it, you can select the appropriate alarm and click Acknowledge. Alarms are neither cleared nor reset when acknowledged.
Reset to green: An alarm triggered by an event might not reset to a normal state if vCenter Server does not retrieve the event that identifies the normal condition. In such a case, you can click on Reset to green to manually return it to a normal state.
Events Page
The Events page displays information about state changes, such as user actions and system actions, that occur on the HX storage cluster, hosts, or datastores. Examples of state changes include adding a node to the HX storage cluster, removing a node from the HX storage cluster, and reconfiguring a VM resource.
Note
You can export only one page, or 100 events, at a time. Click Newer or Older to display more events and then export again.
Figure 4-13 shows the events and the actions you can take on this page:
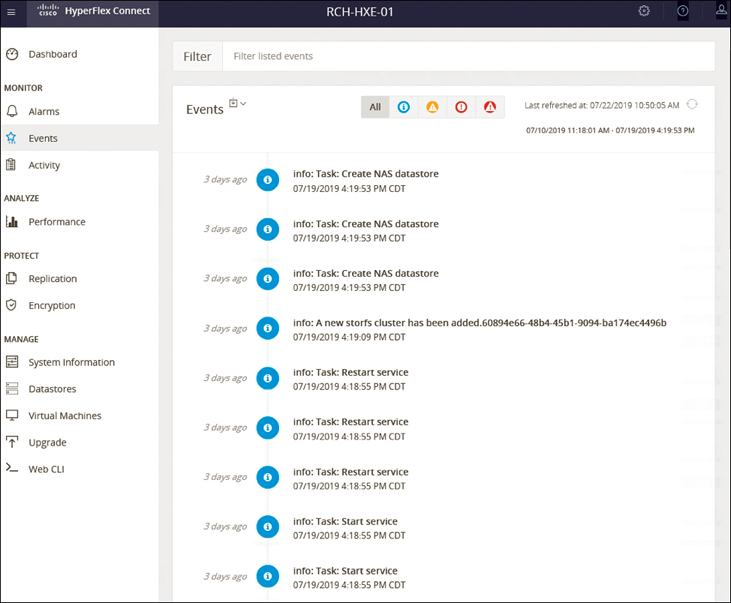
Figure 4-13 Cisco HyperFlex Connect Events
Events: Provides the type, description, timestamp when the event occurred, name of the target, user of the resource for the event, link to vSphere storage cluster events, and event details. The following target and event types are possible:
Target types: Storage Cluster, Host, Datastore, Disk
Event types: Warning, Error, Information, Critical
Download: Downloads the events report in the format you select: csv or doc.
Filter: Allows you to filter the displayed events. Available filters include the following:
All: Shows all events
Info: Shows events with the severity Info
Warning: Shows events with the severity Warning
Error: Shows events with the severity Error
Critical: Shows events with the severity Critical
Activity Page
The Activity page displays a list of recent activities on the HX storage cluster, gathered from vSphere. You can monitor the progress of recent tasks on the HX storage cluster (for example, ReadyClones, VM Power On/Off, and Enter/Exit Maintenance Mode).
Figure 4-14 shows the Activity page.
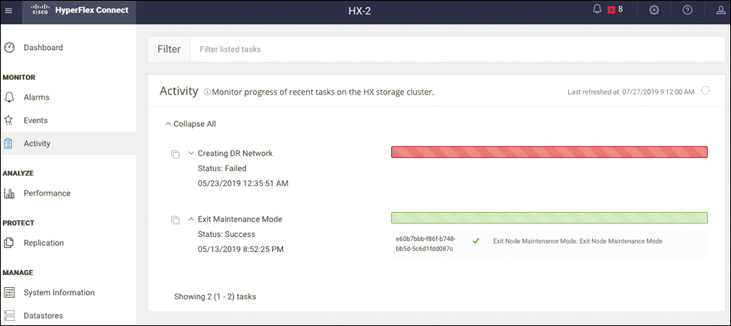
Figure 4-14 Cisco HyperFlex Connect Activity Page
The list of recent tasks on the Activity page includes the following details:
ID
Description
VM power on/off/suspend status
Task status, with possible values In Progress, Success, and Failed
For failed VM power operations, the Existing State and Required State fields are also included, with a date and timestamp and a progress bar.
Performance Page
The Monitor Performance tab of the Performance page shows the read and write performance of the storage cluster, hosts, and datastores (see Figure 4-15).
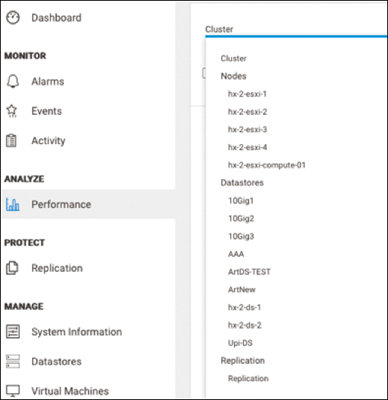
Figure 4-15 Cisco HyperFlex Connect Performance Page
You can select an object from the menu to display associated performance charts:
Cluster: Displays the combined performance of all hosts in the cluster. This is the default.
Nodes > node_name: Displays the performance of a selected node.
Datastores > datastore_name: Displays the performance of a selected datastore.
Figure 4-16 shows examples of performance charts.
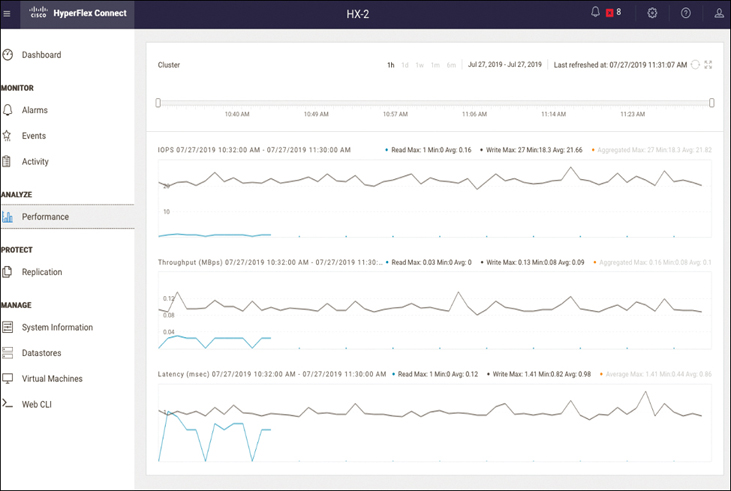
Figure 4-16 Cisco HyperFlex Connect Performance Charts
The screen in Figure 4-16 includes the following parts:
IOPS chart: The number of input and output operations per second performed at a point in time.
Throughput (MBps) chart: The rate of data transfer in the storage cluster, measured in megabytes per second (MBps).
Latency (msec) chart: How long it takes for a single I/O request to complete. This is the time between issuing a request and receiving a response, measured in milliseconds (msec).
This page displays the past one hour of performance data, plotted in 20-second intervals. You can hover your mouse over individual data points to view peak performance information and timestamps. Light blue indicates write operations, and dark blue indicates read operations.
System Information Page
The System Information page displays HX storage cluster system-related information, including node and disk data, and provides access to HX maintenance mode (see Figure 4-17).

Figure 4-17 Cisco HyperFlex Connect System Information Page
This page displays basic configuration information for a HyperFlex storage cluster:
vCenter (link): Provides a link to remotely access vSphere Web Client.
Hypervisor: Indicates the hypervisor version installed on this HX storage cluster.
HXDP Version: Indicates the installer package version installed on this HX storage cluster.
Data Replication Factor: Indicates the number of the redundant data replicas stored on this HX storage cluster. For more detail, see Chapter 6, “Disaster Recovery.”
Uptime: Shows how long this cluster has been up and online.
Total Capacity: Indicates the overall storage size of this cluster.
Available Capacity: Indicates the amount of free storage in this cluster.
DNS Server(s): Indicates the IP address(es) for the DNS server(s) for this HX storage cluster.
NTP Server(s): Indicates the IP address(es) for the NTP server(s) for this HX storage cluster.
HX storage cluster status: Provides the functional status of the HX storage cluster, which can be any of the following:
Online: Cluster is ready.
Offline: Cluster is not ready.
Read Only: Cluster is out of space.
Unknown: Transitional state while the cluster is coming online.
Controller VM Access
You can access the controller VM by using SSH as an administrator. To enable SSH access, click Actions > Enable Controller Access over SSH, as shown in Figure 4-18.

Figure 4-18 Cisco HyperFlex Connect System Information: Enabling Controller VM Access
Nodes Page
The Nodes page displays data about all the nodes in the HX storage cluster (see Figure 4-19). It shows the node name, hypervisor, and controller address, along with status, hardware model for each node, HyperFlex Data Platform installer package version, and number of disks on each node. You can sort data based on column.

Figure 4-19 Cisco HyperFlex Connect System Information: Nodes
In some cases, the HX nodes may need to go through a maintenance window. This may be the case, for example, when replacing disks or making modifications to the UCS service profiles that require reboot. The HX maintenance can be performed with no disruption to the HyperFlex workloads. The maintenance operation can be performed on a single node, on multiple nodes, or on all nodes in the cluster. When you apply changes to all nodes in the cluster, the changes are applied sequentially, through a rolling maintenance operation.
You can select a node and click on Enter HX Maintenance Mode to open the Confirm HX Maintenance Mode dialog box.
Disks Page
The Disks page displays data about all the disks in the HX storage cluster (see Figure 4-20). The seven-column table on this page allows you to sort the data by column.
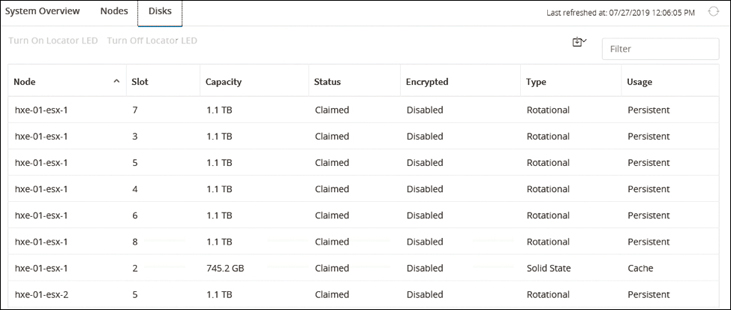
Figure 4-20 Cisco HyperFlex Connect System Information: Disks
The important information to focus on in this screen is as follows:
Node: The name of the node where the disk resides.
Slot: The location of the drive. This identifies the drive for maintenance procedures.
Capacity: The total disk size.
Status: The following status options are available:
Available: The initial state for a newly added, data-at-rest–capable disk. Also, a transitional state when disks move into one of the other states.
Blacklisted: The state when a disk is not being consumed by the cluster due to either a software error or an I/O error. This could be a transitional state while the cluster attempts to repair the disk, if the disk is still available, before the state transitions to Repairing.
Repairing: The state when a blacklisted disk is being repaired.
Claimed: The state when a disk is recognized and in use.
Ignored: The state when a disk is not being consumed by the cluster (for example, the HX controller VM system disk, a disk with other data [valid file system partitions], or a disk where I/O is failing).
Ok To Remove: The state when a self-encrypting drive (SED) has been securely erased using the Secure Erase option and can be removed safely.
To Be Removed: The state when a disk is scheduled for RMA.
Removed: The state when an SED is removed after the Secure Erase option has been used.
Encrypted status: Whether the node is encrypted. The status is enabled if encryption is configured for this data-at-rest–capable disk; otherwise, it is disabled. It may also be Unknown when the SED is removed.
Type: The type of the node, which may be Rotational if the node has a hybrid drive or Solid State for an SSD drive.
Usage: How the node is used. Options are Cache and Persistent. Hybrid nodes use solid-state drives (SSDs) for caching and hard-disk drives (HDDs) for capacity; all flash nodes use fast SSDs or Nonvolatile Memory Express (NVMe) storage for caching and SSDs for capacity.
Turn on Locator LED and Turn Off Locator LED: This option allows activation or deactivation of a beacon LED on the host to help locate the disk.
Secure erase: (Optional) This option is only for a HyperFlex storage cluster that is encrypted using local key encryption.
Datastores Page
Datastores are logical containers, like file systems, that hide specifics of physical storage and provide a uniform model for storing VM files. You can also use datastores to store ISO images and VM templates. Figure 4-21 shows the Datastores page.
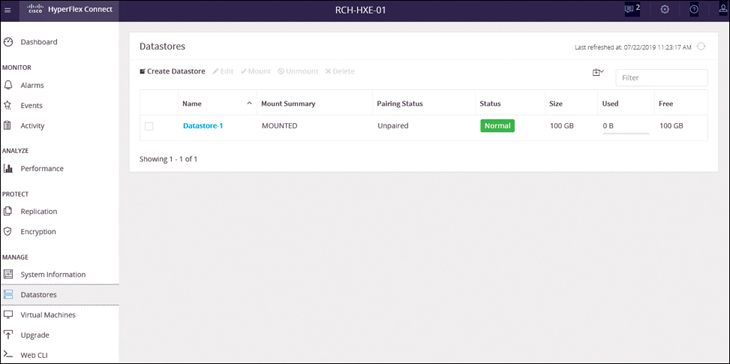
Figure 4-21 Cisco HyperFlex Connect Datastores Page
The Datastores page enables users to create, edit, delete, mount, and unmount datastores. The important information to focus on in this screen is as follows:
Name: The datastore name, which is unique for a given HX storage cluster.
Mount Summary: Basic information about the mount, which can be Mounted when the datastore is successfully mounted on all the nodes in the HX storage cluster or Unmounted if it is not mounted.
Pairing Status: The pairing status of the datastore, which is Remote_datastore when it is paired and Unpaired otherwise.
Status: The status of the datastore, which is Normal when the datastore is mounted on all nodes in this HX storage cluster, Partial when the datastore is available but not mounted on this HX storage cluster, or Warning for any error condition.
Size: The size of the datastore, which is thin provisioned. The minimum size of the datastore is 1 GB. Ensure that the size is sufficient to support the virtual machines in the HX storage cluster.
Used: The portion of the allocated datastore that is consumed by virtual machines and related files.
Free: The amount of the allocated datastore that is available for use by this HX storage cluster.
Create Datastore: This option allows you to create a datastore, for which you will need to provide the name, size, units of the datastore, and block size (see Figure 4-22).
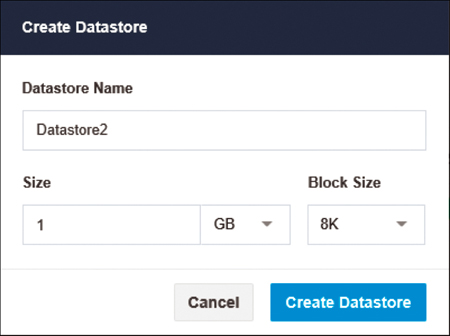
Figure 4-22 Creating a Datastore
You can also edit or delete an existing datastore from the Datastores page.
Note
If you want to rename datastore, do it only from HX connect GUI.
Virtual Machines Page
From the Virtual Machines page, you can perform virtual machine–related tasks such as creating ReadyClones, changing virtual machine power settings, and configuring virtual machine protection through replication (see Figure 4-23).
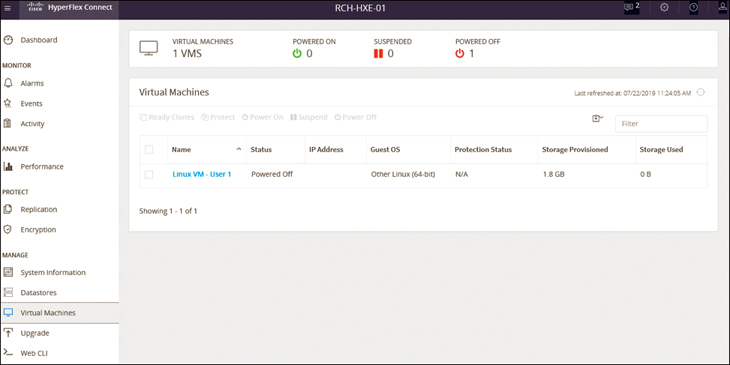
Figure 4-23 Cisco HyperFlex Connect Virtual Machines Page
With the replication feature you can protect virtual machines by taking replication snapshots at each configured interval. The snapshots are replicated to or from the remote cluster configured in the replication pair. This allows the virtual machines to remain active during replication.
The important information to focus on in this screen is as follows:
Name: The virtual machine name. Click anywhere in the row to select the virtual machine and enable tasks on that virtual machine. Multiple selection enables group tasks for the virtual machines.
Status: The power state of the virtual machine, which can be Powered On, Suspended, or Powered Off.
IP Address: If configured, the IP address for network access by the virtual machine.
Guest OS: If installed, the operating system version on the virtual machine.
Protection Status: Whether replication is applied to the virtual machine. These are the options:
N/A: Protection cannot be applied to any virtual machine or protection group because the replication network and replication pair are not configured.
Protected: A replication schedule has been applied to this virtual machine. If protected through a protection group, the <protection_group_name> is in parentheses. If protected individually, only the word Protected is listed.
Unprotected: No replication schedule has been configured for this virtual machine.
Storage Provisioned: The amount of storage configured for use by the virtual machine. The total provisioned on all the virtual machines combined exceeds the amount available through the HX storage cluster.
Storage Used: The amount of storage currently consumed by the virtual machine. The total consumed storage on all the virtual machines combined does not exceed the amount available through the HX storage cluster.
Ready Clones: This option allows you to rapidly create and customize multiple cloned VMs from a host VM. It lets you create multiple copies of VMs that can then be used as standalone VMs. Clones are useful when you deploy many identical VMs to a group.
Upgrade Page
Cisco HyperFlex systems have several components that can be upgraded, depending on the environment. The core components in a HyperFlex system are as follows:
Cisco UCS server firmware (the UCS C-bundle, which consists of UCS server, BIOS, CIMC, NIC, and so on)
Cisco HX Data Platform software
VMware ESXi software
Cisco HyperFlex upgrade deployment can be performed in either online mode or offline mode. You can choose the type of upgrade you want to perform based on your environment.
Figure 4-24 shows the upgrade options.
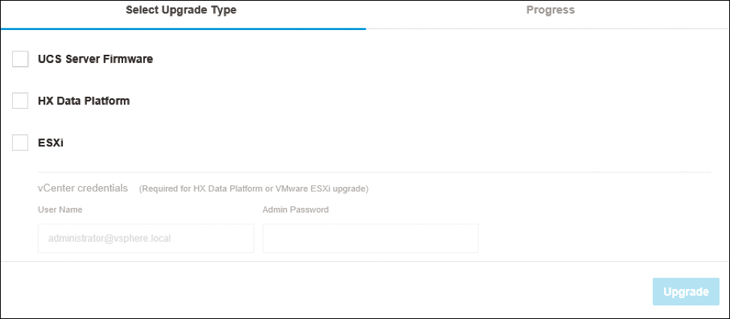
Figure 4-24 Options for Upgrading HyperFlex Clusters
UCS Server Firmware
To upgrade the UCS server firmware, you need to provide UCS Manager detail and click on Discover. When you do, HyperFlex Connect populates the M5 Desired Version drop-down, and you can select the version you want to upgrade. Figure 4-25 shows a UCS Server Firmware upgrade page.
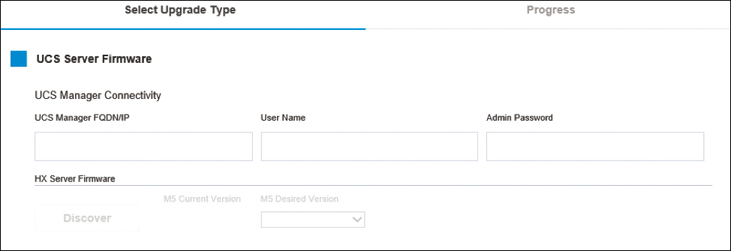
Figure 4-25 Options for Upgrading HyperFlex Clusters
HX Data Platform Upgrade
When you select the HX Data Platform option, you see the current version and can provide an HX file bundle for the version that you want to upgrade (see Figure 4-26).
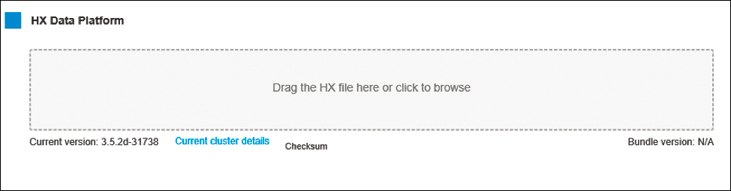
Figure 4-26 HX Data Platform Upgrade
ESXi Upgrade
When you select the ESXi option, you see the current version of ESXi and can specify the ESXi bundle that you want to upgrade (see Figure 4-27).

Figure 4-27 ESXi Upgrade
Progress Page
The Validation screen shows the progress of checks performed. If validation fails, you need to fix the validation errors. If there are no errors, you can confirm to complete upgrade.
For detailed upgrade information, see Chapter 5, “Maintaining HyperFlex.”
Web CLI Page
You can monitor and manage a storage cluster by using the Cisco HX Data Platform command-line interface (CLI). The web CLI allows you to run stcli (the HX Data Platform storage controller VM command line) through HX Connect.
Figure 4-28 shows the screen from which to run commands through the web CLI.
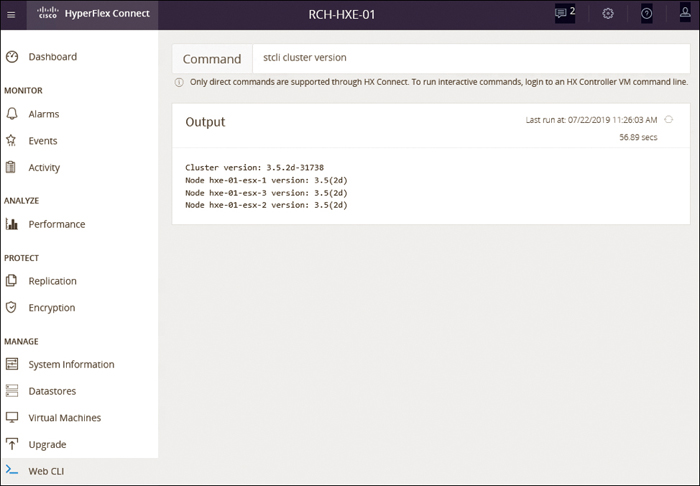
Figure 4-28 Cisco HyperFlex Connect: Running Commands Through the Web CLI
You can use the command line to run direct commands that complete in a single pass and do not require responses (for example, stcli cluster info).
Only direct commands are supported through HX Connect. To run interactive commands, you need to log in to the storage controller VM command line.
Replication
HyperFlex Connect can be used to monitor the status of the protected VMs and to initiate VM migrations, test recoveries, or failovers. It provides native replication and disaster recovery between VMs on a pair of connected HyperFlex clusters that reside in two different vCenter clusters, usually at two separate data centers and connected via WAN, VPN, L2 over L3, or dark fiber. Each cluster server acts as a disaster recovery site for the VMs running on the other cluster and protects virtual machines by replicating to the peer cluster for disaster recovery.
The Replication page is available under Protect. You can configure the replication network and a cluster pairing from this page (see Figure 4-29).
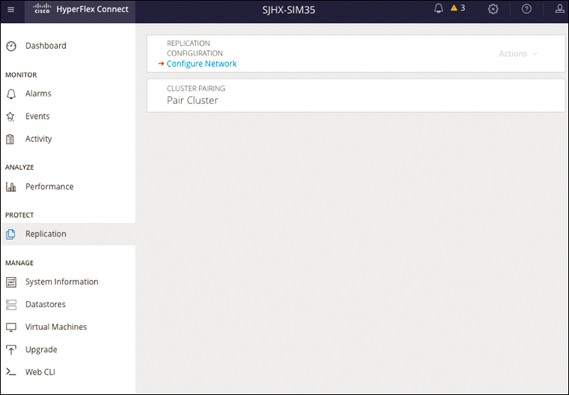
Figure 4-29 Cisco HyperFlex Connect: Configuring a Network for Replication
When configuring a replication network, you need to provide the VLAN ID for the replication network, the replication subnet in CIDR notation (that is, a.b.c.d/n), the gateway IP address for the subnet, starting and ending IP addresses for the range that will be added to the pool assigned to the SCVMs, outbound bandwidth limits between 10 and 100,000 Mbps, and MTU.
Figure 4-30 shows the screen from which you can configure IP addresses and bandwidth.

Figure 4-30 Cisco HyperFlex Connect: Configure IP & Bandwidth Page
Replication Pairing
Two HyperFlex clusters that will be able to replicate VMs to each other must first be paired before the replication can begin, and a datastore on each cluster must also be paired. Prior to pairing, the replication networking on both clusters must be configured, and datastores must have been created on both clusters. Each HyperFlex cluster can be paired with only one other cluster, and each datastore can be paired with only one other datastore. The snapshots and VMs on the source cluster, in their source datastore, will be replicated to the paired cluster and stored in the paired datastore. You must know the administrative login credentials of the remote cluster and the remote cluster’s management IP address in order to proceed.
When configuring a replication pair, you need to provide the name, the cluster management IP address or FQDN for the remote cluster, the username, and the password. The username and password must have admin rights in the vCenter server managing the remote cluster. Once pairing is done, you can map a local datastore with a remote data-store.
Figure 4-31 shows the screen you can use to configure remote cluster information for a replication pair.
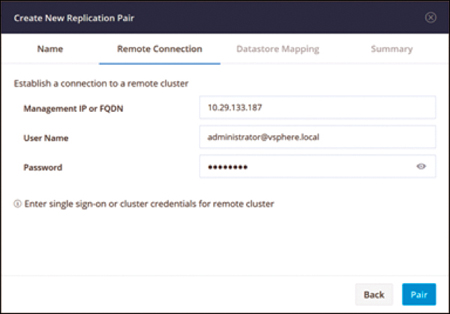
Figure 4-31 Cisco HyperFlex Connect: Configuring a Remote Cluster
Once a replication pair is established and datastores are mapped to each other across two HX clusters, VM protection can be configured. VMs can be protected individually, or they can be added to a new or existing protection group. For more detail, refer to Chapter 6.
Encryption
HX data-at-rest security is accomplished through SEDs and is managed through Cisco HX Connect in conjunction with UCSM and local or remote key stores using Key Management Interoperability Protocol (KMIP).
SEDs provide native data-at-rest encryption. All qualified disks are FIPS 140-2 Level 2 validated components for data-at-rest encryption. The hardware encryption is built in; a media encryption key controls this encryption and decryption. The performance is comparable to that of a non-SED system and is transparent to data optimization functions (such as deduplication and compression).
If a HyperFlex cluster has SEDs and is encryption capable, Data-at-Rest Encryption Capable appears at the top of the Summary tab.
Figure 4-32 shows the screen you use to configure encryption.

Figure 4-32 Cisco HyperFlex Connect: Configuring Encryption
When you click the Configure encryption button, you are asked to provide UCSM detail. Figure 4-33 shows the UCSM credentials required to start encryption.
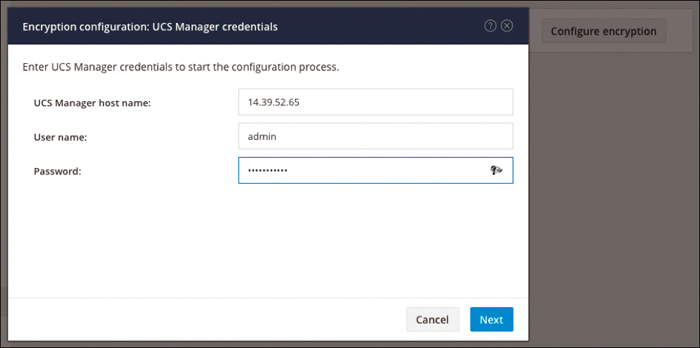
Figure 4-33 UCSM Credentials to Start the Configuration Process
The encryption keys associated with a SED implementation are as follows:
Media encryption key: This is where data is always stored in encrypted form. A media encryption key controls the encryption and decryption. This key is never stored in the processor or memory.
Key-encryption key: This key, also known as a security key, is used to encrypt the media encryption key. To enable an SED, you must provide a security key.
Cisco HyperFlex supports both local and remote security keys. When you configure a key locally, you must remember the key. If you forget the key, you cannot retrieve it, and you will lose the data if the drive power cycles. You can configure the key remotely by using a key management server (also known as a KMIP server). This method addresses the issues related to safe-keeping and retrieval of the keys in the local manager.
You can configure a server with SEDs in a cluster to use one of the following certificate options:
Use certificate authority signed certificates: Generate certificate signing requests (CSRs) signed by an external certificate authority.
Use self-signed certificates: Generate self-signed certificates.
Figure 4-34 shows the options for encrypting a cluster.
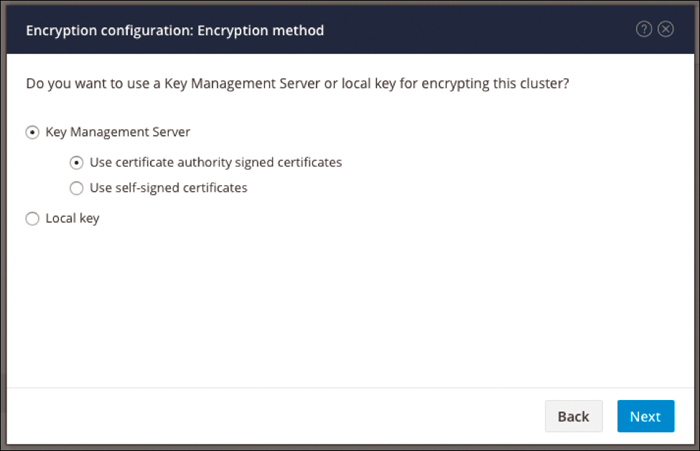
Figure 4-34 Selecting a Cluster Encryption Method
If you are self-signing, you need to specify a local certificate authority in the configuration and get a root certificate. If you are using a trusted third-party CA, you need to specify that in the configuration and use that CA’s root certificate.
Figure 4-35 shows the screen for CSR configuration for encryption. You need to provide an email address, an organization name and unit name, a locality, a state, and a country to generate a certificate. You can download certificates to get them signed by a certificate authority.
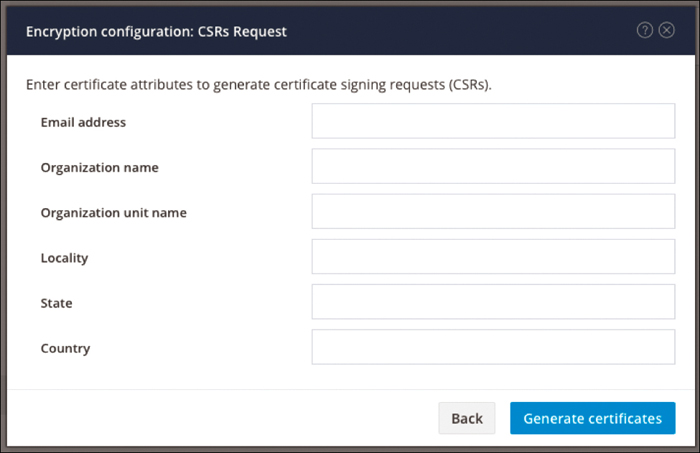
Figure 4-35 Certificate Attributes to Generate Certificates
For a local key, you need to provide a passphrase to generate certificates. Figure 4-36 shows the local key configuration for encryption.

Figure 4-36 Specifying a Passphrase to Enable Encryption
At any time, for security purposes, if you need to regenerate the authentication keys in a cluster, you can do so using the rekey operation to regenerate the keys; this operation does not destroy the existing data.
Summary
Cisco HyperFlex Connect provides access to a HyperFlex storage cluster. The Dashboard page allows you to view overall cluster health and operational status, cluster storage–related configuration, and IOPS. You can also manage system information, datastores, and VMs from HX Connect. HyperFlex Connect provides additional monitoring capabilities, including alarms, event logs, and activity logs. You can analyze the historical and current performance of a HyperFlex cluster by using the built-in performance charts. You can upgrade HX DP software and Cisco UCS firmware as well. Cisco HyperFlex Connect allows you to configure data protection features, including VM replication and data-at-rest encryption.
Chapter 5, “Maintaining HyperFlex,” discusses Hyperflex Licensing, Virtual Machine Management, Scaling Hyperflex, Hardware replacement and Hyperflex upgrade.