Chapter 7
Deploying HyperFlex Anywhere with Cisco Intersight
This chapter provides details about what Cisco Intersight is and how you can deploy edge clusters and standard clusters through Intersight.
Cloud-Based Management
A cloud-based management platform provides unified access to applications and to infrastructure monitoring, configuration, and orchestration, which helps reduce IT management complexity and unify the deployment and management of many edge devices. Cisco Intersight is Cisco’s new system management platform for Cisco UCS servers and Cisco HyperFlex systems. This cloud-based platform offers centralized management that enables IT organizations to analyze, simplify, and automate their environments in ways that are not possible using traditional tools. This capability empowers organizations to achieve significant savings in total cost of ownership (TCO) and to deliver applications faster so they can support new business initiatives. To access the Cisco Intersight platform, go to https://intersight.com.
The Cisco Intersight platform simplifies the installation, monitoring, troubleshooting, upgrade, and support processes for your infrastructure. It offers the following benefits:
Cloud-based management: Thanks to the capability to manage Cisco UCS and Cisco HyperFlex systems from the cloud, you can quickly and easily manage and scale your infrastructure, whether it is in the data center or a remote or branch office location.
Automation: The unified API in Cisco UCS and Cisco HyperFlex systems enables policy-based configuration and management of the infrastructure. It also makes the Cisco Intersight platform and the devices connected to it fully programmable and DevOps friendly.
Analytics and telemetry: The Cisco Intersight platform monitors the health and relationships of all physical and virtual infrastructure components. It also collects telemetry and configuration information to develop the intelligence of the platform in accordance with Cisco information security requirements.
Advanced level of support: Solid integration with the Cisco Technical Assistance Center (TAC) enables more efficient and proactive technical support. The Cisco Intersight platform provides enhanced operations automation by expediting file transmission to accelerate troubleshooting.
Recommendation engine: Driven by analytics and machine learning, the Cisco Intersight recommendation engine provides actionable intelligence for IT operations management through a constantly increasing knowledge base and practical insights learned from the entire system.
Management as a service (MaaS): The Cisco Intersight platform provides management as a service and is designed to be infinitely scalable and easy to implement. It relieves users of the burden of maintaining systems management software and hardware.
Figure 7-1 shows the Cisco Intersight login page.

Figure 7-1 Cisco Intersight
The Cisco Intersight website and framework can be upgraded with new and enhanced feature sets independently of the products that are managed, thus providing many new features and capabilities with no downtime or upgrades required of end users. Future releases of Cisco HyperFlex systems will enable additional functions along with upgrades to the Cisco Intersight framework. This unique combination of embedded and online technologies will provide a complete cloud-based management solution that can manage Cisco HyperFlex systems throughout the entire life cycle.
The minimum supported web browser versions to run the Cisco Intersight platform are as follows:
Google Chrome: Release 62.0.3202.94
Firefox: Release 57.0.1
Microsoft Edge: Release 40.15063.674.0
Safari: Release 10.1.1
Two licensing editions are available for Cisco Intersight customers:
Base edition: This edition is available at no additional cost to customers. It is automatically included with every Cisco UCS and Cisco HyperFlex system purchase. Cisco Intersight Base edition provides access to a portal that delivers centralized monitoring and basic inventorying of managed systems, organizational capabilities including tagging and search, and the capability to launch native endpoint management interfaces including Cisco UCS Manager and Cisco HyperFlex Connect.
Essentials edition: This edition provides additional value beyond what is provided in the Base edition. It includes features to centralize configuration management through a unified policy engine, determine compliance with the Cisco UCS Hardware Compatibility List (HCL), and initiate firmware updates. The Essentials edition provides a single interface for monitoring, management, and operations, with the capability to launch the virtual keyboard, video, and mouse (vKVM) console directly from the Cisco Intersight platform.
Figure 7-2 summarizes the features of the Cisco Intersight license types.

Figure 7-2 Cisco Intersight License Options
The Cisco Intersight Essentials edition can be ordered for 1-year, 3-year, and 5-year subscription periods. You can start a free 90-day evaluation trial of the Essentials edition by signing up at the licensing page in the Cisco Intersight platform.
HyperFlex Cluster Policies in Intersight
HyperFlex cluster profiles are built on policies which are administrator-defined rules and operating characteristics such as node identity, interfaces, and network connectivity. Every active node in a HyperFlex cluster must be associated with a HyperFlex cluster profile.
HyperFlex policies in Cisco Intersight provide different configurations, including Auto Support, External Storage (such as FC and iSCSI), security, network configuration, and more. A policy that is configured can be assigned to any number of servers to provide a configuration baseline. All HyperFlex policies can be shared by HyperFlex Edge and HyperFlex with fabric interconnect, unless otherwise mentioned in the list that follows:
Auto-Support Policy: Enables Auto-Support, the alert notification service provided through HyperFlex Data Platform in Intersight. When Auto-Support is enabled, notifications are sent to designated email addresses or email aliases that you want to receive the notifications. Typically, Auto-Support is configured during HyperFlex storage cluster creation by configuring the SMTP mail server and adding email recipients.
DNS, NTP, and Timezone Policy: Configures DNS, NTP, and the time zone on all servers. DNS and NTP servers should reside outside a HyperFlex storage cluster. Use an internally hosted NTP server to provide a reliable source for the time.
External FC Storage Policy: Enables the use of external FC Storage and configures the WWxN name and the associated VSAN details. This policy is not applicable to HyperFlex edge clusters.
External iSCSI Storage Policy: Enables the use of external iSCSI storage and configures the associated VLAN details. This policy is not applicable to HyperFlex Edge clusters.
HyperFlex Storage Network Policy: Configures the storage network VLAN name ID for the HyperFlex cluster.
IP & Hostname Policy: Configures the management IP pool. The Management IP addresses 169.254.254.0/23 are now reserved for Cisco Container Platform.
Network Configuration Policy: Configures the VLAN, KVM, and MAC prefix for the management network in fabric interconnects; and uplink speed, VLAN, and jumbo frames for the management network in edge clusters. The VLAN must have access to Intersight. This policy cannot be shared by HyperFlex edge and HyperFlex with fabric interconnect clusters.
Proxy Setting Policy: Specifies the HTTP proxy settings to be used by the HyperFlex installation process and the HyperFlex storage controller VMs. This policy is required when the Internet access of your servers, including CIMC and HyperFlex storage controller VMs, is secured by an HTTP proxy.
Security Policy: Configures an ESXi and controller VM password for the HyperFlex cluster. This policy presents an option to update the hypervisor password in Intersight, if you have not already changed it on the hypervisor.
Storage Configuration Policy: Configures the options for VDI optimization (for hybrid HyperFlex systems) and cleanup of disk partitions. For HyperFlex with fabric interconnect, this policy provides the option to enable logical availability zones as part of the cluster deployment workflow. Logical availability zones are not supported on HyperFlex edge clusters.
vCenter Policy: (Optional) Registers a cluster to vCenter to ensure that the cluster functions smoothly.
Cisco HyperFlex Edge Cluster Deployment
Cisco HyperFlex Edge brings the simplicity of hyperconvergence to remote and branch office (ROBO) and edge environments.
Starting with Cisco HX Data Platform Release 4.0, HyperFlex Edge deployments can be based on 2-node (2N), 3-node (3N), or 4-node (4N) edge clusters. Figure 7-3 shows the Cisco Intersight Edge 2N, 3N, and 4N deployments options.
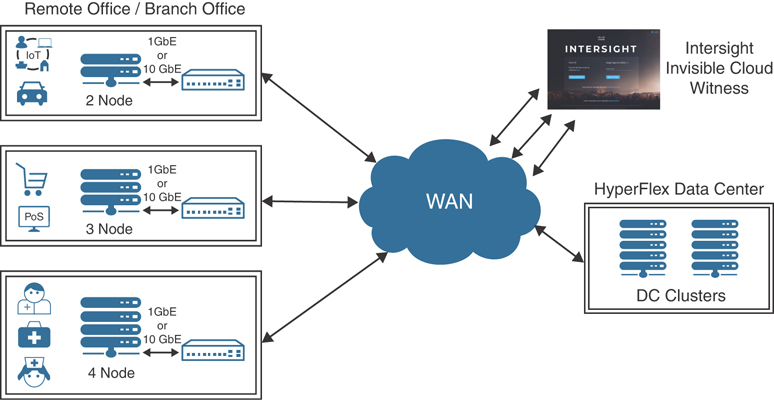
Figure 7-3 Cisco Intersight Edge Deployment Options
Cisco HyperFlex Edge 2-node clusters require the use of Cisco Intersight for initial deployment and ongoing operations using the invisible cloud witness. HyperFlex Edge 2-node clusters cannot be deployed using the on-premises installer.
HyperFlex Edge 3-node and 4-node clusters may also be deployed using Cisco Intersight. For on-premises HyperFlex, an installer VM may be used to deploy 3-node and 4-node HyperFlex edge clusters.
Intersight Arbitrator Overview for 2-Node
Intersight and the device connector serve as a secondary heartbeat between controllers when the primary communication channel is not responding. The two nodes in the cluster maintain separate connections to the Intersight service.
Intersight holds a single WitnessLock object for each HyperFlex cluster. Nodes can update the WitnessLock object to attain the lock in the event of node failure or network partitioning. The node that acquires the lock can then proceed to take ownership of the cluster and start serving data requests. Lock acquire is implemented as a REST POST to update the object in Intersight.
Once a lock is acquired, it can only be released by the node that acquired the lock. If a node attempts to acquire a lock that is already held by a peer node, it receives an HTTP error in response. All locking operations are exposed by a device connector REST API running on localhost 8777 on each controller VM. The device connector exposes the APIs, which are then invoked by the 2-node ROBO controller service.
Figure 7-4 shows the lock attained by Intersight in the event of node failure or network partitioning.

Figure 7-4 WitnessLock in the Event of Node Failure or Network Partitioning
The minimum supported firmware versions for Cisco HyperFlex Edge systems to be deployed by the Cisco Intersight platform are:
Cisco IMC software: Release 3.1(2d)
Cisco HyperFlex Data Platform: Release 2.6.1b
Device connector: Release 1.0.4-10 or later
Physical Topology
Single-switch and dual-switch are two physical topologies supported between the HX-Series servers and the upstream network. The choice depends on the requirements of the installation and the availability of hardware and networking resources.
Cisco HyperFlex Edge offers both Gigabit Ethernet and 10 Gigabit Ethernet installation options.
Cisco HyperFlex Edge Single-Switch Configuration
The single-switch configuration requires a single switch and a minimum of two Gigabit Ethernet ports per server. Link and switch redundancy are not provided in this basic topology. Access ports and trunk ports are the two supported network port configurations.
Figure 7-5 shows a Cisco HyperFlex Edge single-switch configuration.

Figure 7-5 Cisco HyperFlex Edge Single-Switch Configuration
The single-switch topology requires at least two separate networks:
A management network, which includes guest VM network and VMware vMotion traffic
A data network for storage traffic
Two Gigabit Ethernet ports on each server are required, and one of these two ports must be dedicated to Cisco HyperFlex storage traffic.
The upstream network has the following requirements:
A managed switch with VLAN capability is required.
A minimum of six physical Gigabit Ethernet ports for three Cisco HyperFlex nodes are required if in-band Cisco IMC is configured on the Gigabit Ethernet LOM (LAN on motherboard) ports in shared mode. Users can optionally configure out-of-band IMC using a dedicated port on the LOM card, which requires an additional Gigabit Ethernet switch port per server.
PortFast or a PortFast trunk should be configured for uninterrupted IMC access.
Cisco HyperFlex Edge Dual-Switch Configuration
The dual-switch configuration provides full redundancy that protects against switch failures, link and port failures, and LOM and PCIe NIC hardware failures. It requires two switches, which can be standalone or stacked switches, four Gigabit Ethernet ports, and one additional Intel i350 PCIe NIC per server. Trunk ports are the only supported network port configuration.
Figure 7-6 shows a Cisco HyperFlex Edge dual-switch configuration.
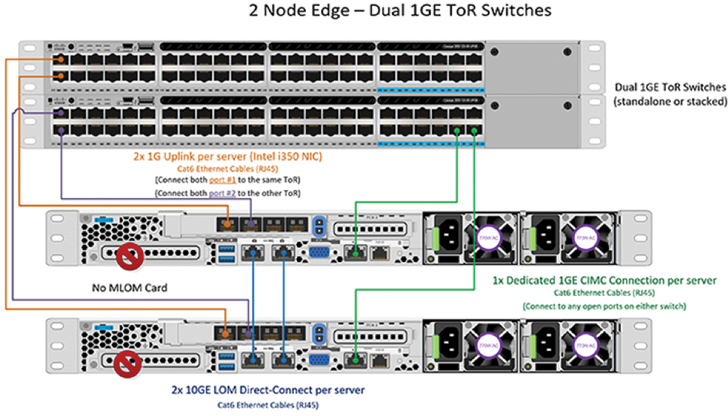
Figure 7-6 Cisco HyperFlex Edge Dual-Switch Configuration
The dual-switch topology also requires two separate networks:
A management network, which includes the guest VM network
A data network for storage and VMware vMotion traffic
Four Gigabit Ethernet ports on each server are required: two ports from the onboard LOM card and two ports from a PCIe add-on NIC. One LOM and one PCIe port serve management and virtual machine guest traffic in a redundant configuration, and the second LOM and second PCIe port serve storage data and vMotion traffic in a redundant and load-balanced configuration.
The upstream network has the following requirements:
Two managed switches with VLAN capability are required.
A minimum of 12 physical Gigabit Ethernet ports for three Cisco HyperFlex nodes are required if in-band Cisco IMC is configured on the Gigabit Ethernet LOM ports in shared mode. Users can optionally configure out-of-band IMC using a dedicated port on the LOM card, which requires an additional Gigabit Ethernet switch port per server.
A PortFast trunk should be configured for uninterrupted IMC access.
Logical Topology
The Cisco HyperFlex system has communication pathways that are categorized into four zones:
Management zone
Data storage zone
vMotion zone
Guest virtual machine zone
The Cisco HyperFlex installer creates four virtual switches (vSwitches) on all HX-Series nodes, each serving a different network:
vswitch-hx-inband-mgmt
vswitch-hx-storage-data
vswitch-hx-vm-network
vmotion
For a Cisco HyperFlex Edge system, only the first two vSwitches are used: vswitch-hx-inband-mgmt and vswitch-hx-storage-data.
Figure 7-7 shows a Cisco Intersight Edge single-switch configuration.
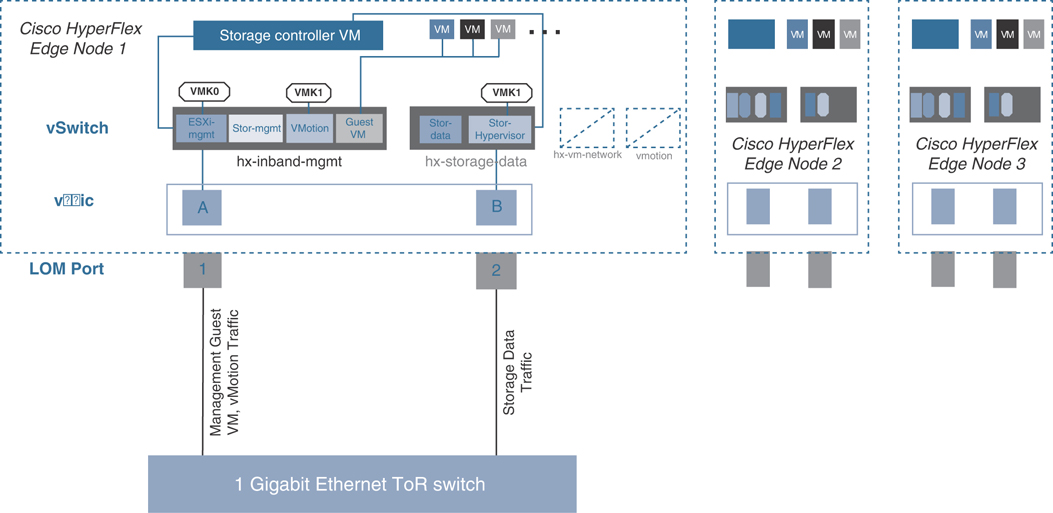
Figure 7-7 Cisco Intersight Edge Single-Switch Configuration
For the single-switch configuration, one LOM port is assigned to vswitch-hx-inband-mgmt, and another LOM port is assigned to vswitch-hx-storage-data. The data storage network requires a dedicated port in this configuration. Therefore, vswitch-hx-storage-data carries the storage data traffic, and vswitch-hx-inband-mgmt carries the traffic for management, vMotion, and guest virtual machines. There is no uplink redundancy on vSwitches in this configuration.
Figure 7-8 shows a Cisco Intersight Edge dual-switch configuration.

Figure 7-8 Cisco Intersight Edge Dual-Switch Configuration
For the dual-switch configuration, the redundancy occurs at the vSwitch level: One LOM port and one PCIe NIC port are assigned to vswitch-hx-inband-mgmt, and the second LOM port and the second PCIe NIC port are assigned to vswitch-hx-storage-data. The vMotion VMkernel port is on the vswitch-hx-storage-data network and uses a failover order opposite that of the storage data network. With this approach, the uplinks for storage traffic and the uplinks for vMotion traffic are set as active/standby, but each service uses the opposite active link. The vswitch-hx-inband-mgmt network is set to active/standby with the same failover order for all port groups. By default, all network services use the active path and fail over to the standby path only as needed during a failure scenario.
Cisco HyperFlex servers communicate with Cisco Intersight through a device connector that is embedded in firmware and can be enabled from the Cisco IMC software. The IMC is a baseboard management controller that provides embedded server management for Cisco HyperFlex HX-Series rack servers. It can be configured to operate in dedicated mode or shared mode.
Installing Cisco HyperFlex Edge with the Cisco Intersight Platform
A Cisco HyperFlex system comes with a factory preinstalled configuration. Cisco HyperFlex servers are delivered with the proper firmware revisions preset, a copy of the VMware ESXi hypervisor software preinstalled, and some components of the Cisco HyperFlex software prestaged.
When you install a Cisco HyperFlex system from the Cisco Intersight cloud management platform, the installer function is delivered from the cloud, so users don’t need an installer virtual machine. A Cisco HyperFlex Edge installation with the Cisco Intersight platform is supported only for completely new factory-shipped Cisco HyperFlex M5 rack-mount servers.
The following steps summarize the installation workflow for Cisco HyperFlex Edge:
Step 1. Complete the preinstallation checklist.
Step 2. Ensure that the network is set up.
Step 3. Log in to Cisco Intersight.
Step 4. Claim devices (that is, edge nodes).
Step 5. Run the HyperFlex cluster profile wizard.
Step 6. Run the postinstallation script through the controller VM.
Intersight Installation Prerequisites
Prior to beginning the installation activities, you must set up a Cisco Intersight account. You also should gather all the configuration settings contained in the preinstallation checklist. To create your account, you must first have a valid Cisco ID. If you do not yet have a Cisco ID, the account can be generated in this way:
Step 1. Visit https://intersight.com from your workstation.
Step 2. Click Sign In with Cisco ID. On the Cisco Log In page, you can either choose to log into an existing account or create a new account.
Step 3. Click Register Now and provide the requested information to create a Cisco.com account.
Step 4. After a valid account has been created, use it to log in to the Cisco Intersight platform.
To install Cisco HyperFlex Data Platform from Cisco Intersight, you need to allocate some IP addresses that are used by the system for Cisco UCS IMC, Cisco HyperFlex and VMware ESXi management, Cisco HyperFlex storage, and VMware vMotion:
The Cisco UCS IMC IP addresses and HX Data Platform management IP addresses must allow communication with the Cisco Intersight platform.
Additional IP addresses for the Cisco HyperFlex Edge system need to be allocated from the appropriate subnets and VLANs to be used.
By default, the Cisco HyperFlex installation assigns a static IP address to the management interface of the ESXi servers.
For the IMC network, either DHCP or static assignment can be used to ease the configuration process.
The use of DHCP is not recommended for Cisco HyperFlex and ESXi management, Cisco HyperFlex storage, or vMotion networks.
DNS servers should be configured to query fully qualified domain names (FQDNs) in the Cisco HyperFlex and ESXi management group. DNS forward and reverse lookup records need to be created prior to beginning the installation.
All device connectors on the Cisco HyperFlex nodes and all Cisco HyperFlex controller virtual machines must properly resolve public domains through DNS and permit outbound-initiated HTTPS connections on port 443 so that the latest Cisco HyperFlex software packages can be automatically downloaded and the Cisco HyperFlex edge cluster can be fully deployed from the Cisco Intersight platform.
Consistent time clock synchronization is required across the components of the Cisco HyperFlex system; NTP is used by the IMC, vCenter, ESXi hypervisor hosts, and Cisco HyperFlex storage platform controller virtual machines.
Prior to performing the installation, create the required VLAN IDs in the upstream network. At a minimum, two VLANs are needed for trunk link connected to the upstream network: a VLAN for the Cisco HyperFlex and ESXi management group and a VLAN for the Cisco HyperFlex storage group.
Optionally, you can add two more VLANs: a VLAN for the vMotion group and at least one VLAN for the guest virtual machine traffic.
Several usernames and passwords need to be defined or known as part of the Cisco HyperFlex installation process: those for the Cisco Intersight account, Cisco UCS IMC administrator, VMware ESXi administrator, Cisco HyperFlex administrator, and VMware vCenter administrator.
Cisco Integrated Management Controller Configuration
The Cisco Intersight cloud-based management platform provides remote management of Cisco HyperFlex Edge servers through a device connector that is embedded in and can be enabled through Cisco IMC software. The Cisco UCS device connector provides access to Cisco UCS server management functions that are built in to the server. By pointing a device connector to the Cisco Intersight platform, Cisco UCS servers and Cisco HyperFlex clusters can be claimed as serviceable devices and easily managed remotely. The Cisco Intersight platform needs access to the IMC and to the Cisco HyperFlex management network. To enable the device connector on the Cisco HyperFlex nodes and the Cisco Intersight platform to communicate, the IMC interface needs to be configured on each server.
Two options are available for setting the IP address for the IMC: DHCP or static configuration. The following steps guide you through a static configuration:
Step 1. Attach the VGA dongle to the new Cisco HyperFlex server and connect it to a monitor and USB keyboard. Power on the server.
Step 2. Wait for some minutes until the screen with the Cisco logo appears.
Step 3. When prompted for boot options, press the F8 key to enter the Cisco IMC configuration utility. Figure 7-9 shows the Cisco HyperFlex server boot options.

Figure 7-9 Cisco HyperFlex Server Boot Options
Step 4. For a first-time configuration, you are prompted for a new IMC password. Enter the default password password as the current IMC password and then set a new IMC password. The configuration described here uses Cisco123 as the new password (although this is not a very good password and is used as an example only).
Step 5. In the Cisco IMC configuration utility window, choose the desired NIC mode. Select Dedicated if you want to access the IMC through the dedicated management port. Select Shared LOM if you want to access the IMC through any LOM port. Select Shared LOM Ext mode if you want to access the IMC through any LOM or adapter port.
Step 6. Deselect the DHCP enabled option and select IPv4 to set a static IP address.
Step 7. Enter IPv4 settings for the CIMC IP, prefix/subnet, and gateway options.
Step 8. Leave NIC redundancy set to Active-active.
Step 9. Select the VLAN enabled option and enter the VLAN ID for IMC management.
Step 10. Press F10 to save the configuration and then press Esc to exit the utility. The server reloads and may boot into the ESXi operating system preloaded at the factory.
Step 11. Ping the IMC IP address that was just set to validate the configuration.
Step 12. Open a web browser with https:// to the IMC management GUI. Log in as admin with the configured password.
Step 13. On the Summary page, check the running versions of the BIOS and IMC firmware to verify that these versions meet the requirements for Cisco HyperFlex and Cisco Intersight deployment. If an IMC upgrade is needed, go to the Cisco website to download the latest Host Upgrade Utility (HUU) and use that utility to upgrade the firmware to a compatible version. Figure 7-10 shows the Cisco HyperFlex server summary page.

Figure 7-10 Cisco HyperFlex Server Summary Page
Step 14. If desired, click Select Timezone to set the correct time zone for the server.
Step 15. From the navigation pane, choose Compute and then click the Power Policies tab. Change the Power Restore Policy from the default Power Off to the desired option.
Step 16. From the navigation pane, expand Admin. Then click Networking, and under the Network tab, review the IMC IP settings and add an alternative DNS server here if desired. You can change the hostname here as well.
Step 17. Click the NTP Setting tab. Then add your NTP server information.
Step 18. After making the changes you want, click Save Changes to save and apply the changed values. A hostname change creates a new certificate for the web browser and requires you to log in to the web GUI again. The system may take several minutes to commit the changes.
Step 19. Repeat steps 1–18 for all Cisco HyperFlex Edge servers.
Claiming Devices in Cisco Intersight
Now you can enable the device connector on the Cisco HyperFlex servers and let the Cisco Intersight platform claim them for cloud management. Follow these steps:
Step 1. Log in to the IMC web management GUI with https://.
Step 2. From the navigation pane, expand Admin. Then click Device Connector and enable Cisco Intersight management on the device connector, using Allow Control as the access mode. (This option may already be set.) This configuration enables the IMC to establish a connection to the Cisco Intersight platform. Figure 7-11 shows the Device Connector configuration in IMC.
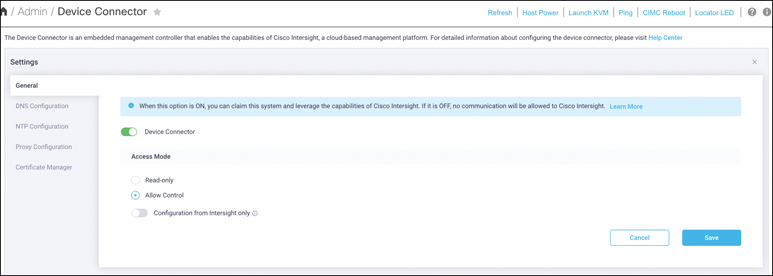
Figure 7-11 Device Connector Configuration in IMC
Step 3. Wait until the connection succeeds and a claim code has been generated for this device. Note that the device is not claimed yet. Write down the device ID (server system number) and claim code as they will be needed in a subsequent step.
Step 4. Repeat steps 1 through 3 for each Cisco HyperFlex Edge server to gather all device IDs and claim codes. Note that each claim code has an expiration time, as indicated by the colored bar under the claim code. Be sure to claim the servers before the codes expire.
Step 5. Go to Cisco Intersight Cloud Management platform, at https://intersight.com.
Step 6. Log in with your Cisco ID and password. If this is your first time using the Cisco Intersight platform, you should take a site tour to learn about some of the platform’s main features.
Step 7. To claim a new device, in the navigation pane at the left, click Devices. Then, in the top-right corner of the Devices window, click Claim a New Device. Figure 7-12 shows how to claim a new device from Intersight.
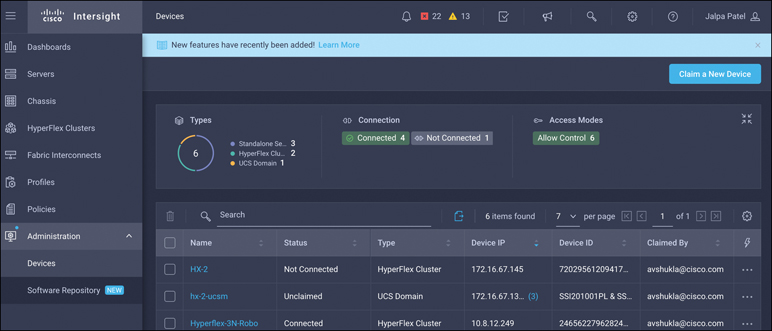
Figure 7-12 Claiming a New Device from Intersight
Step 8. Enter the device ID and claim code obtained from the IMC management GUI. Use copy and paste for accuracy. Click Claim.
Step 9. Wait until the device has been claimed successfully and then go to the server’s IMC page to verify the claim. The Device Connector page should now show that this device has been claimed.
Step 10. Repeat steps 5–10 to claim all three Cisco HyperFlex servers on the Cisco Intersight platform.
Step 11. Review the Device window again. The Cisco HyperFlex nodes should now be listed as connected devices.
Step 12. You now have the option to launch the IMC management GUI directly from the Cisco Intersight platform. If you want to do so, click Launch IMC.
Step 13. To unclaim (remove) a device from the Cisco Intersight platform, select the device and click the trash icon. On the pop-up confirmation page, click Remove to confirm the removal.
Cisco HyperFlex Edge Clusters Installation Wizard
The Cisco Intersight platform provides an installation wizard to install, configure, and deploy Cisco HyperFlex edge clusters. The wizard constructs a preconfiguration definition of an edge cluster called a Cisco HyperFlex cluster profile. The cluster profile is policy based, with administrator-defined sets of rules and operating characteristics such as the node identity, interfaces, and vCenter connectivity. Every active node in the edge cluster must be associated with a Cisco HyperFlex cluster profile. After the user enters all the configuration settings, the installation wizard validates and deploys the cluster profile on the Cisco HyperFlex edge nodes.
To install and configure a Cisco HyperFlex edge cluster with the Cisco Intersight platform, complete the following steps:
Step 1. Log in to the Cisco Intersight cloud management platform at https://intersight.com with your Cisco ID and password.
Step 2. In the navigation pane at the left, choose Service Profiles. On the Service Profiles page, select the HyperFlex Cluster Profiles tab and click Create HyperFlex Cluster Profile. Figure 7-13 shows how to create HyperFlex cluster profiles.
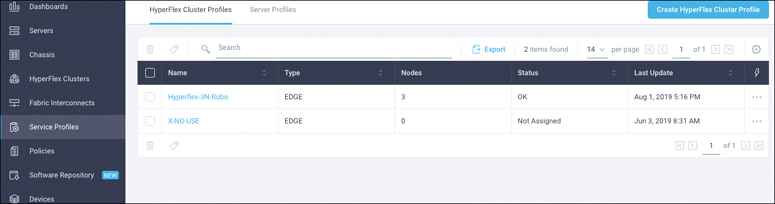
Figure 7-13 Creating HyperFlex Cluster Profiles
Step 3. Proceed through the installation steps of the HyperFlex cluster profile installation wizard. First, on the General page (see Figure 7-14), enter a cluster name that is unique and can be used as the HX Data Platform cluster name, vCenter cluster name, and Cisco Intersight cluster name. Under Type, select Cisco HyperFlex Edge. Add the necessary description and tags for this cluster for reference.

Figure 7-14 Type of HyperFlex Cluster
Step 4. Click Next to move to the Cluster Configuration page of the wizard.
Step 5. Click the + sign to expand the Security section (see Figure 7-15). Enter root as the hypervisor administration username and password. Enter a user-supplied password for the Cisco HyperFlex controller virtual machine and then confirm that password in the second text field.
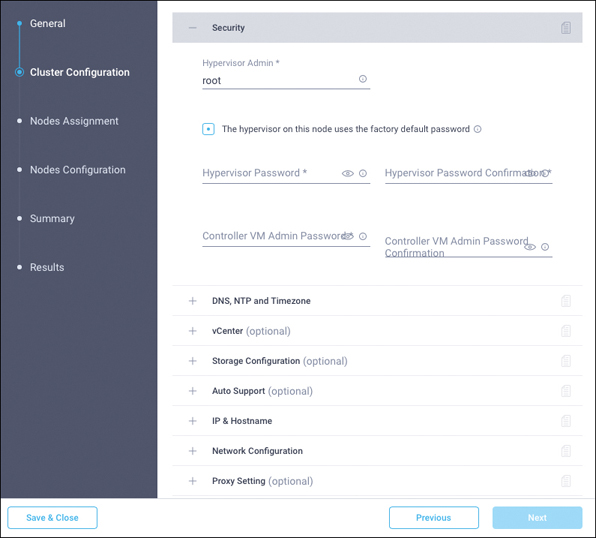
Figure 7-15 Security Configuration
Step 6. Close the Security section, and the settings are automatically saved to a policy named local-credential-policy. This policy is reusable and can be selected when you create your next Cisco HyperFlex cluster profile.
Step 7. (Optional) To choose an existing policy for your cluster profile, at the policy line click the Select Policy button. Choose the desired policy from the available policy list and click Select.
Step 8. Click the + sign to expand the DNS, NTP, and Timezone section of the page (see Figure 7-16). Choose a time zone from the drop-down list and enter DNS server and NTP server information. Click the + sign to enter secondary DNS and NTP servers.

Figure 7-16 DNS, NTP, and Timezone Configuration
Step 9. Close the DNS, NTP and Timezone section, and the settings are automatically saved to a reusable policy named sys-config-policy.
Step 10. Click the + sign to expand the vCenter section. Enter the vCenter server FQDN or IP address, administration username, and password. Enter the data center name for vCenter hosting the Cisco HyperFlex Edge cluster. Leave the vCenter Single Sign-On Server field blank unless instructed otherwise by the Cisco Technical Assistance Center (TAC). If you are deploying your system in a nested vCenter configuration, you can leave the vCenter fields blank and register the cluster to vCenter after it has been deployed on the cluster. For help, see the guide “How to Deploy vCenter on the HX Data Platform.” Figure 7-17 shows the vCenter configuration.
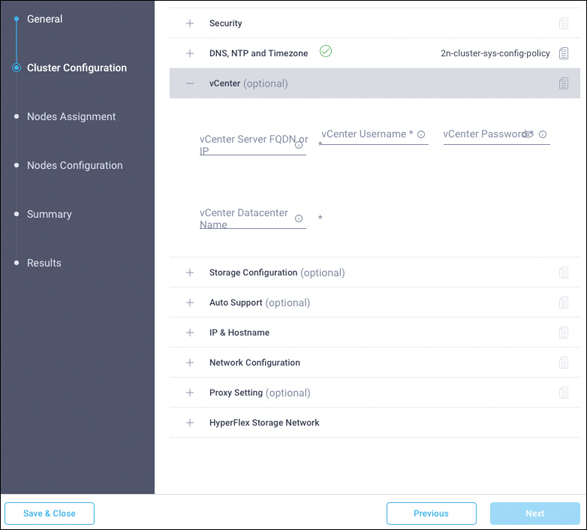
Figure 7-17 vCenter Configuration
Step 11. Close the vCenter section, and the settings are automatically saved to a reusable policy named vcenter-config-policy.
Step 12. Click the + sign to expand the Storage Configuration section. Select Clean Up Disk Partitions if you are performing a reinstallation on top of an existing deployment. If you are deploying a virtual desktop infrastructure (VDI) environment on a hybrid Cisco HyperFlex cluster, select the VDI Optimization box. Figure 7-18 shows the storage configuration options.

Figure 7-18 Storage Configuration
Step 13. Close the Storage Configuration section, and the settings are automatically saved to a reusable policy named cluster-storage-policy.
Step 14. Click the + sign to expand the Auto Support section (see Figure 7-19). Select the box Auto-Support to enable this feature. Enter your email address for service ticket notification.

Figure 7-19 Auto-Support Configuration
Step 15. Close the Auto-Support configuration, and the settings are automatically saved to a reusable policy named auto-support-policy.
Step 16. Click the + sign to expand the IP & Hostname section (see Figure 7-20). Enter a hostname prefix. In a later step, hostnames will be sequentially assigned to hosts using this prefix. Enter the starting IP address, ending IP address, netmask, and gateway for the management IP address pool. IP addresses from this range will automatically be assigned to hosts in the node configuration step. If you enter only the management network IP addresses, the same range will be used for both ESXi management and Cisco HyperFlex controller virtual machine management IP addresses. If you want to use a second, noncontiguous range of IP addresses for the Cisco HyperFlex controller virtual machines, you may optionally enter the starting IP address, ending IP address, netmask, and gateway for the controller virtual machine management IP address pool. Note that these two IP ranges must fall within the same IP subnet and VLAN.
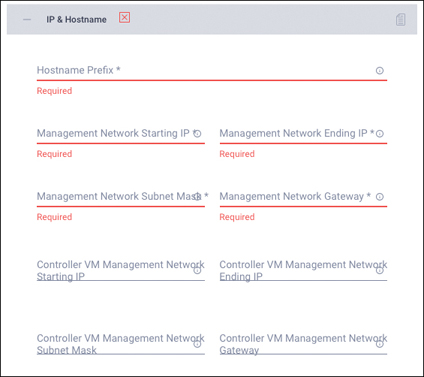
Figure 7-20 IP and Hostname Configuration
Step 17. Close the IP & Hostname section, and the settings are automatically saved to a reusable named node-config-policy.
Step 18. Click the + sign to expand the Network Configuration section (see Figure 7-21). Enter the VLAN ID for the management network. Leave the Jumbo Frames checkbox unselected for Cisco HyperFlex Edge deployments.
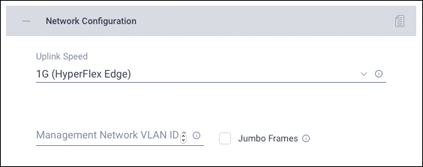
Figure 7-21 Network Configuration
Step 19. Close the Network section, and the settings are automatically saved to a reusable policy named cluster-network-policy.
Step 20. (Optional) Click the + sign to expand the Proxy Setting section (see Figure 7-22).

Figure 7-22 Proxy Configuration
Step 21. Click the + sign to expand the HyperFlex Storage Network section (see Figure 7-23). Enter the VLAN ID for the data storage network. As a best practice, use a unique storage VLAN for each cluster if you are deploying multiple clusters in the same network.
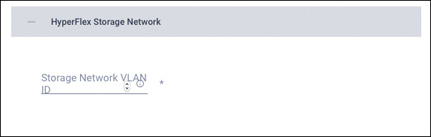
Figure 7-23 Storage Network Configuration
Step 22. Click Next to move to the Nodes Assignment page of the wizard (see Figure 7-24). Select three available Cisco HyperFlex Edge nodes. You also have the option to assign nodes later, saving the Cisco HyperFlex cluster profile now and returning when the hardware is available for assignment after it has been claimed in the Cisco Intersight platform.
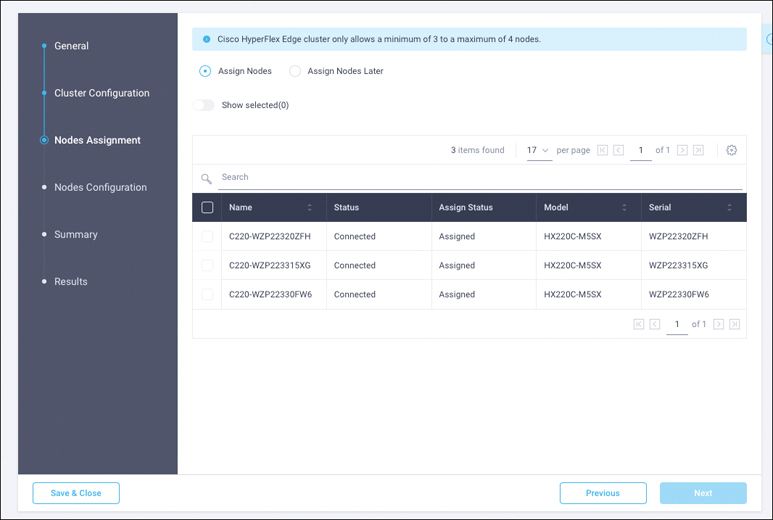
Figure 7-24 Node Assignment
Step 23. Click Next to navigate to the Nodes Configuration page. Review the node configuration for all three Cisco HyperFlex Edge nodes. You can freely modify the hostname defined by automatic IP address assignment if desired. Enter the cluster management IP address within the same IP management subnet.
Step 24. Click Next to move to the Summary page. Review the Cluster Configuration and Nodes Configuration pages and check them for errors.
Step 25. Click Validate to validate the Cisco HyperFlex edge cluster configuration without starting the deployment. This selection starts a series of hardware, software, and environmental checks that take a few minutes to complete. Alternatively, click Validate & Deploy to complete validation and deployment together. This option performs an explicit validation first, followed by the start of the actual deployment.
Step 26. Wait until validation succeeds. Fix any errors found and note any warnings before continuing.
Step 27. On the Results page for the validation process (see Figure 7-25), click Validate & Deploy to install the Cisco HyperFlex edge cluster. Optionally, you can click Close to complete deployment later. Installation time will vary, depending on network bandwidth, but typically takes about one hour. You can remain on the Results page to watch the cluster deployment progress in real time. Alternatively, you can click Close to send the task to the background and navigate elsewhere within the Cisco Intersight platform. To return to the Results page, navigate back to the Service Profiles > HX Cluster Profile list view and select the cluster name.
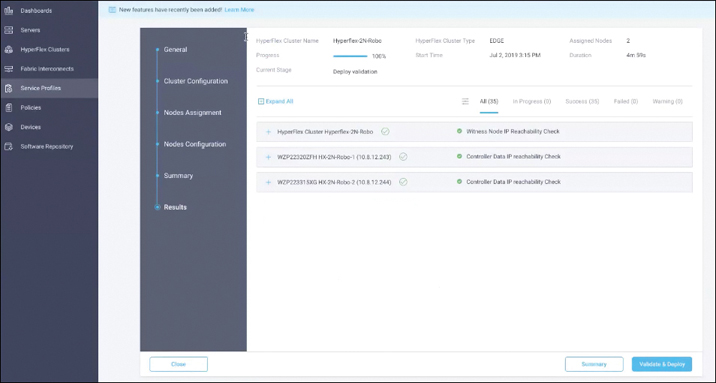
Figure 7-25 Cluster and Node Configuration
Step 28. When the deployment has completed successfully, click OK.
Step 29. When you are back on the Service Profiles > HX Cluster Profile page, find the newly deployed Cisco HyperFlex cluster profile with a status of OK.
Step 30. If desired, clone and modify the cluster profile to quickly create many new cluster profiles. To clone a cluster profile, select the profile that you want to clone, in the Settings column click the three dots (…), and then click Clone. Figure 7-26 shows the options to clone or unassign nodes.
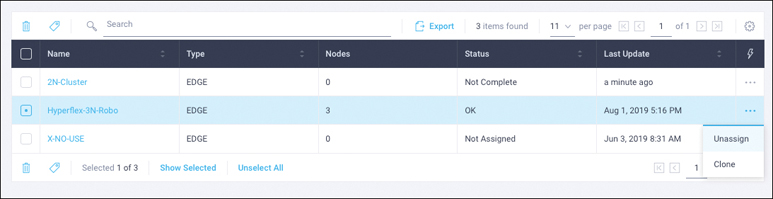
Figure 7-26 Cloning or Unassigning Nodes
Step 31. In the Clone pop-up window, enter the name for the cloned cluster and choose the number of clones. Click Clone.
Step 32. Before deploying the new copy of the cloned cluster profile, review the configuration and make any necessary changes to the policies.
Step 33. To unassign the servers from the selected cluster profile, in the Settings column, click the three dots (…) and then click Unassign and then click Unassign again. Note that unassigning removes all assigned servers from the cluster profile. This action is specific to the Cisco Intersight platform and does not result in a factory reset or affect the operation of the running cluster. To completely clean up this cluster from the Cisco Intersight platform, unclaim the cluster and associated servers. Contact the TAC for return materials authorization (RMA) support or cluster reinstallation procedures.
Step 34. To verify the Cisco HyperFlex edge cluster information on the Cisco Intersight platform, in the navigation pane, go to the HyperFlex Clusters page and click the hyperlinked cluster name.
Step 35. On the HyperFlex Clusters page, on the General tab, review the summary information about the new cluster: health state, storage capacity, node count, and so on. Check for any critical alarms requiring your attention.
Step 36. On the same page, click the Profile tab and review the newly created HX cluster profile information. Under Cluster, you can review the details of the policies you just configured (see Figure 7-27).
Step 37. Review the Nodes configuration.
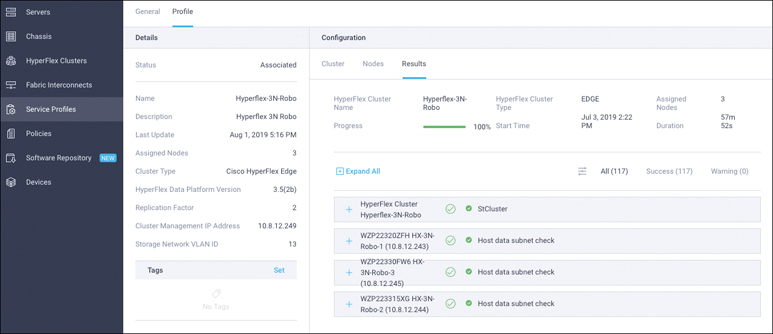
Figure 7-27 HX Cluster Profile Information
Step 38. Review the details of the installation process under Results (see Figure 7-28). Click the + sign at the top of each panel to view the detailed information.
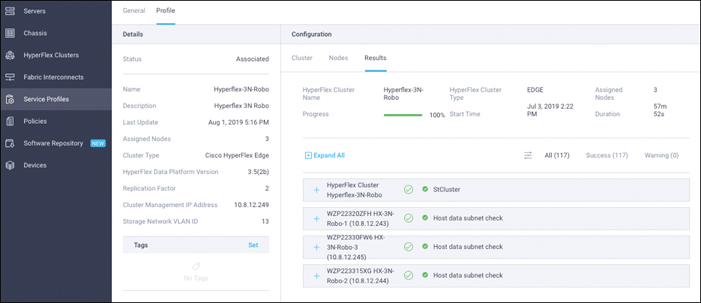
Figure 7-28 Results Tab
Step 39. Review more detailed status information for the new Cisco HyperFlex Edge cluster in the Cisco HyperFlex Connect management GUI. Cisco HyperFlex Connect can be directly launched from the Cisco Intersight platform. To find the cross-launch feature, navigate to the cluster list view by selecting HyperFlex Clusters in the navigation pane at the left.
Step 40. Find the desired cluster in the list, in the Settings column click the three dots (…), and then click Launch HyperFlex Connect. The native Cisco HyperFlex Connect user interface launches in a new browser tab. You can easily manage large-scale Cisco HyperFlex deployments directly from the Cisco Intersight platform. All Cisco HyperFlex functions are available through cross-launch except cluster upgrades, support bundle downloads, and HX Data Platform device connector settings. This operation must be performed by directly launching Cisco HyperFlex Connect over the local network.
Postinstallation Configuration
To automate the postinstallation procedures and verify the Cisco HyperFlex cluster configuration, a script is provided on the Cisco HyperFlex controller virtual machines. These steps can also be performed manually or with a PowerCLI script in vCenter, if preferred.
The following procedure uses the post_install script:
Step 1. Use SSH to go to the cluster management IP address and log in using the username and the controller virtual machine password provided during installation. Verify that the cluster is online and healthy by using the stcli cluster info or stcli cluster storage-summary command.
Step 2. Type the command curl -L http://cs.co/hxupdate | sh in the shell and press Enter to update to the latest postinstallation script. Look for the message “Scripts successfully updated.”
Step 3. Type the command /usr/share/springpath/storfs-misc/hx-scripts/post_install.py in the shell and press Enter.
Step 4. Enter the Cisco HyperFlex storage controller virtual machine root password for the Cisco HyperFlex cluster. (Use the password entered during the Cisco HyperFlex cluster installation.) Also enter the vCenter username and password. You must license the vSphere hosts through the script or complete this task in vCenter before continuing. Failure to apply a license will result in an error when you attempt to enable VMware High Availability (HA) or Distributed Resource Scheduler (DRS) in subsequent steps.
Step 5. Enter y to enable HA/DRS.
Step 6. Enter y to disable the ESXi hosts’ SSH warning. SSH running in ESXi is required in HX Data Platform 2.6.
Step 7. Add the vMotion VMkernel interfaces to each node by entering y. Enter the netmask, the vMotion VLAN ID, and the vMotion IP addresses for each of the hosts, as prompted. vMotion will be configured using best practices according to the choice of a single- or dual-switch configuration. In the case of single-switch configuration, a traffic shaper will automatically be applied to the VMkernel port to help ensure that vMotion does not consume all the bandwidth available on the shared uplink port.
Step 8. If desired, add virtual machine network port groups for guest virtual machine traffic. Enter n to skip this step and create the port groups manually in vCenter. Alternatively, you can create virtual machine network port groups and add them to the virtual machine vSwitch. This step will add the same network configuration to all nodes in the cluster. After the postinstallation script is complete, a vMotion VMkernel port and virtual machine network port groups are visible for each host in vCenter.
Step 9. Enter n to skip the testing of the Auto-Support email function.
Step 10. When a summary of the cluster is displayed upon completion of the script, verify that the cluster is healthy. You should enable a syslog destination for permanent storage of the ESXi host logs. The configuration can be performed manually in vCenter or through a PowerCLI script.
Cisco HyperFlex Edge is optimized for ROBO and edge environments. As previously described, Cisco HyperFlex Edge systems also can be remotely deployed from the cloud with the Cisco Intersight platform. This is a big step forward in Cisco’s strategy to build cloud-managed, on-premises, intelligent infrastructure.
Standard UCSM Managed HyperFlex Cluster Deployment
For a standard UCSM managed HyperFlex cluster, you use almost the same steps as for an edge cluster. Only two things are different here:
You need to claim fabric interconnects instead of individual nodes.
In the HX cluster profile installation wizard, under HX Cluster Type, select Cisco HyperFlex with Fabric Interconnect and then select Replication Factor (see Figure 7-29).

Figure 7-29 Cluster Types and Replication Factor
The following steps summarize the installation workflow for configuring a fabric interconnect–attached HyperFlex cluster:
Step 1. Complete the preinstallation checklist.
Step 2. Ensure that the network is set up.
Step 3. Log in to Cisco Intersight.
Step 4. Claim devices (that is, FIs).
Step 5. Run the HyperFlex cluster profile wizard.
Step 6. Run the postinstallation script through the controller VM.
Summary
The Cisco Intersight cloud management platform is designed to deploy, monitor, manage, and provide additional value-added services with strengthened security to Cisco UCS and Cisco HyperFlex products. In the future, Cisco Intersight capabilities will continue to improve, with the end goal of providing customers with the industry’s lowest operating costs at greatest scale. The Cisco Intersight platform combined with Cisco HyperFlex systems will completely transform the way that IT infrastructure is managed in the future.