

Volume configuration
A volume is a logical disk provisioned out of a storage pool and is recognized by a host with a unique identifier (UID) field and a parameter list.
The first part of this chapter provides a brief overview of IBM Spectrum Virtualize volumes, the classes of volumes available, and the topologies that they are associated with. It also provides an overview of advanced customization available.
The second part describes how to create volumes by using the GUI’s Quick and Advanced volume creation menus, and shows you how to map these volumes to defined hosts.
The third part provides an introduction to the new volume manipulation commands, which are designed to facilitate the creation and administration of volumes used for IBM HyperSwap topology.
|
Note: Advanced host and volume administration, such as volume migration and creating volume copies, is described in Chapter 10, “Copy services” on page 481.
|
This chapter includes the following topics:
6.1 Introduction to volumes
A volume is a logical disk that the system presents to attached hosts. For an IBM Spectrum Virtualize system, the volume presented is from a virtual disk (VDisk). A volume is a discrete area of usable storage that has been virtualized, using IBM Spectrum Virtualize code, from storage area network (SAN) storage that is managed by the IBM Spectrum Virtualize cluster. The term virtual is used because the volume presented does not necessarily exist on a single physical entity.
Volumes have the following characteristics or attributes:
•Volumes can be created and deleted.
•Volumes can be resized (expanded or shrunk).
•Volume extents can be migrated at run time to another MDisk or storage pool.
•Volumes can be created as fully allocated or thin-provisioned. A conversion from a fully allocated to a thin-provisioned volume and vice versa can be done at run time.
•Volumes can be stored in multiple storage pools (mirrored) to make them resistant to disk subsystem failures or to improve the read performance.
•Volumes can be mirrored synchronously or asynchronously for longer distances. An IBM Spectrum Virtualize system can run active volume mirrors to a maximum of three other IBM Spectrum Virtualize systems, but not from the same volume.
•Volumes can be copied by using FlashCopy. Multiple snapshots and quick restore from snapshots (reverse FlashCopy) are supported.
•Volumes can be compressed.
•Volumes can be virtual. The system supports VMware vSphere Virtual Volumes, sometimes referred to as VVols, which allow VMware vCenter to manage system objects, such as volumes and pools. The system administrator can create these objects and assign ownership to VMware administrators to simplify management of these objects.
|
Note: A managed disk (MDisk) is a logical unit of physical storage. MDisks are either Redundant Arrays of Independent Disks (RAID) from internal storage, or external physical disks that are presented as a single logical disk on the SAN. Each MDisk is divided into several extents, which are numbered, from 0, sequentially from the start to the end of the MDisk. The extent size is a property of the storage pools that the MDisks are added to.
Attention: MDisks are not visible to host systems.
|
Volumes have two major modes: Managed mode and image mode. Managed mode volumes have two policies: The sequential policy and the striped policy. Policies define how the extents of a volume are allocated from a storage pool.
The type attribute of a volume defines the allocation of extents that make up the volume copy:
•A striped volume contains a volume copy that has one extent allocated in turn from each MDisk that is in the storage pool. This is the default option, but you can also supply a list of MDisks to use as the stripe set as shown in Figure 6-1.
|
Attention: By default, striped volume copies are striped across all MDisks in the storage pool. If some of the MDisks are smaller than others, the extents on the smaller MDisks are used up before the larger MDisks run out of extents. Manually specifying the stripe set in this case might result in the volume copy not being created.
If you are unsure if there is sufficient free space to create a striped volume copy, select one of the following options:
•Check the free space on each MDisk in the storage pool by using the lsfreeextents command.
•Let the system automatically create the volume copy by not supplying a specific stripe set.
|

Figure 6-1 Striped extent allocation
•A sequential volume contains a volume copy that has extents that are allocated sequentially on one MDisk.
•Image-mode volumes are a special type of volume that have a direct relationship with one MDisk.
6.1.1 Image mode volumes
Image mode volumes are used to migrate LUNs that were previously mapped directly to host servers over to the control of the IBM Spectrum Virtualize system. Image mode provides a one-to-one mapping between the logical block addresses (LBAs) between a volume and an MDisk. Image mode volumes have a minimum size of one block (512 bytes) and always occupy at least one extent.
An image mode MDisk is mapped to one, and only one, image mode volume.
The volume capacity that is specified must be equal to the size of the image mode MDisk. When you create an image mode volume, the specified MDisk must be in unmanaged mode and must not be a member of a storage pool. The MDisk is made a member of the specified storage pool (Storage Pool_IMG_xxx) as a result of creating the image mode volume.
IBM Spectrum Virtualize also supports the reverse process, in which a managed mode volume can be migrated to an image mode volume. If a volume is migrated to another MDisk, it is represented as being in managed mode during the migration, and is only represented as an image mode volume after it reaches the state where it is a straight-through mapping.
An image mode MDisk is associated with exactly one volume. If the (image mode) MDisk is not a multiple of the MDisk Group’s extent size, the last extent is partial (not filled). An image mode volume is a pass-through one-to-one map of its MDisk. It cannot be a quorum disk and it does not have any metadata extents that are assigned to it from the IBM Spectrum Virtualize system. Managed or image mode MDisks are always members of a storage pool.
It is a preferred practice to put image mode MDisks in a dedicated storage pool and use a special name for it (for example, Storage Pool_IMG_xxx). The extent size that is chosen for this specific storage pool must be the same as the extent size into which you plan to migrate the data. All of the IBM Spectrum Virtualize copy services functions can be applied to image mode disks. See Figure 6-2.

Figure 6-2 Image mode volume versus striped volume
6.1.2 Managed mode volumes
Volumes operating in managed mode provide a full set of virtualization functions. Within a storage pool, the IBM Spectrum Virtualize supports an arbitrary relationship between extents on (managed mode) volumes and extents on MDisks. Each volume extent maps to exactly one MDisk extent.
Figure 6-3 shows this mapping. It also shows a volume that consists of several extents that are shown as V0 - V7. Each of these extents is mapped to an extent on one of the MDisks: A, B, or C. The mapping table stores the details of this indirection.
Several of the MDisk extents are unused. No volume extent maps to them. These unused extents are available for use in creating volumes, migration, expansion, and so on.

Figure 6-3 Simple view of block virtualization
The allocation of a specific number of extents from a specific set of MDisks is performed by the following algorithm:
•If the set of MDisks from which to allocate extents contains more than one MDisk, extents are allocated from MDisks in a round-robin fashion.
•If an MDisk has no free extents when its turn arrives, its turn is missed and the round-robin moves to the next MDisk in the set that has a free extent.
When a volume is created, the first MDisk from which to allocate an extent is chosen in a pseudo-random way rather than by choosing the next disk in a round-robin fashion. The pseudo-random algorithm avoids the situation where the striping effect that is inherent in a round-robin algorithm that places the first extent for many volumes on the same MDisk.
Placing the first extent of several volumes on the same MDisk can lead to poor performance for workloads that place a large I/O load on the first extent of each volume, or that create multiple sequential streams.
6.1.3 Cache mode for volumes
It is also possible to define the cache characteristics of a volume. Under normal conditions, a volume’s read and write data is held in the cache of its preferred node, with a mirrored copy of write data that is held in the partner node of the same I/O Group. However, it is possible to create a volume with cache disabled. This setting means that the I/Os are passed directly through to the back-end storage controller rather than being held in the node’s cache.
Having cache-disabled volumes makes it possible to use the native copy services in the underlying RAID array controller for MDisks (LUNs) that are used as the IBM Spectrum Virtualize image mode volumes. Using IBM Spectrum Virtualize Copy Services rather than the underlying disk controller copy services gives better results.
Cache characteristics of a volume can have any of the following settings:
•readwrite. All read and write I/O operations that are performed by the volume are stored in cache. This is the default cache mode for all volumes.
•readonly. All read I/O operations that are performed by the volume are stored in cache.
•disabled. All read and write I/O operations that are performed by the volume are not stored in cache. Under normal conditions, a volume’s read and write data is held in the cache of its preferred node, with a mirrored copy of write data that is held in the partner node of the same I/O Group. With cache disabled volume, the I/Os are passed directly through to the back-end storage controller rather than being held in the node’s cache.
|
Note: Having cache-disabled volumes makes it possible to use the native copy services in the underlying RAID array controller for MDisks (LUNs) that are used as IBM Spectrum Virtualize image mode volumes. Consult IBM Support before turning off the cache for volumes in production environment to avoid any performance degradation.
|
6.1.4 Mirrored volumes
The mirrored volume feature provides a simple RAID 1 function, so a volume has two physical copies of its data. This approach enables the volume to remain online and accessible even if one of the MDisks sustains a failure that causes it to become inaccessible.
The two copies of the volume often are allocated from separate storage pools or by using image-mode copies. The volume can participate in FlashCopy and remote copy relationships. It is serviced by an I/O Group, and has a preferred node.
Each copy is not a separate object and cannot be created or manipulated except in the context of the volume. Copies are identified through the configuration interface with a copy ID of their parent volume. This copy ID can be 0 or 1.
This feature provides a point-in-time copy function that is achieved by “splitting” a copy from the volume. However, the mirrored volume feature does not address other forms of mirroring that are based on remote copy, which is sometimes called IBM HyperSwap, that mirrors volumes across I/O Groups or clustered systems. It is also not intended to manage mirroring or remote copy functions in back-end controllers.
Figure 6-4 provides an overview of volume mirroring.

Figure 6-4 Volume mirroring overview
A second copy can be added to a volume with a single copy or removed from a volume with two copies. Checks prevent the accidental removal of the only remaining copy of a volume. A newly created, unformatted volume with two copies initially has the two copies in an out-of-synchronization state. The primary copy is defined as “fresh” and the secondary copy is defined as “stale.”
The synchronization process updates the secondary copy until it is fully synchronized. This update is done at the default synchronization rate or at a rate that is defined when the volume is created or modified. The synchronization status for mirrored volumes is recorded on the quorum disk.
If a two-copy mirrored volume is created with the format parameter, both copies are formatted in parallel, and the volume comes online when both operations are complete with the copies in sync.
If mirrored volumes are expanded or shrunk, all of their copies are also expanded or shrunk.
If it is known that MDisk space (which is used for creating copies) is already formatted or if the user does not require read stability, a no synchronization option can be selected that declares the copies as synchronized (even when they are not).
To minimize the time that is required to resynchronize a copy that is out of sync, only the
256 kibibyte (KiB) grains that were written to since the synchronization was lost are copied. This approach is known as an incremental synchronization. Only the changed grains must be copied to restore synchronization.
256 kibibyte (KiB) grains that were written to since the synchronization was lost are copied. This approach is known as an incremental synchronization. Only the changed grains must be copied to restore synchronization.
|
Important: An unmirrored volume can be migrated from one location to another by adding a second copy to the wanted destination, waiting for the two copies to synchronize, and then removing the original copy 0. This operation can be stopped at any time. The two copies can be in separate storage pools with separate extent sizes.
|
When there are two copies of a volume, one copy is known as the primary copy. If the primary is available and synchronized, reads from the volume are directed to it. The user can select the primary when the volume is created or can change it later.
Placing the primary copy on a high-performance controller maximizes the read performance of the volume.
Write I/O operations data flow with a mirrored volume
For write I/O operations to a mirrored volume, the IBM Spectrum Virtualize preferred node definition, with the multipathing driver on the host, is used to determine the preferred path. The host routes the I/Os through the preferred path, and the corresponding node is responsible for further destaging written data from cache to both volume copies. Figure 6-5 shows the data flow for write I/O processing when volume mirroring is used.

Figure 6-5 Data flow for write I/O processing in a mirrored volume
As shown in Figure 6-5, all the writes are sent by the host to the preferred node for each volume (1). Then, the data is mirrored to the cache of the partner node in the I/O Group (2), and acknowledgment of the write operation is sent to the host (3). The preferred node then destages the written data to the two volume copies (4).
A volume with copies can be checked to see whether all of the copies are identical or consistent. If a medium error is encountered while it is reading from one copy, it is repaired by using data from the other copy. This consistency check is performed asynchronously with host I/O.
|
Important: Mirrored volumes can be taken offline if no quorum disk is available. This behavior occurs because the synchronization status for mirrored volumes is recorded on the quorum disk.
|
Mirrored volumes use bitmap space at a rate of 1 bit per 256 KiB grain, which translates to
1 MiB of bitmap space supporting 2 TiB of mirrored volumes. The default allocation of bitmap space is 20 MiB, which supports 40 TiB of mirrored volumes. If all 512 MiB of variable bitmap space is allocated to mirrored volumes, 1 PiB of mirrored volumes can be supported.
1 MiB of bitmap space supporting 2 TiB of mirrored volumes. The default allocation of bitmap space is 20 MiB, which supports 40 TiB of mirrored volumes. If all 512 MiB of variable bitmap space is allocated to mirrored volumes, 1 PiB of mirrored volumes can be supported.
Table 6-1 shows you the bitmap space default configuration.
Table 6-1 Bitmap space default configuration
|
Copy service
|
Minimum allocated bitmap space
|
Default allocated bitmap space
|
Maximum allocated bitmap space
|
Minimum1 functionality when using the default values
|
|
Remote copy2
|
0
|
20 MiB
|
512 MiB
|
40 TiB of remote mirroring volume capacity
|
|
FlashCopy3
|
0
|
20 MiB
|
2 GiB
|
•10 TiB of FlashCopy source volume capacity
•5 TiB of incremental FlashCopy source volume capacity
|
|
Volume mirroring
|
0
|
20 MiB
|
512 MiB
|
40 TiB of mirrored volumes
|
|
RAID
|
0
|
40 MiB
|
512 MiB
|
•80 TiB array capacity using RAID 0, 1, or 10
•80 TiB array capacity in three-disk RAID 5 array
•Slightly less than 120 TiB array capacity in five-disk RAID 6 array
|
1 The actual amount of functionality might increase based on settings such as grain size and strip size. RAID is subject to a 15% margin or error.
2 Remote copy includes Metro Mirror, Global Mirror, and active-active relationships.
3 FlashCopy includes the FlashCopy function, Global Mirror with change volumes, and active-active relationships.
The sum of all bitmap memory allocation for all functions except FlashCopy must not exceed 552 MiB.
6.1.5 Thin-provisioned volumes
Volumes can be configured to be thin-provisioned or fully allocated. A thin-provisioned volume behaves as though application reads and writes were fully allocated. When a thin-provisioned volume is created, the user specifies two capacities:
•The real physical capacity that is allocated to the volume from the storage pool
•Its virtual capacity that is available to the host
In a fully allocated volume, these two values are the same.
Therefore, the real capacity determines the quantity of MDisk extents that is initially allocated to the volume. The virtual capacity is the capacity of the volume that is reported to all other IBM Spectrum Virtualize components (for example, FlashCopy, cache, and remote copy), and to the host servers.
The real capacity is used to store the user data and the metadata for the thin-provisioned volume. The real capacity can be specified as an absolute value, or as a percentage of the virtual capacity.
Thin-provisioned volumes can be used as volumes that are assigned to the host, by FlashCopy to implement thin-provisioned FlashCopy targets, and with the mirrored volumes feature.
When a thin-provisioned volume is initially created, a small amount of the real capacity is used for initial metadata. I/Os are written to grains of the thin volume that were not previously written, which causes grains of the real capacity to be used to store metadata and the actual user data. I/Os are written to grains that were previously written, which updates the grain where data was previously written.
The grain size is defined when the volume is created. The grain size can be 32 KiB, 64 KiB, 128 KiB, or 256 KiB. The default grain size is 256 KiB, which is the preferred option. If you select 32 KiB for the grain size, the volume size cannot exceed 260 TiB. The grain size cannot be changed after the thin-provisioned volume is created. Generally, smaller grain sizes save space, but they require more metadata access, which can adversely affect performance.
When using thin-provisioned volume as a FlashCopy source or target volume, use 256 KiB to maximize performance. When using thin-provisioned volume as a FlashCopy source or target volume, specify the same grain size for the volume and for the FlashCopy function.
Figure 6-6 shows the thin-provisioning concept.

Figure 6-6 Conceptual diagram of thin-provisioned volume
Thin-provisioned volumes store user data and metadata. Each grain of data requires metadata to be stored. Therefore, the I/O rates that are obtained from thin-provisioned volumes are less than the I/O rates that are obtained from fully allocated volumes.
The metadata storage used is never greater than 0.1% of the user data. The resource usage is independent of the virtual capacity of the volume. If you are using the thin-provisioned volume directly with a host system, use a small grain size.
|
Thin-provisioned volume format: Thin-provisioned volumes do not need formatting. A read I/O that requests data from deallocated data space returns zeros. When a write I/O causes space to be allocated, the grain is “zeroed” before use.
|
The real capacity of a thin volume can be changed if the volume is not in image mode. Increasing the real capacity enables a larger amount of data and metadata to be stored on the volume. Thin-provisioned volumes use the real capacity that is provided in ascending order as new data is written to the volume. If the user initially assigns too much real capacity to the volume, the real capacity can be reduced to free storage for other uses.
A thin-provisioned volume can be configured to autoexpand. This feature causes the IBM Spectrum Virtualize to automatically add a fixed amount of more real capacity to the thin volume as required. Therefore, autoexpand attempts to maintain a fixed amount of unused real capacity for the volume, which is known as the contingency capacity.
The contingency capacity is initially set to the real capacity that is assigned when the volume is created. If the user modifies the real capacity, the contingency capacity is reset to be the difference between the used capacity and real capacity.
A volume that is created without the autoexpand feature, and therefore has a zero contingency capacity, goes offline when the real capacity is used and it must expand.
Autoexpand does not cause the real capacity to grow much beyond the virtual capacity. The real capacity can be manually expanded to more than the maximum that is required by the current virtual capacity, and the contingency capacity is recalculated.
To support the auto expansion of thin-provisioned volumes, the storage pools from which they are allocated have a configurable capacity warning. When the used capacity of the pool exceeds the warning capacity, a warning event is logged. For example, if a warning of 80% is specified, the event is logged when 20% of the free capacity remains.
A thin-provisioned volume can be converted nondisruptively to a fully allocated volume (or vice versa) by using the volume mirroring function. For example, the system allows a user to add a thin-provisioned copy to a fully allocated primary volume, and then remove the fully allocated copy from the volume after they are synchronized.
The fully allocated-to-thin-provisioned migration procedure uses a zero-detection algorithm so that grains that contain all zeros do not cause any real capacity to be used.
6.1.6 Compressed volumes
This is a custom type of volume where data is compressed as it is written to disk, saving additional space. Compression is a separately orderable license that is set on a per enclosure basis. One license is required for each control or expansion enclosure and each enclosure in any external storage systems that use virtualization.To use the compression function, you must obtain the IBM Real-time Compression license.
|
Note: For IBM Storwize V5000 Gen2, only Storwize V5030 and Storwize V5030F models support compression.
|
6.1.7 Volumes for various topologies
A Basic volume is the simplest form of volume. It consists of a single volume copy, made up of extents striped across all MDisks in a storage pool. It services I/O by using readwrite cache and is classified as fully allocated (reported real capacity and virtual capacity are equal). You can create other forms of volumes, depending on the type of topology that is configured on your system:
•With standard topology, which is a single-site configuration, you can create a basic volume or a mirrored volume.
By using volume mirroring, a volume can have two physical copies. Each volume copy can belong to a different pool, and each copy has the same virtual capacity as the volume. In the management GUI, an asterisk indicates the primary copy of the mirrored volume. The primary copy indicates the preferred volume for read requests.
•With HyperSwap topology, which is a three-site HA configuration, you can create a basic volume or a HyperSwap volume.
HyperSwap volumes create copies on separate sites for systems that are configured with HyperSwap topology. Data that is written to a HyperSwap volume is automatically sent to both copies so that either site can provide access to the volume if the other site becomes unavailable.
|
Note: For IBM Storwize V5000 Gen2, the HyperSwap topology is supported only on Storwize V5030 and Storwize V5030F systems.
|
•Virtual Volumes (VVols): The IBM Spectrum Virtualize V7.6.0 release also introduces Virtual Volumes. These volumes are available in a system configuration that supports VMware vSphere Virtual Volumes. These volumes allow VMware vCenter to manage system objects, such as volumes and pools. The Spectrum Virtualize system administrators can create volume objects of this class, and assign ownership to VMware administrators to simplify management.
For more information about configuring vVol with IBM Spectrum Virtualize, see Configuring VMware Virtual Volumes for Systems Powered by IBM Spectrum Virtualize, SG24-8328.
|
Note: From V7.4.0 onwards, it is possible to prevent accidental deletion of volumes, if they have recently performed any I/O operations. This feature is called Volume protection, and it prevents active volumes or host mappings from being deleted inadvertently. This is done by using a global system setting. For more information, see IBM Knowledge Center:
|
6.2 Create Volumes menu
The GUI is the simplest means of volume creation, and presents different options in the Create Volumes menu depending on the topology of the system.
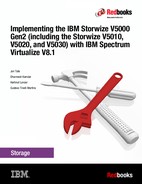
To start the process of creating a volume, follow the steps listed:
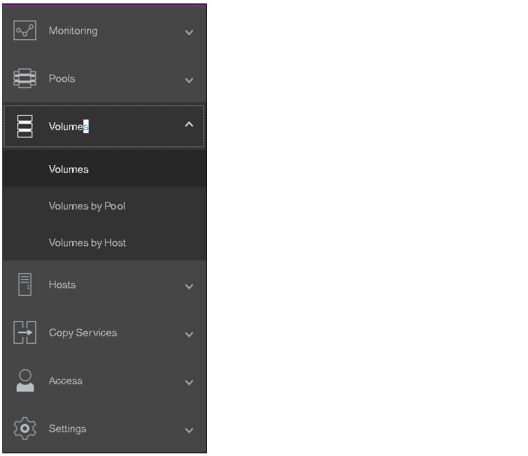
Figure 6-7 Volumes

Figure 6-8 Volumes sub-menu option
3. On the right pane, you will get a list of existing volumes, if any, as shown in Figure 6-9.

Figure 6-9 Existing volumes

Figure 6-10 Create Volumes
5. Depending on the topology of the system, the Create Volumes button will provide different options.
For standard topology, Create Volumes will pop up window with options to create basic, mirrored or custom volume as shown in Figure 6-11.

Figure 6-11 Create Volume options for standard topology
For HyperSwap topology, Create Volumes option will pop up window with options to create basic, HyperSwap or custom volume as shown in Figure 6-12.

Figure 6-12 Create Volume options for HyperSwap topology
Clicking any of the three choices in the Create Volumes window opens a drop-down window where volume details can be entered. The example shown in Figure 6-13 shows a Basic volume to demonstrate this view.

Figure 6-13 Basic Volume
|
Notes:
•A Basic volume is a volume whose data is striped across all available managed disks (MDisks) in one storage pool.
•A Mirrored volume is a volume with two physical copies, where each volume copy can belong to a different storage pool.
•A Custom volume, in the context of this menu, is either a Basic or Mirrored volume with customization from the default parameters.
Volume Creation also provides, using the Capacity Savings parameter, the ability to change the default provisioning of a Basic or Mirrored Volume to Thin-provisioned or Compressed.
|
Volume migration is described in 6.8, “Migrating a volume to another storage pool” on page 333. Creating volume copies is described in 6.3.2, “Creating Mirrored volumes using Volume Creation” on page 306.
6.3 Creating volumes using the Volume Creation
This section focuses on using the Volume Creation operation to create Basic and Mirrored volumes in a system with standard topology. It also covers creating host-to-volume mapping. As previously stated, Volume Creation is available on four different volume classes:
•Basic
•Mirrored
•Custom
•HyperSwap
|
Note: The ability to create HyperSwap volumes using the GUI simplifies creation and configuration. This simplification is enhanced by the GUI using the mkvolume command.
|
6.3.1 Creating Basic volumes using Volume Creation
The most commonly used type of volume is the Basic volume. This type of volume is fully provisioned, with the entire size dedicated to the defined volume. The host and the IBM Spectrum Virtualize system see the fully allocated space.
Create a Basic volume by clicking the Basic icon as shown in Figure 6-14 on page 304. This action opens an additional input window where you can define the following information:
•Pool: The pool in which the volume is created (drop-down)
•Quantity: The number of volumes to be created (numeric up/down)
•Capacity: Size of the volume in units (drop-down)
•Capacity Savings (drop-down):
– None
– Thin-provisioned
– Compressed
•Name: Name of the volume (cannot start with a numeric)
•I/O group
The Basic volume creation process is shown in Figure 6-14.

Figure 6-14 Creating Basic volume
An appropriate naming convention is recommended for volumes for easy identification of their association with the host or host cluster. At a minimum, it should contain the name of the pool or some tag that identifies the underlying storage subsystem. It can also contain the host name that the volume is mapped to, or perhaps the content of this volume, for example, name of applications to be installed.
When all of the characteristics of the Basic volume have been defined, it can be created by selecting one of the following options:
•Create
•Create and Map to Host
|
Note: The Plus sign (+) icon highlighted in green in Figure 6-14, can be used to create more volumes in the same instance of the volume creation wizard.
|
In this example, the Create option has been selected (the volume-to-host mapping can be performed later). At the end of the volume creation, following confirmation window appears as shown in Figure 6-15.

Figure 6-15 Create Volume Task Completion window: Success
Success is also indicated by the state of the Basic volume being reported as formatting in the Volumes pane as shown in Figure 6-16.

Figure 6-16 Basic Volume Fast-Format
|
Notes:
•Fully allocated volumes are automatically formatted through the quick initialization process after the volume is created. This process makes fully allocated volumes available for use immediately.
•Quick initialization requires a small amount of I/O to complete, and limits the number of volumes that can be initialized at the same time. Some volume actions, such as moving, expanding, shrinking, or adding a volume copy, are disabled when the specified volume is initializing. Those actions are available after the initialization process completes.
•The quick initialization process can be disabled in circumstances where it is not necessary. For example, if the volume is the target of a Copy Services function, the Copy Services operation formats the volume.The quick initialization process can also be disabled for performance testing, so that the measurements of the raw system capabilities can take place without waiting for the process to complete.
For more information, see IBM Knowledge Center:
|
6.3.2 Creating Mirrored volumes using Volume Creation
IBM Spectrum Virtualize offers the capability to mirror volumes, which means a single volume, presented to a host, can have two physical copies. Each volume copy can belong to a different pool, and each copy has the same virtual capacity as the volume. When a server writes to a mirrored volume, the system writes the data to both copies. When a server reads a mirrored volume, the system picks one of the copies to read.
Normally this is the primary copy (as indicated in the management GUI by an asterisk (*)). If one of the mirrored volume copies is temporarily unavailable (for example, because the storage system that provides the pool is unavailable), the volume remains accessible to servers. The system remembers which areas of the volume are written and resynchronizes these areas when both copies are available.
The use of mirrored volumes results in the following outcomes:
•Improves availability of volumes by protecting them from a single storage system failure
•Provides concurrent maintenance of a storage system that does not natively support concurrent maintenance
•Provides an alternative method of data migration with better availability characteristics
•Converts between fully allocated volumes and thin-provisioned volumes
|
Note: Volume mirroring is not a true disaster recovery (DR) solution, because both copies are accessed by the same node pair and addressable by only a single cluster, but it can improve availability.
|
To create a mirrored volume, complete the following steps:
1. In the Create Volumes window, click Mirrored and in the Mirrored copies subsection, choose the Pool of Copy1 and Copy2 by using the drop-down menu. Although the mirrored volume can be created in the same pool, this setup is not typical. Next, in the Volume Details, enter Quantity, Capacity, Capacity savings, and Name.
Generally, keep mirrored volumes on a separate set of physical disks (Pools). Leave the I/O group option at its default setting of Automatic (see Figure 6-17).
Figure 6-17 Mirrored Volume creation
2. Click Create (or Create and Map to Host)
3. Next, the GUI displays the underlying CLI commands being run to create the mirrored volume and indicates completion as shown in Figure 6-18.

Figure 6-18 Task complete: creating Mirrored volume
|
Note: When creating a Mirrored volume by using this menu, you are not required to specify the Mirrored Sync rate. It defaults to 2 MBps. Customization of this synchronization rate can be done by using the Custom option.
|
Volume Creation with Capacity Saving options
The Volume Creation operation also provides, using the Capacity Savings parameter, the ability to alter the provisioning of a Basic or Mirrored volume into Thin-provisioned or Compressed.

Figure 6-19 Volume Creation with Capacity Saving option set to Compressed
Alternatively, select Thin-provisioned from the menu to define a Thin-provisioned volume.
6.4 Mapping a volume to the host
After a volume is created, it can be mapped to a host:
1. From the Volumes menu, highlight the volume that you want to create a mapping for and then select Actions from the menu bar.
|
Tip: An alternative way of opening the Actions menu is to highlight (select) a volume and use the right mouse button.
|
2. From the Actions menu, select the Map to Host or Host Cluster option as shown in Figure 6-20 on page 310.

Figure 6-20 Map to Host
3. This action opens a Create Mapping window. In this window, indicate whether the volume needs to be mapped to a host or host cluster, select the desired host or host cluster, and whether you want system assigned SCSI ID or self assigned as shown in Figure 6-21.

Figure 6-21 Mapping a Volume to Host
4. Click Next. A window will open up listing already mapped volumes to that host along wit the new volume will be mapped, as shown in Figure 6-22 with blue rectangle.

Figure 6-22 Map volume to host
5. Click Map Volumes and the Modify Mappings window displays the command details, and then a Task completed message as shown in Figure 6-23.

Figure 6-23 Volume mapped
6.5 Creating Custom volumes
The Create Volumes window enables Custom volume creation. It provides an alternative method of defining Capacity savings options, such as Thin-provisioning and Compression, but also expands on the base level default options for available Basic and Mirrored volumes. A Custom volume can be customized regarding Mirror sync rate, Cache mode, and Fast-Format.
The Custom volume creation operation consists of several options:
•Volume Location (Mandatory, defines the Pools to be used)
•Volume Details (Mandatory, defines the Capacity savings option such as Thin Provisioning or Compression or none)
•General (for changing default options for Cache mode and Formatting)
•Summary
Work through these options to customize your Custom volume as wanted, and then commit these changes by using Create as shown in Figure 6-24.

Figure 6-24 Customization submenus
6.5.1 Creating a custom thin-provisioned volume
A thin-provisioned volume can be defined and created by using the Custom option. Regarding application reads and writes, thin-provisioned volumes behave as though they were fully allocated. When creating a thin-provisioned volume, you can specify two capacities:
•The real physical capacity that is allocated to the volume from the storage pool. The real capacity determines the quantity of extents that are initially allocated to the volume.
•Its virtual capacity available to the host. The virtual capacity is the capacity of the volume that is reported to all other components (for example, FlashCopy, cache, and remote copy) and to the hosts.
To create a thin-provisioned volume, complete the following steps:
1. From the Create Volumes window, select the Custom option. In the Volume Location subsection define the pool in which the volume is created.Use the drop-down menu in the Pool option to choose the pool. All other options, such as Volume copy type, Caching I/O group, Preferred node, and Accessible I/O groups, can be left with their default options as shown in Figure 6-25.

Figure 6-25 Volume Location for thin-provisioned volume
2. Next, in the Volume Details subsection you can input the Quantity, Capacity (virtual), Capacity Savings (choose Thin-provisioned from the drop-down menu), and Name of the volume being created as shown in Figure 6-26.

Figure 6-26 Volume Details
3. Next, in the Thin Provisioning subsection enter the real and virtual capacity, expansion criteria, and grain size as shown in Figure 6-27.

Figure 6-27 Thin Provisioning
The Thin Provisioning options are as follows (defaults are displayed in parentheses):
– Real capacity: (2%). Specify the size of the real capacity space used during creation.
– Automatically Expand: (Enabled). This option enables the automatic expansion of real capacity, if more capacity is to be allocated.
– Warning threshold: (Enabled). Enter a threshold for receiving capacity alerts.
– Grain Size: (256 kibibytes (KiB)). Specify the grain size for real capacity. This option describes the size of the chunk of storage to be added to used capacity. For example, when the host writes 1 megabyte (MB) of new data, the capacity is increased by adding four chunks of 256 KiB each.
|
Important: If you do not use the autoexpand feature, the volume will go offline after reaching its real capacity.
The default grain size is 256 KiB. The optimum choice of grain size depends on volume use type. For more information, see the “Performance Problem When Using EasyTier With Thin Provisioned Volumes” topic:
•If you are not going to use the thin-provisioned volume as a FlashCopy source or target volume, use 256 KiB to maximize performance.
•If you are going to use the thin-provisioned volume as a FlashCopy source or target volume, specify the same grain size for the volume and for the FlashCopy function.
|
4. Next, in the General sub-section enter the caching mode as Enabled, Read-only or Disabled as shown in Figure 6-28. Also enter unit device identifier (UDID) if this volume is going to be mapped to an OpenVMS host.

Figure 6-28 General details

Figure 6-29 Task completed, the thin-provisioned volume is created
6.5.2 Creating Custom Compressed volumes
The configuration of compressed volumes is similar to thin-provisioned volumes. To create a Compressed volume, complete the following steps:
1. From the Create Volumes window, select the Custom option. In the Volume Location subsection define the pool in which the volume is created.Use the drop-down menu in the Pool option to choose the pool.
All other options, such as Volume copy type, Caching I/O group, Preferred node, and Accessible I/O groups, can be left with their default options as shown in Figure 6-30.

Figure 6-30 Defining a volume as compressed using the Capacity savings option
2. Next, in the Volume Details subsection you can input the Quantity, Capacity (virtual), Capacity Savings (choose Compressed from the drop-down menu), and Name of the volume being created as shown in Figure 6-31.

Figure 6-31 Volume Details
3. Next, in the Compressed subsection enter the real either in terms of % of virtual capacity or in GiB, expansion criteria, warning threshold and desired % of the virtual capacity at which you should receive a warning as shown in Figure 6-32.

Figure 6-32 Compressed details
4. Next, in the General sub-section enter the caching mode as Enabled, Read-only or Disabled as shown in Figure 6-33. Also enter unit device identifier (UDID) if this volume is going to be mapped to an OpenVMS host.

Figure 6-33 General details

Figure 6-34 Compressed volume created
6.5.3 Custom Mirrored Volumes
The Custom option in the Create Volumes window is used to customize volume creation. Using this feature, the default options can be overridden and volume creation can be tailored to the specifics of the clients environment.
Modifying the Mirror sync rate
The Mirror sync rate can be changed from the default setting by using the Custom option, subsection Volume Location, of the Create Volumes window.
This option sets the priority of copy synchronization progress, enabling a preferential rate to be set for more important volumes (Figure 6-35).

Figure 6-35 Customization of Mirrored sync rate
The progress of formatting and synchronization of a newly created Mirrored Volume can be checked from the Running Tasks menu. This menu reports the progress of all currently running tasks, including Volume Format and Volume Synchronization (Figure 6-36).

Figure 6-36 Progress of all currently running tasks
Creating a Custom Thin-provisioned Mirrored volume
The Custom option in the Create Volumes window is used to customize volume creation. Using this feature, the default options can be overridden and volume creation can be tailored to the specifics of the clients environment.
The Mirror Sync rate can be changed from the default setting under the Volume Location subsection of the Create Volume window. This option sets the priority of copy synchronization progress, enabling a preferential rate to be set for more important mirrored volumes.
The summary shows you the capacity information and the allocated space. You can customize the thin-provision settings or the mirror synchronization rate. After you create the volume, the task completed window opens as shown in Figure 6-37.

Figure 6-37 Task completed window
The initial synchronization of thin-mirrored volumes is fast when a small amount of real and virtual capacity is used.
6.6 HyperSwap and the mkvolume command
HyperSwap volume configuration is not possible until site awareness has been configured.
When the HyperSwap topology is configured, the GUI uses mkvolume command to create volumes instead of traditional mkvdisk command. This section describes the mkvolume command that is used in HyperSwap topology. The GUI continues to use mkvdisk when all other classes of volumes are created.
In this section, the new mkvolume command is described, and how the GUI uses this command, when HyperSwap topology has been configured, rather than the “traditional” mkvdisk command.
|
Note: It is still possible to create HyperSwap volumes as in the V7.5.0 release, as described in the following white paper:
You can also get more information in IBM Storwize V7000, Spectrum Virtualize, HyperSwap, and VMware Implementation, SG24-8317:
|
HyperSwap volumes are a new type of HA volumes that are supported by IBM Spectrum Virtualize. They are built off two existing IBM Spectrum Virtualize technologies:
•Metro Mirror
•Volume Mirroring
These technologies have been combined in an active-active configuration deployed by using Change Volumes (as used in the Global Mirror with Change Volumes) to create a Single Volume (from a host perspective) in an HA form. The volume presented is a combination of four “traditional” volumes but is a single entity from a host (and administrative) perspective as shown in Figure 6-38.

Figure 6-38 What makes up a HyperSwap Volume
The GUI simplifies the complexity of HyperSwap volume creation by only presenting the volume class of HyperSwap as a Volume Creation option after HyperSwap topology has been configured.
In the following example, HyperSwap topology has been configured and the Volume Creation window is being used to define a HyperSwap Volume as shown in Figure 6-39.
The capacity and name characteristics are defined as for a Basic volume (highlighted in blue in the example) and the mirroring characteristics are defined by the Site parameters (highlighted in red).

Figure 6-39 HyperSwap Volume creation with Summary of actions
The drop-downs help during creation, and the Summary (lower left of the creation window) indicates the actions that are carried out when the Create option is selected. As shown in Figure 6-39, a single volume is created, with volume copies in site1 and site2. This volume is in an active-active (Metro Mirror) relationship with extra resilience provided by two change volumes.
The command that is issued to create this volume is shown in Figure 6-40, and can be summarized as follows:
svctask mkvolume -name <name_of_volume> -pool <X:Y> -size <Size_of_volume> -unit <units>

Figure 6-40 Example mkvolume command
6.6.1 Volume manipulation commands
Five CLI commands for administering volumes were released in IBM Spectrum Virtualize V7.6.0. However, the GUI continues to use existing commands for all volume administration, except for HyperSwap volume creation (mkvolume) and deletion (rmvolume). The following CLI commands are available for administering volumes:
•mkvolume
•mkimagevolume
•addvolumecopy
•rmvolumecopy
•rmvolume
In addition, the lsvdisk and GUI functionality is available. The lsvdisk command now includes volume_id, volume_name, and function fields to easily identify the individual VDisk that make up a HyperSwap volume. These views are “rolled-up” in the GUI to provide views that reflect the client’s view of the HyperSwap volume and its site-dependent copies, as opposed to the “low-level” VDisks and VDisk-change-volumes.
As shown in the Figure 6-41, Volumes → Volumes shows the HyperSwap Volume ITSO_HS_VOL with an expanded view opened by using the twisty (V) to reveal two volume copies: ITSO_HS_VOL (site1) (Master VDisk) and ITSO_HS_VOL (site2) (Auxiliary VDisk). We do not show the VDisk-Change-Volumes.

Figure 6-41 Hidden Change Volumes
Likewise, the status of the HyperSwap volume is reported at a “parent” level. If one of the copies is synchronized or not or offline, the HyperSwap volume reflects this state as shown in Figure 6-42.

Figure 6-42 Parent volume reflects state of copy volume
HyperSwap-related individual commands are described briefly here:
•mkvolume
Create an empty volume by using storage from existing storage pools. The type of volume created is determined by the system topology and the number of storage pools specified. Volume is always formatted (zeroed). This command can be used to create these items:
– Basic volume: Any topology
– Mirrored volume: Standard topology
– HyperSwap volume: HyperSwap topology
•rmvolume
Remove a volume. For a HyperSwap volume, this process includes deleting the active-active relationship and the change volumes.
The -force parameter with rmvdisk is replaced by individual override parameters, making it clearer to the user exactly what protection they are bypassing.
•mkimagevolume
Create an image mode volume. This command can be used to import a volume, preserving existing data. Implemented as a separate command to provide greater differentiation between the action of creating an empty volume and creating a volume by importing data on an existing MDisk.
•addvolumecopy
Add a copy to an existing volume. The new copy is always synchronized from the existing copy. For HyperSwap topology systems, this process creates a highly available volume. This command can be used to create the following volume types:
– Mirrored volume: Standard topology
– HyperSwap volume: HyperSwap topology
•rmvolumecopy
Remove a copy of a volume. Leaves the volume intact. Converts a Mirrored or HyperSwap volume into a basic volume. For a HyperSwap volume, this process includes deleting the active-active relationship and the change volumes.
This command enables a copy to be identified simply by its site.
The -force parameter with rmvdiskcopy is replaced by individual override parameters, making it clearer to the user exactly what protection they are bypassing.
See IBM Knowledge Center for more details:
6.7 Mapping Volumes to Host after volume creation
Newly created volume can be mapped to the host at creation time, or later. If the volume was not mapped to a host during creation, then to map it to a host, follow the steps in 6.7.1, “Mapping newly created volumes to the host using the wizard” on page 327.
6.7.1 Mapping newly created volumes to the host using the wizard
This section involves continue to map the volume that was created in 6.3, “Creating volumes using the Volume Creation” on page 303. We assume that you followed that procedure and are on the Volumes pane showing list of volumes as shown in Figure 6-43.

Figure 6-43 Volume list
To map a volume, complete the following steps:
1. Right-click the volume name to be mapped and select Map to Host or Host Cluster menu option as shown in Figure 6-44.

Figure 6-44
2. Select a host or a host cluster to which the new volume should be attached as shown in Figure 6-45.

Figure 6-45 Select a host or a host cluster
|
Note: At this point you can let system assign a SCSI ID or choose it to assign it manually via Self Assign radio button. In this example, we chose to let system assign a SCSI ID.
|
3. Click Next. You will be shown a summary window with the volume to be mapped along with already existing volumes mapped to the host as shown in Figure 6-46.

Figure 6-46 Map Volume summary
4. Click Map Volumes. A window indicating task of volume mapping completed will be shown as in Figure 6-47.

Figure 6-47 Volume mapping task completed
5. After the task completes, the wizard returns to the Volumes window.
6. You can verify the host mapping by clicking on Hosts from the main panel and selecting Hosts, as shown in Figure 6-48.

Figure 6-48 Hosts from main panel
7. Right-click the host to which the volume was mapped and select Modify Volume Mappings, as shown in Figure 6-49.

Figure 6-49 Modify host mappings
8. A window will pop up showing volumes currently mapped to the selected host, as shown in Figure 6-50.

Figure 6-50 Volumes mapped to a host
The host is now able to access the volumes and store data on them. See 6.8, “Migrating a volume to another storage pool” on page 333 for information about discovering the volumes on the host and making additional host settings, if required.
Multiple volumes can also be created in preparation for discovering them later, and customize mappings.
6.8 Migrating a volume to another storage pool
IBM Spectrum Virtualize provides online volume migration while applications are running. Storage pools are managed disk groups, as described in Chapter 4, “Storage pools” on page 143. With volume migration, data can be moved between storage pools, regardless of whether the pool is an internal pool, or a pool on another external storage system. This migration is done without the server and application knowing that it even occurred.
The migration process itself is a low priority process that does not affect the performance of the IBM Spectrum Virtualize system. However, it moves one extent after another to the new storage pool, so the performance of the volume is affected by the performance of the new storage pool after the migration process.
To migrate a volume to another storage pool, complete the following steps:

Figure 6-51 Volumes submenu option from main panel

Figure 6-52 Selecting Migrate to Another Pool option
3. The Migrate Volume Copy window opens. If your volume consists of more than one copy, select the copy (from the menu shown in Figure 6-53) that you want to migrate to another storage pool. If the selected volume consists of one copy, this selection menu is not available.

Figure 6-53 Migrate Volume Copy window: Select copy
4. Select the new target storage pool as shown in Figure 6-54.

Figure 6-54 Selecting the new pool for volume migration
5. Click Migrate and the volume copy migration starts as shown in Figure 6-55. Click Close to return to the Volumes pane.

Figure 6-55 Migrate Volume Copy started
6. Depending on the size of the volume, the migration process takes some time, but you can monitor the status of the migration in the running tasks bar at the bottom of the GUI as shown in Figure 6-56.

Figure 6-56 Migration progress
After the migration is completed, the volume is shown in the new storage pool. Figure 6-57 shows that it was moved from the Pool0 to the Pool2.

Figure 6-57 Migration complete
The volume copy has now been migrated without any host or application downtime to the new storage pool. It is also possible to migrate both volume copies to other pools online.
Another way to migrate volumes to another pool is by performing the migration using the volume copies, as described in 6.9, “Migrating volumes using the volume copy feature” on page 337.
|
Note: Migrating a volume between storage pools with different extent sizes is not supported. If you need to migrate a volume to a storage pool with a different extent size, use volume copy features instead.
|
6.9 Migrating volumes using the volume copy feature
IBM Spectrum Virtualize supports creation, synchronizing, splitting, and deleting volume copies. A combination of these tasks can be used to migrate volumes to other storage pools. The easiest way to migrate volume copies is to use the migration feature described in 6.8, “Migrating a volume to another storage pool” on page 333. If you use this feature, one extent after another is migrated to the new storage pool. However, using volume copies provides another possibility to migrate volumes.
To migrate a volume, complete the following steps:

Figure 6-58 Adding the volume copy to another pool
2. Select the desired pool into which a new copy will be created, as shown in Figure 6-59.

Figure 6-59 Add Volume Copy
3. You will get a confirmation window, as shown in Figure 6-60.

Figure 6-60 Volume Copy task completed
4. Wait until the copies are synchronized. Then, change the role of the copies and make the new copy of the primary copy, as shown in Figure 6-61.

Figure 6-61 Making the new copy in a different storage pool as primary
5. A task completion window will be shown as in Figure 6-62.

Figure 6-62 Primary copy change task completed
6. Split or delete the old copy from the volume, as shown in Figure 6-63.

Figure 6-63 Deleting the older copy
7. Ensure that the new copy is in the target storage pool, as shown in Figure 6-64.

Figure 6-64 Verifying the new copy in the target storage pool
This migration process requires more user interaction, but it offers some benefits, for example, if you migrate a volume from a tier 1 storage pool to a lower performance tier 2 storage pool. In step 1, you create the copy on the tier 2 pool. All reads are still performed in the tier 1 pool to the primary copy. After the synchronization, all writes are destaged to both pools, but the reads are still only done from the primary copy.
Now you can switch the role of the copies online (step 3), and test the performance of the new pool. If you are done testing your lower performance pool, you can split or delete the old copy in tier 1, or switch back to tier 1 in seconds, in case tier 2 pool did not meet your performance requirements.
6.10 I/O throttling
You can set a limit on the number of I/O operations that are accepted for a volume. The limit is set in terms of I/O operations per second (IOPS) or MBps. By default, no I/O throttling rate is set when a volume is created.I/O throttling is also referred to as I/O governing.
Base the choice between I/O and MB as the I/O governing throttle on the disk access profile of the application. Database applications generally issue large amounts of I/O, but they transfer only a relatively small amount of data. In this case, setting an I/O governing throttle that is based on MBps does not achieve much. It is better to use an IOPS as a second throttle.
At the other extreme, a streaming video application generally issues a small amount of I/O, but it transfers large amounts of data. In contrast to the database example, setting an I/O governing throttle that is based on IOPS does not achieve much, so it is better to use an MBps throttle.
An I/O governing rate of 0 does not mean that zero IOPS (or MBps) can be achieved. It means that no throttle is set.
|
Note:
•I/O governing does not affect FlashCopy and data migration I/O rates.
•I/O governing on a Metro Mirror and Global Mirror secondary volume does not affect the rate of data copy from the primary volume.
|
6.10.1 Define throttle on a volume
To set a throttle on a volume, follow the steps as listed.
1. From the Volumes window, select the desired volume to throttle as shown in Figure 6-65.

Figure 6-65 Edit Throttle
2. A window will come up where you can set the throttle either in terms of IOPS or bandwidth (MBps) or both. In our example, we set the throttle on IOPS as shown in Figure 6-66.

Figure 6-66 IOPS throttle on a volume

Figure 6-67 Volume throttle completed
6.10.2 Remove a throttle from a volume
To set a throttle on a volume, follow the steps as listed
1. From the Volumes window, select the desired volume to throttle as shown in Figure 6-68.

Figure 6-68 Edit Throttle
2. A window will come up where you can remove the throttle that was defined. In our example, we remove the throttle on IOPS by clicking on Remove as shown in Figure 6-69.

Figure 6-69 Remove throttle
3. A task completion window will be shown as in Figure 6-70.

Figure 6-70 Volume throttle removal task completed
..................Content has been hidden....................
You can't read the all page of ebook, please click here login for view all page.