

External storage virtualization
This chapter describes how to incorporate external storage systems into the virtualized world of the IBM Storwize V5030. A key feature of the IBM Storwize V5030 is its ability to consolidate disk controllers from various vendors into storage pools. By virtualizing vendors disk controllers, the storage administrator can manage and provision storage to applications from a single user interface and use a common set of advanced functions across all of the storage systems under the control of the IBM Storwize V5030.
A distinction must be made between virtualizing external storage and importing existing data into the IBM Storwize V5030. Virtualizing external storage means the creation of logical units with no data on them and the addition of these logical units to storage pools under the IBM Storwize V5030 control. In this way, the external storage can benefit from the IBM Storwize V5030 features, such as Easy Tier and Copy Services.
When existing data needs to be put under the control of the IBM Storwize V5030, it must first be imported as an image mode volume. It is strongly recommended to copy the existing data onto internal or external storage that is under the control of the IBM Storwize V5030 instead of letting the data within an image mode volume, so the data can benefit from the IBM Storwize V5030 features.
|
Note: External storage virtualization is available on the Storwize V5030 model only. It is not available on the Storwize V5010 or Storwize V5020. However, these models can still import data from external storage systems. For more information about storage migration, see Chapter 7, “Storage migration” on page 347.
|
Specifically, this chapter provides information about the following topics:
•Working with external storage virtualization
11.1 Planning for external storage virtualization
This section describes how to plan for virtualizing external storage with the IBM Storwize V5030. Virtualizing the storage infrastructure with the IBM Storwize V5030 makes your storage environment more flexible, cost-effective and easy to manage. The combination of the IBM Storwize V5030 and an external storage system allows more storage capacity benefits from the powerful software functions within the IBM Storwize V5030.
The external storage systems that are incorporated into the IBM Storwize V5030 environment can be new systems or existing systems. Any data on the existing storage systems can be easily migrated to an environment that is managed by the IBM Storwize V5030, as described in Chapter 7, “Storage migration” on page 347.
11.1.1 License for external storage virtualization
From a licensing standpoint, when external storage systems are virtualized by the IBM Storwize V5030, a per-enclosure External Virtualization license is required.
|
Migration: If the IBM Storwize V5030 is used as a general management tool, you must order the correct External Virtualization licenses. The only exception is if you want to migrate existing data from external storage systems to IBM Storwize V5030 internal storage and then remove the external storage. You can temporarily configure your External Storage license for a 45-day period. For more than a 45-day migration requirement, the correct External Virtualization license must be ordered.
|
You can configure the IBM Storwize V5030 licenses by clicking the Settings icon and then System → Licensed Functions. For more information about setting licenses on the IBM Storwize V5030, see Chapter 2, “Initial configuration” on page 37.
For assistance with licensing questions or to purchase any of these licenses, contact your IBM account team or IBM Business Partner.
11.1.2 SAN configuration planning
External virtualization is only supported by using Fibre Channel or Fibre Channel over Ethernet (FCoE). Therefore, it is a prerequisite to install a pair of the optional 16 Gb Fibre Channel adapter cards (or a pair of the optional 10 GbE adapter cards if you use FCoE).
External storage controllers that are virtualized by the IBM Storwize V5030 must be connected through storage area network (SAN) switches. A direct connection between the IBM Storwize V5030 and external storage controllers is not supported.
1. Ensure that the switches or directors are at the firmware levels that are supported by the IBM Storwize V5030 and that the port login maximums that are listed in the restriction document are not exceeded. The configuration restrictions are listed on the IBM Support home page, which is available at this website:
The suggested SAN configuration is based in a dual fabric solution. The ports on external storage systems and the IBM Storwize V5030 ports must be evenly split between the two fabrics to provide redundancy if one of the fabrics goes offline.
2. After the IBM Storwize V5030 and external storage systems are connected to the SAN fabrics, zoning on the switches must be configured. In each fabric, create a zone with the four IBM Storwize V5030 worldwide port names (WWPNs), two from each node canister with up to a maximum of eight WWPNs from each external storage system.
|
Ports: The IBM Storwize V5030 supports a maximum of 16 ports or WWPNs from an externally virtualized storage system.
|
Figure 11-1 shows an example of how to cable devices to the SAN. Refer to this example as we describe the zoning. For this example, we used an IBM Storwize V3700 as our external storage.

Figure 11-1 SAN cabling and zoning example
3. Create an IBM Storwize V5030/external storage zone for each storage system to be virtualized, as shown in the following examples:
– Zone the external Storwize V3700 canister 1 port 2 with the Storwize V5030 canister 1 port 2 and canister 2 port 2 in the blue fabric.
– Zone the external Storwize V3700 canister 2 port 2 with the Storwize V5030 canister 1 port 4 and canister 2 port 4 in the blue fabric.
– Zone the external Storwize V3700 canister 1 port 3 with the Storwize V5030 canister 1 port 1 and canister 2 port 1 in the red fabric.
– Zone the external Storwize V3700 canister 2 port 1 with the Storwize V5030 canister 1 port 3 and canister 2 port 3 in the red fabric.
11.1.3 External storage configuration planning
Logical units that are created on the external storage system must provide redundancy through various RAID levels, preventing a single physical disk failure from causing a managed disk (MDisk), storage pool, or associated host volume from getting offline. To minimize the risk of data loss, virtualize storage systems only where logical unit numbers (LUNs) are configured by using a RAID level other than RAID 0 (RAID 1, RAID 10, RAID 0+1, RAID 5, RAID 6, Distributed RAID 5, or Distributed RAID 6):
1. Verify that the storage controllers to be virtualized by the IBM Storwize V5030 meet the configuration restrictions, which are listed on the IBM Support home page, at this website:
2. Ensure that the firmware or microcode levels of the storage controllers to be virtualized are supported by the IBM Storwize V5030. See the IBM System Storage Interoperation Center (SSIC) website for more details:
The IBM Storwize V5030 must have exclusive access to the LUNs from the external storage system that are presented to it. LUNs cannot be shared between the IBM Storwize V5030 and other storage virtualization platforms or between an IBM Storwize V5030 and hosts. However, different LUNs can be mapped from the same external storage system to an IBM Storwize V5030 and other hosts in the SAN through different storage ports.
3. Ensure that the external storage subsystem LUN masking is configured to map all LUNs to all of the WWPNs in the IBM Storwize V5030 storage system. Ensure that you check the IBM Storwize V5030 IBM Knowledge Center and review the “Configuring and servicing external storage system” topic before you prepare the external storage systems for discovery from the IBM Storwize V5030 system. This Knowledge Center topic is at this website:
11.1.4 Guidelines for virtualizing external storage
When external storage is virtualized by using the IBM Storwize V5030, the following guidelines must be followed:
•Avoid splitting arrays into multiple LUNs at the external storage system level. When possible, create a single LUN per array for mapping to the IBM Storwize V5030.
•Use 6 - 8 disks per RAID group when you create the external LUNs, more than that and it may result in a longer rebuild time in case of a single disk failure, affecting the performance of the LUN and exposing it to complete failure if a second disk fails during the rebuild. Additionally, the smaller the number of disks, the more likely it is that write operations span an entire stripe (stripe size, which is multiplied by the number of members, minus one). In this case, write performance is improved.
•Except for Easy Tier, do not mix MDisks that vary in performance or reliability in the same storage pool. Put only MDisks of the same size and performance into the same storage pool. Likewise, group MDisks from different arrays into different pools. For more information about Easy Tier, see Chapter 9, “Advanced features for storage efficiency” on page 431.
•Do not leave volumes in image mode. Use image mode only to import or export existing data into or out of the IBM Storwize V5030. Migrate data from image mode volumes and associated MDisks to other storage pools to benefit from storage virtualization and the enhanced benefits of the Storwize V5030, such as Easy Tier.
11.2 Working with external storage
This section describes how to manage external storage by using an IBM Storwize V5030.
The basic concepts of managing an external storage system are the same as the concepts for managing internal storage. The IBM Storwize V5030 discovers LUNs from the external storage system as one or more MDisks. These MDisks are added to a storage pool in which volumes are created and mapped to hosts, as needed.
11.2.1 Adding external storage
To add external storage systems to the IBM Storwize V5030 virtualized environment, complete the following steps:
1. Zone a minimum of two and a maximum of 16 Fibre Channel ports from the external storage system with all eight Fibre Channel ports on the IBM Storwize V5030 system. For more information about zoning, see 11.1.2, “SAN configuration planning” on page 636. Because the IBM Storwize V5030 is virtualizing your storage, hosts need to be zoned with the Storwize V5030 controller’s WWPNs.
2. By using the storage partitioning or LUN masking feature of the external storage system, create a group that includes all eight IBM Storwize V5030 WWPNs.
3. Create equal size arrays on the external system by using any RAID level except zero.
4. Create a single LUN per RAID array.
5. Map the LUNs to all eight Fibre Channel ports on the IBM Storwize V5030 system by assigning them to the group that was created in step 2 on page 639.
6. Verify that the IBM Storwize V5030 discovered the LUNs as unmanaged MDisks. To get to the external storage pool panel, select External Storage from the Pools menu as shown in Figure 11-2.

Figure 11-2 Selecting the external storage
7. If the external storage does not show up automatically, click Discover storage from the Actions menu on the External Storage panel, as shown in Figure 11-3.
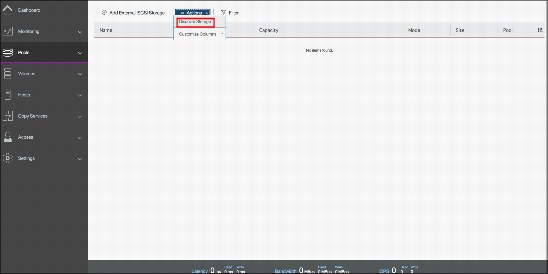
Figure 11-3 Discover storage
8. The MDisks are unassigned and need to be assigned to the correct storage tiers. It is important to set the tiers correctly if you plan to use the Easy Tier feature. For more information about storage tiers, see Chapter 9, “Advanced features for storage efficiency” on page 431.
9. Select the MDisks to assign and either use the Actions drop-down menu or right-click and select Modify Tier, as shown in Figure 11-4.

Figure 11-4 Modify Tier option
10. Ensure that the correct MDisk tier is chosen, as shown in Figure 11-5. Click Modify to change the tier setting.

Figure 11-5 Choosing a storage tier
11. After the tier is assigned, add the MDisks to an existing pool or create a new pool to include them. Figure 11-6 shows how to add selected MDisks to an existing storage pool. Click Assign under the Actions menu.

Figure 11-6 Adding MDisks to a pool
If the storage pool does not exist, follow the procedure that is outlined in Chapter 4, “Storage pools” on page 143.
12. Add the MDisks to the pool. Select the pool to which the MDisks are going to be assigned and click Assign, as shown in Figure 11-7. After the task completes, click Close.
|
Important: If the external storage volumes to virtualize behind the Storwize V5030 contain data and this data needs to be retained, do not use the “Assign to pool” option to manage the MDisks. This option can destroy the data on the disks. Instead, use the Import option. For more information, see 11.2.2, “Importing image mode volumes” on page 643.
|

Figure 11-7 Selecting the storage pool to assign the MDisks to the pool
13. The external MDisks that are assigned to a pool within IBM Storwize V5030 are displayed under the MDisks by Pools panel as shown in Figure 11-8. Create volumes from the storage pool and map them to hosts, as needed. See Chapter 6, “Volume configuration” on page 287 to learn how to create and map volumes to hosts.

Figure 11-8 External MDisks displayed on MDisks by Pools panel
11.2.2 Importing image mode volumes
If the external storage systems are not new systems and data exists on the LUNs that must be kept after virtualization, you must import the existing LUNs. The process of importing existing data on external volumes is simplified by using the storage migration wizard, which is described in Chapter 7, “Storage migration” on page 347.
To manually import volumes, they must not be assigned to a storage pool and they must be unmanaged managed disks (MDisks). Hosts that access data from these external storage system LUNs can continue to access data, but the hosts must be rezoned and mapped to the Storwize V5030 to use these external storage system LUNs after they are presented through the IBM Storwize V5030.
Figure 11-9 shows how to import an unmanaged MDisk:
1. Select the unmanaged MDisk and click Import from the Actions drop-down menu. Multiple MDisks can be selected by using the Ctrl key.

Figure 11-9 Import MDisk option
2. Selecting the Import option opens a new panel that requires additional volume information, as shown in Figure 11-10.

Figure 11-10 Import MDisks as Volumes panel
– You can change the default volume names to more meaningful names by editing the Volume names text boxes.
– You can choose between importing the volume to a temporary pool as an image mode volume, which the IBM Storwize V5030 can create and name for you, or migrating the volume to an existing pool.
An image mode volume has a direct block-for-block translation from the imported MDisk and the external LUN. Therefore, the existing data is preserved. In this state, the IBM Storwize V5030 is acting as a proxy and the image mode volume is simply a “pointer” to the existing external LUN. Because of the way that virtualization works on the IBM Storwize V5030, the external LUN is presented as an MDisk, but we cannot map an MDisk directly to a host. Therefore, the IBM Spectrum Virtualize software must create the image mode volume, to allow hosts to perform the mapping through the Storwize V5030.
3. If you choose a temporary pool, you must first select the extent size for the pool. The default value for extents is 1 GB. If you plan to migrate this volume to another pool later, ensure that the extent size matches the extent size of the prospective target pool. For more information about extent sizes, see Chapter 4, “Storage pools” on page 143.
If an existing storage pool is chosen, the Storwize V5030 can perform a migration task. The external LUN can be imported into a temporary migration pool and a migration task can run in the background to copy data to MDisks that are in the target storage pool. At the end of the migration, the external LUN and its associated MDisk can be in the temporary pool and show as managed, but they can be removed from the Storwize V5030.
Figure 11-11 shows how to select an existing pool for volume migration. The pool must have enough available capacity to store the volumes that are being imported.

Figure 11-11 Import volumes into an existing pool
4. Select Copy Services if copy services (replication functionality) are used on the external storage system that hosts the LUN. Click Import to confirm your selections and to start the import process.
|
Note: Only pools with sufficient capacity are shown because the import of an MDisk to an existing storage pool can migrate storage. This storage can be migrated only if sufficient capacity exists in the target pool to create a copy of the data on its own MDisks. The external MDisk can be imported as an image mode volume into a temporary migration pool and a volume migration can take place in the background to create the volume in the target pool.
|
A migration task starts and can be tracked through the System Migration panel within the Pools menu, as shown in Figure 11-12. The actual data migration begins after the MDisk is imported successfully.

Figure 11-12 Checking the migration status
When the migration completes, the migration status disappears and the volume is displayed in the target pool, as shown in Figure 11-13.

Figure 11-13 Volume is assigned to the target pool
5. After the migration completes, the image mode volume is automatically deleted, but the external LUN exists as a managed MDisk in the temporary storage pool. It is unassigned from the pool and listed as an unassigned MDisk. Later, you can retire the external LUN and remove it completely from the Storwize V5030 by unmapping the volume at the external storage and by clicking Detect MDisks on the Storwize V5030. For more information about removing external storage, see 11.2.4, “Removing external storage” on page 652.
If you choose to import a volume as an image mode volume, the external LUN appears as an MDisk with an associated image mode volume name and can be listed, as shown in Figure 11-14.

Figure 11-14 Image mode volumes
The volume is also listed in the System Migration panel because the IBM Storwize V5030 expects you to migrate these volumes later, as shown in Figure 11-15.

Figure 11-15 Migrations are available for image mode volumes
At the end of this process, the volume can be mapped to a host.
11.2.3 Managing external storage
The IBM Storwize V5030 provides an individual external panel for managing external storage systems:
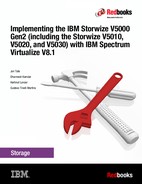
1. You can access the external panel by clicking Pools → External Storage, as shown in Figure 11-2 on page 639. Extended help information for external storage is available by clicking the help (?) icon and selecting External Storage, as shown in Figure 11-16.

Figure 11-16 Extended help for external storage
The External Storage window that is shown in Figure 11-17 provides an overview of all of your external storage systems. The list shows the external storage systems that are managed by the IBM Storwize V5030. With the help of the filter, you can show only the external storage systems that you want to work with.
2. Clicking the arrow sign that precedes each of the external storage controllers provides more detailed information, including all of the MDisks that are mapped from it.

Figure 11-17 External Storage window
3. In the External Storage panel, there are options in the Actions menu that can be applied to external storage controllers, as shown in Figure 11-18. Select the external controller and click Actions to display the available options. Alternatively, right-click the external controller.

Figure 11-18 External controllers options under Actions menu
4. You can change the name of any external storage system by right-clicking the controller and selecting Rename. Alternatively, use the Actions drop-down menu and select Rename.
5. In the Rename Storage System panel, define the storage controller name and click Rename as shown in Figure 11-19.
Figure 11-19 Rename Storage System panel
6. Click Show Dependent Volumes to display the logical volumes that depend on the selected external storage system, as shown in Figure 11-20.

Figure 11-20 Volumes that depend on the external storage
7. From the Volumes Dependent on Storage System panel, multiple volume actions are available, as shown in Figure 11-21.

Figure 11-21 Volume actions
In the IBM Storwize V5030 virtualization environment, you can migrate your application data nondisruptively from one internal or external storage pool to another, simplifying storage management with reduced risk.
Volume copy is another key feature that you can benefit from by using IBM Storwize V5030 virtualization. Two copies can be created to enhance availability for a critical application. A volume copy can be also used to generate test data or for data migration.
For more information about the volume actions of the IBM Storwize V5030 storage system, see Chapter 8, “Advanced host and volume administration” on page 373.
8. In the External Storage panel you can also right-click an MDisk (or use the Actions drop-down menu) to display the available options for a selected MDisk, as shown in Figure 11-22.

Figure 11-22 MDisk Actions menu in the External Storage window
11.2.4 Removing external storage
If you want to remove the external storage systems from the IBM Storwize V5030 virtualized environment, the following options are available:
•To remove the external storage systems and discard the data on them, complete the following steps:
a. Stop any host I/O on the volumes.
b. Remove the volumes from the host file systems, logical volume, or volume group and remove the volumes from the host device inventory.
c. Remove the host mapping of volumes and the volumes themselves on the IBM Storwize V5030.
d. Remove the storage pools to which the external storage systems belong, or you can keep the storage pool and remove the MDisks of the external storage from the storage pools.
e. Unzone and disconnect the external storage systems from the IBM Storwize V5030.
f. Click Detect MDisks for the IBM Storwize V5030 to discover the removal of the external storage systems.
•To remove the external storage systems and keep the volumes and their data on the IBM Storwize V5030, complete the following steps:
a. Migrate volumes and their data to other internal or external storage pools that are on the IBM Storwize V5030.
b. Remove the storage pools to which the external storage systems belong, or you can keep the storage pools and remove the MDisks of the external storage from the storage pools.
c. Unzone and disconnect the external storage systems from the IBM Storwize V5030.
d. Click Detect MDisks for the IBM Storwize V5030 to discover the removal of the external storage systems.
•To remove the external storage systems from the IBM Storwize V5030 control and keep the volumes and their data on other external storage systems, complete the following steps:
a. Migrate volumes and their data to other internal or external storage pools on the IBM Storwize V5030, as described in Chapter 7, “Storage migration” on page 347.
b. Remove the storage pools to which the original external storage systems belong, or you can keep the storage pools and remove the MDisks of that external storage from the storage pools.
c. Export the volumes that were migrated in step a to image mode with the new MDisks on the target external storage systems. For more information about the restrictions and prerequisites for migration, see Chapter 7, “Storage migration” on page 347.
You must record pre-migration information, for example, the original Small Computer System Interface (SCSI) identifiers (IDs) that the volumes used when they were mapped to hosts. Certain operating systems do not support a change of the SCSI ID during migration. Unzone and disconnect the external storage systems from the IBM Storwize V5030.
d. Click Detect MDisks for the IBM Storwize V5030 to discover the removal of the external storage systems.
..................Content has been hidden....................
You can't read the all page of ebook, please click here login for view all page.