

Advanced host and volume administration
The IBM Storwize V5000 Gen2 offers many functions for volume and host configuration. The basic host and volume features of the IBM Storwize V5000 are described in Chapter 5, “Host configuration” on page 199 and Chapter 6, “Volume configuration” on page 287. The chapters also describe how to create hosts and volumes and how to map them to a host.
This chapter focuses on advanced host and volume administration topics. The first part of it describes the following host administration topics:
The second part of the chapter consists of the following volume-related tasks:
8.1 Advanced host administration
This section describes advanced host administration, including host modification, host mappings, and deleting hosts. Basic host creation and mapping are described in Chapter 5, “Host configuration” on page 199. We assume that hosts are defined and volumes are mapped to them.
The following topics are covered in this section:
•Modifying hosts, as described in 8.1.1, “Modifying volume mappings” on page 376
•Ports by host, as described in 8.2, “Adding and deleting host ports” on page 393
•Host mappings, as described in 8.2, “Adding and deleting host ports” on page 393
The top-level Hosts menu is shown in Figure 8-1.

Figure 8-1 Hosts menu
Complete the following steps:

Figure 8-2 Hosts panel
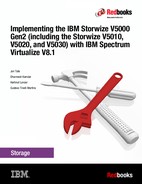
2. Select a host and click Actions (as shown in Figure 8-3), or right-click the host to show the available actions.
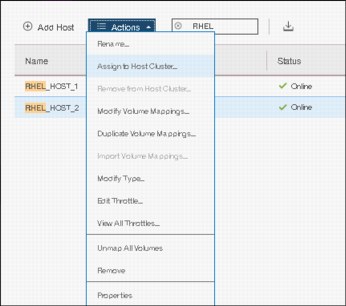
Figure 8-3 Actions menu on the Hosts panel
As shown in Figure 8-3, several actions are associated with host mapping. For more information, see 8.1.1, “Modifying volume mappings” on page 376 and 8.1.2, “Unmapping volumes from a host” on page 379.
8.1.1 Modifying volume mappings
Complete the following steps:
1. From the Hosts panel, after you select a host and click Actions, select Modify Volume Mappings to open the Modify Host Mappings panel, as shown in Figure 8-4.

Figure 8-4 Host mappings panel
2. Click Add Volume Mappings. A window will come up listing all the additional volumes that can be mapped to the selected host as shown in Figure 8-5.

Figure 8-5 Select a host to modify
3. Select the volume that you need to map to the host. Also indicate whether you would like to let the system assign the SCSI ID or you want to assign the SCSI ID by yourself. In this example, RHEL_2_VOL_3 volume is being mapped with the user supplied SCSI ID as shown in Figure 8-6.

Figure 8-6 Selecting the volume and SCSI ID for mapping to a host
4. Click Next. As shown in Figure 8-7, a window opens where the user can provide the SCSI ID to be used for the mapping. The right hand pane side also shows the current SCSI ID’s being used for mapping other volumes to the same host.

Figure 8-7 Selecting the SCSI ID for the mapping
|
Important: The IBM Storwize V5000 automatically assigns the lowest available SCSI ID if none is specified. However, you can set a SCSI ID for the volume. The SCSI ID cannot be changed while the volume is assigned to the host.
|
5. Click Next. A window will open indicating new mapping to the host, along with already mapped volumes to that host, as shown in Figure 8-8. SCSI ID’s for each of the mappings is also shown as part of this process.

Figure 8-8 Volume map

Figure 8-9 Volume mapping confirmation window
8.1.2 Unmapping volumes from a host
To unmap a volume from a host, follow the steps listed here:

Figure 8-10 Hosts
2. From the right hand side pane, select the host for which you want to unmap a volume, and then click Action, as shown in Figure 8-11.

Figure 8-11 Action for the selected host
3. Click Modify Volume Mapping. A window with a list of volumes currently mapped to the selected host will be shown, as in Figure 8-12.

Figure 8-12 List of volumes mapped to the host
4. Select the volume that you want to unmap and then click Remove Volume Mappings as shown in Figure 8-13.

Figure 8-13 Selecting the volume to be unmapped
|
Note: To unmap multiple volumes click and hold the shift key and then select each consecutive volume in the window. If the multiple volumes you want to unmap are not consecutive, then click the Ctrl key and then select each volume as desired.
|
5. A window listing the volume that is to be unmapped displays, as shown in Figure 8-14.

Figure 8-14 Remove volume mapping summary window

Figure 8-15 Volume unmap task completion
7. The selected volume is now unmapped.
8.1.3 Renaming a host
To rename a host, follow the steps as listed:

Figure 8-16 Hosts

Figure 8-17 Selecting Rename action for host
3. A window opens where you can enter the new name, as shown in Figure 8-18.

Figure 8-18 Rename a host window

Figure 8-19 Renaming a host
5. The selected host is renamed and a task completion confirmation window displays, as shown in Figure 8-20.

Figure 8-20 Rename a Host task completion
6. Click Close.
8.1.4 Removing a host
To remove a host, follow the steps as listed:

Figure 8-21 Hosts

Figure 8-22 Selecting Remove operation
3. Verify the number of hosts you are removing, along with confirmation to remove the host even if the host has mapped volumes, as shown in Figure 8-23.

Figure 8-23 Removing a host
|
Note: If a host has volumes mapped, then to remove the host, you will have to check the box for Remove the hosts even if volumes are mapped to them. These volumes will no longer be accessible to the hosts to force the action.
|
4. A task completion window opens, as shown in Figure 8-24.

Figure 8-24 Host removal task completion
5. Click Close.
8.1.5 Host properties
This section describes the host properties, which provide the following information:
•Overview
•Mapped volumes
•Port definitions
Overview
To open the Host Details panel, complete the following steps:
1. Select the host.
2. From the Actions menu, click Properties. You can also highlight the host and right-click to access the Actions menu, as shown in Figure 8-25.

Figure 8-25 Opening host properties
3. Figure 8-26 shows the Overview tab of the Host Details panel. Select the Show Details check box in the lower-left corner of the window to see more information about the host.

Figure 8-26 Host details
The Overview tab provides the following information:
– Host name: Host object name.
– Host ID: Host object identification number.
– Status: The current host object status. This value can be Online, Offline, or Degraded.
– Host type: The type of host can be Generic, Generic (hidden secondary volumes), HP/UX, OpenVMS, Target Port Group Support (TPGS), and VMware Virtual Volume (VVOL).
– Number of Fibre Channel (FC) ports: The number of host Fibre Channel ports.
– Number of Internet SCSI (iSCSI) ports: The number of host iSCSI names or host iSCSI qualified names (IQN) IDs.
– Number of serial-attached SCSI (SAS) ports: The number of host SAS ports.
– I/O group: The I/O group from which the host can access a volume (or volumes).
– iSCSI Challenge Handshake Authentication Protocol (CHAP) secret: The CHAP information if it exists or if it is configured.
4. To change the host properties, click Edit. Several fields can be edited, as shown in Figure 8-27.

Figure 8-27 Host properties: Editing the host information
5. For the host type, choose one of these values: Generic, Generic (hidden secondary volumes), HP/UX, OpenVMS, TPGS, or VVOL.
6. After you change any host information, click Save to apply your changes.
Mapped Volumes
Figure 8-28 shows the Mapped Volumes tab, which provides an overview of the volumes that are mapped to the host. This tab provides the following information:
•SCSI ID
•Volume name
•Unique identifier (UID)
•Caching I/O group ID

Figure 8-28 Host Details: Mapped Volumes tab
Port Definitions
Figure 8-29 on page 393 shows the Port Definitions tab, which shows the configured host ports and their status. This tab provides the following information:
•Name: The worldwide port names (WWPNs) (for SAS and FC hosts) or iSCSI Qualified Name (IQN) for iSCSI hosts
•Type: Port type
•Status: Current port status
•Number of nodes that are logged in: Lists the number of IBM Storwize V5000 node canisters that each port (initiator port) is logged in to

Figure 8-29 Host port definitions
|
Note: You can also add additional ports for the host using this window.
|
Click Close to close the Host Details panel.
8.2 Adding and deleting host ports
In this section we describe how to add and delete port(s) to and from a host definition. The examples shown here are for Fibre Channel ports, but the steps shown are equally applicable for SAS and iSCSI ports as well.
8.2.1 Adding host port
To add or delete host ports, go to the Port Definitions tab, as shown in “Port Definitions” on page 392, then follow the steps listed here:

Figure 8-30 Add host port
2. Select the type of port that you want to add. In this example, we chose Fibre Channel port, as shown in Figure 8-31.

Figure 8-31 Type of port to be added
3. A window opens with a drop-down for you to choose the desired WWPN to be added, as shown in Figure 8-32.

Figure 8-32 Drop-down of WWPNs
|
Note: If the WWPN does not show in the drop-down list, click Rescan and try again. If the port does not show up even after the rescanning, then check the zoning.
|

Figure 8-33 Add Port to List

Figure 8-34 Port Definitions
|
Note: If the selected port is not the desired one, then you can click the red cross to delete it from the selection.
|

Figure 8-35 Add Ports to Host task completed
7. The Host Details window now shows the ports defined for the host, including the recently added one, as shown in Figure 8-36.
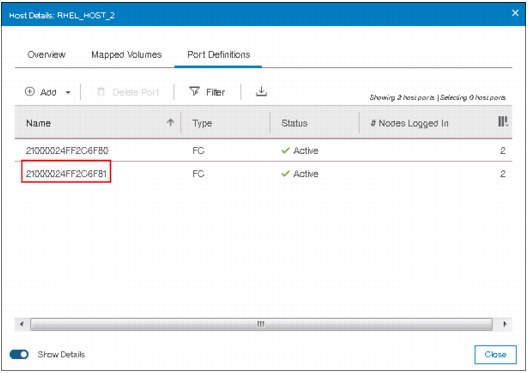
Figure 8-36 Port Definitions after adding a port
8.2.2 Deleting a host port
To add or delete host ports, go to the Port Definitions tab, as shown in “Port Definitions” on page 392, then follow the steps listed here:
1. Select the port that you want to delete, as shown in Figure 8-37.

Figure 8-37 Selecting the port to delete

Figure 8-38 Delete Port operation
3. Verify the number of ports and the port to be deleted, as shown in Figure 8-39.

Figure 8-39 Delete port
4. Click Delete. A window indicating port deletion Task completed displays, as shown in Figure 8-40.

Figure 8-40 Port deletion task completed
5. A window displays with the current ports for the selected host, as shown in Figure 8-41.

Figure 8-41 Host ports after deletion of a port
8.3 Advanced volume administration
This section describes volume administration tasks, such as volume modification and the creation of volume copies. We assume that you completed Chapter 6, “Volume configuration” on page 287, and that you are familiar with volume creation and generic, thin-provisioned, mirrored, thin-mirrored, and compressed volumes.
Figure 8-42 shows the following options, which are available in the Volumes menu for advanced feature administration:
•Volumes
•Volumes by Pool
•Volumes by Host

Figure 8-42 Volumes menu
8.3.1 Advanced volume functions
To perform advanced volume functions, complete the following steps:
Figure 8-43 Volumes panel
This panel lists all configured volumes on the system and provides the following information:
– Name: Shows the name of the volume. If a twisty sign (>) appears before the name, two copies of this volume exist. Click the twisty sign (>) to expand the view and list the volume copies, as shown in Figure 8-43 on page 403.
– State: Provides the status information about the volume, which can be online, offline, or degraded.
– Synchronized: For mirrored volumes, whether the copies are synchronized or not.
– Pool: Shows in which storage pool the volume is stored. The primary copy, which is marked with an asterisk (*), is shown unless you expand the volume copies.
– UID: The volume unique identifier.
– Host mappings: Shows whether a volume has host mapping: Yes when host mapping exists and No when no hosting mappings exist.
– Capacity: The disk capacity that is presented to the host. If a blue volume is listed before the capacity, this volume is a thin-provisioned volume. Therefore, the listed capacity is the virtual capacity, which might be larger than the real capacity on the system.
– Global Mirror Change Volume: Indicates whether a volume is a change volume for a Global Mirror relationship or not.
|
Tip: Right-click anywhere in the blue title bar to customize the volume attributes that are displayed. You might want to add useful information, such as the caching I/O group and the real capacity.
|
2. To create a volume, click Create Volumes and complete the steps described in Chapter 6, “Volume configuration” on page 287.
3. Right-clicking or selecting a volume and opening the Actions menu shows the available actions for a volume, as shown in Figure 8-44.

Figure 8-44 Actions menu for a volume
Depending on the Storwize V5000 model capabilities and volume types, the following volume actions are available:
•Rename (8.3.5, “Renaming a volume” on page 408).
•Map to Host or Host Cluster (8.3.2, “Mapping a volume to a host” on page 406).
•Shrink (8.3.6, “Shrinking a volume” on page 409).
•Expand (8.3.7, “Expanding a volume” on page 410).
•Modify capacity savings (choose between none, Thin Provisioning, and Compression).
•Modify mirror synchronization rate (Set the synchronization rate value. For more information, see 8.4, “Volume properties and volume copy properties” on page 420.)
•Cache mode (Choose between Enabled, Read Only, and Disabled.)
•Modify open VMS unit device identifier (UDID).
•Unmap all hosts (8.3.3, “Unmapping volumes from all hosts” on page 407).
•View mapped hosts (8.3.4, “Viewing which host is mapped to a volume” on page 408).
•Modify I/O group (only applicable to multiple I/O group systems).
•Space Savings (only for compressed volumes).
•Migrate to another pool (8.3.8, “Migrating a volume to another storage pool” on page 411).
•Export to image mode (8.3.9, “Exporting to an image mode volume” on page 411).
•Duplicate (8.3.11, “Duplicating a volume” on page 415).
•Add volume copy (8.3.12, “Adding a volume copy” on page 417).
•Enable access to stale copy (available for IBM HyperSwap volumes if the copy is not up-to-date and inaccessible, but contains consistent data from an earlier time).
•Edit Throttle.
•View All Throttles.
•Delete (8.3.10, “Deleting a volume” on page 414).
•Volume Copy Actions (see 8.5, “Advanced volume copy functions” on page 423).
•Modify Properties.
Other actions are available for copies of volumes. For more information, see 8.5, “Advanced volume copy functions” on page 423.
8.3.2 Mapping a volume to a host
To map a volume to a host, see the procedure in 6.7, “Mapping Volumes to Host after volume creation” on page 327.
8.3.3 Unmapping volumes from all hosts
To remove all host mappings from a volume, complete the following steps:
1. Select Unmap All Hosts from the Actions menu. This action removes all host mappings, which means that no hosts can access this volume.

Figure 8-45 Unmapping from host or hosts
3. After the task completes, click Close to return to the Volumes panel.
|
Important: Ensure that the required procedures are run on the host OS before you run the unmapping procedure.
|
8.3.4 Viewing which host is mapped to a volume
To determine which host mappings are configured, complete the following steps:
1. Highlight a volume and select View Mapped Host from the Actions menu. The Host Maps tab of the Volume Details panel opens, as shown in Figure 8-46. In this example, host RHEL_HOST_1 is mapped to the RHEL_HOST_1_BOOT_VOL volume.

Figure 8-46 Volume to host mapping
2. To remove a mapping, highlight the host and click Unmap from Host. If several hosts are mapped to this volume (for example, in a cluster), only the selected host is removed.
8.3.5 Renaming a volume
To rename a volume, complete the following steps:
1. Select Rename from the Actions menu. The Rename Volume window opens.
2. Enter the new name, as shown in Figure 8-47.

Figure 8-47 Renaming a volume
3. Click Reset to reset the name field to the original name of the volume.
4. Click Rename to apply the changes.
5. Click Close to close the panel.
8.3.6 Shrinking a volume
The IBM Storwize V5000 can shrink volumes. Use this feature only if the host OS supports it. This capability reduces the capacity that is allocated to the particular volume by the amount that is specified.
1. To shrink a volume, select Shrink from the Actions menu.
2. Enter the new volume size or the value by which to shrink the volume, as shown in Figure 8-48.
|
Important: Before you shrink a volume, ensure that the host OS supports this capability. If the OS does not support shrinking a volume, log disk errors and data corruption can occur.
|

Figure 8-48 Shrink Volume panel
3. Click Shrink to start the process.
4. Click Close when the task completes to return to the Volumes panel.
5. Run the required procedures on the host OS after the shrinking process.
|
Important: For volumes that contain more than one copy, you might receive a CMMVC6354E error. Check the Running tasks window and wait for the copy to synchronize. If you want the synchronization process to complete more quickly, increase the rate by increasing the Mirror Sync Rate value in the Actions menu. When the copy is synchronized, resubmit the shrink process.
Similar errors might occur if other tasks, for example, volume expand or format operations, are running on the volume. The solution is to wait until these operations finish, then restart the shrink process.
|
8.3.7 Expanding a volume
The IBM Storwize V5000 can expand volumes. Use this feature only if the host OS supports it. This capability increases the capacity that is allocated to the particular volume by the amount that is specified. To expand a volume, complete the following steps:
1. Select Expand from the Actions menu.
2. Enter the new volume size or enter the amount by which the volume needs to expand.

Figure 8-49 Expand Volume panel
4. If the task completion dialog stays open, review the results of the operation and click Close to return to the Volumes panel.
5. Run the required procedures on the host OS to use the full available space.
|
Note: You can expand the capacity of volumes in Metro Mirror and Global Mirror relationships that are in consistent_synchronized state if those volumes are using thin-provisioned or compressed copies.
You cannot expand the following types of volumes:
•Volumes in HyperSwap relationships or in Global Mirror relationships that are operating in cycling mode
•Volumes in relationships where a change volume is configured
•Volumes that have a fully allocated copy
For further information on volume expansion see the following website:
|
8.3.8 Migrating a volume to another storage pool
To migrate a volume to another storage pool, see 6.8, “Migrating a volume to another storage pool” on page 333.
8.3.9 Exporting to an image mode volume
Image mode provides a direct block-for-block translation from a managed disk (MDisk) to a volume with no virtualization. An image mode MDisk is associated with one volume only. This feature can be used to export a volume to a non-virtualized disk and to remove the volume from storage virtualization.
|
Note: Among the IBM Storwize V5000 family, this feature is available only on the IBM Storwize V5030 storage systems.
|
To export to an image mode volume, complete the following steps:
1. Select the volume that you want. From the Actions menu, choose Export to Image Mode, as shown in Figure 8-50.

Figure 8-50 Exporting a volume to an image mode
2. The Export to Image Mode wizard opens and displays the available MDisks. Select the MDisk to which to export the volume, and click Next, as shown in Figure 8-51.

Figure 8-51 Selecting the MDisk to which to export the volume
3. Select a storage pool into which the image-mode volume is placed after the migration completes, as shown in Figure 8-52.

Figure 8-52 Select the storage pool
4. Click Finish to start the migration. After the task is complete, check the results and click Close to return to the Volumes panel.
|
Important: Use image mode to import or export existing data into or out of the IBM Storwize V5000. Migrate data from image mode MDisks to other storage pools to benefit from storage virtualization.
|
For more information about importing volumes from external storage, see Chapter 7, “Storage migration” on page 347 and Chapter 4, “Storage pools” on page 143.
8.3.10 Deleting a volume
To delete a volume, complete the following steps:
1. Select Delete from the Actions menu.
2. Confirm the number of volumes and select the check box if you want to force the deletion. Figure 8-53 shows the Delete Volume panel.

Figure 8-53 Delete Volume panel
3. Click Delete to remove the selected volume or volumes from the system. After the task completes, click Close to return to the Volumes panel.
|
Important: You must force the deletion if the volume has host mappings or if the volume is used in FlashCopy mappings. To be cautious, always ensure that the volume has no association before you delete it.
|
8.3.11 Duplicating a volume
You can create a new volume by using the same presets and parameters as an existing volume. These parameters are shown:
•Volume preset (generic, thin-provision, and compressed)
•Volume size
•Storage pool
•Access and caching I/O group
•Caching mode
•Easy Tier status
•Virtualization type
|
Important: Duplicating a volume does not duplicate the volume data. The duplicating task creates a volume with the same preset and volume parameters as the source volume. Duplicating mirrored and image-mode volumes is not supported.
|
To duplicate a volume, complete the following steps:

Figure 8-54 Duplicate volume option
2. The Duplicate Volume window, which is shown in Figure 8-55, can be used to change the name of the new volume. By default, a sequence integer is appended to the name of the volume to be duplicated.

Figure 8-55 Duplicate Volume
3. Click Duplicate to start the process. If the task completion dialog stays on the window, review the process results and click Close.
8.3.12 Adding a volume copy
If a volume consists of only one copy, you can add a second mirrored copy of the volume. This second copy can be generic or thin-provisioned.
You can also use this method to migrate data across storage pools with different extent sizes.
To add a second copy, complete the following steps:

Figure 8-56 Add Volume Copy option
2. Select the storage pool in which to create the copy. Select capacity savings, between None, Thin-provisioned or Compressed. Click Add, as shown in Figure 8-57.

Figure 8-57 Add Volume Copy: Select a storage pool
3. The copy is created after you click Add and data starts to synchronize as a background task. If the task completion dialog stays on the window, review the results and click Close.
4. Now, the volume that is named APP1_VOL has two volume copies, which are stored in two separate storage pools (Figure 8-58).

Figure 8-58 Volume copies
8.4 Volume properties and volume copy properties
This section provides an overview of all available information that relates to the IBM Storwize V5000 volumes.
To open the advanced view of a volume, complete the following steps:
1. Select Properties from the Actions menu. Click View more details to show the full list of volume properties, as shown in Figure 8-59.

Figure 8-59 Volume details overview
The following details are available:
– Name: Shows the name of the volume.
– Pool: Gives you information about the storage pool in which the volume exists. The value “many” indicates that the volume has multiple copies, which can be in different pools.
– State: Gives status information about the volume, which can be online, offline, or degraded.
– Capacity: Shows the capacity of the volume. If the volume is thin-provisioned, this number is the virtual capacity.
– UID: The volume unique identifier.
– Number of FlashCopy mappings: The number of existing FlashCopy relationships. For more information, see Chapter 10, “Copy services” on page 481.
– Caching I/O group: Specifies the volume caching I/O group.
– Accessible I/O groups: Shows the I/O group that the host can use to access the volume.
– Preferred node: Specifies the ID of the preferred node for the volume.
– Encrypted: Shows whether the volume is encrypted.
– I/O throttling: You can set a limit on the number of I/O operations that are accepted for a volume. The limit is set in terms of I/O operations per second (IOPS) or bandwidth. For more details on I/O throttling, 6.10, “I/O throttling” on page 343.
– Mirror sync rate: After creation, or if a volume copy is offline, the mirror sync rate weights the synchronization process. Volumes with a high sync rate (100%) complete the synchronization faster than volumes with a lower priority. By default, the rate is set to 50% for all volumes.
– Cache mode: Shows whether the cache is enabled or disabled for this volume.
– Cache state: Indicates whether open I/O requests are in the cache that is not destaged to the disks.
– ID: Shows the identifier (ID) of the volume.
– UDID (OpenVMS): The unit device identifiers (UDIDs) are used by OpenVMS hosts to access the volume.
– Virtualization type: Specifies the virtualization type of the volume. The value can be striped, seq, image, or many. The value “many” indicates that the volume has multiple copies, which can have different virtualization types.
2. To open the advanced view of a volume copy, select the copy of the volume that you want and click Actions → Properties, as shown in Figure 8-60.

Figure 8-60 Volume copy properties
3. The Properties panel opens. Click View more details to show the full list of the volume copy properties, which is shown in Figure 8-61.
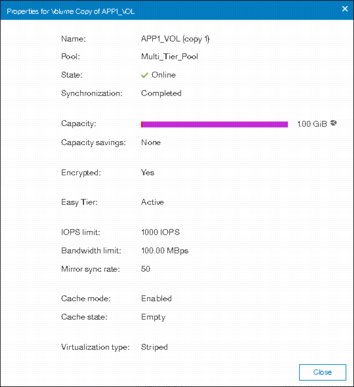
Figure 8-61 Volume copy properties
The following additional volume copy details are available:
– Capacity: Shows the allocated (used) and the virtual (real) capacity. You can hover your mouse pointer over the pie chart to display information for additional tiers.
– Capacity savings: Shows the method of capacity savings for the volume copy. It can be None for a generic copy, Compressed, or Thin-provisioned.
– Easy Tier: Indicates the Easy Tier state.
|
Mirror synchronization rate: Setting the Mirror Sync Rate to 0% disables synchronization.
|
4. To change the volume copy properties for the thin-provisioned or compressed volume copy type, select a volume copy from the Volumes panel, and click Actions → Modify Properties. Use the Modify Properties dialog, which is shown in Figure 8-62, to customize the thin-provisioning values: Warning Threshold and Enable Autoexpand.

Figure 8-62 Modify volume copy properties
5. Modify the values if needed and click OK. After the task completes, check the results of the operation and click Close to return to the Volumes panel.
8.5 Advanced volume copy functions
In 8.3.1, “Advanced volume functions” on page 403, we described all of the available actions at a volume level and how to create a second volume copy. In this section, we focus on volumes that consist of two volume copies and how to apply the concept of two copies for business continuity and data migration.
To access advanced volume copy functions, complete the following steps:
1. Select the desired volume having multiple copies.
2. Click the twisty (>) to show all the copies.
3. Then, select a volume copy.
4. Open the Actions menu to display the following volume copy actions (Figure 8-63).

Figure 8-63 Volume Copy Actions menu
The following functions are available on the Actions menu:
– Create a volume from this copy
– Split into a new volume (8.5.2, “Splitting into a new volume” on page 426)
– Make primary (8.5.1, “Volume copy: Make Primary” on page 424)
– Validate volume copies (8.5.3, “Validate Volume Copies option” on page 427)
– Modify properties (8.4, “Volume properties and volume copy properties” on page 420)
8.5.1 Volume copy: Make Primary
When you look at the volume copies, you can see that one of the copies shows an asterisk (*) next to its name, as shown in Figure 8-64.
Figure 8-64 Volume copy names
Each volume has a primary and a secondary copy, and the asterisk indicates the primary copy. The two copies are always synchronized, which means that all writes are destaged to both copies, but all reads are always performed from the primary copy. The maximum configurable number of copies per volume is two. The roles of the copies can be changed.
To accomplish this task, complete the following steps:
1. Select the secondary copy. Then, click Actions → Make Primary. Usually, it is a preferred practice to place the volume copies on storage pools with similar performance, because the write performance is constrained if one copy is placed on a lower-performance pool.
2. Figure 8-65 shows the secondary copy Actions menu.

Figure 8-65 Make primary option
3. If you require high read performance, you can place the primary copy in a solid-state drive (SSD) pool or an externally virtualized Flash System and then place the secondary copy in a normal disk storage pool. This action maximizes the read performance of the volume and guarantees that a synchronized second copy is in your less expensive disk pool. You can migrate online copies between storage pools. For more information about how to select the copy that you want to migrate, see 8.3.8, “Migrating a volume to another storage pool” on page 411.

Figure 8-66 Change the primary volume copy
5. If the task completion dialog stays on the window, check the process output and click Close.
The volume copy feature is also a powerful option for migrating volumes, as described in 8.5.5, “Migrating volumes by using the volume copy features” on page 431.
8.5.2 Splitting into a new volume
If the two-volume copies are synchronized, you can split one of the copies to a new volume and map this volume to another host. From a storage point of view, this procedure can be performed online, which means that you can split one copy from the volume and create a copy from the remaining volume without affecting the host. However, if you want to use the split copy for testing or backup, you must ensure that the data inside the volume is consistent. Therefore, the data must be flushed to storage to make the copies consistent.
For more information about flushing the data, see your operating system documentation. The easiest way to flush the data is to shut down the hosts or application before a copy is split.
In our example, volume APP1_VOL has two copies: Copy 0 is primary and Copy 1 is secondary.
To split a copy, complete the following steps:
1. Click Split into New Volume (Figure 8-67) on any copy and the remaining secondary copy automatically becomes the primary for the source volume.

Figure 8-67 Split into New Volume option
2. Figure 8-68 shows the Split Volume Copy panel to specify a name for the new volume.

Figure 8-68 Split Volume Copy panel
3. If the task completion dialog stays on the window after the task completes, review the results and click Close to return to the Volumes panel.
4. As shown in Figure 8-69, the copy appears as a new volume that is named APP1_VOL_SPLITTED_VOL (as specified during the split process). The new volume can be mapped to a host.

Figure 8-69 Volumes: New volume from the split copy operation
|
Important: If you receive error message code CMMVC6357E while you are splitting a volume copy, click the Running Tasks icon to view the synchronization status. Then, wait for the copy to synchronize and repeat the splitting process.
|
8.5.3 Validate Volume Copies option
You can check whether the volume copies are identical and process the differences between them if they are not.
To validate the copies of a mirrored volume, complete the following steps:

Figure 8-70 Actions menu: Validate Volume Copies
2. The Validate Volume Copies dialog opens, as shown in Figure 8-71.

Figure 8-71 Validate Volume Copies panel
The following options are available:
– Generate Event of Differences
Use this option if you want to verify that the mirrored volume copies are identical. If any difference is identified, the command stops and logs an error that includes the logical block address (LBA) and the length of the first difference. You can use this option, starting at a different LBA each time, to count the number of differences on a volume.
– Overwrite Differences
Use this option to overwrite contents from the primary volume copy to the other volume copy. The command corrects any differing sectors by copying the sectors from the primary copy to the copies, which are compared. Upon completion, the command process logs an event, which indicates the number of differences that were corrected. Use this option if you are sure that the primary volume copy data is correct or that your host applications can handle incorrect data.
– Return Media Error to Host
Use this option to convert sectors on all volume copies, which contain different contents, into virtual medium errors. Upon completion, the command logs an event, which indicates the number of differences that were found, the number that were converted into medium errors, and the number that were not converted. Use this option if you are unsure what the correct data is and you do not want an incorrect version of the data to be used.
3. Select which action to perform and click Validate to start the task.
4. The volume is now checked. If the task dialog stays open, review the task results and click Close.
5. Figure 8-72 shows the output when you select the volume copy Generate Event of Differences option.

Figure 8-72 Volume copy validation output
The validation process runs as a background process and might take time, depending on the volume size. You can check the status in the Running Tasks window, as shown in Figure 8-73.

Figure 8-73 Validate Volume Copies: Running Tasks
8.5.4 Delete volume copy option
To delete a volume copy, complete the following steps:

Figure 8-74 Actions menu: Delete a volume copy

Figure 8-75 Delete a copy confirmation
3. If the task completion dialog is still open after the copy is deleted, review the results of the operation and click Close to return to the Volumes panel.
4. The copy is deleted, but the volume stays online by using the remaining copy (Figure 8-76).
Figure 8-76 Volume remains online after the copy deletion
8.5.5 Migrating volumes by using the volume copy features
In the previous sections, we showed how to create, synchronize, split, and delete volume copies. A combination of these tasks can be used to migrate volumes to other storage pools.
The easiest way to migrate volume copies is to use the migration feature that is described in 8.3.8, “Migrating a volume to another storage pool” on page 411. By using this feature, one extent after another is migrated to the new storage pool. However, the use of volume copies provides another way to migrate volumes if the storage pool extent sizes differ.
To migrate a volume, complete the following steps:
1. Create a second copy of your volume in the target storage pool. For more information, see 8.3.12, “Adding a volume copy” on page 417.
2. Wait until the copies are synchronized.
3. Change the role of the copies and make the new copy the primary copy. For more information, see 8.5, “Advanced volume copy functions” on page 423.
4. Split or delete the old copy from the volume. For more information, see 8.5.2, “Splitting into a new volume” on page 426 or 8.5.4, “Delete volume copy option” on page 430.
This migration process requires more user interaction with the IBM Storwize V5000 GUI, but it offers benefits. For example, we look at migrating a volume from a tier 1 storage pool to a lower-performance tier 2 storage pool.
In step 1, you create the copy on the tier 2 pool, while all reads are still performed in the tier 1 pool to the primary copy. After the synchronization, all writes are destaged to both pools, but the reads are still only from the primary copy.
Because the copies are fully synchronized, you can switch their roles online (step 3), and analyze the performance of the new pool. After you test your lower performance pool, you can split or delete the old copy in tier 1 or switch back to tier 1 in seconds if the tier 2 storage pool did not meet your requirements.
8.6 Volumes by storage pool
To see the layout of volumes within pools, complete the following steps:

Figure 8-77 Volumes by Pool menu
2. The Volumes by Pool panel opens, as shown in Figure 8-78.

Figure 8-78 Volumes by Pool panel
The left pane is called the pool filter. The storage pools are displayed in the pool filter. For more information about storage pools, see Chapter 4, “Storage pools” on page 143.
In the upper right, you see information about the pool that you selected in the pool filter. The following information is also shown:
– Pool icon: Because storage pools can have different characteristics, you can change the storage pool icon by clicking it. For more information, see 4.2, “Working with storage pools” on page 156.
– Pool name: The name that was entered when the storage pool was created. Click it to change the name, if needed.
– Pool details: Shows you the information about the storage pools, such as the status, number of managed disks, and Easy Tier status.
– Volume allocation: Shows you the amount of capacity that is allocated to volumes from this storage pool.
The lower-right section lists all volumes with at least one copy in the selected storage pool. The following information is provided:
– Name: Shows the name of the volume.
– State: Shows the status of the volume.
– UID: Shows the volume unique identifier (UID).
– Host mappings: Shows whether host mappings exist.
– Capacity: Shows the capacity that is presented to hosts.
3. Also, you can create volumes from this panel. Click Create Volumes to open the Volume Creation panel. The steps are described in Chapter 6, “Volume configuration” on page 287.
Selecting a volume and opening the Actions menu or right-clicking the volume shows the same options, as described in 8.3, “Advanced volume administration” on page 403.
8.7 Volumes by host
To see an overview of the volumes that a host can access, complete the following steps:

Figure 8-79 Volumes by Host option
2. The Volumes by Host panel opens, as shown in Figure 8-80.

Figure 8-80 Volumes by Host panel
3. The host filter is in the left pane of the view. Selecting a host shows its properties in the right pane, such as the host name, number of ports, host type, and the I/O group to which it has access.
The right pane, next to the host name, shows icons for Fibre Channel, iSCSI and SAS connectivity. Depending on the type of host connectivity, the respective icon will be highlighted and the other icons will be disabled.
The volumes that are mapped to this host are listed in the table in the lower-right part of the panel.
4. You can create a volume from this panel. Click Create Volumes to open the same wizard as described in Chapter 6, “Volume configuration” on page 287.
Selecting a volume and opening the Actions menu or right-clicking the volume shows the same options, as described in 8.3, “Advanced volume administration” on page 403.
..................Content has been hidden....................
You can't read the all page of ebook, please click here login for view all page.