
CHAPTER 5
Live Data Collection from Windows Systems
One of the first steps of any preliminary investigation is to obtain enough information to determine an appropriate response. The steps you take to confirm whether or not an incident occurred vary depending on the type of incident. Obviously, you will take different steps to verify unacceptable web surfing than you will to determine whether an employee has been stealing files from another system’s file shares. You need to take into consideration the totality of the circumstances before responding at the target system, using the standard investigative techniques outlined in Chapter 4. If we could become a broken record, we would repeat “totality of the circumstances” over and over. Initial response is an investigative as well as a technical process!
The goal of an initial response is twofold: Confirm there is an incident, and then retrieve the system’s volatile data that will no longer be there after you power off the system. During your initial, hands-on response, you want to perform as few operations as possible to gather enough information to make the decision whether the incident warrants forensic duplication.
In this chapter, we outline the steps to take when performing the initial response to a Windows NT/2000/XP system, whether the system was used by an attacker or was the victim of an attack. We begin by discussing the pre-incident preparation and the creation of a response toolkit. Then we describe how to gather volatile data in a manner that minimizes the alteration of the system. Finally, we address making a decision about performing a forensic duplication of the evidence.
For an initial response, you need to plan your approach to obtain all the information without affecting any potential evidence. Because you will be issuing commands with administrator rights on the victim system, you need to be particularly careful not to destroy or alter the evidence. The best way to meet this goal is to prepare a complete response toolkit.
CAUTION
During severe incidents, you may have an audience of onlookers, gaping open-mouthed as you respond. Your response may be magic to them. These onlookers will be a distraction for you unless you are experienced, alert, and prepared.
Do not underestimate the importance of the monotonous and laborious step of creating a response toolkit. By spending the time to collect the trusted files and burn them onto a CD-ROM (or store them on floppies), you are much better equipped to respond quickly, professionally, and successfully. A live investigation is not the time to create or test your toolkit for the first time!
In all incident responses, regardless of the type of incident, it is critical to use trusted commands. For responding to Windows, we maintain a CD or two floppy disks that contain a minimum of the tools listed in Table 5-1.
| Tool | Description | Source |
| cmd.exe | The command prompt for Windows NT and Windows 2000 | Built in |
| PsLoggedOn | A utility that shows all users connected locally and remotely | www.foundstone.com |
rasusers |
A command that shows which users have remote-access privileges on the target system | NT Resource Kit (NTRK) |
netstat |
A system tool that enumerates all listening ports and all current connections to those ports | Built in |
| Fport | A utility that enumerates all processes that opened any TCP/IP ports on a Windows NT/2000 system | www.foundstone.com |
| PsList | A utility that enumerates all running processes on the target system | www.foundstone.com |
| ListDLLs | A utility that lists all running processes, their command-line arguments, and the dynamically linked libraries (DLLs) on which each process depends | www.foundstone.com |
nbtstat |
A system tool that lists the recent NetBIOS connections for approximately the last 10 minutes | Built in |
arp |
A system tool that shows the MAC addresses of systems that the target system has been communicating with, within the last minute | Built in |
kill |
A command that terminates a process | NTRK |
md5sum |
A utility that creates MD5 hashes for a given file | www.cygwin.com |
rmtshare |
A command that displays the shares accessible on a remote machine | NTRK |
netcat |
A utility used to create a communication channel between two different systems | www.atstake.com/research/ tools/network_utilities |
cryptcat |
A utility used to create an encrypted channel of communications | http://sourceforge.net/ projects/cryptcat |
| PsLogList | A utility used to dump the contents of the event logs | www.foundstone.com |
ipconfig |
A system tool that displays interface configuration information | Built in |
| PsInfo | A utility that collects information about the local system build | www.foundstone.com |
| PsFile | A utility that shows files that are opened remotely | www.foundstone.com |
| PsService | A utility that shows information about current processes and threads | www.foundstone.com |
auditpol |
A utility used to display the current security audit settings | NTRK |
doskey |
A system tool that displays the command history for an open cmd.exe shell | Built in |
In Windows, there are two types of applications: those based on a graphical user interface (GUI) and those based on a console user interface (CUI). Since GUI programs create windows, have pull-down menus, and generally do “behind-the-scenes” interaction, we advise against using them for an investigation. All of the tools listed in Table 5-1 are CUI or command-line tools.
You need to ensure that your toolkit will function exactly as intended and not alter the target system. We take several steps to prepare our toolkits for initial response:

During your initial response, you will gather a lot of information from the live system. We use the term live to refer to a system that is relevant to an investigation, whether it is the attacking system or the victim, and is currently powered on. Think of it as the crime scene before photos are taken and bodies are removed. You are operating in an untrusted environment, where the unexpected should be anticipated.
You have four options when retrieving information from a live system:
netcat or cryptcat.Saving data to the hard drive is undesirable because it modifies the system. Recording data by hand is not practical due to the volume of information. Floppy drives are usually not a great choice because the data will not fit on the floppy. Other removable, writable media with a larger capacity than a floppy would be ideal, but the victim system may not have a drive for such media. However, we are happy to report a new solution: the removable USB drive. These small devices, about the size of your thumb, provide fantastic storage capabilities (up into the gigabyte range) and can be used to store your toolkit as well as the collected data. These devices have drivers built in, so they will work with any computer that sports a USB port and Windows software. USB ports are fairly ubiquitous now, so we recommend obtaining a few of these devices for your response toolkit.
Despite the proliferation of USB ports, you still need to be able to save data across a network. We often choose
netcat to transfer the information from the target system to a remote forensic workstation.netcat is a freely available tool that creates a channel of communication between hosts. We use it during initial response to create a reliable, TCP connection between the target system and the forensic workstation used for analysis. All that you need to use netcat is an IP address on the target network and a laptop system with enough storage space to retain the information you gather.Using
netcat allows you to transfer all the relevant system information and files you require to confirm whether or not an incident occurred. This technique of information gathering promotes two sound practices:Figure 5-2 illustrates the process of using
netcat during initial response.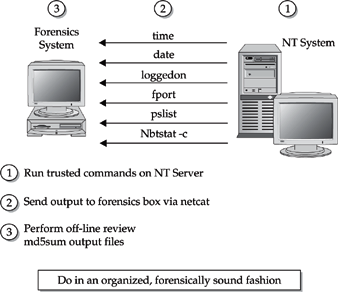
To use
netcat, you initiate a netcat listener on the forensic workstation and redirect all incoming data to a file. Figure 5-3 illustrates the forensic workstation listening for incoming connections on port 2222. It will write the information received on that port to a file called pslist.
On the target system,
netcat is used to funnel the output to your response commands to the forensic workstation. The command line in Figure 5-4 runs pslist, sending the output of the command to the forensic workstation, at IP address 192.168.0.20.
When transferring files in this manner,
netcat does not know when the data transfer is complete. You will need to break the connection after the data transfer is complete by pressing CTRL-C on the forensic workstation. You will know data transfer is complete when the floppy or CD-ROM stops spinning on the target system or when the file size is no longer growing on the forensic workstation.Use md5sum to Ensure Evidence Integrity
Remember to protect the integrity of the files you retrieve during the response using
md5sum. We prefer to run md5sum on the files stored on the forensic workstation. We perform an md5sum in the presence of witnesses. We call it the two-man integrity rule.GO GET IT ON THE WEB
md5sum: http://www.cygnus.com
The drawback of transferring data across a network is that the data may be visible to network eavesdroppers. Consider encrypting the traffic using
cryptcat. An alternative is to use a crossover cable to directly connect the victim system and the forensics workstation.cryptcat has the same syntax and functions as the netcat command, but the data transferred is encrypted. There are two compelling arguments for encrypting your traffic when sending files from a target system:GO GET IT ON THE WEB
cryptcat: http://sourceforge.net/projects/cryptcat
Now that you have a forensic toolkit and a methodology, you need to determine exactly which data to collect. At this point, you want to obtain the volatile data from the Windows NT/2000 system prior to turning off that system. At a minimum, we collect the following volatile data prior to forensic duplication:
If you know that your investigation is unlikely to require forensic duplication, you may want to collect more data. For example, you may want to dump RAM, obtain some information from the Registry, or perform other actions on the target system, pending the totality of the circumstances. Gathering this information is covered in the “Performing an In-Depth Live Response” section later in this chapter. Here, we describe the steps necessary to obtain critical data that is lost if you simply turn off the system and perform forensic duplication.
Consider the Best Time for an Incident Response
Carefully determine the most appropriate time to respond to the incident. If an employee is suspected of unacceptable use of his system to run an illicit business on company time and company resources, there may not be exigent circumstances that warrant immediate action, in broad daylight, in front of all the other employees. If you conduct your initial response at night or during a weekend, your actions will be more discreet. On the other hand, an active attack against your e-commerce server may warrant immediate action. The bottom line: Plan your response for the appropriate time.
It’s one thing to have the technical skills required for proper incident response; it is quite another to implement a complete, unbiased, professional process. You need to have a methodology that is both organized and documented. There are two reasons for diligently documenting your actions when responding at the console of a victim system:
What if the server you are retrieving information from crashes, and a client or your boss blames your actions for the downtime? If you dutifully documented your actions, you will have a written history of the steps you took on the machine, which should provide a defense to any challenge.
Before you begin collecting data, you should have an MD5 sum file with the checksums of each tool you will use. If you need to use untrusted binaries during a response, be sure to record the full pathnames of those binaries.
We recommend that you use a form to plan and document your response. For our investigations, we record the start time of the command executed and the command line entered. We document whether we ran a truste or untrusted binary. Then we generate an MD5 sum of the data obtained by each command and add any relevant comments. Here is an example of such a form:

Use a form like this to write down all the commands you are going to run before you respond on the target system. This approach ensures that the investigator plans ahead!
Legal Issues
It is a good idea to have a witness sign the form and verify each MD5 sum performed during the response. At the end of your response, before you review the output, copy all the output files and their corresponding checksums to backup media. Immediately provide copies to another party. Remember the two-man integrity rule!
Now that you know what to collect and how to document your response, you are ready to retrieve the volatile data. We have created a “top-ten” list of the steps to use for data collection:
1. Execute a trusted cmd.exe.
2. Record the system time and date.
3. Determine who is logged in to the system (and remote-access users, if applicable).
4. Record modification, creation, and access times of all files.
5. Determine open ports.
6. List applications associated with open ports.
7. List all running processes.
8. List current and recent connections.
9. Record the system time and date.
10. Document the commands used during initial response.
The following sections describe how to perform each of these steps. Remember that you may need to collect more data than what we show in this list.
Executing a Trusted Cmd.exe
As discussed in previous chapters, investigators need to be careful of tripwires or booby traps that attackers put in place to foil incident response. You may run what you think is cmd.exe on a victim system, only to discover that you actually executed
del *.* in the WINNTSystem32 directory, rendering the system virtually inoperable. The solution is to execute a trusted version of cmd.exe from your own toolkit. Figure 5-5 illustrates using the Start | Run command on a Windows system to open a trusted cmd.exe on the floppy drive.
Recording the System Time and Date
After executing the trusted command shell, it is a good idea to capture the local system
date and time settings. This is important to correlate the system logs, as well as to mark the times at which you performed your response. The time and date commands are a part of the cmd.exe application. Figure 5-6 illustrates the execution of the date command, redirecting the output to a file called date.txt on the floppy drive. The second command in the figure uses the append operator (>>) to add the output to the time command to the date.txt file.
When you execute the
date and time commands, you must press the ENTER key to indicate that you do not want to change the settings.Be Consistent with Your Output Filenames
Maintain a consistent naming convention for your output files, such as prepending each command with a case and system identifier. An example would be the case number followed by the machine IP address, then a descriptive title, as in “FS030503-10.48.73.21-date.txt.” Also, as soon as you create a file, immediately generate an MD5 sum of the results. This helps to ensure the integrity of the document file.
Determining Who Is Logged in to the System and Remote-Access Users
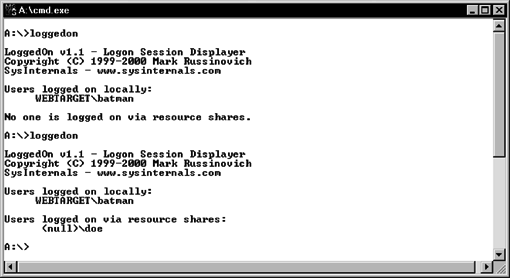
The next step is to determine which user accounts have active connections to the system. You want to know whose service you may be interrupting should you decide to terminate the network connections to the victim system. Mark Russinovich created PsLoggedOn, a utility that shows all users connected locally and remotely. Notice the null session connection from a remote system in Figure 5-7.
If you are responding to a system that offers remote access via modem lines, you need to determine which user accounts have remote-access privileges on the target system. If none do, you know that the modem is for outgoing connections (or at least not Remote Access Service, or RAS). If several accounts can access the system via RAS, you need to decide whether or not you want to pull the telephone lines from the system during the response. You may not want to allow any access to the target system while you are responding. The command-line tool to enumerate the users who can log in to a system via RAS is called
rasusers.Recording Modification, Creation, and Access Times of All Files
Use the
dir command to get a directory listing of all the files on the target system, recording their size, access, modification, and creation times. This is often the most important and critical step to incident response!If you can identify the relevant timeframe when an incident occurred, the time/date stamps become the evidence of which files an attacker touched, uploaded, downloaded, and executed. Windows performs this task extremely quickly. Here are examples of using
dir to obtain access (a), modification (w), and creation (c) times:dir / t:a /a / s /o:d c: |
Provides a recursive directory listing of all the access times on the C: drive |
dir/t:w/a/s /o:dd: |
Provides a recursive directory listing of all the modification times on the D: drive |
dir / t:c /a / s /o:d e: |
Provides a recursive directory listing of all the creation times on the E: drive |
Determining Open Ports
To determine which ports are open, use
netstat, a standard Windows command that enumerates all listening ports and all current connections to those ports. netstat is useful for recording volatile data such as current connections and connections that have just terminated. Figure 5-8 shows netstat being executed on an NT Server machine.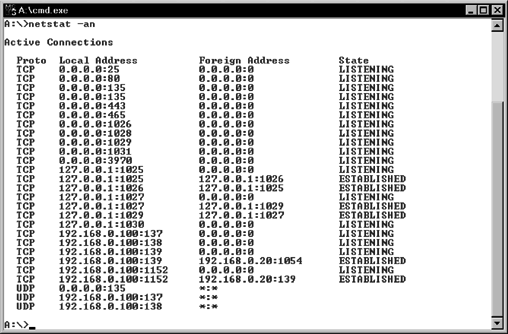
You will notice many localhost connections listed in the output. Even though a software package runs on a single machine, it may have been written with the client/server model in mind. Thus,
netstat will almost always show connections between applications on the localhost 127.0.0.1. These connections are rarely of concern to the investigator. You will be looking for suspicious remote IP addresses and listening ports.Listing Applications Associated with Open Ports
It is helpful to know which services listen on which specific ports. Otherwise, you will not be able to discern rogue processes from proper mission-critical processes. Foundstone supplies a free tool called Fport, which enumerates listening ports for all processes on a Windows NT/2000 system. Figure 5-9 shows the syntax for Fport and the corresponding output.

GO GET IT ON THE WEB
Fport: http://www.foundstone.com
If Fport reveals a rogue process listening for connections, and
netstat shows current connections to that process, you may want to terminate the process to protect your system from potentially malicious actions taken by unauthorized intruders. When necessary, use the kill command to terminate rogue processes.What Can Happen
You are sitting in front of your Windows NT system at work, when suddenly, your default web browser starts up and connects you to an online gambling site. You suspect that someone has installed some kind of remote-access server on your system.
Where to Look for Evidence
Figure 5-10 shows the results of running Fport on a system that has several remote-access trojans installed.

Process ID 162 looks suspicious, because WINNTwinpop.exe is listening for connections on ports 6000 and 12346, which are ports commonly used by the popular Netbus trojan. Process ID 199 is also suspicious, because it shows Windll, which is used by the GirlFriend trojan. One quick solution is to copy both files to the response floppy, and then use an up-to-date virus scanner or Pest Patrol on another system to determine if these programs are remote-access trojans. You could also get both winpop.exe (the Netbus trojan) and windll.exe (the GirlFriend trojan) for further analysis.
GO GET IT ON THE WEB
Trojan and remote access service ports: http://www.doshelp.com/trojanports.htm
Pest Data Catalog: http://research.pestpatrol.com
Listing All Running Processes
Before you power off a target system, it is important to record all of the processes currently running on that system. You cannot obtain this information if you simply unplug the power cord! When a process is executed on a Windows system, a kernel object and an address space that contains the executable code are created. The kernel object created is used by the operating system to manage the process and maintain statistical information about the process.
You can use Mark Russinovich’s PsList utility to enumerate all running processes on the target system. Figure 5-11 shows an example of running PsList.

NOTE
The original Windows API had no functions that enumerated the running processes from the kernel objects (no
ps command as in Unix). The developers of Windows NT created the PSAPI.dll to enumerate which processes are running on a system. Windows 95 and 98 use a different API to enumerate processes, which we do not cover in this book.If you cannot tell the difference between Windows critical processes and rogue processes, PsList will not be of much use to you. You need to recognize normal processes so that you can identify those processes that may be out of place or nefarious. For example, if PsList reveals that the EVENTVWR process is running, this suggests that someone is looking at the logs. If you see USRMGR, you might suspect that someone is trying to change the audit policies, add or delete a user account, or change user account data (passwords). Table 5-2 lists some common NT system processes.
| NT Process | Description |
| SMSS | The Session Manager that sets up the NT environment during the bootup process |
| CSRSS | The Client/Server Runtime Server Subsystem, used to maintain the Win32 system environment and numerous other vital functions |
| WINLOGON | The Windows logon service |
| SERVICES | Used by NT to manage services |
| LSASS | The Local Security Authority Security Service, which is always running to verify authentication on a system |
| SPOOLSS | The spooler service for the print subsystem |
| RPCSS | The remote procedure call subsystem |
| ATI2PLAB | A portion of the video driver subsystem |
| EXPLORER.EXE | Responsible for creating the Start button, desktop objects, and the taskbar |
| EVENTVWR | The Event Viewer application |
| USRMGR | The User Manager application |
| MSDTC | The Microsoft Distributed Transaction Coordinator, which is configured to start automatically when an NT system starts |
NOTE
If you lose the Windows desktop for some reason (such as a hung process), you can choose Start | Run and enter Explorer. The desktop should reappear.
Listing Current and Recent Connections
netstat, arp, and nbtstat are useful utilities for determining who is connected or has recently connected to a system. Many Windows NT/2000 workstations have audit policies that do not log successful or failed logons. Therefore, these three utilities may be your only way to identify a remote system connecting to a workstation.netstat Many computer security specialists use netstat to list the open ports on a system. Since Fport lists the open ports and the application listening on each port, we use netstat to determine current connections and the remote IP addresses of those current connections, and to view recent connections.arp This utility is used to access the ARP cache, which maps the IP address to the physical MAC address for the systems that the target system has been communicating with in the last minute.nbtstat This utility is used to access the remote NetBIOS name cache, listing the recent NetBIOS connections for approximately the last ten minutes. Figure 5-12 shows an example of using nbtstat to list current and recent NetBIOS connections.
Recording the System Time and Date
Issue the
date and time commands again (repeat step 2) to record the time and date that you completed the live data collection. This ensures that you have a record of when you were on the system, so that if anything is changed on the system outside this timeframe, you will know that you are not responsible for the alteration.Legal Issues
Sandwiching your data-retrieval commands between
time and date commands is a forensically sound principle. This may become critical if an adversary challenges the steps you took during a response. You can pinpoint the exact actions you took on the system and the exact timeframe in which you took them.Documenting the Commands Used during Initial Response
Use the
doskey /history command to display the command history of the current command shell on a system (if the situation warrants). We also use doskey /history to keep track of the commands executed on the system during a response, as shown in Figure 5-13.
Many of the steps taken during the initial response can be incorporated into a single batch script. We often script our response, and then use
netcat to transfer the results of the script to a forensic workstation. Simply create a text file and add a .bat extension to it to make it a batch file. Here is a sample script that can be used when responding to incidents on Windows NT/2000 systems:
We named the above file ir.bat, and we run it on target systems to get the bare essentials. Notice how we surround the response with the
time and date commands.When redirecting the output of a script of multiple commands to a single
netcat socket, you need to use the following command line on your analysis system:The L stands for listen harder, telling the
netcat socket not to close without user intervention (CTRL-C). The results are a single text file (iroutput.txt, in this case), which contains all the volatile information, recorded in a neat fashion.Sometimes, your response at the console of a live system needs to go beyond merely obtaining the volatile information. Perhaps shutting off the target system is not even an option, because there are numerous concerns about disruption of service.
You may need to find evidence and properly remove rogue programs without disrupting any services provided by the victim machine. In other words, you will not be able to shut off the machine, disable network connections, overtax the CPU, or use Safeback and EnCase (or any other popular Windows/DOS-based forensic software). This is somewhat contrary to traditional computer forensics, but the requirement to be able to retrieve forensically sound data without disrupting the operation of the victim computer is becoming more common.
CAUTION
Unless you are experienced and know exactly how to pluck out all of the evidence needed during a live response, you should strongly consider forensic duplication of the victim system. In-depth live response should be left to the professionals who know exactly what to look for. Otherwise, you may be left with an incomplete response without evidence or proper purging of rogue processes and files.
Your first steps are to collect the most volatile data, as described in the previous sections and summarized here:
date and time commands to sandwich your response between starting and ending times. These commands record the current system time for correlation between system logs and network-based logging.netstat to view current and recent connections on all listening ports.After gathering this information, you can continue with some investigative steps that minimize the disruption of a target system’s operation.
To perform an in-depth live response, we use the tools listed in Table 5-3. These tools are presented in the order in which they are commonly used, but you may need to use them in a different order to meet the needs of your specific situation. Each one of these commands has standard output, which means that you can use all of these commands in conjuction with
netcat to respond across a network connection.| Tool | Description | Source |
auditpol |
A command-line tool that determines the audit policy on a system | NTRK |
reg |
A command-line tool used to dump specific information (keys) within the NT/2000 Registry | NTRK |
regdump |
A command-line tool that dumps the Registry as a text file | NTRK |
| pwdump3e | A utility that dumps the SAM database so that the passwords can be cracked | www.polivec.com/pwdump3.html |
| NTLast | A utility that monitors successful and failed logons to a system | www.foundstone.com |
| Sfind | A utility that detects files hidden within NTFS file streams | www.foundstone.com |
| Afind | A utility that can search a file system to determine files accessed during specific timeframes | www.foundstone.com |
dumpel |
A command-line tool that is used to dump the NT/2000 event logs | NTRK |
Two key sources of evidence on Windows NT/2000 systems are the event logs (if auditing is on) and the Registry on the target system. Thus, a thorough review of both is required during most investigations. We use the following approach, which obtains quite a bit of information from a live Windows NT/2000 system:
These steps are discussed in more detail in the following sections.
Obtaining Event Logs during Live Response
Several tools are helpful for obtaining event logs from a live system:
auditpol This tool from the NTRK discovers which audit policies exist on the system. Why try to obtain logs from a system if none exist? If Security Policy Changes auditing is turned on, you will find events recorded in the Security log (event ID 612). Figure 5-14 shows the command line and output for auditpol.ntlast shows successful logons (Figure 5-15).ntlast –f enumerates failed console logons (Figure 5-16).ntlast –r lists all successful logons from remote systems (Figure 5-17).ntlast–f–r shows failed remote logons.dumpel You will want to retrieve the other logs for offline analysis. Why search randomly on the target system using Event Viewer? Use dumpel (from the NTRK) and netcat to retrieve remote logs.dumpel –l security –t dumps the entire Security log, with tabs as delimiters, to any file you specify.dumpel –l application –t dumps the Application log to standard output.


GO GET IT ON THE WEB
NTLast: http://www.foundstone.com
What Can Happen
An attacker sends an email with a remote-access trojan attachment to several recipients at an organization. The attacker is hoping that the recipients will unwittingly execute her trojan, allowing her backdoor access to the organization’s network. However, the attacker’s trojan fails to execute properly because the organization requires that every desktop system run an anti-virus program that quarantines evil files.
Where to Look for Evidence
The following entry is a victim system’s Application log. Notice how the system HOMER4 was infected by a file called 04.D, which is actually the BackGate trojan. Also notice that this file was located in the c:Inetpubscripts directory. This file was probably placed on the system via a web server hack, such as the popular MDAC attack or the Internet Information Server (IIS) Unicode/double decode attack. The trojan was placed in the directory where the default web server scripts are stored. It is likely that the attacker had placed an Active Server Pages (ASP) page that allowed her to upload arbitrary files.

You can also view the logs on the target system remotely by choosing Log | Select Computer. You will need to have administrator-level access in order to remotely view the Security log on a remote system. Figure 5-18 illustrates how to establish a NetBIOS connection to the remote system to the IPC share, logging in to system
webtarget as batman (which just happens to be the administrator account).
After you have the administrator account connection, simply choose Log | Select Computer, and you will be able to remotely view the event log on that system, as shown in Figure 5-19. If you want to create a local copy, save the file.

NOTE
We included how to access the event logs via a network connection solely because we are frequently asked how remote administration of Windows systems can be conducted. We do not feel that this is a sound methodology when responding to a computer security incident.
Reviewing the Registry during a Live Response
The Windows Registry stores a wealth of important data that is useful during initial response. We cover the full details of investigating the Registry in Chapter 12.
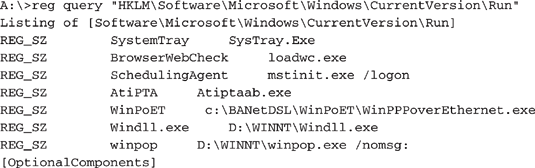
For live retrieval of the important Registry data, you can use
regdump or reg query, both from the NTRK. The regdump utility creates an enormous text file of the Registry. We use reg query instead and extract just the Registry key values of interest. Here is a sample batch file that we have used to get some information from a target NT system:
You can tailor this example to get information about the Registry keys that are of interest on your system.
What Can Happen
An attacker uploads a remote-access trojan to the victim system and places an entry in the RunOnce key of the Registry so that the rogue application will be executed every time the victim system is rebooted.
Where to Look for Evidence
The following is a section of the Registry we retrieved from a victim system. You will note that two programs, windll.exe and winpop.exe, are executed each time the system is booted. The next step would be to obtain WINNTwindll.exe and WINNTwinpop.exe and perform tool analysis to determine their functions.
Obtaining System Passwords
You may need to get the passwords off the system at the time of response, particularly if you have an uncooperative user. Use pwdump3e, an updated version of Todd Sabin’s pwdump, to dump the passwords from the Security Accounts Manager (SAM) database. These passwords may be cracked on a forensic workstation using John the Ripper, L0phtcrack, or any other Windows password-cracking tool. Remember that if you decide to do a forensic duplication of the system, you will likely need the system passwords to boot the system into its native NT/2000 operating system. You will want to be able to log on with the administrator account.
GO GET IT ON THE WEB
pwdump3e: http://www.polivec.com/pwdump3.html
L0phtcrack: http://www.atstake.com/research/lc/index.html
John the Ripper: http://www.openwall.com/john
Dumping System RAM
It may be important for you to dump the contents of memory, perhaps to obtain passwords, get the cleartext of a recently typed encrypted message, or retrieve the contents of a recently opened file. Unfortunately, it is sometimes difficult to obtain Windows memory contents in a forensically sound manner.
There are two types of memory that an investigator may wish to obtain: user mode (application) memory and full-system memory. You can use the userdump.exe utility, part of the Microsoft OEM Support Tools package, to dump application memory. You can use George Garner’s modified version of the GNU utility dd to dump full-system memory. For details on using these utilities, see Curtis Rose’s whitepaper, “Windows Live Incident Response Volatile Data Collection: Non-disruptive User and System Memory Forensic Acquisition.”
GO GET IT ON THE WEB
Microsoft support tools: http://download.microsoft.com/download/win2000srv/
Utility/3.0/NT45/EN-US/Oem3sr2.zip
dd.exe for system memory collection: http://users.erols.com/gmgarner/forensics
After reviewing the system information you retrieved during the initial response, you need to decide whether to perform a forensic duplication of the evidence. The forensic duplication of the target media provides the mirror image of the target system. This methodology provides due diligence when handling critical incidents. It also provides a means for having working copies of the target media for analysis without worrying about altering or destroying potential evidence. Generally, if the incident is severe or deleted material may need to be recovered, a forensic duplication is warranted.
Law enforcement generally prefers forensic “bit-for-bit, byte-for-byte” duplicates of target systems. If you are responding to an incident that can evolve into a corporate-wide issue with grave consequences, you may want to perform a forensic duplication.
It is a good idea to have some policy that addresses when full duplication of a system is required. This may hinge on the system itself or the type of activity investigated. For example, you may choose to consider a sexual harassment suit or any investigation that can lead to the firing or demotion of an employee as grave enough to perform forensic duplication. If you are unsure, you can take the approach of imaging everything and sorting it out later.
Initial response is a stage of preliminary information gathering to determine whether or not unlawful, unauthorized, or unacceptable activity occurred. The information gathered during your initial response forms the basis for your level of response. During the initial response, it may be necessary to capture live data—volatile evidence—before it is lost through actions such as rebooting or shutting down a system. When live data collection is necessary, it is critical to adhere to sound forensic principles and alter the state of the system as little as possible. The information you obtain during the response may lead to administrative or legal proceedings.
The actions you take during the initial response are critical to foster good decisions later in an investigation. We have found that the best approach is an incremental one. Use the least intrusive commands first to determine the scope of the incident and to decide whether it warrants a full forensic duplication. In our opinion, if you have the resources and the technical capabilities, you can never go wrong with a full duplication.
1. On what media do you store and use your forensic toolkit? Why?
2. How do you determine which executables are associated with listening ports?
3. Why is it unnecessary to obtain application logs during live response?
4. Why is remotely viewing event logs not considered a sound practice?
..................Content has been hidden....................
You can't read the all page of ebook, please click here login for view all page.