Chapter 6. The AX 2012 client
In this chapter
Integrating with the Microsoft Office client
Introduction
At its core, the AX 2012 Windows client is a form-based Windows application that lets users interact with the data contained on the server. You can modify the client to display new data types or to alter how users interact with existing data types. The user interface consists of forms that are declared in metadata and often contain associated code.
AX 2012 includes several updates and additions for the client. Some of the more substantial changes include new patterns for master records (details forms) and secondary data (list pages and transaction details forms), a new vertically expanding FastTabs control, the use of Action panes and Action pane strips to display actions more prominently, and the introduction of FactBoxes to showcase related information. For more information, see Chapter 5, “Designing the user experience.”
The majority of this chapter covers key aspects of the AX 2012 client. However, some of the information in this chapter is at the overview level. For more detailed information, see the “Client” section of the AX 2012 SDK at http://msdn.microsoft.com/en-us/library/gg880996.
Working with forms
A form is the basic unit of display in the client. A typical form displays fields that show the current record and buttons that represent the actions the user can take on that record, and a mechanism to change which record is being shown.
To create a form, you use the Application Object Tree (AOT) to define the metadata for the form. If necessary, you can add code to handle any events that cannot be handled declaratively in metadata.
The following high-level steps describe the basic process for creating a form:
1. Create the form resource. You can create a form from scratch, but often, you can use an existing form or a template as a starting point. When you create the form, be sure to set the Caption property on the form’s Design node. This is an important but often overlooked step.
2. Add data sources and set up join information. You can define custom queries and filters, if necessary.
3. Add controls to the form. You can add controls that are bound to fields to display data and action controls, such as buttons and Action panes, that let the user perform actions on the current record.
4. Add parts to the form that display data related to the main record. Parts can reduce the navigation that users must perform to find information.
5. Add navigation items so that users can access your form. Create a MenuItem control that points to the form. Add a reference to that MenuItem to Menu controls, or to other forms through MenuItemButton controls, to let the user navigate to the form.
6. Override form and control methods if you cannot achieve the behavior that you want declaratively through metadata.
7. Add business logic to classes as necessary to implement the functionality that the new form provides.
The following sections in this chapter contain more information about the components in each step. For the latest information and most up-to-date examples about how to build and customize forms, see the “Client” section in the AX 2012 SDK at http://msdn.microsoft.com/en-us/library/gg880996.
Form patterns
Earlier releases of Microsoft Dynamics AX had informal patterns for form development. In AX 2012, several form patterns have been formalized and are provided as templates.
When you create a form, select a form pattern that reflects the type of data that appears in the form and the interaction pattern that is provided to the user. The “Form User Experience Guidelines” topic on MSDN (http://msdn.microsoft.com/EN-US/library/gg886605) discusses each of the form patterns. These guidelines are useful to ensure a seamless experience between the new form and the existing forms in AX 2012.
After you select a form pattern, you can create a form by using a template: In the AOT, right-click the Forms node, click New Form From Template, and then select the template you want.
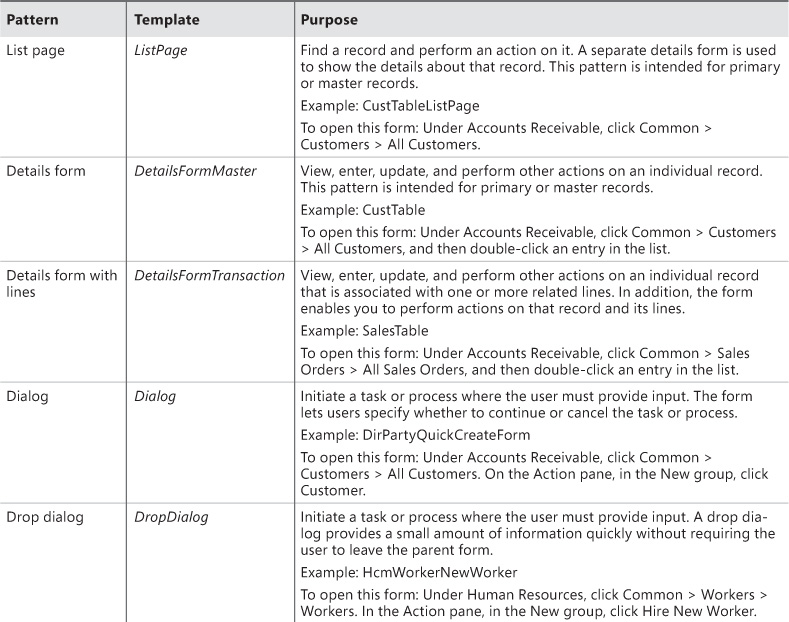
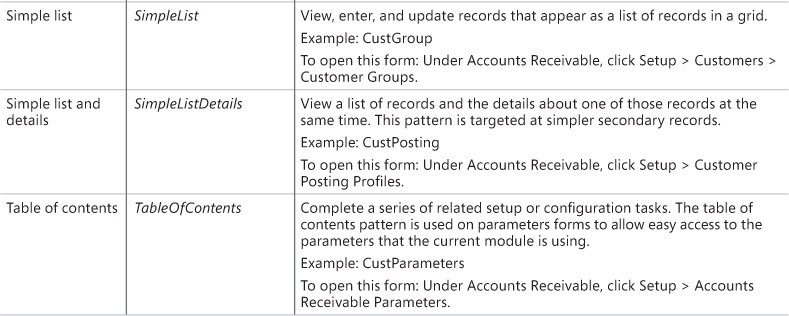
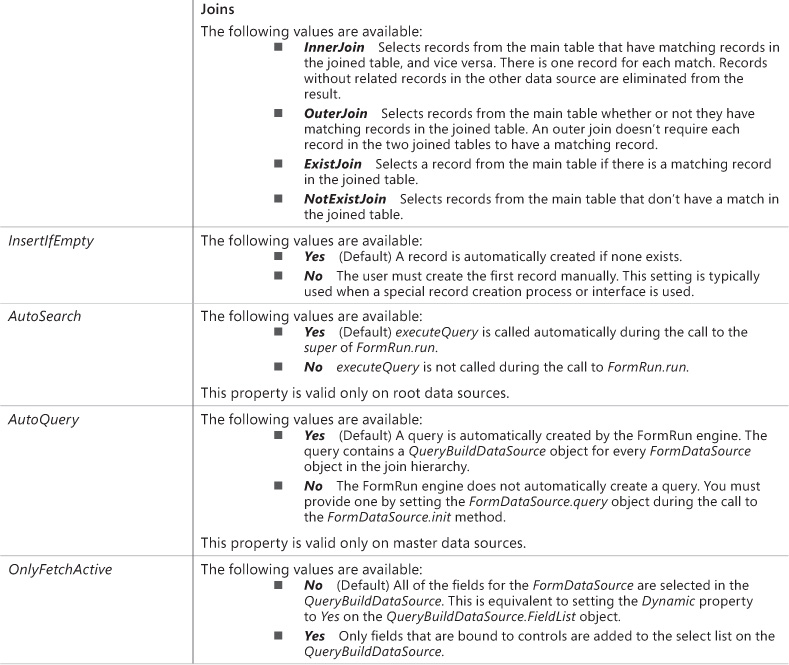
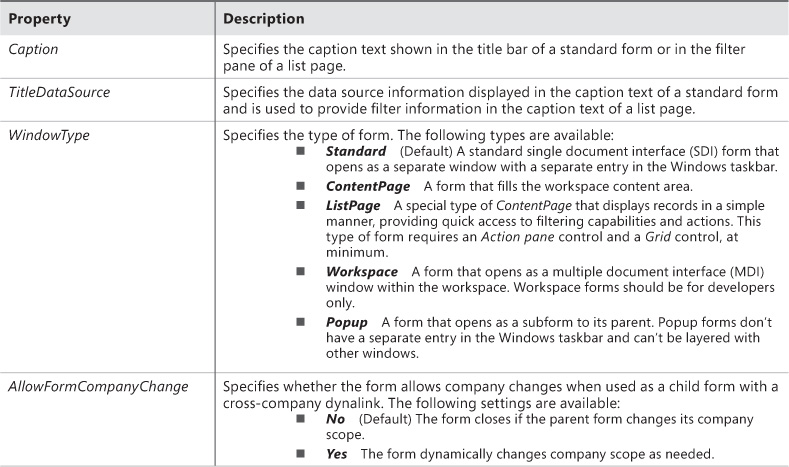
The form that AX 2012 generates contains property values and controls that implement the structure specified by the form pattern. Table 6-1 describes the form templates that are available and the purpose of each type of form.
There are no formalized patterns for journal and inquiry forms because the structure of those forms is highly dependent on the data and processes they support.
Form metadata
The form metadata in AX 2012 is extensive, but it is well-structured and easy to work with after you become familiar with it. The following are the primary metadata nodes for a form resource:
![]() Form.DataSources The data structures that are used for the form. For more information, see the “Form data sources” section later in this chapter.
Form.DataSources The data structures that are used for the form. For more information, see the “Form data sources” section later in this chapter.
![]() Form.Designs.Design The controls that display the data for the record. This metadata node name is often shortened to Form.Design or Form Design. For more information, see the “Adding controls” section later in this chapter.
Form.Designs.Design The controls that display the data for the record. This metadata node name is often shortened to Form.Design or Form Design. For more information, see the “Adding controls” section later in this chapter.
![]() Form.Parts The additional parts that display related data. For more information, see the “Using parts” section later this chapter.
Form.Parts The additional parts that display related data. For more information, see the “Using parts” section later this chapter.
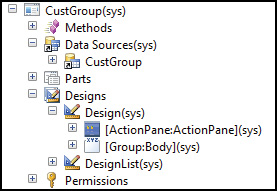
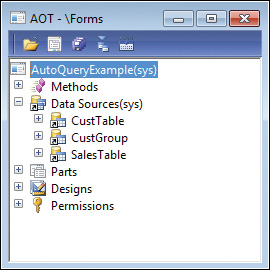
Figure 6-1 illustrates these nodes in the AOT for the CustGroup form.
Ideally, you should use metadata to customize forms. Metadata customization is preferred over code customization because metadata changes (also called deltas) are easier to merge than code changes. To ensure the greatest level of reuse, any changes you make to the metadata should be made at the lowest level possible—for example, at the table level instead of the form level.
When customizing forms, you should be aware of the metadata associations and the metadata inheritance that are used to fully define the form and its contents.
Metadata associations
You edit the metadata in AX 2012 by using the AOT. The base definitions for forms contained within the AOTForms node consist of a hierarchy of metadata that is located in other nodes in the AOT. To fully understand a form, you should investigate the metadata associations it makes. For example, a form uses tables that are declared in the AOTData DictionaryTables node, menu items that are declared in the AOTMenu Items node, queries that are declared in the AOTQueries node, and classes that are declared in the AOTClasses node.
Metadata inheritance
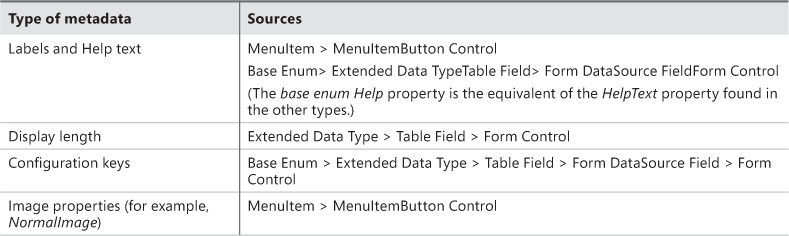
You need to be aware of the inheritance within the metadata used by forms. For example, tables use base enums, extended data types (EDTs), and configuration keys. A simple example of inheritance is that the Image properties on a MenuItemButton are inherited from the associated MenuItem if they aren’t explicitly specified on that MenuItemButton.
Inheritance also occurs within forms. Controls that are contained within other controls receive certain metadata property behaviors from their parents unless different property values are specified, including Labels, HelpText, Configuration Key, Enabled, and the various Font properties.
Table 6-2 shows examples of pieces of metadata that are inherited from associated metadata.
Form data sources
AX 2012 has a rich data access framework that makes it easy to add data to forms and bind controls to that data. The basis of this is the form data source, which allows binding the tables and fields to a form.
The form data source points to a specific table, map, or view. The field list on the form data source is automatically populated with the fields that are defined on the resource it refers to. From that list, you can bind controls to those fields or any of the data methods that exist on the table or form data source.
Form data sources can be divided into the following categories:
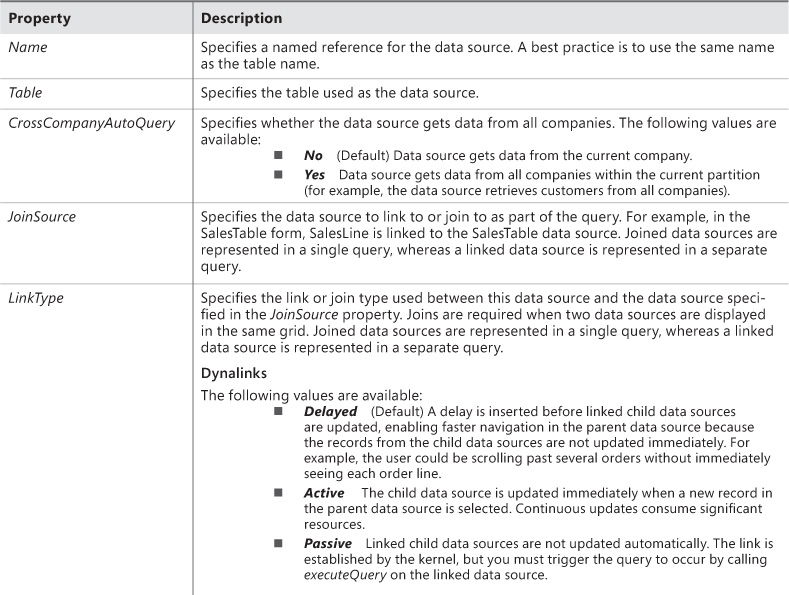
![]() Root data sources Root data sources do not contain a value for the JoinSource property and therefore are not joined with or linked to any other data source. Most forms have only one root data source. The root data source references the table data that is the primary subject of the form. Root data sources are sometimes called top-level data sources.
Root data sources Root data sources do not contain a value for the JoinSource property and therefore are not joined with or linked to any other data source. Most forms have only one root data source. The root data source references the table data that is the primary subject of the form. Root data sources are sometimes called top-level data sources.
![]() Master data sources Master data sources are root data sources or dynalinked data sources. A single query is used to retrieve the data for a master data source and the data sources that are joined to it. You can think of a master data source as being at the root of a query hierarchy.
Master data sources Master data sources are root data sources or dynalinked data sources. A single query is used to retrieve the data for a master data source and the data sources that are joined to it. You can think of a master data source as being at the root of a query hierarchy.
![]() Joined data sources Joined data sources are those that are joined to another data source. These data sources have a LinkType value of InnerJoin, OuterJoin, ExistJoin, or NotExistJoin. Typically, you use a join to combine data sources so that the data is retrieved by a single query. For example, in the CustTable form, DirPartyTable is joined to CustTable.
Joined data sources Joined data sources are those that are joined to another data source. These data sources have a LinkType value of InnerJoin, OuterJoin, ExistJoin, or NotExistJoin. Typically, you use a join to combine data sources so that the data is retrieved by a single query. For example, in the CustTable form, DirPartyTable is joined to CustTable.
![]() Linked data sources Linked data sources are data sources that are linked to another data source in the form. These data sources have a LinkType value of Active, Delayed, or Passive. Use a link for data sources that have a parent/child relationship so that the data is retrieved in separate queries. For example, in the SalesTable form, SalesLine is linked to SalesTable.
Linked data sources Linked data sources are data sources that are linked to another data source in the form. These data sources have a LinkType value of Active, Delayed, or Passive. Use a link for data sources that have a parent/child relationship so that the data is retrieved in separate queries. For example, in the SalesTable form, SalesLine is linked to SalesTable.
Dynalinks
The term dynalink refers to two data sources that are dynamically linked. A dynalink always has a parent data source and a child data source—for example, the SalesTable (Sales orders) form, where the SalesTable (Sales order) data source is the parent and the SalesLine (Sales order line) data source is the child. If two data sources have a dynalink, when a record changes in the parent data source, the child data source is notified about that change. The query for the child data source is reexecuted to retrieve the appropriate related data.
The following types of dynalinks are available:
![]() Intra-form Intra-form dynalinks occur between data sources that have a LinkType value of Active, Passive, or Delayed. The child data source has a query that is separate from the parent data source, and the query runs at a time that is determined by the LinkType property.
Intra-form Intra-form dynalinks occur between data sources that have a LinkType value of Active, Passive, or Delayed. The child data source has a query that is separate from the parent data source, and the query runs at a time that is determined by the LinkType property.
![]() Inter-form Inter-form dynalinks occur between related data sources on forms where one form (the parent) opens another form (the child). The DataSource property of a MenuItemButton on the parent form is used to specify which data source is used as the parent form side of the link. The child form side of the link is the first root data source.
Inter-form Inter-form dynalinks occur between related data sources on forms where one form (the parent) opens another form (the child). The DataSource property of a MenuItemButton on the parent form is used to specify which data source is used as the parent form side of the link. The child form side of the link is the first root data source.
Table inheritance
Table inheritance in AX 2012 functions much like class inheritance in any object-orientated language. However, it has the added benefit of allowing polymorphic queries of the data in tables. (For more information about table inheritance, see Chapter 17, “The database layer.”)
If you model a form data source on a table that is a base type, the derived types are automatically expanded into a subnode called Derived Data Sources. This node is not editable and is generated by the forms engine. The derived data sources have no properties or methods of their own because all of those characteristics are inherited from the base form data source. However, you can still override and add methods to the fields for derived data sources. For example, the DirPartyTable data source, shown in Figure 6-2, is part of a table inheritance hierarchy.
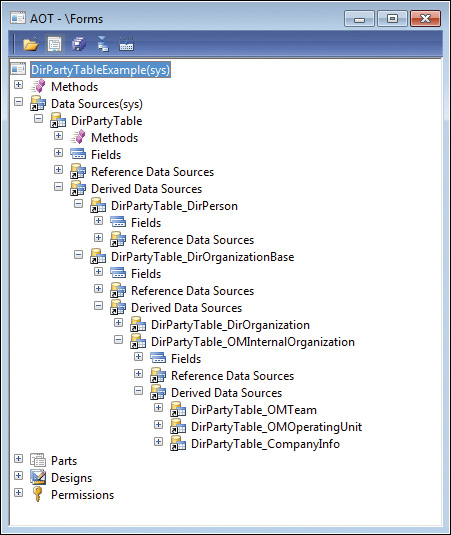
Figure 6-2 shows all of the automatically generated data sources, one for each derived type. The Fields node for each derived type lists the fields for that type. When there is only a single chain of base types, all of the base fields are collapsed into a single Fields node underneath the form data source. For example, if you model a form data source based on the DirPerson type, the Fields node would contain all of the fields in the chain.
Instance methods on the form data source also follow the table inheritance hierarchy. For example, if the user triggers the validateWrite event when the current active record is of type DirPerson, the FormDataSource.validateWrite method is called, which will call DirPerson.validateWrite, which will call DirPartyTable.validateWrite, which will call the kernel-level Common.validateWrite. However, non–instance-specific methods such as executeQuery work on the general form data source, so there are no calls to any base methods.
Because polymorphic queries are allowed, polymorphic creation of records is also supported. When a user clicks New on a form with a form data source that has no derived types, the concrete type to create is known. However, when the form data source has derived types, the user must be prompted to select a type to create.
Traditionally, to create a record in X++ code, you had to call only the FormDataSource.create method. However, that method does not let you specify the type. To support the polymorphic creation scenario, use the following method:
FormRun.createRecord(str _formDataSourceName [, boolean _append = false])
All create actions performed by the kernel are routed through this method. You should also use this method instead of the create method. The first parameter specifies the name of the form data source in which to create the record, and the second parameter contains the same append value that is passed to the create method. You can override this behavior by adding conditional code that depends on the type being created. The call to the super of the method executes the correct logic depending on the type.
If the type (or any of the types in the join hierarchy) is a polymorphic type, the user is prompted to select the type of record to create, as shown in Figure 6-3.
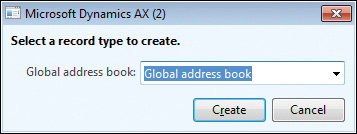
The createRecord method lets you override the behavior of the super to either specify the types of records that the user can create, or display your own dialog box to the user. To inform the kernel of which types you want the user to choose from, you use the following method:
FormDataSource.createTypes(Map _concreteTypesToCreate [, boolean _append = false])
The first parameter contains a map of string key/value pairs, where the key is the name of the form data source and the value is the name of the table type to create. For example, if your objective is to always create a type of CompanyInfo, you could use the next code snippet. Note that the name of the form data source is the name of the data source that is modeled on the form, not the derived data source, as shown in the following code:
public void createRecord(str _formDataSourceName, boolean _append = false)
{
Map typestoCreate = new Map(Types::String, Types::String);
if(_formDataSourceName == "DirPartyTable")
{
typestoCreate.insert("DirPartyTable", "CompanyInfo");
DirPartyTable_ds.createTypes(typestoCreate, _append);
}
else
{
super(_formDataSourceName, _append);
}
}
Unit of Work
Saving records in form data sources can occur in two ways. The traditional approach is that all of the inner-joined and outer-joined data sources are saved together in one process, but each record is saved to the server in individual remote procedure calls (RPCs) and transactions. This can be troublesome, because sometimes you need all of the records to be saved in a single transaction. To achieve this, you can set the ChangeGroupMode property on the Data Sources node to ImplicitInnerOuter. (The default setting is None, which results in the behavior described earlier.) With the ImplicitInnerOuter setting, all of the inner-joined and outer-joined records are grouped into a single RPC to the server and occur in a single transaction. If anything causes the transaction to be cancelled, the changes are rolled back. This feature is called Unit of Work. For more information about Unit of Work, see Chapter 17.
With this new approach, the write and delete methods no longer apply, because the actions occurred in the call to the super for those methods. With the change group mode behavior, the writing, written, deleting, and deleted methods are used. For each type of operation, when the validate method for each data source is called on the client, the methods ending in ing, such as writing, are called. The transaction then occurs on the server, where the table insert, update, or delete methods are called. Finally, the methods ending in ed or en, such as deleted or written, are called.
Unit of Work has an additional feature called OptionalRecord that saves database space by inserting outer-joined records only if the values have been changed from the default. For OptionalRecord, the two possible options are ImplicitCreate and ExplicitCreate. In the ImplicitCreate scenario, the forms engine automatically creates the outer-joined record if the record does not exist in the database. The record is saved only if values are changed from the default value. In the ExplicitCreate scenario, you can model a check box on the form that explicitly controls the behavior of record creation and deletion for the outer-joined record.
Date effectivity
Date effectivity allows tracking of how data changes over time. The date effectivity functionality lets users with appropriate security privileges see the entire change history for a record. It also provides support for creating records that become effective on specific dates. Interest and currency conversion rates are good examples of date effective records because they make use of specific effective dates and times. For more information, see Chapter 17 or download the white paper, “Using date effective data patterns,” from http://download.microsoft.com/download/4/E/3/4E36B655-568E-4D4A-B161-152B28BAAF30/Using_Date_Effective_Patterns_AX2012.pdf.
Surrogate foreign keys
Traditional foreign keys in Microsoft Dynamics AX used the natural key or a type of intelligent key for the target object. This had many drawbacks, such as breaking referential integrity if the value of a natural key was changed. To solve those problems and improve performance through the use of integer keys, surrogate foreign key support was added to AX 2012. Surrogate foreign key support uses reference data sources and Reference Group controls to provide surrogate key support in the client. For more information, see Chapter 17.
Metadata for form data sources
Table 6-3 describes some of the most important form data source properties.
Form queries
One of the most common ways of customizing a form is to modify the queries that the form uses. There are two primary ways to do this: by using the AutoQuery property or by using an explicit query. When the form loads, the following processing occurs for form data sources:
1. Form data source objects are created that reference the data that is retrieved from the database.
2. The form’s queries are run to retrieve data.
3. Controls that are bound to fields show data that was retrieved.
By default, when the FormDataSource.AutoQuery property is set to Yes, a query is created for the form based on its data sources. The query is created in the call to the super of the form’s init method. The query contains a QueryBuildDataSource object for each form data source in the direct join hierarchy. Additional queries are created for dynalinked form data sources. These queries are linked to the current data in their joined parent so that the queries are correct. This has the benefit of splitting tables across multiple database queries, which can improve performance and remove the cross-product results that occur in 1:n joins. Figure 6-4 shows the data sources for an example AutoQuery.
In this example, properties are set on the data sources as follows:
![]() The CustTable data source is the root form data source; therefore, its JoinSource property is not set.
The CustTable data source is the root form data source; therefore, its JoinSource property is not set.
![]() The CustGroup data source has its JoinSource property set to CustTable with a LinkType value of OuterJoin.
The CustGroup data source has its JoinSource property set to CustTable with a LinkType value of OuterJoin.
![]() The SalesTable data source has a JoinSource of CustTable and a LinkType value of Delayed.
The SalesTable data source has a JoinSource of CustTable and a LinkType value of Delayed.
With AutoQuery behavior, a query will be created with a root QueryBuildDataSource object of CustTable that has a child data source of CustGroup. Because the SalesTable data source is linked with a dynalink, it has its own query with a single root QueryBuildDataSource object. The SalesTable QueryBuildDataSource object has a dynalink added to it through the addDynalink method to the CustTable data source. When the form loads, the initial query runs to retrieve the data from CustTable and CustGroup. After the results are returned, a query runs to retrieve the SalesTable data based on the record in CustTable that is currently selected.
The second way of modeling the data access for a form is to use a query as the basis for the data source structure. You can do this by performing a drag-and-drop operation to add the query to the Data Sources node, or by setting the Query property. In this scenario, the query causes the respective form data sources to be generated for the form. No additional data sources can be added. This method of modeling data access is generally used only for list pages, because it requires two metadata items to be created to model the form. The extra work is beneficial in the case of list pages, because composite queries are created that contain filters for the secondary list pages that reuse the same list page form. For example, Customers On Hold, which is a secondary list page, reuses the Customers list page.
queryBuildDataSource and queryRunQueryBuildDataSource methods
An important change in AX 2012 is the addition of the FormDataSource.queryBuildDataSource method and the FormDataSource.queryRunQueryBuildDataSource method. These methods expose the respective Query and QueryBuildDataSource objects that the forms engine uses. These methods let X++ developers quickly access the correct QueryBuildDataSource object for the form data source. This is especially helpful when a form has multiple form data sources of the same type, such as the CustTable form.
Query and QueryRun objects
An important part of query interaction with the form is accessing the proper query to work with. For every data source on a form, there are two queries: the FormDataSource.query and the FormDataSource.queryRun.query. When a form initially loads, the Query is created in the call to the super of the FormDataSource.init method. Any modifications that you want to remain regardless of the filters that a user defines or clears should be applied to this query. In the call to the super of the executeQuery method, the QueryRun object is created, which contains a copy of the original Query object. When a user applies a filter, the filter is applied to QueryRun.query, and the research method is called. An internal flag is set that specifies not to re-create the QueryRun object, and then the executeQuery method is called. When the user clears the filters, executeQuery is called, which, by default, re-creates the QueryRun object from the base Query object.
CopyCallerQuery property
CopyCallerQuery is a property for the MenuItemButton and MenuItem resources that specifies whether to copy the query from the source form to the target form. When using CopyCallerQuery, the same rules apply as when you manually assign a query through code:
![]() The root data sources of the query must match the form data source.
The root data sources of the query must match the form data source.
![]() The joined data sources for the query should also be compatible.
The joined data sources for the query should also be compatible.
In AX 2012, the kernel automatically adds any missing QueryBuildDataSource objects for required form data sources. This makes the queries as compatible as possible.
Query filters
Forms in AX 2012 apply filtering through the use of QueryFilter objects instead of QueryBuildRange objects. QueryBuildRanges are applied to the ON clause in a Transact-SQL statement, which works correctly for inner joins because the ON clause and the WHERE clause provide equivalent behavior. However, this does not work as expected for outer joins. The expected behavior for data sources with outer joins is to apply the WHERE clause to restrict the entire query, instead of the ON clause, which restricts only the join. To solve this problem, the QueryFilter class was created. All of the internal kernel logic in the forms engine that modifies queries uses QueryFilter objects. It is recommended that all new X++ logic on forms use QueryFilter objects instead of QueryBuildRange objects for consistency.
For more information about query filters, see Chapter 17.
Adding controls
AX 2012 includes a large selection of controls that you can use to create data-driven forms quickly. When you add controls to a form, set as few properties as possible so that the controls can take full advantage of defaults and automatic values. Default and Auto property values on controls allow AX 2012 to use predefined functionality when determining display characteristics and behavior.
![]() Note
Note
The product is an excellent source of information about how to build a form. You can see how forms in the product are built and which controls are used.
Control overrides
Each control has a set of methods that you can override. Try to keep code in the overridden method (on the form) to a minimum by calling a class instance or a static method when possible.
Control data binding
Many controls can be bound explicitly to a data source and data field to display the data field value. Other controls, such as buttons, can be bound to a data source to obtain the data context. If a control is not explicitly bound to a data source, its data source context comes from either its parent hierarchy or the form default, if the data source is not specified by a parent of the control.
The implied context of a data source is particularly important when actions are executed and records are saved:
![]() When an action executes, it executes in the context of a particular data source. For example, when it initiates an action to create a new record, the record that is created depends on the current data context.
When an action executes, it executes in the context of a particular data source. For example, when it initiates an action to create a new record, the record that is created depends on the current data context.
![]() If changes to a record have not been saved when the cursor focus moves from a control in one data source context to a control in a different data source context, the record is saved automatically.
If changes to a record have not been saved when the cursor focus moves from a control in one data source context to a control in a different data source context, the record is saved automatically.
Design node properties
The Design node of a form contains the controls that display record data. The Design node contains properties, the most important of which are described in Table 6-4.
Run-time modifications
You can add or remove controls at run time through code in response to user actions. For example, filter controls can be added and removed as needed.
When changing the form at run time, you should lock it by using the element.lock method and the element.unlock method to ensure the changes occur at the same time instead of flickering into effect gradually. Locking the form can also improve performance because the form is redrawn only once.
Action controls
Add action controls such as buttons and Action panes to let users perform actions on the current record.
Buttons
Users click buttons to perform actions. Several types of button controls are available:
![]() MenuItemButton Activates a MenuItem to open a form, run a class, or display a report. This is the most common type of button because the behavior is modeled rather than defined explicitly through X++ code. For more information, see the “Adding navigation items” section later in this chapter.
MenuItemButton Activates a MenuItem to open a form, run a class, or display a report. This is the most common type of button because the behavior is modeled rather than defined explicitly through X++ code. For more information, see the “Adding navigation items” section later in this chapter.
![]() CommandButton Executes a system-defined command, such as OK, Export to Excel, and Close. Use this type of button whenever a system-defined command exists for the action that you want to add.
CommandButton Executes a system-defined command, such as OK, Export to Excel, and Close. Use this type of button whenever a system-defined command exists for the action that you want to add.
![]() Button Provides a clicked method that you can override to add X++ code. This type of button is used infrequently. Avoid using it, if possible, because it means that code will be added directly to the form.
Button Provides a clicked method that you can override to add X++ code. This type of button is used infrequently. Avoid using it, if possible, because it means that code will be added directly to the form.
![]() DropDialogButton Opens a drop dialog form. Drop dialogs let the user quickly provide information or make choices that are necessary to execute some action. For example, with a drop dialog, a user can select a specific hold state when putting a customer on hold.
DropDialogButton Opens a drop dialog form. Drop dialogs let the user quickly provide information or make choices that are necessary to execute some action. For example, with a drop dialog, a user can select a specific hold state when putting a customer on hold.
![]() MenuButton Displays a menu. This type of button can contain any button type except another MenuButton.
MenuButton Displays a menu. This type of button can contain any button type except another MenuButton.
You should populate the Text property for a Button or a MenuButton. However, the text for a CommandButton or a MenuItemButton should come implicitly from the referenced command or MenuItem, respectively.
You can place buttons directly on a form or within a ButtonGroup that is on a form. More commonly, buttons are placed inside an Action pane or an Action pane strip.
Action panes and Action pane strips
An Action pane (see Figure 6-5) organizes and displays buttons that represent the actions the form supports. An action is a task or operation that occurs when the user clicks a button on the Action pane. With actions, you can use data that is displayed in the current form to let users perform commands, open related forms, or execute custom X++ code.

Use an Action pane at the top of large forms when you need multiple tabs to display the actions that are available for the entire form.
Use an Action pane strip at the top of smaller forms when there are a small number of actions for the form. You can define an Action pane strip by setting the ActionPane.Style property to Strip.
You can also use an Action pane strip to display actions that have a specific context. Common locations for an Action pane strip are at the top of a TabPage, FastTab, or Group control. The context might be fields of a particular category within a record or a collection of associated child records. The most common usage of a contextual Action pane strip is when displaying the Add and Remove actions above a grid that contains associated child records, as shown in Figure 6-6. When you are using an Action pane strip in a particular data context, you should set the DataSource property of the Action pane control.
For more information about how to design Action panes, see Chapter 5.
Layout controls
Three main layout controls are used to display other controls inside them:
![]() Group A Group control provides a way to group and categorize individual controls within the form. The Design node of a form, in addition to containing all of the controls, has many of the properties and behaviors of Group controls.
Group A Group control provides a way to group and categorize individual controls within the form. The Design node of a form, in addition to containing all of the controls, has many of the properties and behaviors of Group controls.
![]() TabPage A TabPage control organizes the controls and fields on the form so that only a subset is displayed at one time.
TabPage A TabPage control organizes the controls and fields on the form so that only a subset is displayed at one time.
![]() Grid A Grid control displays input controls in a simple row and column format that allows the compact display of multiple fields for multiple records of the same type.
Grid A Grid control displays input controls in a simple row and column format that allows the compact display of multiple fields for multiple records of the same type.
Group
Use the Group control to organize related fields and other controls into logical groups within a form. You can create and label a Group control manually (by using the Caption property). You can also create a Group control by using the DataGroup property to point to a field group that has been predefined on a table (the data source).
Try to use table field groups whenever possible. Table field groups allow for easier maintenance of the application because a change to a table field group affects every form or report that uses that field group.
If you are manually adding controls and a caption to a Group control, be sure to provide a descriptive and understandable caption that accurately describes the group.
TabPage
Use TabPage controls to reduce the complexity of a form by hiding fields until the user needs them. TabPage controls are listed within a parent Tab control. The Tab control is commonly called a tab group to differentiate it from the TabPage controls it contains.
The following styles are available for TabPage controls:
![]() Standard Shows TabPage controls stacked on top of each other so that only one TabPage is visible at a time. This style, shown in Figure 6-7, is used throughout the product and should be familiar to most users.
Standard Shows TabPage controls stacked on top of each other so that only one TabPage is visible at a time. This style, shown in Figure 6-7, is used throughout the product and should be familiar to most users.
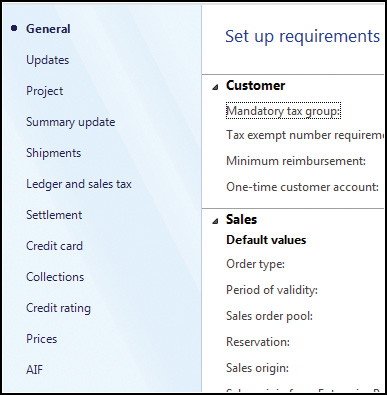
![]() VerticalTabs Shows TabPage controls listed as a vertically organized set of links to the left of the TabPage that is visible so that only one TabPage is visible at a time. This style, shown in Figure 6-8, is commonly used on parameters forms. Forms using this style are often said to have a table of contents style.
VerticalTabs Shows TabPage controls listed as a vertically organized set of links to the left of the TabPage that is visible so that only one TabPage is visible at a time. This style, shown in Figure 6-8, is commonly used on parameters forms. Forms using this style are often said to have a table of contents style.
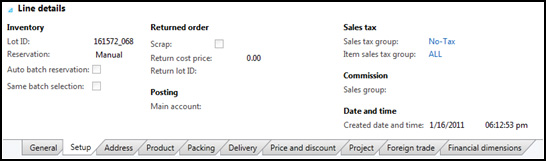
![]() IndexTabs Shows TabPage controls listed as a horizontally organized set of tabs underneath the TabPage that’s visible, so that only one TabPage is visible at a time. This style, shown in Figure 6-9, is commonly used to display the line details on transaction detail forms.
IndexTabs Shows TabPage controls listed as a horizontally organized set of tabs underneath the TabPage that’s visible, so that only one TabPage is visible at a time. This style, shown in Figure 6-9, is commonly used to display the line details on transaction detail forms.
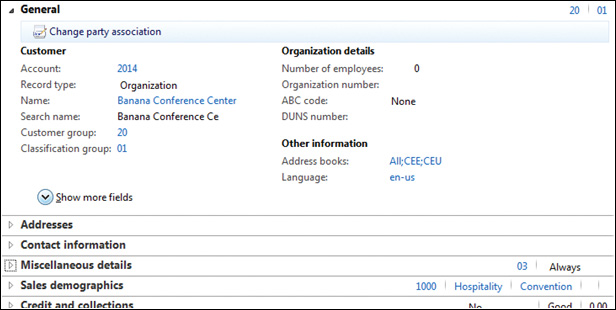
![]() FastTabs Shows TabPage controls listed vertically and lets users show multiple TabPage controls at a time. The user can choose which pages to see, and expand and collapse TabPage controls as necessary. With the FastTabs style, shown in Figure 6-10, you can also display summary information for key fields, even when the control is collapsed.
FastTabs Shows TabPage controls listed vertically and lets users show multiple TabPage controls at a time. The user can choose which pages to see, and expand and collapse TabPage controls as necessary. With the FastTabs style, shown in Figure 6-10, you can also display summary information for key fields, even when the control is collapsed.
To ensure that FastTabs are helpful to users, keep them short so that users can see only the information that’s necessary, provide descriptive labels, and display only the most important summary fields when the tab is collapsed. For more tips on creating effective FastTabs, see Chapter 5.
Grid
Use a Grid control to display a collection of records that are associated with the primary record on the form. For example, you could use a Grid control to display contacts or addresses for a customer.
If you do not want the Grid control to take up the entire form, you can control the size by using the VisibleRows property. For example, when you are displaying the addresses of a customer, many customers will only have one or two addresses. Setting VisibleRows to 3 is one way to display the relevant information and take up minimal space.
Input controls
You can use input controls in either a bound or an unbound manner. Input controls can be bound to either fields or methods.
Field-bound controls
Input controls represent the fields on a form. To create input controls that are bound to fields, you can manually add controls to the form and then bind them to fields in the data source. Another alternative is to drag fields from the data source to the form, as in the following procedure:
1. Right-click the Form.Data Sources node, and then click Open In New Window.
2. Place the new window containing the form data sources next to the original AOT window.
3. Drag the fields you want from the data sources to the appropriate location in a Group, TabPage, or Grid control on the form. This action creates the appropriate type of input control (StringEdit for strings, IntEdit for integers, and so on) and binds it to the data source field.
Method-bound controls
If you bind an input control to a display method, you can present data that is processed or created through code. You should place display methods that relate to a particular table on that table instead of on a form data source.
When binding a control to a display method, use the Datasource and Datamethod properties to point at the appropriate display method.
Display methods use the display keyword in the method declaration. The best examples of display methods are those that already exist in AX 2012. Use the search capability in the AOT to find example display methods on tables by looking for the display keyword followed by a space (display).
The standard display method format is as follows:
display SomeEDT myDisplayMethod()
{
//Code here...
return "returnValue";
}
Unbound controls
You can add input controls such as StringEdit and IntEdit to a form and manipulate them through X++ code to provide the user experience you want. An example of this is seen in the AxdWizard form. Unbound controls can also be used to provide a custom filtering experience. An example of this is seen in the SalesLineBackOrder form.
ManagedHost control
If the predefined controls provided with AX 2012 do not meet a specific need, or if using a prebuilt component would save time, you can use an externally created control. With the ManagedHost control, you can use .NET controls on AX 2012 forms. The ManagedHost control is the preferred solution when you need an externally created control because of the ease of use it provides.
To use a .NET control within an AX 2012 form, the AOT must contain a reference to the .NET assembly that contains the control. To add new .NET controls, add the assembly or assemblies that contain the controls to the Reference node of the AOT by right-clicking that node and then clicking Add Reference.
To reference that .NET control within an AX 2012 form, add a ManagedHost control and then use the Managed Control Selector dialog box to select the control you want. Right-click the new control to subscribe to events.
Try this simple example to add a .NET button to a form:
1. In the AOT, right-click the Forms node, and then click New.
2. Right-click the Design node, and then point to New Control > ManagedHost.
3. In the Managed Control Selector dialog box, in the top grid, select the System.Windows.Forms assembly; in the Controls grid, select Button; and then click OK.
![]() Note
Note
The System.Windows.Forms assembly is referenced by default, so you do not need to add a reference.
4. Set the name of the control to ManagedButton.
5. Right-click the ManagedButton control to open the Events dialog box, and then add the Click event.
6. Expand the Methods node for the form, open the init method, and replace the existing code with the following to set the text for the button:
public void init()
{
super();
_ManagedButton_Control = ManagedButton.control();
_ManagedButton_Control.add_Click(new ManagedEventHandler(this, 'ManagedButton_
Click'));
_ManagedButton_Control.set_Text("Managed button");
}
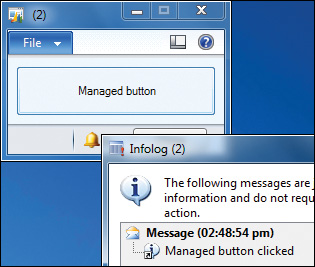
7. Open the code for the Click method, and then replace the existing code with the following to display text in the InfoLog:
void ManagedButton_Click(System.Object sender, System.EventArgs e)
{
info("Managed button clicked");
}
Run the form, and then click the button. The result is shown in Figure 6-11.
Other controls
You can create additional types of controls for a form to provide additional information or interactivity. For example, the static text control can provide instructional text to guide a user through a process, and the Window control can display images that help inform the user about a product or service. For more information, see “Controls in Microsoft Dynamics AX” at http://msdn.microsoft.com/en-us/library/gg881259.
Using parts
You use a part to retrieve and show data that is related to the selected record on the host form. Parts can be used in the FactBox pane of any form, or in the preview pane of a list page.
Types of parts
The following types of parts are available:
![]() Info parts are displayed like forms at run time. At design time, info parts use a simplified set of metadata that allows them to be displayed in both the AX 2012 client and the Enterprise Portal web client. Info parts have simple styling and are essentially a collection of data fields from the specified query. Info parts can define a set of actions to display below the data fields. Preview panes for list pages should be modeled as info parts so that they are also visible in Enterprise Portal.
Info parts are displayed like forms at run time. At design time, info parts use a simplified set of metadata that allows them to be displayed in both the AX 2012 client and the Enterprise Portal web client. Info parts have simple styling and are essentially a collection of data fields from the specified query. Info parts can define a set of actions to display below the data fields. Preview panes for list pages should be modeled as info parts so that they are also visible in Enterprise Portal.
![]() Cue groups are a collection of cues. Cues are a mechanism for showing the count of the records from a query. Often, the query used for the cue is restricted based on the record currently shown on the host form. A cue contains three things: a query that provides the count, a MenuItemName property that specifies the action to take when a user clicks a cue, and a label that informs the user what the count is for (if none is provided, the MenuItem label is used). For more information about how to use cues, see Chapter 5.
Cue groups are a collection of cues. Cues are a mechanism for showing the count of the records from a query. Often, the query used for the cue is restricted based on the record currently shown on the host form. A cue contains three things: a query that provides the count, a MenuItemName property that specifies the action to take when a user clicks a cue, and a label that informs the user what the count is for (if none is provided, the MenuItem label is used). For more information about how to use cues, see Chapter 5.
![]() Form parts are pointers to existing forms that can be displayed as FactBoxes. The Form property specifies the form to display, and the Caption property provides the title caption for the FactBox. When you are building a form to display as a form part, set the Style property to FormPart, the ViewEditMode property to View, and the Width property to ColumnWidth to ensure correct styling.
Form parts are pointers to existing forms that can be displayed as FactBoxes. The Form property specifies the form to display, and the Caption property provides the title caption for the FactBox. When you are building a form to display as a form part, set the Style property to FormPart, the ViewEditMode property to View, and the Width property to ColumnWidth to ensure correct styling.
Referencing a part from a form
The Parts node for each form references the parts that are used to display data related to the record being displayed by the form. Within the Parts node, you create part references that ensure the correct context.
To create a standard part reference, follow these steps:
1. Set the MenuItemName property to the MenuItem that specifies the part. A MenuItem is used to reference each part to ensure that standard MenuItem-based security can be applied.
2. Set the DataSourceName and DataSourceRelationName properties to specify the correct data relation (dynalink) to use between the host form and the part.
3. Set the PartLocation property to indicate whether the part should be displayed as a FactBox (the default) or as a preview pane.
4. (Optional. For list pages only.) Set the DisplayTarget property to indicate whether the part will be displayed in the AX 2012 client, Enterprise Portal, or both.
5. (Optional) Set the Visible property to hide the FactBox by default. The FactBox is still available for users if they choose to show it.
Adding navigation items
To give users access to the forms you create, you add references to them on menus.
MenuItem
In AX 2012, a MenuItem is a modeled pointer to another resource such as a form, class, or report. You define MenuItem metadata in the Menu Items node of the AOT. The Menu Items node has three subnodes that are used for categorization purposes. The Display, Action, and Output types usually reference forms, classes, and reports, respectively. However, a common exception is to have a display MenuItem reference a class that is used to initialize and open a form.
Menu
In AX 2012, a Menu is a structured collection of references to MenuItems and other Menus. The navigation pane, area pages, and address bar are mechanisms for exposing the menu metadata that you define in the Menus and Menu Items nodes of the AOT. The module menus are defined in the MenusMainMenu node of the AOT. You can follow the menu structure from that starting point. For example, the Accounts Receivable module is represented by the MenusMainMenuAccountsReceivable MenuReference and is defined in MenusAccountsReceivable.
When adding a Menu item to a menu, ensure that the IsDisplayedInContentArea property is set appropriately. For list pages and content pages that are displayed in the client, set this property to Yes so that the address bar is populated correctly.
Menu definitions
In previous releases of Microsoft Dynamics AX, forms were generally specific to a single module. However, in AX 2012, the application has been reorganized to be more role-specific. As a result, several new modules were created, such as Sales and Marketing and Inventory and Warehouse Management. Many commonly used forms are now found in multiple modules; for example, the Customers and Sales Orders forms are now located in both the Accounts Receivable and Sales and Marketing modules.
When defining a module menu or adding items to an existing module menu, try to follow the standard groupings that are used in other menus:
![]() Common Contains the most commonly accessed forms in the module. The Common group usually contains links to list pages.
Common Contains the most commonly accessed forms in the module. The Common group usually contains links to list pages.
![]() Periodic Contains links to secondary data forms.
Periodic Contains links to secondary data forms.
![]() Inquiries Contains links to forms that provide read-only views of data that are related to the current module.
Inquiries Contains links to forms that provide read-only views of data that are related to the current module.
![]() Reports Contains links to reports.
Reports Contains links to reports.
![]() Setup Contains links to setup forms, including the parameters forms. Sometimes this group also contains secondary data forms.
Setup Contains links to setup forms, including the parameters forms. Sometimes this group also contains secondary data forms.
The primary list pages listed in the Common group should be accompanied by secondary list pages. A secondary list page is a list page that adds ranges (filters) to a primary list page. You can implement a secondary list page as a menu item that points at the primary list page form but also specifies a query that adds a filter.
Customizing forms with code
You should customize forms with code only when the result cannot be accomplished by customizing metadata. When you customize forms by using metadata, upgrades are easier. Metadata change conflicts are easier to resolve, whereas code change conflicts need deeper investigation that sometimes involves creating a new merged method that attempts to replicate the behavior of the two original methods.
When you customize AX 2012, the following ideas might provide good starting points for investigation:
![]() Use examples in the base AX 2012 application by using the Find command on the Forms node in the AOT (Ctrl+F).
Use examples in the base AX 2012 application by using the Find command on the Forms node in the AOT (Ctrl+F).
![]() Refer to the system documentation entries (AOTSystem Documentation) for information about system classes, tables, functions, enumerations, and other system elements that are implemented in the AX kernel.
Refer to the system documentation entries (AOTSystem Documentation) for information about system classes, tables, functions, enumerations, and other system elements that are implemented in the AX kernel.
![]() Add a debug breakpoint in the init method for the form when you are looking for a suitable location for your customization code. Step through the execution of the method overrides. Note that control events (such as Clicked) do not trigger debugging breakpoints. You must explicitly add the breakpoint keyword to the X++ code for the debugger to stop in these methods.
Add a debug breakpoint in the init method for the form when you are looking for a suitable location for your customization code. Step through the execution of the method overrides. Note that control events (such as Clicked) do not trigger debugging breakpoints. You must explicitly add the breakpoint keyword to the X++ code for the debugger to stop in these methods.
For simpler code maintenance, follow these guidelines:
![]() Use the field and table functions of fieldNum, such as fieldNum(SalesTable, SalesId), and tableNum, such as tableNum(SalesTable), when working with form data sources.
Use the field and table functions of fieldNum, such as fieldNum(SalesTable, SalesId), and tableNum, such as tableNum(SalesTable), when working with form data sources.
![]() Avoid hard-coding strings. Instead, use labels, such as throw error(“@SYS88659”), and functions such as fieldStr and tableStr, which return the names of specified fields or a specified table, respectively.
Avoid hard-coding strings. Instead, use labels, such as throw error(“@SYS88659”), and functions such as fieldStr and tableStr, which return the names of specified fields or a specified table, respectively.
![]() Use as few method overrides as possible. Each additional method override has a chance of causing merge issues during future upgrades, patch applications, or code integrations.
Use as few method overrides as possible. Each additional method override has a chance of causing merge issues during future upgrades, patch applications, or code integrations.
Method overrides
By overriding form methods, you can influence the form life cycle and control how the form responds to some user-initiated events. Table 6-5 describes the most important form methods to override. The most commonly overridden form methods are init and run.

By overriding methods on form data sources and form data source fields, you can influence how the form reads and writes data and responds to user-initiated data-related events. Table 6-6 describes the most important form data source methods to override. The most commonly overridden form data source methods are init, active, executeQuery, write, and linkActive.
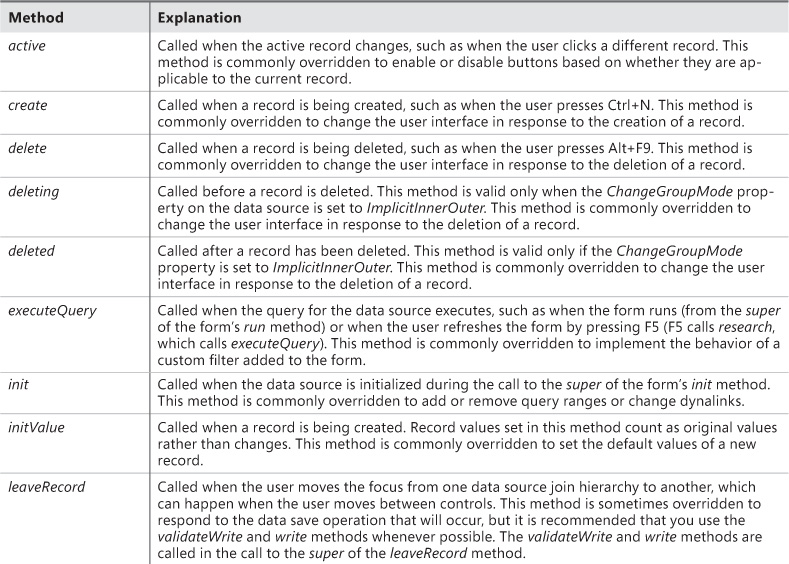
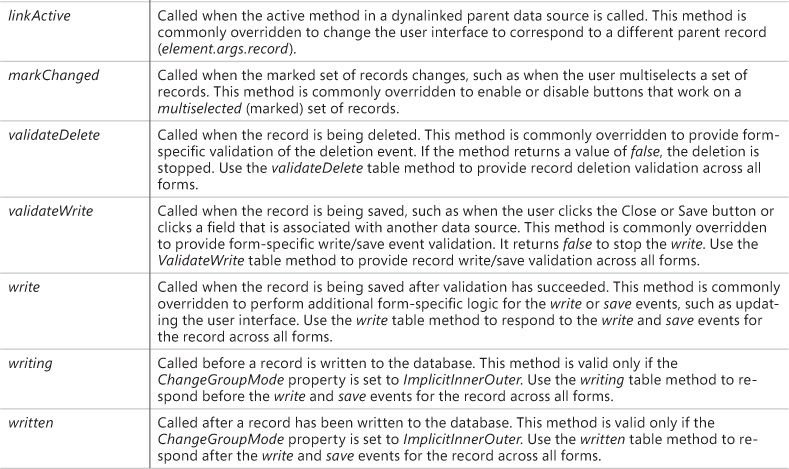
Table 6-7 describes the methods to override for fields in form data sources. The most commonly overridden method for form data source fields is the modified method.
Auto variables
When X++ code executes in the scope of a form, form-specific Auto variables are created to help developers access important objects related to the form. These variables are read-only and are described in Table 6-8.

Business logic
After the form structure is complete, add calls to business logic by using MenuItem references or by using explicit code in method overrides or button clicks. Try to keep explicit code on the form to a minimum, because any code that is written on the form cannot be used in other forms, reports, services, or form classes. If you need to add business logic, place it in separate classes when possible to allow it to be used with multiple forms.
To reference business logic in classes:
1. Put a static main method on the class.
2. Add the code to the main method that starts the business logic.
3. Create an Action MenuItem that references the class.
4. Add a MenuItemButton on the form that points at the Action MenuItem.
For an example, you can follow these steps, using the following code inside the main method:
static void main(Args args)
{
print "Hello World";
pause;
}
After control is passed to the class, the args method can provide contextual information that might be useful when the class is called from multiple forms.
Custom lookups
Lookups for table references are provided automatically by the client framework and are sufficient for the large majority of scenarios. Automatic lookups are generated by using metadata from the target table. To get the fields to use for the lookup form, the framework first checks the AutoLookup field group on the table. If that field group is empty, the framework checks the AutoIdentification field group. If the AutoIdentification field group is empty, the TitleField1 and TitleField2 fields from the table are used for the lookup.
Automatic lookups generated by the framework perform in the ideal way for usability. If you choose to create your own custom lookup form for a given table, you should use the same pattern so that the behavior is consistent.
Creating a simple custom lookup is simple, especially if you want it to be used for all lookups for the target table type. Model a simple form with a Grid control to display the records, and then use the form name as the value for the FormHelp property on the EDT for the foreign key field. This works for both regular foreign keys and surrogate foreign keys. When the FormHelp property is set, the custom lookup form will be used instead of an automatically generated lookup.
In some scenarios, such as query modification or custom record selection, you might want to provide logic that runs before or after the lookup form is loaded. In these cases, you can use the FormAutoLookupFactory class. This class is implemented in the kernel and exposes much of the same functionality, such as initial positioning and filtering, to allow custom lookups to behave consistently. For an example in the application, examine the HCMWorkerLookup form and class. Looking at the class, you will notice that there are many different scenarios in which this form can be loaded. The different methods on the FormAutoLookupFactory class are called in each case. There is also corresponding code on the form that handles these cases, such as the code to set the SelectMode for the different types of source control.
Integrating with the Microsoft Office client
With the AX 2012 Office Add-ins, users can pull AX 2012 data into Microsoft Excel for ad hoc and predefined reporting, push data from Excel into AX 2012 for data entry, and generate Microsoft Word documents for sharing data with others.
This section describes how to make data sources available to the Office Add-ins and then provides an overview of how to create Excel and Word templates and make them available to users.
Make data sources available to Office Add-ins
Before the Office Add-ins can consume data from AX 2012, you must make the appropriate services and queries available as data sources.
Make a service available
To make a service available:
1. In the AOT, under the Services node, right-click the service that you want to make available, and then click Add-ins > Register Service.
2. In the client, click System Administration > Setup > Services and Application Integration Framework > Inbound Ports, and then do the following:
a. Create a new inbound port.
b. Select the service operations to add to the port.
c. Activate the port.
3. In the client, click Organization Administration > Setup > Document Management > Document Data Sources.
4. In the Document Data Sources form, do the following:
a. Create a new document data source.
b. Select the module that is associated with the data source.
c. Set the Type field to Service.
d. Select the inbound port that you just added as the data source.
e. Activate the new document data source.
Make a query available
To make a query available:
1. Define a new query in the AOT, if necessary.
2. In the client, click Organization Administration > Setup > Document Management > Document Data Sources.
3. In the Document Data Sources form, do the following:
a. Create a new document data source.
b. Select the module that the data source (the query) is associated with.
c. Set the Type field to Query.
d. Select the query that you want to use as the data source.
e. Activate the new document data source.
Build an Excel template
After you make the appropriate queries and services available as document data sources to the Office Add-ins, you can create Excel templates that access data through them. Users can then use these to view and analyze AX 2012 data in Excel, using Excel features such as conditional formatting, PivotTables, and calculated fields. If the workbook uses service data sources, users can modify the data in the workbook and then publish those data changes back to AX 2012.
A template can be as simple as a listing of the latest sales orders or as complex as an executive digital dashboard. Figure 6-12 shows an example of an Excel template.

From within an Excel workbook, do the following to access data from AX 2012:
1. Open the Options dialog box from the Microsoft Dynamics AX tab on the ribbon to ensure that the appropriate server and port connection information is present.
2. Click Add Data, and then select the appropriate query and service data sources.
3. Double-click or drag fields from the field chooser to add them to the worksheet.
4. Refresh the worksheet to verify the data that is being retrieved from AX 2012 and added to the workbook. If the dataset is too large, use the Filter option on the ribbon to add a filter.
Before providing the workbook to other users, do the following:
1. If necessary, add filters to restrict the dataset that is returned.
2. Open the Connection Options dialog box and remove the existing connection information so that the user’s connection information is supplied automatically by the Client SDK (using the information contained in the Microsoft Dynamics AX Client Configuration Utility).
3. Save the workbook without connection information.
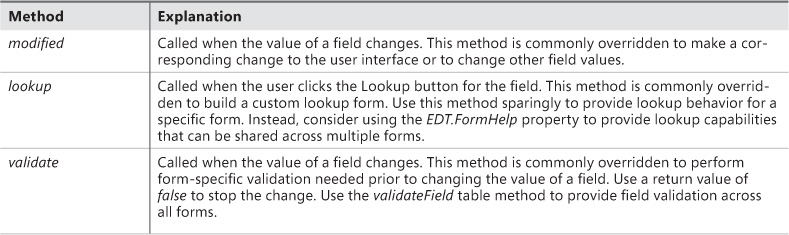
Build a Word template
You can create Word templates that allow users to generate Word documents that contain AX 2012 data. Figure 6-13 shows an example of a Word template.
From within a Word document, do the following to access data from AX 2012:
1. Open the Options dialog box from the Microsoft Dynamics AX tab on the ribbon to ensure that the appropriate server and port connection information is present.
2. Click Add Data, and then select the appropriate query and service data sources.
3. Double-click or drag fields from the field chooser to add them to the document. If you want to show calculated fields (display methods) on a data source, right-click that data source in the field chooser and then click Show Calculated Fields.
4. (Optional) Add individual field bindings throughout the document. These fields can be interspersed with static text, formatting, images, and other content.
5. (Optional) Display repeated values, such as the lines of a Sales Order. To do so, insert a table, and then add field bindings into the first row of that table.
6. Add a filter to select a particular record. When you are using a template that is available through the generate-from-template functionality, this record-specific filter is not present.
7. Save the document.
8. Click the Merge button to generate a document from the template.
Before sharing a document template with other users:
1. Add filters to restrict the dataset returned as needed.
2. Open the connection options dialog box and remove the existing connection information so that the user’s connection information is supplied automatically by the Client SDK (using the information contained in the Client Configuration Utility).
3. Save the document without connection information.
4. Provide your users with a copy of the document.
Add templates for users
Several forms in AX 2012 have a Generate From Template button in the Attachments group of the Action pane. An example from the Customers list page is shown in Figure 6-14.

To add a group of templates as an option in a Generate From Template list:
1. Create Word document or Excel workbook templates that have a filter that does not restrict the results to a single record.
2. In the client, click Organization Administration > Setup > Document Management > Document Types.
3. Create a new document type, setting the Class field to Template Library.
4. Set the Document Library field to point to the Microsoft SharePoint folder where the templates are located. Ensure that the URL points to the folder and not a page (for example, http://myserver/DocumentTemplates/).
5. Click Synchronize to import the template list and activate the templates.
6. Verify that the templates appear in the Generate From Template list on the form. If the templates are not shown, ensure that the primary data source for the templates matches the primary data source for the form.
If the Generate From Template button is not available on a form, users can still generate a document from a template by opening the Document Handling form (File > Command > Document Handling) and then creating a new attachment from the Template Library type.
To add the Generate From Template button to additional forms or list pages:
1. Find the Generate From Template button on the Customers list page and copy it to the form you want to add it to. The path to the button is as follows:
AOTFormsCustTableListPage.DesignsDesignActionPane:ActionPaneActionPaneTab:HomeTabButtonGroup:AttachmentsGroupMenuButton:mbTemplatesButton
2. Edit the MouseDown method on the button to pass the correct TableId to the createTemplateOnMenuButton method by changing the CustTable.TableId parameter to point to the correct table (for example, MyTable.TableId).