Chapter 14. Extending AX 2012
In this chapter
Comparing the SysOperation and RunBase frameworks
Introduction
Microsoft Dynamics AX provides several frameworks that you can use to extend an application. In AX 2012, the SysOperation framework replaces the RunBase framework to provide support for business transaction jobs, such as exchange rate adjustment or inventory closing. AX 2012 also provides two extensibility patterns: the extension framework, which works well for developing add-ins, and the eventing framework, which is based on eventing concepts in the Microsoft .NET Framework.
The first part of this chapter introduces the SysOperation framework and discusses an example that compares the SysOperation and RunBase frameworks. The next section provides more information about RunBase classes to help you understand existing functionality developed with the RunBase framework.
The final sections describe the extension and eventing frameworks. The extension framework reduces or eliminates the coupling between application components and their extensions. The eventing framework is new in AX 2012. The methods in an X++ class can raise an event immediately before they start (the pre event), and again after they end (the post event). These two events offer opportunities for you to insert custom code into the program flow with event handlers.
The SysOperation framework
You use the SysOperation framework when you want to write application logic that supports running operations interactively or by means of the AX 2012 batch server. This framework provides capabilities that are similar to those of the RunBase framework.
The batch framework, which is described in detail in Chapter 18, “Automating tasks and document distribution,” has specific requirements for defining operations:
![]() The operation must support parameter serialization so that its parameters can be saved to the batch table.
The operation must support parameter serialization so that its parameters can be saved to the batch table.
![]() The operation must have a way to display a user interface that lets users modify batch job parameters. For more information about batch jobs in AX 2012, see Chapter 18 and the topic, “Process batch jobs and tasks,” at http://technet.microsoft.com/en-us/library/gg731793.aspx.
The operation must have a way to display a user interface that lets users modify batch job parameters. For more information about batch jobs in AX 2012, see Chapter 18 and the topic, “Process batch jobs and tasks,” at http://technet.microsoft.com/en-us/library/gg731793.aspx.
![]() The operation must implement the interfaces needed for integration with the batch server runtime.
The operation must implement the interfaces needed for integration with the batch server runtime.
Although the RunBase framework defines coding patterns that implement these requirements, the SysOperation framework goes further by providing base implementations for many of the interfaces and classes in the patterns.
Unlike the RunBase framework, the SysOperation framework implements the Model-View-Controller (MVC) design pattern, separating presentation from business logic. For more information, see “Model-View-Controller” at http://msdn.microsoft.com/en-us/library/ff649643.aspx.
SysOperation framework classes
The SysOperationServiceController class provides several useful methods, such as the following:
![]() getServiceInfo Gets the service operation
getServiceInfo Gets the service operation
![]() getDataContractInfo Gets the data contracts that are used as parameters and return values for the service operation, and gets the user interface (UI) builder information for each of the data contracts
getDataContractInfo Gets the data contracts that are used as parameters and return values for the service operation, and gets the user interface (UI) builder information for each of the data contracts
![]() startOperation Makes the service call in various modes, including synchronous, asynchronous, and batch
startOperation Makes the service call in various modes, including synchronous, asynchronous, and batch
The SysOperationUIBuilder and SysOperationAutomaticUIBuilder classes help to create the default user interface from a definition of the data contract or from a custom form definition. You can write custom UI builders that derive from this base class to provide defaulting and validation or to raise specific events. You can override the following methods:
![]() postBuild Overriding this method lets you get references to the dialog box controls if the UI builder is dynamic (in other words, if the UI builder is not form-based).
postBuild Overriding this method lets you get references to the dialog box controls if the UI builder is dynamic (in other words, if the UI builder is not form-based).
![]() postRun Overriding this method lets you register validation methods.
postRun Overriding this method lets you register validation methods.
SysOperation framework attributes
SysOperation attributes specify metadata for the data contracts to provide loose coupling with UI builders. The following attributes are available:
![]() DataContractAttribute Identifies a class as a data contract
DataContractAttribute Identifies a class as a data contract
![]() DataMemberAttribute Identifies a property as a data member
DataMemberAttribute Identifies a property as a data member
![]() SysOperationContractProcessingAttribute Designates a default UI builder for the data contract
SysOperationContractProcessingAttribute Designates a default UI builder for the data contract
![]() SysOperationLabelAttribute, SysOperationHelpTextAttribute, and SysOperationDisplayOrderAttribute Specify the label, help text, and display order attributes, respectively, for the data member
SysOperationLabelAttribute, SysOperationHelpTextAttribute, and SysOperationDisplayOrderAttribute Specify the label, help text, and display order attributes, respectively, for the data member
Comparing the SysOperation and RunBase frameworks
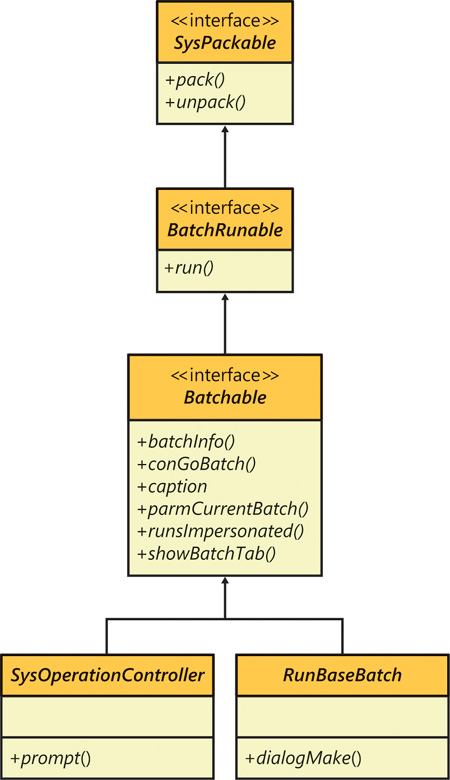
The SysOperation and the RunBase frameworks are designed to build applications that have operations that can run on the batch server or interactively. For an operation to run on the batch server, it must support the following:
![]() Parameter serialization by means of the SysPackable interface
Parameter serialization by means of the SysPackable interface
![]() The standard run method that is defined in the BatchRunable interface
The standard run method that is defined in the BatchRunable interface
![]() The batch server integration methods found in the Batchable interface
The batch server integration methods found in the Batchable interface
![]() A user interface that enables and displays user input
A user interface that enables and displays user input
Figure 14-1 illustrates how all operations that must run by means of the batch server must derive from either the SysOperationController or the RunBaseBatch base class.
The code examples in the following sections illustrate the basic capabilities provided by the two frameworks. These examples run an operation both interactively (by means of a dialog box) and in batch mode.
To view and use the samples on your own, import PrivateProject_SysOperationIntroduction.xpo, and then press Ctrl+Shift+P to view the sample code in the Projects window. You can view the following two sample classes in the Sample_1_SysOperation_Runbase_Comparison node:
![]() SysOpSampleBasicRunbaseBatch
SysOpSampleBasicRunbaseBatch
![]() SysOpSampleBasicController
SysOpSampleBasicController
These classes compare the functionality of the RunBase framework to the functionality of the SysOperation framework.
Before you run the samples, you must compile the project and generate common intermediate language (CIL) for the samples.
1. In the Development Workspace, right-click the project name, and then click Compile.
2. Click Build, and then click Generate Incremental CIL (or press Ctrl+Shift+F7).
RunBase example: SysOpSampleBasicRunbaseBatch
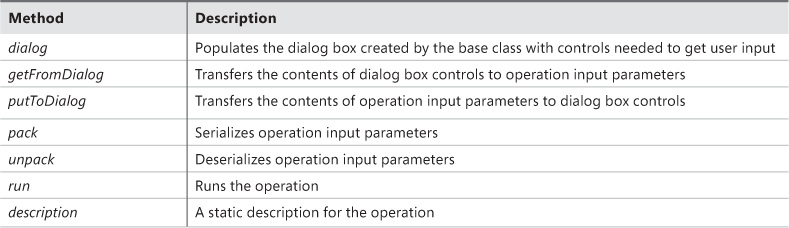
The simplest operation that is based on the RunBaseBatch base class must implement several overridden methods. Table 14-1 describes the overridden methods that are implemented in the SysOpSampleBasicRunbaseBatch class. Example code following the table illustrates how to use these methods.
In the override for the classDeclaration method that derives from RunBaseBatch, you must declare variables for input parameters, dialog box controls, and a macro, LOCALMACRO, that defines a list of variables that must be serialized:
class SysOpSampleBasicRunbaseBatch extends RunBaseBatch
{
str text;
int number;
DialogRunbase dialog;
DialogField numberField;
DialogField textField;
#define.CurrentVersion(1)
#LOCALMACRO.CurrentList
text,
number
#ENDMACRO
}
Next, override the dialog method. This method populates the dialog box created by the base class with two controls that accept user input: a text field and a numeric field. The initial values from the class member variables are used to initialize the controls. Note that the type of each control is determined by the name of the extended data type (EDT) identifier:
protected Object dialog()
{
dialog = super();
textField = dialog.addFieldValue(IdentifierStr(Description255),
text,
'Text Property',
'Type some text here'),
numberField = dialog.addFieldValue(IdentifierStr(Counter),
number,
'Number Property',
'Type some number here'),
return dialog;
}
The overridden getFromDialog method transfers the contents of the dialog box controls to operation input parameters:
public boolean getFromDialog()
{
text = textField.value();
number = numberField.value();
return super();
}
The overridden putToDialog method transfers the contents of operation input parameters to dialog box controls:
protected void putToDialog()
{
super();
textField.value(text);
numberField.value(number);
}
The overridden pack and unpack methods serialize and deserialize the operation input parameters:
public container pack()
{
return [#CurrentVersion, #CurrentList];
}
public boolean unpack(container packedClass)
{
Integer version = conPeek(packedClass,1);
switch (version)
{
case #CurrentVersion:
[version,#CurrentList] = packedClass;
break;
default:
return false;
}
return true;
}
The overridden run method runs the operation. The following example prints the input parameters to the Infolog. It also prints the tier that the operation is running on and the runtime that is used for execution.
public void run()
{
if (xSession::isCLRSession())
{
info('Running in a CLR session.'),
}
else
{
info('Running in an interpreter session.'),
if (isRunningOnServer())
{
info('Running on the AOS.'),
}
else
{
info('Running on the Client.'),
}
}
info(strFmt('SysOpSampleBasicRunbaseBatch: %1, %2', this.parmNumber(), this.parmText()));
}
The description method provides a static description for the operation. Override the description method as shown in the following example to use this description as the default value for the caption shown in batch mode and in the user interface:
public static ClassDescription description()
{
return 'Basic RunBaseBatch Sample';
}
Override the main method that prompts the user for input and then runs the operation or adds it to the batch queue, as shown in the following example:
public static void main(Args _args)
{
SysOpSampleBasicRunbaseBatch operation;
operation = new SysOpSampleBasicRunbaseBatch();
if (operation.prompt())
{
operation.run();
}
}
The overridden parmNumber and parmText methods are optional. It is a Microsoft Dynamics AX best practice to expose operation parameters with the property pattern for better testability and for access to class member variables outside the class. Override these methods as shown in the following example:
public int parmNumber(int _number = number)
{
number = _number;
return number;
}
public str parmText(str _text = text)
{
text = _text;
return text;
}
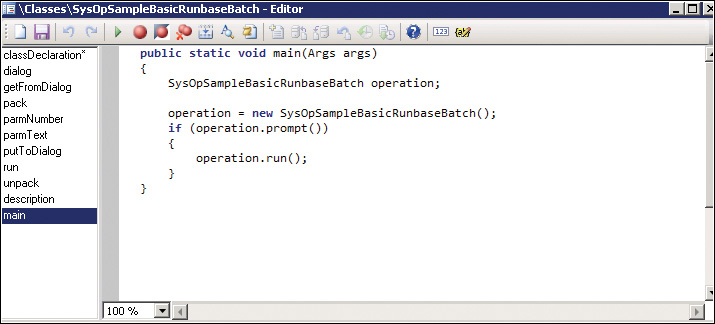
The main method for the RunBaseBatch sample prompts the user for input for the operation when the operation.prompt method is called. If the prompt returns true, main calls the operation.run method directly. If the prompt returns false, it indicates that the user either canceled the operation or scheduled it to run as a batch.
To run the sample interactively, run the main method by clicking Go in the Code Editor window, as shown in Figure 14-2.
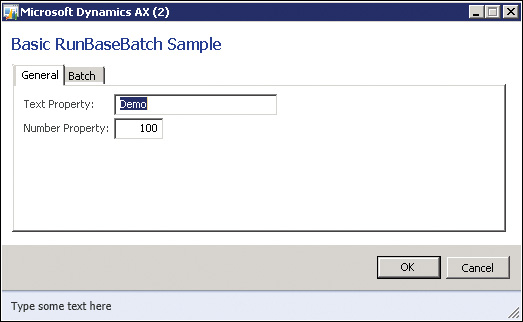
On the General tab of the sample user interface, enter information in the Text Property and Number Property fields, as shown in Figure 14-3.
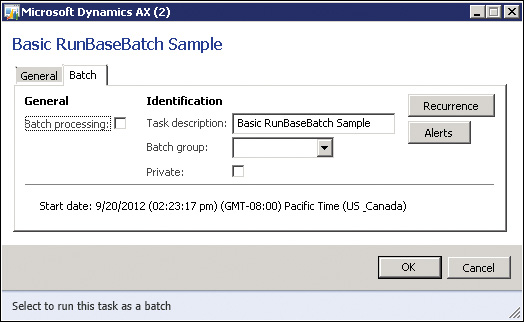
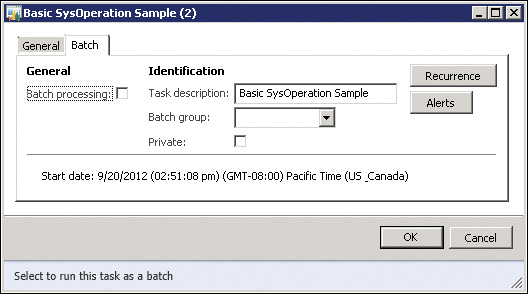
On the Batch tab, ensure that the Batch Processing check box is cleared, as shown in Figure 14-4.
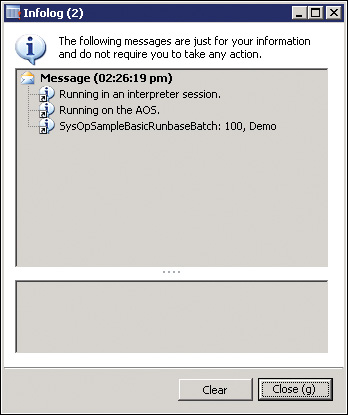
Click OK to run the operation and print the output to the Infolog.
View the Infolog messages, as shown in Figure 14-5. They show that the operation ran on the server because the sample SysOpSampleBasicRunbaseBatch class has the RunOn property set to Server. The operation ran by means of the X++ interpreter, which is the default for X++ code.
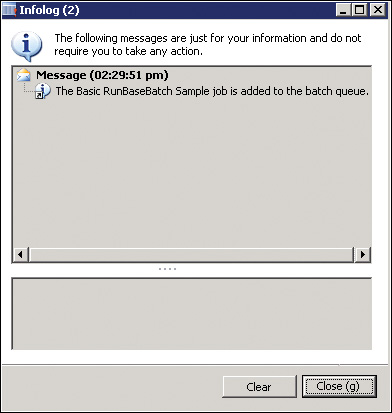
To run the sample in batch mode, rerun the operation by clicking Go in the Code Editor window, and enter data for the Text Property and the Number Property on the General tab of the sample user interface.
Next, select the Batch Processing check box on the Batch tab to run the operation on the batch server. When the Batch Processing check box is selected, the Infolog message in Figure 14-6 appears, indicating that the operation has been added to the batch queue.
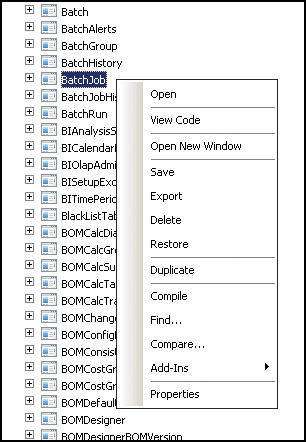
The operation might take up to a minute to get scheduled. After waiting for about a minute, open the BatchJob form from the Forms node in the Application Object Tree (AOT), as shown in Figure 14-7.
The Job Description form opens, as shown in Figure 14-8.
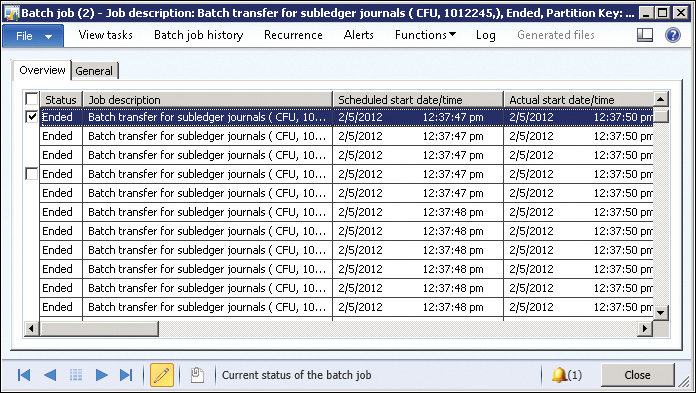
Press the F5 key to update the form. Press the F5 key repeatedly until the job entry shows that the job has ended. Sorting by the Scheduled Start Date/Time column might help you find the operation if there are many job entries in the grid.
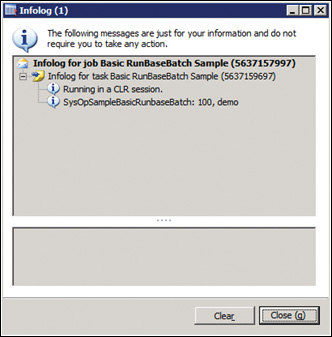
To view the log, select the operation, and then click Log on the toolbar.
The Infolog in Figure 14-9 shows messages indicating that the operation ran in a common language runtime (CLR) session, which is the batch server execution environment.
SysOperation example: SysOpSampleBasicController
As mentioned earlier, the SysOperation framework provides the same capabilities as the RunBase framework but also includes base implementations for common overrides. The SysOperation framework handles basic user interface creation, parameter serialization, and routing to the CLR execution environment.
The SysOperation sample contains two classes: a controller class named SysOpSampleBasicController and a data contract class named SysOpSampleBasicDataContract. Table 14-2 describes the overridden methods that are necessary to match the functionality demonstrated in the RunBase sample in the previous section. Notice that you do not have to override the dialog, getFromDialog, putToDialog, pack, unpack, and run methods in the SysOpSampleBasicController class, because the SysOperation framework provides the base functionality for these methods. Example code later in this section illustrates how to use these methods.
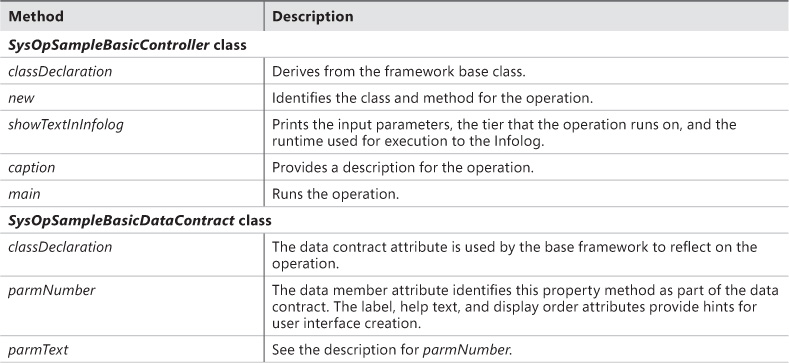
TABLE 14-2 Method overrides for SysOpSampleBasicController and SysOpSampleBasicDataContract classes.
![]() Important
Important
Normally, the SysOpSampleBasicController class would derive from SysOperationServiceController, which provides all of the base functionality for building operations; however, the AX 2012 version of the class contains a few known issues, and these will be addressed in a future service pack. To work around the issues, a new common class, SysOpSampleBaseController, is available. For more information, see the white paper, “Introduction to the SysOperation Framework,” at http://go.microsoft.com/fwlink/?LinkId=246316.
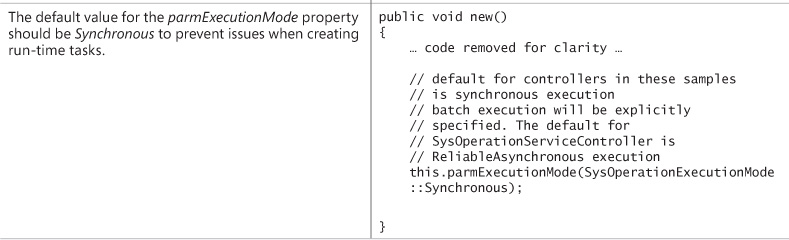
Table 14-3 describes the issues and illustrates the solutions provided by the SysOpSampleBase-Controller class.
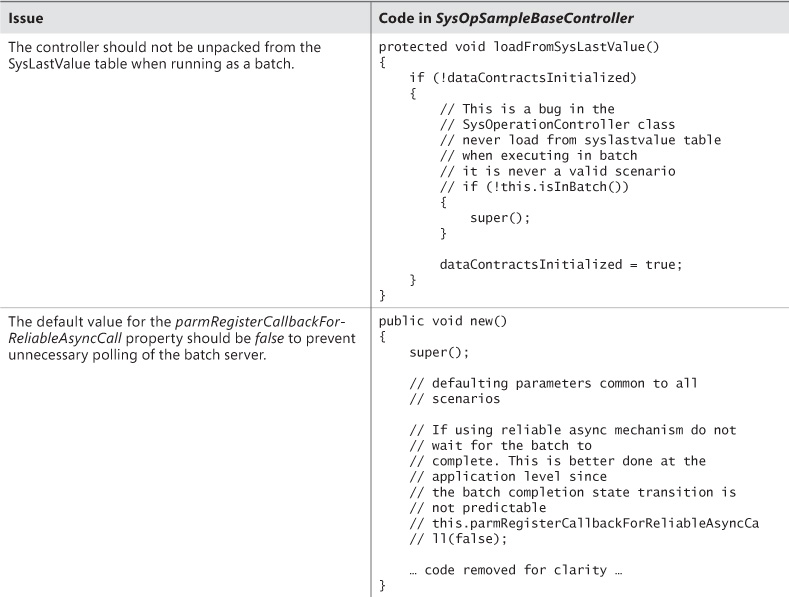
The class declaration for SysOpSampleBasicController derives from the framework base class, SysOpSampleBaseController, which is provided with the sample code:
class SysOpSampleBasicController extends SysOpSampleBaseController
{
}
The new method for SysOpSampleBasicController identifies the class and method for the operation. In the following example, the new method points to a method on the controller class. However, it can point to any class method. The framework reflects on this class and method to provide the user interface and parameter serialization.
void new()
{
super();
this.parmClassName(
classStr(SysOpSampleBasicController));
this.parmMethodName(
methodStr(SysOpSampleBasicController,
showTextInInfolog));
this.parmDialogCaption(
'Basic SysOperation Sample'),
}
In the following example, the showTextInInfolog method prints the input parameters, the tier where the operation is running, and the runtime to the Infolog window:
public void showTextInInfolog(SysOpSampleBasicDataContract data)
{
if (xSession::isCLRSession())
{
info('Running in a CLR session.'),
}
else
{
info('Running in an interpreter session.'),
if (isRunningOnServer())
{
info('Running on the AOS.'),
}
else
{
info('Running on the Client.'),
}
}
info(strFmt('SysOpSampleBasicController: %1, %2', data.parmNumber(), data.parmText()));
}
The caption method provides a description for the operation. This description is used as the default value for the caption shown in batch mode and the operation user interface.
public ClassDescription caption()
{
return 'Basic SysOperation Sample';
}
The main method prompts the user for input and then runs the operation or adds it to the batch queue:
public static void main(Args args)
{
SysOpSampleBasicController operation;
operation = new SysOpSampleBasicController();
operation.startOperation();
}
The three methods that you override in the SysOpSampleBasicDataContract class are shown in the following example. The framework uses the data contract attribute to reflect on the operation in the class declaration. The parmNumber and parmText methods use the data member attribute to identify these property methods as part of the data contract. The label, help text, and display order attributes provide hints for creating the user interface.
[DataContractAttribute]
class SysOpSampleBasicDataContract
{
str text;
int number;
}
[DataMemberAttribute,
SysOperationLabelAttribute('Number Property'),
SysOperationHelpTextAttribute('Type some number >= 0'),
SysOperationDisplayOrderAttribute('2')]
public int parmNumber(int _number = number)
{
number = _number;
return number;
}
[DataMemberAttribute,
SysOperationLabelAttribute('Text Property'),
SysOperationHelpTextAttribute('Type some text'),
SysOperationDisplayOrderAttribute('1')]
public Description255 parmText(str _text = text)
{
text = _text;
return text;
}
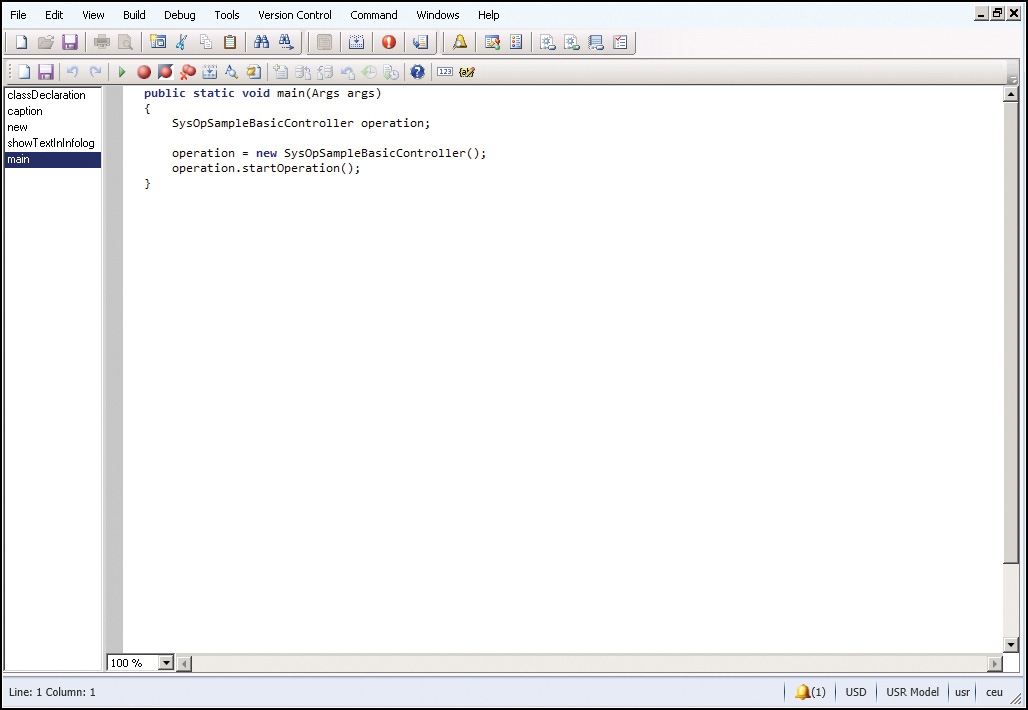
As in the RunBase sample, click Go on the Code Editor toolbar in the main method of the SysOpSampleBasicController class to run the SysOperation sample operation, as shown in Figure 14-10.
The main class calls operation.startOperation, which handles running the operation synchronously or adding it to the batch queue. The startOperation method invokes the user interface for the operation and then calls run.
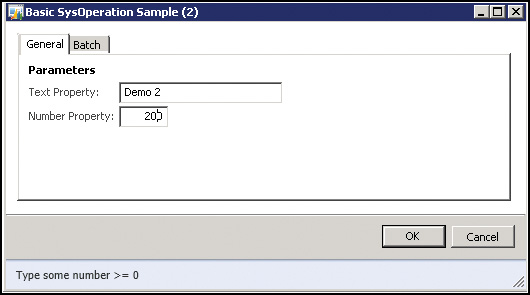
To run the operation interactively, enter information on the General tab of the operation user interface, as shown in Figure 14-11. The user interface created by the SysOperation framework is similar to the one created in the RunBase sample.
On the Batch tab, ensure that the Batch Processing check box is cleared, as shown in Figure 14-12.
Click OK to run the operation and print the output to the Infolog window, as shown in Figure 14-13.
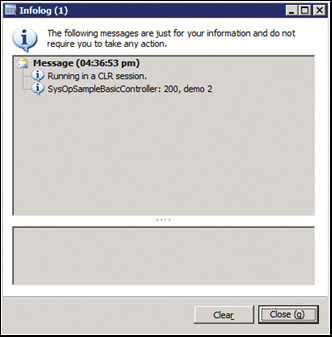
The Infolog messages show that, unlike in the RunBase sample, the operation ran in a CLR session on the server.
If you repeat the previous steps but select the Batch Processing check box on the Batch tab, the operation runs on the batch server, just as in the RunBase sample.
The operation might take up to a minute to get scheduled. After waiting for about a minute, open the Batch Job form from the AOT.
Repeatedly update the form by pressing the F5 key until the job entry shows that the job has ended. Sorting by the Scheduled Start Date/Time column might help you find the operation if there are many job entries in the grid. After you find the correct job, select it, and then click Log on the toolbar to open an Infolog window.
The RunBase framework
You can use the RunBase framework throughout AX 2012 whenever you must execute a business transaction job. Extending the RunBase framework lets you implement business operations that don’t have default support in AX 2012. The RunBase framework supplies many features, including dialog boxes, query windows, validation-before-execution windows, the progress bar, client/server optimization, pack-unpack with versioning, and optional scheduled batch execution at a specified date and time.
![]() Note
Note
Because the RunBase framework has largely been replaced by the SysOperation framework, the following sections are intended to help you understand existing functionality that uses the RunBase framework.
Inheritance in the RunBase framework
Classes that use the RunBase framework must inherit from either the RunBase class or the RunBaseBatch class. If the class extends RunBaseBatch, it can be enabled for scheduled execution in batch mode.
In a good inheritance model, each class has a public construction mechanism unless the class is abstract. If the class doesn’t have to be initialized, use a static construct method. Because X++ doesn’t support method name overloading, you should use a static new method if the class must be initialized further upon instantiation. For more information about constructors, see the “Constructor encapsulation” section in Chapter 4, “The X++ programming language.”
Static new methods have the following characteristics:
![]() They are public.
They are public.
![]() Their names are prefixed with new.
Their names are prefixed with new.
![]() They are named logically or with the arguments that they take. Examples include newInventTrans and newInventMovement.
They are named logically or with the arguments that they take. Examples include newInventTrans and newInventMovement.
![]() They usually take nondefault parameters only.
They usually take nondefault parameters only.
![]() They always return a valid object of the class type, instantiated and initialized, or throw an error.
They always return a valid object of the class type, instantiated and initialized, or throw an error.
![]() Note
Note
A class can have several new methods with different parameter profiles. The NumberSeq class is an example of a class with multiple new methods.
The default constructor (the new method) should be protected to force users of the class to instantiate and initialize it with the static construct or new method. If new has some extra initialization logic that is always executed, you should place it in a separate init method.
To make writing customizations easier, a best practice is to add construction functionality for new subclasses (in higher layers) without mixing code with the construct method in the original layer.
Property method pattern
To allow other business operations to run your new business operation, you might want to run it without presenting any dialog boxes to the user. If you decide not to use dialog boxes, you need an alternative to set the values of the necessary member variables of your business operation class.
In AX 2012 classes, member variables are always protected. In other words, they can’t be accessed outside the class; they can be accessed only from within objects of the class or its subclasses. To access member variables from outside the class, you must write accessor methods. The accessor methods can get, set, or both get and set member variable values. All accessor methods start with parm. In AX 2012, accessor methods are frequently referred to as parm methods.
A Microsoft Dynamics AX best practice is not to use separate get and set accessor methods. The accessor methods are combined into a single accessor method, handling both get and set, in a pattern called the property method pattern. Accessor methods should have the same name as the member variable that they access, prefixed with parm.
The following is an example of how a method implementing the property method pattern could look:
public NoYesId parmCreateServiceOrders(NoYesId _createServiceOrders =
createServiceOrders)
{
createServiceOrders = _createServiceOrders;
return createServiceOrders;
}
If you want the method to work only as a get method, change it to something such as this:
public NoYesId parmCreateServiceOrders()
{
return createServiceOrders;
}
And if you want the method to work only as a set method, change it to this:
public void parmCreateServiceOrders(NoYesId _createServiceOrders =
createServiceOrders)
{
createServiceOrders = _createServiceOrders;
}
When member variables contain huge amounts of data (such as large containers or memo fields), the technique in the following example is recommended. This technique determines whether the parameter is changed. The disadvantage of using this technique in all cases is the overhead of an additional method call.
public container parmCode(container _code = conNull())
{
if (!prmIsDefault(_code))
{
code = _code;
}
return code;
}
Pack-unpack pattern
When you want to save the state of an object with the option to reinstantiate the same object later, you must use the pack-unpack pattern. The RunBase framework requires that you implement this pattern to switch the class between client and server (for client/server optimization) and to present the user with a dialog box that states the choices made the last time the class executed. If your class extends the RunBaseBatch class, you also need to use the pack-unpack pattern for scheduled execution in batch mode.
The pattern consists of a pack method and an unpack method. These methods are used by the SysLastValue framework, which stores and retrieves user settings or usage data values that persist between processes.
![]() Note
Note
A reinstantiated object is not the same object as the saved object. It is a copy of the object with the same values as the packed and unpacked member variables.
The pack method must be able to read the state of the object and return it in a container. Reading the state of the object involves reading the values of the variables needed to pack and unpack the object. Variables used at execution time that are declared as member variables don’t have to be included in the pack method. The first entry in the container must be a version number that identifies the version of the saved structure. The following code is an example of the pack method:
container pack()
{
return [#CurrentVersion, #CurrentList];
}
Macros must be defined in the class declaration. CurrentList is a macro defined in the ClassDeclaration holding a list of the member variables to pack. If the variables in the CurrentList macro are changed, the version number should also be changed to allow safe and versioned unpacking. The unpack method can support unpacking previous versions of the class, as shown in the following example:
class InventCostClosing extends RunBaseBatch
{
#define.maxCommitCount(25)
// Parameters
TransDate transDate;
InventAdjustmentSpec specification;
NoYes prodJournal;
NoYes updateLedger;
NoYes cancelRecalculation;
NoYes runRecalculation;
FreeTxt freeTxt;
Integer maxIterations;
CostAmount minTransferValue;
InventAdjustmentType adjustmentType;
boolean collapseGroups;
...
#DEFINE.CurrentVersion(4)
#LOCALMACRO.CurrentList
TransDate,
Specification,
ProdJournal,
UpdateLedger,
FreeTxt,
MaxIterations,
MinTransferValue,
adjustmentType,
cancelRecalculation,
runRecalculation,
collapseGroups
#ENDMACRO
}
public boolean unpack(container packedClass)
{
#LOCALMACRO.Version1List
TransDate,
Specification,
ProdJournal,
UpdateLedger,
FreeTxt,
MaxIterations,
MinTransferValue,
adjustmentType,
del_minSettlePct,
del_minSettleValue
#ENDMACRO
#LOCALMACRO.Version2List
TransDate,
Specification,
ProdJournal,
UpdateLedger,
FreeTxt,
MaxIterations,
MinTransferValue,
adjustmentType,
del_minSettlePct,
del_minSettleValue,
cancelRecalculation,
runRecalculation,
collapseGroups
#ENDMACRO
Percent del_minSettlePct;
CostAmount del_minSettleValue;
boolean _ret;
Integer _version = conpeek(packedClass,1);
switch (_version)
{
case #CurrentVersion:
[_version, #CurrentList] = packedClass;
_ret = true;
break;
case 3:
// List has not changed, just the prodJournal must now always be updated
[_version, #CurrentList] = packedClass;
prodJournal = NoYes::Yes;
updateLedger = NoYes::Yes;
_ret = true;
break;
case 2:
[_version, #Version2List] = packedClass;
prodJournal = NoYes::Yes;
updateLedger = NoYes::Yes;
_ret = true;
break;
case 1:
[_version, #Version1List] = packedClass;
cancelRecalculation = NoYes::Yes;
runRecalculation = NoYes::No;
_ret = true;
break;
default:
_ret = false;
}
return _ret;
}
If any member variable isn’t packable, the class can’t be packed and reinstantiated to the same state. If any of the members are other classes, records, cursors, or temporary tables, they must also be made packable. Other classes that don’t extend RunBase can implement the pack and unpack methods by implementing the SysPackable interface.
When the object is reinstantiated, it must be possible to call the unpack method, which reads the saved state and reapplies the values of the member variables. The unpack method can reapply the correct set of member variables according to the saved version number, as shown in the following example:
public boolean unpack(container _packedClass)
{
Version version = conpeek(_packedClass, 1);
switch (version)
{
case #CurrentVersion:
[version, #CurrentList] = _packedClass;
break;
default:
return false;
}
return true;
}
The unpack method returns a Boolean value that indicates whether the initialization succeeded.
As mentioned earlier in this section, the pack and unpack methods have three responsibilities:
![]() Switching a RunBase-derived class between client and server
Switching a RunBase-derived class between client and server
![]() Presenting the user with final choices made when the class was last executed
Presenting the user with final choices made when the class was last executed
![]() Scheduling the execution of the class in batch mode
Scheduling the execution of the class in batch mode
In some scenarios, it is useful to execute specific logic depending on the context in which the pack or unpack method is called. You can use the isSwappingPrompt method on RunBase to detect whether the pack or unpack method is called in the context of switching between client and server. The isSwappingPrompt method returns true when called in this context. You can use the isInBatch method on RunBaseBatch to detect whether the unpack method is called in the context of executing the class in batch mode.
Client/server considerations
Typically, you want to execute business operation jobs on the server tier because these jobs almost always involve several database transactions. However, you want the user dialog box to be executed on the client tier to minimize client/server calls from the server tier. Fortunately, both the SysOperation and the RunBase framework can help you run the dialog box on the client and the business operation on the server.
To run the business operation job on the server and push the dialog box to the client, you should be aware of two settings. On the menu item that calls the job, set the RunOn property to Server; on the class, set the RunOn property to Called From. For more information about these properties, see the “Writing tier-aware code” section in Chapter 13, “Performance.”
When the job is initiated, it starts on the server, and the RunBase framework packs the internal member variables and creates a new instance on the client, which then unpacks the internal member variables and runs the dialog box. When the user clicks OK in the dialog box, RunBase packs the internal member variables of the client instance and unpacks them again in the server instance.
The extension framework
The extension framework is an extensibility pattern that reduces or eliminates the coupling between application components and their extensions. Many of the application foundation frameworks in Microsoft Dynamics AX are written by using the extension framework.
The extension framework uses the class attribute framework and the class factory framework to decouple base and derived classes in two steps.
Create an extension
First, create a class attribute method by extending the SysAttribute class.
An example can be found in the Product Information Management module in the PCAdaptorExtensionAttribute class:
class PCAdaptorExtensionAttribute extends SysAttribute
{
PCName modelName;
public void new(PCName _modelName)
{
super();
if (_modelName == '')
{
throw error(Error::missingParameter(this));
}
modelName = _modelName;
}
public PCName parmModelName(PCName _modelName = modelName)
{
modelName = _modelName;
return modelName;
}
}
Add metadata
Next, use the PCAdaptorExtensionAttribute class attribute to add metadata to a derived class.
The following example code extends the PCAdaptor class to create a MyPCAdaptor object instead of a PCAdaptor object when you process a product configuration that is created from a product configuration model named Computers:
[PCAdaptorExtensionAttribute('Computers')]
class MyPCAdaptor extends PCAdaptor
{
protected void new()
{
super();
}
}
You can test this extension by performing the following steps:
1. Press Ctrl+Shift+W to open the AX 2012 Development Workspace.
2. Add the MyPCAdaptor class to the AOT, and then compile the class.
3. Add a breakpoint in the PCAdaptorFactory.getAdaptorFromModelName method.
4. In the AX 2012 Windows client, click Product Information Management > Common > Product Configuration Models.
5. On the Action pane, in the New group, click Product Configuration Model. The New Product Configuration Model dialog box opens.
6. In the Name field, enter Computers.
7. Enter a name in the Root Component Section Name field, and then click OK. The Constraint-based Product Configuration Model details form opens.
8. In the Attributes section of the form, add an attribute for the root component. For example, size and color are common attributes.
9. On the Action pane, in the Run group, click Test.
10. Select a value for the attribute.
The AX 2012 debugger launches at the breakpoint that you added in step 3.
As you step through the code, you can see how the SysExtensionAppClassFactory is used to create an instance of the MyPCAdaptor class:
adaptor = SysExtensionAppClassFactory::getClassFromSysAttribute(
classStr(PCAdaptor), extensionAttribute);
The getClassFromSysAttribute method works by searching through the classes that are derived from the PCAdaptor class. It returns an instance when it finds a class that has a PCAdaptorExtensionAttribute that returns a product model name that matches the name of the product configuration model passed in. In this case, an instance is created for the product configuration model named Computers.
Your custom code benefits by using this extension model because the base and derived classes are decoupled, and it takes less code to extend the capabilities of AX 2012.
Extension example
The following end-to-end example shows how to write extensible classes and presents some sample extensions.
First, create a class derived from SysAttribute called CalendarExtensionAttribute, which can be used to mark a class as extensible:
public class CalendarExtensionAttribute extends SysAttribute
{
str calendarType;
}
public void new(str _calendarType)
{
super();
if (_calendarType == '')
{
throw error(error::missingParameter(this));
}
calendarType = _calendarType;
}
public str parmCalendarType(str _calendarType = calendarType)
{
calendarType = _calendarType;
return calendarType;
}
Next, use the newly created attribute class to add metadata to the extensible Calendar class and its derived classes:
[CalendarExtensionAttribute("Default")]
public class Calendar
{
}
public void new()
{
}
public void sayIt()
{
info("All days are work days except for weekends!");
}
The following code illustrates two sample extensions, a FinancialCalendar and a HolidayCalendar. Both classes override the sayIt method:
[CalendarExtensionAttribute("Financial")]
public class FinancialCalendar extends Calendar
{
}
public void sayIt()
{
super();
info("Financial Statements are available on the last working day of June!");
}
[CalendarExtensionAttribute("Holiday")]
public class HolidayCalendar extends Calendar
{
}
public void sayIt()
{
super();
info( "Eight public holidays including New Year's Day!");
}
Finally, a custom factory class is created to generate the appropriate instance of the Calendar class. This custom factory class uses the SysExtensionAppClassFactory.getClassFromSysAttribute method, which searches through the derived classes of the Calendar class to match the parameters of their attribute metadata with the parameters in the call. The following code shows the CalendarFactory class that creates a calendar instance:
public class CalendarFactory
{
}
public static Calendar instance(str _calendarType)
{
CalendarExtensionAttribute extensionAttribute =
new CalendarExtensionAttribute(_calendarType);
Calendar calendar =
SysExtensionAppClassFactory::getClassFromSysAttribute(classStr(calendar), extensionAttribute);
if (calendar == null)
{
calendar = new Calendar();
}
return calendar;
}
The following code contains a job that shows possible calendar creation scenarios:
static void CreateCalendarsJob(Args _args)
{
Calendar calendar = CalendarFactory::instance("Holiday");
calendar.sayIt();
calendar = CalendarFactory::instance("Financial");
calendar.sayIt();
calendar = CalendarFactory::instance("Default");
calendar.sayIt();
}
Eventing
Eventing is another extensibility pattern that reduces or eliminates the coupling between application components and their extensions. Whereas the extension framework is coarse-grained and suitable for add-ins, eventing can be fine-grained. You can use it to augment or modify existing application behaviors effectively.
The following terms are related to events in X++:
![]() Producer The logic that contains the code that causes a change. It is an entity that emits events.
Producer The logic that contains the code that causes a change. It is an entity that emits events.
![]() Consumer The application code that represents an interest in being notified when a specific event occurs. It is an entity that receives events.
Consumer The application code that represents an interest in being notified when a specific event occurs. It is an entity that receives events.
![]() Event A representation of a change having happened in the producer.
Event A representation of a change having happened in the producer.
![]() Event payload The information that the event carries with it. When a person is hired, for example, the payload might include the employee’s name and date of birth.
Event payload The information that the event carries with it. When a person is hired, for example, the payload might include the employee’s name and date of birth.
![]() Delegate The definition of the information that is passed from the producer to the consumer when an event takes place.
Delegate The definition of the information that is passed from the producer to the consumer when an event takes place.
By using events, you can potentially lower the cost of creating and upgrading customizations. If you create code that is often customized by others, you can create events in places where customizations typically occur. Then, developers who customize the original functionality in another layer can subscribe to an event. When customized functionality is tied to an event, the underlying application code can be rewritten with little impact on the customization, as long as the same events are raised in the same sequence from one version to the next.
You can use events to support the following programming paradigms:
![]() Observation Events can detect exceptional behavior and generate alerts when such behavior occurs. For example, this type of event might be used in a regulation-compliance system. If more than a designated amount of money is transferred from one account to another, an event can be raised, and event handlers can respond to the event appropriately. For example, the event handlers could reject the transaction and send an alert to the account manager.
Observation Events can detect exceptional behavior and generate alerts when such behavior occurs. For example, this type of event might be used in a regulation-compliance system. If more than a designated amount of money is transferred from one account to another, an event can be raised, and event handlers can respond to the event appropriately. For example, the event handlers could reject the transaction and send an alert to the account manager.
![]() Information dissemination Events can deliver the right information to the right consumers at the right time. Information can be disseminated by publishing an event to anyone who wants to react to it. For example, the creation of a new worker in the system might be of interest to Human Resources employees who conduct new employee orientations.
Information dissemination Events can deliver the right information to the right consumers at the right time. Information can be disseminated by publishing an event to anyone who wants to react to it. For example, the creation of a new worker in the system might be of interest to Human Resources employees who conduct new employee orientations.
![]() Decoupling Events produced by one part of the application can be consumed by a different part of the application. The producer does not have to be aware of the consumers, nor do the consumers need to know details about the producer. One producer’s event can be acted upon by any number of consumers. Conversely, consumers can act upon any number of events from many different producers. For example, the creation of a new worker in the system might be consumed by the Project Management and Accounting module, if you want to include the worker in default project teams.
Decoupling Events produced by one part of the application can be consumed by a different part of the application. The producer does not have to be aware of the consumers, nor do the consumers need to know details about the producer. One producer’s event can be acted upon by any number of consumers. Conversely, consumers can act upon any number of events from many different producers. For example, the creation of a new worker in the system might be consumed by the Project Management and Accounting module, if you want to include the worker in default project teams.
Microsoft Dynamics AX events are based on .NET eventing concepts. For more information, see “X++, C# Comparison: Event” at http://msdn.microsoft.com/en-us/library/gg881685(v=ax.60).aspx.
Delegates
In X++, you can add delegates as members of a class. The syntax for defining a delegate is the same as the syntax used for defining a method, with the following exceptions:
![]() The delegate keyword is used.
The delegate keyword is used.
![]() No access modifiers can be used on a delegate declaration because all delegates are protected members.
No access modifiers can be used on a delegate declaration because all delegates are protected members.
![]() The return type must be void.
The return type must be void.
![]() The body must be empty; that is, it can contain neither declarations nor statements.
The body must be empty; that is, it can contain neither declarations nor statements.
![]() A delegate can be declared only as a member of a class. A delegate cannot be a member of a table.
A delegate can be declared only as a member of a class. A delegate cannot be a member of a table.
For example, a delegate for an event that is raised when a person is hired could be expressed like this:
delegate void hired(str personnelNumber, UtcDateTime startingDate)
{
// Delegates do not have any code in the body
}
The parameters defined in the parameter profile can be any type allowed in X++. In particular, it is useful to pass an object instance and to have the handlers modify the state of the object. In this way, the publisher can solicit values from the subscribers.
Pre and post events
Pre and post events are predefined events that occur when methods are called. Pre event handlers are called before the designated method executes, and post event handlers are called after the method call has ended. You can think of these event handlers as augmenting an existing method with additional methods that are called before and after the designated method. The event handlers for these pre and post events are visible in the AOT as subnodes of the methods to which they apply.
The following pseudocode illustrates a method without event handlers:
void someMethod(int i)
{
--body of the method--
}
The following example shows the method after event handlers are added:
void someMethod(int i)
{
preHandler1(i);
preHandler2(i);
--body of the method—
postHandler1(i);
postHandler2(i);
}
Not having any event handlers for a particular method leaves the method intact. Therefore, no overhead is incurred for methods that do not have any pre or post handlers assigned to them.
If an exception is thrown in a pre event handler, neither the remaining event handlers nor the method itself is invoked. If a method that has any pre event or post event handlers throws an exception, the remaining post event handlers are not invoked. If an exception is thrown in a post event handler, the remaining event handlers are not called.
Each pre event handler can access the original values of the parameters and modify them as required. A post event handler can modify the return value of the method.
Event handlers
Event handlers are the methods that are called when the delegate is called, either directly through code (for coded events) or from the environment (for modeled events that are maintained in the AOT). The relationship between the delegate and the handlers can be maintained in the code or in the AOT.
To add an event handler declaratively in the AOT, you identify a static method to handle the event on the delegate, and then simply drag the method to the delegate node that represents the event to be handled. You can remove an event handler by using the Delete menu item that is available for any node in the AOT. You can use only static methods in this context.
To add a static event handler in code, you use a special X++ syntax, as shown in the following example:
void someMethod(int i)
{
this.MyDelegate += eventhandler(Subscriber::MyStaticHandler);
}
The delegate name appears on the left side of the += operator. On the right side, you can see the keyword eventhandler, along with the qualified name of the handler to add. The compiler checks that the parameter profiles of the delegate and the handler match. The qualified name in the example uses two colon characters ( :: ) to separate the type name and the delegate, which designates that the event handler is static.
To call a method on a particular object instance, use the syntax shown in the following example:
void someMethod(int i)
{
EventSubscriber subscriber = new EventSubscriber();
this.MyDelegate += eventhandler(subscriber.MyInstanceHandler);
}
You can remove the event handler from a delegate by using the -= operator instead of the += operator. An example of removing a static event handler is as follows:
void someMethod(int i)
{
this.MyDelegate -= eventhandler(Subscriber::MyHandler);
}
Here are some things to keep in mind about events:
![]() The X++ compiler does not allow you to raise events from outside the class in which the delegate is defined.
The X++ compiler does not allow you to raise events from outside the class in which the delegate is defined.
![]() The runtime environment makes no guarantees about the order in which the event handlers are called.
The runtime environment makes no guarantees about the order in which the event handlers are called.
![]() An event handler can be implemented either in managed code or in X++. You define managed code event handlers in a Microsoft Visual Studio project that you add to the AOT.
An event handler can be implemented either in managed code or in X++. You define managed code event handlers in a Microsoft Visual Studio project that you add to the AOT.
Eventing example
The following example illustrates the use of both coded and modeled events. The example also shows the ways in which arguments can be passed to event handlers.
The following code implements an array with an event indicating that an element has changed:
public class arrayWithChangedEvent extends Array
{
}
delegate void changedDelegate(int _index, anytype _value)
{
}
public anytype value(int _index, anytype _value = null)
{
anytype paramValue = _value;
anytype val = super(_index, _value);
boolean newValue = (paramValue == val);
if (newValue)
this.changedDelegate(_index, _value);
return val;
}
The following dynamic event handler is added at run time:
public class arrayChangedEventListener
{
arrayWithChangedEvent arrayWithEvent;
}
public void new(ArrayWithChangedEvent _arrayWithEvent)
{
arrayWithEvent = _arrayWithEvent;
// Register the event handler with the delegate
arrayWithEvent.ChangedDelegate += eventhandler(this.ListenToArrayChanges);
}
public void listenToArrayChanges(int _index, anytype _value)
{
info(strFmt("Array changed at: %1 - with value: %2", _index, _value));
}
public void detach()
{
// Detach event handler from delegate
arrayWithEvent.changedDelegate -= eventhandler(this.listenToArrayChanges);
}
The following example contains two static event handlers:
public static void ArrayPreHandler(XppPrePostArgs args)
{
int indexer = args.getArg("_index");
str strVal = "";
if (args.existsArg("_value") && typeOf(args.getArg("_value")) == Types::String)
{
strVal = "Pre-" + args.getArg("_value"); // Mark the value as Pre- processed
args.setArg("_value", strVal);
// The changes to parameter values may be based on
// state of the record or environment variables.
}
}
public static void ArrayPostHandler(XppPrePostArgs args)
{
anytype returnValue = args.getReturnValue();
str strReturnValue = "";
if (typeOf(returnValue) == Types::String)
{
strReturnValue = returnValue + "-Post"; // post- mark the return value
args.setReturnValue(strReturnValue);
}
}
To exercise the eventing example, add the pre and post event handlers to the value method of the ArrayWithChangedEvent class in the AOT, and then run the following job:
static void EventingJob(Args _args)
{
// Create a new array
ArrayWithChangedEvent arrayWithEvent = new ArrayWithChangedEvent(Types::String);
// Create listener for the array
ArrayChangedEventListener listener = new ArrayChangedEventListener(arrayWithEvent);
// Test by adding items to the array
info(arrayWithEvent.value(1, "Blue"));
info(arrayWithEvent.value(2, "Cerulean"));
info(arrayWithEvent.value(3, "Green"));
// Detach listener from array
listener.Detach();
// The following additions should not invoke the listener,
// except when any pre and post events exist
info(arrayWithEvent.value(4, "Orange"));
info(arrayWithEvent.value(5, "Pink"));
info(arrayWithEvent.value(6, "Yellow"));
}