Chapter 15. Testing
In this chapter
Unit testing features in AX 2012
Microsoft Visual Studio 2010 test tools
Introduction
Ensuring a high-quality user experience with an enterprise resource planning (ERP) product like AX 2012 can be challenging. Out of the box from Microsoft, the product is broad, deep, and complex. A typical customer deployment adds one or more independent software vendor (ISV) products to better tailor the product for specific purposes. Finally, a customer or partner customizes AX 2012 to further align it with company processes and policies.
End users don’t see or, for that matter, care about the complexities of the product or who delivered what functionality. End users want a product that enables them to perform their daily tasks efficiently, effectively, and with a good user experience. The entire ecosystem—Microsoft, ISV developers, Microsoft Dynamics AX partners, and customer IT developers—is part of a critical quality-assurance link that end users depend on when using AX 2012 to accomplish their goals.
This chapter focuses on features and tools that facilitate improved testing of AX 2012 ISV solutions and customizations. AX 2012 includes several capabilities that collectively take a major step forward in helping developers test AX 2012 solutions effectively.
Unit testing features in AX 2012
The SysTest framework for unit testing has been part of the MorphX development environment for several releases. The framework can be very useful for traditional unit testing of X++ classes and methods. The framework can also be used for integration testing of business logic that spans multiple classes.
Past editions of this book and the current MSDN documentation on the SysTest framework do a very good job of explaining the framework basics. By making use of the attribute capabilities in the X++ language, the SysTest framework in AX 2012 has capabilities that you can use to develop and execute your tests more flexibly. This section focuses on these features.
Using predefined test attributes
X++ attributes are a new feature in AX 2012 and are described in Chapter 4, “The X++ programming language.” This section describes how you can use the predefined test attributes in the SysTest framework to improve development and execution flexibility.
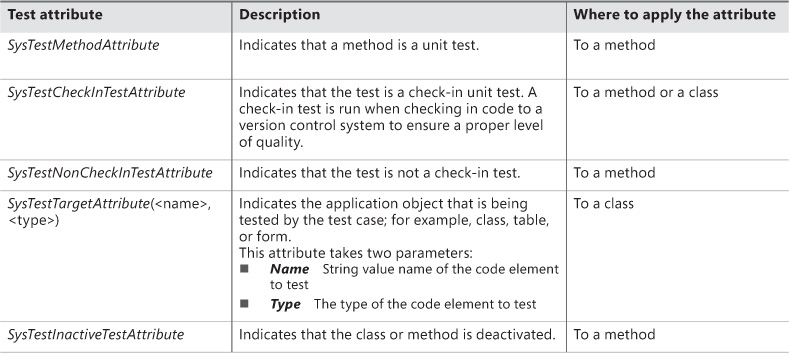
Five SysTest attributes are provided as part of the framework. These attributes are described in Table 15-1.
Naming conventions were used heavily in previous versions of the SysTest framework to indicate the intent of a class or a method. A class naming convention of <TargetClass>Test was used to specify the code class targeted for code coverage collection. (You could also override the testsElementName method on your test class as an alternative to this convention.) All methods intended to be test methods in a SysTestCase-derived class had to start with the string test.
By using SysTestTargetAttribute and SysTestMethodAttribute, you can be more explicit in your unit test code. The following code examples show you how to use these attributes.
[SysTestTargetAttribute(classStr(Triangles), UtilElementType::Class)]
public class TrianglesTest extends SysTestCase
{
}
[SysTestMethodAttribute]
public void testEQUILATERAL()
{
Triangles triangle = new Triangles();
this.assertEquals(TriangleType::EQUILATERAL, triangle.IsTriangle(10, 10, 10));
}
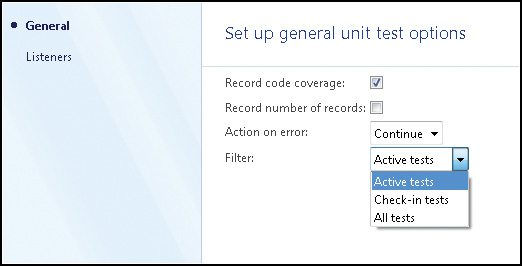
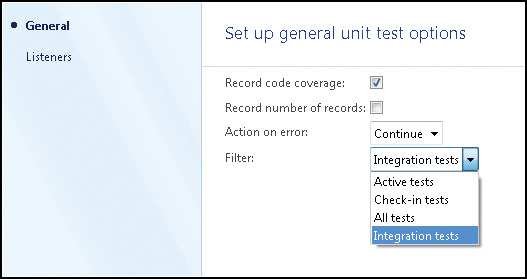
The predefined attributes provide the capability to create filters so that you can execute specific tests, as shown in Figure 15-1. You can use SysTestCheckInTestAttribute, SysTestNonCheckInTestAttribute, and SysTestInactiveTestAttribute for this purpose. In the Parameters form, which you access from the unit test toolbar, you can select the filter you want to use when running tests. For information about how to create a filter, see the following section.
Executing regression tests when code is checked in to version control is a great way to keep your code base at a high level of quality. But you don’t always want to run all tests because the amount of time required for execution might become an issue. This is where the attributes SysTestCheckInTestAttribute and SysTestNonCheckInTestAttribute are useful. For more information about version control, see Chapter 2, “The MorphX development environment and tools.”
Use the following steps to specify which tests are executed on check-in:
1. Attribute test methods with SysTestCheckInTestAttribute or SysTestNonCheckInTestAttribute. Note that the default option is for a test to not be a check-in test, so you have to specify the SysTestCheckInTestAttribute to opt in. The best approach is to be explicit with all tests, as shown in this example.
[SysTestMethodAttribute,
SysTestCheckInTestAttribute]
public void testEQUILATERAL()
{
Triangles triangle = new Triangles();
this.assertEquals(TriangleType::EQUILATERAL, triangle.IsTriangle(10, 10, 10));
}
2. Create a new test project, and put all unit test classes with check-in tests into the project.
3. In the Settings dialog box for the test project that you created (right-click the name of the project, and then click Settings), specify Check-in Tests as the filter.
4. In System Settings for Version Control (on the Version Control menu, click System Settings), select your test project in the Test project list.
On your next check-in, the appropriate tests will execute, and the results will be displayed in an Infolog message.
Creating test attributes and filters
The predefined test attributes described in the previous section are a good starting point for being more explicit in your test code and for organizing your tests. A well-organized strategy for using test projects can also be helpful. But there’s a good chance that you will want to take test organization a step further for your development projects. Fortunately, you can extend the test attribute capabilities by creating your own attributes and filters.
As noted earlier in this chapter, the SysTest framework can be useful for both class-level unit testing and for integration tests on business logic that spans classes. However, it might be useful to be able to run just the integration tests in certain scenarios because they are more functionally oriented. For example, you might want to run only the integration tests when moving code from your test environment into preproduction.
This section demonstrates how you can create a new attribute and a corresponding filter to use on integration tests.
First, create the new attribute. This is quite straightforward because you only need to create a class that inherits from SysTestFilterAttribute.
class SysTestIntegrationTestAttribute extends SysTestFilterAttribute
{
}
You can now use this attribute on a new test method as follows:
[SysTestMethodAttribute,
SysTestIntegrationTestAttribute]
public void testIntegratedBusinessLogic()
{
this.assertFalse(true);
}
Although this attribute is informative to anyone reading the test code, it isn’t useful for execution until you also enable it in the Filter drop-down list for test selection. To do this, you need to implement a test strategy for the IntegrationTestAttribute. The term “strategy” is used because the test strategy is implemented by following the Strategy design pattern.
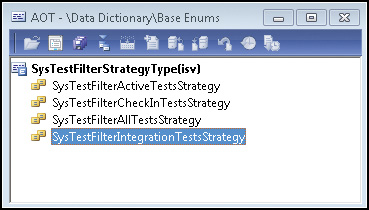
First, extend the SysTestFilterStrategyType enumeration with an additional element, as shown in Figure 15-2. Remember to set an appropriate label on the Properties sheet.
Next, implement the strategy in a class with the same name as the enumeration element name. This class inherits from SysTestFilterStrategy and has a class declaration, as shown in the following example:
class SysTestFilterIntegrationTestsStrategy extends SysTestFilterStrategy
{
}
The most straightforward way to implement this strategy is to follow the pattern in one of the other SysTestFilter<attribute>TestsStrategy classes. You need to implement only two methods in this case.
The construct method returns a new instance of the class. You will use this method shortly.
public static SysTestFilterIntegrationTestsStrategy construct()
{
return new SysTestFilterIntegrationTestsStrategy();
}
The work in this class is being done in the isValid method. This method determines whether a test method should be included in the list of selected tests. For SysTestFilterIntegrationTestsStrategy, here is the implementation.
public boolean isValid(classId _classId, identifierName _method)
{
SysDictMethod method;
DictClass dictClass;
method = this.getMethod(_classId, _method);
if (method)
{
//
// If the test method has the integration attribute, include it.
//
if (method.getAttribute(attributestr(SysTestIntegrationTestAttribute)))
{
return true;
}
}
//
// If the test class has the integration attribute, include it.
//
dictClass = new DictClass(_classId);
if (dictClass.getAttribute(attributestr(SysTestIntegrationTestAttribute)))
{
return true;
}
return false;
}
![]() Note
Note
Additional code is required to achieve the correct behavior of a SysTestInactiveTest-Attribute that could also be used on the test method. This code was omitted to keep the example simple.
There is one last thing to do to enable the new integration test attribute. The newType method in the SysTestFilterStrategy class creates the appropriate type based on the selection in the Filter list and must have an additional case added to it, as shown in the following example:
public static SysTestFilterStrategy newType(SysTestFilterStrategyType _type)
{
SysTestFilterStrategy strategy;
switch (_type)
{
<snip – non essential code removed>
// Create an integration test strategy
case SysTestFilterStrategyType::SysTestFilterIntegrationTestsStrategy:
strategy = SysTestFilterIntegrationTestsStrategy::construct();
break;
default:
throw error(error::wrongUseOfFunction(funcname()));
}
strategy.parmFilterType(_type);
return strategy;
}
The Integration Tests option is now available in the Filter list (see Figure 15-3) and, when selected, will run only those test methods attributed with SysTestIntegrationTestAttribute.
Microsoft Visual Studio 2010 test tools
Although the SysTest unit testing capabilities are critical for developers who are testing AX 2012, much of the testing is not done by developers. The functional testing, validating that the product meets the customer requirements, is typically done by someone with a title like functional consultant, business analyst, or possibly someone whose primary job involves using AX 2012 to accomplish daily tasks.
These functional testers have a number of things in common:
![]() They are experts in the product and the application of the product to solve business needs.
They are experts in the product and the application of the product to solve business needs.
![]() They are not trained as software developers or software testers. Any nontrivial programming required for their test efforts is challenging.
They are not trained as software developers or software testers. Any nontrivial programming required for their test efforts is challenging.
![]() They are not trained as software testers, but they are typically quite good at testing. They have an inquisitive nature that gives them a knack for finding issues in the product.
They are not trained as software testers, but they are typically quite good at testing. They have an inquisitive nature that gives them a knack for finding issues in the product.
![]() They would love to have automated test support for repetitive tasks, but they also believe that using an exploratory manual testing approach is the best way to validate the system and find critical issues.
They would love to have automated test support for repetitive tasks, but they also believe that using an exploratory manual testing approach is the best way to validate the system and find critical issues.
Microsoft Visual Studio 2010 Ultimate and Visual Studio Test Professional contain Microsoft Test Manager, an application that was designed with these types of testers in mind. This package of testing tools is well suited for AX 2012 projects. Microsoft Team Foundation Server (TFS), which is required for Microsoft Test Manager, brings several other quality-focused benefits to the table. It provides an application lifecycle management (ALM) solution for the development phase of the project by integrating requirements management, project management, source code control, bug tracking, build processes, and test tools together. For more information about ALM, see the white paper, “What Is Application Lifecycle Management?” at http://www.microsoft.com/global/applicationplatform/en/us/RenderingAssets/Whitepapers/What%20is%20Application%20Lifecycle%20Management.pdf.
This section focuses on best practices for applying Microsoft Test Manager to AX 2012 projects. For more information about how to use Microsoft Test Manager, see “Testing your application using Microsoft Test Managervvv on MSDN (http://msdn.microsoft.com/en-us/library/jj635157.aspx).
Using all aspects of the ALM solution
The quality assurance plan for your project should not be focused on testing alone. On the contrary, many factors can have a bigger impact on the quality of the project than the amount of testing done. One key quality factor is configuration management. With the Visual Studio ALM solution, you can track all of the significant artifacts in your software development process. You can drive higher quality in your projects by adopting the ALM solution throughout your project.
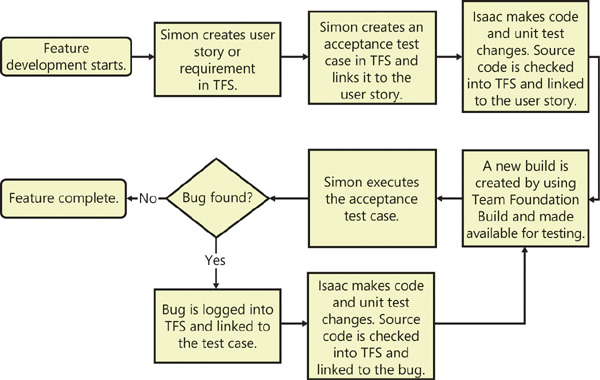
Figure 15-4 shows an end-to-end feature development cycle involving Simon, a functional consultant, and Isaac, an IT developer. As you can see, the process involves tracking requirements, test cases, source code, builds, and bugs. Many of these items are tracked in TFS. It also describes traceability between these artifacts. You could also incorporate work items into the process for improved project management.
Using an acceptance test driven development approach
In a rapidly changing environment like most AX 2012 projects, an agile development approach is often the best development methodology. One agile development practice that is particularly helpful in ensuring high quality is acceptance test driven development (ATDD). ATDD involves defining the critical test cases, the acceptance test cases, ahead of the development effort as a requirement. (The term requirement is used generically here. The requirement can be a user story, a feature, or another artifact that describes functionality that is valuable to a customer.)
Acceptance test cases frequently exercise the primary flows for a requirement. Additional test cases are required to fully test the requirement. Acceptance test cases should be a collaborative effort between the developer, the tester, and the author of the requirement. A significant benefit of this collaboration is clarity because the individuals involved frequently have different, unstated versions of how they expect the requirement to be implemented.
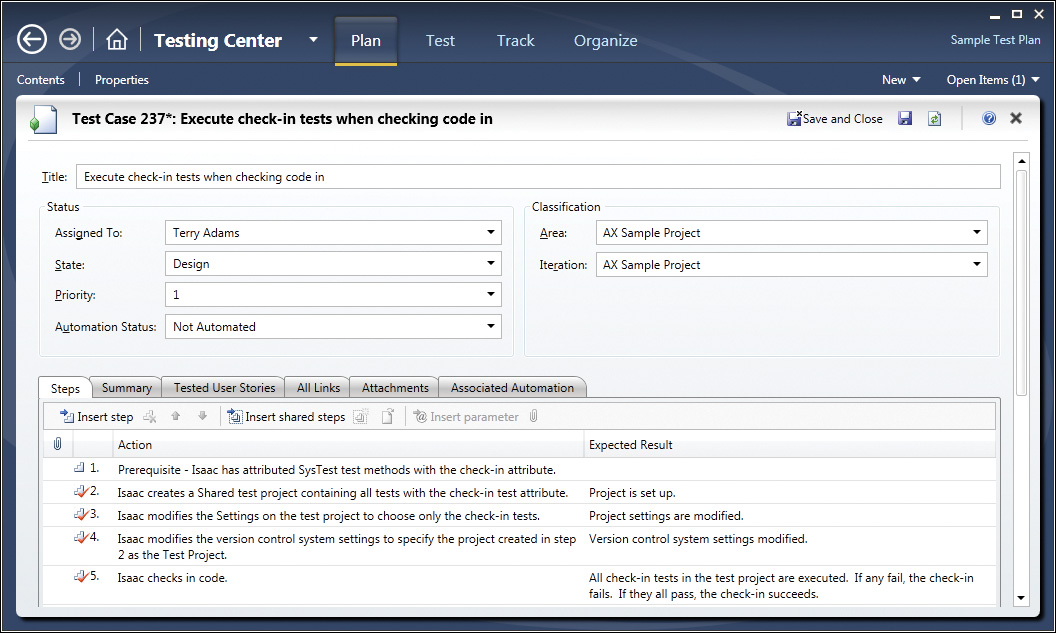
Though the requirement should be free of implementation details, the acceptance test cases must have some implementation details to make them useful—but not too many. Figure 15-5 shows a sample acceptance test case for a feature described in the previous section—executing unit tests when code is checked in. The test case specifies details such as the forms that are expected to be used, but it doesn’t specify the exact field names.
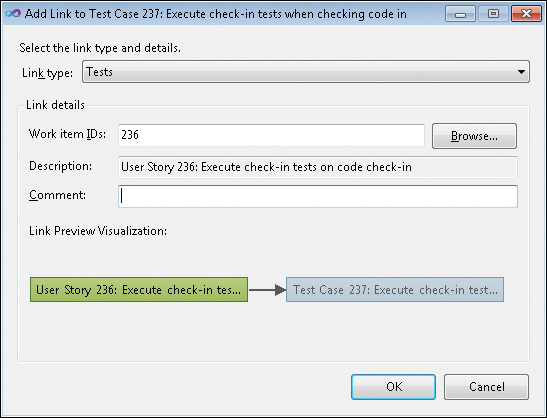
After you create the test, link it to the requirement on the Tested User Stories tab. (In this example, a user story is the requirement.) The Add Link form will look like Figure 15-6 after linking.
By linking the test case to the requirement, you can use a nice feature in Microsoft Test Manager, the capability to build test plans based on requirement-based test suites. By specifying the requirement using the Add Requirements button in the Microsoft Test Manager Plan area, you pull in all test cases that are linked to the requirement.
Using shared steps
With shared steps, you can reuse the same steps in multiple test cases. Think of shared steps as subroutines for your manual test cases. Using this capability appropriately is a big step toward long-term maintainability of your test cases.
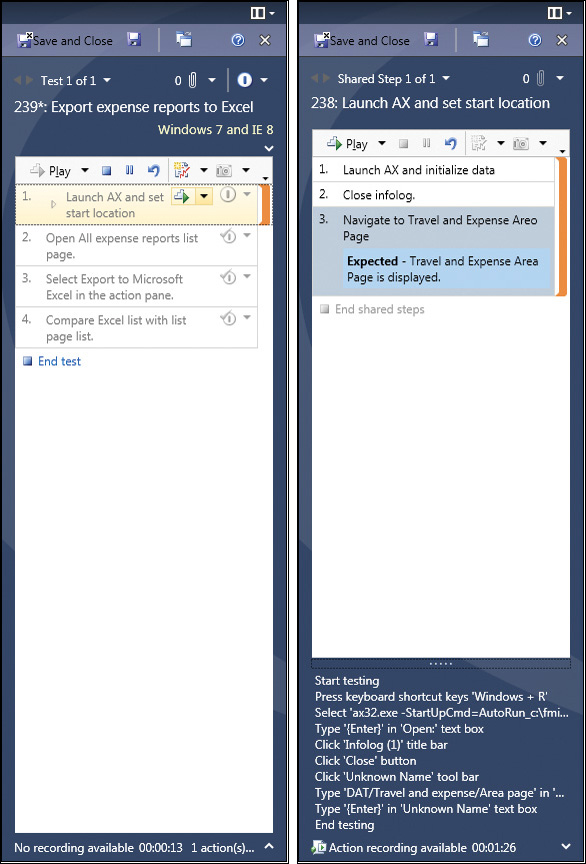
A prime opportunity for using shared steps arises when you need to get the application into a known state at the start of each test case. For AX 2012 tests, starting the application through the command line and using command-line options to initialize the application for testing is an excellent strategy.
Here’s an example of how to start AX 2012 and run a job to initialize data. First, create an XML file, fminitializedata.xml, that you will reference in the command line, and save it in a well-known location.
![]() Note
Note
Though this example uses the root folder of drive C, a better approach would be to define an environment variable for the location.
<?xml version="1.0" ?>
<AxaptaAutoRun
exitWhenDone="false"
logFile="c:AXAutorun.log">
<Run type="job" name="InitializeFMDataModel" />
</AxaptaAutoRun>
Now the application can be started from the Run dialog box with the following command string: ax32.exe -StartUpCmd=AutoRun_c:fminitializedata.xml.
You can incorporate this command line into a Launch AX And Set Start Location shared step along with some basic navigation so that the test case always starts from a known location, as shown in Figure 15-7.

Recording shared steps for fast forwarding
Microsoft Test Manager includes basic record-and-playback capability. Because of the focus on the manual tester, record and playback is not intended for end-to-end, push-button automation when a test is fully automated. Instead, a manual tester can use this functionality to fast-forward through the routine portion of a test case to get to the interesting part, where validation is required and exploratory testing drives the effective discovery of bugs.
Shared steps are a great starting point for building efficiency into your manual testing through fast-forward capabilities. Microsoft Test Manager can record a shared step independently (Organize > Shared Steps Manager > Create Action Recording). The actions recorded for the shared step can be used in all test cases that use those actions. You can also optimize the playback by using the most efficient and reliable actions.
With its long command line and the need to consistently be in a known state, the Launch AX And Set Start Location shared step shown in Figure 15-7 is a great candidate to record.
To make this as efficient and reliable as possible, you can do the following:
![]() To get to the Run dialog box for typing in the command line, use Windows logo key+R instead of the mouse to open it. In general, shortcut keys are a better option for record and playback.
To get to the Run dialog box for typing in the command line, use Windows logo key+R instead of the mouse to open it. In general, shortcut keys are a better option for record and playback.
![]() To navigate to a particular area page, type the path into the address bar. This approach has multiple advantages because it goes directly to the page and is independent of the location where the application was last left.
To navigate to a particular area page, type the path into the address bar. This approach has multiple advantages because it goes directly to the page and is independent of the location where the application was last left.
The left side of Figure 15-8 shows a test case in Microsoft Test Manager that includes a shared step. The right side of Figure 15-8 shows the shared step itself. Notice the arrow in the highlighted first step. This gives you the option to fast-forward through the shared step.
Developing test cases in an evolutionary manner
Creating detailed, step-by-step test cases early in the development process can become counterproductive as the application evolves to its final form. A better alternative is to develop your test cases in phases:
![]() Phase 1 Identify the titles of the test cases needed for the requirements planned in your current development phase. Create the test cases and associated metadata (area, priority, and so on).
Phase 1 Identify the titles of the test cases needed for the requirements planned in your current development phase. Create the test cases and associated metadata (area, priority, and so on).
![]() Phase 2 Flesh out the test case by using an intent-driven approach. Perhaps a test case requires the creation of a customer with a past due account. Performing these actions requires many steps. Starting with the Create Customer With Past Due Account step is sufficient in this phase.
Phase 2 Flesh out the test case by using an intent-driven approach. Perhaps a test case requires the creation of a customer with a past due account. Performing these actions requires many steps. Starting with the Create Customer With Past Due Account step is sufficient in this phase.
![]() Phase 3 Add details to the test cases as required. If your testers are domain experts, you might not need additional details. Although omitting details introduces variability, the action recording provides the developer with the details of the steps taken.
Phase 3 Add details to the test cases as required. If your testers are domain experts, you might not need additional details. Although omitting details introduces variability, the action recording provides the developer with the details of the steps taken.
This phase also provides an opportunity to create additional shared steps that can be reused across test cases. If multiple test cases require Create Customer With Past Due Account, create a shared step and perhaps record it. Alternatively, you can include an appropriate customer record in your data.
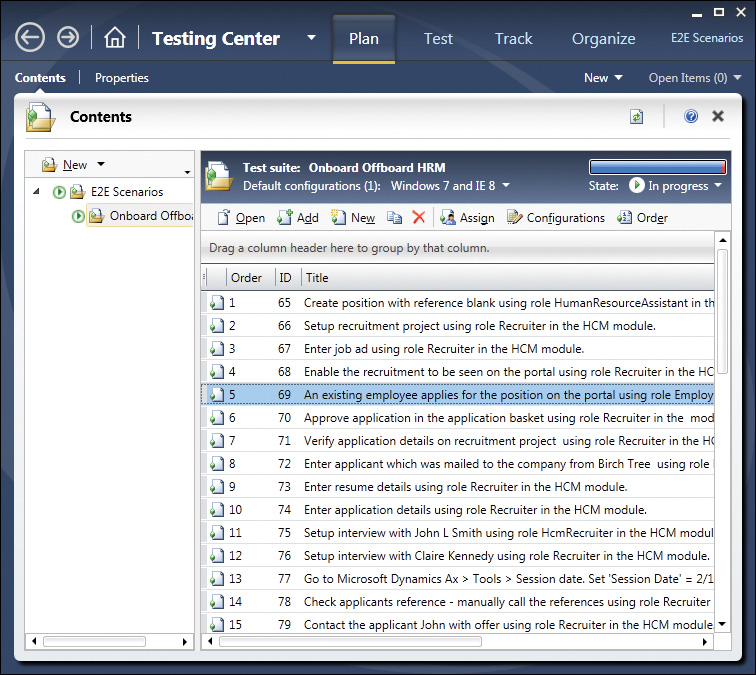
Using ordered test suites for long scenarios
Scenario tests are valuable for business applications because long workflows are typical of business processes. Mapping these long scenarios to a test case can be challenging because you don’t want a test case that has dozens of steps.
Microsoft Test Manager solves this problem by providing the capability to define the order of test cases within a test suite. Figure 15-9 shows an example of a human resources end-to-end scenario that is divided into many short test cases and then ordered within a test suite.
Putting everything together
So far, this chapter has discussed some key aspects of developer testing and functional testing. This section ties these topics together with some bigger-picture application lifecycle management areas.
Executing tests as part of the build process
The Visual Studio 2010 ALM solution also includes Team Foundation Build, a workflow-enabled system that you use to compile code, run associated tests, perform code analysis, release continuous builds, and publish build reports. You can apply Team Foundation Build to AX 2012 projects. Though the build process is beyond the scope of this chapter, running tests from Team Foundation Build is not.
Tests that are executed as part of a build process must be fully automated. Given this requirement, the starting point should be tests written by using the SysTest framework. Fortunately, some tools are in place to enable execution of AX 2012 SysTest test cases from the Visual Studio environment.
The first step is for the SysTest framework to provide results in a format that Visual Studio expects—specifically, the TRX output format. There are two pieces of good news here. First, the SysTest framework provides an extensible model for test listeners for results. Second, the Microsoft Dynamics AX partner ecosystem has provided a sample TRX implementation on CodePlex that uses the Test Listeners capability. The SysTestListenerTRX package for AX 2012 can be downloaded from http://dynamicsaxbuild.codeplex.com/releases.
The second step is to initiate tests from Visual Studio. The Generic Test Case capability was developed to wrap an existing program. This is perfect for this situation because AX 2012 can run a test project from the command line and specify the Test Listener and the location of the output file.
Suppose you want to execute all tests marked with SysTestIntegrationTestAttribute that were created earlier in this chapter. After downloading and installing the SysTestListenerTRX package from the link shown earlier, do the following:
1. Create a new test project in AX 2012. Add all test classes that have SysTestIntegrationTest-Attribute on the class or on a method. As described for check-in tests earlier in this chapter, right-click the project, and then click Settings. In the Settings window, select Integration Tests.
2. Create a new test project in Visual Studio.
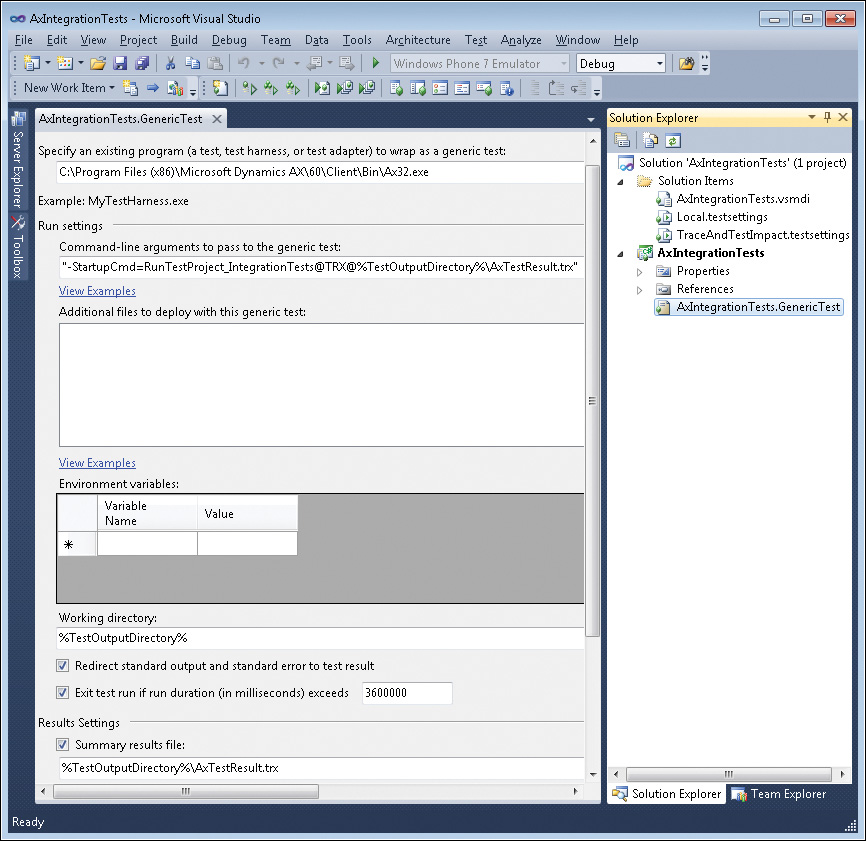
3. On the Test menu, click New Test, and then, in the Add New Test dialog box, double-click Generic Test.
4. Set up the generic test as shown in Figure 15-10, by completing the following steps:
a. In Specify An Existing Program, type the full path to Ax32.exe.
b. In Command-Line Arguments, type the string shown in Figure 15-10 ("-StartupCmd=RunTestProject_IntegrationTests@TRX@%TestOutputDirectory%Ax-TestResult.trx"). This string specifies that the AX 2012 test project named IntegrationTests should be run, that the TRX listener is used, and that the output will be placed in %TestOutputDirectory%AxTestResult.trx.
c. Under Results Settings, select the Summary Results File check box, and then specify the location for the result by using the same path and name as on the command line.
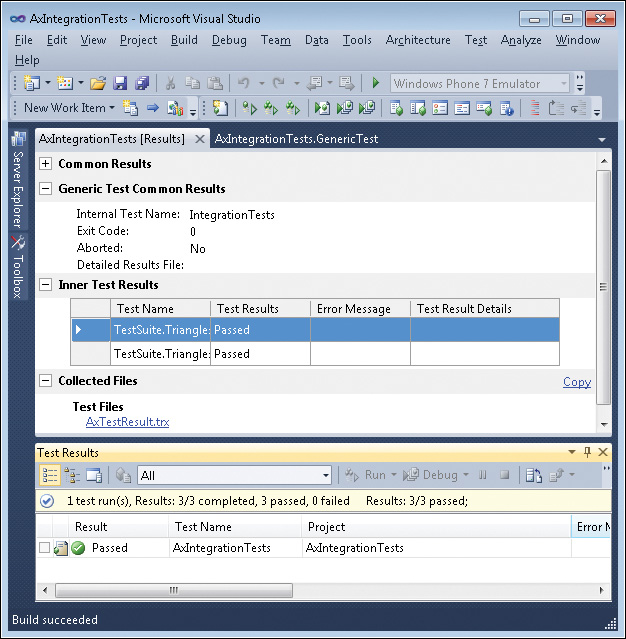
When you run all tests in the solution from Visual Studio (click the Test menu > Run > All Tests In Solution), you will see the AX 2012 client open and then close. The results for this example are shown in Figure 15-11. Two tests were marked with SysTestIntegrationTestAttribute, and both passed.
Using the right tests for the job
A typical AX 2012 development project has four unique environments: development, test, preproduction, and production. This section provides a brief description of each environment and discusses how to apply the test tools in this chapter to each of them.
The development environment is where developers are actively contributing code. A high-quality development process focuses on ensuring high quality as close to the source of possible defects as possible. This is an excellent opportunity to use the SysTest framework for developing unit tests for new classes or methods and integration tests for basic multiclass interaction. Over time, these automated tests can form a regression suite that can be executed during the check-in and build processes as described in this chapter. The ATDD process described earlier in this chapter for validating requirements should also be applied in the development environment, so the testers on the project need to be involved during the development phase, optimally using the Visual Studio 2010 test tooling.
Broader testing is targeted for the test environment. Varying levels of integration testing are typical of this environment, with a strong focus on ensuring that business processes are functioning end to end. Creating test suites that use ordered test cases in Microsoft Test Manager is a good approach here. This is a good opportunity to evolve the detail of the test cases, using a well-designed approach for shared steps to minimize duplication across the suites. As the product changes and new builds are created, the SysTest regression suite should continue to be executed.
User acceptance testing (UAT) is the primary activity in the preproduction environment. The Microsoft Test Manager test suites developed for the test environment can form the basis for the UAT performed by users in the business. The data that you use for this testing should be a snapshot of the production data.
If all goes well in the previous environments, the code is deployed to production. To minimize downtime, only a cursory check, or smoke test, is performed after the new code is deployed. This typically is a manual test case defined by the business but exercised by the IT specialists performing the deployment. Again, you can use Microsoft Test Manager to define the test case and provide an execution environment with shared steps for auditing and debugging purposes.
To ensure that you have a high-quality, comprehensive test plan in place, you might want to review additional documentation that contains processes and guidelines for quality-focused development. For more information, see the Microsoft Dynamics AX 2012 white paper, “Testing Best Practices,” at http://www.microsoft.com/download/en/details.aspx?id=27565, and “Microsoft Dynamics Sure Step Methodology,” at http://www.microsoft.com/download/en/details.aspx?displaylang=en&id=5320.