Chapter 7. Enterprise Portal
In this chapter
Enterprise Portal architecture
Developing for Enterprise Portal
Introduction
With the Enterprise Portal web client, organizations can extend and expand the use of enterprise resource planning (ERP) software so that they can reach out to customers, vendors, business partners, and employees. With Enterprise Portal, users can access business applications and collaborate from anywhere.
Users access Enterprise Portal remotely through a web browser or from within a corporate intranet, depending on how Enterprise Portal is configured and deployed. Enterprise Portal serves as the central place for users to access any data, structured or unstructured, such as transactional data, reports, charts, key performance indicators (KPIs), documents, and alerts. For information about the Enterprise Portal user interface, see Chapter 5, “Designing the user experience.”
Enterprise Portal also serves as a web platform. It contains a set of default webpages and user roles that you can use as is or modify to meet unique business needs. You can also use it to customize or create new web-based business applications in AX 2012.
Enterprise Portal in AX 2012 adds a number of new features to speed up the development of business applications. By using the new model-driven development approach, you can build list pages that work both in Enterprise Portal and in the AX 2012 Windows client, reducing development time. New project and control templates in Microsoft Visual Studio enable rapid application development. New metadata settings let you instantly enable common patterns that you previously had to write code to support.
Enterprise Portal architecture
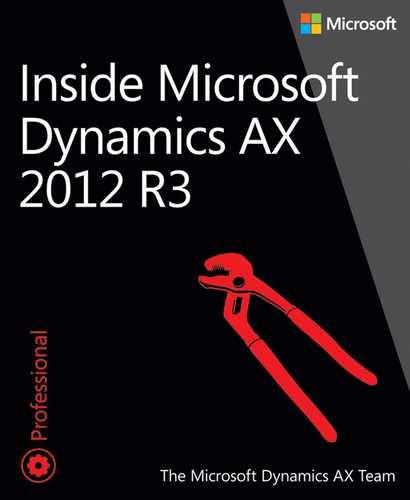
Enterprise Portal brings the best of AX 2012, ASP.NET, and Microsoft SharePoint technologies together to provide a rich web-based business application. It combines the functionality of SharePoint with the structured business data in AX 2012.
You can use MorphX to take advantage of the extensive programming model to define data access and business logic in AX 2012. You can build web user controls and define the web user interface elements by using Visual Studio. The web controls can contain AX 2012 components like AxGridView, in addition to standard ASP.NET controls like TextBox. The data access and business logic defined in AX 2012 is exposed to the web user controls through data binding, data and metadata application programming interfaces (APIs), and proxy classes.
Figure 7-1 shows the architecture of Enterprise Portal.
Enterprise Portal uses the web part page framework from SharePoint. Web parts are reusable SharePoint components that generate HTML and provide the foundation for the modular presentation of data. By using this framework, you can build webpages that allow easy customization and personalization. The web part page framework also makes it easy to integrate content, collaborate, and use third-party applications. Webpages can contain both AX 2012 web parts and SharePoint web parts.
The AX 2012 web parts present information and expose functionality from AX 2012. The User control web part can host any ASP.NET web user control, including the Enterprise Portal web user controls. It can connect to AX 2012 through the Enterprise Portal framework. You can use SharePoint web parts to fulfill other content and collaboration needs. For example, you might have a custom web part that goes out to a site, fetches the latest news about your organization, and displays it. Or you might have a web part that displays data from another SharePoint site within your organization.
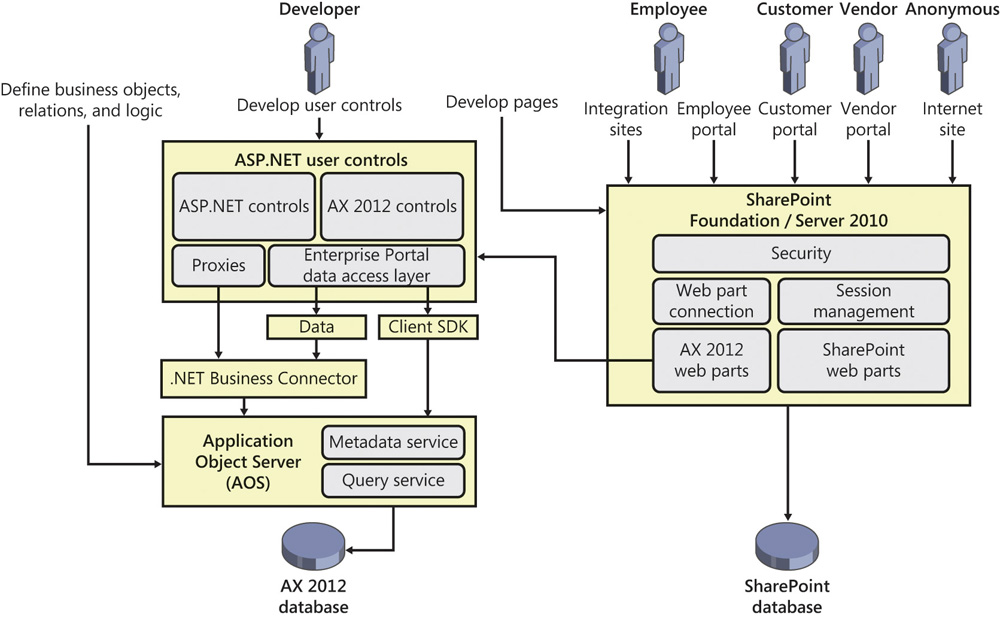
The first step in developing or customizing an application on Enterprise Portal is to understand the interactions between the user’s browser on the client and Enterprise Portal on the server when the user accesses Enterprise Portal.
The following sequence of interactions occurs when a user accesses an Enterprise Portal page:
1. The user opens the browser on his or her computer and navigates to Enterprise Portal.
2. The browser establishes a connection with the Internet Information Services (IIS) web server.
3. IIS authenticates the user based on the authentication mode being used.
4. After the user is authenticated, SharePoint verifies that the user has permission to access the site.
5. If the user is authorized to access the site, the request is passed to the SharePoint module.
6. SharePoint gets the data about the page from the SharePoint database or the file system. This data consists of information such as the page layout, the master page, the web parts that go on the page, and their properties.
7. SharePoint processes the page by creating and initializing the web parts and applying any properties and personalization data. To display the top navigation bar, the Quick Launch, and the Action pane, a custom navigation provider gets information from AX 2012 (modules, menus, submenus, and menu items).
8. Enterprise Portal initializes the web parts and starts a web session with the Enterprise Portal framework through the .NET Business Connector (BC.NET) to the Application Object Server (AOS).
9. The web framework checks for AX 2012 authorization and then calls the appropriate web handlers in the web framework to process the Enterprise Portal objects that the web parts point to.
10. The User control web part runs the web user control that it references. The web user control connects to AX 2012 through BC.NET and renders the HTML to the web part.
11. The webpage assembles the HTML returned by all of the web parts and renders the page in the user’s browser.
As you can see in this sequence, the AOS processes the business logic and data retrieval, ASP.NET processes the user interface elements, and SharePoint handles the overall page layout and personalization. Figure 7-2 shows a graphical representation of this sequence of events.
Enterprise Portal components
This section describes the components that make up an Enterprise Portal page: web parts, Application Object Tree (AOT) elements, datasets, and Enterprise Portal framework controls.
Web parts
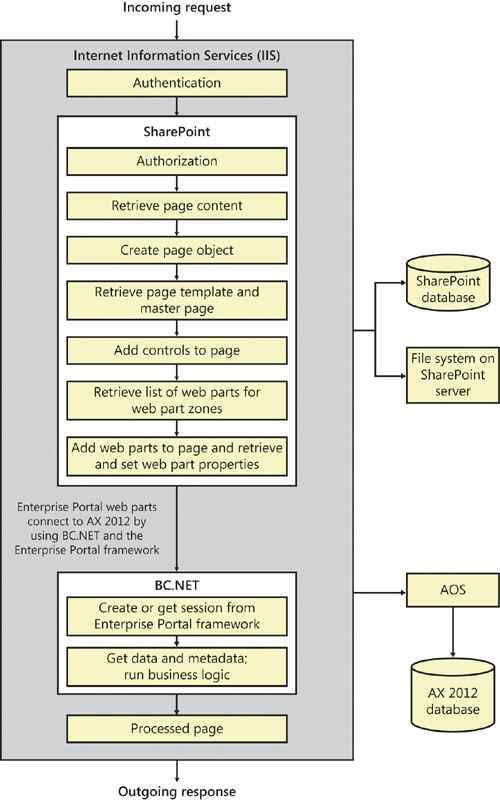
Web parts support customization and personalization and can be integrated easily into a webpage. Enterprise Portal includes a standard set of web parts, shown in Figure 7-3, that expose the business data in AX 2012.
The following web parts are included with Enterprise Portal:
![]() Action pane Used to display the Action pane, which is similar to the SharePoint ribbon. The Action pane points to a web menu in the AOT and displays buttons in tabs and groups to improve the buttons’ discoverability. You can use the AxActionPane control in a web control as an alternative to using the Action pane web part.
Action pane Used to display the Action pane, which is similar to the SharePoint ribbon. The Action pane points to a web menu in the AOT and displays buttons in tabs and groups to improve the buttons’ discoverability. You can use the AxActionPane control in a web control as an alternative to using the Action pane web part.
![]() Business overview Used to display business intelligence (BI) information such as KPIs and other analytical data in Role Centers. For more information, see Chapter 10, “BI and analytics.”
Business overview Used to display business intelligence (BI) information such as KPIs and other analytical data in Role Centers. For more information, see Chapter 10, “BI and analytics.”
![]() Connect Used to display the links to information from the Microsoft Dynamics AX community. This web part is typically used on Role Center pages.
Connect Used to display the links to information from the Microsoft Dynamics AX community. This web part is typically used on Role Center pages.
![]() Cues Used to display numeric information—such as the number of active opportunities and new leads—visually as a stack of paper. The Cues web part is generally added to Role Center pages and points to a Cue Group in the AOT. For more information about Cues, see Chapter 5.
Cues Used to display numeric information—such as the number of active opportunities and new leads—visually as a stack of paper. The Cues web part is generally added to Role Center pages and points to a Cue Group in the AOT. For more information about Cues, see Chapter 5.
![]() Infolog Used to display Microsoft Dynamics AX Infolog messages on the webpage. When you create a new web part page by using Enterprise Portal page templates, the Infolog web part is automatically added to the top of the page in the Infolog web part zone. Any error, warning, or information message that AX 2012 generates is automatically displayed by the Infolog web part. If you need to display some information from your web user control in the Infolog web part, you need to send the message through the C# proxy class for the X++ Infolog object.
Infolog Used to display Microsoft Dynamics AX Infolog messages on the webpage. When you create a new web part page by using Enterprise Portal page templates, the Infolog web part is automatically added to the top of the page in the Infolog web part zone. Any error, warning, or information message that AX 2012 generates is automatically displayed by the Infolog web part. If you need to display some information from your web user control in the Infolog web part, you need to send the message through the C# proxy class for the X++ Infolog object.
![]() Left navigation Used to display page-specific navigation instead of module-specific navigation. You can use this web part as an alternative to the Quick launch web part, which displays module-specific navigation. This web part points to a web menu in the AOT.
Left navigation Used to display page-specific navigation instead of module-specific navigation. You can use this web part as an alternative to the Quick launch web part, which displays module-specific navigation. This web part points to a web menu in the AOT.
![]() List Used to display the contents of a model-driven list page. When you deploy a model-driven list page to Enterprise Portal, the page template automatically adds the List web part to the Middle Column zone of the page. This web part points to the display menu item for the model-driven list page form.
List Used to display the contents of a model-driven list page. When you deploy a model-driven list page to Enterprise Portal, the page template automatically adds the List web part to the Middle Column zone of the page. This web part points to the display menu item for the model-driven list page form.
![]() Page title Used for displaying the page title. When you create a new web part page, the Page title web part is automatically added to the Title Bar zone. By default, the Page title web part displays the text specified in the PageTitle property of the Page Definition node in the AOT. If no page definition exists, the page name is displayed. You can override this behavior and get the title from another web part on the page by using a web part connection. For example, if you’re developing a list page and you want to display information from a record, such as the customer account and name as the page title, you can connect the User control web part that displays the grid to the Page title web part. When the user selects a different record in the customer list, the page title changes to display the currently selected customer account and name.
Page title Used for displaying the page title. When you create a new web part page, the Page title web part is automatically added to the Title Bar zone. By default, the Page title web part displays the text specified in the PageTitle property of the Page Definition node in the AOT. If no page definition exists, the page name is displayed. You can override this behavior and get the title from another web part on the page by using a web part connection. For example, if you’re developing a list page and you want to display information from a record, such as the customer account and name as the page title, you can connect the User control web part that displays the grid to the Page title web part. When the user selects a different record in the customer list, the page title changes to display the currently selected customer account and name.
![]() Quick launch Used for displaying module-specific navigation links on the left side of the page. When you create a new web part page, the Quick launch web part is automatically added to the Left Column zone if the template that you choose has this zone. The Quick launch web part displays the web menu set in the QuickLaunch property of the corresponding web module in the AOT. All pages in a given web module (subsite) display the same navigation options in the left pane.
Quick launch Used for displaying module-specific navigation links on the left side of the page. When you create a new web part page, the Quick launch web part is automatically added to the Left Column zone if the template that you choose has this zone. The Quick launch web part displays the web menu set in the QuickLaunch property of the corresponding web module in the AOT. All pages in a given web module (subsite) display the same navigation options in the left pane.
![]() Quick links Used to display a collection of links to frequently used menu items and external websites. This web part is generally added to Role Center pages.
Quick links Used to display a collection of links to frequently used menu items and external websites. This web part is generally added to Role Center pages.
![]() Report Used to display Microsoft SQL Server Reporting Services (SSRS) reports for AX 2012.
Report Used to display Microsoft SQL Server Reporting Services (SSRS) reports for AX 2012.
![]() Toolbar Used to display a toolbar on the page in a location that you select. For example, you can use a Toolbar web part to place Add, Edit, and Remove buttons for a grid control directly above that grid control. The Toolbar web part points to a web menu in the AOT. Alternatively, you can use an AxToolbar control in a web user control instead of the Toolbar web part.
Toolbar Used to display a toolbar on the page in a location that you select. For example, you can use a Toolbar web part to place Add, Edit, and Remove buttons for a grid control directly above that grid control. The Toolbar web part points to a web menu in the AOT. Alternatively, you can use an AxToolbar control in a web user control instead of the Toolbar web part.
![]() Unified work list Used to display workflow actions, alert notifications, and activities. This web part is generally added on Role Center pages. For more information, see Chapter 8, “Workflow in AX 2012.”
Unified work list Used to display workflow actions, alert notifications, and activities. This web part is generally added on Role Center pages. For more information, see Chapter 8, “Workflow in AX 2012.”
![]() User control Used for hosting any ASP.NET control, including the AX 2012 web controls that you develop. This web part points to a managed web content item that identifies the web user control. The User control web part can both pass and consume record context information to and from other web parts. To make the web part do that, set the role of the User control web part as Provider, Consumer, or Both, and then connect the web part to other web parts. User control web parts automatically use AJAX, which allows them to update the content that they display without having to refresh the entire page.
User control Used for hosting any ASP.NET control, including the AX 2012 web controls that you develop. This web part points to a managed web content item that identifies the web user control. The User control web part can both pass and consume record context information to and from other web parts. To make the web part do that, set the role of the User control web part as Provider, Consumer, or Both, and then connect the web part to other web parts. User control web parts automatically use AJAX, which allows them to update the content that they display without having to refresh the entire page.
AOT elements
The AOT contains several elements that are specific to Enterprise Portal, in addition to other programming elements such as forms, classes, and tables. For more information about the elements that are available for creating Enterprise Portal pages, see Chapter 1, “Architectural overview.”
Datasets
You use datasets to define the data access logic. A dataset is a collection of data usually presented in tabular form. Datasets bring the familiar data and programming model from Microsoft Dynamics AX forms together with ASP.NET data binding. In addition, datasets offer an extensive X++ programming model for validating and manipulating the data when create, read, update, or delete operations are performed in Enterprise Portal. You can use the AxDatasource control to access datasets to display and manipulate data from any ASP.NET control that supports data binding.
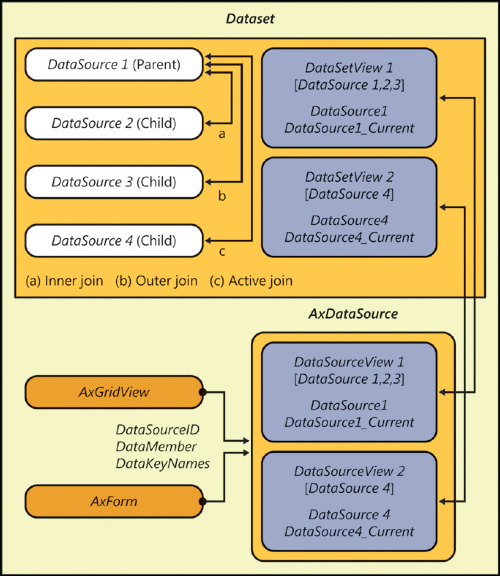
You create datasets by using MorphX. A dataset can contain one or more data sources that are joined together. A data source can point to a table or a view in AX 2012, or you can join data sources to display data from multiple tables as a single data source. To do this, you use inner or outer joins. To display parent-child data, you use active joins. To display data from joined data sources or from parent-child datasets, you use dynamic dataset views (DataSetView class). With a view-based interface, tables are accessed through dynamic dataset views instead of directly. You can access inner-joined or outer-joined tables through only one view, which has the same name as the primary data source. Two views are available with active-joined data sources: one with the same name as the parent data source, and another with the same name as the child data source. The child data source contains records related only to the current active record in the parent data source.
Each dataset view can contain zero or more records, depending on the data. Each dataset view also has a corresponding special view, which contains just the current, single active record. This view has the same name as the original view with the suffix _Current appended to the view name. Figure 7-4 shows the dataset views inside a dataset, along with the data binding.
As mentioned earlier, datasets offer an extensive and familiar X++ programming model. Some of the methods used frequently include init, run, pack, and unpack:
![]() init The init method is called when initializing a dataset. This method is called immediately after the new operator and creates the run-time image of the dataset. Typical uses of init include initializing variables and queries, adding ranges to filter the data, and checking the arguments passed.
init The init method is called when initializing a dataset. This method is called immediately after the new operator and creates the run-time image of the dataset. Typical uses of init include initializing variables and queries, adding ranges to filter the data, and checking the arguments passed.
![]() run The run method is called after the dataset is initialized and opened, and immediately after init. Typical uses of run include conditionally setting the visibility of fields, changing the access level on fields, and modifying queries.
run The run method is called after the dataset is initialized and opened, and immediately after init. Typical uses of run include conditionally setting the visibility of fields, changing the access level on fields, and modifying queries.
![]() pack The pack method is called after the dataset is run. You generally implement the pack-unpack pattern to save and store the state of an object, which you can later reinstantiate. A typical use of pack is to persist a variable used in the dataset between postback actions for user controls.
pack The pack method is called after the dataset is run. You generally implement the pack-unpack pattern to save and store the state of an object, which you can later reinstantiate. A typical use of pack is to persist a variable used in the dataset between postback actions for user controls.
![]() unpack The unpack method is called if a dataset was previously packed and is later accessed. If a dataset was previously packed, you do not call init and run. Instead, you call only unpack.
unpack The unpack method is called if a dataset was previously packed and is later accessed. If a dataset was previously packed, you do not call init and run. Instead, you call only unpack.
Data sources within a dataset also include a number of methods that you can override. These methods are similar to those in the FormDataSource class in the AX 2012 client. You can use them to initialize default values and to validate values and actions. For more information about these events, such as when they are executed and common usage scenarios, see the topic, “Methods on a Form Data Source,” on MSDN (http://msdn.microsoft.com/en-us/library/aa893931.aspx).
Enterprise Portal framework controls
The Enterprise Portal framework has a built-in set of controls that you can use to access, display, and manipulate AX 2012 data.
AxDataSource
The AxDataSource control extends DataSourceControl in ASP.NET to provide a declarative and data store–independent way to read and write data from AX 2012. Datasets that you create in the AOT are exposed to ASP.NET through the AxDataSource control. You can associate ASP.NET data-bound user interface controls with the AxDataSource control through the DataSourceID property. By doing so, you can connect and access data from AX 2012 and bind it to the control without specific domain knowledge of AX 2012.
The AxDataSource control is a container for one or more uniquely named views of type AxDataSourceView. The AxDataSourceView class extends the Microsoft .NET Framework DataSourceView class and implements the functionality to read and write data. A data-bound control can identify the set of capabilities that are enabled by properties of AxDataSourceView and use it to show, hide, enable, or disable the user interface components. AxDataSourceView maps to the dataset view. The AxDataSource control automatically creates AxDataSourceView objects based on the dataset that it references. The number of objects created depends on the data sources and the joins that are defined for the dataset. You can use the DataMember property of a data-bound control to select a particular view.
The AxDataSource control also supports filtering records within and across other AxDataSource controls and data source views. When you set the active record on the data source view within an AxDataSource control, all child data source views are also filtered based on the active record. You can filter across AxDataSource controls by using record context. With record context, one AxDataSource control acts as the provider of the context, and one or more AxDataSource controls act as consumers. An AxDataSource control can act as both a provider and a consumer. When the active record changes on the provider AxDataSource control, the record context is passed to other consuming AxDataSource controls and they apply that filter also. You use the Role and ProviderView properties of the AxDataSource control to specify whether an AxDataSource control is a provider, a consumer, or both. A web user control can contain any number of AxDataSource controls; however, only one can be a provider. Any number can be consumers.
You can use the DataSetViewRow object to access the rows in a DataSetView. The GetCurrent method returns the current row, as shown in the following example:
DataSetViewRow row = this.AxDataSource1.GetDataSourceView("View1").DataSetView.GetCurrent();
The GetDataSet method on the AxDataSource control specifies the dataset to bind. The DataSetRun property provides the run-time instance of the dataset, and you can use the AxaptaObjectAdapter property to call methods defined in the dataset.
this.AxDataSource1.GetDataSet().DataSetRun.AxaptaObjectAdapter.Call("method1");
AxForm
With the AxForm control, you can allow users to create, view, and update a single record. This control displays a single record from a data source in a form layout. It is a data-bound control with built-in data modification capabilities. When you use AxForm with the declarative AxDataSource control, you can easily configure it to display and modify data without having to write any code.
The DataSourceID, DataMember, and DataKeyNames properties define the data-binding capabilities of the AxForm control. AxForm also provides properties to autogenerate action buttons and to set the text and mode of the buttons. You set the UpdateOnPostback property if you want the record cursor to be updated at postback so that other controls can read the change. AxForm also provides before and after events for all of the actions that can be taken on the form. You can write code in these events to customize the user interface or provide application-specific logic.
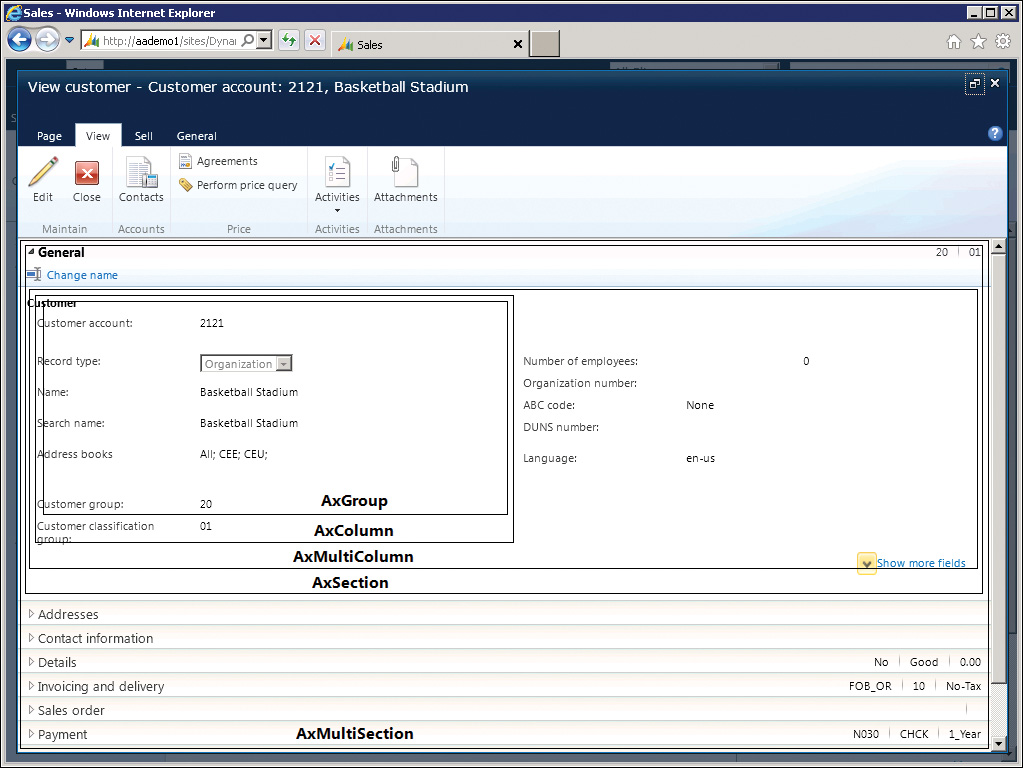
AxMultiSection
The AxMultiSection control acts as a container for a collection of AxSection controls. All AxSection controls within an AxMultiSection control are rendered in a stacked set of rows, which users can expand or collapse. You can configure AxMultiSection so that only one section is expanded at a time. In this mode, expanding a section causes it to become active, and any previously expanded section is collapsed. To enable this behavior, set the ActiveMode property to true. You can then use the ActiveSectionIndex property to get or set the active section.
AxSection
AxSection is a generic container for other controls. You can place any control in an AxSection control. Each AxSection control includes a header that contains the title of the section and a button that allows the user to expand or collapse the section. AxSection provides properties to display or hide the header and border. Through events exposed by AxSection, you can write code that runs when the section is expanded or collapsed. The AxSection control can be placed only within an AxMultiSection control.
AxMultiColumn
The AxMultiColumn control acts as a container for a collection of AxColumn controls. All AxColumn controls within an AxMultiColumn control are rendered as a series of columns. The AxMultiColumn control makes it easy to create a multicolumn layout that optimizes the use of screen space. An AxMultiColumn control is usually placed within an AxSection control.
AxColumn
AxColumn is a generic container for other controls. You can place any control inside AxColumn. However, the AxColumn control can be placed only within an AxMultiColumn control.
AxGroup
The AxGroup control contains the collection of bound fields that displays the information contained in a record. You can place an AxGroup control inside an AxSection or AxColumn control.
Figure 7-5 shows an Enterprise Portal page containing several of the controls that have been discussed so far in this chapter.
The following code snippets illustrate some high-level control hierarchies for different form layouts. The first one is a commonly used pattern in Enterprise Portal. It displays two expandable sections, one below the other. Each section displays fields in two columns next to each other. If you want to display additional sections or columns, you can add AxSection and AxColumn controls.
<AxMultiSection>
<AxSection>
<AxMultiColumn>
<AxColumn>
<AxGroup><Fields>BoundFields or TemplateFields...</Fields> </AxGroup>
</AxColumn>
<AxColumn>
< AxGroup><Fields>BoundFields or TemplateFields...</Fields> </AxGroup>
</AxColumn>
</AxMultiColumn>
</AxSection>
<AxSection>
<AxMultiColumn>
<AxColumn>
< AxGroup><Fields>BoundFields or TemplateFields...</Fields> </AxGroup>
</AxColumn>
<AxColumn>
< AxGroup><Fields>BoundFields or TemplateFields...</Fields> </AxGroup>
</AxColumn>
</AxMultiColumn>
</AxSection>
</AxMultiSection>
The following layout displays two expandable sections, one below the other and in a single column:
<AxMultiSection>
<AxSection>
<AxGroup><Fields>BoundFields or TemplateFields...</Fields> </AxGroup>
<AxGroup><Fields>BoundFields or TemplateFields...</Fields> </AxGroup>
</AxSection>
<AxSection>
<AxGroup><Fields>BoundFields or TemplateFields...</Fields> </AxGroup>
<AxGroup><Fields>BoundFields or TemplateFields...</Fields> </AxGroup>
</AxSection>
</AxMultiSection>
The following layout is for an ASP.NET wizard with two steps:
<asp:Wizard>
<WizardSteps>
<asp:WizardStep>
<AxGroup><Fields>BoundFields or TemplateFields...</Fields> </AxGroup>
</asp:WizardStep>
<asp:WizardStep>
<AxGroup><Fields>BoundFields or TemplateFields...</Fields> </AxGroup>
</asp:WizardStep>
</WizardSteps>
</asp:Wizard>
AxGridView
The AxGridView control displays the values from a data source in a tabular format. Each column represents a field and each row represents a record. The AxGridView control extends the ASP.NET GridView control to provide selection, grouping, expansion, row filtering, a context menu, and other enhanced capabilities.
AxGridView also includes built-in data modification capabilities. By using AxGridView with the declarative AxDataSource control, you can easily configure and modify data without writing code. AxGridView also has many properties, methods, and events that you can easily customize with application-specific user interface logic.
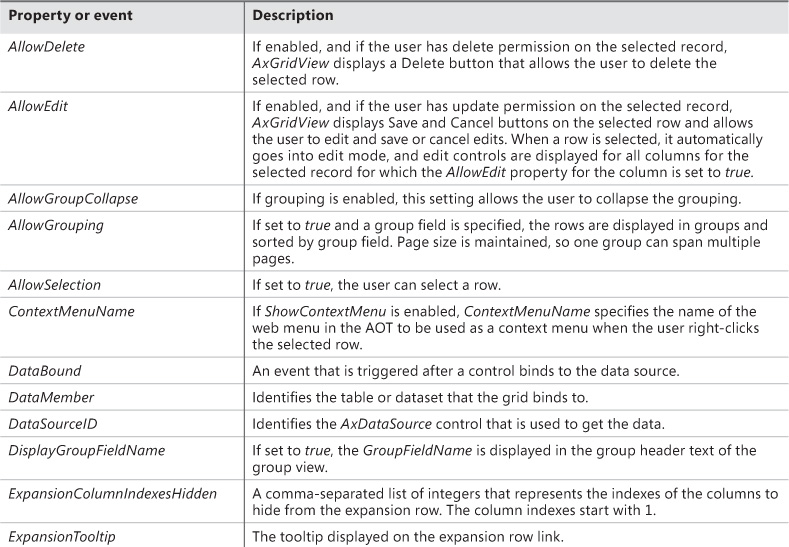
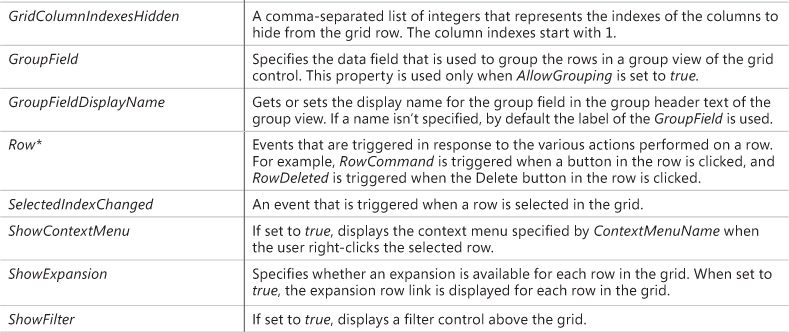
Table 7-1 lists some of the AxGridView properties and events. For a complete list of properties, methods, and events for AxGridView, see “AxGridView,” at http://msdn.microsoft.com/en-us/library/cc584514.aspx.
AxHierarchicalGridView
Use the AxHierarchicalGridView control when you want to display hierarchical data in a grid format. For example, you might have a grid that displays a list of tasks in a project. With this control, each task can have subtasks, and you can present all tasks and subtasks in a single grid, as shown in Figure 7-6.
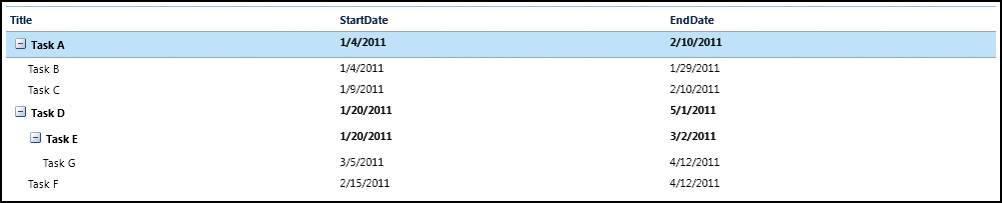
You use the HierarchyIdFieldName property to uniquely identify a row and the HierarchyParentIdFieldName property to identify the parent of a row. The following example illustrates the markup for an AxHierarchicalGridView control:
<dynamics:AxDataSource ID="AxDataSource1" runat="server" DataSetName="Tasks" ProviderView="Tasks">
</dynamics:AxDataSource>
<dynamics:AxHierarchicalGridView ID="AxHierarchicalGridView1" runat="server"
BodyHeight="" DataKeyNames="RecId" DataMember="Tasks"
DataSetCachingKey="e779ece0-43b7-4270-9dc9-33f4c61d42b7"
DataSourceID="AxDataSource1" EnableModelValidation="True"
HierarchyIdFieldName="TaskId" HierarchyParentIdFieldName="ParentTaskId">
<Columns>
<dynamics:AxBoundField DataField="Title" DataSet="Tasks"
DataSetView="Tasks" SortExpression="Title">
</dynamics:AxBoundField>
<dynamics:AxBoundField DataField="StartDate" DataSet="Tasks"
DataSetView="Tasks" SortExpression="StartDate">
</dynamics:AxBoundField>
<dynamics:AxBoundField DataField="EndDate" DataSet="Tasks"
DataSetView="Tasks" SortExpression="EndDate">
</dynamics:AxBoundField>
</Columns>
</dynamics:AxHierarchicalGridView>
AxContextMenu
Use the AxContextMenu control to create and display a context menu. This control provides methods to add and remove menu items and separators at run time. It also provides methods to resolve client or Enterprise Portal URLs, as shown in the following example:
AxUrlMenuItem myUrlMenuItem = new AxUrlMenuItem("MyUrlMenuItem");
AxContextMenu myContextMenu = new AxContextMenu();
myContextMenu.AddMenuItemAt(0, myUrlMenuItem);
AxGridView uses AxContextMenu when the ShowContextMenu property is set to true. You can access the AxContextMenu object by using the syntax AxGridview.ContextMenu.
AxFilter
Use the AxFilter control to filter the data that is retrieved from a data source. This control sets a filter on an instance of a DataSetView object by using an instance of an AxDataSourceView object. The AxDataSourceView object is responsible for keeping the data synchronized with the filter that is set by calling the SetAsChanged and ExecuteQuery methods when data has changed. AxDataSourceView and DataSetView expose the following properties that you can use to access the filter programmatically:
![]() SystemFilter Gets the complete list of ranges on the query, including open, hidden, and locked, into the conditionCollection property on the filter object
SystemFilter Gets the complete list of ranges on the query, including open, hidden, and locked, into the conditionCollection property on the filter object
![]() UserFilter Gets only the open ranges on the QueryRun property into the conditionCollection property on the filter object
UserFilter Gets only the open ranges on the QueryRun property into the conditionCollection property on the filter object
![]() ResetFilter Clears the filter set on the QueryRun property and thus resets the filter (ranges) set programmatically
ResetFilter Clears the filter set on the QueryRun property and thus resets the filter (ranges) set programmatically
You can set the range in the dataset in X++ as follows:
qbrBlocked = qbds.addRange(fieldnum(CustTable,Blocked));
qbrBlocked.value(queryValue(CustVendorBlocked::No));
qbrBlocked.status(RangeStatus::Hidden);
To read the filter that is set on the data source in a web user control, use one of the following lines of code:
this.AxDataSource1.GetDataSourceView(this.AxGridView1.DataMember).SystemFilter.ToXml();
or
this.AxDataSource1.GetDataSet().DataSetViews[this.AxGridView1.DataMember].SystemFilter.ToXml();
The return value will look something like the following:
<?xml version="1.0" encoding="utf-16"?><filter xmlns:xsi="http://www.w3.org/2001/XMLSchema-
instance" xmlns:xsd="http://www.w3.org/2001/XMLSchema" name="CustTable"><condition
attribute="Blocked" operator="eq" value="No" status="hidden" /></filter>
You can also set the filter programmatically:
string myFilterXml = @"<filter name='CustTable'><condition attribute='CustGroup' status='open'
value='10' operator='eq' /></filter>";
this.AxDataSource1.GetDataSourceView(this.AxGridView1.DataMember).SystemFilter.
AddXml(myFilterXml);
The AxGridView control also uses AxFilter when ShowFilter is set to true. You can access the AxFilter object by using AxGridview.FilterControl and the filter XML by using AxGridView.Filter. The filter reads the metadata from the AxDataSource component that is linked to the grid and displays filtering controls dynamically so that the user can filter the data source on any of the fields that are not hidden or locked. The filtering controls are rendered above the grid.
AxLookup
Use the AxLookup control on data entry pages to help the user pick a valid value for a field that references keys from other tables. In Enterprise Portal, lookups are metadata-driven by default and are automatically enabled for fields based on the relationship defined by metadata in the AOT.
The Customer Group lookup on the Customer details page is an example of a lookup that is automatically enabled. The extended data type (EDT) and table relationship metadata in the AOT define a relationship between the Customer table and the Customer group table. A lookup is automatically rendered so that the user can choose a customer group in the Customer group field when creating a customer record. You don’t need to write any code to enable this behavior—it happens automatically.
In some scenarios, the automatic behavior isn’t sufficient, and you might be required to customize the lookup. The lookup infrastructure of Enterprise Portal offers flexibility and customization options in both X++ and C# so that you can tailor the lookup user interface and the data retrieval logic to meet your needs.
To control the lookup behavior, in the Data Set node in the AOT, you can override the dataSetLookup method of a field in the data source. For example, if you want to filter the values that are displayed, you override dataSetLookup, as shown in the following X++ code:
void dataSetLookup(SysDataSetLookup sysDataSetLookup)
{
List list;
Query query = new Query();
QueryBuildDataSource queryBuildDataSource;
Args args;
args = new Args();
list = new List(Types::String);
list.addEnd(fieldstr(HcmGoalHeading, GoalHeadingId));
list.addEnd(fieldstr(HcmGoalHeading, Description));
queryBuildDataSource = query.addDataSource(tablenum(HcmGoalHeading));
queryBuildDataSource.addRange(fieldnum(HcmGoalHeading,Active)).value(
queryValue(NoYes::Yes));
sysDataSetLookup.parmLookupFields(list);
sysDataSetLookup.parmSelectField(fieldStr(HcmGoalHeading,GoalHeadingId));
// Pass the query to SysDataSetLookup so it result is rendered in the lookup page.
sysDataSetLookup.parmQuery(query);
}
In the preceding example, the entire list is built dynamically, and addRange is used to restrict the values. The SysDataSetLookup class in X++ provides many properties and methods to control the behavior of the lookup.
You can also customize the lookup in C# in the web user control by writing code in the Lookup event of bound fields or by using the AxLookup control for fields that don’t have data binding. To use AxLookup to provide lookup values for any ASP.NET control that isn’t data bound, set the TargetControlID property of AxLookup to the ASP.NET control to which the lookup value is to be returned. Alternatively, you can base AxLookup on the EDT, the dataset, the custom dataset, or the custom user control by specifying the LookupType property. You can also control which fields are displayed in the lookup and which ones are returned. You can do this either through the markup or through code. You can write code to override the Lookup event and control the lookup behavior, as shown in the following code:
protected void AxLookup1_Lookup(object sender, AxLookupEventArgs e)
{
AxLookup lookup = (AxLookup)sender;
// Specify the lookup fields
lookup.Fields.Add(AxBoundFieldFactory.Create(this.AxSession,
lookup.LookupDataSetViewMetadata.ViewFields["CustGroup"]));
lookup.Fields.Add(AxBoundFieldFactory.Create(this.AxSession,
lookup.LookupDataSetViewMetadata.ViewFields["Name"]));
}
AxActionPane
The AxActionPane control performs a function similar to the Action pane web part. You can use it to display the Action pane at the top of the page, similar to the SharePoint ribbon. Use the WebMenuName property of the AxActionPane control to reference the web menu that contains the menu items to display on the Action pane as buttons. To improve discoverability, the buttons are displayed in tabs and groups. You can use the DataSource and DataMember properties of the AxActionPane control to associate the Action pane buttons with data.
To use the AxActionPane control in a web user control, you need to add a reference to the Microsoft.Dynamics.Framework.Portal.SharePoint assembly. You can do this by adding the following lines in the markup for the web user control:
<%@ Register Assembly="Microsoft.Dynamics.Framework.Portal.SharePoint, Version=6.0.0.0,
Culture=neutral, PublicKeyToken=31bf3856ad364e35" Namespace="Microsoft.Dynamics.Framework.
Portal.SharePoint.UI.WebControls" TagPrefix="dynamics" %>
If you prefer, you can use the Action pane web part as an alternative to the AxActionPane control.
AxToolbar
The AxToolbar control performs a function similar to the Toolbar web part. You can use it to display a toolbar at a certain location on the page instead of using the Action pane at the top of the page. For example, you might choose to display a toolbar at the top of a grid control with New, Edit, and Delete actions.
Internally, AxToolbar uses the SharePoint toolbar controls. AxToolbarButton, which is used within AxToolbar, is derived from SPLinkButton. It is used to render top-level buttons. Similarly, AxToolBarMenu, which is used within AxToolbar, is derived from Microsoft.SharePoint.WebControls.Menu. This control renders a drop-down menu by means of a callback when a user clicks a button. Thus, the menu item properties can be modified before the menu items are rendered.
If you prefer, you can use the Toolbar web part as an alternative to AxToolbar. Generally, you use the Toolbar web part to control the display of toolbar menu items. But if you have a task page that contains both master and detail information, such as a purchase requisition header and line items, you should use place AxToolbar in your web user control above the AxGridview control containing the details to allow the user to add and manage the line items.
You can bind AxToolbar to an AxDataSource or use it as an unbound control. When the controls are bound, the menu item context is automatically based on the item that is currently selected. When the controls are unbound, you must write code to manage the toolbar context.
You can point the toolbar to a web menu in the AOT by using the WebMenuName property. With a web menu, you can define a multilevel menu structure with the SubMenu, MenuItem, and MenuItem reference nodes. Each top-level menu item is rendered by using the AxToolbarButton control as a link button. Each top-level submenu is rendered by using the AxToolbarMenu control as a drop-down menu. If you have submenus, additional levels are displayed as submenus.
SetMenuItemProperties, ActionMenuItemClicking, and ActionMenuItemClicked are events that are specific to AxToolbar. You use SetMenuItemProperties to change the behavior of drop-down menus; for example, to show or hide menu items based on the currently selected record, set or remove context, and so on. The following code shows an example of how to change the menu item context in the SetMenuItemProperties event:
void Webpart_SetMenuItemProperties(object sender, SetMenuItemPropertiesEventArgs e)
{
// Do not pass the currently selected customer record context,
// since this menu is for creating new (query string should be empty)
if (e.MenuItem.MenuItemAOTName == "EPCustTableCreate")
{
((AxUrlMenuItem)e.MenuItem).MenuItemContext = null;
}
}
If you have defined user interface logic in a web user control and want to call this function instead of the one defined in the AOT when a toolbar item is clicked, use ActionMenuItemClicking and ActionMenuItemClicked. For example, you can prevent a menu item from executing the action defined in the AOT by using the ActionMenuItemClicking event and defining your own action in C# by using the ActionMenuItemClicked event in the web user control, as shown here:
void webpart_ActionMenuItemClicking(object sender, ActionMenuItemClickingEventArgs e)
{
if (e.MenuItem.MenuItemAOTName.ToLower() == "EPCustTableDelete")
{
e.RunMenuItem = false;
}
}
void webpart_ActionMenuItemClicked(object sender, ActionMenuItemEventArgs e)
{
if (e.MenuItem.MenuItemAOTName.ToLower() == "EPCustTableDelete")
{
int selectedIndex = this.AxGridView1.SelectedIndex;
if (selectedIndex != -1)
{
this.AxGridView1.DeleteRow(selectedIndex);
}
}
}
AxPopup controls
Use an AxPopup control to open a page in a pop-up browser window, to close a pop-up page, or to pass data from the pop-up page to the parent page and trigger a PopupClosed server event on the parent. This functionality is encapsulated in two controls: AxPopupParentControl, which you use on the parent page, and AxPopupChildControl, which you use on the pop-up page itself. Both controls are derived from AxPopupBaseControl. These controls are AJAX-compatible, so you can create them conditionally as part of a partial update.
AxPopupParentControl allows a page, typically a web part page, to open in a pop-up window. You can open a pop-up window from a client-side script by using the GetOpenPopupEventReference method. The string that is returned is a JavaScript statement that can be assigned, for example, to a button’s OnClick attribute or to a toolbar menu item. The following code shows how to open a pop-up window with client-side scripting by modifying the OnClick event:
protected void SetPopupWindowToMenuItem(SetMenuItemPropertiesEventArgs e)
{
AxUrlMenuItem menuItem = new AxUrlMenuItem("EPCustTableCreate");
//Calling the JavaScript function to set the properties of opening web page
//on clicking the menuitems.
e.MenuItem.ClientOnClickScript =
this.AxPopupParentControl1.GetOpenPopupEventReference(menuItem);
}
You can also open a pop-up window from a server method by calling the OpenPopup method. Because pop-up blockers can block server-initiated pop-up windows, use OpenPopup only when necessary.
When placed on a pop-up page, AxPopupChildControl allows the page to close. You can close the pop-up page with a client-side script by using the GetClosePopupEventReference method, as shown in the following example:
this.BtnOk.Attributes.Add("onclick",
this.popupChild.GetClosePopupEventReference(true, true) + "; return false;");
You can close a pop-up window from the server event by using the ClosePopup method. Use the server method when additional processing is necessary upon closing, such as performing an action or calculating values to be passed to the parent page. The ClosePopup and OpenPopup methods have two parameters:
![]() setFieldValues When true, this indicates that data must be passed back to the parent page.
setFieldValues When true, this indicates that data must be passed back to the parent page.
![]() updateParent When true, this indicates that the parent page must post back after the pop-up page is closed. AxPopupChildControl makes a call (through a client-side script) to the parent page to post back, with the AxPopupParentControl as the target. AxPopupParentControl then triggers the PopupClosed server event. When the event is triggered, the application code of the parent page can receive the values that are passed from the pop-up page and perform an action or update its state.
updateParent When true, this indicates that the parent page must post back after the pop-up page is closed. AxPopupChildControl makes a call (through a client-side script) to the parent page to post back, with the AxPopupParentControl as the target. AxPopupParentControl then triggers the PopupClosed server event. When the event is triggered, the application code of the parent page can receive the values that are passed from the pop-up page and perform an action or update its state.
You can pass data from the pop-up page back to the parent page by using AxPopupField objects. You expose these objects through the Fields property of AxPopupBaseControl, from which both AxPopupParentControl and AxPopupChildControl are derived. AxPopupParentControl and AxPopupChildControl have fields with the same names. When the pop-up page closes, the value of each field of AxPopupChildControl is assigned (through a client-side script) to the corresponding field in AxPopupParentControl.
Optionally, you can associate AxPopupField with another control, such as TextBox (or any other control), by assigning the TargetId property of the AxPopupField control to the ID property of the target control. This is useful, for example, when the pop-up page has a TextBox control. To pass the user input to the parent page on closing the pop-up page—and to perform the action entirely on the client to avoid a round trip—you need to associate a field with the TextBox control. When AxPopupField isn’t explicitly associated with a target control, it is implicitly associated with a HiddenField control that is created automatically by AxPopupParentControl or AxPopupChildControl.
You can then set the value of the field on the server by using the SetFieldValue method. Typically, you call SetFieldValue on AxPopupChildControl, and you can call it at any point that the user interacts with the pop-up page, including the initial rendering or the closing of the page. You can retrieve the value of the field by using the GetFieldValue method. Typically, you call this method on AxPopupParentControl during the processing of the PopupClosed event. You can clear the values of nonassociated fields by calling the ClearFieldValues method.
You can also set or retrieve values of AxPopupFields on the client by manipulating the target control value. You can retrieve the target control, whether explicitly or implicitly associated, by using the TargetControl property.
BoundField controls
BoundField controls are used by data-bound controls (such as AxGridView, AxGroup, ASP.NET GridView, and ASP.NET DetailsView) to display the value of a field through data binding. The way in which a bound field control is displayed depends on the data-bound control in which it is used. For example, the AxGridView control displays a bound field control as a column, whereas the AxGroup control displays it as a row.
The Enterprise Portal framework provides a number of enhanced bound field controls that are derived from ASP.NET bound field controls but are integrated with the AX 2012 metadata. These controls are described in Table 7-2.
Depending on the field type, the Bound Field Designer in Visual Studio automatically groups fields under the correct bound field type.
AxContentPanel
The AxContentPanel control extends the ASP.NET UpdatePanel control. It acts as a container for other controls and allows for partial updates of the controls that are placed inside it, eliminating the need to refresh the entire page. It also provides a mechanism to provide and consume the record context for its child controls.
AxPartContentArea
Use AxPartContentArea to define the FactBox area in a control. This control acts as a container for AxInfoPart, AxFormPart, and CueGroupPartControl.
AxInfoPart
Use the AxInfoPart control to display an Info Part. This control must be placed inside an AxPartContentArea control.
AxFormPart
Use the AxFormPart control to display a Form Part. This control must be placed inside an AxPartContentArea control.
CueGroupPartControl
Use the CueGroupPartControl control to display a Cue Group. This control must be placed inside an AxPartContentArea control.
AxDatePicker
Use the AxDatePicker control to display a calendar control that allows a user to pick a date.
AxReportViewer
Use the AxReportViewer control to display an SSRS report.
Developing for Enterprise Portal
To develop Enterprise Portal applications, you use a combination of MorphX, Visual Studio, and SharePoint products and technologies:
![]() MorphX You use MorphX to develop the data and business-tier components in your application. You also use MorphX to define navigation elements; store unified metadata and files; import and deploy controls, pages, and list definitions; and generate proxies. For more information about MorphX, see Chapter 2, “The MorphX development environment and tools.”
MorphX You use MorphX to develop the data and business-tier components in your application. You also use MorphX to define navigation elements; store unified metadata and files; import and deploy controls, pages, and list definitions; and generate proxies. For more information about MorphX, see Chapter 2, “The MorphX development environment and tools.”
![]() Visual Studio You use Visual Studio for developing and debugging web user controls. The Visual Studio Add-in for Enterprise Portal provides project and control templates to speed the development process. Visual Studio provides an easy way to add new controls to the AOT; tools for importing controls and style sheets from the AOT; and the capability to work with proxies. The Enterprise Portal framework provides various APIs for accessing data and metadata.
Visual Studio You use Visual Studio for developing and debugging web user controls. The Visual Studio Add-in for Enterprise Portal provides project and control templates to speed the development process. Visual Studio provides an easy way to add new controls to the AOT; tools for importing controls and style sheets from the AOT; and the capability to work with proxies. The Enterprise Portal framework provides various APIs for accessing data and metadata.
![]() SharePoint products and technologies You use SharePoint to develop web part pages and lists. You also use it to edit master pages, which contain the common elements for all the pages in a site. With a browser, you can use the Create or Edit Page tool of SharePoint to design your web part page. You can also use SharePoint Designer to create or edit both web part pages and master pages.
SharePoint products and technologies You use SharePoint to develop web part pages and lists. You also use it to edit master pages, which contain the common elements for all the pages in a site. With a browser, you can use the Create or Edit Page tool of SharePoint to design your web part page. You can also use SharePoint Designer to create or edit both web part pages and master pages.
The AOT controls all metadata for Enterprise Portal and stores all of the controls and pages that you develop in Visual Studio and SharePoint. It also stores other supporting files, definitions, and features under the Web node.
This section walks you through the steps necessary to create an Enterprise Portal list page and details page, and explains how to improve performance by using AJAX. For information about the Enterprise Portal user interface, see Chapter 5.
Creating a model-driven list page
AX 2012 introduces a new model-driven way of creating list pages. With AX 2009, you had to create a form to be displayed in the client and a webpage to be displayed in Enterprise Portal. With model-driven list pages, you model the list page once and can have it appear in both the client and in Enterprise Portal. The form displayed in the client and the webpage displayed in Enterprise Portal share code and metadata. Any changes to the form are reflected automatically in both the client and in Enterprise Portal. This leads to a number of advantages, such as reduced development effort, a unified code base, and easier maintenance.
Figure 7-7 shows an example of the development environment for creating a model-driven list page.
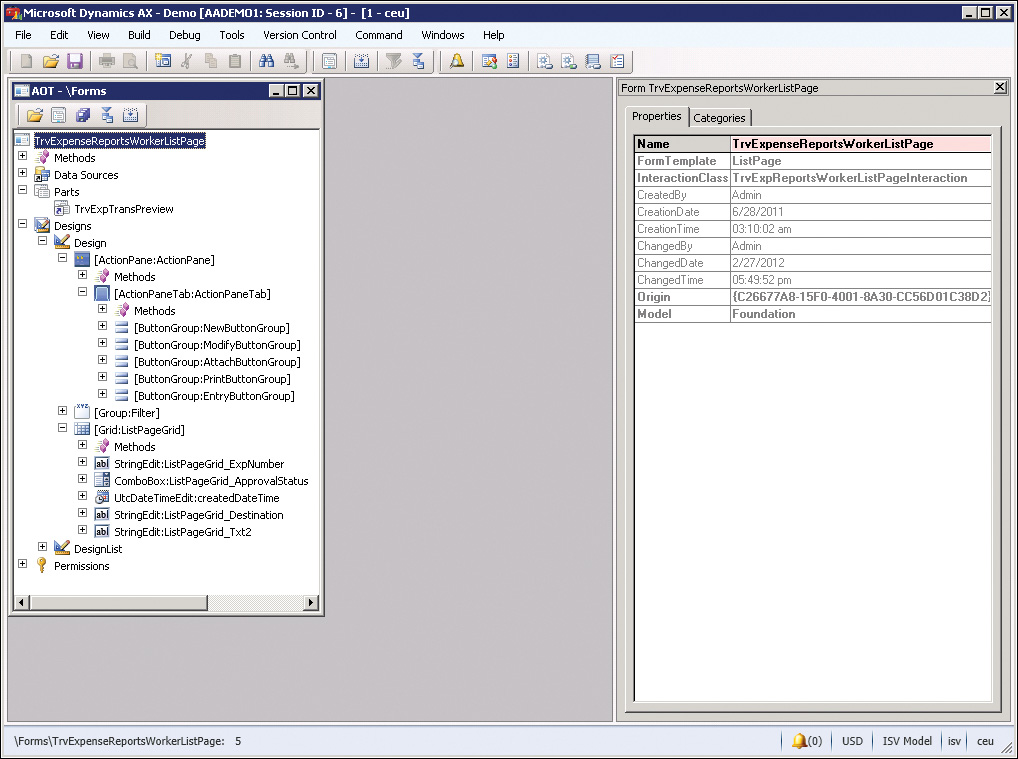
The following are high-level steps that you can use to create a model-driven list page.
1. Start the Development Workspace.
2. Create a new form in the AOT, and set the FormTemplate property to ListPage. This setting automatically adds design elements such as the filter, grid, and Action pane.
3. Set the query on the form to get the data that you want the form to display.
4. Set the DataSource property on the grid to the required data view.
5. Add the fields that you want to display in the grid.
6. Create and add an Action pane, and Info Parts if required. Ideally, you should create one Info Part to be displayed in the Preview Pane (below the grid) and one or more Info Parts, Form Parts, and Cue Groups to be displayed in the FactBox area (to the right of the grid). The Preview Pane should display extended information about the selected record, and the FactBoxes should display related information. To link these parts to the list page, you will need to create the corresponding display menu items.
7. Create a display menu item that points to the form. Right-click the menu item, and click Deploy To EP.
8. When prompted, select the module that you want to deploy the page to. This will automatically create a SharePoint web part page for the list page for Enterprise Portal. It will also create a URL web menu item and import the corresponding page definition in the AOT.
9. Set the HyperLinkMenuItem property on the first field in the grid to a display menu item that corresponds to a details page, and then refresh the AOT. This will render links in the first column that can be used to open the record by using a linked details page.
Defining a list page interaction class
To achieve more control over how your model-driven list page behaves, you can specify a custom interaction class by using the InteractionClass property of the form. The name of your class should end with ListPageInteraction and can inherit either the SysListPageInteractionBase class, which is easy to use, or the ListPageInteraction class, which is more flexible.
The SysListPageInteractionBase class provides methods that you can override and that serve as a place to put custom code. The following are some of these methods:
![]() initializing Called when the list page initializes.
initializing Called when the list page initializes.
![]() selectionChanged Called when the user selects a different record on the list page.
selectionChanged Called when the user selects a different record on the list page.
![]() setButtonEnabled Enables or disables buttons, called from the selectionChanged method.
setButtonEnabled Enables or disables buttons, called from the selectionChanged method.
![]() setButtonVisibility Displays or hides buttons. This method is called once when the form opens.
setButtonVisibility Displays or hides buttons. This method is called once when the form opens.
![]() setGridFieldVisibility Shows or hides grid fields. This method is called once when the form opens.
setGridFieldVisibility Shows or hides grid fields. This method is called once when the form opens.
For more information, see the topic, “SysListPageInteractionBase Class,” at http://msdn.microsoft.com/en-us/library/syslistpageinteractionbase.aspx.
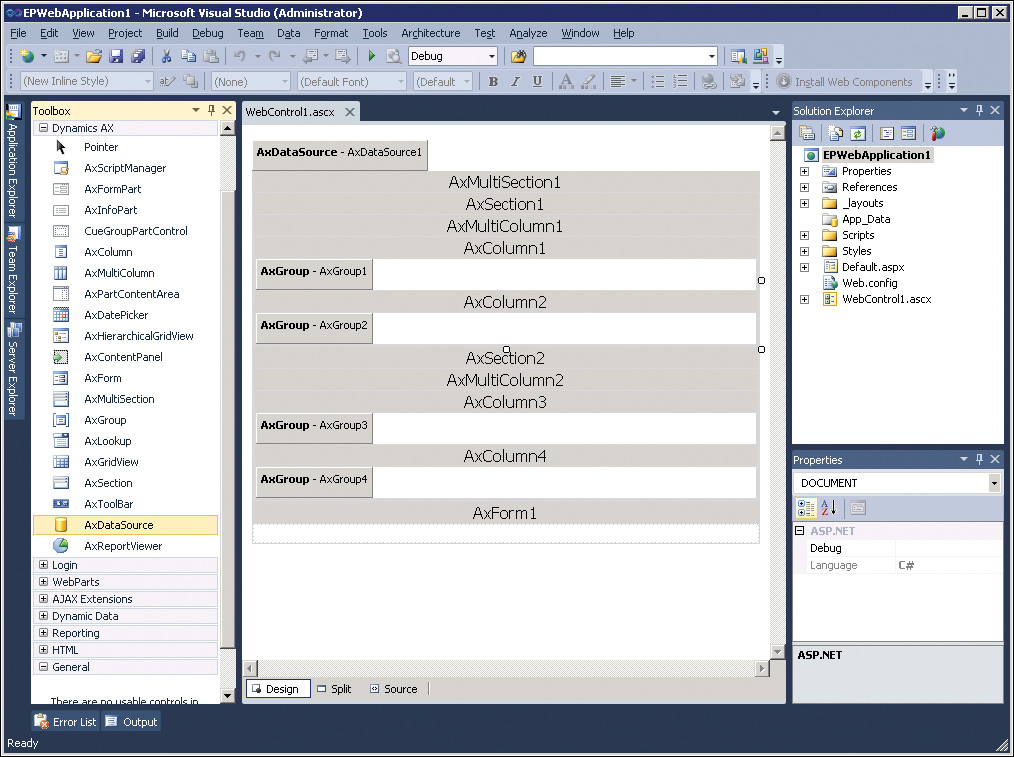
Creating a details page
A details page in Enterprise Portal displays detailed information about a specific record.
Use the following high-level steps to create a details page:
1. In Visual Studio, use the EP Web Application Project template (in the Microsoft Dynamics AX category) to create a new project.
2. Add a new item to the project by using the EP User Control with the Form template (found in the Microsoft Dynamics AX category). This automatically adds the control to the AOT.
3. Switch to design view, select the AxDataSource control (see Figure 7-8), and then set the DataSet name.
4. Select the AxForm control, and then ensure that DataSourceID is set to the AxDataSource.
5. Set the DataMember and DataKeyNames on the form as appropriate.
6. If required, change the default mode of the form to Edit or Insert (it is ReadOnly by default).
7. To autogenerate the Save and Close buttons, do the following:
• In ReadOnly mode, set AutoGenerateCancelButton to true.
• In Edit mode, set AutoGenerateEditButton to true.
• In Insert mode, set AutoGenerateInsertButton to true.
• Select an AxGroup control and ensure that the FormID property is set.
8. Click the Edit Fields link and add the required fields to the AxGroup control.
9. Compile the EP Web Application by using the Build menu. Ensure that there are no errors. Compiling the application automatically deploys the control to the SharePoint directory.
10. In AX 2012, start the Development Workspace, and then navigate to WebWeb ContentManaged.
11. Right-click the managed item that maps to the web user control that you created, and then click Deploy To EP.
12. When prompted, select the module you want to deploy the page to. This will automatically create a SharePoint web part page for Enterprise Portal and put your web user control on the page by using the User control web part. It will also create a URL web menu item and import the corresponding page definition in the AOT.
13. Select the web menu item created for the page, and then set WindowMode to Modal. This will cause the details page to open in a modal dialog box.
14. Create a new display menu item and set the WebMenuItemName property to the web menu item that is linked to the details page.
15. Use this display menu item to link to the details page from the list page grid, as described in the “Creating a model-driven list page” section earlier in this chapter.
Modal dialog box settings
Enterprise Portal uses modal dialog boxes to implement standard interaction patterns for pages. In AX 2012, Enterprise Portal includes two new metadata settings, WindowMode and WindowSize, on the web menu item, which you can use to implement these interaction patterns without writing any code.
WindowMode has the following four settings:
![]() Inline Causes the target URL to open in the same window. This setting replaces the current page with the target page that the menu item links to.
Inline Causes the target URL to open in the same window. This setting replaces the current page with the target page that the menu item links to.
![]() Modal Causes the target URL to open in a modal dialog box on top of the window. The current page is still available in the background. However, because the dialog box is modal, the user can interact only with the modal dialog box and not with the page that is in the background.
Modal Causes the target URL to open in a modal dialog box on top of the window. The current page is still available in the background. However, because the dialog box is modal, the user can interact only with the modal dialog box and not with the page that is in the background.
If a web menu item with WindowMode set to Modal is opened from within a modal dialog box, the modal dialog box is reused. The page currently open in the modal dialog box is replaced with the target page that the menu item links to.
![]() NewModal Functions in a similar way to the Modal setting but does not reuse an existing modal dialog box. Therefore, if a web menu item with WindowMode set to NewModal is opened from within a modal dialog box, a second-level modal dialog box opens on top of the old one (as shown in Figure 7-9).
NewModal Functions in a similar way to the Modal setting but does not reuse an existing modal dialog box. Therefore, if a web menu item with WindowMode set to NewModal is opened from within a modal dialog box, a second-level modal dialog box opens on top of the old one (as shown in Figure 7-9).
![]() NewWindow Causes the target URL to open in a new window.
NewWindow Causes the target URL to open in a new window.
WindowSize has five settings: Maximum, Large, Medium, Small, and Smallest. These settings correspond to five predefined sizes for the modal dialog boxes.
AJAX
You can use .NET AJAX to create ASP.NET webpages that can update data on the page without refreshing the entire page. AJAX provides client-side and server-side components that use the XMLHttpRequest object, along with JavaScript and DHTML, to enable portions of the page to update asynchronously, again without refreshing the entire page. With AJAX, you can develop Enterprise Portal webpages just as you would any regular ASP.NET page, and you can declaratively mark the components that should be rendered asynchronously.
By using the UpdatePanel server control, you can enable sections of a webpage to be partially rendered without an entire page postback. The User control web part contains the UpdatePanel server control internally. The script library is included in the master page, so that any control can use AJAX without the need to write any explicit markup or code.
For example, if you add a text box and button and write code for the button’s click event on the server without AJAX, when a user clicks the button, the entire page is refreshed. But when you load the same control through the User control web part, as in the following example, the button uses AJAX and updates the text box without refreshing the entire page:
<asp:TextBox ID="TextBox1" runat="server"></asp:TextBox>
<asp:Button ID="Button1" runat="server" onclick="Button1_Click" Text="Button" />
In the code-behind, update the text box with the current time after 5 seconds:
protected void Button1_Click(object sender, EventArgs e)
{
System.Threading.Thread.Sleep(5000);
TextBox1.Text = System.DateTime.Now.ToShortTimeString();
}
If you want to override the AJAX behavior and force a full postback, you can use the PostBackTrigger control in the User control web part, as shown here:
<%@ Register assembly="System.Web.Extensions, Version=3.5.0.0, Culture=neutral,
PublicKeyToken=31bf3856ad364e35" Namespace="System.Web.UI" TagPrefix="asp" %>
<asp:UpdatePanel ID="UpdatePanel1" runat="server">
<ContentTemplate>
<asp:TextBox ID="TextBox1" runat="server"></asp:TextBox>
<asp:Button ID="Button1" runat="server" onclick="Button1_Click" Text="Button" />
</ContentTemplate>
<Triggers>
<asp:PostBackTrigger ControlID="Button1" />
</Triggers>
</asp:UpdatePanel>
Session disposal and caching
All web parts on a webpage share the same session in AX 2012. After the page is served, the session is disposed of. To optimize performance, you can control the timeframe for the disposal of the session. Through settings in the Web.config file, you can specify the session timeout, in addition to the maximum number of cached concurrent sessions.
For example, to set the maximum number of cached concurrent sessions to 300 and the session timeout to 45 seconds, add the <Microsoft.Dynamics> section, as shown in the following example, after the </system.web> element. Remember that an increase in any of these values comes at the cost of additional memory consumption.
<Microsoft.Dynamics>
<Session MaxSessions="300" Timeout="45" />
</Microsoft.Dynamics>
Many of the methods that you use in the Enterprise Portal framework to add code to a User control require access to the Session object. You also need to pass the Session object when using proxy classes. You can access the Session object through the web part that hosts the User control, as shown here:
AxBaseWebPart webpart = AxBaseWebPart.GetWebpart(this);
return webpart == null ? null : webpart.Session;
By default, Enterprise Portal uses the ASP.NET session state. However, you can configure and use Windows Server AppFabric distributed caching with Enterprise Portal to further improve performance in server farm environments. After you install and configure Windows Server AppFabric, you can specify the name and region for Enterprise Portal to use in the Web.config file.
For example, to set the cache name as MyCache and the region as MyRegion, add the <Microsoft.Dynamics> section, as shown here, after the </system.web> element in the Web.config file for Enterprise Portal:
<Microsoft.Dynamics>
<AppFabricCaching CacheName="MyCache" Region="MyRegion" />
</Microsoft.Dynamics>
Context
Context is a data structure that is used to share data related to the current environment and user actions taking place with different parts of a web application. Context passes information to a web part about actions taking place in another control so that the web part can react. Context can also be used to pass information to a new page. Generally, information about the current record that the user is working on provides the information for the context. For example, when the user selects a row in a grid view, other controls might require information about the newly selected row so that they can react.
AxContext is an abstract class that encapsulates the concept of the context. The classes AxTableContext and AxViewContext derive from and implement AxContext. AxTableContext is for table-based context, and AxViewContext is for dataset view context. A view can contain more than one table, so it contains an AxTableContext object for each table in the view in the TableContextList collection. The RootTableContext property returns the TableContext of the root table in that dataset view. AxViewDataKey uniquely identifies the AxViewContext, and it contains the TableDataKeys collection. AxTableDataKey uniquely identifies AxTableContext. An event is raised whenever the context changes. If the context is changed within a User control, the CurrentContextChanged event is raised. If the context changes in other web parts that are connected to the User control, the ExternalContextChanged event is raised.
You can write code in these events on the AxBaseWebPart from your web user control and use the CurrentContextProviderView or ExternalContextProviderView and ExternalRecord properties to get the record associated with the context. You can trigger all of these events programmatically from your application logic by calling FireCurrentContextChanged or FireExternalContextChanged so that all other connected controls can react to the change that you made through your code. The following example triggers the CurrentContextChanged event:
void CurrentContextProviderView_ListChanged(object sender,
System.ComponentModel.ListChangedEventArgs e)
{
/* The current row (which is the current context) has changed update the consumer webparts.
Fire the current context change event to refresh (re-execute the query) the consumer web
parts
*/
AxBaseWebPart webpart = this.WebPart;
webpart.FireCurrentContextChanged();
}
The next code example gets the record from the connected web part.
First, subscribe to the ExternalContextChanged event in the consumer web user control, as shown here:
protected void Page_Load(object sender, EventArgs e)
{
//Add Event handler for the ExternalContextChange event.
//Whenever selecting the grid of the provider web part changes, this event gets fired.
(AxBaseWebPart.GetWebpart(this)).ExternalContextChanged +=
new
EventHandler<Microsoft.Dynamics.Framework.Portal.UI.AxExternalContextChangedEventArgs>
(AxContextConsumer_ExternalContextChanged);
}
Next, get the record passed through the external context, as shown in the following example:
void AxContextConsumer_ExternalContextChanged(object sender,
Microsoft.Dynamics.Framework.Portal.UI.AxExternalContextChangedEventArgs e)
{
//Get the AxTableContext from the ExternalContext passed through web part connection and
//construct the record object and get to the value of the fields
IAxaptaRecordAdapter currentRecord = (AxBaseWebPart.GetWebpart(this)).ExternalRecord;
if (currentRecord != null)
{
lblCustomer.Text = (string)currentRecord.GetField("Name");
}
}
Data
The ASP.NET controls access and manipulate data through data binding to AxDataSource. You can also access the data through the APIs directly. The Microsoft.Dynamics.AX.Framework.Portal.Data namespace contains several classes that work together to retrieve data.
For example, use the following code to get the current row from the DataSetView:
private DataSetViewRow CurrentRow
{
get
{
try
{
DataSetView dsv =
this.ContactInfoDS.GetDataSet().DataSetViews[this.ContactInfoGrid.DataMember];
return (dsv == null) ? null : dsv.GetCurrent();
}
// CurrentRow on the dataset throws exception in empty data scenarios
catch (System.Exception)
{
return null;
}
}
}
To set the menu item with context for the current record, use the following code:
DataSetViewRow currentContact =
this.dsEPVendTableInfo.GetDataSourceView(gridContacts.DataMember).DataSetView.GetCurrent();
using (IAxaptaRecordAdapter contactPersonRecord = currentContact.GetRecord())
{
((AxUrlMenuItem)e.MenuItem).MenuItemContext =
AxTableContext.Create(AxTableDataKey.Create(
this.BaseWebpart.Session, contactPersonRecord, null));
}
Metadata
The Enterprise Portal framework provides a rich set of APIs for accessing the metadata in the AOT through managed code. The Microsoft.Dynamics.AX.Framework.Services.Client namespace contains several classes that work together to retrieve metadata from the AOT. Enterprise Portal controls use the metadata to retrieve information about formatting, validation, and security, among other things, and apply it in the user interface automatically. You can also use these APIs to retrieve the metadata and use it in your user interface logic.
The MetadataCache class is the main entry point for accessing metadata and provides static methods for this purpose. For example, to get the metadata for an enum, you use the EnumMetadata class and the MetadataCache.GetEnumMetadata method, as shown here:
/// <summary>
/// Loads the drop-down list with the enum values.
/// </summary>
private void LoadDropdownList()
{
EnumMetadata salesUpdateEnum = MetadataCache.GetEnumMetadata(
this.AxSession, EnumMetadata.EnumNum(this.AxSession, "SalesUpdate"));
foreach (EnumEntryMetadata entry in salesUpdateEnum.EnumEntries)
{
ddlSelectionUpdate.Items.Add(new ListItem(
entry.GetLabel(this.AxSession), entry.Value.ToString()));
}
}
To get the label value for a table field, use the following code:
TableMetadata tableSalesQuotationBasketLine =
MetadataCache.GetTableMetadata(this.AxSession, "CustTable");
TableFieldMetadata fieldItemMetadata = tableSalesQuotationBasketLine.FindDataField("AccountNum");
String s = fieldItemMetadata.GetLabel(this.AxSession);
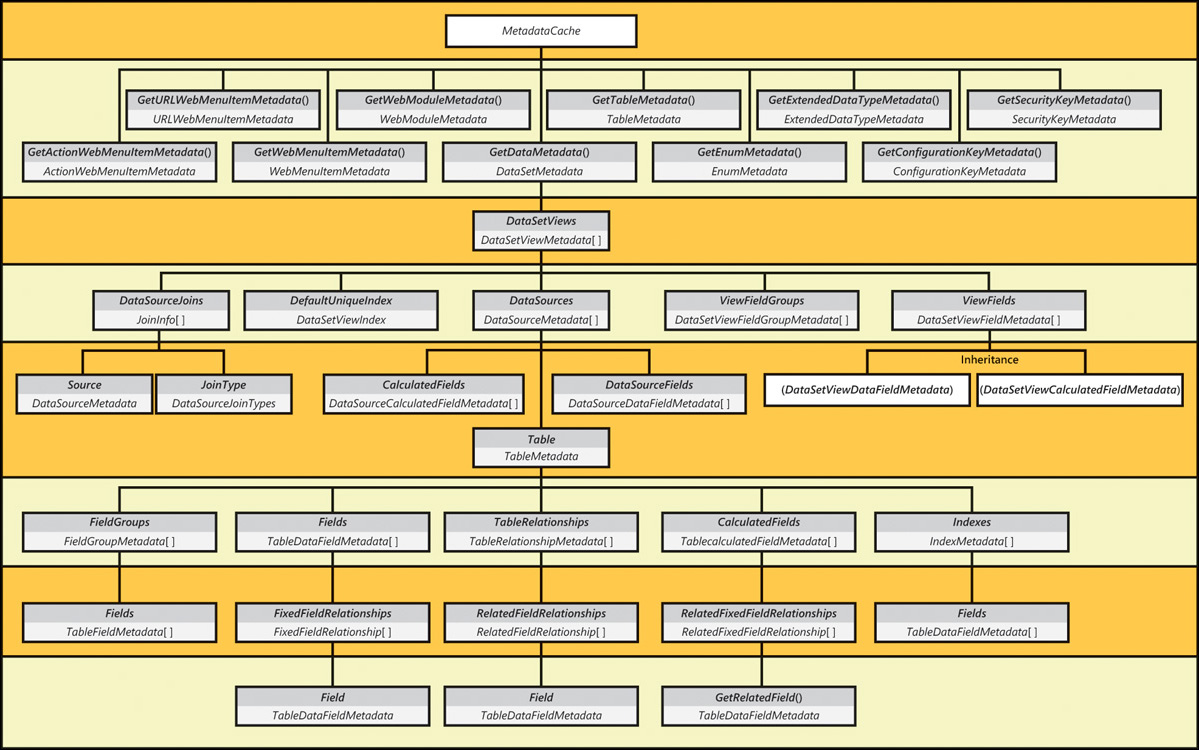
Figure 7-10 shows a portion of the object access hierarchy for metadata. For simplicity, not all APIs are included in the figure.
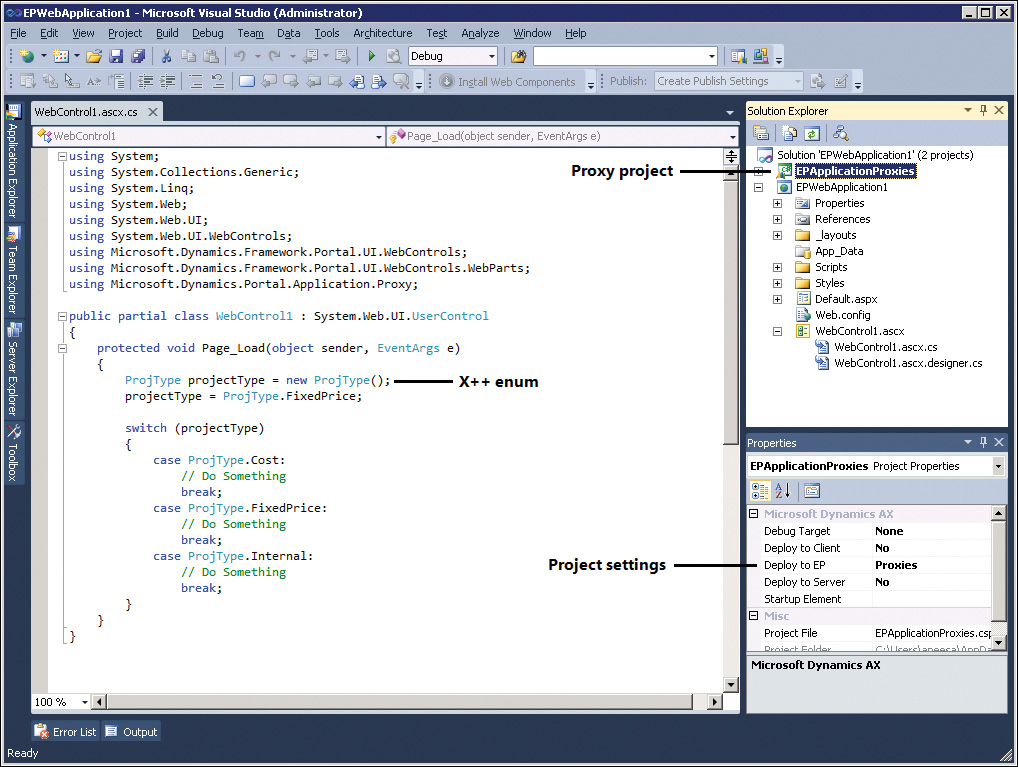
Proxy classes
If you need to access X++ classes, call table methods, or use enums in your user control, the Enterprise Portal framework provides an easy way of creating managed wrappers for these X++ objects. A proxy file internally wraps the BC.NET calls and provides a simple, typed interface for C# applications.
Several predefined proxies are available for use in Enterprise Portal. They are defined in the EPApplicationProxies and the EPApplicationProxies1 projects in the AOT, which are located under Visual Studio ProjectsC Sharp Projects. To use these proxy projects, open your web application project in Visual Studio, and then add a reference to these projects by clicking Project > Add EP Proxy Project. Then, in the web control, add a using statement to provide access to the proxy namespace, as shown here:
using Microsoft.Dynamics.Portal.Application.Proxy;
If you need to create a new proxy, you can create your own Visual C# class library project in Visual Studio by doing the following:
1. Set the default namespace of the project to Microsoft.Dynamics.Portal.Application.Proxy.
2. On the File menu, select the option to add the project to the AOT.
3. In Project Properties, set the Deploy to EP property to Proxies.
You can then add the objects from Application Explorer to the project, and the Enterprise Portal framework will automatically generate and deploy proxies for these to the App_Code folder of the IIS website. After you add a reference to a proxy project, you can access the X++ methods as though they are written in C#, as shown in Figure 7-11.
ViewState
The web is stateless, which means that each request for a page is treated as a new request, and no information is shared. When loaded, each ASP.NET page goes through a regular page life cycle, from initialization and page load onward. When a user interacts with the page, requiring the server to process control events, ASP.NET posts the values in the form to the same page to process the event on the server. A new instance of the webpage class is created each time the page is requested from the server. When postback happens, ASP.NET uses the ViewState feature to preserve the state of the page and controls so that changes made to the page during the round trip are not lost. The Enterprise Portal framework uses this feature, and Enterprise Portal ASP.NET controls automatically save their state to ViewState. The ASP.NET page reads the ViewState and reinstates the page and control state during the regular page life cycle. Therefore, you don’t need to write any code to manage state if you’re using Enterprise Portal controls. However, if you want to persist in-memory variables, you can write code to add or remove items from the StateBag class in ASP.NET, as shown here:
public int Counter
{
get
{
Object counterObject = ViewState["Counter"];
if (counterObject == null)
{
return 0;
}
return (int)counterObject;
}
set
{
ViewState["Counter"] = value;
}
}
If you need to save the state of an X++ dataset, you can use the pack-unpack design pattern to store the state. For more information, see the topic, “Pack-Unpack Design Pattern,” at http://msdn.microsoft.com/en-us/library/aa879675.aspx.
The Enterprise Portal framework uses the ASP.NET ViewState property to store the state of most controls.
Labels
AX 2012 uses a localizable text resource file, the label file, to store messages that are displayed to the user. The label file is also used for user interface text, Help text in the status bar, and captions. You can use labels to specify the user interface text in web controls and for element properties in the AOT Web node. You can add labels by setting the Label property in the AOT or by using X++ code.
When you use data-bound controls such as AxGridView or AxForm for the user interface, the bound fields automatically use the label associated with the field in the AOT and render it in the user’s language at run time.
If you want to show a label in your web control for non–data-bound scenarios, use the AxLabel expression. AxLabel is a standard ASP.NET expression that looks up the labels defined in the AOT and renders them in the user’s language when the page is rendered. To add the AxLabel expression, you can use the expression editor available in the design view of the web control by clicking the button that appears on the (Expressions) property. Alternatively, you can type the expression directly in the markup:
<asp:Button runat="server" ID="ButtonChange" Text="<%$ AxLabel:@SYS70959 %>" OnClick="ButtonChange_Click" />
You can also add labels through code by using the Labels class, as shown here:
string s = Microsoft.Dynamics.Framework.Portal.UI.Labels.GetLabel("@SYS111587");
For better performance, Enterprise Portal caches the labels for all supported languages. If you add or change a label in the AOT, you need to clear the cache on the Enterprise Portal site by using the Refresh AOD command under Administration on the Enterprise Portal Home page.
Formatting
AX 2012 is a global product that supports multiple languages and is used in many countries/regions. Displaying data in the correct format for each localized version is a critical requirement for any global product. Through metadata, the Enterprise Portal framework recognizes the user’s current locale and system settings to display data automatically in the correct format in data-bound controls.
If you’re not using data-bound controls and want your unbound ASP.NET controls to be formatted like Enterprise Portal controls, you can use the AxValueFormatter class in the Enterprise Portal framework. This class implements the ICustomFormatter and IFormatProvider interfaces and defines a method that supports custom, user-defined formatting of an object’s value. This method also provides a mechanism for retrieving an object to control formatting. For the various data types, specific ValueFormatter classes that are derived from AxValueFormatter are implemented: AxStringValueFormatter, AxDateValueFormatter, AxDateTimeValueFormatter, AxTimeValueFormatter, AxRealValueFormatter, AxNumberValueFormatter, AxGuidValueFormatter, and AxEnumValueFormatter.
You use AxValueFormatterFactory to create AxValueFormatter objects. You can create any of the preceding formatters, or you can create a formatter based on an EDT in AX 2012. The data type for the extended data is retrieved from the metadata object for the EDT, and the culture information comes from the context. The various rules for languages and countries, such as number formats, currency symbols, and sort orders, are aggregated into a number of standard cultures. The Enterprise Portal framework identifies the culture based on the user’s language setting in AX 2012 and makes this information available in the context. Formatter objects have a Parse method that you can use to convert a string value back into the underlying data type. For example, the following code formats the data based on a given EDT:
private string ToEDTFormattedString(object data, string edtDataType)
{
ExtendedDataTypeMetadata edtType = MetadataCache.GetExtendedDataTypeMetadata(
this.AxSession, ExtendedDataTypeMetadata.TypeNum(this.AxSession, edtDataType));
IAxContext context = AxContextHelper.FindIAxContext(this);
AxValueFormatter valueFormatter = AxValueFormatterFactory.CreateFormatter(
this.AxSession, edtType, context.CultureInfo);
return valueFormatter.FormatValue(data);
}
Validation
You use ASP.NET validator controls to validate user input on the server and, optionally, on the client (the browser). The Enterprise Portal framework includes ASP.NET validators that are specific to Microsoft Dynamics AX. AxBaseValidator derives from System.Web.UI.WebControls.BaseValidator, and AxValueFormatValidator derives from AxBaseValidator. Both are metadata-driven and are used intrinsically by bound fields. You can also use them in unbound scenarios.
ASP.NET validators are triggered automatically when a postback occurs that causes validation. For example, an ASP.NET button control causes validation on the client and the server when clicked. All validators that are registered on the page are validated. If a validator is found to be invalid, the page becomes invalid, and the Page.IsValid property returns a value of false.
The importance of Page.IsValid is best highlighted with an example. Suppose you add an ASP.NET button that executes some business logic in the OnClick event before redirecting the user to a different page. As mentioned earlier, the button causes validation by default, so validators are executed before the OnClick event is triggered. If you don’t check to determine whether the page is valid in the OnClick event handler, the user is redirected even if a validation error occurs that requires the user’s attention.
Enterprise Portal controls such as AxForm and AxGridView automatically check validation and won’t perform the requested action if validation fails. The validator controls automatically write any validation errors to the Infolog.
When you’re using ASP.NET controls directly instead of Enterprise Portal controls, as a best practice, make sure that your code examines the Page.IsValid property before any actions, such as navigating away from the current page, are completed. If errors occur, you’ll want to keep the current page with Infolog displaying the errors so that the user will notice the errors and take corrective action.
Error handling
In Enterprise Portal, BC.NET (including proxies), the metadata, and the data layer all throw exceptions when error conditions occur. The Enterprise Portal ASP.NET controls automatically handle these exceptions, taking appropriate actions and displaying the errors in an Infolog.
Exceptions in Enterprise Portal are divided into three categories. These exception categories are defined in the AxExceptionCategory enumeration:
![]() NonFatal Indicates that the exception handling code should respond appropriately and allow the request to continue normally.
NonFatal Indicates that the exception handling code should respond appropriately and allow the request to continue normally.
![]() AxFatal Indicates that an unrecoverable error has occurred in Enterprise Portal, and Enterprise Portal content will not be displayed. Content not related to Enterprise Portal should be displayed as expected.
AxFatal Indicates that an unrecoverable error has occurred in Enterprise Portal, and Enterprise Portal content will not be displayed. Content not related to Enterprise Portal should be displayed as expected.
![]() SystemFatal Indicates that a serious error, such as out of memory, has occurred, and the request must be canceled. Errors of this kind often cause an HTTP error code of 500.
SystemFatal Indicates that a serious error, such as out of memory, has occurred, and the request must be canceled. Errors of this kind often cause an HTTP error code of 500.
Your code must handle any exceptions that might occur, if your code does any of the following:
![]() Directly calls methods in data layers from Enterprise Portal
Directly calls methods in data layers from Enterprise Portal
![]() Directly calls metadata methods
Directly calls metadata methods
![]() Uses proxy classes to call X++ methods
Uses proxy classes to call X++ methods
The following code shows how to use AxControlExceptionHandler in the try-catch statement to handle exceptions:
try
{
// Code that may encounter exceptions goes here.
}
catch (System.Exception ex)
{
AxExceptionCategory exceptionCategory;
// Determine whether the exception can be handled.
if (AxControlExceptionHandler.TryHandleException(this, ex, out exceptionCategory) == false)
{
// The exception was fatal and cannot be handled. Rethrow it.
throw;
}
if (exceptionCategory == AxExceptionCategory.NonFatal)
{
// Application code to properly respond to the exception goes here.
}
}
AxControlExceptionHandler tries to handle AX 2012 exceptions based on the three exception categories described earlier in this section. It returns a value of true if the type of exception is NonFatal.
Security
In Enterprise Portal, AX 2012 security is layered on top of, and depends on, the security of the underlying products and technologies, such as SharePoint and IIS. For external-facing sites, communication security and firewall configurations are also important to help secure Enterprise Portal.
Enterprise Portal has two configurations in its site definition. The first, referred to as Microsoft Dynamics Public, allows Internet customers or prospective customers to view product catalogs, request customer accounts, and so on. The second, referred to as Microsoft Dynamics Enterprise Portal, is a complete portal for self-service scenarios involving intranet or extranet users who are authenticated employees, vendors, and customers.
The Microsoft Dynamics Public configuration has anonymous authentication enabled in both IIS and SharePoint so that anyone on the web can access it. To connect to AX 2012, this configuration uses a built-in Microsoft Dynamics AX user account named Guest. The Guest account is part of the Enterprise Portal Guest user group, which has limited access to the AX 2012 components that are necessary for the public site to function.
The Microsoft Dynamics Enterprise Portal configuration uses either Integrated Windows authentication or Basic authentication over Secure Sockets Layer (SSL) that is enabled in IIS and SharePoint. This secured site restricts access to users with Active Directory accounts who are also configured as Microsoft Dynamics AX users and have access that has been enabled for the site by the Microsoft Dynamics AX system administrator. You use the System Administration > Setup > Users > User Relations dialog box in the client to set up users as an employee, vendor, business relation, or customer contact. Then you can grant them access to Enterprise Portal sites through Site groups for each Enterprise Portal site.
Both types of Enterprise Portal sites use the .NET Business Connector proxy account to establish connections to the AOS. The SharePoint application pool must be configured with a Windows domain user account, and this account must be specified as the Microsoft Dynamics AX .NET Business Connector proxy account for both sites to function. After the connection is established, Enterprise Portal uses either LogonAsGuest or LogonAs—depending on the type of Enterprise Portal site the current user has access to—to activate the Microsoft Dynamics AX security mechanism. AX 2012 provides various means and methods of limiting user access, such as placing restrictions on individual tables and fields and limiting the availability of application features through configuration keys and web configuration keys, as shown in Figure 7-12. User-level security can also be applied by using roles, duties, and privileges.
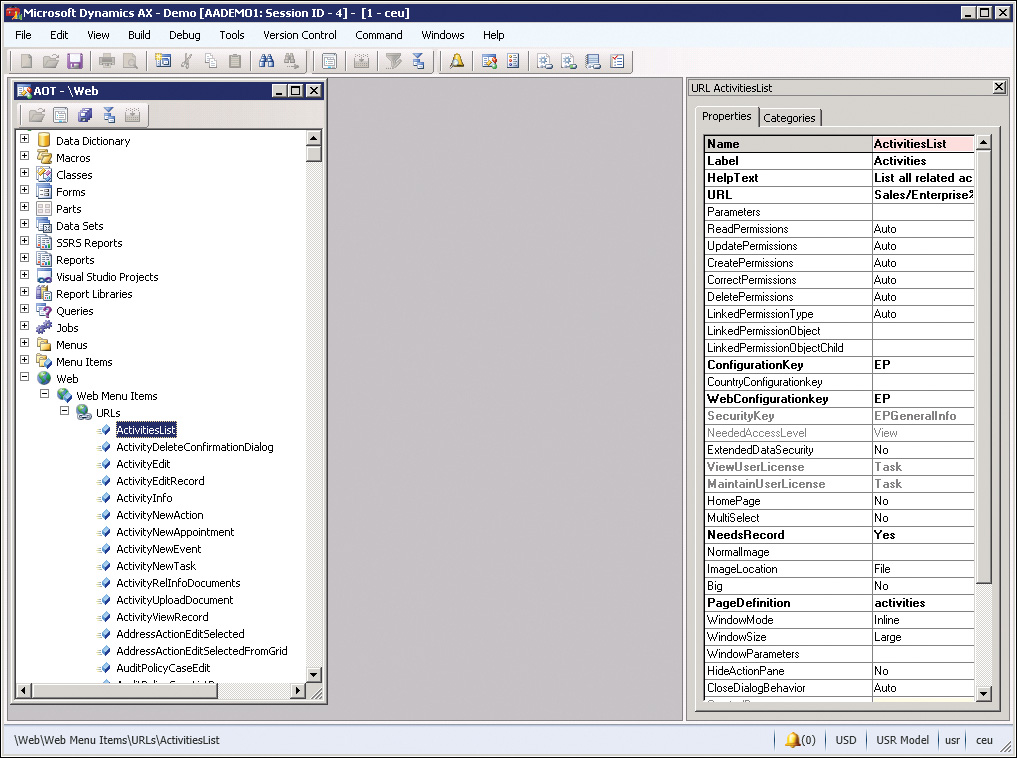
Enterprise Portal security is role-based. This means that you can easily group tasks associated with a business function into a role, such as Sales or Consultant, and assign users to this role to give them the necessary permissions on the AX 2012 objects to perform those tasks in Enterprise Portal. To allow users access to more functionality, you can assign them to more than one role. For more information about roles, see Chapter 11, “Security, licensing, and configuration.”
Secure web elements
To securely expose web controls through web parts in SharePoint, you can use privileges. You can either create a new privilege or use an existing one. You can add managed web content (WebWeb ContentManaged) or web menu items that reference URLs (WebWeb Menu ItemsURLs) or actions (WebWeb Menu ItemsActions) as entry points for privileges to control which users can access them.
Remember to secure both the web menu item and the managed web content. If you secure only the web menu item (see Figure 7-13), the user can still access the managed web content (for example, a web control) and can add it to a page that he or she has access to.
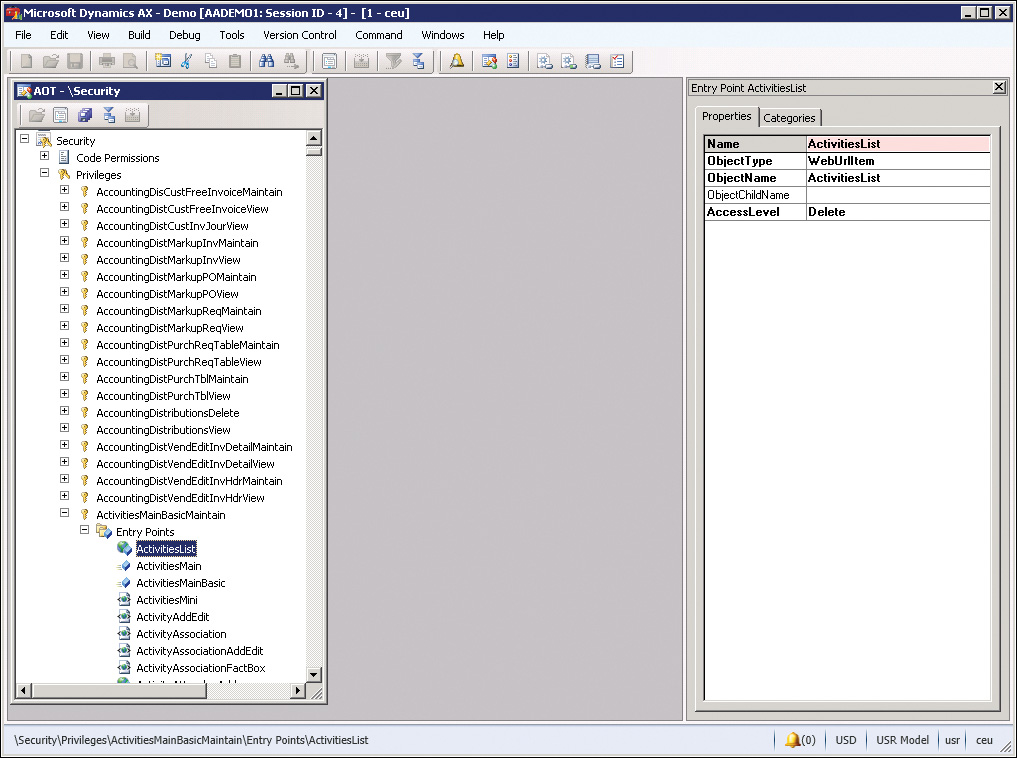
At logon, the user’s role determines the access. If a user doesn’t have access to a web menu item, that item doesn’t appear on the user’s web menu. If a link in the web menu item appears in other web user controls that the user has access to, the item linked with the web menu item appears as text rather than as a link.
If the user doesn’t have access to web content on a webpage, the content isn’t rendered on the page. Web part properties also limit the items that are displayed in the drop-down list based on the user permissions for the underlying objects. Moreover, the types of operations that are allowed on these objects depend on the access level set for the objects in the roles that the user belongs to.
Record context and encryption
Record context is the interface for passing information through the query string to a web part page to retrieve a record from AX 2012. Enterprise Portal uses record context to locate a record in the AX 2012 database and display it in a web form for viewing and editing.
The following are some of the query string parameters that are used to pass the record context to an Enterprise Portal web part page:
![]() WTID Equals the Table ID
WTID Equals the Table ID
![]() WREC Equals the Rec ID
WREC Equals the Rec ID
![]() WKEY Equals the Unique Record Key (the field identifier and the value of the field for the record to be retrieved)
WKEY Equals the Unique Record Key (the field identifier and the value of the field for the record to be retrieved)
These parameters are passed either in a query string or in post data on webpages. To help secure Enterprise Portal, AX 2012 uses a hash parameter. This ensures that a URL that is generated for one user cannot be used by any other user. For debugging and web development, the system administrator can turn off the encryption (by using the hash parameter) on the Enterprise Portal General tab of the Web Sites form, which is located in System Administration > Setup > Enterprise Portal > Web Sites. If record-level security and other data-level security are already active and no security threats exist, turning off the encryption could result in better performance. However, it is strongly recommended that you keep the encryption turned on.
SharePoint integration
Enterprise Portal is built on the SharePoint platform, and to enable collaboration and content management, it takes advantage of some of the useful features and functionality offered by SharePoint.
Site navigation
The Enterprise Portal site uses the SharePoint navigation elements and object model for showing AX 2012 navigation items from the AOT. To display web menus from the AOT as the top and left navigation elements on the SharePoint site, Enterprise Portal setup adds the navigation providers DynamicsLeftNavProvider and DynamicsTopNavProvider. For SharePoint Standard and Enterprise editions, DynamicsMOSSTopNavProvider is added instead of DynamicsTopNavProvider. The navigation providers override the default TopNavigationDataSource and QuickLaunchDataSource.
Web modules define the SharePoint sites and subsites in Enterprise Portal (for example, Sales and Employee Services). These sites and subsites are also used to build the top navigation bar. If you want to hide a link to a module from the top navigation bar, you can set the ShowLink property to No on the web module.
Web menus represent a collection of URL and action web menu items. You can use these elements to define the Quick Launch structure for a web module by setting the QuickLaunch property of a web module (see Figure 7-14) to the corresponding web menu. Alternatively, you can use the Quick launch web part for this purpose. The links are automatically hidden or displayed based on the user’s permissions. Web menu items help you create sites that are dynamic and versatile.
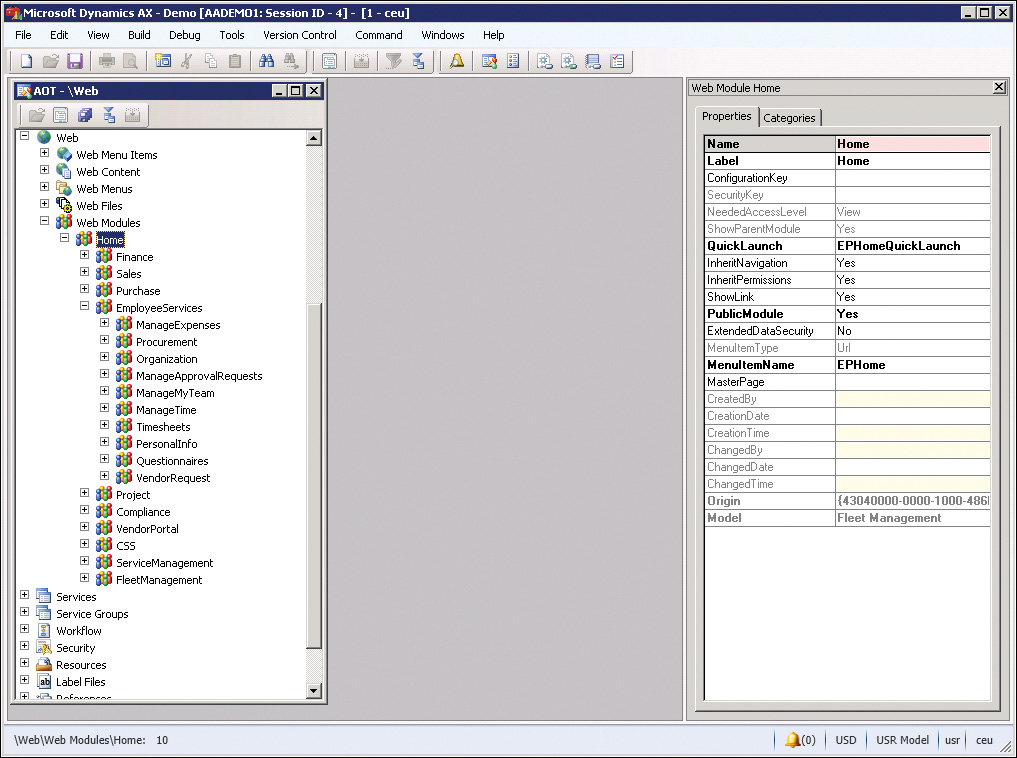
FIGURE 7-14 Web modules determine the sites, subsites, and Quick Launch links that are displayed on a page.
You can also use web menus with the Left navigation web part to provide navigation links on a page or web user control.
Internally, the framework uses the WebLink class to generate hyperlinks. This class has all the properties and methods that the framework needs to pass information back and forth between the browser and the server. More importantly, it has a method that returns the URL for the link. WebLink also has several methods for passing record information.
Site definitions, page templates, and web parts
You can customize SharePoint sites by using site definitions or custom templates that are built on existing site definitions. Site definitions encompass multiple files that are located in the file system on each web server. These files define the structure and schema for the site. You can create new site definitions by copying the existing site definition files and modifying them to meet the needs of the new sites. You create custom templates by using the user interface to customize existing sites and storing them as templates.
The Enterprise Portal site definition files and custom templates are stored in the AOT under WebWeb FilesStatic Files. Enterprise Portal setup deploys these files from the AOT to the web server file system and SharePoint.
Enterprise Portal includes one default site definition, which has two configurations: one for authenticated users and another for public Internet users. The site definition is deployed to the <drive>:\Program FilesCommon FilesMicrosoft SharedWeb Server Extensions14TEMPLATESiteTemplatesAXSITEDEF folder. The web part page templates are deployed to the language-specific site definition folder: <drive>:Program FilesCommon FilesMicrosoft SharedWeb Server Extensions14TEMPLATE<lcid>AXSITEDEF.
Enterprise Portal deployment is deployed as a set of four SharePoint features. A SharePoint site represents a modular, server-side, file system–level customization that contains items that can be installed and activated in a SharePoint environment. The feature definitions are deployed to <drive>:Program FilesCommon FilesMicrosoft SharedWeb Server Extensions14TEMPLATEFEATURES. These Enterprise Portal feature definitions are as follows:
![]() DynamicsAxEnterprisePortal Enables basic Enterprise Portal deployment steps, such as deploying the master page and other files and components, setting navigation providers, and registering AX 2012. This feature is for the SharePoint Foundation environment.
DynamicsAxEnterprisePortal Enables basic Enterprise Portal deployment steps, such as deploying the master page and other files and components, setting navigation providers, and registering AX 2012. This feature is for the SharePoint Foundation environment.
![]() DynamicsAxEnterprisePortalMOSS Includes environment-specific steps for deploying to SharePoint Standard and Enterprise edition environments.
DynamicsAxEnterprisePortalMOSS Includes environment-specific steps for deploying to SharePoint Standard and Enterprise edition environments.
![]() DynamicsSearch Enables the Enterprise Portal search control on Enterprise Portal sites that enable searching across AX 2012 and SharePoint data.
DynamicsSearch Enables the Enterprise Portal search control on Enterprise Portal sites that enable searching across AX 2012 and SharePoint data.
![]() DynamicsAxWebParts Enables deployment of the various AX 2012 web parts.
DynamicsAxWebParts Enables deployment of the various AX 2012 web parts.
Enterprise Portal feature-related files are stored in the AOT under WebWeb FilesStatic Files. The Static Files node also has other infrastructure-related files, such as the .aspx file that is used for importing and exporting page and list definitions, document-handling infrastructure files, the master page, common ASP.NET pages, images, style sheets, and configuration files.
EPSetupParams is an XML file used to define the default Enterprise Portal site attributes, such as the title, description, and URL, when the site is automatically created through Enterprise Portal setup.
The Enterprise Portal master page automatically adds the Page title, Quick launch, and Infolog web parts. When a page is created in Enterprise Portal, these web parts are already available on the webpage, creating consistency across all web part pages in Enterprise Portal and supporting rapid application development. Figure 7-15 shows some of the key files that constitute the site definition and their locations on the web server.
Enterprise Portal web parts are kept in the AOT under WebWeb FilesStatic Files. If necessary, partners and customers can add their own web parts under this node, and Enterprise Portal will deploy these files to the global assembly cache on the web server and add a safe control entry in the Web.config file.
Web part pages display one or more web parts. Web parts provide an easy way to build powerful webpages that display a variety of information, ranging from an AX 2012 data view of a list in the current site to external data presented in custom-built web parts. You can create web part pages in SharePoint by using Internet Explorer. You simply drag web parts onto web part pages and set their properties with prepopulated lists. You can edit web part pages in either SharePoint Designer or Internet Explorer. You can use Internet Explorer to edit a page and change its web parts, arrange the order of the web parts, and set the web part properties. You can use SharePoint Designer to insert logos or other graphics, to customize document libraries or lists, to apply themes and styles, to customize the master page, and so on. Keep in mind, however, that you can’t import pages edited with SharePoint Designer into the AOT.
You can import web part pages created in the Enterprise Portal site in SharePoint into the AOT as page definitions by using the Import Page tool from web menu items of type URL. The page definitions are stored in the AOT under WebWeb FilesPage Definitions.
The page definitions imported into the AOT automatically create pages when a site is created with the Enterprise Portal site definition. The PublicPage property of the page definition node determines whether the page should be created on the public site. All the pages are created for the authenticated site. The page definition Title property, if used, must be set to a label so that the page displays the localized title when used with different language settings.
Importing and deploying a web part page
When you create a new web part page in Enterprise Portal, you should import the page into the AOT. You can then deploy the page to a different Enterprise Portal site or have the system automatically deploy it when creating a new Enterprise Portal site. To import the page to the AOT, create a web menu item that points to the page, right-click the item, and then click Import Page. The imported page definition is stored under WebWeb FilesPage Definitions. After the page is imported, it can use AX 2012 labels for the page title so that the same page definition can be used for sites in different languages.
To create or deploy an Enterprise Portal site or individual elements such as web modules, pages, web controls, images, and so on, you can use the AxUpdatePortal command-line utility. AxUpdatePortal also supports remote deployment, so you don’t have to log on physically to an Enterprise Portal server to deploy to it.
The AxUpdatePortal utility is located either in the C:Program FilesMicrosoft Dynamics AX60Setup folder where Enterprise Portal is installed, or in the C:Program FilesMicrosoft Dynamics AX60EnterprisePortalTools where the AX 2012 client is installed.
Table 7-3 lists the parameters that AxUpdatePortal supports.
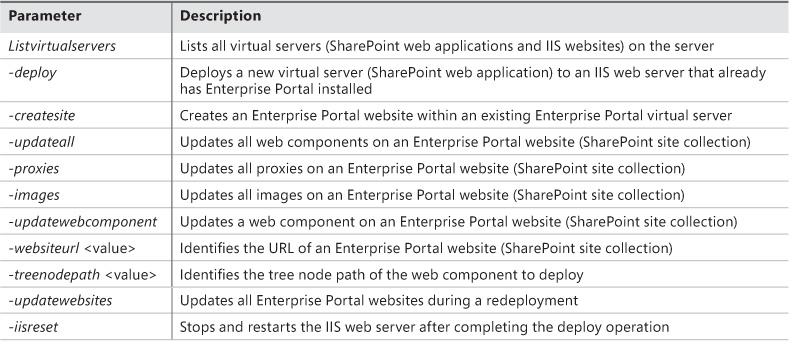
For more details about these parameters, use AxUpdatePortal /?.
Here are some examples of how to use the AxUpdatePortal utility to perform actions on a website located at http://ServerName/site/DynamicsAX:
![]() Create and deploy a new Enterprise Portal website:
Create and deploy a new Enterprise Portal website:
AxUpdatePortal -deploy -createsite -websiteurl "http://ServerName/site/DynamicsAx"
![]() Update all components of the Enterprise Portal website:
Update all components of the Enterprise Portal website:
AxUpdatePortal -updateall -websiteurl "http://ServerName/site/DynamicsAx"
![]() Deploy all proxies to the Enterprise Portal website:
Deploy all proxies to the Enterprise Portal website:
AxUpdatePortal -proxies -websiteurl "http://ServerName/site/DynamicsAx"
![]() Deploy the Customers web control to the Enterprise Portal website:
Deploy the Customers web control to the Enterprise Portal website:
AxUpdatePortal -updatewebcomponent –treenodepath "WebWeb FilesWeb ControlsCustomers"
-websiteurl "http://ServerName/site/DynamicsAx"
Enterprise Search
Enterprise Search in AX 2012 lets users search for data, metadata, and the contents of documents that are attached to records. This search capability is available in both Enterprise Portal and the client. Enterprise Search uses the Metadata service and the Query service in AX 2012 to gather the data and metadata from AX 2012. To index and execute search queries, Enterprise Search uses the SharePoint Business Connectivity Services (BCS).
To enable this rich search functionality, you must install the Enterprise Search component in AX 2012 Setup. If you are using SharePoint Standard or Enterprise edition, you do not need to install any other prerequisites for Enterprise Search because these have search capabilities built in. However, if you are using SharePoint Foundation, you need to install Microsoft Search Server 2010 Express as a prerequisite for Enterprise Search.
Enterprise Search uses queries to make data searchable in AX 2012. When Enterprise Search is installed, it indexes the default queries and runs a full crawl of the data and metadata. If you want to make additional data searchable, follow these steps:
1. In the AOT, either find the query that fetches the data, or create a new query.
2. Set the Searchable property on the query to Yes.
3. Compile the query and ensure that there are no best practice errors.
4. In the client, start the Enterprise Search Configuration wizard (System Administration > Setup > Search > Search Configuration), shown in Figure 7-16. The wizard will display a list of all queries in the AOT whose Searchable property is set to Yes.

By default, all queries whose Searchable property is set to Yes are selected to be published to BCS. You can clear any queries that you do not want to publish.
5. If you want, use the Select Fields option to prevent specific fields from being indexed.
6. Select the check box to start a full crawl of the data source. Alternatively, you can use SharePoint Central Administration to start a full or incremental crawl manually.
7. Click Next, and then click Finish.
The Enterprise Search Configuration wizard uses the credentials of a search crawler account to index the data and publishes the queries to BCS. You can also see your published queries in SharePoint Central Administration under Application Management > Manage Service Applications > Business Data Connectivity Service.
Changes to metadata information (such as to web menus) are rare, so by default, Enterprise Search executes a full crawl of the metadata only once during installation. Alternatively, changes to data (such as to sales orders) are frequent. By default, Enterprise Search performs a full crawl of the data once during installation, and an incremental crawl every day at midnight.
If you publish a new query, you can start a full crawl directly from the Enterprise Search Configuration wizard, as mentioned earlier. You can also start a full or an incremental crawl manually in SharePoint Central Administration by following these steps:
1. Start SharePoint Central Administration.
2. Navigate to Application Management > Manage Service Applications > Search Service Application.
3. In the left navigation pane, under Crawling, click Content Sources. You will see two content sources: one for data and one for metadata.
4. Click either content source, and then click either Start Full Crawl or Start Incremental Crawl, as shown in Figure 7-17. Keep in mind that crawling can take a long time, depending on how much data or metadata there is to index.
After the data and metadata has been crawled and indexed, it is published to BCS. Users can execute searches by using the search box located in the upper-right corner of Enterprise Portal. The results are trimmed at search time based on the user’s role, language, and other settings, so that users see only the data that is available and applicable to them.
Themes
Enterprise Portal integrates with SharePoint themes. You can apply an existing SharePoint theme to the Enterprise Portal site to change its appearance just as you can with any other SharePoint site. Partners and customers can also create new SharePoint themes and customize or extend the Enterprise Portal style sheets to map to the new theme.
Enterprise Portal uses five style sheets. AXEP.css is the base style sheet. AXEP_RTL.css is used for right-to-left languages and cascades on top of AXEP.css. These two files are located on the web server under <drive>:Program FilesCommon FilesMicrosoft SharedWeb Server Extensions14TEMPLATELAYOUTS<lcid>STYLESThemable. The AXEP_CRC.css, AXEP_CRC_RTL.css, and AXEP_WebPart_Padding.css style sheets are used for Role Centers when rendered in the client. These files are located on the web server under <drive>:Program FilesCommon FilesMicrosoft SharedWeb Server Extensions14TEMPLATELAYOUTSepStylesheets.
The Enterprise Portal master page references these style sheets. The AXEP.css and AXEP_RTL.css style sheets contain SharePoint theme directives and are therefore placed in the special directory where SharePoint can locate them.
When a SharePoint theme is applied to the Enterprise Portal site, SharePoint parses the directives and makes modifications to reflect the new theme. These modifications include color and font replacements and even recoloring of some images. It then stores the modified style sheet and images in the SharePoint content database. The master page then references this new style sheet so that the Enterprise Portal appearance reflects the applied theme.