
In Chapter 2 we learned about the Internet of Things, IoT devices, practical use cases, and messaging protocols. We also gained the conceptual understanding of Azure IoT Suite and its various components, especially Azure IoT Hub. Armed with this knowledge, it is time to create an IoT solution ourselves. We will create our own IoT network and write applications for devices in that network to solve a real-world problem.
Write applications for IoT devices using Azure’s device SDK
Create simulated IoT devices
Create an IoT Hub
Perform device-to-Cloud and Cloud-to-device communication
Use the Notification Hubs service to send out push notifications
Use Case: Centralized Patient Monitoring
Our use case will revolve around solving a problem for Asclepius Consortium. Refer the section called “Smart Hospitals ” in Chapter 1 for more details about this fictional association.
The Problem
The member hospitals of Asclepius Consortium are all faced with the same problem. A doctor or nurse cannot be with each patient at all times, even with patients in the ICU, in order to attend to other existing and new incoming patients. Normally, a nurse visits a patient after set regular intervals to administer medications and check vital statistics, but sometimes this is not enough. There have been instances when complications occurred—severe and otherwise—due to delay in providing necessary care when the patient’s vitals started to deteriorate just because nurses and doctors could not be timely notified.
Clearly, a solution that could automate monitoring and notifications would be a godsend in such a typical healthcare scenario.
The Solution
The simplest solution involves creating a network of two IoT devices—connected via an Azure IoT Hub—one for collecting patient data (device with sensors) and the other for taking action based on collected data (device with actuator). Data is processed and the action to be taken is calculated over at the hub. Depending on the size of hospital and other factors, an actual deployment of such a solution would be larger and more sophisticated than our two-device setup, but the basics would remain the same. Our simplified solution will give you a good starting point to build upon. Azure IoT makes it super easy to scale solutions by providing a fully managed interface to add, remove, and maintain virtually unlimited IoT devices later.

Dataflow of the proposed centralized patient monitoring solution
Step 1. A standard medical device connected to the patient constantly records their vitals—body temperature, pulse rate, respiration rate, and blood pressure.
Step 2. An IoT device (Device 1) is connected to patient’s medical device through GPIO or a wireless interface. Device 1 receives all data being recorded by the medical device. Apart from that, it has its own sensors to measure room’s temperature and humidity values. A combination of all these statistics is necessary to reliably monitor the patient’s health.
Step 3. Device 1 sends out the combined telemetry data to our IoT Hub. An application (solution backend) written to receive hub’s incoming messages constantly analyzes the input stream of data. If the values lie within normal ranges, no action is taken. Conversely, if our logic detects an anomaly it sends out a message to Device 2 to trigger an alarm. As an added precaution, a push notification is relayed to doctors’ phones through an Azure Notification Hub.
Step 4. Device 2—installed outside the patient’s room—continuously listens to our IoT Hub. Depending on the severity of message received from hub, it triggers a physical alarm connected to it as an actuator.
Step 5. A physical alarm immediately catches the attention of nearby staff, reducing potential delays in patient getting professional medical help.
In our implementation of this solution, we will be using one simulated device and one actual device (Raspberry Pi).
Device 1 will be a simulated device, which is basically a custom software program that uses Azure’s device SDK to simulate an IoT device and generate random sensor values. Learning to create a simulated device will have two advantages: (1) you will get to learn how IoT Hub works even if you do not have an actual device and/or its sensors, and (2) you will learn to test your network before using actual devices.
Device 2 will be a Raspberry Pi Zero W, which is essentially a Pi Zero with WiFi and Bluetooth pre-installed. Pi Zero W is cheap ($10) and easy-to-use.
Getting an Azure Subscription
If you already have an Azure account, feel free to skip this section. Utilizing the services in Azure IoT Suite, including IoT Hub, will require you to have a valid Azure subscription. An Azure subscription is different from simply having a free Microsoft Live ID (@outlook.com or @hotmail.com email account). A subscription can be obtained several ways, including creating an account on Azure’s website using your credit card and getting it bundled with Visual Studio Professional. For the purposes of this book, we’ll explore the former option.
Signing up for an Azure account is easy, but requires you to have a Microsoft account—get it free at signup.live.com if you already don’t have one. You have two options to sign up for an Azure account—get a Pay-As-You-Go subscription or start with a 30-day free trial.
With a Pay-As-You-Go subscription, you pay monthly charges for services that you use, as per you use them. The subscription is a no-commitment one, meaning it does not require you to pay any additional initial or fixed monthly charges. For example, if the only service you are availing is a VM that costs $20/month, then that’s all what you pay monthly, for as long as you use it. Likewise, if you have activated the free tier of an IoT Hub, you pay $0 or nothing if you stay within the bounds imposed by the free tier.
The 30-day free trial is your safest bet and is highly recommended if you are a first-time user. With the trial, you get a complimentary $200 (subject to change at any time) credit in your Azure account. You can use this credit however you like. Once you have exhausted your free credits—which is usually an unlikely scenario—you will be asked to pay for the additional paid services. After the 30 days of the trial period are over, you will be given an option to switch to Pay-As-You-Go subscription. If you don’t, you will lose access to the services you’d set up during the trial period. Your Azure Portal access, however, will remain intact. But unlike how trials go usually, Azure does not automatically upgrade you to a paid plan after your trial expires. So there is zero risk of your credit/debit card getting involuntarily charged.
It is worth mentioning that Visual Studio Professional and Enterprise subscribers get complimentary Azure credits every month—$50 for Professional and $150 for Enterprise subscribers. This amount is automatically credited every month to the Microsoft account linked to a Visual Studio subscription.
Assuming that you do not have an existing Azure account, let’s sign up for the free trial. With a Microsoft account, head over to https://azure.microsoft.com/en-in/free and click the Start Free button. You may be asked to log in using your Microsoft account at this point. Once you do, you will receive a message about your account having no existing subscriptions.
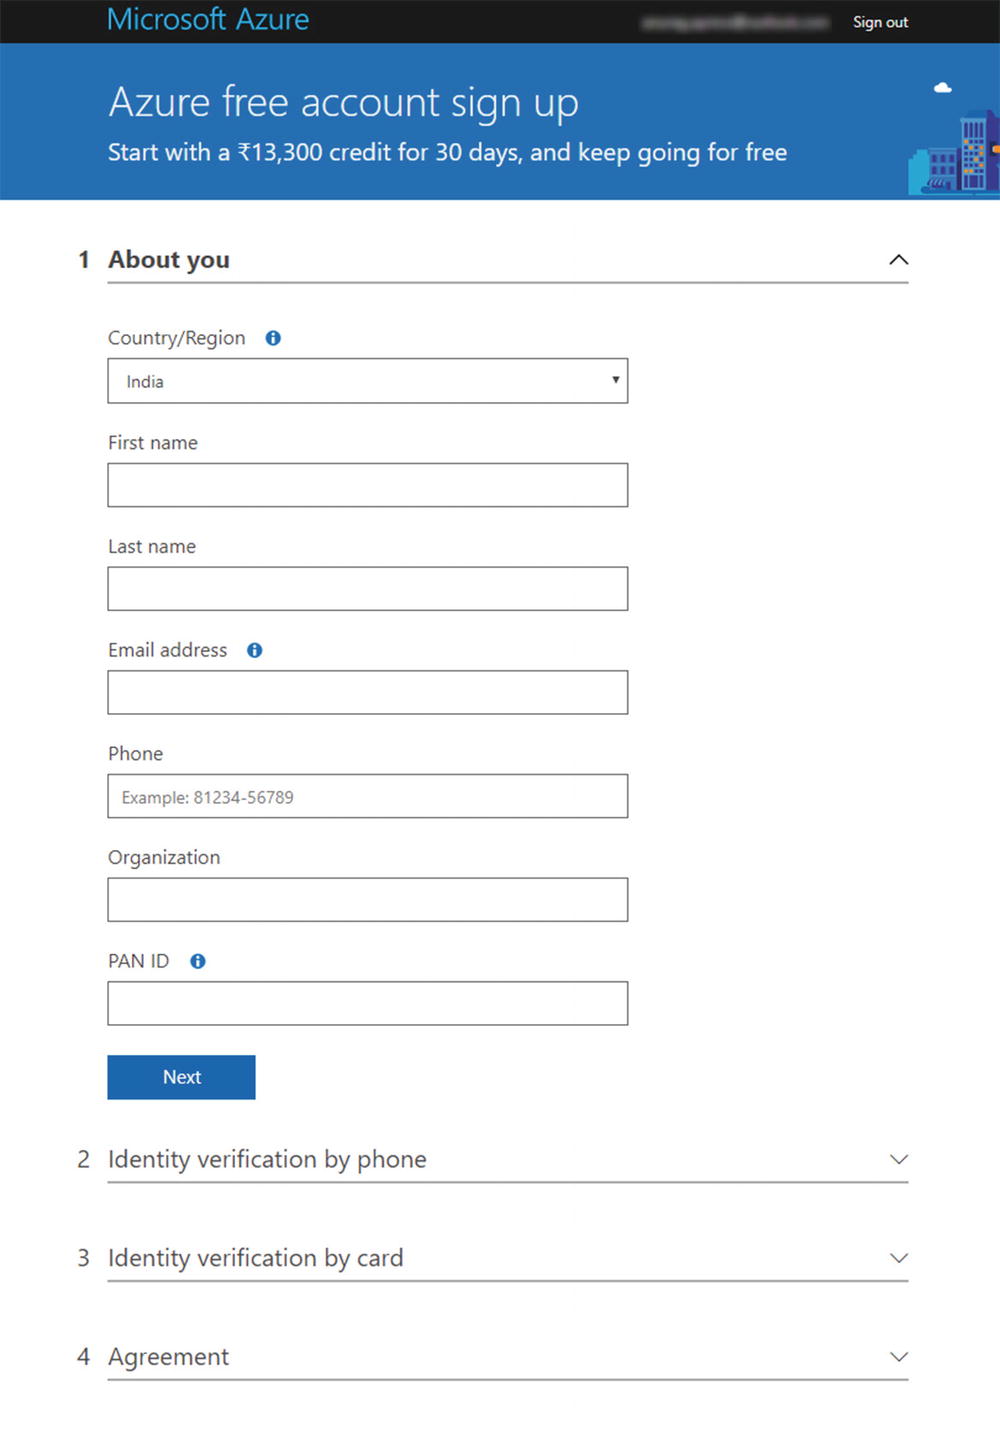
Azure trial signup form
Next, you will be asked to enter some additional information for identity verification purposes. This includes your mobile number and credit card details. Please note that credit card details are required only for verification. You may be charged a minor phony amount during signup, but that transaction would be instantly reversed. As stated by Microsoft on their website—We keep prices low by verifying that account holders are real people, not bots or anonymous trouble makers. Don't worry, your card will not be charged unless you explicitly convert to a paid offer, although you might see a temporary authorization hold.
Once your identity is verified, you will need to accept the subscription agreement to complete your application. At this point, it’s a good idea to spend a few minutes quickly scanning through the agreement terms and offer details, links to both of which are given in the Agreement section of the application form. Once you’ve accepted the agreement and clicked the Sign Up button, you will be redirected to the subscriber’s page. Here, click the button to go to Azure Portal.
Creating an IoT Hub
IoT Hub sits at the core of our network. It is the entity that allows devices to securely communicate with the solution backend and vice versa. We’ll create this first and deal with the devices later. With an Azure subscription at our disposal, go ahead and create a hub.

The new resource blade in Azure

New IoT Hub form
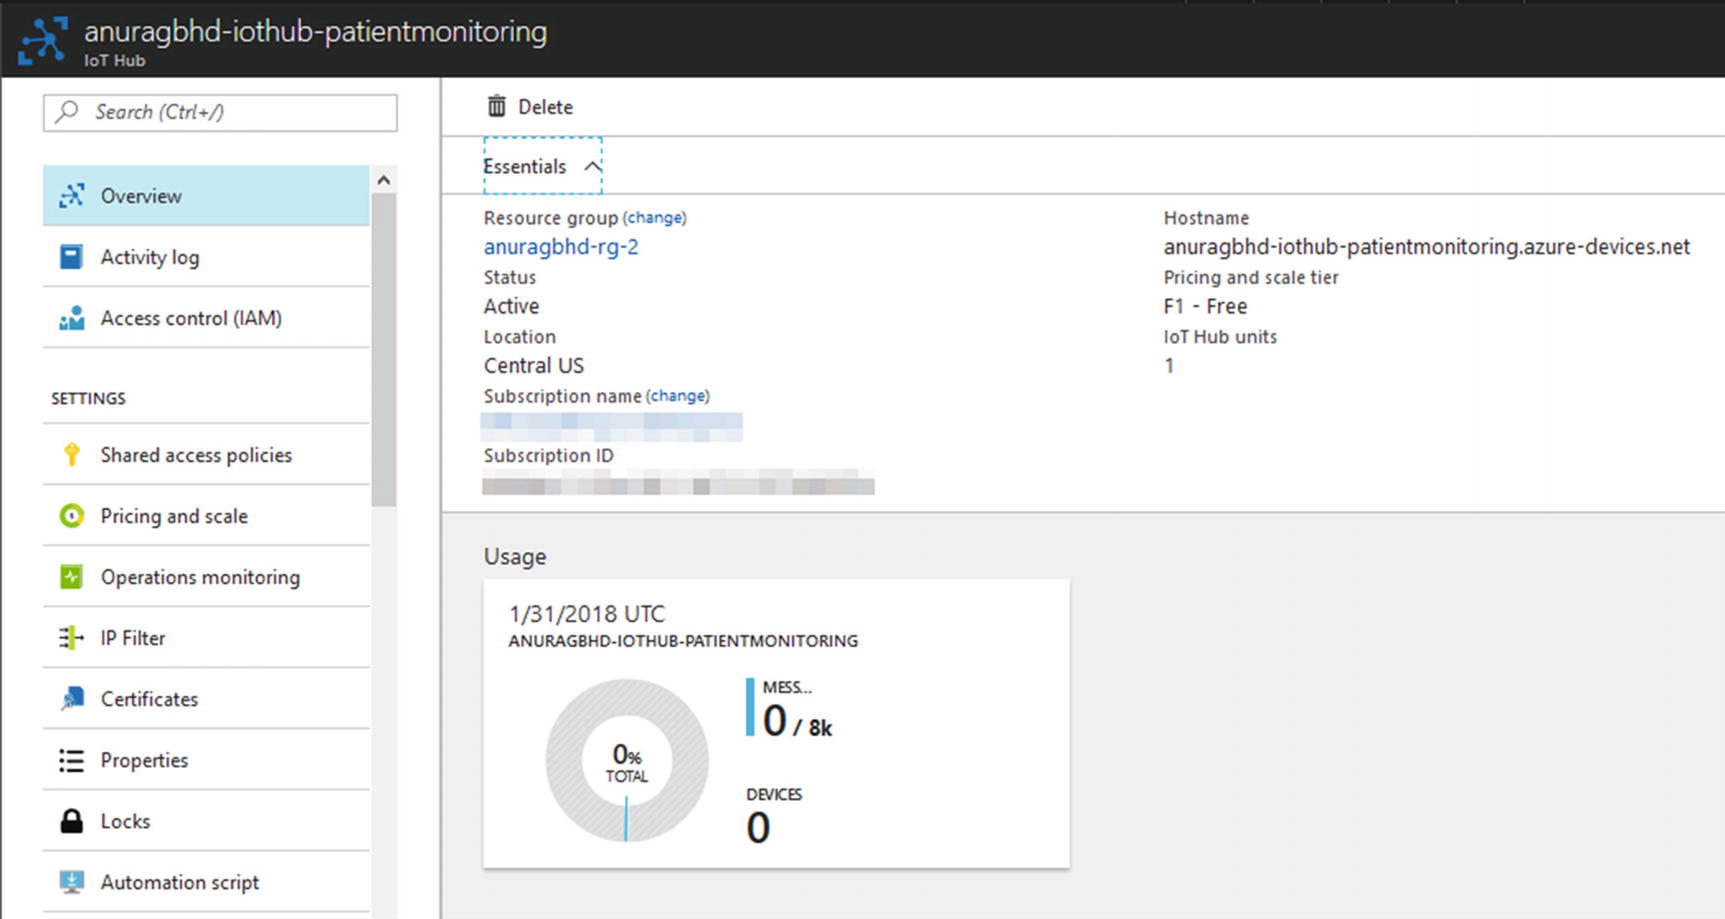
Details blade for our newly created IoT Hub
The Hostname value, though, cannot be used directly to register devices or by applications to send/receive messages to/from the hub. You will additionally need a shared access key pair for that. The combination of hostname and a shared access key is a connection string. As you’ll see later, shared access keys will be different for each registered device as well as for registering new devices.
When a new hub is created, Azure creates for you various roles (policies) with varying permissions on the hub. Each policy has its own set of shared access keys. For the purposes of our solution, let’s retrieve the connection string corresponding to the policy with full permissions. In a production setup, you might want to use a more restrictive policy.
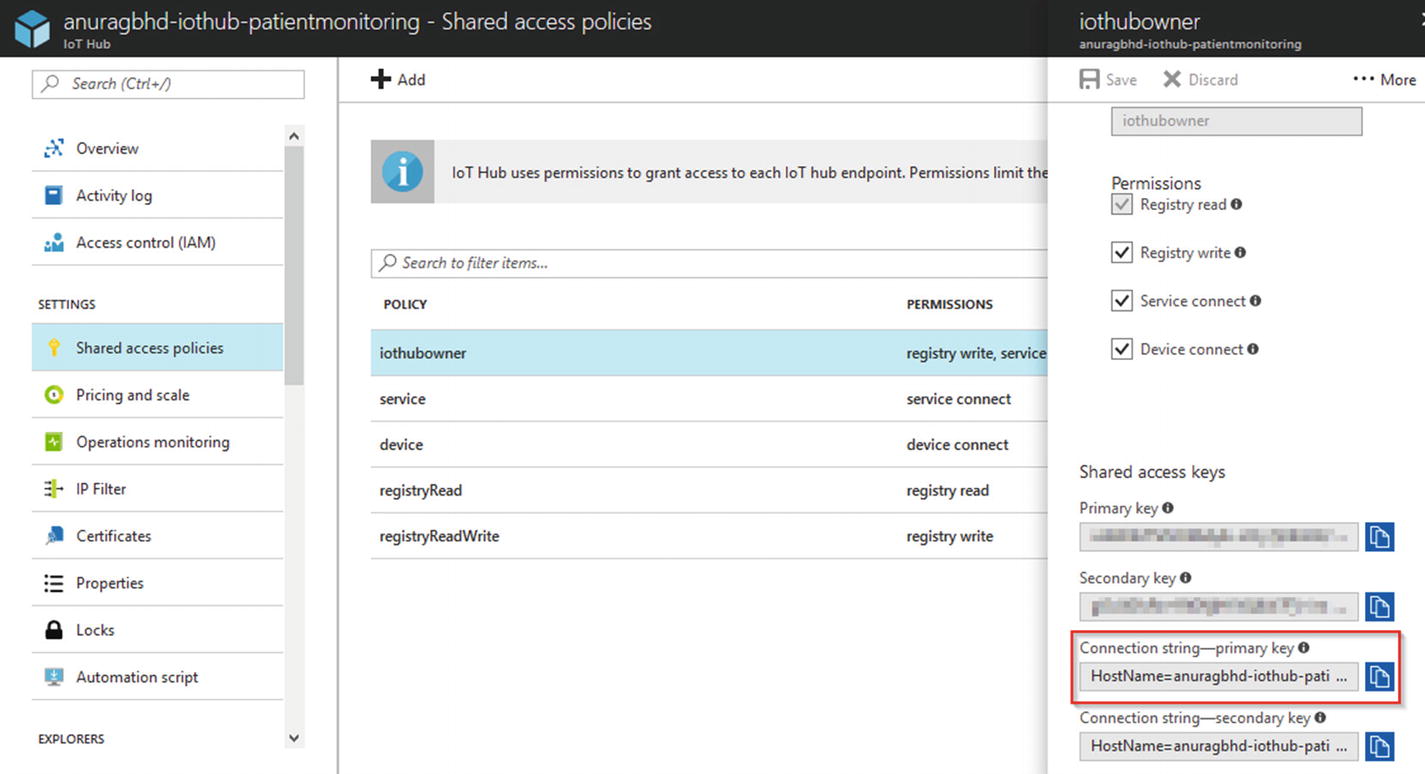
Getting the connection string of the IoT Hub
Creating Device Identities
The next step in sequence is to register our the devices in the hub’s registry. You saw in Chapter 2 how security is the number one concern of an IoT Hub. A device cannot connect to a hub if it is not registered with it. So, even before we create our simulated device (Device 1) and configure our Pi Zero (Device 2), we will create their device identities. Each device identity is associated with a device ID and a key. Our client applications, running on the devices, will need these values to identify themselves to the hub.
There are two ways to create a device identity—using code and through Azure Portal. We will explore both.
Using Code
This method requires using Azure’s Devices SDK to write a few lines of code. It may be a little bit cumbersome to register just one or two devices using this method, but it is extremely helpful while registering hundreds or thousands of devices, or when automating device registration.
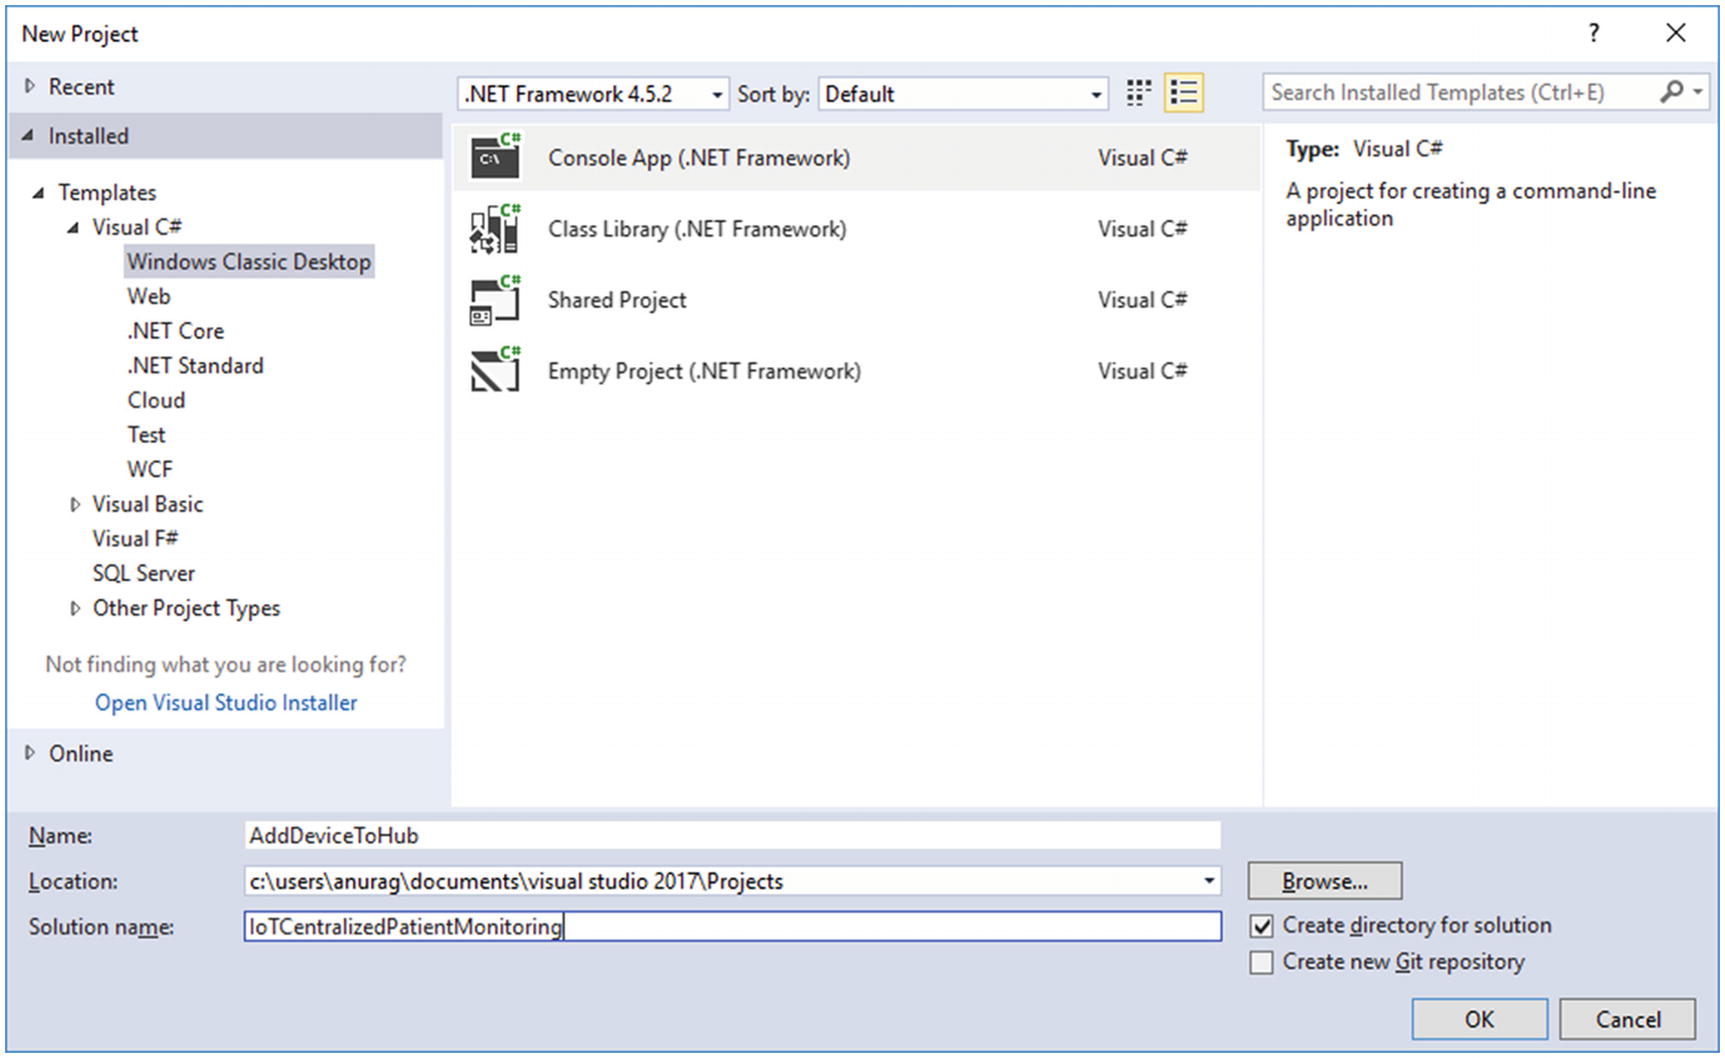
Creating a new console app in Visual Studio 2017
Once Visual Studio has finished creating the new application, right-click the AddDeviceToHub project in Solution Explorer and select Manage NuGet Packages. In the package manager window, switch to Browse tab, search for Microsoft.Azure.Devices and install the first package in the list (that exactly matches the searched name). You may be prompted to install several dependencies along with the Azure IoT Devices SDK; choose to install all.
Note
The version we used for all subsequent code examples is Visual Studio Professional 2017. If you do not have Professional 2017 or are running an older version, we highly recommend that you upgrade. VS Community 2017—available completely free of cost—will work equally well.
Next, add a new app setting for IoT Hub’s connection string in App. config . Add the following code. Replace the value attribute’s value with the connection string you noted at the end of “Creating an IoT Hub” section earlier.
In Program.cs, copy-paste the following code:
Let’s break down this program to understand what’s happening in each section.
Adding a NuGet package automatically adds its DLLs in the project’s references, but its corresponding using statements need to be manually placed in the code. That is why we have the following two lines at the top:
We need a reference to hub’s registry manager. So, we created a new static field:
We also created a static field for the connection string:
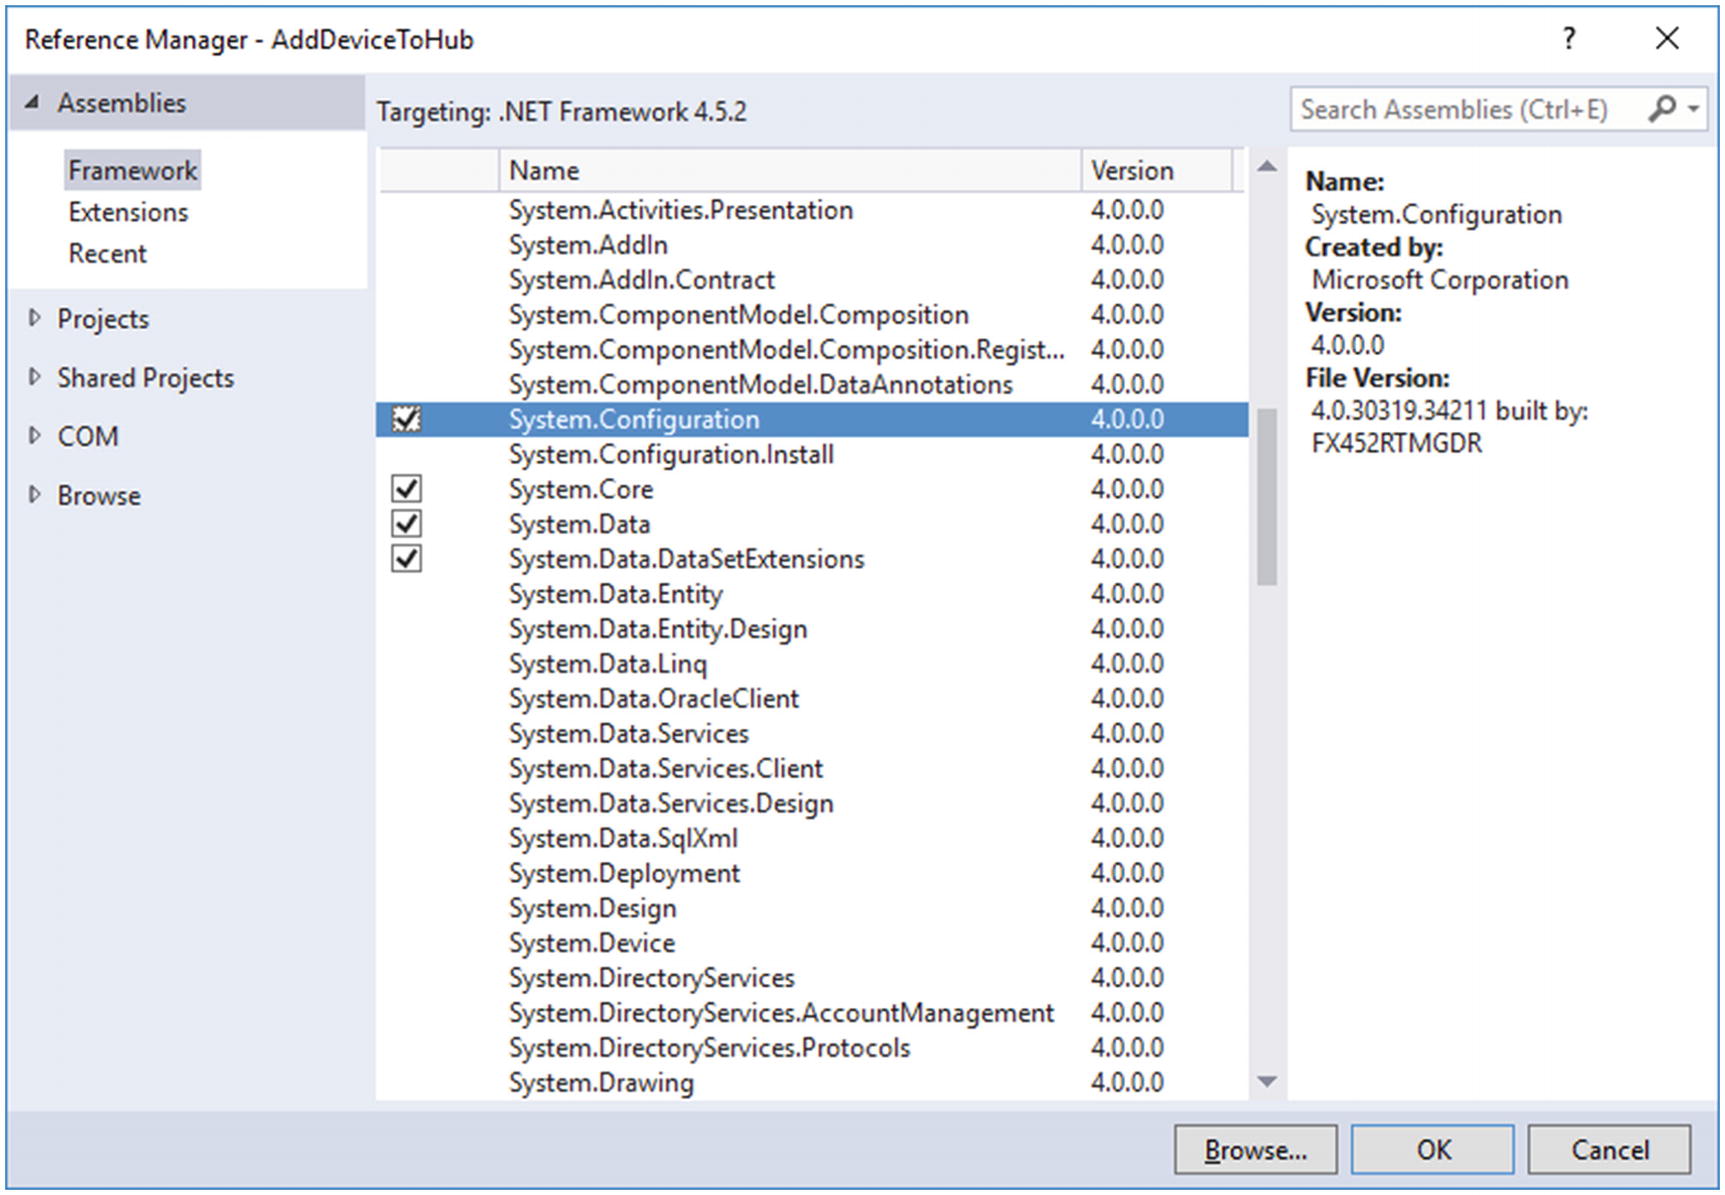
Adding a reference to System.Configuration
RegisterDeviceAsync is the actual method that registers our device. We use it to register only Device 1. It tries to add the device in our hub’s registry. If the device with the specified device ID already exists, an instance of the existing device is fetched. The shared access key of the added device is then printed to the console.
Finally, everything is put together in the Main method by making a call to the RegisterDeviceAsync method.
Using the Portal

Adding a device through Azure Portal
Once the device is added successfully, it will be listed in the device explorer alongside Device 1 that we added using code earlier. If added device’s status shows as “disabled,” enable the device by opening its Device Details blade.
Creating a Simulated Device
With our hub created and devices registered with it, let’s create our simulated device that will periodically send patient telemetry data to the hub.
Creating the Application
The steps are similar to what we saw in Creating Device Identities section. In Visual Studio, create another console application called SimulatedDevice in the same solution IoTCentralizedPatientMonitoring. Install the NuGet package Microsoft.Azure.Devices.Client to the new project. Like before, add a reference to System.Configuration in order to read app settings from App.config.
In App.config, add the following key-value pairs:
The value of iotHubHostname is the hostname we noted down in the “Creating an IoT Hub” section rather than the connection string. deviceSharedAccessKey is the output that was printed at the end in the “Using Code” subsection of “Creating Device Identities”. If you did not get a chance to note it down, you can easily get it from IoT Devices explorer of your hub in Azure Portal; take the primary key value from there.
Add the following code in SimulatedDevice project’s Program.cs file:
Let’s break down the code as before.
We start by adding the required using statements:
We create an instance of DeviceClient, the class that exposes methods to communicate with the hub. We also read app setting values into class fields.
In the SendPatientTelemetryToHubAsync method, we start by setting minimum values for telemetry parameters that will be recorded (simulated) by the device.
- 1.
Generates fake sensor values.
// Pretentiously received from the medical devicedouble currentBodyTemperature = minBodyTemperature + random.NextDouble() * 4; // 36.5-40.5 degdouble currentPulseRate = minPulseRate + random.NextDouble() * 40; // 60-100 per mindouble currentRespirationRate = minRespirationRate + random.NextDouble() * 4; // 12-16 per min// Pretentiously received from on-board sensorsdouble currentTemperature = minRoomTemperature + random.NextDouble() * 12; // 18-30 degdouble currentHumidity = minRoomHumidity + random.NextDouble() * 30; // 30-60% - 2.
Builds the telemetry data object.
var deviceTelemetryData = new{messageId = Guid.NewGuid().ToString(),deviceId = deviceId,patientBodyTemperature = currentBodyTemperature,patientPulseRate = currentPulseRate,patientRespirationRate = currentRespirationRate,rooomTemperature = currentTemperature,roomHumidity = currentHumidity}; - 3.
Serializes and sends the data to hub.
var messageString = JsonConvert.SerializeObject(deviceTelemetryData);var message = new Message(Encoding.ASCII.GetBytes(messageString));await deviceClient.SendEventAsync(message); - 4.
Waits for 3000 milliseconds (three seconds) until repeating.
await Task.Delay(3000);
Running the Application
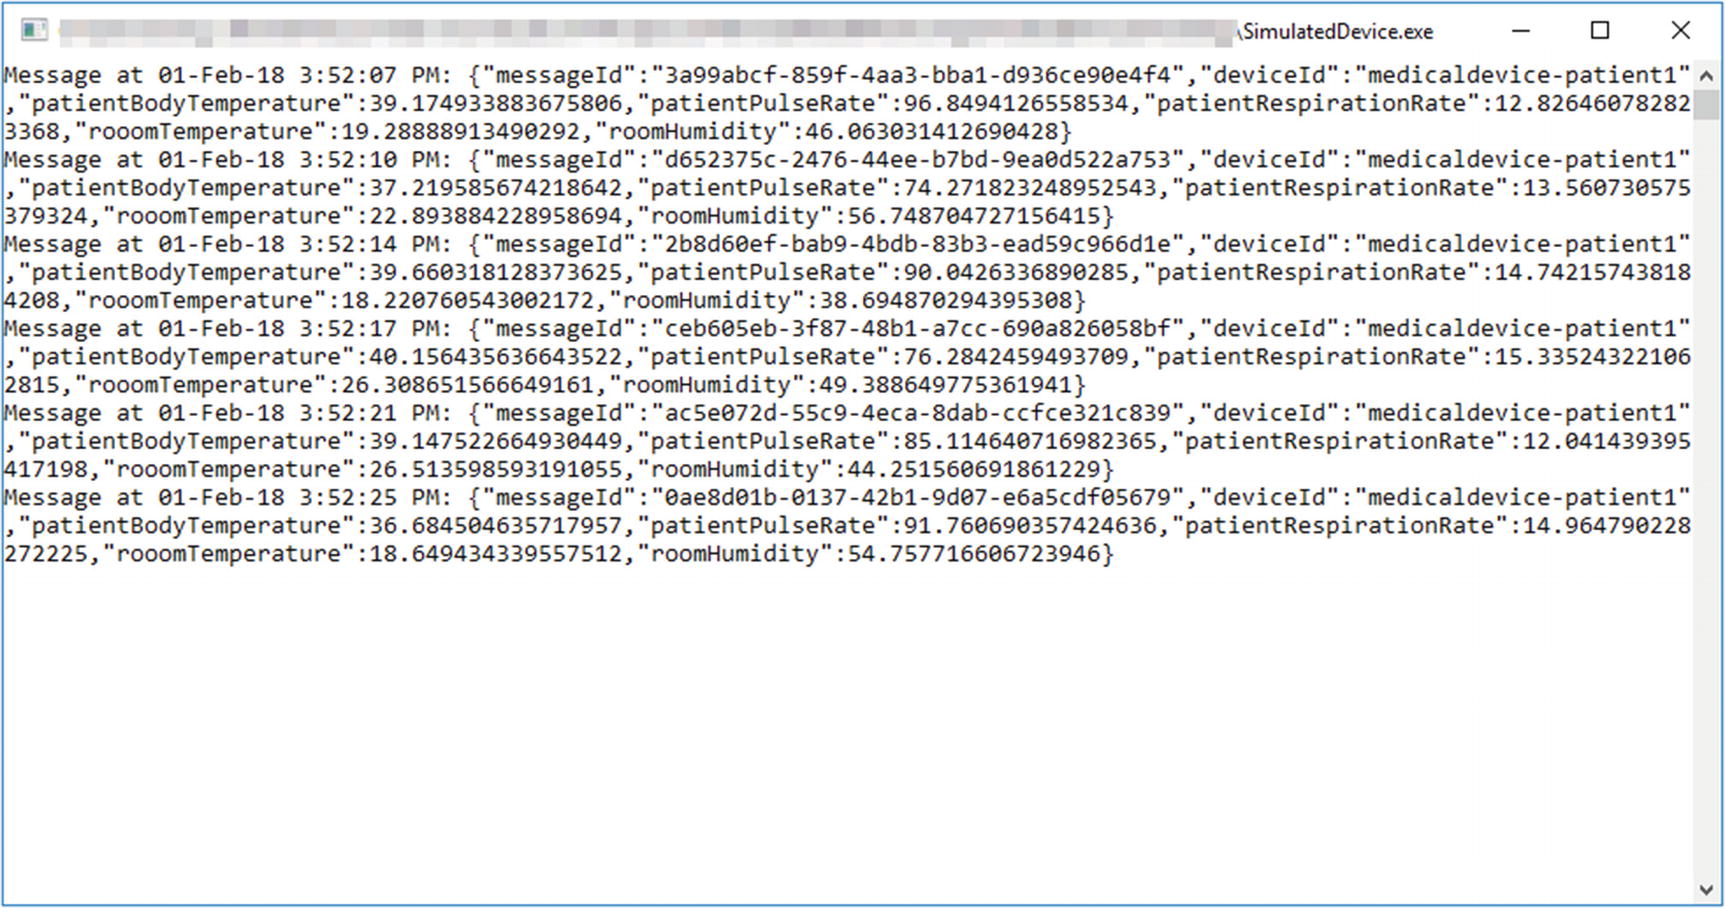
Output from the simulated device console application
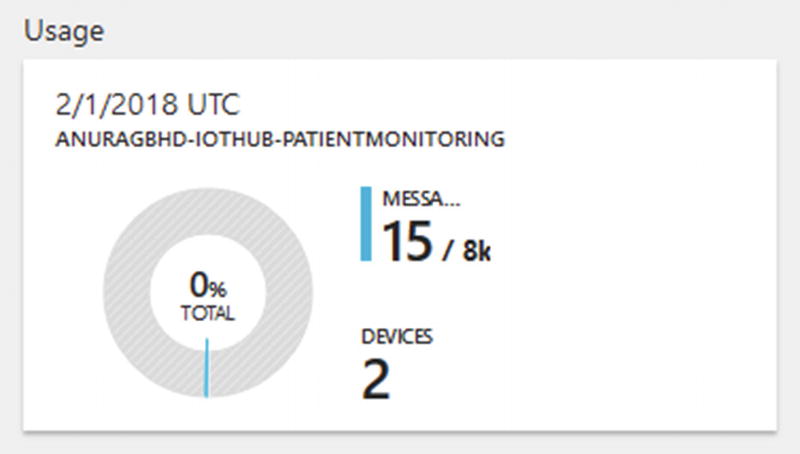
Daily usage—messages exchanges—for a hub can be checked in Azure Portal
Creating the Solution Backend
Show messages in the console received from the device (device-to-cloud)
Analyze received messages and make decisions
Send messages to another device (Cloud-to-device)
Send push notifications to Android phones through Notification Hubs
Creating the Application
As previously, we’ll create the solution backend as a console application. In Visual Studio, add a new console app project called SolutionBackend to the IoTCentralizedPatientMonitoring solution.
Creating a Notification Hub

Creating a Notification Hub in Azure
Keep the hub name that you use here handy, as you’ll use it later. The Namespace field can have the same value as hub name field. Stick to the free tier for this exercise. It comes with a generous limit of 1 million push notifications and 150 registered devices (to which notifications can be sent via the hub).
Azure Notification Hubs supports all major device platforms to send out notifications to—iOS, Android, Windows, Windows Phone, etc. In this exercise, we’ll limit our push notifications to Android devices only.
Sending to each platform requires separate settings in the hub. For Android, we need a Google Cloud Messaging (GCM) API key. Getting your key through the standard process may be complicated if you are new to Android development. We’ll take a shortcut by going the Firebase route.

Locating the API key in Firebase for GCM
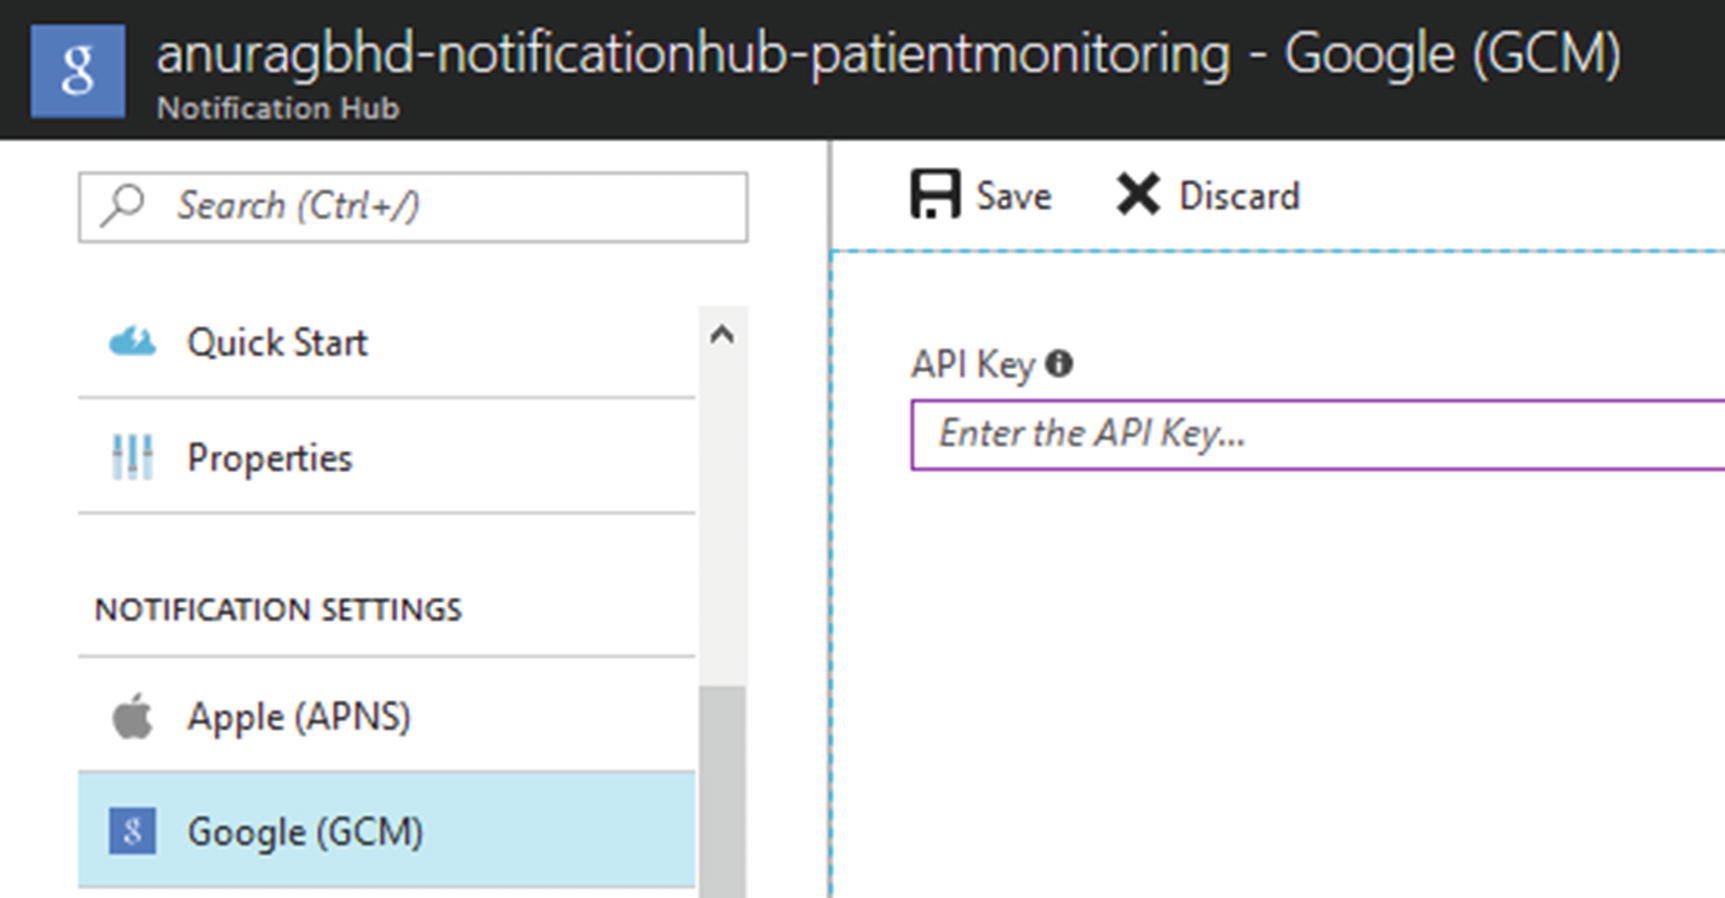
Setting the GCM API key in notification hub to allow it to send messages to Android devices
Adding Dependencies
We need three NuGet packages—Microsoft.ServiceBus.Messaging (for reading device-to-Cloud messages), Microsoft.Azure.Devices (for sending Cloud-to-device messages), and Microsoft.Azure.NotificationHubs (for sending push notifications). Install them for this project via the NuGet Package Manager. As usual, we also need to reference app settings in App.config. So, add a reference to System.Configuration.
When all dependencies are installed, add the following using statements at the top in Program.cs:
Adding App Settings
Add the following settings in App.config:
connectionString will be what we noted in the “Creating an IoT Hub” section. notificationHubName will be what we noted in the “Creating a Notification Hub” subsection just a while ago. To retrieve the value for notificationHubConnectionString, on your notification hub’s Azure Portal page, go to Access Policies ➤ DefaultFullSharedAccessSignature and copy the connection string.
Adding Initializations
Add the following static fields in Program.cs:
Initialize them in the Main method as shown here.
Receiving Messages from Devices
Let’s create a new method for receiving messages sent to our IoT Hub by connected devices (only the medical device in our case).
In the infinite while loop, we are constantly checking to see incoming messages on the hub. We can do all sorts of things with received messages. In our code, we are writing them to the console and then performing basic analysis to make decisions. It’s important to note that messages are received as serialized JSON strings as we sent them in SimulatedDevice project.
ShowMessageOnConsole() method is simple beyond your imagination:
We’ll look at the AnalyzeMessage() method in a bit. First, let’s hook up the receive messages method in the Main() method. Add the following lines at the end of Main:
Although IoT Hub’s free tier (F1) allows for two partitions, we are reading the first partition for keeping our code simple. For this simplicity, we are sacrificing receiving messages written to the second partition. A production application will typically have even more partitions (4 and above).
Analyzing Received Messages
Add the following method in Program.cs:
The code is pretty much self-explanatory. As the received message is a serialized JSON string, we convert it into a C# object before we can start analyzing it. Once that is done, we perform a simplistic analysis of checking the patient’s body temperature.
Sending Messages to Device
As with other things in Azure IoT devices SDK, sending messages to a device is dead simple.
Check the call to this method in the AnalyzeMessage() method in the last section.
Sending Push Notifications
Sending messages to the notification hub to be further relayed as push notifications is equally simple.
Running the Application
Our simple solution backend is now ready to be tested. Before running, verify the app settings in App.config. Incorrect app settings values is a common cause of issues.
To be able to test the solution backend, you will need the SimulatedDevice project to be running simultaneously. Otherwise, the backend will have no messages to receive and analyze. Visual Studio provides an easy way to run multiple projects at once. In Solution Explorer, right-click the solution IoTCentralizedPatientMonitoring and select Properties. In Common Properties ➤ Startup Project, select the Multiple Startup Projects option. Set Start as the action for both the SimulatedDevice and SolutionBackend projects. Click OK to save.
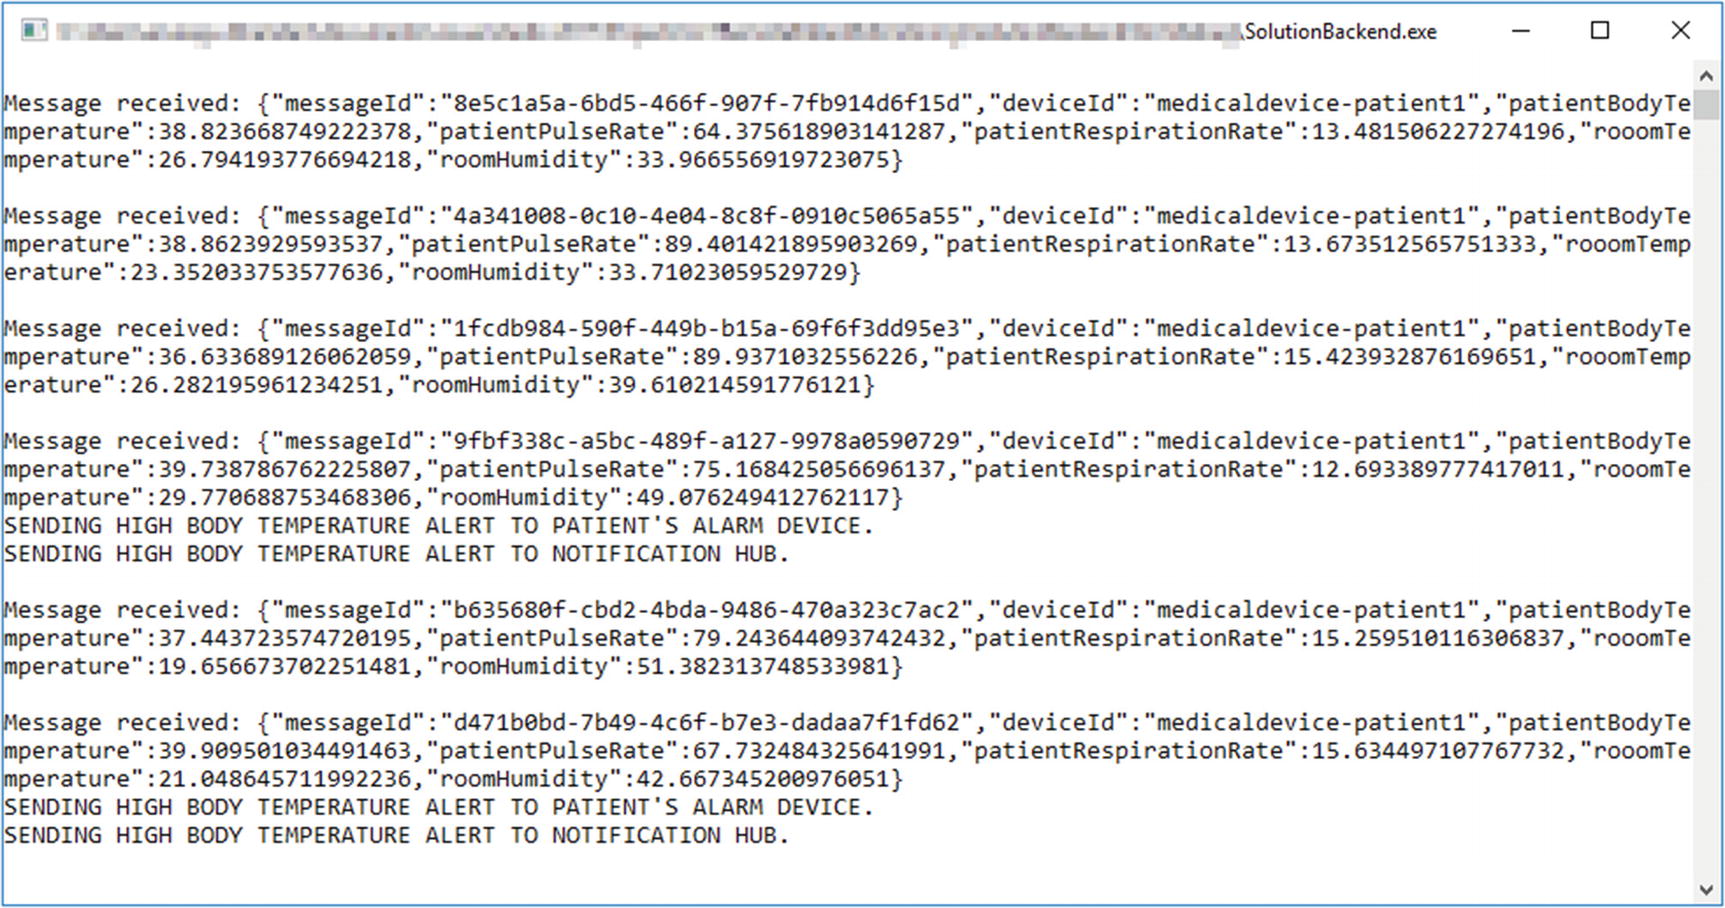
Messages that were sent by the simulated device are received by the solution backend
As you can see in Figure 3-15, there were a couple of instances when a patient’s body temperature was high and alerts were sent to the alarm device and notification hub. In the next section, we write and run an application on an actual Raspberry Pi Zero. That is when you’ll be able to see the alerts received from the solution backend, routed through IoT Hub.
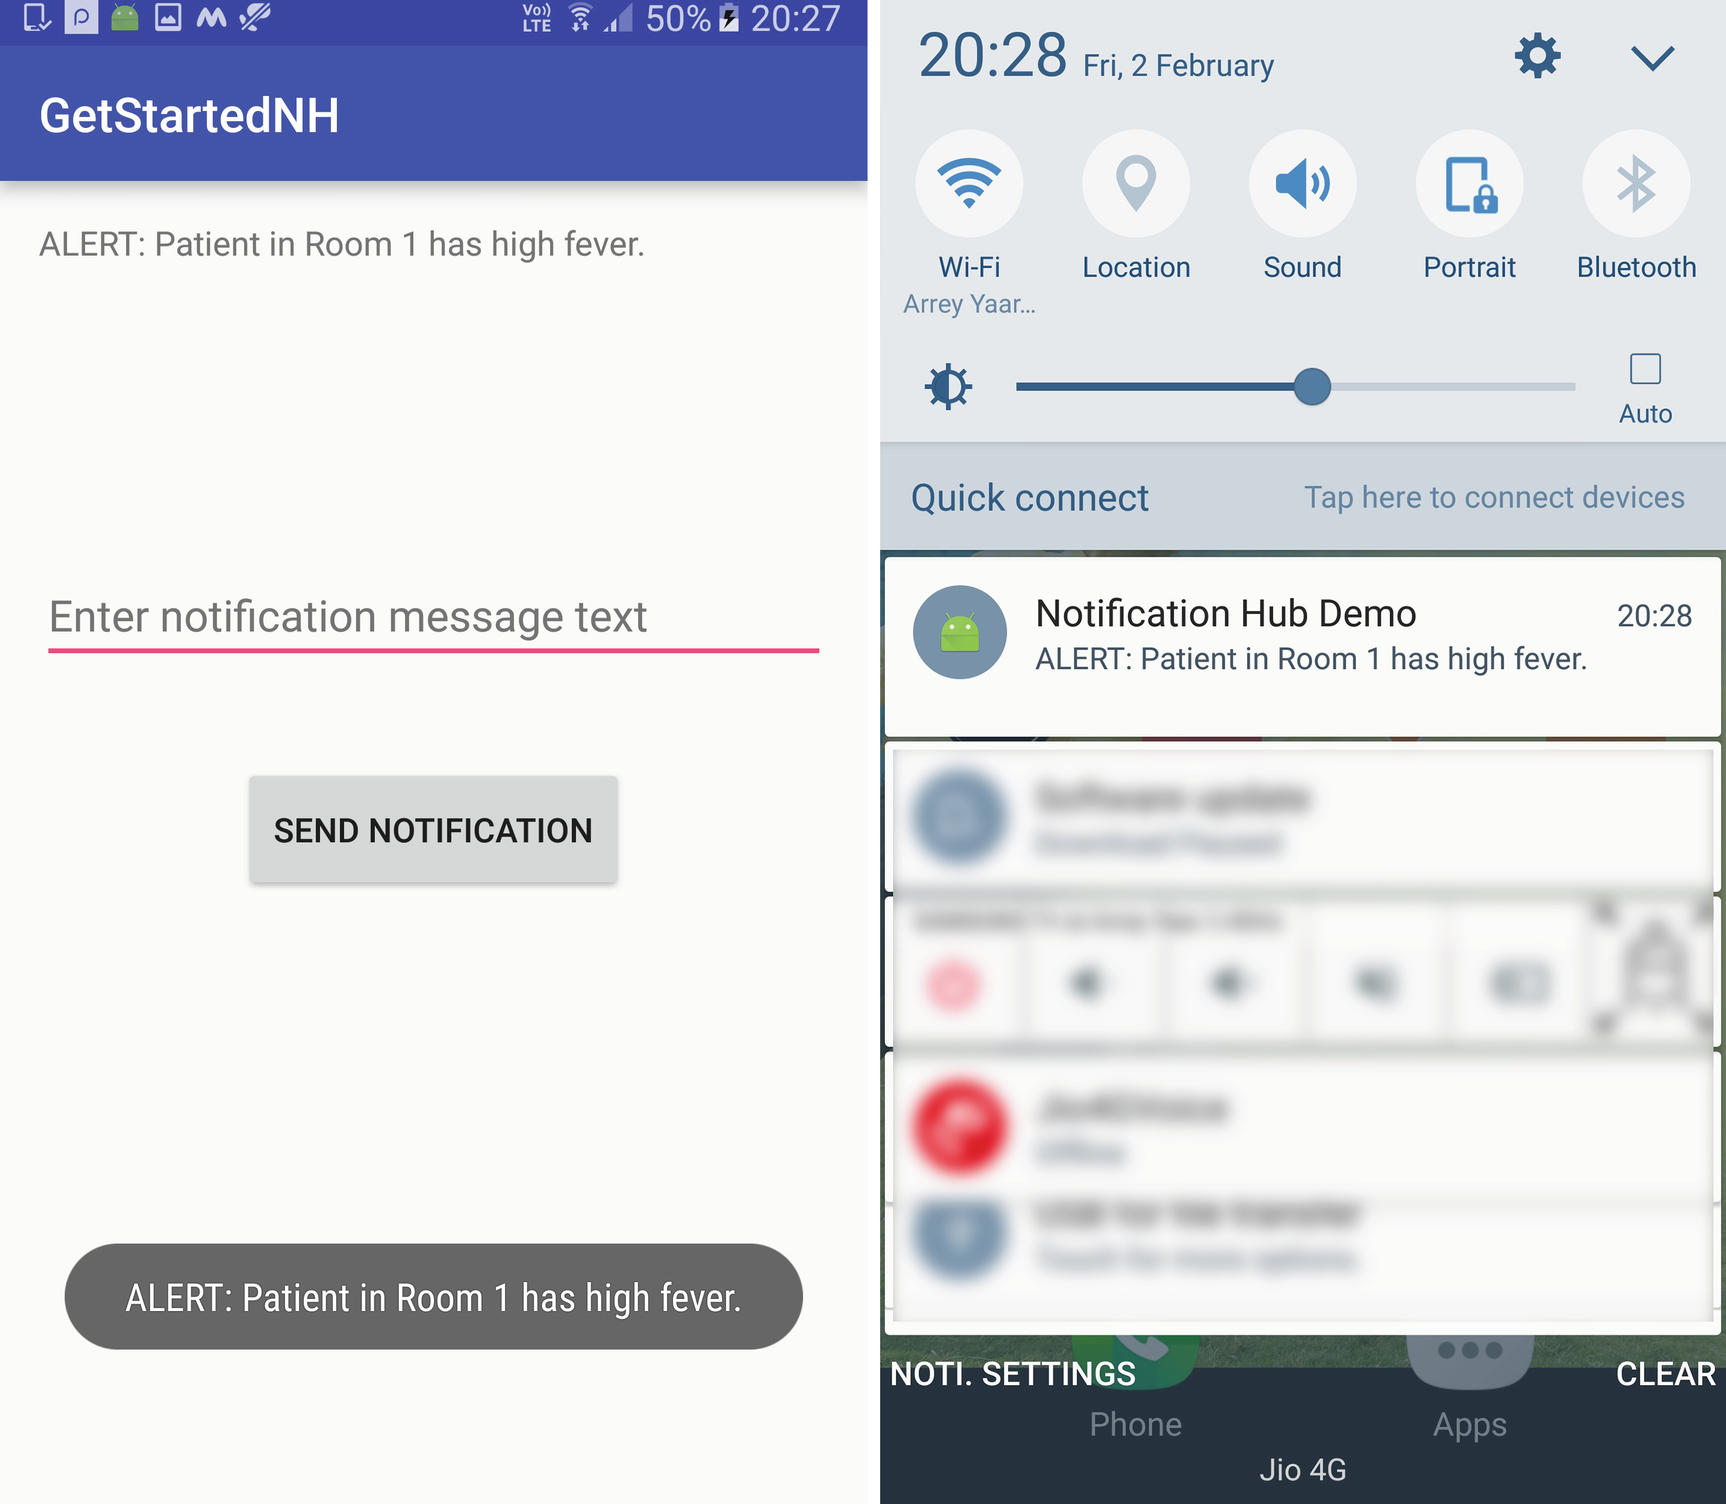
Alert notifications received from the hub by Azure’s IoT Hub demo Android app: (left) in-app notification in the form of a toast and (right) message in the phone’s notifications shade
Tip
You can write additional code in the Android app to make the phone vibrate strongly and play a sharp, persistent ringtone whenever an alert notification is received to immediately catch doctors’ attention.
Writing an IoT Application for Raspberry Pi
The thing that you were waiting for is here. Time has come to finally put your Pi to use. The joy of watching a physical device do wonderful things is beyond compare.
Tip
It’s okay if you do not have a physical Pi Zero. Azure’s Raspberry Pi web simulator is a great way to test your code in the absence of a real device. It runs completely in a browser and has two components—a Pi with its circuit configuration on the left and a code editor on the right. As of writing this book, the simulator is in early preview stage and doesn’t allow for modifying the pre-configured circuit. But that may change in future. The Pi web simulator is available at https://azure-samples.github.io/raspberry-pi-web-simulator .
The build-up to this section has already taught you a lot of things you need to know about writing applications for IoT devices. You have already created a simulated device using Azure IoT devices SDK. Developing for an actual device will be similar, as you will be using the same SDK. But this time you will be writing the application not in C# but in JavaScript (using node.js). This is because Linux is the most common operating system available for the Pi. Running .NET applications on Linux is possible through Mono, but it’s notoriously tricky to set up and maintain properly. Python and node.js are popular choices for developing applications for Pi and several other IoT devices.
Note
Instructions in this section apply not only to Pi Zero but all other models of Raspberry Pi as well, including Model 1 B+, 2, and 3.
Setting Up Your Pi
Choose the right operating system (Raspbian is an officially supported flavor of Linux)
Download and install the operating system on a microSD card
Connect Pi to LAN or WiFi networks, etc.
We recommend that you install Raspbian. Once you have your Pi all set up, ensure you have SSH access and I2C interface enabled. Doing so is as easy as running the raspi-config command; you will find detailed instructions on Pi’s website.
Connecting to Pi via SSH
There are several ways to connect to a Pi from a computer to write and deploy software on it. Remote access via SSH is the most common and secure method. You could also simply connect a monitor/TV and a keyboard to your Pi and start coding as you normally would on your laptop. Or, access Pi’s desktop using VNC or xrdp. Both methods will allow you to connect Pi’s graphical interface, much like when you use RDP to connect to a remote Windows VM. Connecting via SSH is faster and requires less hardware. The only downside is SSH allows only for command-line access. You do not get to access the graphical interface. But, why worry? We are developers! We love to write code and execute commands.

Connecting to Pi via SSH using PuTTY

Pi’s command-line interface after connecting
Installing node.js
Node.js is a server-side implementation of JavaScript. It provides ultra-fast APIs for accessing I/O (files, databases, etc.) and other system-level resources. In other words, Node is an application server to run JavaScript-based applications. Learn more about Node at https://nodejs.org .
There is more than one way to install the latest version of node.js in Raspbian. It’s best to follow the official installation instructions as mentioned at https://nodejs.org . Since Raspbian is a Debian-based Linux OS, follow the instructions to install node via package manager (apt-get). The following two commands should ideally do the trick:
To verify if node was installed correctly, run this command:
Note
Skip the following instructions if the package manager installation of nodejs worked for you.
You should get an output such as v9.5.0. If this method does not work, go to the Downloads page on nodejs.org and download the Linux Binary (ARM) package corresponding to your Pi’s model. For example, for Pi Zero you download the ARMv6 package:
Next, extract the downloaded tarball archive to a globally-accessible location. Run the following three commands:
Add the above directory permanently to your PATH environment variable.
Open the .profile file in a text editor:
And add these lines to the end of the document:
Finally, refresh your PATH:
Creating the Application
Create a new directory to store the application and enter into it:
Initialize this directory as a node application:
You will be asked a series of questions, at the end of which a new file called package. json will be generated.
Installing Dependencies
Now, install Azure IoT devices SDK dependencies. This step is similar to installing NuGet packages in Visual Studio. Run the following command:
This will install the required dependencies in a new folder called node_modules and update the package.json file. Our final package.json file looked like this:
Note
If the installation of the wiring-pi package fails, ensure that you have Git installed in Raspbian. To install Git, run the sudo apt-get install git-core command.
Connecting an Actuator
The simplest actuator that we can use in an alarm device is an LED that provides a visual indication about an event. LEDs are cheap and very easily available. We will connect a red LED to our Pi Zero’s GPIO. You can do the same or connect a sound device such as a buzzer. The wiring connection will pretty much remain the same.
GPIO pins work in two modes—input (for sensors) and output (for actuators). In output mode, a pin’s voltage may be set to high (1) or low (0) through code to turn an actuator on or off. Although there are 40 GPIO pins on recent Pi models, not all of them can be usable by sensors and actuators. Also, there are more than one pin numbering systems. Visit https://pinout.xyz/pinout/wiringpi to see Pi Zero’s pin layout. As we are using the wiring-pi node module for interacting with pins, we’ll follow its numbering system.

Circuit layout for our Pi Zero. The LED is connected to pin 15 (WiringPi notation)
Writing the Code to Receive Messages and Take Action
Create a new file called index.js in the current directory:
And paste the following code:
You will notice that, although the code is in a different language, the structure is pretty much the same. Go through it a couple of times and refer to the comments in the code for hints.
Running the Application
Run the application using the following command:
If the connection to the IoT Hub is successful, you will see the message " Connected to IoT Hub " printed in console. At this point, the alarm device is listening to the hub for incoming messages.
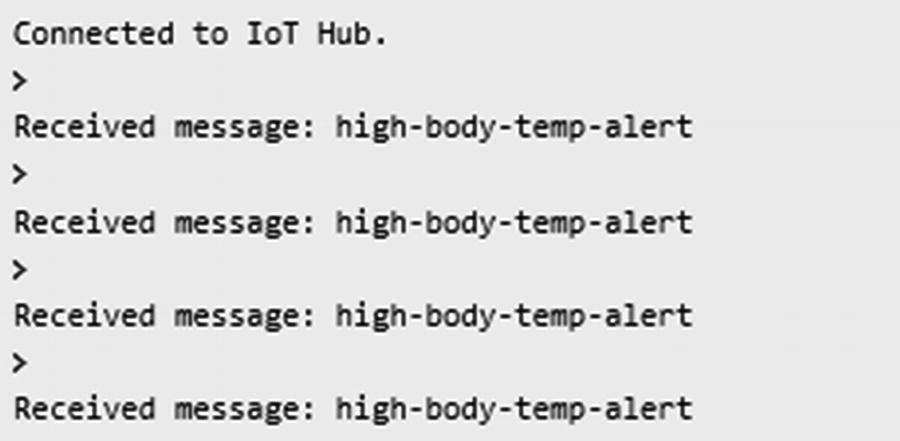
Console output from the node.js application running on Pi
Congratulations. You have successfully created your first-ever IoT network with functioning devices and a solution backend!
Recap
Get an Azure subscription required to use IoT Suite services
Create an IoT Hub in Azure Portal
Register devices in the hub via code and the Portal
Create a simulated device using Azure IoT devices SDK that sends telemetry data to the hub
Create a solution backend that receives device messages, analyzes them, and sends messages to another IoT device
Send push notifications using the Azure Notification Hubs service
Write applications for real IoT devices (Raspberry Pi Zero)
In the next chapter, you will learn about another key enabler of AI 2.0 applications—artificial intelligence.