
The famous saying “Rome wasn’t built in a day” is so true about Microsoft cognitive services. Each service is exposed as a RESTful API by abstracting years and decades of experience, complex algorithms, deep neural networks, fuzzy logic, and research from the Microsoft research team. In Chapter 4, you were introduced to Microsoft Cognitive Services. You also learned how cognitive services are different from traditional programming systems. Later in Chapter 4, you got a sneak preview of all the Microsoft Cognitive Services API that Microsoft has produced.
Chapter 5 continued the journey of cognitive services by covering the prerequisites of creating Cognitive Services and setting up a development environment. You also got familiar with using your first cognitive applications in Visual Studio and recognized the power of the Computer Vision API.
Welcome to this chapter. In this chapter, we extend Cognitive Services by applying them to the smart hospital use case that we introduced in Chapter 1. As you now know, Microsoft Cognitive Services are broadly classified into six main categories, and each of them has 4-5 services, which leads to about 29 services while writing these books. Each of the Cognitive Services can be used in our smart hospital Asclepius Consortium. We will go through some of the most powerful ways of using cognitive services, especially around NLU, speech, and using the Face API, and apply them to the Asclepius hospital example.
Understand some of the powerful ways to apply cognitive services
Understand natural language understanding (NLU) and LUIS
Develop, test, host, and manage the LUIS application for the smart hospital
Interact with the Speech API
Use the Speech API to convert speech to text and text to speech
Use face detection and recognition in hospital scenarios
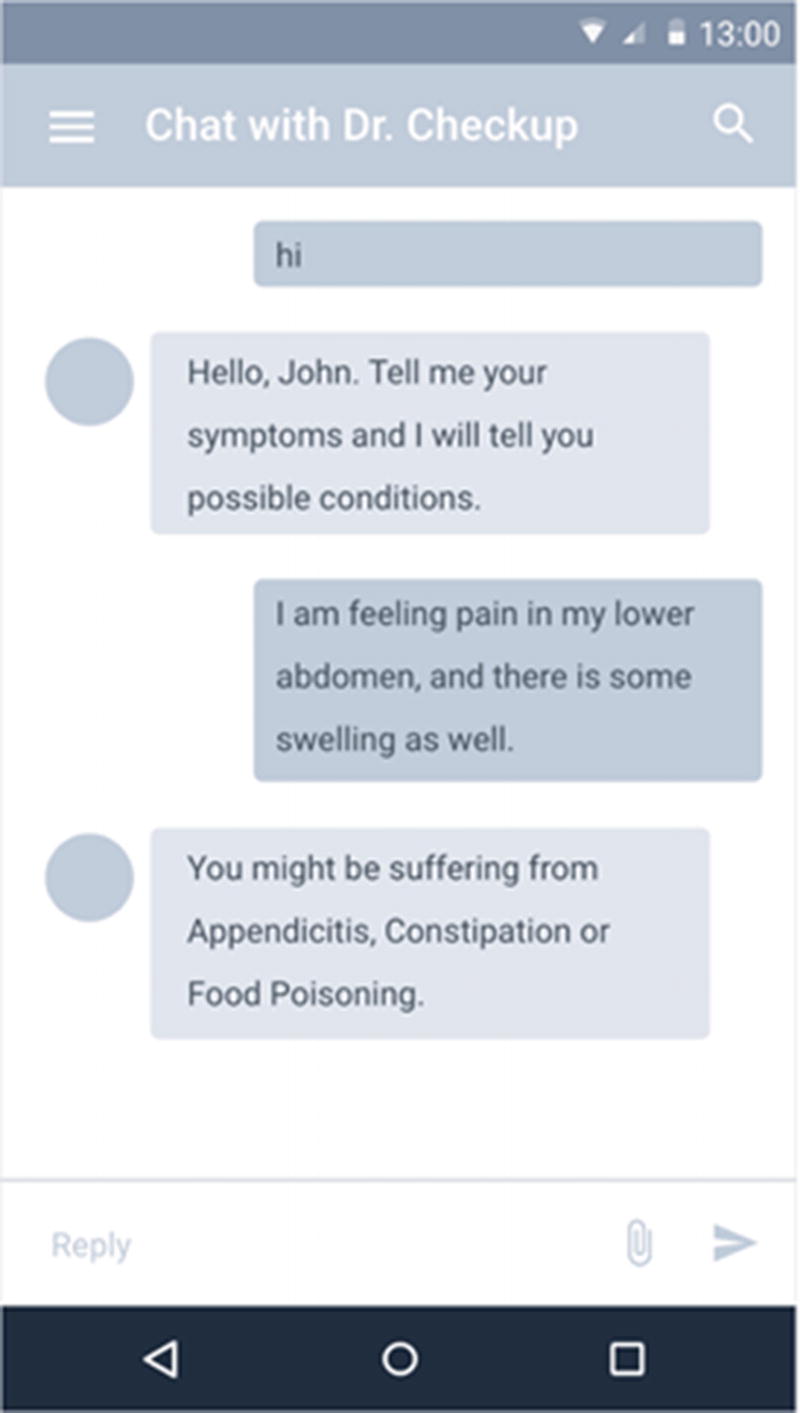
The Dr. Checkup app provides a basic diagnosis

Dr. Checkup is scheduling an appointment with a doctor after chatting with a patient
Asclepius Consortium also uses the same NLU techniques of scheduling appointments in their frontend teller machines.
Microsoft’s Mission and NLU
Microsoft’s earlier mission was to have desktop computers in every home. Microsoft has been very successful in achieving that in most of the Western world. Recently Microsoft revised their mission to “Empowering every person and every organization on the planet to achieve more”. This new mission from Microsoft is more human in nature compared to previously being more technological. The supreme goal of artificial intelligence has always been to serve humanity. In order for AI to serve humanity, it should be able to understand humans. As a first step, AI should understand and process the languages that humans speak.
As more and more intelligent systems are devised, it is important for these systems to understand human languages, interpret the meanings, and then take appropriate actions wherever necessary. This domain of interpreting human languages is called Natural Language Understanding (NLU). NLU is the ability of a machine to convert natural language text to a form that the computer can understand. In other words, it’s the ability to extract the meaning from the sentence. This enables the system to understand the “what” question of the language.
“How does my schedule look today?
Now this question can be asked in a variety of ways. Some of them
What’s my schedule for the day?
Are there a lot of meetings in the office?
How busy is my calendar for today?
To humans, it is immediately clear that these sentences are a person’s way of inquiring about her schedule for the day. For a machine, it may not be clear. In fact, creating an NLU engine has been one of the more complex problems to solve. There is variety of factors, but the main issues is that there is no one algorithm to resolve it. Moreover, training a machine to understand grammar, rules, and slang is difficult. Thanks to the advent of deep learning, we can now achieve great precision of language understanding by training the engine with thousands of utterances, create a pattern recognition based on those examples, and then constantly improve on it to identify formal and informal rules of language understanding.
Based on this NLU theory, various commercial offerings exist and are based on the intent-entity schema that we briefly discussed in Chapter 4. Intent helps in understanding the intention of the user behind the question being asked. If you look at these examples, there were multiple ways of asking same questions, but the intention was the same—get me the schedule for that day. Once we know the right intent, it is then straightforward for the system to respond with a correct answer.
To identify the right intention, NLU systems are also trained to recognize certain keywords. These keywords are called entities. In our previous examples, to get a schedule from a calendar, you often need require person’s name and date. Each of these can be marked as entities. It is important to understand that entities are optional and not all sentences may be accompanied by them. There is also a good chance that a sentence may have more than one entity as well. We are going to discuss identifying intents and entities later in the chapter.
Language Understanding Intelligent Service (LUIS)
The Language Understanding Intelligent Service aka LUIS is Microsoft’s NLU cloud service and is part of the cognitive suite discussed in Chapter 4. It is important to understand that LUIS shouldn’t be treated as a full-fledged software application for your end user. LUIS only replaces the NLU component from the overall stack. It’s an NLU engine that handles NLU implementation by abstracting the inner machine learning model’s complexity. Your frontend still can be a website, chatbot, or any application ranging from a graphical to conversational user interface. In our Asclepius use case, the frontend is mobile application (Dr. Checkup). Before we open LUIS and start working, it is important to understand the underpinnings of LUIS that require deep expertise in design. Let’s look at the behind the scenes aspects of LUIS.
Designing on LUIS
The LUIS framework is just like a clean slate that’s been trained on a few built-in entities. As a first step, it is important to design the LUIS application in an effective manner. Designing a LUIS application requires a profound understanding of the problems that your software is trying to solve. For example, our use case of the smart hospital requires LUIS to be used to converse with patients to book an appointment with a doctor or to talk with the hospital chatbot to detect whether a doctor’s attention is really required. There are no strict guidelines or rules to follow while implementing LUIS. However, based on our experiences while interacting with LUIS and another NLU system, we came up with some high-level guidelines.
Design Guidelines for Using LUIS
Plan your scope first. It is very important to plan the scope and narrow it down to what’s inside the scope of LUIS. Clear identification of the scope is the first step in successfully achieving delivery of LUIS implementation. We recommend you keep the scope of applying LUIS limited to a few tasks or goals.
Use a prebuilt domain (if possible). Once the scope is finalized, you are aware now of the use case or domain that LUIS is going to solve. LUIS also comes with some prebuilt domains that have a set of entities and intents previously defined. These prebuilt domains are also pre-trained and are ready to use. Use prebuilt domain whenever you can. If your requirement is achieved with prebuilt intents or entities, choose them before creating a new one. You can always customize the prebuilt domains. You should always try to pick at least one of the prebuilt domains and entities along, even if you also have to create a few new ones to suit your requirements.
Identify the tasks that your application is going to perform. Once a domain is identified, list the tasks that your application is going to perform. These tasks identify the intention of the end user to access your application. As you may have guessed, create each task as an intent. It is important to break tasks appropriately so that you don’t have tasks that are non-specific. The more tasks you have, the more rigorous the training is.
Identify additional information required for tasks. Not all tasks are straightforward. Most of them require some additional information. This additional information are called entities. Entities complement the intents for identifying specific tasks. You can think of entities as variables of your application that are required to store and pass information to your client application.
Training is a key. At the core, LUIS accepts textual inputs. These inputs are called utterances. LUIS needs to be trained extensively on these utterances before the LUIS model will really understand future utterances. The more example utterances you have, the better the model. In order to identify various utterances, it’s better to collect phrases that you expect the user would type and identify different ways through which the same questions can be asked. If your application must deal with multiple similar use cases, there's a good chance LUIS will get confused with the lack of sufficient training for each of the similar use cases. Despite your training, it is not safe to assume that LUIS will respond with absolute accuracy. LUIS is based on the active machine learning model, which ensures that the LUIS model keeps on learning and enhancing the model in time. In fact, LUIS keeps track of all utterances for which it was unable to predict an intent with high confidence. You will find such utterances under the “Suggested Utterances” section on an intent’s page. Use this option to appropriately label utterances and confirm to LUIS whether it was right or wrong. LUIS training is a continuous process, until you find suggested utterances sections showing no suggestions.
Plan Your Scope First

The high-level interactions between various actors while booking appointments or during initial diagnosis
- 1.
The patient asks, either through a mobile application or the frontend teller machine (either through message or voice), to talk with Dr. Checkup.
- 2.
If the patient submits the query through voice, the mobile app/frontend teller machine uses the Microsoft Speech API to convert the voice into text.
- 3.
The application then passes the text to the LUIS app to determine the intent of the question asked.
- 4.
LUIS performs its NLU analysis and returns its predictions for intent and entity. The result is returned as JSON back to the application.
- 5.
The application checks for top scoring intents in the returned JSON and decides on the desired action. The action can be scheduling an appointment or providing a basic diagnosis. If action is scheduling an appointment, it checks with a doctor’s calendar and sets the appointment. For a basic diagnosis, it talks with the databases by passing the intent and entity combination received.
- 6.
The database has a predefined set of answers stored for the combination of intent and entity. The answer is retrieved and sent back to the mobile application.
- 7.
The application displays the desired result to the patient, either through text or voice.
In these scenarios and applications, NLU plays a vital role in the implementation. Before we delve more into other aspects, let us first look at how to identify intents and entities.
Identifying Intents and Entities
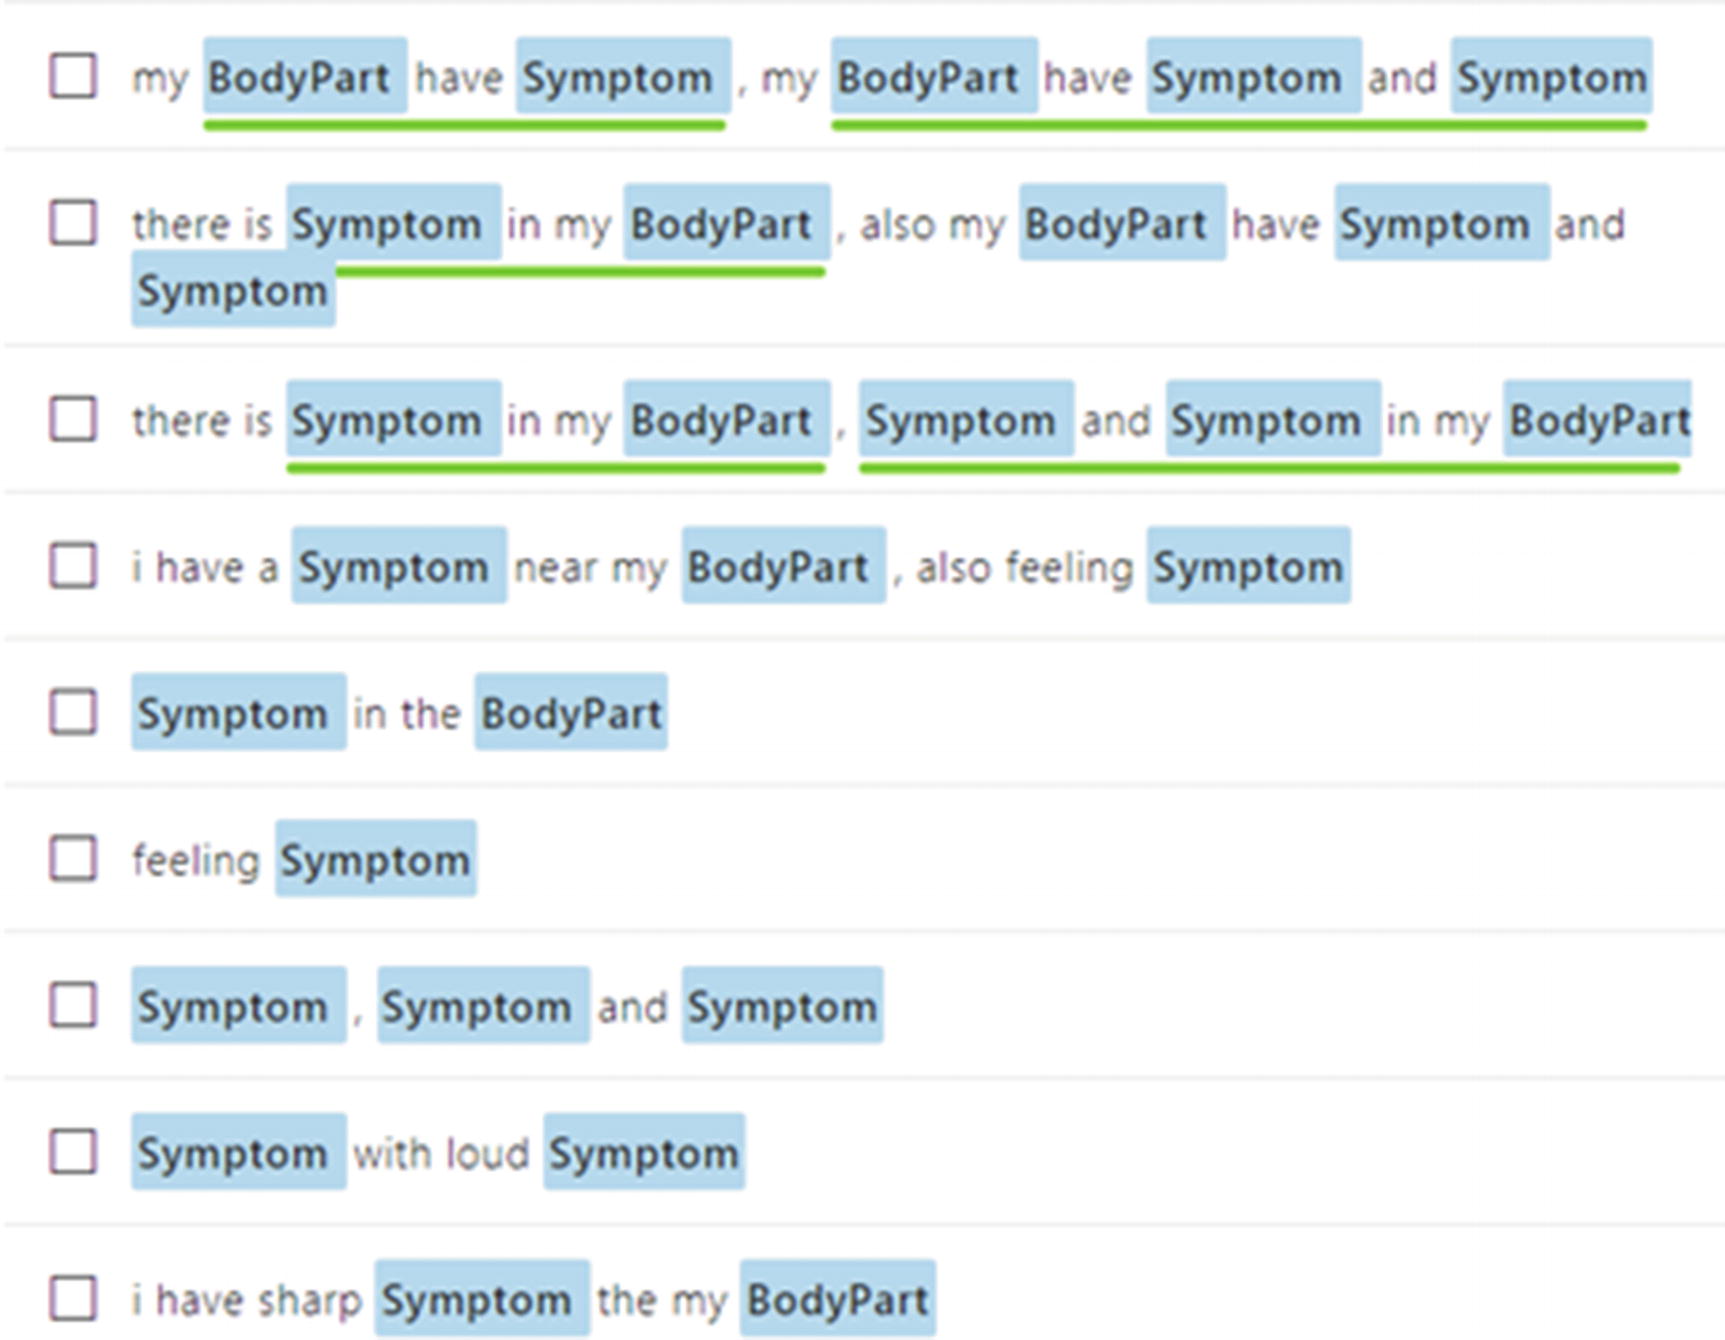
Some of the ways that users can share their symptoms


Some ways to schedule an appointment with a doctor
These examples are for setting an appointment with the doctor and have the entity doctortype associated with them. There are times when the user specifies the intent but doesn’t provide an entity. Then it’s up to the application logic to decide on the next step. You can check back with the user or even proceed to process while assuming some default value. Consider this example:
I want to see a doctor
The user wants to schedule an appointment with a doctor, but doesn’t specify the doctor’s name or even the date and time. In this scenario, you can set the default type for the entity. In this case, it can be a physician for example and the appointment time can be the next available slot.
Creating a Data Dictionary for LUIS
The Data Dictionary Sample for Dr. Checkup
Utterances | Intent | Entity |
|---|---|---|
Schedule an appointment with the physician tomorrow before 5 PM | scheduleAppointment | DoctorType = physician, datetime = tomorrow, AppointmentTime::StartTime = AppointmentTime::EndTime = 5 PM |
Pain in abdomen | checkCondition | Symptom = Pain Body part = abdomen |
Feverish with loud cough | checkCondition | Symptom = feverish Body Part = Loud Cough |
Set an appointment with orthopedist | scheduleAppointment | Doctor type = orthopedist |
This table is just an example, but it would be wise to create it as Excel sheet and use it as a design document for your LUIS application.
Tip
The data dictionary shown in Table 6-1 is a basic dictionary to get started. You can extend it and make it more usable. For instance, add an Answer column that provides a message about what answer would be returned to the user. You can also use this data dictionary to create test use cases.
Identifying intent and entities is the one of the most important tasks. Once the intents and entities are identified, the next task is to create these entities and intents on LUIS. Before you create entities in LUIS, you need to grab a subscription key for LUIS.
Getting a Subscription Key for LUIS

A screenshot of the Azure Service Portal after selecting the new option from the menu

Filling in the form for creating a LUIS subscription key

The LUIS subscription keys are created in the Azure Portal
Apply the Subscription
- 1.
Open the LUIS site from https://luis.ai .
- 2.
Log in through the same Microsoft account that you used in the Azure Portal. While writing the book, LUIS asks for accepting license and grants LUIS permission to access the Microsoft account.
- 3.
Click OK. You are now on the LUIS dashboard page. If this is the first time you have logged in, you will see the MyApps section empty.
- 4.
Click on Create New App to create a new app and specify name, culture, and optional description, as shown in Figure 6-9. Click Done. You can provide your own name and culture as per your logic.
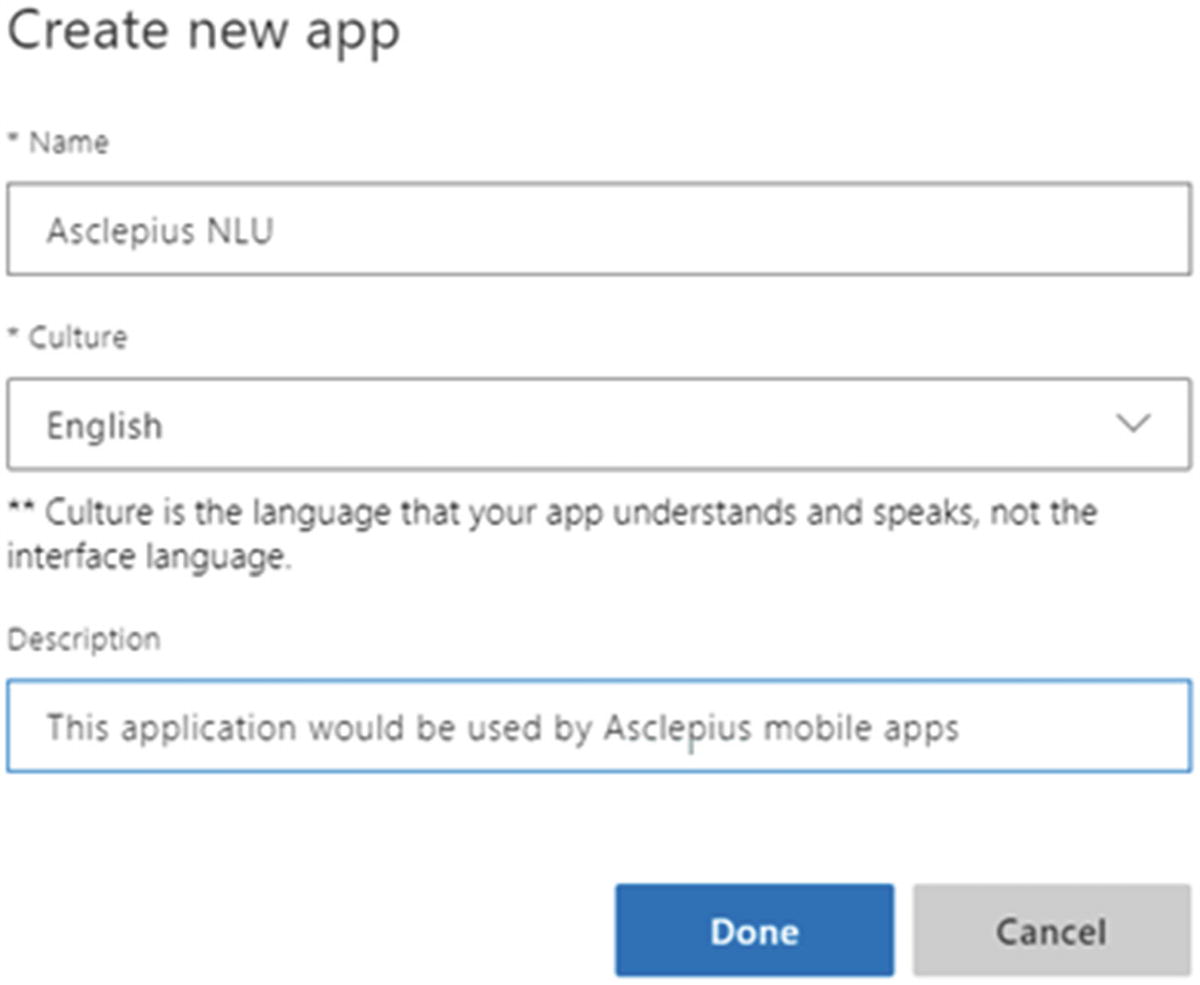
Creating a new application in LUIS
Congratulations, you have quickly created an application. Now it’s time to add your subscription keys to the application before creating intents and entities.
Applying the Subscription Key in LUIS
As you click Done previously, you are redirected to the application’s page. If not, click on Asclepius NLU from the MyApps section.

Assigning a LUIS key to the app
It’s time now to add intents and entities.
Adding Intent and Entities

The ScheduleAppointment intent screenshot with a few utterances
Repeat this process for all the intents, entities, and utterances created in the data dictionary. You should now train, test, and publish the LUIS as an endpoint, which can be used by the mobile application.
Training and Testing LUIS
One of the reasons we followed this process was to ensure that all the intents have some sample utterances. If an intent doesn’t have an utterance, you can’t train the application. Hover over the Train button. You will see the message “App has untrained changes”. Click Train on the top right to train the app. By training, you ensure that LUIS is creating a generalized model with utterances and will be able to identify intents and entities. Once the training process is successfully complete, your Train button should have a green notification bar mentioning this fact. You can now hover the Train button. You will get the message “App up to date”.
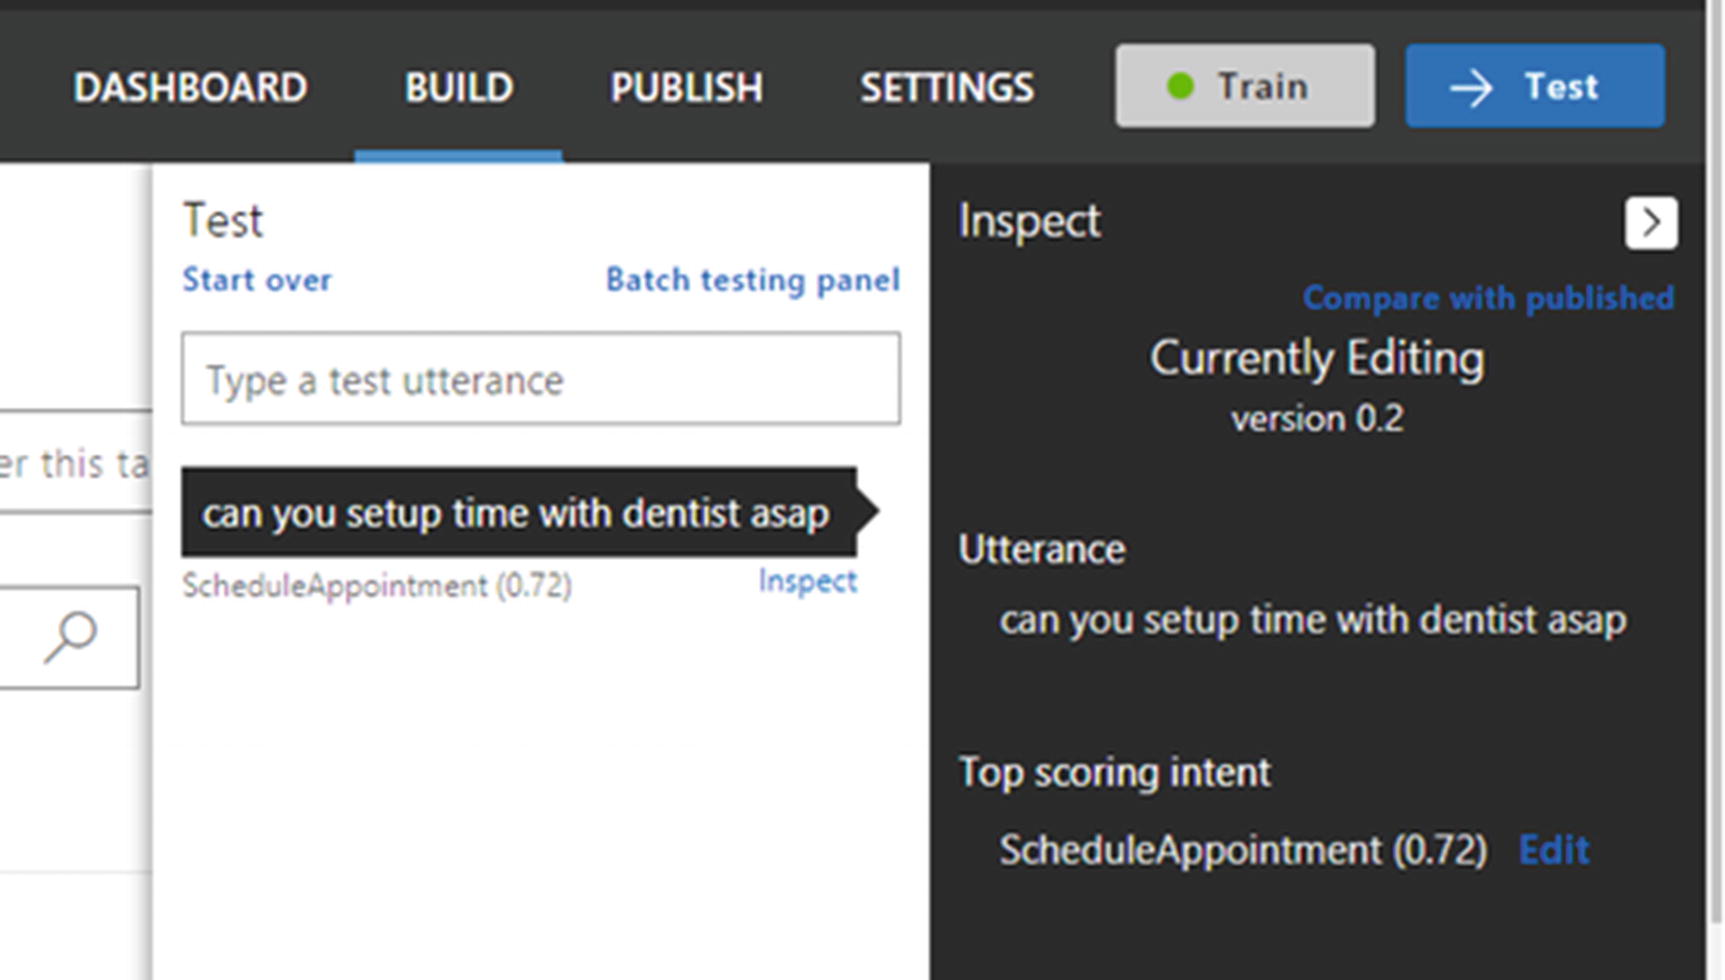
The LUIS test and inspect screen to inspect the LUIS result and change the top scoring intent
You will realize soon that not all tests yield the desired result. Initially, apart from getting a positive output from LUIS, you may also end up getting different intents for your test utterances, or even getting the right intent without an entity. Both require rigorous training. It can come through either through your training utterance or through the production application. For your application to use it, you need to push it to the production endpoint so you can get an HTTP endpoint, which can be used to call your LUIS app.
Publishing LUIS App
The endpoint is nothing but a web service to access a LUIS app. The endpoint receives an utterance via a query string parameter and returns a JSON output with a corresponding intent-entities breakdown. When you are publishing for the first time, an endpoint URL is generated for you based on your application’s ID and the subscription key. This URL remains constant throughout the lifetime of your LUIS app.
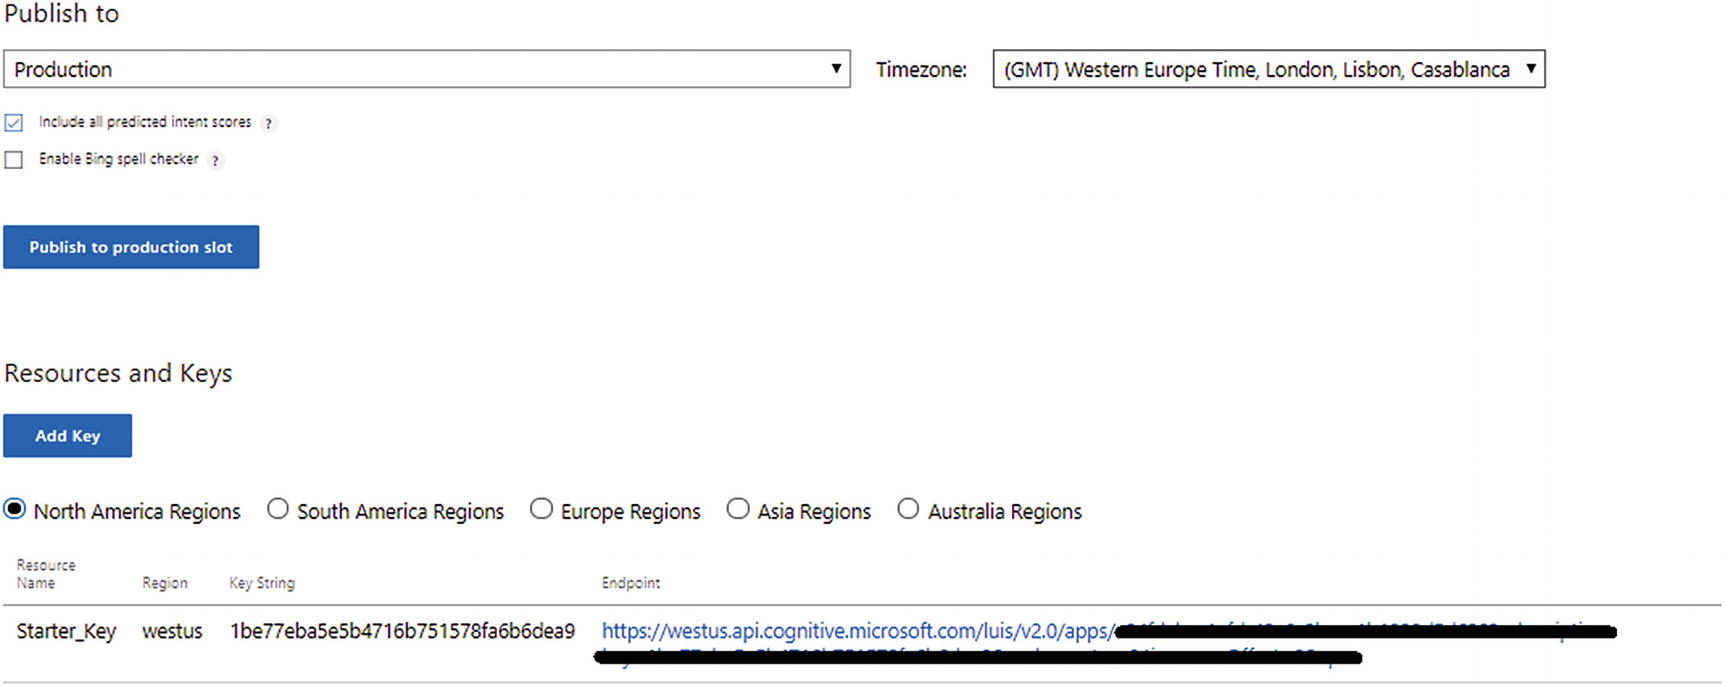
Publishing the LUIS app to get an endpoint
Using a LUIS Endpoint
Using a LUIS endpoint is easy. You just need to call the HTTP endpoint created in the earlier section and pass your query with parameter q. If the endpoint is correct, you start getting the response in JSON, as shown in the following code:
You now understand the essence of training. The more training there is, the higher the confidence score. Our frontend teller and mobile application uses this endpoint and takes the first confidence score to talk to our database, which in turns returns the actual answer to be displayed to the user. Apart from the mobile device and the frontend teller UI, they also have the additional work to maintain the state of the user. LUIS supports a limited set of dialog management but, at the time this book was written, dialog management support hasn’t been so flexible, so we urge your software application to maintain it. Our frontend application also caters to interaction with voice users. Therefore, let’s look at how to implement speech in our application.
Interaction with Speech
There are many new devices coming up almost every morning. Gone are those days where we just expect our devices to understand some set of commands and take actions on them. Interaction with these devices has also been changed drastically in the last decade. Among all of them, speech has been one of the most powerful, and it is of course a natural way for interaction with the users. Consider the personal assistants like Cortana, Siri, or even smart voices controlling cars—almost all of them have the natural interaction of speech. The Asclepius chains of hospitals have patients coming from various fields and they also want their frontend teller machine, along with mobile devices, to have speech interaction capabilities.
Broadly speaking, speech interactions used in the Asclepius mobile and frontend teller applications must convert speech into text or vice versa. Traditionally, implementing speech in the application has been always been a difficult job. Thanks to the Microsoft Cognitive Bing Speech API, which provides the easiest way to enhance your application with speech-driven scenarios. The Speech API provides ease of use by abstracting all the complexity of speech algorithms and presenting an easy-to-use REST API.
Getting Started with Bing Speech API
The Bing Speech API has various implementations of the Speech API to suit customer requirements. Requirements are accomplished by using Speech Recognition and Speech Synthesis. Speech recognition, aka speech to text, allows you to handle spoken words from your users in your application using a recognition engine and convert the words to text. Speak Synthesis, also known as Text to Speech (TTS), allows you to speak words or phrases back to the users through a speech synthesis engine.
Speech to Text
- 1.
Get a JSON Web Token (JWT) by calling the token service.
- 2.
Put the JWT token in the header and call the Bing Speech API.
- 3.
Parse the text.
Getting the JWT Token
All calls to the Microsoft Cognitive Services API require authentication before actually using the service. Unlike other Cognitive Services, which just require a subscription key to be passed, the Bing Speech API also requires an access token, also called a JWT token, before it’s called. access_token is the JWT token passed as a base64 string in the speech request header. To obtain the JWT token, users need to send a POST message to the token service and pass the subscription key as shown here:
The following code shows you how to use this in the frontend teller ASP.NET application:
Code Walkthrough
- 1.
Create a URL pointing to the speech endpoint with a necessary parameter. Ensure each parameter is been used once, otherwise, you end up getting an HTTP 400 error.
- 2.
Call the getValidToken method to get the JWT token. In order to ensure utmost security, each JWT token is valid for only 10 minutes. Therefore, tokens need to be refreshed on or before 10 minutes to ensure they are always valid. Calling the Speech API with an invalid token results in an error. GetValidToken shows a mechanism to achieve it. You are also free to use your own method. Internally, the GetValidToken method calls the getNewToken method to get the JWT token.
- 3.
Pass the valid JWT token as an authorization header prefixed with the string Bearer.
- 4.
Convert the audio being passed from analog to digital by using codecs.
- 5.
Call the Speech API asynchronously and get the JSON data.
- 6.
Deserialize JSON to a .NET object for further use.
Congratulations! You now know how to convert any speech to text with just a few lines of code. Let’s also learn how to convert text to speech as well.
Text to Speech
Text-to-speech conversion follows nearly the same pattern of speech-to-text conversion. Let’s look at the code first before going through the code walkthrough:
Code Walkthrough
- 1.
Create a SSML markup for the text to be converted into speech by calling the generateSSML method.
Note Speech Synthesis Markup Language (SSML) is a common standard way to represent speech in XML format . It is part of W3C specification. SSML provides a uniform way of creating speech-based markup text. Check the official spec for complete SSML syntax at https://www.w3.org/TR/speech-synthesis .
- 2.
Call the Text to Speech API. You first need to get a valid token. For that, you can reuse the getValidToken() method shown in the speech-to-text code.
- 3.
Make a POST request to https://speech.platform.bing.com/synthesize to get a byte array of the audio sent back as a response by the Text to Speech API. There are various ways to make POST requests. We use a popular third-party HTTP library called RestSharp. Easy installation of RestSharp in Visual Studio is supported via NuGet.
- 4.
Use a SoundPlayer class, a built-in .NET class, to play audio files and streams, in order to convert a byte array into speech. SoundPlayer is a built-in .NET class that plays audio files and streams. The format of this audio file is determined by the value of the x-Microsoft-outputformat header. As SoundPlayer only supports WAV audio files, use riff-16khz-16bit-mono-pcm as the value for the outputformat header.
Identifying and Recognizing Faces
Like any smart hospital, Asclepius has a very tight surveillance system. Asclepius consortium is also very careful about the number of people visiting patients. The Asclepius surveillance system monitors inventory warehouse, restricts only a limited set of doctors and nurses into security and warehouse zones, and even with the attending patients. This smart digital action helps restrict unwanted people from entering buy raising the alarm when a security breach is attempted. Asclepius also has an automated attendance system, which doesn’t require the user to carry an identity card or any device. As soon as the employee enters the hospital, she is identified from the CCTV camera and her attendance is registered. Her time in and out of the system is also being monitored. All rooms and bays have digital identification mechanism for allowing only authorized people to enter rooms. This all has been achieved through the use of various cognitive technologies, especially the Face API.
What Does the Face API Work?
Face API at a high level helps in detecting, identifying, verifying, and recognizing faces. It also can be used to get more insights about a face. Face detection and identification is not a new concept. It’s been used across academia, government institutions, and industries for decades in one form or another. The Face API extends it by bringing years of Microsoft research into face detection and recognition in a simple-to-use API.
How Does Asclepius Achieve Strong Surveillance?
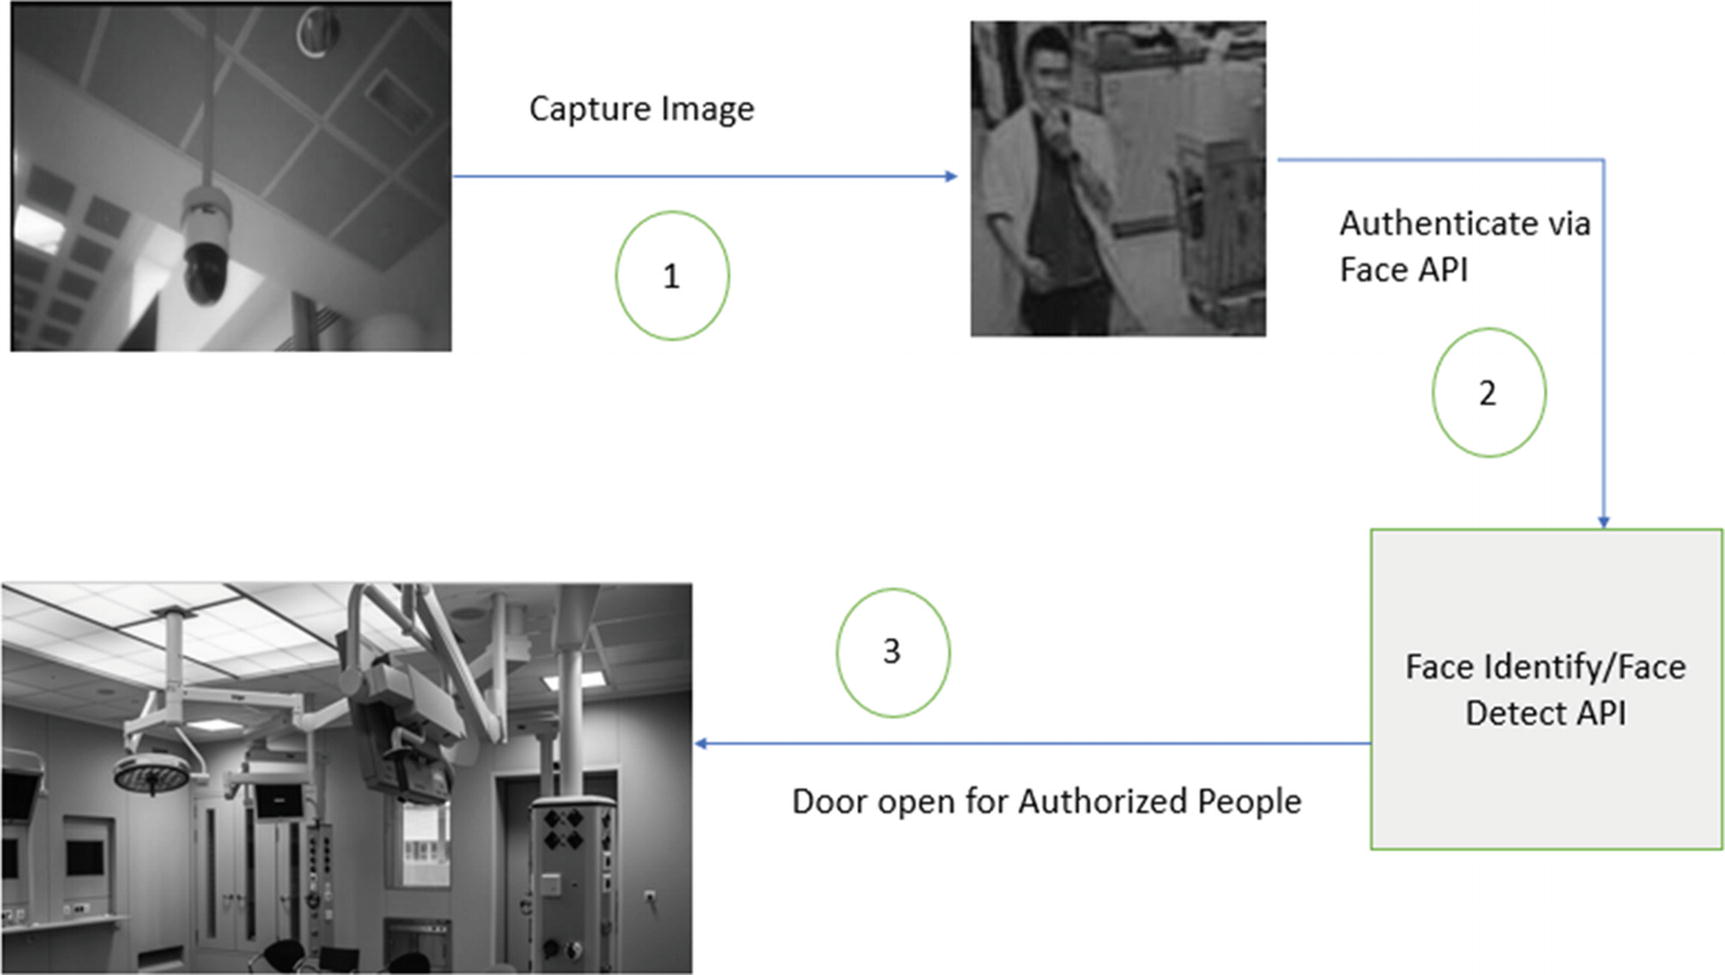
How Asclepius consortium is using face recognition to recognize people and open the door for them
Getting Keys for the Face API
- 1.
Go to the Azure Portal ➤ AI + Cognitive service blade.
- 2.
Select the API type as Face API.
- 3.
Fill out the location, pricing tier, and resource group, and then click Create to create a subscription.
Make sure the subscription key for the Face API is handy. You’ll need it soon.
Creating a Person and Person Group
- 1.
Create a Person group.
- 2.
Create a person.
- 3.
Add faces to the person.
- 4.
Train the Person group.
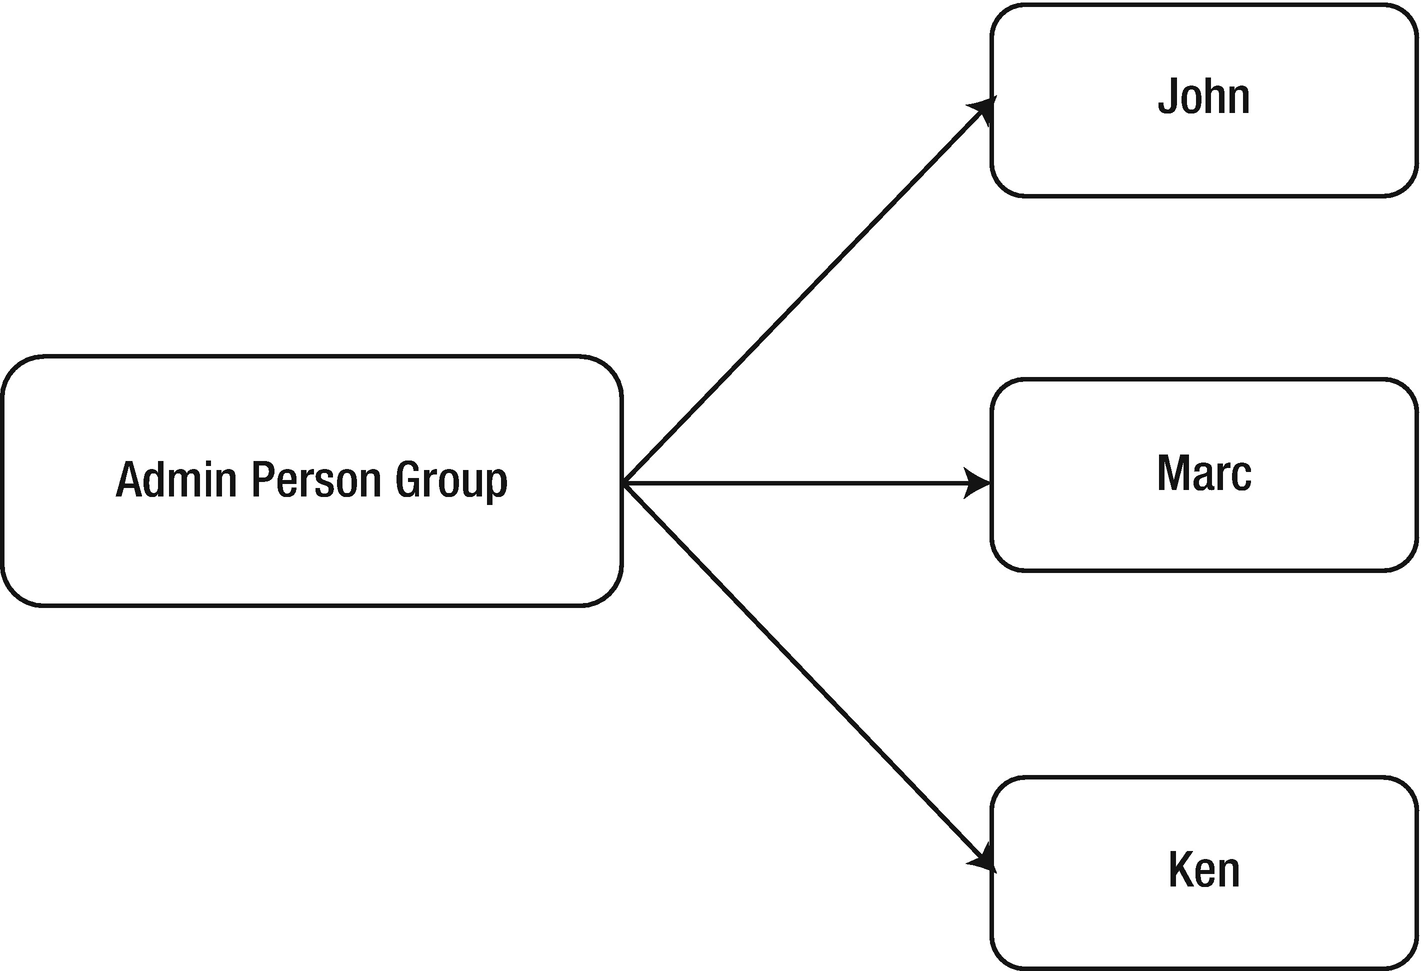
The correlation between the Person group and a person
As shown in Figure 6-15, John, Marc, and Ken are part of the Admin Person group. Likewise, Asclepius has other person groups that handle authentication and authorization for other tasks. For example, the Regular Person group is for all the regular employees in the hospital. The Regular Person group is used to handle the automated attendance process by monitoring and validating all people entering the hospital using a secured bay.
Creating a Person group profile is a straightforward and easy process. You need to provide an HTTP PUT API, which is available at https://[location].api.cognitive.microsoft.com/face/v1.0/persongroups/, by passing the Person group name and the subscription key of the Face API that you created earlier.
If you call the API with a valid subscription key and your person name is unique, you will get successful response 200 with an empty response body. Ensure that all the Face APIs only support application/json.
Once all the groups are added, the next step is to add a person to these groups. Adding a person is also an easy task. You need to call a https://[location].api.cognitive.microsoft.com/face/v1.0/persongroups/{personGroupId}/persons where the location needs to be replaced with the location used while getting the Face API and persongroupid needs to be replaced with the Person Group name in which this person needs to be added. The Person name to be created needs to be part of the JSON body request. For example, the following code shows how to add Nishith to the Admin group created previously:
Successful calls create a unique person ID with JSON response shown here:
Tier | Person per Person Group | Persons per Subscription |
|---|---|---|
Free Tier | 1K | 1K |
S0 | 10K | 1M |
If you exceed the limit, you will get the QuotaExceeded error. While creating a person, you didn’t provide any faces.
Add Faces
In order to add faces, call https://[location].api.cognitive.microsoft.com/face/v1.0/persongroups/{personGroupId}/persons/{personId} via an HTTP Post. Be sure to replace the location, persongroupid, and person ID with the appropriate values. Pass the image as an URL in the application body. For example, use the following code to add Nishith’s image to the Nishith Person in the Admin group:
A successful call with this URL will result in returning a persisted face ID:
Make sure the image is an URL and is specified in the request body; your application should be Internet accessible. Only files having extensions of JPEG, PNG, GIF, and BMP are supported and each image should not be more than 4MB. Each person can have multiple faces so efficient training can be done. You can tag up to 248 faces per person.
Training Is the Key
More training results in better accuracy. We must now train the Person group. Any changes to the faces would require training the Person group again before using it to identify faces. In order to train the Person group, give an HTTP POST call to https://[location].api.cognitive.microsoft.com/face/v1.0/persongroups/[persongroupname]/train and pass the subscription key. Replace the persongroupname and location appropriately. For example, to train the Admin Person group, the HTTP request would be:
A successful call to the API would result in Empty JSON.
Using the Face API for Authentication
Once a person and the Person group are trained, the Face API can then be used to authenticate or identify a face from an unknown Person group. As mentioned, all the bays and rooms of Asclepius have digital entrance mechanisms that are supported by Smart CCTV cameras. The digital locks are tied to one or more Person groups. Door locks are only open when the system authenticates and authorizes a person as being part of the Person group.
As and when a new person tries to enter a room, the CCTV camera first calls the Face Detect API by passing the captured image from CCTV to detect human faces in the image, which also returns face IDs for those faces. Those face IDs are then been passed to the Face Identify API to test it against person groups. When the Face Identify API returns a confidence score of more than .9, the door opens. The system also tracks the time spent in that room as well.
To call the Face Detect API for the image being captured, use the URL https://westus.api.cognitive.microsoft.com/face/v1.0/detect?returnFaceId=true&returnFaceLandmarks=false . Then pass the subscription key as the header and the image being captured from the CCTV camera as part of the JSON request body. For example:
The response will return an array of face entries in JSON, along with face ID, as shown in this code.
In this code, a face is returned along with the face ID. Use the face ID and pass it to the Face Identify API, as shown in the following code, to validate whether the face ID captured is part of the Person group that’s authorized to enter the bay:
In this code, the confidenceThreshold parameter is set to .9, which acts as a confidence score for determining the identity of a person. ConfidenceThreshold is an optional parameter and should have a value between O and 1. With proper subscription, it returns the result as a JSON API:
In this code, the face is being detected with 100% accuracy, so the digital door opens.
Your Assignment
How many patients and people came into the hospital yesterday?
Were the patients happy after consulting with the doctor?
Who entered or attempted to enter the secured inventory warehouse?
What are all the products and tools taken out of inventory?
How do we respond to critical and severe patients 24X7?
Can we monitor people activity and ensure that people get proper support whenever and wherever required?
When did Dr. John (for example) enter the hospital and where is he currently? Or when was the patient named Mike last attended to?
How can we identify instruments, doctors, and other inventory objects?
Hint
We discussed Video AI briefly in Chapter 4, but essentially Video AI helps in processing videos, generating insights such as the face recognition and tracking, detecting voice activity, performing sentiment analysis, detecting scenes, and much more. You need a couple of APIs of Video AI to do this. You need an Index API to index, a Search API to do a search, a Visual Insights API to get insights, and then the Streaming API to do the actual streaming. This is achieved by discovering content in the video and generating insights. To learn more about it, visit https://Vi.microsoft.com . At the time this book was written, Video Indexer is in preview mode.
Recap
In this chapter, you learned about some of the powerful ways to use Microsoft Cognitive Services and apply them to the Asclepius hospital example. You got an in-depth understanding about LUIS and learned how to create, train, test, and publish a LUIS application. You also learned how to convert text to speech and speech to text by calling the Speech API. Later in the chapter, you learned how to use the Face API to identify and recognize faces and to create a strong surveillance system.