
Chapter 11. Continuous integration tools
Life is a continuous exercise in creative problem solving.
Michael J. Gelb
This chapter covers
- Practicing continuous integration
- Introduction to CruiseControl
- Introduction to Hudson
In the two previous chapters we described ways to execute our tests automatically by using tools such as Ant and Maven. Our tests were then triggered by the build. Now it’s time to go to the next level: automatically executing the build and the tests at a regular interval by using some other popular tools. In this chapter we introduce the paradigm of continuous integration and show you how to schedule your project to be built automatically in a certain timeframe.
11.1. A taste of continuous integration
Integrating the execution of JUnit tests as part of your development cycle—code : run : test : code (or test : code : run : test if you’re test-first inclined)—is an important concept in the sense that JUnit tests are unit tests, that is, they test a single component of your project in isolation. A great many of the projects out there, however, have modular architecture, where different developers on the team work on different modules of the project. Each developer takes care of developing their own module and their own unit tests to make sure their module is well tested.
Modules interact with each other, so we need to have all the different modules assembled to see how they work together. In order for the application to be test proven, we need another sort of test: integration or functional tests. As you already saw in chapter 3, these tests test the interaction between different modules.
But almost always integration tests are time consuming, and as a single developer you may not have all the modules built on your machine. Therefore, it makes no sense to run all the integration tests during development. That’s because at development we’re focused on only our module, and all we want to know is that it works as a single unit. During development we care mostly that if we provide the right input data, the module not only behaves as expected but also produces the expected result.
Test-driven development taught us to test early and test often. Executing all our unit, integration, and functional tests every time we make a small change would slow us immensely. To avoid this, we execute at development time only the unit tests—as early and as often as reasonable. What happens to the integration tests?
11.1.1. Continuous integration testing
Integration tests should be executed independently from the development process. The best way is to execute them at a regular interval (say, 15 minutes). This way, if something gets broken, you’ll hear about it within 15 minutes, and there’s a better chance for you to fix it.
Definition[1]
1 This definition is taken from a marvelous article by Martin Fowler and Matthew Foemmel. It can be found here: http://www.martinfowler.com/articles/continuousIntegration.html.
Continuous integration (CI)—Continuous integration is a software development practice whereby members of a team integrate their work frequently. Usually each person integrates at least daily, leading to multiple integrations per day. Each integration is verified by an automated build (including a test) to detect integration errors as quickly as possible. Many teams find that this approach leads to significantly reduced integration problems and allows for the development of cohesive software more rapidly.
To get the integration tests executed at a regular interval, we also need to have the modules of the system prepared and built. After the modules are built and the integration tests are executed, we’d like to see the results of the execution as quickly as possible.
We need a software tool to do all of the following steps automatically:
- Check out the project from the source control system.
- Build each of the modules and execute all of the unit tests to verify that the different modules work as expected in isolation.
- Execute integration tests to verify that the modules integrate with each other in the expected way.
- Publish the results from the tests executed in step 3.
Several questions may arise at this point. First, what’s the difference between a human executing all these steps and a tool doing so? The answer is, there’s no difference and there shouldn’t be! Apart from the fact that no one can bear doing such a job, if you take a close look at the first item in the list, you’ll see that we check out the project from the source control system. We do that as if we were new members of the team and just started with the project—with a clean checkout in an empty folder. Then, before moving on, we want to make sure that all of the modules work properly in isolation, because if they don’t, it makes little sense to test whether they integrate well with the other modules. The last step in the proposed scenario is to notify the developers about the test results. The notification could be done with an email, or an ICQ message, or by publishing the reports from the tests on a web server.
This overall interaction is shown in figure 11.1. The CI tool interacts with the source control system to get the project (1). After that it uses the build tool that your project is using, builds your project, and executes different kinds of tests (2 and 3). Finally (4), the CI tool publishes the results and blows the whistle so that everybody can see them.
Figure 11.1. Continuous integration scheme
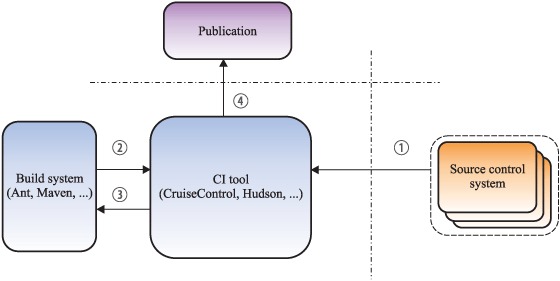
The four steps are general and could be greatly improved. For instance, it would be better to check to see if any changes have been made in the source control system before we start building. Otherwise, we waste the CPU power of our machine, knowing for sure that we’ll get the same results.
Now that we agree that we certainly need a tool to continuously integrate our projects, let’s see which open source solutions we might want to use (there’s no sense in reinventing the wheel when there are good tools already made for us).
11.2. CruiseControl to the rescue
The first open source[2] project we’re going to look at is called CruiseControl (CC) (http://cruisecontrol.sourceforge.net/) and is currently the de facto standard when it comes to continuous build process. This project was created by a company called ThoughtWorks and was the first continuous integration server available.
2 The CruiseControl framework is distributed under its own BSD-style license. The software is an OSI-certified open source solution.
11.2.1. Getting started with CruiseControl
The first thing to do before we can start building our code continuously is to manage our resources. By this we mean finding a suitable host machine for our CruiseControl server. We need to manage the resources we have in such manner as to dedicate a separate machine to continuous integration. We may not need this at the beginning, but with time our project will get bigger, and the CI build will take longer, so it’s always better to have a separate machine for the integration build.
Another good practice is to create an ad hoc user on the host machine for the CC server. This user will have the right permissions to start the continuous server and execute the builds.
Once you find the host for the CruiseControl server, it’s time to install it. The installation procedure is pretty simple. You go to the CruiseControl website (http://cruisecontrol.sourceforge.net/) and download the zip distribution of your choice. As this book is being written, the latest version of CruiseControl is 2.8.3, and we use the binary distribution.
Once you download the distribution, you need to extract it into a folder (probably the best place to extract the zip is in the home directory of the CC user you just created), which from now on we refer to as $CC_HOME. In the $CC_HOME directory, you should see the content we shown in table 11.1.
Table 11.1. Default content of the $CC_HOME folder
|
File/folder |
Used for |
|---|---|
| apache-ant-distribution | Distribution of the Apache Ant project that comes bundled with the CruiseControl server distribution. You could choose to use this distribution or any later version. |
| docs | Documentation of the CruiseControl project. |
| lib | Various third-party libraries for the project. |
| logs | The logs of the continuous builds. |
| projects | The projects you build continuously. By default there’s a sample project already set up in this folder called connectfour. |
| webapp | Used to store a GUI to the build server. |
| config.xml | The main configuration file of CruiseControl. |
| cruisecontrol script | This .bat or .sh script (depending on the architecture you’re using) is used to start CruiseControl. |
There are several things to notice in the folder structure within the $CC_HOME folder. As you can see, the CruiseControl package comes with an Apache Ant distribution. But this doesn’t mean that you can’t use Maven as a build system. You can use whichever one you like best. We talk further on this topic later on.
Another thing that’s worth mentioning is the projects folder. This folder is where you store the projects you want to build continuously. If you look in that folder you’ll see a sample project called connectfour. This is a checked-out project, so before moving on it’s good to take a brief look at it.
Now that we’ve found a host for our CruiseControl installation and we’ve seen how the project is structured, let’s start using it by setting up a project to build.
11.2.2. Setting up a sample project
Setting up a project in CruiseControl is straightforward. You need to do only three things:
- Check out your project in the projects folder.
- Configure CruiseControl for the project’s build.
- Start CruiseControl.
Let’s look at these steps one by one.
Usually we keep the source in a central repository using a source control system, and that system has responsibility for managing the version of your software. If you’re using Subversion as your revision control system, you can easily check out your project by first navigating to the $CC_HOMEprojects folder and then executing the following command there:
svn co http://url.of.your.repository.here/ theNameOfMyProject
You need to specify the URL of your source repository and also the name of the folder in which to check out the project. Then Subversion will check out a local copy of your project in the theNameOfMyProject folder.
11.2.3. The CruiseControl config file explained
Now that we have the project checked out in the projects folder, it’s time to configure CruiseControl to build it the way we want. The configuration itself is done with a file called config.xml. You can find the config script in the $CC_HOME folder, and if you look at it, you should see something like listing 11.1.
Listing 11.1. CruiseControl’s config.xml
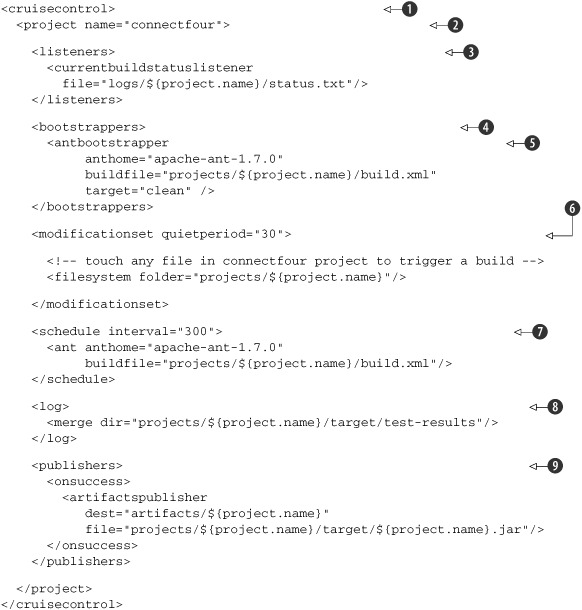
This config file describes the build for the connectfour project. We’ll walk through it and explain what the different parts mean, so that later you can modify the script with your project’s configurations.
We start with a global cruisecontrol tag ![]() , which is required, and inside that global tag we list all the projects we want to build
, which is required, and inside that global tag we list all the projects we want to build ![]() . We can have multiple projects being built, but that means that we must give all the projects a distinct name (using the
name attribute of the project tag).
. We can have multiple projects being built, but that means that we must give all the projects a distinct name (using the
name attribute of the project tag).
The listeners element ![]() is used mainly to enlist different pluggable listener instances. These listeners are notified of every project build event
(like the start or end of the project). For instance, in our config.xml we define a currentbuildstatuslistener, which we use to write the project’s statuses in a file, specified by the file attribute.
is used mainly to enlist different pluggable listener instances. These listeners are notified of every project build event
(like the start or end of the project). For instance, in our config.xml we define a currentbuildstatuslistener, which we use to write the project’s statuses in a file, specified by the file attribute.
Listeners in CruiseControl are interesting creatures, so we’d like here to spend a few lines on them. As you’ve probably noticed, building the project on a regular schedule wastes a lot of resources. CruiseControl is smart in that it doesn’t fire a new build unless it detects some changes in the source control system. Otherwise, the build would be pointless, because we’d get the same results. But how do we distinguish whether the CruiseControl server was up and skipped the build because there were no changes in the source control system or the server was down? The solution is the listeners. You can configure CruiseControl’s listeners to log everything in a file, somewhere on the filesystem. The upside is that the events that activate the listeners are triggered regardless of the state of the source control system. This way you can keep track of whether a build was attempted.
The next thing in our config.xml is the bootstrappers element ![]() . This is a container element to define some actions that need to be taken before the build is executed. Again, the bootstrappers are run regardless of whether a build is necessary or not. In our config file we’ve specified an antbootstrapper
. This is a container element to define some actions that need to be taken before the build is executed. Again, the bootstrappers are run regardless of whether a build is necessary or not. In our config file we’ve specified an antbootstrapper ![]() that will invoke the clean target of our project’s build descriptor and will clean all the resources we’ve used during the previous build.
that will invoke the clean target of our project’s build descriptor and will clean all the resources we’ve used during the previous build.
The modificationset element ![]() defines the sets of files and folders that CruiseControl will monitor for changes. One thing to remember here is that the
build is attempted only when a change is detected on any of the sets listed in the modificationset element.
defines the sets of files and folders that CruiseControl will monitor for changes. One thing to remember here is that the
build is attempted only when a change is detected on any of the sets listed in the modificationset element.
The schedule element ![]() is the one that schedules the build. The interval parameter specifies the build time interval (in seconds), and inside the schedule element we list the type of build system we’re using. We need to specify the home folder of the build system and also the
buildfile to execute. In our config file we’ve specified Ant, but you can use Maven without any problems as well.
is the one that schedules the build. The interval parameter specifies the build time interval (in seconds), and inside the schedule element we list the type of build system we’re using. We need to specify the home folder of the build system and also the
buildfile to execute. In our config file we’ve specified Ant, but you can use Maven without any problems as well.
The log section ![]() is optional and is used to specify where the logs of the execution should be stored. The merge element inside it tells CruiseControl which logs of the build execution are valuable and should be stored in the log directory
of the CruiseControl execution. In our example, we only care about the .xml files from the JUnit execution, so we’re going
to store them in the log folder.
is optional and is used to specify where the logs of the execution should be stored. The merge element inside it tells CruiseControl which logs of the build execution are valuable and should be stored in the log directory
of the CruiseControl execution. In our example, we only care about the .xml files from the JUnit execution, so we’re going
to store them in the log folder.
The last section is the publishers section ![]() , and it’s used to make the final steps of the scheduled build. The same ways the bootstrappers are executed every time before the build, the publishers are executed every time after the build, regardless of the result of the build. In publishers we can specify what whistles are blown as the build finishes. It could be sending an email, publishing the produced artifacts
somewhere on the internet, or posting a message on the Jabber Messenger. In the example shown previously, we publish the result from the build (the .jar file from the target folder) into the artifacts folder. We do that
only if the result from the execution is successful (see the onsuccess element).
, and it’s used to make the final steps of the scheduled build. The same ways the bootstrappers are executed every time before the build, the publishers are executed every time after the build, regardless of the result of the build. In publishers we can specify what whistles are blown as the build finishes. It could be sending an email, publishing the produced artifacts
somewhere on the internet, or posting a message on the Jabber Messenger. In the example shown previously, we publish the result from the build (the .jar file from the target folder) into the artifacts folder. We do that
only if the result from the execution is successful (see the onsuccess element).
So far, so good—we’re able to start CruiseControl, and according to the configuration in the listing, it will build our project every 300 seconds (if there’s a change in the source control system). So let’s do it. Navigate to the $CC_HOME folder and start the CruiseControl server by issuing the following command:
cruisecontrol.bat
Or in case of UNIX,[3] execute
3 You need to check to make sure that the .sh script has executable modifiers set.
./cruisecontrol.sh
CruiseControl will be executed and will look for the config.xml file to read. If you’ve done everything right, after execution you should see something similar to figure 11.2.
Figure 11.2. Executing CruiseControl for the first time
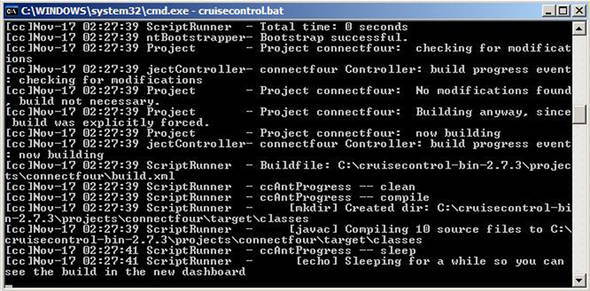
Now it’s time to make a change in the repository, and hopefully after 300 seconds you’ll see the build being executed again.
Here’s an interesting question: how often should you build your projects? This is a tough question, and it all depends on you and on the time you need to make a new build. It makes little sense to make a build every minute when you need more than a minute to execute the build itself. Keep in mind that this is a book about software testing, and we all propagate a lot of testing, using not only JUnit but also all kinds of integration and functional testing tools. This means that production builds tend to be time consuming.
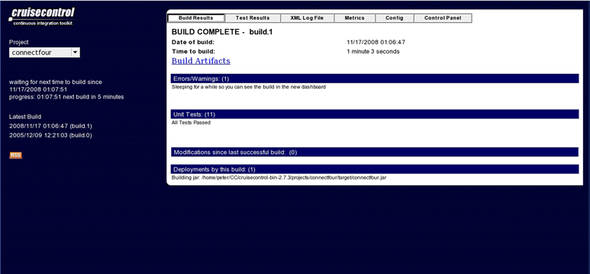
CruiseControl also provides a way to control your scheduled builds through a nice GUI, by starting a Jetty instance. By default, this Jetty instance is started on port 8080, but you can change it (in case that port is already taken). To do so you need to change the port property in your jetty.xml file in the etc folder. For our purposes we start CC on port 8888. You can check the GUI by visiting http://localhost:8888/cruisecontrol/ in a browser. You should be able to see something like the screen displayed in figure 11.3. As you can see, there some nice details on how many builds were iterated, some detailed statistics on how many of them failed, and, of course, the JUnit logs. There’s also an RSS feed that you could subscribe to, to get the results from the execution.
Figure 11.3. CruiseControl control panel in the browser
Let’s move on. Some things are working, but currently the way they are doesn’t give us much data. If we look in the console or the GUI, we can see that the build is going well, but it’s a tedious task to look there all the time. What if we had some way to get the results from the execution directly into our email or, even better, get the email from CruiseControl only in case things go bad?
This is possible, and all we have to do is add another publisher in our config.xml. The section we want to add is shown in listing 11.2.
Listing 11.2. CruiseControl’s htmlemail notification
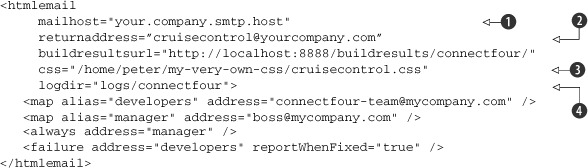
The htmlemail publisher defines the notification emails to be sent. We start by defining the mailhost to use for sending the emails ![]() and also from what address the emails are coming
and also from what address the emails are coming ![]() . These two, along with the buildresultsurl parameter (the location at which our build results reside), are required. All the rest of the parameters are optional. We’re
able to specify a custom CSS stylesheet
. These two, along with the buildresultsurl parameter (the location at which our build results reside), are required. All the rest of the parameters are optional. We’re
able to specify a custom CSS stylesheet ![]() and the path to our logs
and the path to our logs ![]() .
.
The last touch would be to create aliases to which persons the notifications should go. We use the map element to map the alias to an email. After that, we specify on what occasion we want those guys to receive email notifications. By default, CruiseControl delivers notification on both success and failure. But that’s too much information for the development team, and that’s why we’ve listed them to receive only emails on failure and when the problems get fixed.
Now it’s time to restart the CruiseControl server and break the build on purpose. Commit something that’s breaking the build! In only 300 seconds, you should get an email, looking like the one shown in figure 11.4.
Figure 11.4. Email notification from CruiseControl server

As you can see, the report gives you information on not only which JUnit test failed but also the last guy to make a commit in the source control system. It’s pretty easy to determine which member of the team gets the blame for breaking the integration.
CruiseControl has a pluggable architecture, and as you saw, you can plug different listeners, or bootstrappers, to do things before, during, or after the build execution. You can also specify different publishers for different ways of notifying the results from the build execution. Along with the htmlemail method we already covered, there’s a publisher to send an instant message on Yahoo! Messenger or on Jabber Messenger or by posting the results on a blog and collecting them through an RSS feed.
Let’s move on and take a look at another continuous integration server called Hudson. After we’ve covered both of them, you can compare them and choose whichever one you want to use.
11.3. Another neat tool—Hudson
As we mentioned in the beginning of the chapter, CruiseControl was probably one of the first continuous integration servers available. But there are a whole bunch of other software tools out there, trying to compete with CruiseControl by introducing some interesting new features. Some of those tools aren’t even free (like AntHill Pro, Hudson, or Cruise[4]), and those include not only the product you purchase but also training and support.
4 Cruise and CruiseControl aren’t the same! Although they both originated from the same company, ThoughtWorks, CruiseControl was open sourced and is free to use. Cruise is still commercial software.
For the sake of completeness, we need to cover another tool. This way you can choose whichever tool you like. Remember, your software quality will improve not from the tool you choose to use but rather from the fact that you decided to practice continuous integration!
11.3.1. Introducing Hudson
Hudson (http://hudson-ci.org/) is an open source project for continuous build. Like any other software for continuous build, it’s based on the idea of being able to continuously poll the source code from the source control system and, in case it detects changes, to fire up a build. Why do we cover it in this chapter? First, because it has become popular, and second, because it’s very different from CruiseControl.
11.3.2. Installation
Before installing Hudson, make sure you have J2SE version 1.5 or higher already installed. Also make sure your JAVA_HOME environment variable points to where you’ve installed Java.
The installation procedure itself is easy. You go to the project’s website and download the latest version of Hudson. At the time this book is being written, the latest version is 1.352. The Hudson distribution comes as a single WAR file, as opposed to CruiseControl, where the distribution is a zip. You don’t need to extract the WAR file, because Hudson comes with a Winstone servlet container. You can start the server from the command line with the following command:
java –jar hudson.war --httpPort=8888
Note first that we start Hudson on a port other than 8080 (simply because the examples in the book require this port to be free), and second, if you start Hudson this way, all of your logs will go to the console.
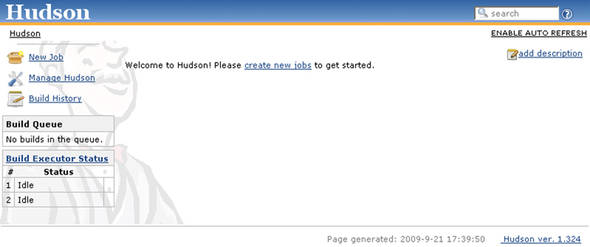
In order to start using the server, you need to navigate to http://localhost:8888/. If no errors occur, you should see something similar to what is shown in figure 11.5.
Figure 11.5. Hudson initial startup screen
There’s also a way to specify different command-line parameters, such as the one to redefine the port on which the server is started or the root under which the application is started.
Also, if you don’t want to use the Winstone servlet container, you can use any other servlet container you want. If you stick with that solution, you’ll be forced to follow the installation procedures specific to the servlet container you use.
11.3.3. Configuring Hudson
Hudson’s advantage over CruiseControl is easier configuration, which is done through the web interface. Once you’ve installed Hudson, it’s time to start the configuration. Open a browser and navigate to http://localhost:8888/. You should see the Hudson welcome screen, and there should be a Manage Hudson link on the left side. Click it, and you’ll be given a list of additional links leading to the parts of the installation you want to configure. Click Configure System, and it will open a web page similar to the one shown in figure 11.6.
Figure 11.6. Hudson configuration screen
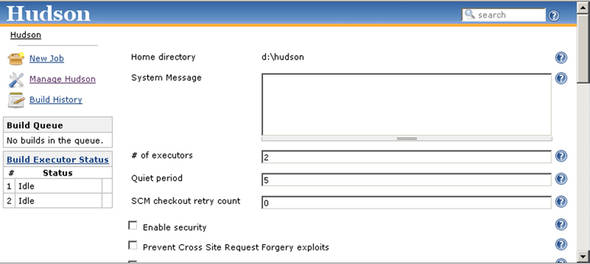
As you already saw, Hudson, in contrast to CruiseControl, comes with no Ant installation, so the tool needs to know where you’ve installed Ant, Maven, JDK, and the like. You need to specify this information on the configuration page shown in figure 11.6.
The first line on the configuration page is Home Directory. The home directory of Hudson is an interesting creature, so we devote a subsection to it.
Hudson home directory
The home directory of Hudson is used to maintain the source, perform builds, and hold some archives. By default it’s located in $USER_HOME/.hudson ($USER_HOME is interpreted as /home/<username> in UNIX systems and as C:Documents and Settings<username> in Windows).
You can change the default location of the Hudson home directory either by setting the HUDSON_HOME environment variable or by setting the HUDSON_HOME servlet-container property.
If you take a sneak peek in the HUDSON_HOME directory, you should see a folder structure similar to the one shown in listing 11.3.
Listing 11.3. Hudson home directory folder structure

Inside the home directory, Hudson keeps a configuration file ![]() , various plug-ins
, various plug-ins ![]() , and all the jobs that it runs
, and all the jobs that it runs ![]() . The jobs, as they’re known in Hudson, are different projects that you build. Each job can have multiple builds, so you can
easily follow which one failed and the cause for the failure.
. The jobs, as they’re known in Hudson, are different projects that you build. Each job can have multiple builds, so you can
easily follow which one failed and the cause for the failure.
Moving forward in the configuration page, there are also some options to specify the path to your Ant installation (in case the project you want to build uses Ant) or your Maven installation (in case your project is being built by Maven). You can also specify a JDK installation, a CVS installation, and email notification installations (such as the email server, username, and password). Take note here that you don’t specify the path to your build.xml files, but instead you point to the place where Ant was installed, so that later on Hudson can to talk to that Ant installation and issue the ant –f build.xml command.
11.3.4. Configuring a project in Hudson
Now that you’ve configured Hudson to find the installations of Ant, Maven, and the others, you can move on and configure a new job. To configure a new job with Hudson, first navigate to the main screen and select the New Job link from the list on the left side. After that you’ll be presented with a sample form to fill in. You need to specify a name for the job, and make sure you choose one of the presented build options. If your build is Maven2-based, make sure you select Build A Maven2 Project; otherwise, go with the Build A Free-style Software Project option. Click OK, and you’ll be presented the job-configuration screen shown on figure 11.7.
Figure 11.7. Job-configuration screen in Hudson
Here you’re given the ability to configure the way you want to build your job. You use the first lines to specify or change the name and the description of the job. After that are some options regarding the source control management (SCM) system you use (Subversion, CVS, and the like).
The next section tunes the settings for the build triggers—on what occasion you want to trigger your build. You’re presented with several options: poll the SCM system to check whether a build is needed, build the project periodically, build it after some dependent projects were built, and so on. Let’s select the Poll The SCM trigger; a field opens where we need to specify on what interval of time we want the poll to happen. This field uses a nice syntax that follows the syntax of the UNIX cron tool. We’d like to have our project executed every hour, so we specify @hourly in the field. You can learn more about the cron syntax if you click the corresponding question mark next to the trigger.
The next section deals with invoking the build itself. You can specify to execute a shell script, a Windows batch file, an Ant build file, or a Maven build file. On any of these you can specify any parameters, targets, goals, and so on. You can also arrange multiple build steps, such as first invoking a shell script and then running Ant. There’s also the option to rearrange all these steps by dragging and dropping.
The last section configures the post-build triggers. The options listed there will help you publish the artifact, publish the Javadoc, build some other project, send an email with the build results, or anything else you need. There’s also the option to select multiple triggers.
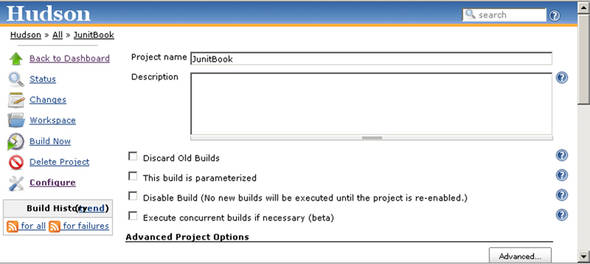
After doing all this, you should save the job configuration. This will lead you to the project’s home page (shown in figure 11.8).
Figure 11.8. Hudson job home page

From the job’s home page you can keep track of the current job. From the menu on the left side, you can choose to see the changes someone has made on the job, inspect the workspace of the job, delete the project, configure it, or schedule another build. You can also subscribe to the build results RSS feeds.
We don’t want to wait another hour for the build to be triggered, so let’s execute it right now. On the job’s home page, click the Build Now link and wait for the build to finish.
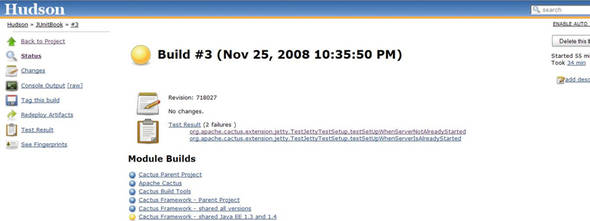
Now you can see the results of the build execution on the job’s home page. You can see not only when the last build was run, but also when the last successful build happened. Clicking any build number lets you explore the build itself: which modules were built, which tests failed or succeeded, and, most important, why (see figure 11.9).
Figure 11.9. Hudson build results
Once you spend some time using Hudson, you’ll probably find it a lot easier to use. Its entire configuration is done through a nice web interface, and it’s relatively easy to do. But the nicest thing is that the web interface is intuitive. That’s why we don’t cover Hudson in detail. Another reason for this is that Hudson is currently undergoing rapid development. It’s a mature project with a large community of developers who constantly improve the codebase. From that point of view, it’ll be interesting to see how the project will evolve in time.
11.4. Benefits of continuous integration
In general, the software tests are there to help you find your own errors. You execute the unit tests every time you make any changes on the code you develop. This way, they cover your back and will alert you whenever you introduce a new bug into the system.
The continuous integration servers have exactly the same purpose: they cover your back and alert you the moment you break the integration with the other modules of the system. And because you can’t run the CI tools manually every time you make a small change in the system, they run on a separate host and try to continuously integrate your software. But again, they protect you and will alert you to a change that breaks the integration.
We’ve heard many excuses from people as to why you shouldn’t use CI tools, and the winner is this one: “I don’t see the profit in using it.” And usually this comes from people who’ve never used a CI server.
We all make errors—face it! You and we, and everybody else—it’s human to err. And no matter how good you are, you’ll sometimes make a mistake and introduce a bug into the system. Knowing this, it seems reasonable to have something notify you when those errors occur. The software tests and CI tools are exactly this. Once you start using a CI tool, no matter which one—CruiseControl or Hudson or anything else—you’ll see how good it is to know that something is watching your back and that an empty mailbox means that nothing is broken.
To sum up we’d say:
- CI tools— Free
- Installation and configuration— A couple of hours work
- Knowing your build is well integrated— Priceless
11.5. Summary
In this chapter we looked at two of the most popular CI tools: CruiseControl and Hudson. As you probably noticed, they’re totally different. So why do we cover those tools?
The reason is to make you understand that continuous integration is an important concept in the modern software development lifecycle and that it makes absolutely no difference which tool you use, but it makes a great difference whether you use CI or not.
With this chapter we close the part of the book that deals with integrating JUnit with the build process. You should now be ready to run your build and execute your tests with Ant or Maven and also to set up a continuous integration build and execute your builds and tests on a scheduled basis.
This way you have JUnit tests that protect your modules from new bugs, and you also have a workspace where you continuously execute your build and run your tests to see if anything got broken during the integration. You’re now fully automated and ready to move on with the next chapters.
The next part of the book deals with testing different layers of your application. We look at some examples of how to execute tests against the presentation layer and also against the database and persistence layers. We show how to test your GUI components, and you can include those tests and run them in the continuous integration environment you just learned about. Let’s move on!