
Appendix B. Extending the JUnit API with custom runners and matchers
This appendix covers
- Introducing the Interceptor pattern
- Implementing custom runners for JUnit
- Implementing custom matchers for JUnit
As we already discussed in chapter 2, the backbone of JUnit consists of three classes—TestClass, Runner, and Suite—the latter one being a Runner itself. This means that once we understand how those classes operate, we can write whatever tests we need with JUnit. If you find JUnit insufficient for your testing needs, you can extend the JUnit API with custom classes. Since JUnit is open source you can rebuild or extend. There is no obvious benefit in extending the TestClass class. On the other hand, the Runner class is especially designed to be easily extensible for our needs.
This appendix gives a brief introduction to how to extend the JUnit API with custom Runner objects. It also describes how to extend the Hamcrest API with custom matchers so that we eventually customize not only our runners but also our assert calls.
B.1. Introducing the Interceptor pattern
So far in the book, we’ve gotten to know a lot of design patterns: the Controller, the Façade, Inversion of Control, and so on. Now it’s time to look at another one: the Interceptor pattern.
The Interceptor pattern can be described as a method that intercepts a business method invocation. The pattern usually consists of several objects. The first one is an Interceptor interface that defines one or more methods that your interceptors will implement. The next is a Delegate object that holds a list of interceptors. The Delegate object is called at the intercepting points of your application, and it invokes the interceptors one after another.
Here are some interesting features of the Interceptor pattern:
- It propagates extensibility and flexibility.
- It enables separation of concerns.
- It increases reusability.
- If not used properly, security issues might occur.
Imagine you’re designing an application for a group of developers. You want them to plug their code into your application as painlessly as possible, and at the same time you don’t want them to change it. What can you do? You can provide some points in your application where the developers can intercept the invocation of the program and introduce their own logic. Others don’t need to change your code; they can simply plug their code into your framework.
B.2. Implementing a custom runner
Let’s start implementing our own custom runner. As you might have already guessed, we want to develop a custom runner that implements the Interceptor pattern we just discussed.
We want to define an Interceptor interface, which will be implemented by the various interceptors that we have. That’s why we start with the Interceptor interface, shown in listing B.1.
Listing B.1. Interceptor interface defining the methods for any of our interceptors
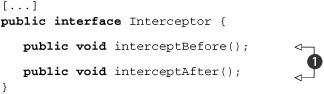
We use this generic interface to define the two methods ![]() in which we define our custom logic to plug into the program execution. Notice that our interceptor methods don’t accept
any parameters. The normal way of implementing the Interceptor pattern would be to call the interceptor methods with some
kind of a context object, so that these methods could monitor and gain access to our application. This can also allow our
application to get some feedback from the execution of the interceptor methods. But for our needs it’s sufficient to implement
the interceptor methods with no input parameters.
in which we define our custom logic to plug into the program execution. Notice that our interceptor methods don’t accept
any parameters. The normal way of implementing the Interceptor pattern would be to call the interceptor methods with some
kind of a context object, so that these methods could monitor and gain access to our application. This can also allow our
application to get some feedback from the execution of the interceptor methods. But for our needs it’s sufficient to implement
the interceptor methods with no input parameters.
After release 4.5, tests in JUnit are executed in a block of statements. That block of statements contains all the features a test might have attached: @Before/@After methods, timeout seconds, ignore features, and the like. Based on these features, different kinds of actions are performed. The tricky part is that the @Before/@After methods are very near the border of the block, and the actual execution of the test is the core of the block of statements (see listing B.2).
Our idea is to wrap the block of statements in another statement that we implement (InterceptorStatement) and pass this statement to the custom runner we write. The custom runner invokes the block of statements, which reaches our statement at some point, and then our statement starts executing the interceptors we’ve defined. Then our statement invokes the wrapped block of statements in order to proceed with the execution in a normal manner. This way, we serve the InterceptorStatement as the delegate object of the Interceptor pattern.
Moving on, listing B.2 presents the InterceptorStatement we use for our own runner.
Listing B.2. InterceptorStatement that wraps the original statement
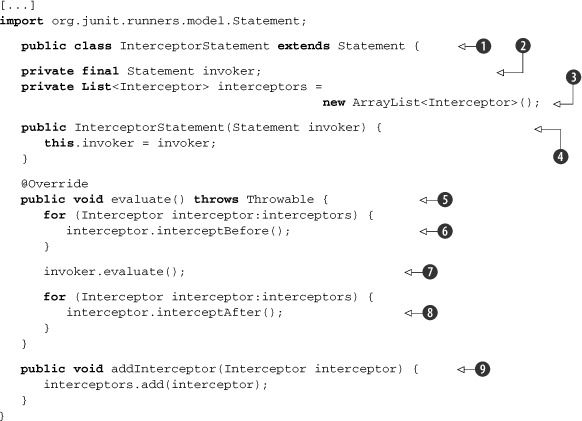
As we already discussed, after JUnit 4.5 every test is executed by a block of statements.[1] Here we create our InterceptorStatement by extending the Statement object ![]() , and we override the evaluate method
, and we override the evaluate method ![]() . Our statement holds a statement to invoke
. Our statement holds a statement to invoke ![]() and a list of Interceptor implementations
and a list of Interceptor implementations ![]() that were added to it
that were added to it ![]() . In the constructor we initialize the invoker statement
. In the constructor we initialize the invoker statement ![]() that we’re wrapping. The evaluate method
that we’re wrapping. The evaluate method ![]() implements the entire logic of the statement; it iterates over all the interceptors and invokes their interceptBefore method
implements the entire logic of the statement; it iterates over all the interceptors and invokes their interceptBefore method ![]() . Next we invoke the evaluate method of the wrapped statement object
. Next we invoke the evaluate method of the wrapped statement object ![]() and again iterate over all the interceptors, this time to invoke the interceptAfter method
and again iterate over all the interceptors, this time to invoke the interceptAfter method ![]() .
.
1 For more on this topic you can read an article by Kent Beck here: http://threeriversinstitute.org/TwoMoreImplementationPatterns.htm.
Now that we’ve prepared the InterceptorStatement object, it’s time to move on and implement the real heart of the custom JUnit runner that we’re making. We do this by extending the BlockJUnit4ClassRunner class, as shown in listing B.3, which was added in version 4.5 of the JUnit framework to help people create custom runners.
Listing B.3. Custom JUnit runner—InterceptorRunner
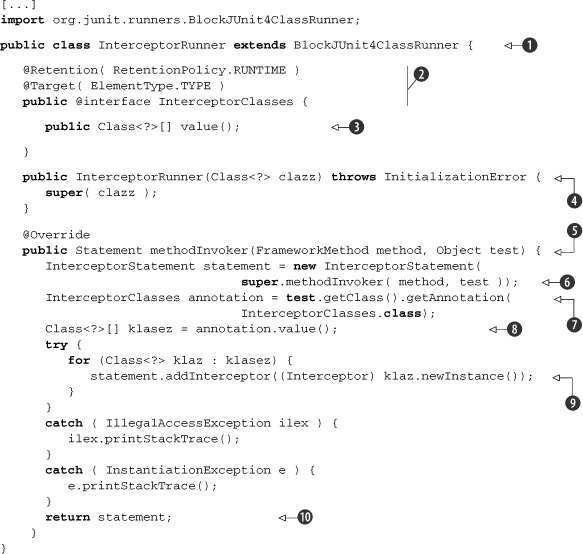
As we just said, in order to implement a custom JUnit runner we need to extend the BlockJUnit4ClassRunner ![]() . In our custom runner we also declare an annotation called @InterceptorClasses at
. In our custom runner we also declare an annotation called @InterceptorClasses at ![]() , which we use to hold the implementations of the Interceptor interface that we want to plug into our execution. Our @InterceptorClasses annotation defines a value() method, to return the classes that it holds at
, which we use to hold the implementations of the Interceptor interface that we want to plug into our execution. Our @InterceptorClasses annotation defines a value() method, to return the classes that it holds at ![]() . In
. In ![]() we define the constructor that we must have, and in
we define the constructor that we must have, and in ![]() we override the methodInvokerStatement method. We start the method by creating an instance of our InterceptorStatement at
we override the methodInvokerStatement method. We start the method by creating an instance of our InterceptorStatement at ![]() .
.
Notice that the InterceptorStatement we wrote in listing B.2 accepts a statement to wrap around. We create this statement by calling the super.methodInvoker method with parameters: our test method and the test class. This creates a Statement one level closer to the core of the statement block. And because the core of the statement block is the test itself, we wrap the test in our custom statement.
At ![]() we obtain the @InterceptorClasses annotation, which must be defined for the test class. Then, in
we obtain the @InterceptorClasses annotation, which must be defined for the test class. Then, in ![]() , we get all the classes that the annotation holds, iterate over the collection of classes, and add them to the InterceptorStatement object at
, we get all the classes that the annotation holds, iterate over the collection of classes, and add them to the InterceptorStatement object at ![]() . The last step is to return our ready-made InterceptorStatement object
. The last step is to return our ready-made InterceptorStatement object ![]() .
.
Our custom JUnit runner is finished! But in order to use it we need some sample implementations of the Interceptor interface. Here comes the real question: “What kind of events do we want to plug into the execution of the tests?”
One of the simplest implementations that could possibly come to mind is a logging implementation; we log a message before and after execution of every test. Listing B.4 contains the code for this interceptor.
Listing B.4. First interceptor—SampleLoggingInterceptor
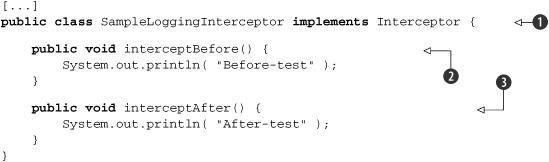
This implementation is simple, but it’s enough for what we currently need. The code implements the Interceptor interface ![]() (to make it a valid interceptor according to our terms) and gives body to the interceptBefore
(to make it a valid interceptor according to our terms) and gives body to the interceptBefore ![]() and interceptAfter methods
and interceptAfter methods ![]() .
.
We use our interceptor in conjunction with our InterceptorRunner. And we use our JUnit runner just like we use any other JUnit runner. Let’s examine it in listing B.5.
Listing B.5. Executing a test case using our custom runner
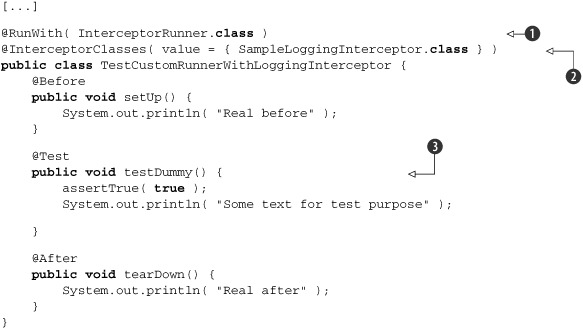
The test case we provide starts with the @RunWith annotation. With this annotation we indicate which JUnit runner we want to execute our tests; in this case we want the InterceptorRunner that we just implemented ![]() . We also provide an @InterceptorClasses annotation to hold the interceptors we want to plug into our execution
. We also provide an @InterceptorClasses annotation to hold the interceptors we want to plug into our execution ![]() . Then we start implementing our test case. In this scenario we have only one test method, defined just for testing purposes
. Then we start implementing our test case. In this scenario we have only one test method, defined just for testing purposes
![]() .
.
The results from the execution are shown here:
Real before
Before-test
Some text for test purpose
After-test
Real after
What’s obvious is that the @Before methods are executed before the interceptBefore method of the interceptor, and the @After methods are executed after the interceptAfter method. We’ll use this feature shortly.
But let’s move on and make another interceptor, this time more valuable than just logging some text to the screen. Listing B.6 shows a sample interceptor that’s used for timing purposes.
Listing B.6. Second interceptor—SampleTimingInterceptor
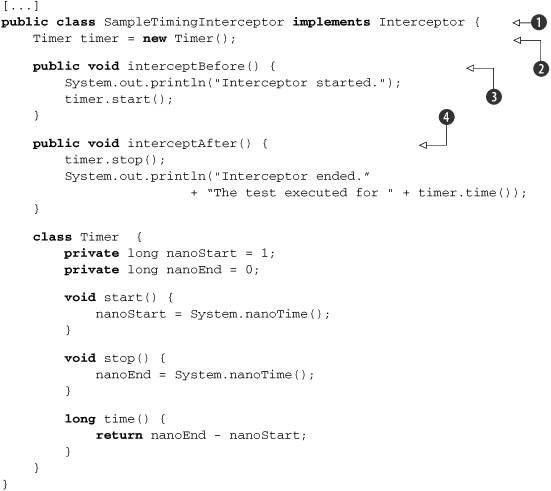
Again, for this interceptor to be a valid interceptor according to our terms, it needs to implement the Interceptor interface ![]() . In
. In ![]() we declare a local timer variable of type Timer, which we use to time the execution of the test method. The interceptBefore method starts the timer
we declare a local timer variable of type Timer, which we use to time the execution of the test method. The interceptBefore method starts the timer ![]() , and the interceptAfter method stops it and prints the execution time on the screen
, and the interceptAfter method stops it and prints the execution time on the screen ![]() .
.
Now we need a test case for this interceptor. And here it comes—listing B.7.
Listing B.7. Test case for the timing interceptor
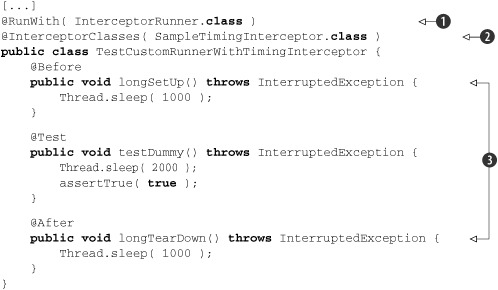
We take the same approach as we used for the last interceptor test case: declare the runner we use with the @RunWith annotation ![]() and specify at
and specify at ![]() which interceptor classes we use by means of the @InterceptorClasses annotation.
which interceptor classes we use by means of the @InterceptorClasses annotation.
You might be wondering why we need these interceptors; they simply execute some common logic before/after the tests (the same
way the @Before/@After methods do). The point is that sometimes it’s hard to determine how much time is required for a test method to execute. In
our case we have the longSetUp() and longTearDown() methods (at ![]() ), which also could take a lot of time, thus making it harder to determine the execution time of the testDummy() method itself. Because our timing interceptor keeps track of the execution time for the test methods only (the interceptBefore method is executed after the @Before methods, and interceptAfter is executed before the @After methods), this makes it a perfect candidate to solve our problem.
), which also could take a lot of time, thus making it harder to determine the execution time of the testDummy() method itself. Because our timing interceptor keeps track of the execution time for the test methods only (the interceptBefore method is executed after the @Before methods, and interceptAfter is executed before the @After methods), this makes it a perfect candidate to solve our problem.
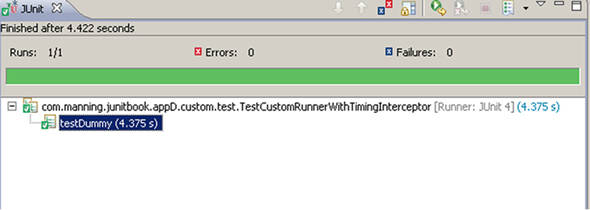
Upon executing the test case, we should see something like the following in the console, despite the fact that the JUnit runner might show a different value (figure B.1).
Interceptor started.
Interceptor ended. The test executed for 2 sec.
Figure B.1. The JUnit test runner shows that it takes 4.375 seconds to execute the whole test (with @Before and @After methods).
B.3. Implementing a custom matcher
As you write more and more tests, you’ll see that sometimes it’s difficult to read an assert statement at first glance. For instance, consider this one:
assertTrue( user.getContext().getPassword().size() >= 6
                      && containsADigit(user.getContext().getPassword()) );
No matter how familiar you are with the code, you’ll always need a few seconds to understand the assert statement. One way to simplify it is by introducing a new method (like the containsADigit method we added). Another way is to add Hamcrest matchers; that will greatly simplify the assert statement. But we might use this assert statement a lot in our tests, and it’s very cumbersome to copy and paste the same long assert everywhere. Wouldn’t it be great if there was a way to implement a custom Hamcrest matcher, so that the assert statement would be simplified?
Fortunately, there is a way, and that’s exactly what we show next. We start by implementing a simple matcher that checks whether a given string is null or empty. Listing B.8 shows the code for the matcher.
Listing B.8. Our first Hamcrest matcher implementation

Basically, if we want to create a custom matcher, we need to extend one of the two classes BaseMatcher<T> or TypeSafeMatcher<T>. In this listing, we extend the first one ![]() . Next, we override the matches method
. Next, we override the matches method ![]() , and we implement our logic on what occasion the matcher will match the conditions; our condition is matched successfully
if the string parameter to which it is applied is not null and is different from an empty string.
, and we implement our logic on what occasion the matcher will match the conditions; our condition is matched successfully
if the string parameter to which it is applied is not null and is different from an empty string.
Here comes the difference between BaseMatcher<T> and TypeSafeMatcher<T>. As you’ll see later, if you extend TypeSafeMatcher<T>, then you’ll have to override another method with the signature
protected boolean matchesSafely(T item);
This means that the method that has to implement our logic can never accept a null object. It will always accept a parameter of type T, which has already been checked for null value and can never be null. We want to implement this check, however, so we stick with the BaseMatcher<T> class.
In ![]() we append a description for the matcher. This description is used in our test cases in case the matcher can’t match the condition.
In
we append a description for the matcher. This description is used in our test cases in case the matcher can’t match the condition.
In ![]() we provide two factory methods (denoted by the @Factory annotation). We call these methods from our test cases to create an instance of our matcher. We provide two methods, only
for readability purposes; sometimes it will be more readable to call one of them and sometimes the other.
we provide two factory methods (denoted by the @Factory annotation). We call these methods from our test cases to create an instance of our matcher. We provide two methods, only
for readability purposes; sometimes it will be more readable to call one of them and sometimes the other.
Listing B.9 shows the corresponding test class that uses our test methods.
Listing B.9. Test class to demonstrate the IsNotNullOrEmpty matcher
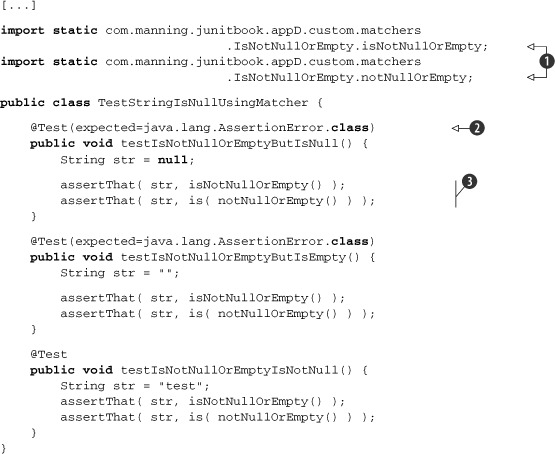
All we need to do is use the static import feature of Java 1.5 and import the matcher that we want to use ![]() . After that, we implement three test methods using the custom matcher we just implemented. The first two deliberately test
failing conditions, and we denote this with the expected parameter of the @Test annotation
. After that, we implement three test methods using the custom matcher we just implemented. The first two deliberately test
failing conditions, and we denote this with the expected parameter of the @Test annotation ![]() . We also use the two factory methods
. We also use the two factory methods ![]() , the second one in conjunction with one of the core matchers of Hamcrest.
, the second one in conjunction with one of the core matchers of Hamcrest.
Now we demonstrate another example of making a custom matcher, this time by using TypeSafeMatcher<T>. For this case, we implement a custom Hamcrest matcher, which checks to see if a given password is valid. We consider the password to be valid if it’s longer than six characters, contains a digit, and also contains a special symbol (any of the following: !, “, #, $, %, &, ’, (, ), *, +, -, ., /).
Listing B.10 shows our custom Hamcrest matcher.
Listing B.10. IsStrongPassword custom matcher

We start the implementation of our custom matcher by extending the TypeSafeMatcher class ![]() . This is the second way to create a matcher.
. This is the second way to create a matcher.
In ![]() we override the matchesSafely method and implement our code logic on what occasion the matcher should match the condition. In our case, the condition is
that the password be longer than six characters and contain a digit and a special symbol.
we override the matchesSafely method and implement our code logic on what occasion the matcher should match the condition. In our case, the condition is
that the password be longer than six characters and contain a digit and a special symbol. ![]() and
and ![]() are two helper methods that we use to validate the password.
are two helper methods that we use to validate the password.
The matchesSafely method will never accept a null value. If that occurs, the matcher will throw a java.lang.AssertionFailedError exception—something that we strive for (a password can never be null).
The describeTo method ![]() appends a description for our matcher to show in the log in case the condition does not match. Next, in
appends a description for our matcher to show in the log in case the condition does not match. Next, in ![]() and
and ![]() we provide two static factory methods that construct an instance of our matcher. We provide two methods instead of one because
sometimes it’s more readable to use one name rather than the other.
we provide two static factory methods that construct an instance of our matcher. We provide two methods instead of one because
sometimes it’s more readable to use one name rather than the other.
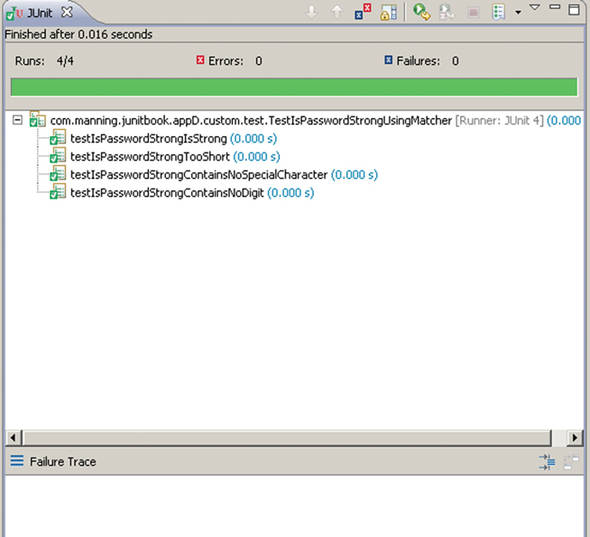
Let’s see our matcher in action! It’s time to create a test case and use the matcher. Listing B.11 shows the code. The results from the execution are shown in figure B.2.
Figure B.2. Results from executing the tests, including the custom matcher
Listing B.11. Test case using our custom matcher
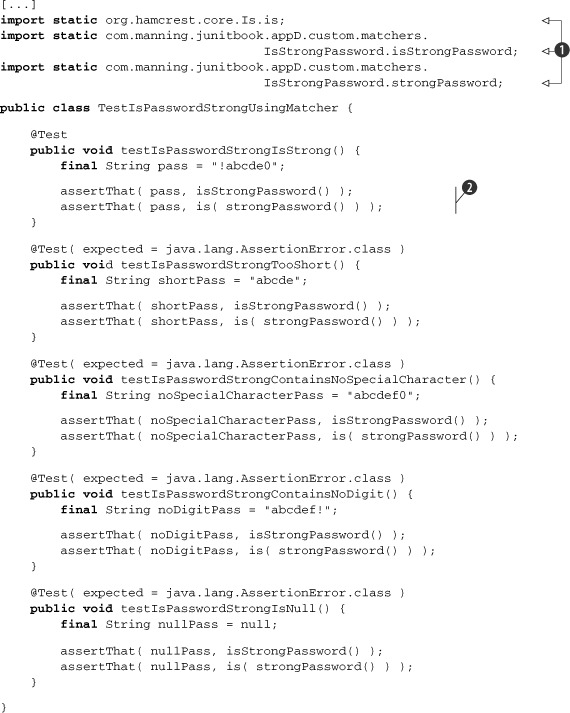
In ![]() we import the matchers that we want to use as static imports. Notice that we import our matchers the exact same way as we
would any of the Hamcrest core matchers. Then we can use any of them, again as we would any Hamcrest matcher
we import the matchers that we want to use as static imports. Notice that we import our matchers the exact same way as we
would any of the Hamcrest core matchers. Then we can use any of them, again as we would any Hamcrest matcher ![]() .
.
The code is nice and clear now, isn’t it?