
Chapter 16. Testing OSGi components
Theory is when you know something, but it doesn’t work. Practice is when something works, but you don’t know why. Programmers combine theory and practice: Nothing works and they don’t know why.
Anonymous
This chapter covers
- The OSGi dynamic module system
- Mock testing of your modules
- In-container testing of your modules
So far, we’ve been testing everything from the Java EE spec. All the Java EE components that we’ve dealt with (JSPs, tag libraries, servlets, filters, EJBs, and so on) have been available for a long time. In this chapter we discuss a technology that became popular relatively recently and is getting more popular every day: OSGi.
We start the chapter by introducing OSGi[1] We then walk through the basic OSGi concepts and provide easy-to-grasp examples by means of the calculator application from chapter 1. In the second part of the chapter, we show how to test our OSGi calculator bundle by introducing the JUnit4OSGi framework.
1 OSGi is a registered trademark of the OSGi Alliance.
16.1. Introducing OSGi
The term OSGi[2] usually refers to two things: the OSGi alliance (http://osgi.org/) and the OSGi service platform.
2 For a complete reference to OSGi we recommend OSGi in Action, by Richard S. Hall, Karl Pauls, Stuart McCulloch, and David Savage (Manning Publications, 2010).
The OSGi alliance is an organization of companies started in late March 1999. The initial companies involved in the alliance included Sun Microsystems, Ericsson, IBM, and others. The idea was to create a standards organization for defining specifications for a Java-based service platform, which could also be remotely managed. This platform consists of multiple bundles (aka modules) that can be installed, started, stopped, updated, and uninstalled remotely and dynamically. These operations can be performed at runtime without an application restart.
The specification this alliance deals with is the OSGi service platform, which defines a component and service model. All implementations of the OSGi framework need to provide an environment for the applications to run in. Applications comprise smaller components called bundles. A bundle is the smallest organization unit in OSGi—a collection of classes, resources, and configuration files, in which the bundle declares its dependencies. The key mission of a bundle is to declare and use services. The OSGi service platform provides a context where all the running services are registered. This bundle context is injected into every bundle during its startup.
The lifecycle of a given OSGi service is shown in figure 16.1.
Figure 16.1. Lifecycle phases of an OSGi bundle
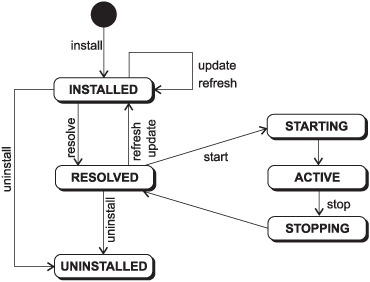
As we mentioned, a bundle can be in different states. The lifecycle layer defines the following six states:
- INSTALLED: The bundle has been installed in the OSGi container.
- RESOLVED: All package requirements are fulfilled and the bundle is ready to be started.
- STARTING: The bundle is in the process of starting.
- ACTIVE: The bundle has started.
- STOPPING: The bundle is in the process of stopping. After this, the bundle will be in the RESOLVED state.
- UNINSTALLED: OSGi has removed the bundle from the container.
It may seem a bit confusing now, but the example we provide will clear things up, so let’s move on and implement our first OSGi service.
16.2. Our first OSGi service
In the first chapter of the book, we implemented a simple calculator application. That application was simple enough to demonstrate the basic concepts of unit testing. We take the same approach in this chapter. We implement the calculator application as an OSGi service. We also implement a sample client for that service and a test bundle for the client. Finally, we install the three bundles in the Apache Felix environment.
The OSGi alliance defines a number of specifications for the OSGi service platform. The implementation of these specifications can be done by anyone. In this chapter, we use the Apache Software Foundation implementation Apache Felix (http://felix.apache.org/). The installation of the Felix project is easy. Start by downloading the latest distribution. Extract the archive and create an environment variable called FELIX_HOME pointing to the Felix folder. The Felix folder should contain the following:
- bin—This folder contains only one JAR file, called felix.jar. This JAR is used to instantiate the Felix console to remotely operate the different services.
- bundle—This folder contains the various Felix bundles.
- conf—This folder contains the Felix configuration file.
- doc—This folder contains the documentation.
The implementation of our calculator service starts with the interface in listing 16.1. Every OSGi service is defined by an interface.
Listing 16.1. CalculatorService interface
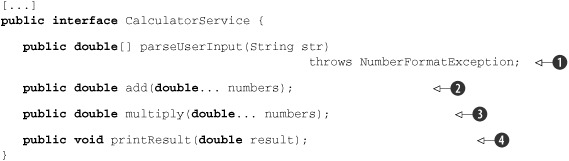
The interface defines the four methods we want to implement in our service. The first one ![]() parses a line of user input. The user is supposed to input several numbers separated by spaces, and this method parses the
input as numbers. The add method
parses a line of user input. The user is supposed to input several numbers separated by spaces, and this method parses the
input as numbers. The add method ![]() sums all the given numbers and returns the result. There is also a multiply method
sums all the given numbers and returns the result. There is also a multiply method ![]() , which multiplies numbers and returns the result. The printResult method
, which multiplies numbers and returns the result. The printResult method ![]() prints a given result number.
prints a given result number.
As we already discussed, every OSGi service exposes a certain interface to other services. Your services must provide an interface and implement it.
Listing 16.2 contains the implementation of the interface in listing 16.1.
Listing 16.2. Implementation of CalculatorService interface
[...]
public class CalculatorImpl implements CalculatorService {

public double  add(double... numbers) {
double  result = 0;
for (double  number:numbers)
       result+=number;
return  result;
}

public double multiply(double... numbers) {
double result = 1;
for (double  number:numbers)
        result*=number;
return  result;
}

public double[] parseUserInput(String str)
throws NumberFormatException {
    String[] numbers = str.split(" ");
double[] result = new double[numbers.length];
for (int i=0;i<numbers.length;i++) {
       result[i] = Double.parseDouble(numbers[i]);
    }
return  result;
}
public void printResult(double result) {
    System.out.println("The result is: " + result);
}

}
This listing declares a class that implements the interface in listing 16.1. The details of the implementation aren’t relevant to OSGi, so we’ll skip it.
There’s no big difference between testing OSGi services and POJOs. You can reuse the test from chapter 1 and include it in a build, as we show in part 3 of this book. This chapter doesn’t cover unit testing alone; it covers integration testing of OSGi services. Before we continue discussing the integration testing of the service that we just implemented, we create a bundle to hold our service and install the service with Apache Felix, an open source implementation of the OSGi R4 Service Platform.
To create the bundle we need an implementation of the BundleActivator interface to register and unregister the service, as shown in listing 16.3.
Listing 16.3. CalculatorBundleActivator
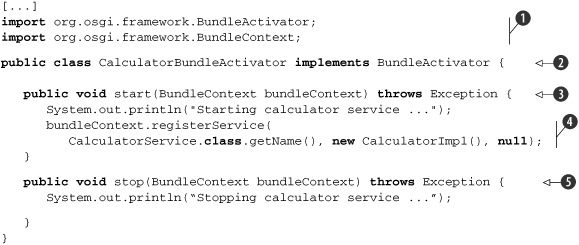
We start by importing the required classes ![]() from felix.jar in the FELIX_HOME bin/ directory. Next, we declare our class to implement the BundleActivator interface
from felix.jar in the FELIX_HOME bin/ directory. Next, we declare our class to implement the BundleActivator interface ![]() . In
. In ![]() and
and ![]() , we implement the required start and stop methods, which define how the bundle will behave once it’s started or stopped. In the start method, we register the CalculatorService interface with the given BundleContext
, we implement the required start and stop methods, which define how the bundle will behave once it’s started or stopped. In the start method, we register the CalculatorService interface with the given BundleContext ![]() . By doing so we notify the framework of our service, and our next step is to expose the interface to other services.
. By doing so we notify the framework of our service, and our next step is to expose the interface to other services.
Our stop method ![]() doesn’t need to do anything because Felix automatically unregisters the service when it stops.
doesn’t need to do anything because Felix automatically unregisters the service when it stops.
To expose our calculator service so that it can be used by other services, we need to include it in a bundle: a JAR file containing all of our classes and the MANIFEST.MF file shown in listing 16.4.
Listing 16.4. Manifest file for the calculator bundle
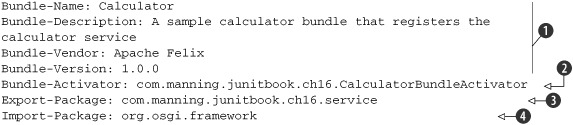
Every OSGi bundle is a JAR file, and what distinguishes the JAR as an OSGi bundle is the MANIFEST.MF file. In the MANIFEST.MF
file, we specify different kinds of metadata for our bundle. The first few lines provide the name, description, vendor, and
version of the bundle ![]() . The Bundle-Activator
. The Bundle-Activator ![]() specifies the full name of the Activator class (the one that implements BundleActivator). As we already mentioned, a bundle can export services. Which package is exported is specified in the Export-Package clause
specifies the full name of the Activator class (the one that implements BundleActivator). As we already mentioned, a bundle can export services. Which package is exported is specified in the Export-Package clause ![]() . A bundle can also use and demand services; we specify which services we use with the last clause. There we define the packages
that are needed by our service
. A bundle can also use and demand services; we specify which services we use with the last clause. There we define the packages
that are needed by our service ![]() . You can specify multiple values separated by commas.
. You can specify multiple values separated by commas.
The final step is to compile the source code and produce the bundle (the JAR file). Open a shell, navigate to the ch16-osgicalculator-service folder, and type in the command to use Maven
mvn clean install
or the command to use Ant
ant
The result should be the same: a JAR file containing the classes and the MANIFEST.MF file in a META-INF folder.
Now that we have the bundle JAR that contains our service, we use the Felix console and install the bundle. Navigate to the FELIX_HOME directory and execute the following command:
java –jar bin/felix.jar
You’ll see the following:
Welcome to Felix.
=================

->
The Felix console is up and running, and you can now manage your services. The first thing you can do from here is list all the services that are installed. Type in the command
-> ps
For a complete list of all the commands you can use, type in the help command:
-> help
We now install our calculator-service bundle. We first copy the JAR file to the FELIX_HOME/bundle folder. Next, we use the install command:
-> install file:bundle/calculator-service.jar
A BundleID will be assigned to our bundle. We use that BundleID to manage our bundle.
Start the service with the following command
-> start [BundleID]
where [BundleID] is a placeholder for your bundle ID.
We’ve installed the bundle and started it. The bundle is now running and exports the service as an API. Next, we create a sample client application for our CalculatorService.
16.2.1. The sample application
The idea behind the client application is to demonstrate how to make another bundle that uses the first one, the CalculatorService. We start by implementing the Bundle-Activator to override the behavior on start and stop. See listing 16.5.
Listing 16.5. ClientBundleActivator implementation
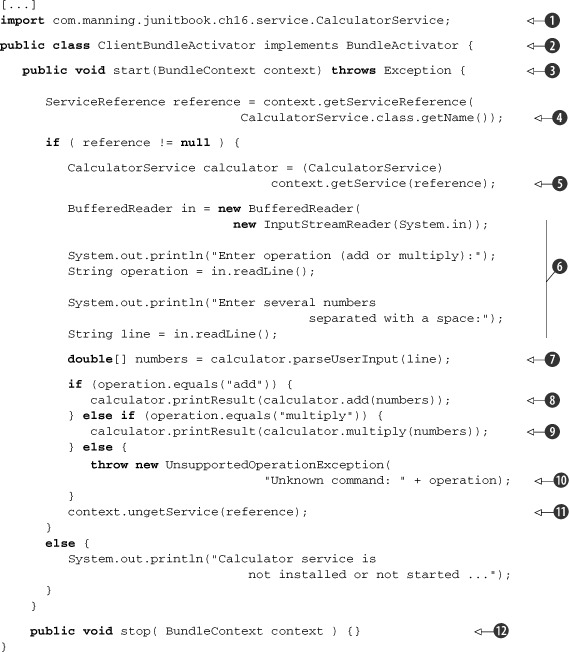
This client reads several lines of user input. The first line must contain the operation the user wants to perform, and the next line should be in the form of several numbers separated by spaces. The client first invokes the parseUserInput method and with the result calls the corresponding add/multiply and print methods of the service we already installed and prints the result on the screen.
The client then imports the necessary classes ![]() . Notice that this time we also import the service from the previous listings. Keep that in mind when it comes to describing
services in the MANIFEST file. At
. Notice that this time we also import the service from the previous listings. Keep that in mind when it comes to describing
services in the MANIFEST file. At ![]() we implement the BundleActivator interface and its two methods at
we implement the BundleActivator interface and its two methods at ![]() and
and ![]() . At
. At ![]() we get a ServiceReference from the context using our service’s class name. If this reference isn’t null, we get the CalculatorService interface from the context at
we get a ServiceReference from the context using our service’s class name. If this reference isn’t null, we get the CalculatorService interface from the context at ![]() , by providing the reference to the service we already have. At
, by providing the reference to the service we already have. At ![]() we read two lines of user input from the command line. The first line contains the operation we want to perform (add or multiply),
and the second line contains a set of numbers separated by spaces. At
we read two lines of user input from the command line. The first line contains the operation we want to perform (add or multiply),
and the second line contains a set of numbers separated by spaces. At ![]() we call the parseUserInput method, and depending on the operation we call either the add method
we call the parseUserInput method, and depending on the operation we call either the add method ![]() or the multiply method
or the multiply method ![]() , or we throw an UnsupportedOperation-Exception if the command is unknown
, or we throw an UnsupportedOperation-Exception if the command is unknown ![]() . The last step is to “unget” the service, at
. The last step is to “unget” the service, at ![]() .
.
Let’s see this client application in action. We need to package it in a bundle with a corresponding manifest file. Listing 16.6 contains the MANIFEST.MF file for the client application.
Listing 16.6. MANIFEST.MF for the client application
Bundle-Name: Calculator client
Bundle-Description: A bundle that uses the calculator service if it finds
it at startup
Bundle-Vendor: Apache Felix
Bundle-Version: 1.0.0
Bundle-Activator: com.manning.junitbook.ch16.client.ClientBundleActivator
Import-Package: junit.framework, org.osgi.framework,
com.manning.junitbook.ch16.service
The only things different from the previous manifest file are the name of the bundle and the activator class. Notice that we also specify in the Import-Package directive a few more packages:
- junit.framework—We need this package because we have some tests to execute in the Felix service platform. More on this later in the chapter.
- com.manning.junitbook.ch16.service—We use the service that’s already installed, so we need to specify its package here.
The one thing that’s left is to navigate on the command line to the ch16-osgi/calculator-client folder from the source code of the book and invoke the appropriate Ant or Maven script. You do this the exact same way we already showed—no matter what script you use, the result should be identical.
Get the JAR file that’s generated from the build and copy it to the FELIX_HOME/ bundle folder. Go to the Felix command-line tool and invoke the two commands for installing and starting the bundle:
-> install file:bundle/calculator-client.jar

-> start [BundleID]
Again, you need to remember the assigned BundleID for this bundle and specify it when starting the bundle. If you don’t remember it, use the ps command to find it.
Once the bundle is started, you will be asked to enter an operation and numbers separated by spaces.
Our client application implementation is so simple that we skipped data validation and exception handling. What happens if we were to enter a blank line or a random string? An exception would be raised, something we don’t want to happen.
How do we test that the client application behaves in the expected way? We need to have some kind of integration tests that we execute inside the service platform (just like in chapter 14 where we executed Cactus tests inside the servlet container). That’s exactly what we do next. In the next section, we introduce an OSGi testing framework called JUnit4OSGi; we also write some tests with that framework and include them in a separate test bundle.
16.3. Testing OSGi services
When it comes to testing OSGi services, we can apply the same categorization that we made in the second part of the book. The normal JUnit tests that you already know how to write would exercise each of your services on its own. Our attention is mainly focused on the integration tests that test the interaction between the different services. So for implementing integration tests there are different approaches that you might take; we already covered those different approaches in the second part of the book, and they include black box testing, using mock objects, and in-container testing.
As for black box testing, there isn’t much you can do. A form of black box testing would be to get an OSGi container, install your services there, and hand it to someone to start playing around and test it “in the black.”
We take a closer look at the other two approaches in the next sections.
16.3.1. Mock objects
Now that we have our services written, let’s examine them. The calculator service exposes an API used by the CalculatorClient service to compute some sums or multiplications. The CalculatorClient service, on the other hand, reads some data input from the command line. This means that if we write a test for this service and invoke it, we have to enter some data on the command line, and because there’s no restriction on the data that we can enter, there’s no way to specify our assertions. There’s also no way to automate those tests, because we always have to have someone entering data on the command line when the tests are executed. The solution for this problem is simple: refactoring.
We need to refactor the ClientBundleActivator in such a way that it allows it to be easily testable. Listing 16.7 shows the refactored class, where the changed lines are marked in bold.
Listing 16.7. Refactored ClientBundleActivator to enable testability

We start by extracting all the data the user normally enters on the command line (the operation and the numbers separated by spaces) as instance variables to the class ![]() . We extract the result from the computation as a local variable
. We extract the result from the computation as a local variable ![]() , and we provide getters and setters for both
, and we provide getters and setters for both ![]() and
and ![]() . This gives us the opportunity to set those parameters before we start the ClientBundleActivator as well as to assert the expected result. Next, in the start method we add a check to see if the user data has been set up
. This gives us the opportunity to set those parameters before we start the ClientBundleActivator as well as to assert the expected result. Next, in the start method we add a check to see if the user data has been set up ![]() , and in case it hasn’t we call the initUserInput method
, and in case it hasn’t we call the initUserInput method ![]() . As you can see in
. As you can see in ![]() , everywhere in our code that we want to use the user data, we use the getter methods of the class. At this point we’re sure
that this data will be set up, either by the setter methods or by the initUserInput method, which reads the data from the command line. In
, everywhere in our code that we want to use the user data, we use the getter methods of the class. At this point we’re sure
that this data will be set up, either by the setter methods or by the initUserInput method, which reads the data from the command line. In ![]() we check the command we want to issue and call the corresponding method in the CalculatorService accordingly. Notice that
the result is this time kept in a local variable, to which we have access through the getter methods.
we check the command we want to issue and call the corresponding method in the CalculatorService accordingly. Notice that
the result is this time kept in a local variable, to which we have access through the getter methods.
The initUserInput method ![]() is called when we have no user data defined through the setter methods. This method has the responsibility for reading the
operation we want to issue
is called when we have no user data defined through the setter methods. This method has the responsibility for reading the
operation we want to issue ![]() as well as the numbers on which we want to issue the command
as well as the numbers on which we want to issue the command ![]() .
.
Now that we’ve refactored the ClientBundleActivator class, we can test it. The class contains one entry-point method called start, which we want to unit test. In order to do this we must obtain a valid BundleContext object, because the method defines it as a parameter. BundleContext itself is an interface, so we have no way to instantiate.
Chapter 7 introduced mock objects, and we saw mock objects frameworks that can produce fake instances of interfaces that we can use in tests. That’s exactly what we’re going to do in listing 16.8.
Listing 16.8. Mock test for the CalculatorService
We start by creating a new JUnit test case ![]() that will exercise our CalculatorService. Just as we did in chapter 6, we define the Mockery context
that will exercise our CalculatorService. Just as we did in chapter 6, we define the Mockery context ![]() and the objects that we want to mock
and the objects that we want to mock ![]() . The @Before method executes before every test method, so that’s where we create the mock objects
. The @Before method executes before every test method, so that’s where we create the mock objects ![]() . At
. At ![]() , we define the expectation for the mock objects. We got lucky—these expectations turn out to be the same for both tests,
which is why we can extract them to the @Before method. We first call the getServiceReference on the mockBundleContext, and after that we call the getService on the same object, passing the ServiceReference we already have. Finally, we call the ungetService method on the mockBundleContext.
, we define the expectation for the mock objects. We got lucky—these expectations turn out to be the same for both tests,
which is why we can extract them to the @Before method. We first call the getServiceReference on the mockBundleContext, and after that we call the getService on the same object, passing the ServiceReference we already have. Finally, we call the ungetService method on the mockBundleContext.
We have two tests: one to test the add method of the service ![]() and another to test the multiply method
and another to test the multiply method ![]() . Those tests have the same structure: We first get a new instance of the ClientBundleActivator class
. Those tests have the same structure: We first get a new instance of the ClientBundleActivator class ![]() and then set the parameters using the setter methods on the class
and then set the parameters using the setter methods on the class ![]() . The last step is to invoke the start method with our fake object
. The last step is to invoke the start method with our fake object ![]() and assert that the expected results are good.
and assert that the expected results are good.
As you can see, using mock objects to test our service requires quite a bit of preparation. We need to take care of the proper instantiation and configuration of the mock objects.
The next section introduces the JUnit4OSGi project, which implements an in-container strategy for testing the CalculatorClient service.
16.4. Introducing JUnit4OSGi
The JUnit4OSGi framework is a simple OSGi testing framework that comes from the iPOJO subcomponent of the Apache Felix project. You can download the JARs from the website of the project, or if you’re using Maven, you can declare them as dependencies in your Maven project.
To use the framework you’ll need several JAR files. The bare minimum you need is this:
- org.apache.felix.ipojo-1.4.0.jar
- org.apache.felix.ipojo.handler.extender-1.4.0.jar
- org.apache.felix.ipojo.junit4osgi-1.0.0.jar
- org.apache.felix.ipojo.junit4osgi.felix-command-1.0.0.jar
Place these files in the sample folder FELIX_HOME/bundles/junit4osgi. Then install them one by one with the Felix command-line tool. Once they’re installed and started, you’ll get the chance to use one extra command on the command line:
-> junit [BundleID]
This command will invoke all the JUnit and JUnit4OSGi tests that are present in the bundle with the given [BundleID] and are listed in the manifest descriptor.
Let’s start implementing our first test cases. Listing 16.9 shows the JUnit4OSGi test case that tests the CalculatorService application.
Listing 16.9. JUnit4OSGi test for our CalculatorService application

The listing starts by importing the necessary classes ![]() . Remember that every external package you use needs to be declared in the MANIFEST.MF file of the bundle. Every JUnit4OSGi
test case needs to extend from the OSGiTestCase class
. Remember that every external package you use needs to be declared in the MANIFEST.MF file of the bundle. Every JUnit4OSGi
test case needs to extend from the OSGiTestCase class ![]() . The JUnit4OSGi framework is a JUnit 3.x extension, so you need to follow the JUnit 3.x rules for writing test cases.
. The JUnit4OSGi framework is a JUnit 3.x extension, so you need to follow the JUnit 3.x rules for writing test cases.
We start our first test method at ![]() and get a ServiceReference of the service we wrote and deployed
and get a ServiceReference of the service we wrote and deployed ![]() . We get the ServiceReference from the context object that JUnit4OSGi provides us. The framework gives us the access to the BundleContext to check the status of the given service, something that we do in
. We get the ServiceReference from the context object that JUnit4OSGi provides us. The framework gives us the access to the BundleContext to check the status of the given service, something that we do in ![]() . By asserting the ServiceReference isn’t null, we make sure that the service is installed and started correctly.
. By asserting the ServiceReference isn’t null, we make sure that the service is installed and started correctly.
The following test methods test the service methods; by having the service reference we can get hold of the service itself (at ![]() ) and invoke different methods (at
) and invoke different methods (at ![]() ) to see that it behaves the expected way
) to see that it behaves the expected way ![]() . We also test the exceptional case to provide a random string (at
. We also test the exceptional case to provide a random string (at ![]() ), and we catch the NumberFormatException that we expect to be raised
), and we catch the NumberFormatException that we expect to be raised ![]() .
.
It’s a best practice to separate all your junit-osgi tests in a separate bundle, and that’s what we’re going to do. Go to the calculator-test folder of the source code of the book, and use Maven or Ant to package the bundle that contains the test from the previous listing. After you’ve done this, copy the resultant JAR file and paste it in the FELIX_HOME/bundle folder so that it’s easy to install. The next step is to install and start the service in the bundle the way we described at the beginning of the chapter.
Our final step is to call the test inside the container
-> junit [BundleId]
replacing the BundleId with the number assigned to your module. If you’re using the source code for the book and there are no errors, the result should be the same as this:
Executing [Client activator tests]
....1
Time: 0

OK (4 tests)
As we already mentioned, the junit command is currently available only for the Apache Felix implementation of OSGi. So how can we run our tests if we use any of the other implementations of OSGi? In that case we have to use the GUI runner that comes with the JUnit4OSGi project.
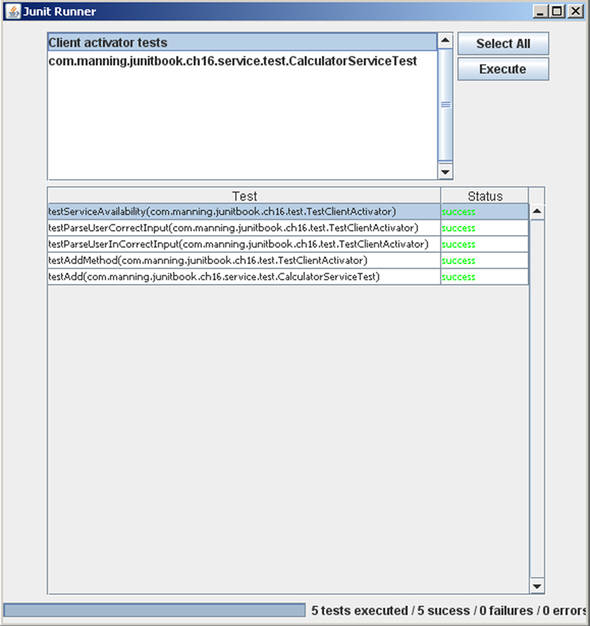
To use the GUI runner, you need to install and start the org.apache.felix.ipojo. junit4osgi.swing-gui.jar bundle. After the bundle is started, you’ll see a Java pop-up that lets you select the bundles that contain JUnit tests. You can select as many as you want, and after clicking the Execute button you should see the result: a green bar for passing tests and a red bar for failing tests (see figure 16.2).
Figure 16.2. Executing the JUnit tests with the GUI runner
This example of executing unit tests through the GUI runner concludes our look at JUnit4OSGi and this chapter on OSGi.
16.5. Summary
In this chapter, we discussed testing OSGi bundles, a technology that is getting more and more popular. We introduced the technology and its key concepts, the bundle and service. You should also be able to test all your OSGi bundles using JUnit4OSGi and to apply different techniques for testing your bundles, like testing with mock objects, integration testing, and so on.
In the following chapters, we begin to study the backend layer of applications. The remaining chapters are concerned with database interactions. We show you different techniques for testing Hibernate and JPA as well as integration testing of your data access layer.