Chapter 2. Exploring core JUnit
Mistakes are the portals of discovery.
James Joyce
This chapter covers
- Using the core JUnit classes
- Understanding JUnit mechanisms
- Understanding the JUnit lifecycle
In chapter 1, we decided that we need a reliable and repeatable way to test our program. Our solution is to write or reuse a framework to drive test code that exercises our program’s API. As our program grows with new classes and new methods to existing classes, we need to grow our test code as well. Experience has taught us that sometimes classes interact in unexpected ways; we need to make sure that we can run all of our tests at any time, no matter what code changes took place. The question becomes, how do we run multiple test classes? And how do we find out which tests passed and which ones failed?
In this chapter, we look at how JUnit provides the functionality to answer those questions. We begin with an overview of the core JUnit concepts—the test class, test suite, and test runner. We take a close look at the core test runners and the test suite before we revisit our old friend the test class. We also examine how the core classes work together.
Then, in the next chapter, we use an example application to show you how to use these core JUnit concepts. We demonstrate best practices for writing and organizing test code.
2.1. Exploring core JUnit
The CalculatorTest program from chapter 1, shown in listing 2.1, defines a test class with a single test method testAdd.
The requirements to define a test class are that the class must be public and contain a zero-argument constructor. In our example, because we don’t define any other constructors, we don’t need to define the zero-argument constructor; Java creates it for us implicitly.
The requirements to create a test method are that it must be annotated with @Test, be public, take no arguments, and return void.
Listing 2.1. The CalculatorTest test case
import static org.junit.Assert.assertEquals;
import org.junit.Test;

public class CalculatorTest {

   @Test
public void testAdd() {
      Calculator calculator = new Calculator();
double result = calculator.add(1, 1);
      assertEquals(2, result, 0);
   }
}
JUnit creates a new instance of the test class before invoking each @Test method. This helps provide independence between test methods and avoids unintentional side effects in the test code. Because each test method runs on a new test class instance, we can’t reuse instance variable values across test methods.
To perform test validation, we use the assert methods provided by the JUnit Assert class. As you can see from the previous example, we statically import these methods in our test class. Alternatively, we can import the JUnit Assert class itself, depending on our taste for static imports. Table 2.1 lists some of the most popular assert methods.
Table 2.1. JUnit assert method sample
|
assertXXX method |
What it’s used for |
|---|---|
| assertArrayEquals("message", A, B) | Asserts the equality of the A and B arrays. |
| assertEquals("message", A, B) | Asserts the equality of objects A and B. This assert invokes the equals() method on the first object against the second. |
| assertSame("message", A, B) | Asserts that the A and B objects are the same object. Whereas the previous assert method checks to see that A and B have the same value (using the equals method), the assertSame method checks to see if the A and B objects are one and the same object (using the == operator). |
| assertTrue("message", A) | Asserts that the A condition is true. |
| assertNotNull("message", A) | Asserts that the A object isn’t null. |
Assert methods with two value parameters follow a pattern worth memorizing: the first parameter (A in the table) is the expected value, and the second parameter (B in the table) is the actual value.
JUnit provides many other methods, such as assertArrayNotEquals, assertNot-Same, assertNotTrue, and so on. It also provides the same methods with a different signature—without the message parameter. It’s a best practice to provide an error message for all your assert method calls. Recall Murphy’s Law and apply it here; when an assertion fails, describe what went wrong in a human-readable message.
When you need to run several test classes at once, you create another object called a test suite (or Suite.) Your test suite is a special test runner (or Runner), so you can run it as you would a test class. Once you understand how a test class, Suite, and Runner work, you’ll be able to write whatever tests you need. These three objects form the backbone of the JUnit framework.
On a daily basis, you need only write test classes and test suites. The other classes work behind the scenes to bring your tests to life.
Definitions
Test class (or TestCase or test case)—A class that contains one or more tests represented by methods annotated with @Test. Use a test class to group together tests that exercise common behaviors. In the remainder of this book, when we mention a test, we mean a method annotated with @Test; when we mention a test case (or test class), we mean a class that holds these test methods—a set of tests. There’s usually a one-to-one mapping between a production class and a test class.
Suite (or test suite)—A group of tests. A test suite is a convenient way to group together tests that are related. For example, if you don’t define a test suite for a test class, JUnit automatically provides a test suite that includes all tests found in the test class (more on that later). A suite usually groups test classes from the same package.
Runner (or test runner)—A runner of test suites. JUnit provides various runners to execute your tests. We cover these runners later in this chapter and show you how to write your own test runners.
Let’s take a closer look at the responsibilities of each of the core objects that make up JUnit; see table 2.2.
Table 2.2. JUnit core objects
|
JUnit concept |
Responsibilities |
Introduced in |
|---|---|---|
| Assert | Lets you define the conditions that you want to test. An assert method is silent when its proposition succeeds but throws an exception if the proposition fails. | Section 2.1 |
| Test | A method with a @Test annotation defines a test. To run this method JUnit constructs a new instance of the containing class and then invokes the annotated method. | Section 2.1 |
| Test class | A test class is the container for @Test methods. | Section 2.1 |
| Suite | The Suite allows you to group test classes together. | Section 2.3 |
| Runner | The Runner class runs tests. JUnit 4 is backward compatible and will run JUnit 3 tests. | Section 2.2 |
We can move on to explaining in detail the objects from this table that we’ve not seen yet: the test Runner and test Suite objects.
To run a basic test class, you needn’t do anything special; JUnit uses a test runner on your behalf to manage the lifecycle of your test class, including creating the class, invoking tests, and gathering results. The next sections address situations that may require you to set up your test to run in a special manner. One of these situations alleviates a common problem when creating tests: invoking tests with different inputs. We discuss this specific scenario with an example in the next section before looking at the remaining test runners provided by JUnit.
2.2. Running parameterized tests
The Parameterized test runner allows you to run a test many times with different sets of parameters. Listing 2.2 demonstrates the Parameterized runner in action (you can find this test in the source code samples for chapter 1).
Listing 2.2. Parameterized tests

To run a test class with the Parameterized test runner, you must meet the following requirements. The test class must carry the @RunWith annotation with the Parameterized class as its argument ![]() . You must declare instance variables used in the tests
. You must declare instance variables used in the tests ![]() and provide a method annotated with @Parameters
and provide a method annotated with @Parameters ![]() , here called getTestParameters. The signature of this method must be @Parameters public static java.util.Collection, without parameters. The Collection elements must be arrays of identical length. This array length must match the number of arguments of the only public constructor.
In our case, each array contains three elements because the public constructor has three arguments. Our example uses this
method to provide the input and expected output values for the tests. Because we want to test the add method of our Calculator program, we provide three parameters: expected value and two values that we add together. At
, here called getTestParameters. The signature of this method must be @Parameters public static java.util.Collection, without parameters. The Collection elements must be arrays of identical length. This array length must match the number of arguments of the only public constructor.
In our case, each array contains three elements because the public constructor has three arguments. Our example uses this
method to provide the input and expected output values for the tests. Because we want to test the add method of our Calculator program, we provide three parameters: expected value and two values that we add together. At ![]() we specify the required constructor for the test. Note that this time our test case doesn’t have a no-argument constructor
but instead has a constructor that accepts parameters for the test. At
we specify the required constructor for the test. Note that this time our test case doesn’t have a no-argument constructor
but instead has a constructor that accepts parameters for the test. At ![]() we finally implement the sum @Test method, which instantiates the Calculator program
we finally implement the sum @Test method, which instantiates the Calculator program ![]() , and assert calls for the parameters we’ve provided
, and assert calls for the parameters we’ve provided ![]() .
.
Running this test will loop exactly as many times as the size of the collection returned by the @Parameters method. The execution of this single test case has the same result as the execution of the following test cases with different parameters:
sum: assertEquals(2, calculator.add(1, 1), 0);
sum: assertEquals(3, calculator.add(2, 1), 0);
sum: assertEquals(4, calculator.add(3, 1), 0);
It’s worth stepping through the JUnit runtime to understand this powerful feature: JUnit calls the static method getTestParameters ![]() . Next, JUnit loops for each array in the getTestParameters collection
. Next, JUnit loops for each array in the getTestParameters collection ![]() . JUnit then calls the only public constructor
. JUnit then calls the only public constructor ![]() . If there is more than one public constructor, JUnit throws an assertion error. JUnit then calls the constructor
. If there is more than one public constructor, JUnit throws an assertion error. JUnit then calls the constructor ![]() with an argument list built from the array elements. In our case, JUnit calls the three-argument constructor
with an argument list built from the array elements. In our case, JUnit calls the three-argument constructor ![]() with the first element in the array, itself an array: {2, 1, 1}. JUnit then calls each @Test method
with the first element in the array, itself an array: {2, 1, 1}. JUnit then calls each @Test method ![]() as usual. JUnit repeats the process for the next array in the getTestParameters collection
as usual. JUnit repeats the process for the next array in the getTestParameters collection ![]() .
.
When you compare the test results with the previous example, you see that instead of running one test, the parameterized JUnit test runner ran the same method three times, once for each value in our @Parameters collection.
The JUnit class Parameterized is one of JUnit’s many test runners. A test runner allows you to tell JUnit how a test should be run. Next, we look at the other JUnit test runners.
2.3. JUnit test runners
When you’re first writing tests, you want them to run as quickly and easily as possible. You should be able to make testing part of the development cycle: code-run-test-code (or test-code run-test if you’re test-first inclined). There are IDEs and compilers for quickly building and running applications; JUnit lets you build and run tests.
2.3.1. Test runner overview
JUnit 4 is built with backward compatibility with version 3.8.x. Because the 4.x version of JUnit is completely different from the 3.x versions, it should be possible to execute not only JUnit 4 tests but also 3.x-style tests. That’s why in its latest versions JUnit provides different runners (listed in table 2.3) for running JUnit 3.x tests, JUnit 4 tests, and different sets of tests.
Table 2.3. JUnit 4 test runners
|
Runner |
Purpose |
|---|---|
| org.junit.internal.runners.JUnit38ClassRunner | This runner is included in the current release of JUnit only for backward compatibility. It will start the test case as a JUnit 3.8 test case. |
| org.junit.runners.JUnit4 | This runner will start the test case as a JUnit 4 test case. |
| org.junit.runners.Parameterized | A Parameterized test runner runs same sets of tests with different parameters. |
| org.junit.runners.Suite | The Suite is a container that can hold different tests. The Suite is also a runner that executes all the @Test annotated methods in a test class. |
JUnit will use a default test runner if none is provided based on the test class. If you want JUnit to use a specific test runner, specify the test runner class using the @RunWith annotation, as demonstrated in the following code:
@RunWith(value=org.junit.internal.runners.JUnit38ClassRunner.class)
public class TestWithJUnit38 extends junit.framework.TestCase {
   [...]
}
Now that we’ve seen an overview of the different test runners and how to direct JUnit to use them, we look at various test runners in more detail.
2.3.2. The JUnitCore façade
To make running tests as quick and easy as possible, JUnit provides a façade (org.junit.runner.JUnitCore), which operates with any of the test runners. JUnit designed this façade to execute your tests and gather results and statistics. You can see the JUnitCore class in action in figure 1.3 in the previous chapter.
A façade[1] is a design pattern that provides a unified interface to a set of interfaces in a subsystem. Façade defines a higher-level interface that makes the subsystem easier to use. You can use a façade to simplify a number of complicated object interactions into a single interface.
1 The definition is taken from the Portland Pattern Repository: http://c2.com/cgi/wiki?FacadePattern.
The JUnit façade determines which runner to use for running your tests. It supports running JUnit 3.8 tests, JUnit 4 tests, and a mixture of both.
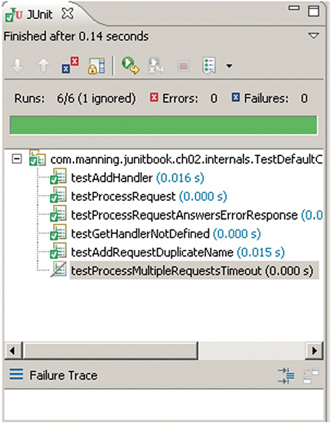
Before JUnit 4, JUnit included Swing and AWT test runners; these are no longer included. Those graphical test runners had a progress indicator running across the screen, known as the famous JUnit green bar. JUnit testers tend to refer to passing tests as green bar and failing tests as red bar. “Keep the bar green to keep the code clean” is the JUnit motto.
Figure 2.1 shows the Eclipse JUnit view after a green-bar test run.
Figure 2.1. JUnit’s green bar, shown in Eclipse
These days, all major IDEs support integration with JUnit.
2.3.3. Custom test runners
Unlike other elements of the JUnit framework, there is no Runner interface. Instead, the various test runners bundled with JUnit all extend the org.junit.runner.Runner class. To create your own test runner, you’ll need to extend the Runner class. Please refer to appendix B, where we cover this topic in detail.
2.4. Composing tests with a suite
For a simple test, you can compile the simple calculator test program from listing 2.1 and hand it to the console façade runner, like this:
>java org.junit.runner.JUnitCore CalculatorTest
The test should run fine assuming the classpath is configured properly. This is simple enough—at least as far as running a single test case is concerned.
2.4.1. Composing a suite of test classes
The next step is to run more than one test class. To facilitate this task JUnit provides the test Suite. The Suite is a container used to gather tests for the purpose of grouping and invocation.
JUnit designed the Suite to run one or more test cases. The test runner launches the Suite; which test case to run is up to the Suite.
You might wonder how you managed to run the example at the end of chapter 1, when you didn’t define a Suite. To keep simple things simple, the test runner automatically creates a Suite if you don’t provide one of your own.
The default Suite scans your test class for any methods that you annotated with @Test. Internally, the default Suite creates an instance of your test class for each @Test method. JUnit then executes every @Test method independently from the others to avoid potential side effects.
If you add another test to the CalculatorTest class, like testSubtract, and you annotate it with the @Test, the default Suite would automatically include it.
The Suite object is a Runner that executes all of the @Test annotated methods in the test class. Listing 2.3 shows how to compose multiple test classes in a single test suite.
Listing 2.3. Composing a Suite from test classes

In listing 2.3, we specify the appropriate runner with the @RunWith annotation ![]() and list the tests we want to include in this test by specifying the test classes in the @SuiteClasses annotation
and list the tests we want to include in this test by specifying the test classes in the @SuiteClasses annotation ![]() . All the @Test methods from these classes will be included in the Suite.
. All the @Test methods from these classes will be included in the Suite.
For the CalculatorTest in listing 2.1, you can represent the default Suite like this:
@RunWith(value=Suite.class)
@SuiteClasses(value={CalculatorTest.class})
public class AllTests {
}
2.4.2. Composing a suite of suites
Because of the clever way JUnit is constructed, it’s possible to create a suite of test suites. For example, listing 2.4 concatenates various files to show how test cases make up suites, which in turn make up a master suite.
Listing 2.4. Suite of suites
[...]
public class TestCaseA {
    @Test
public void testA1() {
        // omitted
    }
}

[...]
public class TestCaseB {
    @Test
public void testB1() {
        // omitted
  }
}

[...]
@RunWith(value=Suite.class)
@SuiteClasses(value = {TestCaseA.class})
public class TestSuiteA {
}

[...]
@RunWith(value=Suite.class)
@SuiteClasses(value = {TestCaseB.class})
public class TestSuiteB {
}

[...]
@RunWith(value = Suite.class )
@SuiteClasses(value = {TestSuiteA.class, TestSuiteB.class})
public class MasterTestSuite{
}
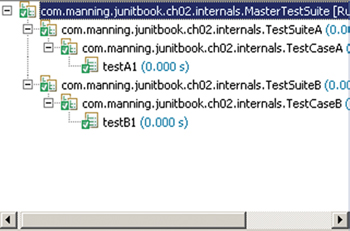
Our simple test suites TestSuiteA and TestSuiteB have only one test case each, a simplification to abbreviate this example. A real suite would contain more than one test class, like our master suite.
You can run any of the classes in this listing as a JUnit test, one of the two test classes, one of the two test suites, or the master test suite. Figure 2.2 displays the result of running the master suite in Eclipse.
Figure 2.2. Running a suite of suites in Eclipse
Test suites provide a powerful way to organize your tests. The convenience isn’t unique to JUnit, as you’ll see in the next section, which will make us reconsider creating any JUnit suites at all.
2.4.3. Suites, IDEs, Ant, and Maven
Ant and Maven also provide ways to run groups of test classes and suites by allowing you to specify, with a type of regular expression, the names of test classes and suites to run. In addition, IDEs like Eclipse allow you to run all test classes and Suites in a selected package or source directory. This is enough to make us reconsider whether it’s worth creating JUnit Suites in the first place.
JUnit Suites are useful if you want to organize your tests in Java, independent of the capability of your build system, because it’s common for someone or a group other than the developers to maintain builds. Similarly, you may wish to provide independence from any given IDE and its JUnit integration capabilities.
2.5. Summary
In this chapter, we introduced the core JUnit concepts and classes. We showed you how to fuse a test class, a Suite, and a Runner.
Use a test class to test one domain object where each test method focuses on one domain method or a specific set of methods. JUnit 4 makes extensive uses of annotations to define and manage tests. JUnit 4 has made obsolete the JUnit 3 requirement of making a test class a TestCase subclass.
You use a test suite to group related test classes together, allowing you to invoke them as a group. You can even group suites together in higher-level suites.
You use a Runner to invoke unit tests and test suites.
In the next chapter, we introduce the Controller design pattern and build a sample Controller component application that we test with JUnit. This way, we not only show you how to use the JUnit components we’ve been discussing so far, but we also introduce many JUnit best practices.