
Chapter 15. Testing JSF applications
The first 90% of the code accounts for the first 10% of the development time. The remaining 10% of the code accounts for the other 90% of the development time.
Tom Cargill
This chapter covers
- The problems of testing JSF applications
- Mock solution of the problems
- JSF unit/integration testing using JSFUnit
- JSF performance testing with JSFUnit
The Cactus framework we introduced in chapter 14 is great for testing most of the Java EE specifications. On a daily basis, the majority of Java developers write Java EE applications, all of which are based on the Java EE spec.
In this chapter we take a closer look at the newest member of the Java EE spec—the JavaServer Faces (JSF) technology. It’s a standard specification developed through the Java Community Process (JCP) for building Java web-based user interfaces. We start the chapter by explaining what JSF is, the problems of testing JSF applications, and how to use the JSFUnit project to solve them. We then implement a sample MusicStore application and demonstrate the power of JSFUnit.
15.1. Introducing JSF
Apart from the specification we mentioned, people refer to JSF[1] as the implementation of this specification: a server-side, user-interface, component framework for Java technology–based applications. This means that different organizations can implement the specification and produce different frameworks, all compatible with the specification. Some of the most popular implementations are Apache MyFaces(http://myfaces.apache.org/) and Sun’s Mojarra JSF reference implementation.
1 If you’re new to the JavaServer Faces technology, we highly recommend JavaServer Faces in Action, by Kito Mann.
In this book, we use the Apache MyFaces implementation because we consider it the most robust.
Figure 15.1 shows an architectural overview of a sample JSF application. The JSF framework was intended to simplify development of web application. For this reason it’s designed to get developers to think in terms of components, managed beans, page navigations, and so on, and not in terms of technical details such as request, response, session, and the like.
Figure 15.1. Architectural overview of a JSF application

JSF handles most of the complexity that you might encounter during development of a web application. JSF also handles the user clicking a web browser button and sending a request to the server. This request needs to be translated in a way that your application can understand. The JSF framework is also responsible for translating and visualizing responses from the application in a way that the browser can display. The framework provides a large number of tag libraries that developers can use to visualize absolutely anything.
Next, we introduce a sample JSF application. In the course of the implementation we explain the different parts of the application, and further in the chapter we test our sample application.
15.2. Introducing the sample application
In the previous section we described the parts of a typical JSF application. We now introduce a real application, the MusicStore application, which we refine and test throughout this chapter.
The MusicStore is a simple JSF application that presents different kinds of music albums, which the user can navigate through and purchase. We start the implementation with a simple POJO (plain old Java object) representing an Album. The implementation is shown in listing 15.1.
Listing 15.1. Album.java POJO object
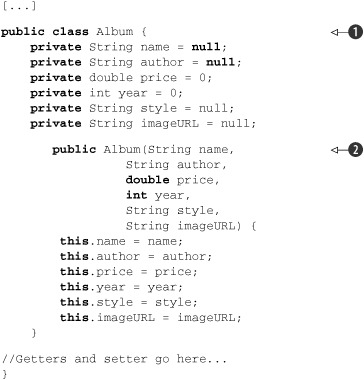
As you can see, the implementation is simple. The Album is a simple POJO that contains several properties ![]() : the name of the album, author of the album, and so on. We have also added getters and setters for those properties and a
constructor
: the name of the album, author of the album, and so on. We have also added getters and setters for those properties and a
constructor ![]() to instantiate different albums.
to instantiate different albums.
Listing 15.2 shows a manager class used to manipulate the albums.
Listing 15.2. The AlbumManager performs different operations on Albums
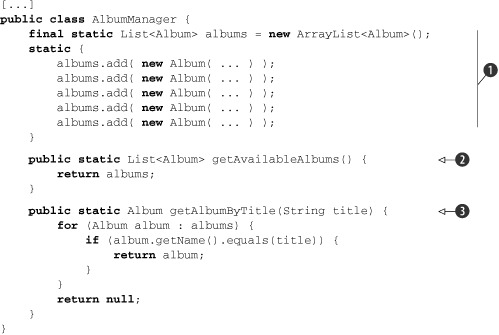
The MusicStore application focuses only on JSF. We avoid additional layers such as interacting with a database. That’s why we start the
implementation with a declaration and initialization of a list of five hardcoded Albums ![]() . Normally we’d invoke a database layer to get these albums, but for the sake of simplicity, we use hardcoded values. To keep
the code listing simple and readable, we removed the Album declarations. Next, we implement a number of methods: one for retrieving all the available albums
. Normally we’d invoke a database layer to get these albums, but for the sake of simplicity, we use hardcoded values. To keep
the code listing simple and readable, we removed the Album declarations. Next, we implement a number of methods: one for retrieving all the available albums ![]() and another for finding an album by title
and another for finding an album by title ![]() .
.
Listing 15.3 implements the bean that communicates with the frontend.
Listing 15.3. ListAvailableAlbumsBean implementation
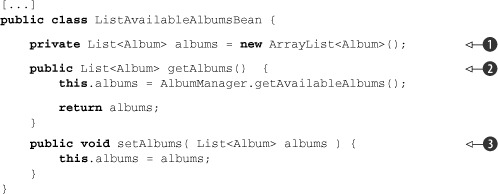
Listing 15.4 describes the bean for our application. For every attribute we want to display in the frontend, we specify a corresponding
property of the bean ![]() . Depending on whether you only read or also write in your property, every property needs to have a getter method
. Depending on whether you only read or also write in your property, every property needs to have a getter method ![]() and a setter method
and a setter method ![]() . JSPs interact with this bean, and the bean itself interacts with the AlbumManager. Before this bean can expose itself to the JSPs, we need to configure the bean in a configuration file called faces-config.xml.
. JSPs interact with this bean, and the bean itself interacts with the AlbumManager. Before this bean can expose itself to the JSPs, we need to configure the bean in a configuration file called faces-config.xml.
Listing 15.4. faces-config.xml to configure our beans
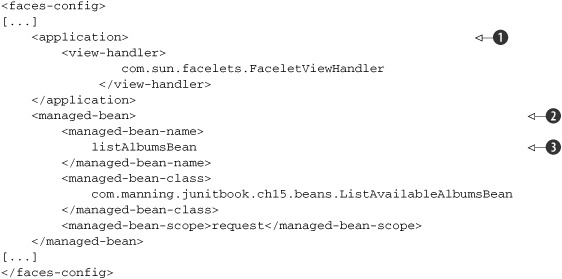
We start with an application declaration ![]() , which contains some information that’s global for the whole application (like the view handlers, the locale parameters,
and so on). The managed-bean declaration
, which contains some information that’s global for the whole application (like the view handlers, the locale parameters,
and so on). The managed-bean declaration ![]() is used to expose our beans to the JSPs. Notice the managed-bean-name declaration
is used to expose our beans to the JSPs. Notice the managed-bean-name declaration ![]() ; this name will be used in the JSP to reference the bean with a class defined in the managed-bean-class declaration.
; this name will be used in the JSP to reference the bean with a class defined in the managed-bean-class declaration.
The only thing that we’re missing to have the full picture of the MusicStore application is the page to display all the albums available. We show this in listing 15.5.
Listing 15.5. The JSP to display all the available albums

We need to import the tag libraries that we want to use in this JSP ![]() . All that our JSP is doing is iterating over all the albums
. All that our JSP is doing is iterating over all the albums ![]() and displaying the information for every album that we want. We use the standard JSTL tag libraries
and displaying the information for every album that we want. We use the standard JSTL tag libraries ![]() as well core JSF tag libraries
as well core JSF tag libraries ![]() .
.
The JSP contains a link that to a managed bean we haven’t defined yet:
<h:commandLink action="#{albumDetailsBean.showAlbumDetails}">
    [...]
</h:commandLink>
We want to implement the following: the list_albums.jsp presents all the albums to the user, and on clicking the name of an album you’re redirected to a page that displays the album details. The new page then allows you to purchase the album or navigate back to the listing page.
Listing 15.6 gives the code for the bean that displays the details for the selected album.
Listing 15.6. AlbumDetailsBean implementation
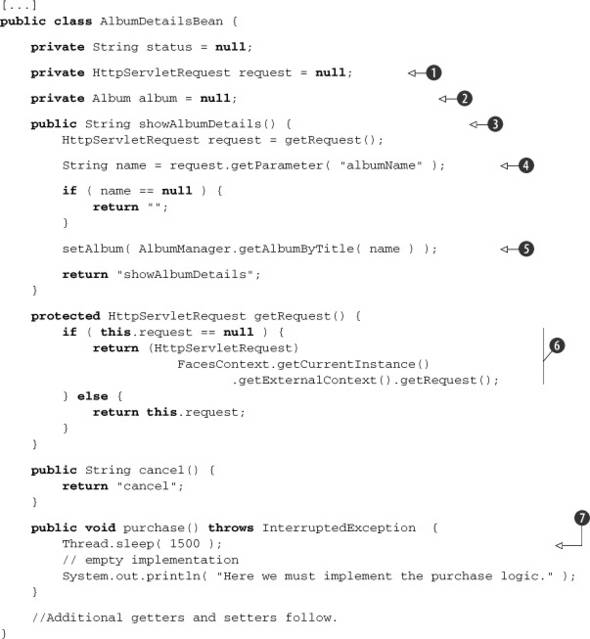
The bean tracks the request ![]() and the album that the user has selected
and the album that the user has selected ![]() . The method that’s called when the user clicks the name of a given album is showAlbumDetails
. The method that’s called when the user clicks the name of a given album is showAlbumDetails ![]() . In this method, we get the request and extract a parameter with the name "albumName"
. In this method, we get the request and extract a parameter with the name "albumName" ![]() . Then we use the AlbumManager to extract the Album object
. Then we use the AlbumManager to extract the Album object ![]() . Pay attention to the way we extract the request
. Pay attention to the way we extract the request ![]() ; if the attribute of the bean is null, we get it from the FacesContext object. In the next section, we mock the request object and set it as an attribute to the bean. The last method is the purchase method
; if the attribute of the bean is null, we get it from the FacesContext object. In the next section, we mock the request object and set it as an attribute to the bean. The last method is the purchase method ![]() ; we call this method when a user wants to purchase a given album. For simplicity, we provide an empty implementation. Notice
that we stop the execution exactly for a second and a half because we want to simulate that this method is time consuming,
which we address when we write performance tests in the last section of this chapter.
; we call this method when a user wants to purchase a given album. For simplicity, we provide an empty implementation. Notice
that we stop the execution exactly for a second and a half because we want to simulate that this method is time consuming,
which we address when we write performance tests in the last section of this chapter.
Now let’s move on to the JSP that provides the details for the bean (shown in listing 15.7).
Listing 15.7. album_details.jsp presenting the details for a given product
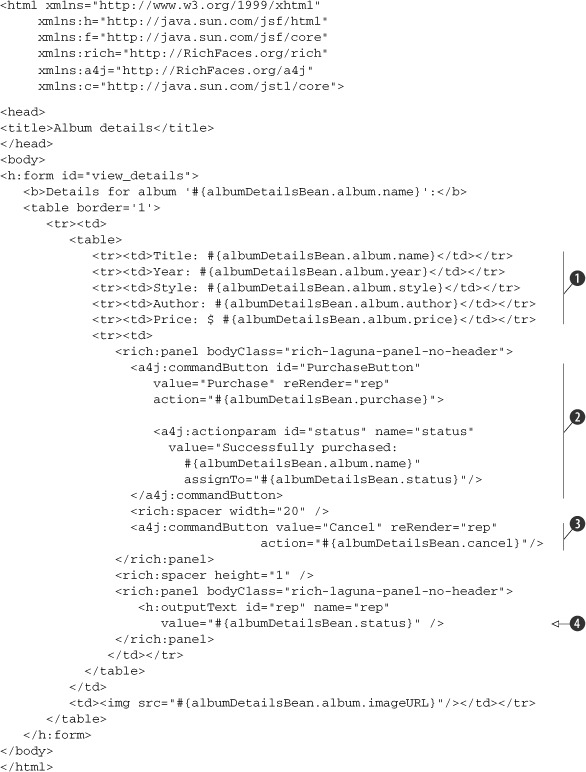
This JSP is implemented using the RichFaces tag libraries. This JSP lists all details for the selected album ![]() . We have two button declarations: the Purchase button
. We have two button declarations: the Purchase button ![]() and the Cancel button
and the Cancel button ![]() . We use RichFaces components to declare these buttons and to implement Ajax behavior. Notice the reRender attribute in the definition: this attribute holds the ID of another component that needs to be rerendered when we get the
response from the server. In our case, the rerendered component is a text component that displays the status of the purchase
. We use RichFaces components to declare these buttons and to implement Ajax behavior. Notice the reRender attribute in the definition: this attribute holds the ID of another component that needs to be rerendered when we get the
response from the server. In our case, the rerendered component is a text component that displays the status of the purchase
![]() .
.
We’re finished; the MusicStore application is now complete. In order to see it in action, you have to get the book source code online. We’ve provided a Maven script with a configured Jetty plug-in; all you have to do is go to the command line, navigate to the folder that contains the pom.xml file for the project, and invoke the Jetty plug-in:
> mvn jetty:run –Pjetty
The Jetty servlet container will start, and if you navigate to http://localhost:8080/ch15-jsfunit/, you should be able to see the application in action (figure 15.2).
Figure 15.2. The two screens of the MusicStore application
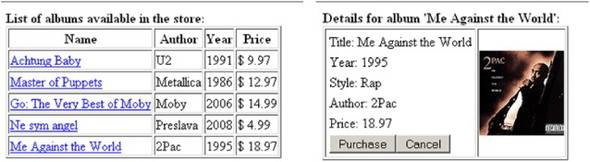
The first image displays all the available albums, and if you click any given album, you should see the second part of the figure, where you can see the details for the album and purchase it.
Moving on, in the next sections we describe how to test the various parts of this application.
15.3. Typical problems when testing JSF applications
As you’ve seen so far, JSF applications typically consist of POJOs (called managed beans) and some frontend JSPs. Here, our managed beans are simple and therefore easy to unit test. So why are JSF applications hard to test?
Indeed, the managed beans are easy to unit test, but the hard part comes when you want to include interaction with a container in your tests. Normally tests give you the security you need to mercilessly refactor your application. They provide you with confidence that you haven’t introduced a new bug into the system.
What could possibly break in a normal JSF application? Here’s list of typical problems that might occur in a JSF application:
- Managed bean problems
- Managed bean method problems
- Faces-config.xml typos
- Improper interface implementation
- Missing getter/setter methods
- Duplicate managed bean declarations
- Various JSF tag problems
- Wrong-navigation problems
JSFUnit static analysis can solve all of these problems, as demonstrated in listing 15.8.
Listing 15.8. Static analysis for your faces-config.xml
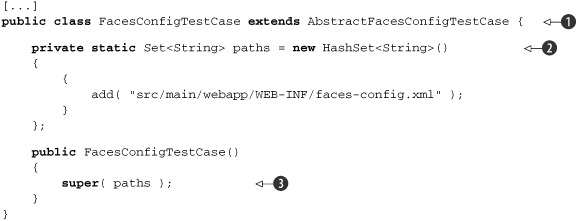
First, we extend the JSFUnit class AbstractFacesConfigTestCase ![]() , and then we create a Set of Strings to hold the paths to our faces-config.xml files
, and then we create a Set of Strings to hold the paths to our faces-config.xml files ![]() and call the constructor of the base class with the Set
and call the constructor of the base class with the Set ![]() . JSFUnit will parse the config files we’ve specified, and it will check the following:
. JSFUnit will parse the config files we’ve specified, and it will check the following:
- That all of our session and application scope beans are serializable
- That all of our managed beans are in a valid scope
- Whether we have missing managed beans
- Whether we’re using the right faces.config class inheritance
- For missing setter methods and for duplicate managed beans
Next, we create tests.
15.4. Strategies for testing JSF applications
The problems that might occur when developing JSF applications have different approaches for solving them. Let’s try to categorize the various ways to test a JSF application.
15.4.1. Black box approach
This is probably the most straightforward approach.[2] With JSF applications, a form of black box testing would be to open a web browser and start clicking pages to verify that everything works as expected. One way to automate black box testing would be to use tools such as Selenium, HttpUnit, or HtmlUnit (see chapters 12 and 13). The point is that in most cases using plain Selenium or HtmlUnit to test your JSF application falls short in several ways. It’s hard to validate expected HTML (which can be complicated by the use of Ajax), and in case you succeed, your tests may fail on minor HTML changes.
2 We highly recommend you read chapter 5 before continuing with this section.
15.4.2. Mock objects to the rescue
Another approach you might take in order to test the MusicStore application is the white box approach. In this case you test only the server-side classes using mocks,[3] without running the whole application in a container.
The managed beans are so simple that to test them you don’t need any kind of mocking. The problems appear when you want to involve objects like FacesContext, which you normally don’t have access to. You can mock those objects, as well as HttpServletRequest, HttpServletResponse, and some other objects, using the techniques described in chapter 7.
For example, let’s test the showAlbumDetails method of the AlbumDetailsBean from listing 15.6 using the JMock library. This method extracts a parameter from the request, so we need to mock the request and pass different values for the parameter, as shown in listing 15.9.
Listing 15.9. Testing the AlbumDetailsBean using JMock
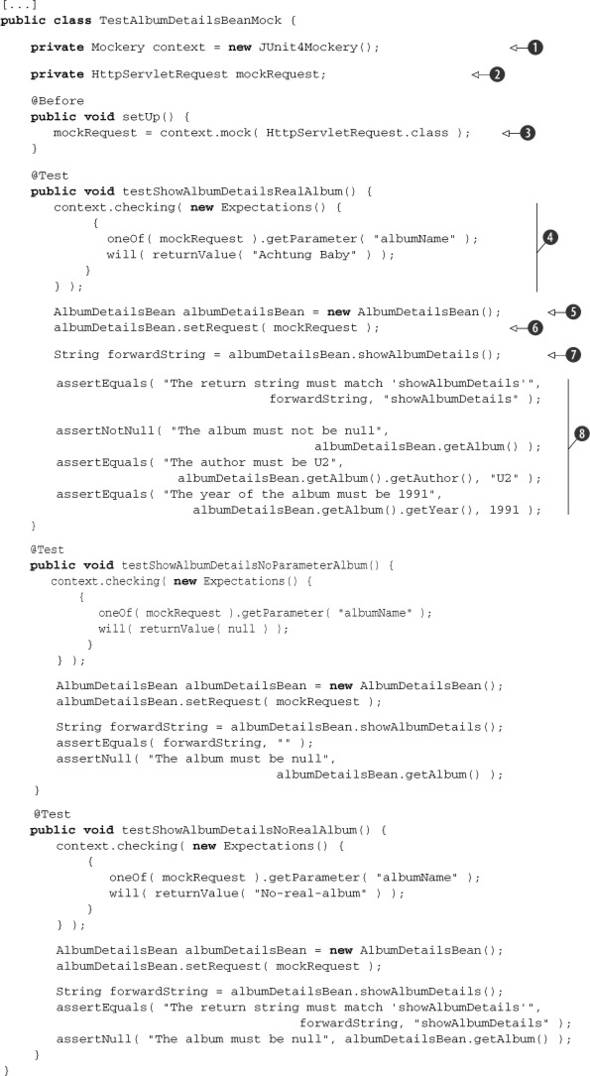
This test should be simple if you’ve already read chapter 7. We start by defining the Mockery context ![]() and the object that we want to mock
and the object that we want to mock ![]() . After that, in the @Before method we initialize the request object to be ready for usage
. After that, in the @Before method we initialize the request object to be ready for usage ![]() . The next step defines several test methods, each of which will test the showAlbumDetails method by specifying a different parameter in the request. For each of those methods we define the expectations
. The next step defines several test methods, each of which will test the showAlbumDetails method by specifying a different parameter in the request. For each of those methods we define the expectations ![]() , initialize AlbumDetailsBean
, initialize AlbumDetailsBean ![]() , set the mock request to the bean
, set the mock request to the bean ![]() , and execute the method under test
, and execute the method under test ![]() . The final test is to perform the assertions that we want
. The final test is to perform the assertions that we want ![]() .
.
Although this kind of testing is easy, the drawback is that only the server-side logic is tested. These tests don’t test the interaction with the HTML pages. Next we look at a non-trivial case, when you want to execute your tests inside the container and test all layers.
15.5. Testing the sample application with JSFUnit
The JSFUnit framework builds on Cactus,[4] which we discussed in the previous chapter, so the lifecycle of a sample test is the same. JSFUnit provides an API to gain access to all of the JSF-related objects in your tests.
4 We strongly encourage you to go back and read chapter 14 if you skipped it and then come back to this chapter.
Let’s start with simple a JSFUnit test-case example, shown in listing 15.10.
Listing 15.10. First JSFUnit test

As with Cactus, we create a test case by extending the Cactus ServletTestCase class ![]() . Because Cactus extends JUnit 3, our test-case class needs to contain one or more testX (where X is user defined) methods
. Because Cactus extends JUnit 3, our test-case class needs to contain one or more testX (where X is user defined) methods ![]() . In these test methods we perform the testing, using the JSFUnit API. In the example, we create a JSFSession object
. In these test methods we perform the testing, using the JSFUnit API. In the example, we create a JSFSession object ![]() , which points to the root of our application. From the JSFSession object, we get two important objects: JSFServerSession
, which points to the root of our application. From the JSFSession object, we get two important objects: JSFServerSession ![]() and JSFClientSession. We use the JSFClientSession to emulate the browser and test the HTML; the JSFServerSession is used to gain access to the JSF state and invoke operations on the managed beans. We check that the viewID is correct
and JSFClientSession. We use the JSFClientSession to emulate the browser and test the HTML; the JSFServerSession is used to gain access to the JSF state and invoke operations on the managed beans. We check that the viewID is correct ![]() and that the managed bean always returns a list of Albums of size 5
and that the managed bean always returns a list of Albums of size 5 ![]() .
.
Testing JSF with JSFUnit looks much like testing with Cactus, but calls the API for testing the JSF components. Because JSFUnit is built on Cactus, we have the same features as we have with Cactus (including the beginX and endX methods we already covered in chapter 14). JSFUnit tests are executed the same way as Cactus tests. JSFUnit requires JDK 1.5+ and one of the following JSF implementations: MyFaces (1.1.x or 1.2.x) or Sun JSF RI (2.0.0-PR, 1.2.x, or 1.1.x.).
To execute the tests you can use Ant or Maven (see chapter 14), or you can execute your tests from a browser.
15.5.1. Executing a JSFUnit test from a browser
To execute tests from a browser, place the cactus-report.xsl file that comes with the Cactus distribution in the root of your web application. After you package the application, deploy it to a servlet container and use a URL like the following:
- http://localhost:8080/ch15-jfsfunit/ServletTestRunner?suite=com.manning.junitbook.ch15.beans.TestListAvailableAlbumsBean&xsl=cactus-report.xsl
You’ll see the results of the test execution, as shown in figure 15.3.
Figure 15.3. Results from the execution of our JSFUnit tests in a browser

Now let’s talk a little about Ajax.
15.5.2. Testing Ajax using JSFUnit
The Ajax elements of an application are scary for most developers to test. But as you saw in chapter 13, it isn’t that hard to test Ajax. In this section we focus on testing the Ajax layer of our application, this time using JSFUnit.
Listing 15.11 shows the album_details.jsp page of our MusicStore application, which will allow us to purchase a given album.
Listing 15.11. album_details.jsp
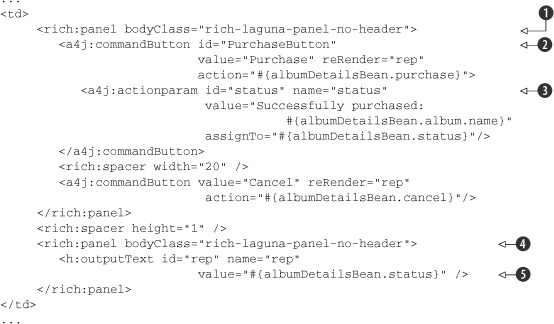
Although we already covered this page in listing 15.7, let’s review it briefly. In our JSP, we use the RichFaces and Ajax4jsf tag libraries to implement the desired Ajax behavior.
We start by defining two rich:panel components ![]() and
and ![]() to hold the rest of our components. In the first panel, we put a commandButton to submit the form to the bean specified in the action parameter
to hold the rest of our components. In the first panel, we put a commandButton to submit the form to the bean specified in the action parameter ![]() . The command button also submits a status parameter to the bean
. The command button also submits a status parameter to the bean ![]() . Notice the reRender parameter of the commandButton. This attribute specifies an ID of another component that needs to be rerendered. In our case, we specify an outputText
. Notice the reRender parameter of the commandButton. This attribute specifies an ID of another component that needs to be rerendered. In our case, we specify an outputText ![]() . You can see the screen for this JSP in figure 15.2.
. You can see the screen for this JSP in figure 15.2.
Now let’s implement some tests for this Ajax scenario. JSFUnit relies heavily on the HtmlUnit headless browser. You can use the JSFClientSession and click anything, regardless of the fact that the request to the bean will be submitted via JavaScript. The code for these tests is shown in listing 15.12.
Listing 15.12. Testing the Ajax components from the album_details.jsp
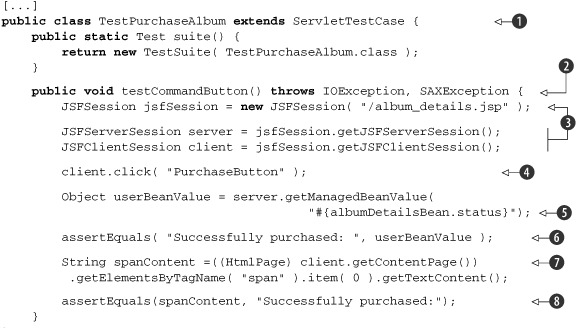
As usual, we start the implementation by declaring a test case by extending the ServletTestCase ![]() . In the test method
. In the test method ![]() we obtain a JSFServerSession object and extract the JSFServerSession/JSFClientSession
we obtain a JSFServerSession object and extract the JSFServerSession/JSFClientSession ![]() . Then we click the "PurchaseButton" RichFaces button
. Then we click the "PurchaseButton" RichFaces button ![]() . At
. At ![]() we extract the value of the status parameter of the managed bean and assert its value
we extract the value of the status parameter of the managed bean and assert its value ![]() . On the client side, we also get the value of the span element on the page
. On the client side, we also get the value of the span element on the page ![]() and assert its content
and assert its content ![]() .
.
The JSFUnit project provides tight integration with the RichFaces project; if you find this treatment brief, you can use the RichFacesClient JSFUnit class. RichFacesClient provides methods for testing drag-and-drop behavior, sliders, calendars, and other JSF widgets.
15.6. Using HtmlUnit with JSFUnit
In this section, we show how JSFUnit and HtmlUnit can work together.
Chapter 12 shows how to get to an HtmlUnit HtmlPage to start testing a page, for example:
WebClient webClient = new WebClient();
    webClient.setThrowExceptionOnScriptError(false);
    HtmlPage searchPage = (HtmlPage)
webClient.getPage("http://www.google.com");
Listing 15.13 shows how to use HtmlUnit in a JSFUnit test:
Listing 15.13. Using HtmlUnit in a JSFUnit test
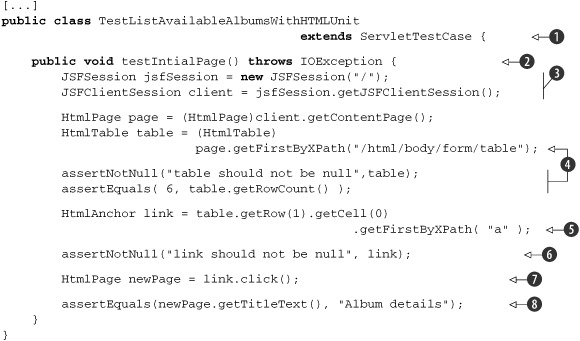
We start our test case again by extending the Cactus ServletTestCase class ![]() . In our test
. In our test ![]() , we create a new JSFSession object with the request URL that we want to invoke. From the jsfSession object, we get a JSFClientSession
, we create a new JSFSession object with the request URL that we want to invoke. From the jsfSession object, we get a JSFClientSession ![]() . From the client object, we get an HtmlTable using an XPath expression reflecting the DOM tree structure of our document
. From the client object, we get an HtmlTable using an XPath expression reflecting the DOM tree structure of our document ![]() . We assert that the table isn’t null and that the number of rows is six (we have five rows for the hardcoded albums and one for the header). From the table we retrieve the second row,
the first cell out of it, and an HTMLAnchor out of the cell
. We assert that the table isn’t null and that the number of rows is six (we have five rows for the hardcoded albums and one for the header). From the table we retrieve the second row,
the first cell out of it, and an HTMLAnchor out of the cell ![]() . Again, we assert that the link isn’t null
. Again, we assert that the link isn’t null ![]() , and we click it
, and we click it ![]() . The last assertion
. The last assertion ![]() compares the title of the page that we got from clicking the link object; we want to make sure that we’re taken to the new page.
compares the title of the page that we got from clicking the link object; we want to make sure that we’re taken to the new page.
15.7. Performance testing for your JSF application
JSFUnit provides the option to test the performance of an application. Going back to our MusicStore application, we’d like to ensure that the purchase method of our AlbumDetailsBeam is always executed in less than a second and a half. Although JUnit 4.5 provides the @Test annotation timeout parameter, when it comes to testing web applications this parameter isn’t sufficient. In most cases, we want to time different phases of the application. JSFUnit provides the JSFTimer class to time the execution of a given phase of an application, as demonstrated in listings 15.14 and 15.15.
Listing 15.14. Enabling the JSFTimer for our application
//web.xml
<context-param>
  <param-name>javax.faces.CONFIG_FILES</param-name>
  <param-value>/WEB-INF/timer-config.xml</param-value>
</context-param>

//timer-config.xml
<?xml version='1.0' encoding='UTF-8'?>
<!DOCTYPE faces-config PUBLIC
  "-//Sun Microsystems, Inc.//DTD JavaServer Faces Config 1.1//EN"
  "http://java.sun.com/dtd/web-facesconfig_1_1.dtd">

<faces-config>
  <lifecycle>
    <phase-listener>
       org.jboss.jsfunit.framework.JSFTimerPhaseListener
    </phase-listener>
  </lifecycle>
</faces-config>
We declare a new context parameter with a value pointing to the timer-config.xml file, which holds the declaration for the timer.
Listing 15.15 shows how to use the timer.
Listing 15.15. Performance test for purchasing an album
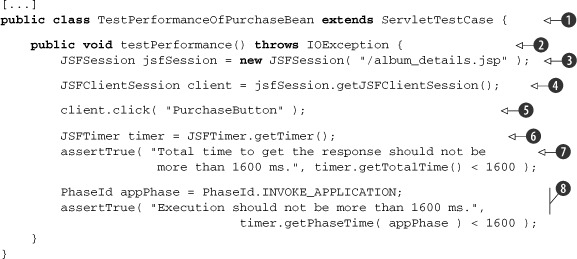
We start by creating a new test case ![]() and a test method
and a test method ![]() . We get a valid JSFSession
. We get a valid JSFSession ![]() and get its JSFClientSession
and get its JSFClientSession ![]() . Next, we click the PurchaseButton to initiate a request to the managed bean
. Next, we click the PurchaseButton to initiate a request to the managed bean ![]() . We create a JSFTimer to measure the execution time
. We create a JSFTimer to measure the execution time ![]() , and we assert that the totalTime of the execution is less than 1600 milliseconds
, and we assert that the totalTime of the execution is less than 1600 milliseconds ![]() .
.
We can also measure the execution time against some specific Phase ![]() . The JSFUnit API provides for timing the execution interval upon any of the standard JSF phases:
. The JSFUnit API provides for timing the execution interval upon any of the standard JSF phases:
- RESTORE_VIEW
- APPLY_REQUEST_VALUES
- PROCESS_VALIDATIONS
- UPDATE_MODEL_VALUES
- INVOKE_APPLICATION
- RENDER_RESPONSE
As we explained in chapters 3 and 4, the main benefit from the test cases is that they serve as a shield. Once you have your test cases written, you can proceed and refactor your application mercilessly, and you’re assured that as long as the tests pass and the bar is green, everything is okay. In this sense, performance testing is important. You can write your tests and assert that the execution of a given method always takes less than a given time barrier. Now you’re free to improve the logic behind that method, and you’ll always be sure that the invocation of the given URL will take no more time than the time barrier allows.
15.8. Summary
Testing JSF applications requires preparation. Black box testing is brittle, limited, and hard to perform. The white box approach (mocking approach) also has its disadvantages; mock tests are always fine grained, which means that the interaction among the different components isn’t tested well. Also, once written, the tests need to be rewritten in case of small cosmetic changes to the application.
JSFUnit, on the other hand, builds on the Cactus project and uses the in-container testing strategy. JSFUnit provides static and performance analysis mechanisms to fully inspect our applications. In this chapter we also showed how to test RichFaces Ajax components.
Starting with chapter 12, we discussed the challenges encountered when testing the frontend layer of a sample Java EE application. In the next chapter, we talk about one of the most recent booms in the Java world, OSGi, and the modularity that it provides.