
Chapter 3. Mastering JUnit
Tests are the Programmer’s Stone, transmuting fear into boredom.
Kent Beck, Test First Development
This chapter covers
- Implementing a sample application
- Testing the sample application with JUnit
- Following JUnit best practices
So far, we’ve made a JUnit survey and shown how to use it (chapter 1). We also looked at JUnit internals, what the core classes and methods are, and how they interact with each other (chapter 2).
We now dive deeper by introducing a real-life component and testing it. In this chapter, we implement a small application using the Controller design pattern. We then test every part of the application using JUnit. We also look at JUnit best practices when writing and organizing your tests.
3.1. Introducing the controller component
Core Java EE Patterns describes a controller as a component that “interacts with a client, controlling and managing the handling of each request,” and tells us that it’s used in both presentation-tier and business-tier patterns.[1]
1 Deepak Alur, John Crupi, and Dan Malks, Core Java EE Patterns: Best Practices and Design Strategies (Upper Saddle River, NJ: Prentice Hall, 2001).
In general, a controller does the following:
- Accepts requests
- Performs any common computations on the request
- Selects an appropriate request handler
- Routes the request so that the handler can execute the relevant business logic
- May provide a top-level handler for errors and exceptions
You’ll find controllers to be handy in a variety of applications. For example, in a presentation-tier pattern, a web controller accepts HTTP requests and extracts HTTP parameters, cookies, and HTTP headers, perhaps making the HTTP elements easily accessible to the rest of the application. A web controller determines the appropriate business logic component to call based on elements in the request, perhaps with the help of persistent data in the HTTP session, a database, or some other resource. The Apache Struts framework is an example of a web controller.
Another common use for a controller is to handle applications in a business-tier pattern. Many business applications support several presentation layers. HTTP clients may handle web applications. Swing clients may handle desktop applications. Behind these presentation tiers, there’s often an application controller, or state machine. Programmers implement many Enterprise JavaBean (EJB) applications this way. The EJB tier has its own controller, which connects to different presentation tiers through a business façade or delegate.
Given the many uses for a controller, it’s no surprise that controllers crop up in a number of enterprise architecture patterns, including Page Controller, Front Controller, and Application Controller.[2] The controller you’ll design here could be the first step in implementing any of these classic patterns. Let’s work through the code for the simple controller, to see how it works, and then try a few tests. If you’d like to follow along and run the tests as you go, all the source code for this chapter is available at SourceForge (http://junitbook.sf.net). See appendix A for more about setting up the source code.
2 Martin Fowler, Patterns of Enterprise Application Architecture (Boston: Addison-Wesley, 2003).
3.1.1. Designing the interfaces
Looking over the description of a controller, four objects pop out: the Request, the Response, the RequestHandler, and the Controller. The Controller accepts a Request, dispatches a RequestHandler, and returns a Response object. With a description in hand, you can code some simple starter interfaces, like those shown in listing 3.1.
Listing 3.1. Request, Response, RequestHandler, and Controller interfaces
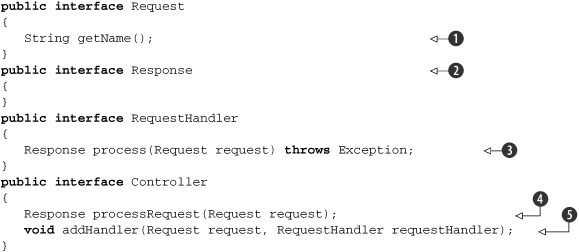
First, define a Request interface with a single getName method that returns the request’s unique name ![]() , so you can differentiate one request from another. As you develop the component, you’ll need other methods, but you can
add those as you go along.
, so you can differentiate one request from another. As you develop the component, you’ll need other methods, but you can
add those as you go along.
Next, specify an empty interface ![]() . To begin coding, you need only return a Response object. What the Response encloses is something you can deal with later. For now, you need a Response type you can plug into a signature.
. To begin coding, you need only return a Response object. What the Response encloses is something you can deal with later. For now, you need a Response type you can plug into a signature.
The next step is to define a RequestHandler that can process a Request and return your Response ![]() . RequestHandler is a helper component designed to do most of the dirty work. It may call on classes that throw any type of exception. Exception is what you have the process method throw.
. RequestHandler is a helper component designed to do most of the dirty work. It may call on classes that throw any type of exception. Exception is what you have the process method throw.
Define a top-level method for processing an incoming request ![]() . After accepting the request, the controller dispatches it to the appropriate RequestHandler. Notice that processRequest doesn’t declare any exceptions. This method is at the top of the control stack and should catch and cope with all errors
internally. If it did throw an exception, the error would usually go up to the Java Virtual Machine (JVM) or servlet container.
The JVM or container would then present the user with one of those nasty white pages. It’s better that you code for it yourself.
. After accepting the request, the controller dispatches it to the appropriate RequestHandler. Notice that processRequest doesn’t declare any exceptions. This method is at the top of the control stack and should catch and cope with all errors
internally. If it did throw an exception, the error would usually go up to the Java Virtual Machine (JVM) or servlet container.
The JVM or container would then present the user with one of those nasty white pages. It’s better that you code for it yourself.
Finally, ![]() is an important design element. The addHandler method allows you to extend the Controller without modifying the Java source.
is an important design element. The addHandler method allows you to extend the Controller without modifying the Java source.
Registering a handler with the controller is an example of Inversion of Control. You may know this pattern as the Hollywood Principle, or “Don’t call us, we’ll call you.” Objects register as handlers for an event. When the event occurs, a hook method on the registered object is invoked. Inversion of Control lets frameworks manage the event lifecycle while allowing developers to plug in custom handlers for framework events.[3]
3.1.2. Implementing the base class
Following up on the interfaces in listing 3.1, listing 3.2 shows a first draft of the simple controller class.
Listing 3.2. The generic controller
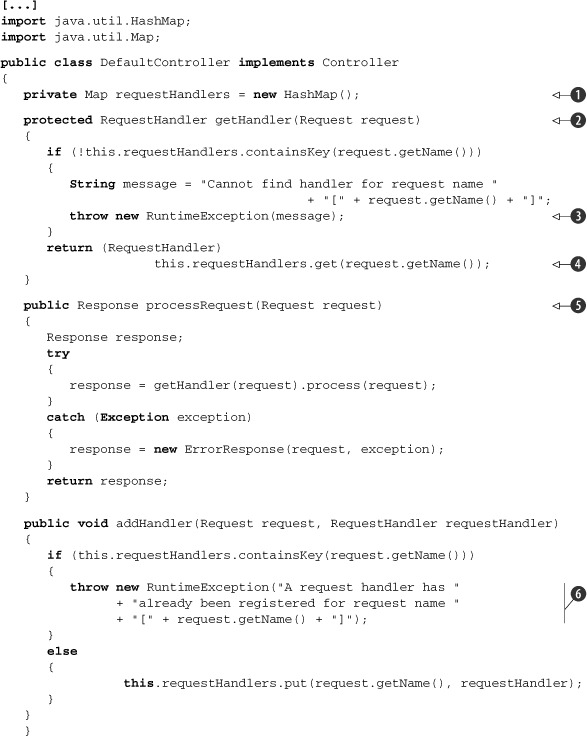
First, declare a HashMap (java.util.HashMap) to act as the registry for your request handlers ![]() . Next, add a protected method, getHandler, to fetch the RequestHandler for a given request
. Next, add a protected method, getHandler, to fetch the RequestHandler for a given request ![]() . If a RequestHandler has not been registered, you throw a RuntimeException (java.lang.RuntimeException)
. If a RequestHandler has not been registered, you throw a RuntimeException (java.lang.RuntimeException) ![]() , because this happenstance represents a programming mistake rather than an issue raised by a user or external system. Java
doesn’t require you to declare the RuntimeException in the method’s signature, but you can still catch it as an exception. An improvement would be to add a specific exception
to the controller framework (NoSuitableRequestHandlerException, for example).
, because this happenstance represents a programming mistake rather than an issue raised by a user or external system. Java
doesn’t require you to declare the RuntimeException in the method’s signature, but you can still catch it as an exception. An improvement would be to add a specific exception
to the controller framework (NoSuitableRequestHandlerException, for example).
Your utility method then returns the appropriate handler to its caller ![]() .
.
The processRequest method ![]() is the core of the Controller class. This method dispatches the appropriate handler for the request and passes back the handler’s Response. If an exception bubbles up, it’s caught in the ErrorResponse class, shown in listing 3.3.
is the core of the Controller class. This method dispatches the appropriate handler for the request and passes back the handler’s Response. If an exception bubbles up, it’s caught in the ErrorResponse class, shown in listing 3.3.
Finally, check to see whether the name for the handler has been registered ![]() , and throw an exception if it has. Looking at the implementation, note that the signature passes the request object, but
you use only its name. This sort of thing often occurs when an interface is defined before the code is written. One way to avoid overdesigning an interface is to practice test-driven development (see chapter 5).
, and throw an exception if it has. Looking at the implementation, note that the signature passes the request object, but
you use only its name. This sort of thing often occurs when an interface is defined before the code is written. One way to avoid overdesigning an interface is to practice test-driven development (see chapter 5).
Listing 3.3. Special response class signaling an error
[...]
public class ErrorResponse implements Response
{
private Request originalRequest;
private Exception originalException;
public ErrorResponse(Request request, Exception exception)
   {
this.originalRequest = request;
this.originalException = exception;
        }
public  Request getOriginalRequest()
   {
return this.originalRequest;
   }
public Exception getOriginalException()
   {
return this.originalException;
   }
}
At this point, you have a crude but effective skeleton for the controller. Table 3.1 shows how the requirements at the top of this section relate to the source code.
Table 3.1. Resolving the base requirements for the component
|
Requirement |
Resolution |
|---|---|
| Accept requests | public Response processRequest(Request request) |
| Select handler | this.requestHandlers.get(request.getName()) |
| Route requests | response = getRequestHandler(request).process(request); |
| Error handling | Subclass ErrorResponse |
The next step for many developers would be to cobble up a stub application to go with the skeleton controller. As test-infected developers, we can write a test suite for the controller without fussing with a stub application. That’s the beauty of unit testing. We can write a package and verify that it works, all outside a conventional Java application.
3.2. Let’s test it!
A fit of inspiration has led us to code the four interfaces shown in listing 3.1 and the two starter classes shown in listings 3.2 and 3.3. If we don’t write an automatic test now, the Bureau of Extreme Programming will be asking for our membership cards back!
Listings 3.2 and 3.3 began with the simplest implementations possible. Let’s do the same with the new set of unit tests. What’s the simplest-possible test case we can explore?
3.2.1. Testing the DefaultController
How about a test case that instantiates the DefaultController class? The first step in doing anything useful with the controller is to construct it, so let’s start there. Listing 3.4 shows the bootstrap test code. It constructs the DefaultController object and sets up a framework for writing tests.
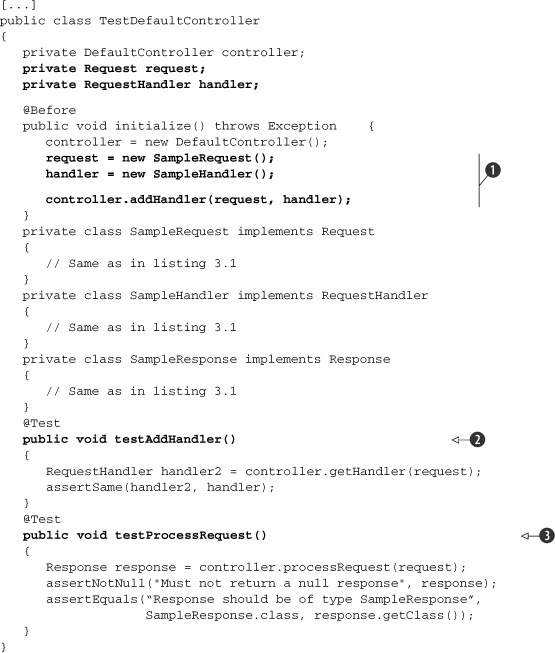
Listing 3.4. TestDefaultController—a bootstrap iteration

Start the name of the test case class with the prefix Test ![]() . The naming convention isn’t required, but by doing so, we mark the class as a test case so that we can easily recognize
test classes and possibly filter them in build scripts. Alternatively, and depending on your native language, you may prefer
to postfix class names with Test.
. The naming convention isn’t required, but by doing so, we mark the class as a test case so that we can easily recognize
test classes and possibly filter them in build scripts. Alternatively, and depending on your native language, you may prefer
to postfix class names with Test.
Next, use the @Before annotated method to instantiate DefaultController ![]() . This is a built-in extension point that the JUnit framework calls between test methods. At
. This is a built-in extension point that the JUnit framework calls between test methods. At ![]() you insert a dummy test method, so you have something to run. As soon as you’re sure the test infrastructure is working,
you can begin adding real test methods. Although this test runs, it also fails. The next step is to fix the test!
you insert a dummy test method, so you have something to run. As soon as you’re sure the test infrastructure is working,
you can begin adding real test methods. Although this test runs, it also fails. The next step is to fix the test!
Use a best practice by throwing an exception for test code that you haven’t implemented yet ![]() . This prevents the test from passing and reminds you that you must implement this code.
. This prevents the test from passing and reminds you that you must implement this code.
Now that you have a bootstrap test, the next step is to decide what to test first.
The @Before and @After annotated methods are executed right before/after the execution of each one of your @Test methods and regardless of whether the test failed or not. This helps you to extract all of your common logic, like instantiating your domain objects and setting them up in some known state. You can have as many of these methods as you want, but beware that if you have more than one of the @Before/@After methods, the order of their execution is not defined.
JUnit also provides the @BeforeClass and @AfterClass annotations to annotate your methods in that class. The methods that you annotate will get executed, only once, before/after all of your @Test methods. Again, as with the @Before and @After annotations, you can have as many of these methods as you want, and again the order of the execution is unspecified.
You need to remember that both the @Before/@After and @BeforeClass/@AfterClass annotated methods must be public. The @BeforeClass/@AfterClass annotated methods must be public and static.
3.2.2. Adding a handler
Now that you have a bootstrap test, the next step is to decide what to test first. We started the test case with the DefaultController object, because that’s the point of this exercise: to create a controller. You wrote some code and made sure it compiled. But how can you test to see if it works?
The purpose of the controller is to process a request and return a response. But before you process a request, the design calls for adding a RequestHandler to do the processing. So, first things first: you should test whether you can add a RequestHandler.
The tests you ran in chapter 1 returned a known result. To see if a test succeeded, you compared the result you expected with whatever result the object you were testing returned. The signature for addHandler is
void addHandler(Request request, RequestHandler requestHandler)
To add a RequestHandler, you need a Request with a known name. To check to see if adding it worked, you can use the getHandler method from DefaultController, which uses this signature:
RequestHandler getHandler(Request request)
This is possible because the getHandler method is protected, and the test classes are located in the same package as the classes they’re testing. This is one reason to define the tests under the same package.
For the first test, it looks like you can do the following:
- Add a RequestHandler, referencing a Request.
- Get a RequestHandler and pass the same Request.
- Check to see if you get the same RequestHandler back.
Where do tests come from?
Now you know what objects you need. The next question is, “Where do these objects come from?” Should you go ahead and write some of the objects you’ll use in the application, such as a logon request?
The point of unit testing is to test one object at a time. In an object-oriented environment like Java, you design objects to interact with other objects. To create a unit test, it follows that you need two flavors of objects: the domain object you’re testing and test objects to interact with the object under test.
Definition
Domain object—In the context of unit testing, the term domain object is used to contrast and compare the objects you use in your application with the objects that you use to test your application (test objects). Any object under test is considered a domain object.
If you used another domain object, like a logon request, and a test failed, it would be hard to identify the culprit. You might not be able to tell whether the problem was with the controller or the request. So, in the first series of tests, the only class you’ll use in production is DefaultController. Everything else should be a special test class.
A vital aspect of unit tests is that they’re finely grained. A unit test independently examines each object you create, so that you can isolate problems as soon as they occur. If you put more than one object under test, you can’t predict how the objects will interact when changes occur to one or the other. When an object interacts with other complex objects, you can surround the object under test with predictable test objects. Another form of software test, integration testing, examines how working objects interact with each other. See chapter 4 for more about other types of tests.
Where do test classes live?
Where do you put the test classes? Java provides several alternatives. For starters, you could do one of the following:
- Make them public classes in your package.
- Make them inner classes within your test-case class.
If the classes are simple and likely to stay that way, then it’s easiest to code them as inner classes. The classes in this example are simple. Listing 3.5 shows the inner classes you can add to the TestDefaultController class.
Listing 3.5. Test classes as inner classes

First, set up a request object ![]() that returns a known name (Test). Next, implement a SampleHandler
that returns a known name (Test). Next, implement a SampleHandler ![]() . The interface calls for a process method, so you have to code that too. You’re not testing the process method right now, so you have it return a SampleResponse object to satisfy the signature. Go ahead and define an empty SampleResponse
. The interface calls for a process method, so you have to code that too. You’re not testing the process method right now, so you have it return a SampleResponse object to satisfy the signature. Go ahead and define an empty SampleResponse ![]() so you have something to instantiate.
so you have something to instantiate.
With the scaffolding from listing 3.5 in place, let’s look at listing 3.6, which shows the test for adding a RequestHandler.
Listing 3.6. TestDefaultController.testAddHandler
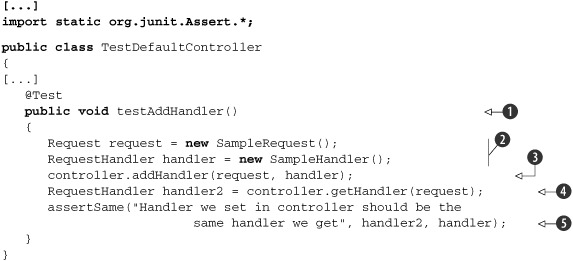
Pick an obvious name for the test method, and annotate your test method with the @Test annotation ![]() . Remember to instantiate your test objects
. Remember to instantiate your test objects ![]() . This code gets to the point of the test: controller (the object under test) adds the test handler
. This code gets to the point of the test: controller (the object under test) adds the test handler ![]() . Note that the DefaultController object is instantiated by the @Before annotated method (see listing 3.4).
. Note that the DefaultController object is instantiated by the @Before annotated method (see listing 3.4).
Read back the handler under a new variable name ![]() , and check to see if you get back the same object you put in
, and check to see if you get back the same object you put in ![]() .
.
You can see that a method is a test method by the @Test annotation. You also must be able to understand what a method is testing by reading the name. Although JUnit doesn’t require any special rules for naming your test methods, a good rule is to start with the testXXX naming scheme, where XXX is the name of the domain method to test. As you add other tests against the same method, move to the testXXXYYY scheme, where YYY describes how the tests differ. Don’t be afraid that the names of your tests are getting long or verbose. As you’ll see by the end of the chapter, it’s sometimes not so obvious what a method is testing by looking at its assert methods. Name your test methods in a descriptive fashion, and add comments where necessary.
Although it’s simple, this unit test confirms the key premise that the mechanism for storing and retrieving RequestHandler is alive and well. If addHandler or getRequest fails in the future, the test will quickly detect the problem.
As you create more tests like this, you’ll notice that you follow a pattern:
- Set up the test by placing the environment in a known state (create objects, acquire resources). The pretest state is referred to as the test fixture.
- Invoke the method under test.
- Confirm the result, usually by calling one or more assert methods.
3.2.3. Processing a request
Let’s look at testing the core purpose of the controller, processing a request. Because you know the routine, we present the test in listing 3.7 and review it.
Listing 3.7. testProcessRequest method
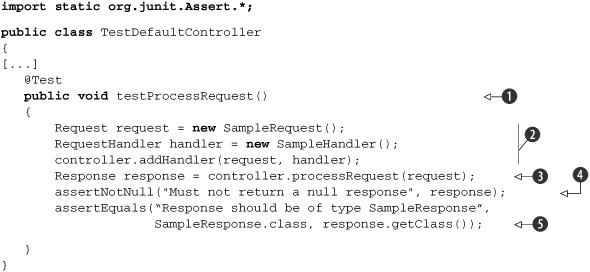
First, annotate the test with the @Test annotation and give the test a simple, uniform name ![]() . Set up the test objects and add the test handler
. Set up the test objects and add the test handler ![]() .
.
At ![]() the code diverges from listing 3.6 and calls the processRequest method. You verify that the returned Response object isn’t null
the code diverges from listing 3.6 and calls the processRequest method. You verify that the returned Response object isn’t null ![]() . This is important because you call the getClass method on the Response object. It will fail with a dreaded NullPointerException if the Response object is null. You use the assertNotNull(String, Object) signature so that if the test fails, the error displayed is meaningful and easy to understand. If you’d used the assertNotNull(Object) signature, the JUnit runner would have displayed a stack trace showing a java.lang.AssertionError exception with no message, which would be more difficult to diagnose.
. This is important because you call the getClass method on the Response object. It will fail with a dreaded NullPointerException if the Response object is null. You use the assertNotNull(String, Object) signature so that if the test fails, the error displayed is meaningful and easy to understand. If you’d used the assertNotNull(Object) signature, the JUnit runner would have displayed a stack trace showing a java.lang.AssertionError exception with no message, which would be more difficult to diagnose.
Once again, compare the result of the test against the expected SampleResponse class ![]() .
.
Whenever you use any of the JUnit assert* methods, make sure you use the signature that takes a String as the first parameter. This parameter lets you provide a meaningful description that’s displayed in the JUnit test runner if the assert fails. Not using this parameter makes it difficult to understand the reason for a failure when it happens.
Factorizing setup logic
Because both tests do the same type of setup, you can try moving that code into a @Before annotated method. At the same time, you don’t want to move it into a new @Before method because you aren’t sure which method will be executed first, and you may get an exception. Instead, you can move it into the same @Before method.
As you add more test methods, you may need to adjust what you do in the @Before methods. For now, eliminating duplicate code as soon as possible helps you write more tests more quickly. Listing 3.8 shows the new and improved TestDefaultController class (changes are shown in bold).
Listing 3.8. TestDefaultController after some refactoring
We move the instantiation of the test Request and RequestHandler objects to initialize ![]() . This saves us from repeating the same code in testAddHandler
. This saves us from repeating the same code in testAddHandler ![]() and testProcessRequest
and testProcessRequest ![]() . Also, we make a new @Before annotated method for adding the handler to the controller. Because @Before methods are executed before every single @Test method, we make sure we have a fully set up DefaultController object.
. Also, we make a new @Before annotated method for adding the handler to the controller. Because @Before methods are executed before every single @Test method, we make sure we have a fully set up DefaultController object.
Definition
Refactor—To improve the design of existing code. For more about refactoring, see Martin Fowler’s already-classic book, Refactoring: Improving the Design of Existing Code.[4]
4 Martin Fowler, Refactoring: Improving the Design of Existing Code (Reading, MA: Addison-Wesley, 1999).
Note that you don’t try to share the setup code by testing more than one operation in a test method, as shown in listing 3.9 (an anti-example).
Listing 3.9. Anti-example: don’t combine test methods
public class TestDefaultController
{
[...]
   @Test
public void testAddAndProcess()
   {
      Request request = new SampleRequest();
      RequestHandler handler = new SampleHandler();
      controller.addHandler(request, handler);
      RequestHandler handler2 = controller.getHandler(request);
      assertEquals(handler2,handler);

      // DO NOT COMBINE TEST METHODS THIS WAY
      Response response = controller.processRequest(request);
      assertNotNull("Must not return a null response", response);
      assertEquals(SampleResponse.class, response.getClass());
   }
}
Don’t try to cram several tests into one method. The result will be more complex test methods, which will become increasingly difficult to read and understand. Worse, the more logic you write in your test methods, the more risk there is that they won’t work and will need debugging. This slippery slope can end with writing tests to test your tests!
Unit tests give you confidence in a program by alerting you when something that had worked now fails. If you put more than one unit test in a method, it becomes more difficult to zoom in on exactly what went wrong. When tests share the same method, a failing test may leave the fixture in an unpredictable state. Other tests embedded in the method may not run or may not run properly. Your picture of the test results will often be incomplete or even misleading.
Because all the test methods in a test class share the same fixture, and JUnit can now generate an automatic test suite, it’s just as easy to place each unit test in its own method. If you need to use the same block of code in more than one test, extract it into a utility method that each test method can call. Better yet, if all methods can share the code, put it into the fixture.
Another common pitfall is to write test methods that don’t contain any assert statements. When you execute those tests, you see JUnit flag them as successful, but this is an illusion of successful tests. Always use assert calls. The only time when not using assert calls may be acceptable is when an exception is thrown to indicate an error condition.
For best results, your test methods should be as concise and focused as your domain methods.
Each test method must be as clear and focused as possible. This is why JUnit provides you with the @Before, @After, @BeforeClass, and @AfterClass annotations: so you can share fixtures between tests without combining test methods.
3.2.4. Improving testProcessRequest
When we wrote the testProcessRequest method in listing 3.7, we wanted to confirm that the response returned is the expected response. The implementation confirms that the object returned is the object that we expected. But what we’d like to know is whether the response returned equals the expected response. The response could be a different class. What’s important is whether the class identifies itself as the correct response.
The assertSame method confirms that both references are to the same object. The assertEquals method utilizes the equals method, inherited from the base Object class. To see if two different objects have the same identity, you need to provide your own definition of identity. For an object like a response, you can assign each response its own command token (or name).
The empty implementation of SampleResponse didn’t have a name property you could test. To get the test you want, you have to implement a little more of the Response class first. Listing 3.10 shows the enhanced SampleResponse class.
Listing 3.10. A refactored SampleResponse
public class TestDefaultController
{
[...]
private class SampleResponse implements Response
   {
private static final String NAME = "Test";
public String getName()
      {
return NAME;
      }
public boolean equals(Object object)
      {
boolean result = false;
if (object instanceof SampleResponse)
         {
            result = ((SampleResponse) object).getName().equals(getName());
         }
return result;
      }
public int hashCode()
      {
return NAME.hashCode();
      }
   }
[...]
Now that SampleResponse has an identity (represented by getName()) and its own equals method, you can amend the test method:
@Test
public void testProcessRequest()
{
   Response response = controller.processRequest(request);
   assertNotNull("Must not return a null response", response);
   assertEquals(new SampleResponse(), response);
}
We’ve introduced the concept of identity in the SampleResponse class for the purpose of the test. But the tests are telling you that this should have existed in the proper Response class. You need to modify the Response interface as follows:
public interface Response
{
   String getName();
}
As you see, tests can sometimes “talk” and guide you to a better design of your application. But this isn’t the real purpose of the tests. Don’t forget that the tests are used to protect us from introducing errors in our code. To do this we need to test every condition under which our application might be executed. We start investigating the exceptional conditions in the next chapter.
3.3. Testing exception handling
So far, your tests have followed the main path of execution. If the behavior of one of your objects under test changes in an unexpected way, this type of test points to the root of the problem. In essence, you’ve been writing diagnostic tests that monitor the application’s health.
But sometimes bad things happen to good programs. Say an application needs to connect to a database. Your diagnostics may test whether you’re following the database’s API. If you open a connection but don’t close it, a diagnostic can note that you’ve failed to meet the expectation that all connections must be closed after use.
But what if a connection isn’t available? Maybe the connection pool is empty. Or perhaps the database server is down. If the database server is configured properly and you have all the resources you need, this may never happen.
All resources are finite, and someday, instead of a connection, you may be handed an exception. “Anything that can go wrong will.”
If you’re testing an application by hand, one way to test for this sort of thing is to turn off the database while the application is running. Forcing error conditions is an excellent way to test your disaster-recovery capability. Creating error conditions is also time consuming. Most of us can’t afford to do this several times a day—or even once a day. In addition, many other error conditions aren’t easy to create by hand.
Testing the main path of execution is a good thing—and a requirement. Testing exception handling is just as important and should also be included as a requirement. If the main path doesn’t work, your application won’t work either (a condition you’re likely to notice.)
Unit tests help ensure that your methods are keeping their API contracts with other methods. If the contract is based solely on other components’ keeping their contracts, then there may not be any useful behavior for you to test. But if the method changes the parameter’s or field’s value in any way, then you’re providing unique behavior that you should test. The method is no longer a simple go-between—it’s a method with its own behavior that future changes could conceivably break. If a method is changed such that it isn’t simple anymore, then you should add a test when that change takes place but not before.
As the JUnit FAQ puts it, “The general philosophy is this: if it can’t break on its own, it’s too simple to break.” This is also in keeping with the Extreme Programming rule: “No functionality is added early.”
What about things like JavaBean getters and setters? Well, that depends. If you’re coding them by hand in a text editor, then yes, you might want to test them. It’s surprisingly easy to miscode a setter in a way that the compiler won’t catch. But if you’re using an IDE that watches for such things, then your team might decide not to test simple JavaBean properties.
We’re all human, and often we tend to be sloppy when it comes to exception cases. Even textbooks scrimp on error handling so as to simplify the examples. As a result, many otherwise great programs aren’t error proofed before they go into production. If properly tested, an application should not expose a screen of death but should trap, log, and explain all errors gracefully.
3.3.1. Simulating exceptional conditions
The exceptional test case is where unit tests shine. Unit tests can simulate exceptional conditions as easily as normal conditions. Other types of tests, like functional and acceptance tests, work at the production level. Whether these tests encounter systemic errors is often a matter of happenstance. A unit test can produce exceptional conditions on demand.
During our original fit of inspired coding, we had the foresight to code an error handler into the base classes. As you saw back in listing 3.2, the processRequest method traps all exceptions and passes back a special error response instead:
try
{
   response = getHandler(request).process(request);
}
catch (Exception exception)
{
   response = new ErrorResponse(request, exception);
}
How do you simulate an exception to test whether your error handler works? To test handling a normal request, you created a SampleRequestHandler that returned a SampleRequest (see listing 3.5). To test the handling of error conditions, you can create a SampleExceptionHandler that throws an exception instead, as shown in listing 3.11.
Listing 3.11. Request handler for exception cases
public class TestDefaultController
{
[...]
private class SampleExceptionHandler implements RequestHandler
   {
public Response process(Request request) throws Exception
      {
throw new Exception("error processing request");
      }
   }
}
This leaves creating a test method that registers the handler and tries processing a request—for example, like the one shown in listing 3.12.
Listing 3.12. testProcessRequestAnswersErrorResponse, first iteration
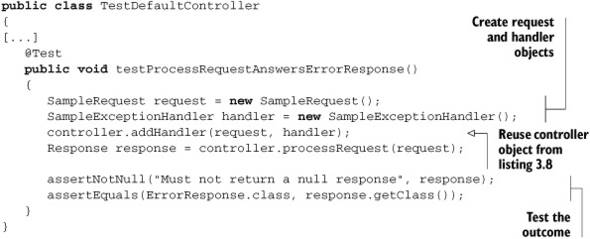
If you ran this test through JUnit, it would fail! A quick look at the message tells you two things. First, you need to use a different name for the test request, because there’s already a request named Test in the fixture. Second, you may need to add more exception handling to the class so that a RuntimeException isn’t thrown in production.
As to the first item, you can try using the request object in the fixture instead of your own, but that fails with the same error. (Moral: Once you have a test, use it to explore alternative coding strategies.) You could consider changing the fixture. If you remove from the fixture the code that registers a default SampleRequest and SampleHandler, you introduce duplication into the other test methods—not good. Better to fix the SampleRequest so it can be instantiated under different names. Listing 3.13 is the refactored result (changes from listings 3.11 and 3.12 are in bold).
Listing 3.13. testProcessRequestExceptionHandler, fixed and refactored
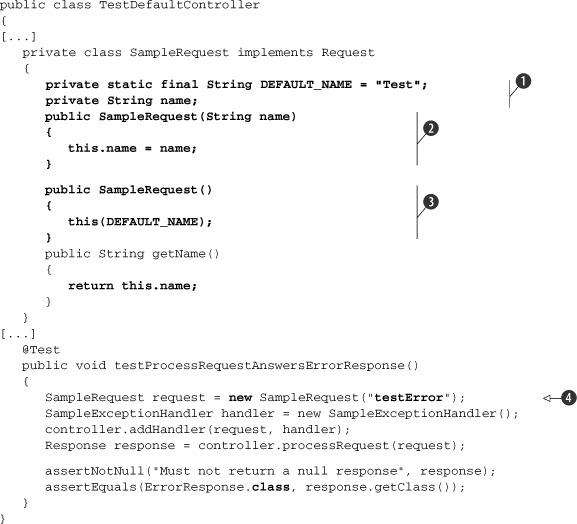
Introduce a member field to hold the request’s name and set it to the previous version’s default ![]() . Next, introduce a new constructor that lets you pass a name to the request
. Next, introduce a new constructor that lets you pass a name to the request ![]() , to override the default. At
, to override the default. At ![]() you introduce an empty constructor, so existing calls will continue to work. Finally, call the new constructor instead
you introduce an empty constructor, so existing calls will continue to work. Finally, call the new constructor instead ![]() , so the exceptional request object doesn’t conflict with the fixture.
, so the exceptional request object doesn’t conflict with the fixture.
If you added another test method that also used the exception handler, you might move its instantiation to the @Before fixture, to eliminate duplication.
Writing unit tests often helps you write better code. The reason is simple: a test case is a user of your code. It’s only when using code that you find its shortcomings. Don’t hesitate to listen to your tests and refactor your code so that it’s easier to use. The practice of test-driven development relies on this principle. By writing the tests first, you develop your classes from the point of view of a user of your code. See chapter 5 for more about TDD.
Because the duplication hasn’t happened yet, let’s resist the urge to anticipate change and let the code stand (Extreme Programming’s “No functionality is added early” rule).
3.3.2. Testing for exceptions
During testing, you found that addHandler throws an undocumented RuntimeException if you try to register a request with a duplicate name. (By undocumented, we mean that it doesn’t appear in the signature.) Looking at the code, you see that getHandler throws a RuntimeException if the request has not been registered.
Whether you should throw undocumented RuntimeException exceptions is a larger design issue. (You can make that a to-do for later study.) For now, let’s write some tests that prove the methods will behave as designed.
Listing 3.14 shows two test methods that prove addHandler and getHandler will throw runtime exceptions when expected.
Listing 3.14. Testing methods that throw an exception
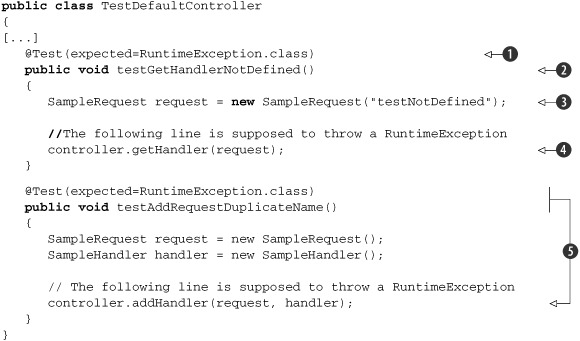
Annotate your method with the @Test annotation to denote that it’s a test method ![]() . Because we’re going to test an exceptional condition and we expect that the test method will produce an exception of some
kind, we need also to specify what kind of an exception we expect to be raised. We do this by specifying the expected parameter of the @Test annotation. Give the test an obvious name
. Because we’re going to test an exceptional condition and we expect that the test method will produce an exception of some
kind, we need also to specify what kind of an exception we expect to be raised. We do this by specifying the expected parameter of the @Test annotation. Give the test an obvious name ![]() . Because this test represents an exceptional case, append NotDefined to the standard testGetHandler prefix. Doing so keeps all the getHandler tests together and documents the purpose of each derivation.
. Because this test represents an exceptional case, append NotDefined to the standard testGetHandler prefix. Doing so keeps all the getHandler tests together and documents the purpose of each derivation.
At ![]() , you create the request object for the test, also giving it an obvious name. Pass the (unregistered) request to the default
getHandler method
, you create the request object for the test, also giving it an obvious name. Pass the (unregistered) request to the default
getHandler method ![]() . Because this request has no handler attached, a RuntimeException should be raised.
. Because this request has no handler attached, a RuntimeException should be raised.
You follow the same pattern ![]() as the first method:
as the first method:
- Insert a statement that should throw an exception.
- Add the expected parameter to the @Test annotation to denote what kind of an exception you expect.
- Proceed normally.
Normally the expected parameter in the @Test annotation clearly tells the developers that an exception of that type should be raised. But you can go even further. Besides naming your test methods in an obvious fashion to denote that this method is testing an exceptional condition, you can also place some comments to highlight the line of the code that produces the expected exception.
The controller class is by no means finished, but you have a respectable first iteration and a test suite proving that it works. Now you can commit the controller package, along with its tests, to the project’s code repository and move on to the next task on your list.
An easy way to identify exceptional paths is to examine the different branches in the code you’re testing. By branches, we mean the outcome of if clauses, switch statements, and try-catch blocks. When you start following these branches, sometimes you may find that testing each alternative is painful. If code is difficult to test, it’s usually just as difficult to use. When testing indicates a poor design (called a code smell, http://c2.com/cgi/wiki?CodeSmell), you should stop and refactor the domain code. In the case of too many branches, the solution is usually to split a larger method into several smaller methods.[5] Alternatively, you may need to modify the class hierarchy to better represent the problem domain.[6] Other situations would call for different refactorings.
5 Fowler, Refactoring, “Extract Method.”
6 More about writing testable code can be found in chapter 4.
A test is your code’s first “customer,” and as the maxim goes, “the customer is always right.”
The next task on our list is timeout testing.
3.4. Timeout testing
So far, we’ve tested our application for proper functionality—when supplied with the right data, not only does it behave in the expected manner, but it also produces the expected result. Now we want to look at another aspect of testing our application: scalability. How scalable is our DefaultController class?
We’re going to write some tests and expect that they run below a given time barrier. To do this, JUnit provides us with another parameter to the @Test annotation called timeout. In this parameter, you can specify your time barrier in terms of milliseconds, and if the test takes more time to execute, JUnit will mark the test as failed. For example, let’s look at the code in listing 3.15.
Listing 3.15. Timeout tests
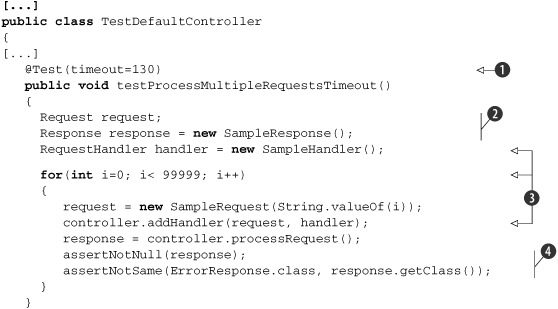
We start by specifying the timeout parameter in milliseconds, which we expect to be our time barrier ![]() . Then
. Then ![]() we declare the Request, Response, and RequestHandler objects we’re going to use in the test. At
we declare the Request, Response, and RequestHandler objects we’re going to use in the test. At ![]() we start a for loop to create 99,999 SampleRequest objects and add them along with a handler to the controller. After that, we invoke the processRequest() method of the controller and assert
we start a for loop to create 99,999 SampleRequest objects and add them along with a handler to the controller. After that, we invoke the processRequest() method of the controller and assert ![]() that we get a non-null Response object and also that the Response we get isn’t an ErrorResponse.
that we get a non-null Response object and also that the Response we get isn’t an ErrorResponse.
You might consider the 130 milliseconds time barrier to be optimistic, and you’re right. This time barrier was the lowest possible on my machine. But the execution time depends on the hardware it runs on (processor speed, memory available, and so on) and also on the software it runs on (mainly the operating system, but also the Java version, and so on). For different developers this test would fail or pass. Further, when adding more functionality in the processRequest() method, the time barrier we’ve chosen will become insufficient for our needs.
We get to the point where a few timeout tests might fail the whole build for some developers. Sometimes it’s good to skip some of the tests. In JUnit 3.x we had to change the name of the test method (to not start with the test prefix). In version 4.x of JUnit, however, we have a nice way to skip a test. The only thing we need to do is annotate the @Test method with an @Ignore annotation. Look at the code in listing 3.16.
Listing 3.16. Ignoring a test method in JUnit 4.x

As you can see, the only thing we’ve added is the @Ignore annotation ![]() to the method. This annotation accepts the value parameter, which lets us insert a message as to why we skip the test.
to the method. This annotation accepts the value parameter, which lets us insert a message as to why we skip the test.
As you saw in the previous listing, we specified why we needed to skip the execution of the test. It’s a good practice to do that. First, you notify your fellow developers why you want to skip the execution of the test, and second, you prove to yourself that you know what the test does, and you don’t ignore it just because it fails.
As we mentioned, in JUnit 3 the only way to skip the execution of a test method was to rename it or comment it out. This gives you no information whatsoever as to how many tests were skipped. In JUnit 4, when you annotate methods with @Ignore, you get statistics that include how many tests JUnit skipped in addition to how many tests passed and failed.
3.5. Introducing Hamcrest matchers
The statistics show that people are easily infected with the unit testing philosophy. Once you get accustomed to writing tests and see how good it feels to have someone protecting you from possible mistakes, you’ll wonder how it was possible to live without unit testing before.
As you write more and more unit tests and assertions, you’ll inevitably encounter the problem that some of the assertions are big and hard to read. For example, consider the code in listing 3.17.
Listing 3.17. Cumbersome JUnit assert method
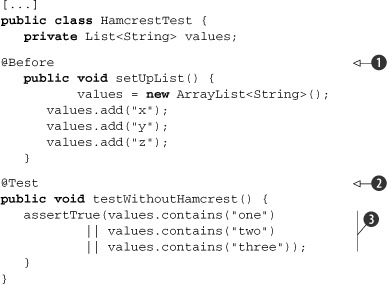
What we do in this example is construct a simple JUnit test, exactly like the ones we’ve been constructing so far. We have
a @Before fixture ![]() , which will initialize some data for our test, and then we have a single test method
, which will initialize some data for our test, and then we have a single test method ![]() . In this test method you can see that we make a long and hard-to-read assertion
. In this test method you can see that we make a long and hard-to-read assertion ![]() (maybe it’s not that hard to read, but it’s definitely not obvious what it does at first glance). Our goal is to simplify
the assertion we make in the test method.
(maybe it’s not that hard to read, but it’s definitely not obvious what it does at first glance). Our goal is to simplify
the assertion we make in the test method.
To solve this problem we’re going to present a library of matchers for building test expressions. Hamcrest (http://code.google.com/p/hamcrest/) is a library that contains a lot of helpful matcher objects (known also as constraints or predicates), ported in several languages (Java, C++, Objective-C, Python, and PHP). Note that Hamcrest isn’t a testing framework itself, but rather it helps you declaratively specify simple matching rules. These matching rules can be used in many different situations, but they’re particularly helpful for unit testing.
Listing 3.18 is the same test method, this time written using the Hamcrest library.
Listing 3.18. Hamcrest library to simplify our assert declarations
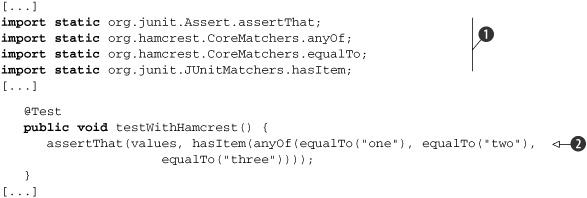
Here we reuse listing 3.17 and add another test method to it. This time we import the needed matchers and the assertThat method ![]() , and after that we construct a test method. In the test method we use one of the most powerful features of the matchers—they
can nest within each other
, and after that we construct a test method. In the test method we use one of the most powerful features of the matchers—they
can nest within each other ![]() . Whether you prefer assertion code with or without Hamcrest matchers is a personal preference. What Hamcrest gives you that standard assertions don’t provide
is a human-readable description of an assertion failure.
. Whether you prefer assertion code with or without Hamcrest matchers is a personal preference. What Hamcrest gives you that standard assertions don’t provide
is a human-readable description of an assertion failure.
If you followed the examples in the two previous listings, you’ve probably noticed that in both the cases we construct a List with the “x”, “y”, and “z” as elements in it. After that we assert the presence of either “one”, “two”, or “three”, which means that the test, as written, will fail. Let’s execute that test. The result from the execution is shown in figure 3.1.
Figure 3.1. The screen on the left shows the stack trace from the execution of the test without using Hamcrest, and the one on the right shows the same thing using Hamcrest.
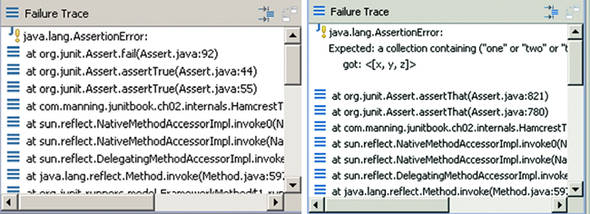
As you can see from the two screens, the one on the right gives a lot more details, doesn’t it? Table 3.2 lists some of the most commonly used Hamcrest matchers.
Table 3.2. Some of the most commonly used Hamcrest matchers
All of them seem straightforward to read and use, and remember that you can combine them with each other.
Finally, Hamcrest is extremely extensible. It’s easy to write your own matchers that check a certain condition. The only thing you need to do is implement the Matcher interface and an appropriately named factory method. You can find more on how to write custom matchers in appendix D of this book, where we provide a complete overview of how to write your own matchers.
3.6. Setting up a project for testing
Because this chapter covers testing a realistic component, let’s finish up by looking at how you set up the controller package as part of a larger project. In chapter 1, you kept all the Java domain code and test code in the same folder.
They were introductory tests on an example class, so this approach seemed simplest for everyone. In this chapter, you’ve begun to build real classes with real tests, as you would for one of your own projects. Accordingly, you’ve set up the source code repository as you would for a real project.
So far, you have only one test case. Mixing this in with the domain classes would not have been a big deal. But experience tells us that soon you’ll have at least as many test classes as you have domain classes. Placing all of them in the same directory will begin to create file-management issues. It will become difficult to find the class you want to edit next.
Meanwhile, you want the test classes to be able to unit test protected methods, so you want to keep everything in the same Java package. The solution is to have one package in two folders. Figure 3.2 shows a snapshot of how the directory structure looks in a popular integrated development environment (IDE).
Figure 3.2. A separate-but-equal filing system keeps tests in the same package but in different directories.
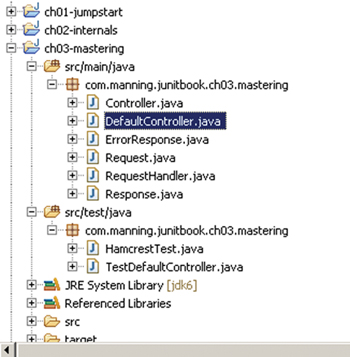
This is the code for the third chapter, so we used ch03-mastering for the top-level project directory name (see appendix C). Under the root directory, we created separate src/main/java and src/main/test folders. Under each of these, the package structure begins.
In this case, all of the code falls under the com.manning.junitbook.ch03.mastering package. The working interfaces and classes go under src/main/java; the classes we write for testing only go under the src/main/test directory.
Beyond eliminating clutter, a separate-but-equal directory structure yields several other benefits. Right now, the only test class has the convenient Test prefix. Later you may need other helper classes to create more sophisticated tests. These might include stubs, mock objects, and other helpers. It may not be convenient to prefix all of these classes with Test, and it becomes harder to tell the domain classes from the test classes.
Using a separate test folder also makes it easy to deliver a runtime JAR with only the domain classes. And it simplifies running all the tests automatically.
Put test classes in the same package as the class they test but in a parallel directory structure. You need tests in the same package to allow access to protected methods. You want tests in a separate directory to simplify file management and to clearly delineate test and domain classes.
3.7. Summary
As you saw in chapter 1, it isn’t hard to jump in and begin writing JUnit tests for your applications. In this chapter, we created a test case for a simple but complete application controller. Rather than test a single component, the test case examined how several components worked together. We started with a bootstrap test case that could be used with any class. Then we added new tests to the test case one by one until all of the original components were under test. Because the assertions were getting more and more complicated, we found a way to simplify them by means of the Hamcrest matchers. We expect this package to grow, so we created a second source code directory for the test classes. Because the test and domain source directories are part of the same package, we can still test protected and package default members.
In the next chapter, we put unit testing in perspective with other types of tests that you need to perform on your applications. We also talk about how unit testing fits in the development lifecycle.