
Chapter 1. JUnit jump-start
Never in the field of software development was so much owed by so many to so few lines of code.
Martin Fowler
This chapter covers
- Exploring JUnit
- Installing JUnit
- Writing our first test
- Running tests
All code is tested.
During development, the first thing we do is run our own programmer’s “acceptance test.” We code, compile, and run. When we run, we test. The test may just be clicking a button to see if it brings up the expected menu. Nevertheless, every day, we code, we compile, we run, and we test.
When we test, we often find issues—especially on the first run. Therefore, we code, compile, run, and test again.
Most of us quickly develop a pattern for our informal tests: we add a record, view a record, edit a record, and delete a record. Running a little test suite like this by hand is easy enough to do, so we do it—over and over again.
Some programmers like this type of repetitive testing. It can be a pleasant break from deep thought and hardcoding. When our little click-through tests finally succeed, there’s a feeling of accomplishment: Eureka! I found it!
Other programmers dislike this type of repetitive work. Rather than run the test by hand, they prefer to create a small program that runs the test automatically. Play-testing code is one thing; running automated tests is another.
If you’re a play-test developer, this book is for you. We’ll show you how creating automated tests can be easy, effective, and even fun.
If you’re already “test-infected,”[1] this book is also for you. We cover the basics in part 1 and then move on to the tough, real-life problems in parts 2, 3, and 4.
1Test-infected is a term coined by Gamma/Beck, “Test-Infected: Programmers Love Writing Tests,” Java Report, 3, 7, 37–50: 1998.
1.1. Proving it works
Some developers feel that automated tests are an essential part of the development process: you can’t prove a component works until it passes a comprehensive series of tests. Two developers felt that this type of unit testing was so important that it deserved its own framework. In 1997, Erich Gamma and Kent Beck created a simple but effective unit testing framework for Java, called JUnit. Their work followed the design of an earlier framework Kent Beck had created for Smalltalk, called SUnit.
Definition
A framework is a semi-complete application.[2] A framework provides a reusable, common structure to share among applications. Developers incorporate the framework into their own application and extend it to meet their specific needs. Frameworks differ from toolkits by providing a coherent structure, rather than a simple set of utility classes.
2 Ralph E. Johnson and Brian Foote, “Designing Reusable Classes,” Journal of Object-Oriented Programming 1.5 (June/July 1988): 22–35; http://www.laputan.org/drc/drc.html.
If you recognize those names, it’s for good reason. Erich Gamma is one of the Gang of Four who gave us the now-classic Design Patterns book.[3] We know Kent Beck equally well for his groundbreaking work in the software discipline known as Extreme Programming (http://www.extremeprogramming.org).
3 Erich Gamma et al., Design Patterns (Reading, MA: Addison-Wesley, 1995).
JUnit (http://www.junit.org) is open source software, released under IBM’s Common Public License Version 1.0 and hosted on SourceForge. The Common Public License is business friendly: people can distribute JUnit with commercial products without a lot of red tape or restrictions.
JUnit quickly became the de facto standard framework for developing unit tests in Java. The underlying testing model, known as xUnit, is on its way to becoming the standard framework for any language. There are xUnit frameworks available for ASP, C++, C#, Eiffel, Delphi, Perl, PHP, Python, REBOL, Smalltalk, and Visual Basic—to name a few!
The JUnit team did not invent software testing or even the unit test. Originally, the term unit test described a test that examined the behavior of a single unit of work.
Over time, usage of the term unit test broadened. For example, IEEE has defined unit testing as “Testing of individual hardware or software units or groups of related units” (emphasis added).[4]
4EEE Standard Computer Dictionary: A Compilation of IEEE Standard Computer Glossaries (New York, IEEE, 1990).
In this book, we use the term unit test in the narrower sense of a test that examines a single unit in isolation from other units. We focus on the type of small, incremental tests that programmers apply to their own code. Sometimes we call these programmer tests to differentiate them from quality assurance tests or customer tests (http://c2.com/cgi/wiki?ProgrammerTest).
Here’s a generic description of a typical unit test from our perspective: “Confirm that the method accepts the expected range of input and that the method returns the expected value for each input.”
This description asks us to test the behavior of a method through its interface. If we give it value x, will it return value y? If we give it value z instead, will it throw the proper exception?
Definition
A unit test examines the behavior of a distinct unit of work. Within a Java application, the “distinct unit of work” is often (but not always) a single method. By contrast, integration tests and acceptance tests examine how various components interact. A unit of work is a task that isn’t directly dependent on the completion of any other task.
Unit tests often focus on testing whether a method follows the terms of its API contract. Like a written contract by people who agree to exchange certain goods or services under specific conditions, an API contract is a formal agreement made by the signature of a method. A method requires its callers to provide specific object references or primitive values and returns an object reference or primitive value. If the method can’t fulfill the contract, the test should throw an exception, and we say that the method has broken its contract.
In this chapter, we walk through creating a unit test for a simple class from scratch. We start by writing a test and its minimal runtime framework, so you can see how we used to do things. Then we roll out JUnit to show you how the right tools can make life much simpler.
Definition
An API contract is a view of an application programming interface (API) as a formal agreement between the caller and the callee. Often the unit tests help define the API contract by demonstrating the expected behavior. The notion of an API contract stems from the practice of, popularized by the Eiffel programming language (http://archive.eiffel.com/doc/manuals/technology/contract).
1.2. Starting from scratch
For our first example, we create a simple calculator class that adds two numbers. Our calculator provides an API to clients and doesn’t contain a user interface; it’s shown in listing 1.1.
Listing 1.1. The test calculator class
public class Calculator {
public double add(double number1, double number2) {
return number1 + number2;
   }
}
Although the documentation isn’t shown, the intended purpose of the Calculator’s add(double, double) method is to take two doubles and return the sum as a double. The compiler can tell us that it compiles, but we should also make sure it works at runtime. A core tenet of unit testing is, “Any program feature without an automated test doesn’t exist.”[5] The add method represents a core feature of the calculator. We have some code that allegedly implements the feature. What’s missing is an automated test that proves our implementation works.
5 Kent Beck, Extreme Programming Explained: Embrace Change (Reading, MA: Addison-Wesley, 1999).
The current implementation of the add method is too simple to break. If add were a minor utility method, then we might not test it directly. In that case, if add did fail, then tests of the methods that used add would fail. The add method would be tested indirectly, but tested nonetheless. In the context of the calculator program, add isn’t just a method; it’s a program feature. In order to have confidence in the program, most developers would expect there to be an automated test for the add feature, no matter how simple the implementation appears. In some cases, we can prove program features through automatic functional tests or automatic acceptance tests. For more about software tests in general, see chapter 3.
Testing anything at this point seems problematic. We don’t even have a user interface with which to enter a pair of doubles. We could write a small command-line program that waited for us to type in two double values and then displayed the result. Then we’d also be testing our own ability to type numbers and add the result ourselves. This is much more than what we want to do. We want to know if this unit of work will add two doubles and return the correct sum. We don’t want to test whether programmers can type numbers!
Meanwhile, if we’re going to go to the effort of testing our work, we should also try to preserve that effort. It’s good to know that the add(double,double) method worked when we wrote it. But what we really want to know is whether the method will work when we ship the rest of the application or whenever we make a subsequent modification. If we put these requirements together, we come up with the idea of writing a simple test program for the add method.
The test program could pass known values to the method and see if the result matches our expectations. We could also run the program again later to be sure the method continues to work as the application grows. What’s the simplest possible test program we could write? What about the CalculatorTest program shown in listing 1.2?
Listing 1.2. A simple test calculator program
public class CalculatorTest {
public static void main(String[] args) {
      Calculator calculator = new Calculator();
      double result = calculator.add(10,50);
if (result != 60) {
         System.out.println("Bad result: " + result);
      }
   }
}
The first CalculatorTest is simple indeed. It creates an instance of Calculator, passes it two numbers, and checks the result. If the result doesn’t meet our expectations, we print a message on standard output.
If we compile and run this program now, the test will quietly pass, and all will seem well. But what happens if we change the code so that it fails? We’ll have to watch the screen carefully for the error message. We may not have to supply the input, but we’re still testing our own ability to monitor the program’s output. We want to test the code, not ourselves!
The conventional way to signal error conditions in Java is to throw an exception. Let’s throw an exception instead to indicate a test failure.
Meanwhile, we may also want to run tests for other Calculator methods that we haven’t written yet, like subtract or multiply. Moving to a modular design would make it easier to catch and handle exceptions as well as extend the test program later. Listing 1.3 shows a slightly better CalculatorTest program.
Listing 1.3. A (slightly) better test calculator program
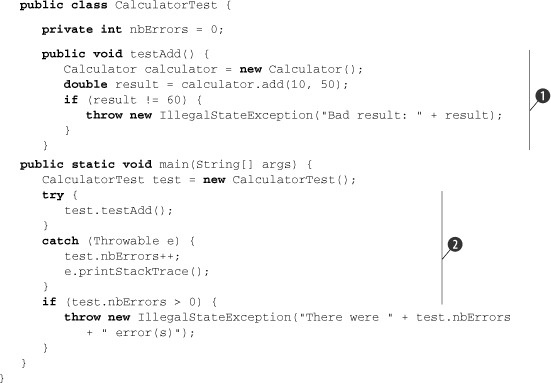
Working from listing 1.3, at ![]() we move the test into its own testAdd method. It’s now easier to focus on what the test does. We can also add more methods with more unit tests later, without
making the main method harder to maintain. At
we move the test into its own testAdd method. It’s now easier to focus on what the test does. We can also add more methods with more unit tests later, without
making the main method harder to maintain. At ![]() , we change the main method to print a stack trace when an error occurs and then, if there are any errors, end by throwing a summary exception.
, we change the main method to print a stack trace when an error occurs and then, if there are any errors, end by throwing a summary exception.
Now that you’ve seen a simple application and its tests, you can see that even this small class and its tests can benefit from the bit of scaffolding code we’ve created to run and manage test results. As an application gets more complicated and tests more involved, continuing to build and maintain our own custom testing framework becomes a burden.
Next, we take a step back and look at the general case for a unit testing framework.
1.3. Understanding unit testing frameworks
Unit testing frameworks should follow several best practices. These seemingly minor improvements in the CalculatorTest program highlight three rules that (in our experience) all unit testing frameworks should follow:
- Each unit test should run independently of all other unit tests.
- The framework should detect and report errors test by test.
- It should be easy to define which unit tests will run.
The “slightly better” test program comes close to following these rules but still falls short. For example, in order for each unit test to be truly independent, each should run in a different class instance and ideally in a different class loader instance.
We can now add new unit tests by adding a new method and then adding a corresponding try/catch block to main. This is a step up, but it’s still short of what we’d want in a real unit test suite. Our experience tells us that large try/catch blocks cause maintenance problems. We could easily leave out a unit test and never know it!
It would be nice if we could add new test methods and continue working. But how would the program know which methods to run? Well, we could have a simple registration procedure. A registration method would at least inventory which tests are running.
Another approach would be to use Java’s reflection and introspection capabilities. A program could look at itself and decide to run whatever methods follow a certain naming convention—like those that begin with test, for example.
Making it easy to add tests (the third rule in our earlier list) sounds like another good rule for a unit testing framework. The support code to realize this rule (via registration or introspection) wouldn’t be trivial, but it would be worthwhile. There’d be a lot of work up front, but that effort would pay off each time we added a new test.
Happily, the JUnit team has saved us the trouble. The JUnit framework already supports introspecting methods. It also supports using a different class instance and class loader instance for each test and reports all errors on a test-by-test basis.
Now that you have a better idea of why you need a unit testing framework, let’s look specifically at JUnit.
1.4. JUnit design goals
The JUnit team has defined three discrete goals for the framework:
- The framework must help us write useful tests.
- The framework must help us create tests that retain their value over time.
- The framework must help us lower the cost of writing tests by reusing code.
We return to these goals in chapter 2.
Next, before we get into the action, we’ll show you how to set up JUnit.
1.5. Setting up JUnit
In order to use JUnit to write your application tests, you need to add the JUnit JAR file to your project’s compilation classpath and to your execution classpath. Follow these steps:
Download the JUnit distribution (junit-4.6 or newer) from http://www.junit.org. JUnit contains several test samples that you’ll run to get familiar with executing JUnit tests.
Unzip the distribution zip file to a directory on your computer system (for example, C: on Windows or /opt/ on UNIX).
In this directory, unzipping will create a subdirectory for the JUnit distribution you downloaded (for example, C:junit4.6 on Windows or /opt/junit4.6 on UNIX).
You’re now ready to run the tests provided with the JUnit distribution. JUnit comes complete with Java programs that you can use to view the result of a test, including a text-based test runner with console output (figure 1.2).
To run the text test runner, open a shell in C:junit4.6 on Windows or in /opt/ junit4.6 UNIX, and type the appropriate command for your operating system:
java -cp junit-4.6.jar;. junit.samples.AllTests
UNIX
java -cp junit-4.6.jar:. junit.samples.AllTests
The AllTests class contains a main method to execute the sample tests:
public static void main (String[] args) {
   junit.textui.TestRunner.run(suite());
}
Figure 1.1 shows the result of the test execution.
Figure 1.1. Execution of the JUnit distribution sample tests using the text test runner
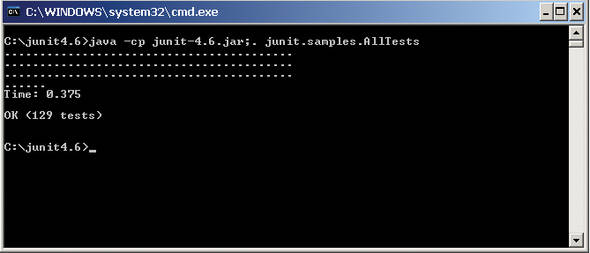
Notice that the JUnit text test runner displays passing tests with a dot. Had there been errors, they would have displayed with an E instead of a dot.
In part 3 of the book, we look at running tests using the Ant build tool and also the Maven build tool.
1.6. Testing with JUnit
JUnit has many features that make it easy to write and run tests. You’ll see these features at work throughout this book:
- Separate test class instances and class loaders for each unit test to avoid side effects
- JUnit annotations to provide resource initialization and reclamation methods: @Before, @BeforeClass, @After, and @AfterClass
- A variety of assert methods to make it easy to check the results of your tests
- Integration with popular tools like Ant and Maven, and popular IDEs like Eclipse, NetBeans, IntelliJ, and JBuilder
Without further ado, let’s turn to listing 1.4 and see what the simple Calculator test looks like when written with JUnit.
Listing 1.4. The JUnit CalculatorTest program

This is a much simpler test; let’s walk through it. At ![]() , we start by defining a test class. The only restriction is that the class must be public; we can name it whatever we like.
It’s common practice to end the class name with Test. Notice also that in contrast to JUnit 3 where we needed to extend the TestCase class, this requirement has been removed in JUnit 4.
, we start by defining a test class. The only restriction is that the class must be public; we can name it whatever we like.
It’s common practice to end the class name with Test. Notice also that in contrast to JUnit 3 where we needed to extend the TestCase class, this requirement has been removed in JUnit 4.
At ![]() , we mark the method as a unit test method by adding the @Test annotation.[6] A best practice is to name test methods following the testXXX pattern. JUnit doesn’t have method name restrictions. You can name your methods as you like; as long as they have the @Test annotation, JUnit will execute them.
, we mark the method as a unit test method by adding the @Test annotation.[6] A best practice is to name test methods following the testXXX pattern. JUnit doesn’t have method name restrictions. You can name your methods as you like; as long as they have the @Test annotation, JUnit will execute them.
6 Annotations were first introduced in JDK 1.5, so in order to use them you need to have version 1.5 or later of the JDK.
At ![]() , we start the test by creating an instance of the Calculator class (the “object under test”), and at
, we start the test by creating an instance of the Calculator class (the “object under test”), and at ![]() , as before, we execute the test by calling the method to test, passing it two known values.
, as before, we execute the test by calling the method to test, passing it two known values.
At ![]() , the JUnit framework begins to shine! To check the result of the test, we call an assertEquals method, which we imported with a static import on the first line of the class. The Javadoc for the assertEquals method is as follows:
, the JUnit framework begins to shine! To check the result of the test, we call an assertEquals method, which we imported with a static import on the first line of the class. The Javadoc for the assertEquals method is as follows:
/**
 * Asserts that two doubles or floats are equal to within a positive delta.
 * If the expected value is infinity then the delta value is ignored.
 */
static public void assertEquals(
   double expected, double actual, double delta)
In listing 1.4, we passed assertEquals these parameters:
expected = 60
actual = result
delta = 0
Because we passed the calculator the values 10 and 50, we tell assertEquals to expect the sum to be 60. (We pass 0 as the delta because we’re adding integers.) When we called the calculator object, we tucked the return value into a local double named result. Therefore, we pass that variable to assertEquals to compare against the expected value of 60.
If the actual value isn’t equal to the expected value, JUnit throws an unchecked exception, which causes the test to fail.
Most often, the delta parameter can be zero, and we can safely ignore it. It comes into play with calculations that aren’t always precise, which includes many floatingpoint calculations. The delta provides a range factor. If the actual value is within the range expected - delta and expected + delta, the test will pass. You may find it useful when doing mathematical computations with rounding or truncating errors or when asserting a condition about the modification date of a file, because the precision of these dates depends on the operating system.
Let’s assume that we’ve entered the code from listings 1.1 and 1.4 in the C:junitbookch01-jumpstart directory (/opt/junitbook/ch01-jumpstart on UNIX). Let’s first compile the code by opening a command shell in that directory and typing the following (we’ll assume we have the javac executable on our PATH):
Windows
javac -cp junit4.6junit-4.6.jar *.java
UNIX
javac -cp /opt/junit4.6/junit-4.6.jar *.java
We’re now ready to start the console test runner, by typing the following:
Windows
java -cp .;junit4.6junit-4.6.jar
    org.junit.runner.JUnitCore CalculatorTest
UNIX
java -cp .:/opt/junit4.6/junit-4.6.jar
    org.junit.runner.JUnitCore CalculatorTest
Figure 1.2 shows the test result.
Figure 1.2. Execution of the first JUnit test CalculatorTest using the text test runner
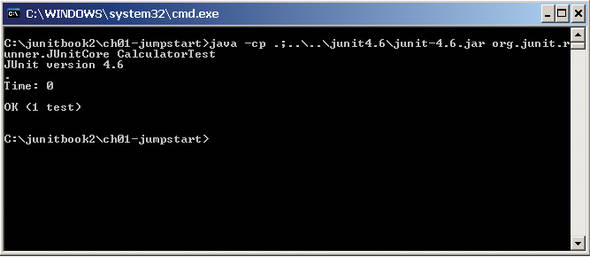
The remarkable thing about the JUnit CalculatorTest class in listing 1.4 is that the code is easier to write than the first CalculatorTest program in listing 1.2. In addition, we can run the test automatically through the JUnit framework.
When we run the test from the command line (figure 1.2), we see the amount of time it took and the number of tests that passed. There are many other ways to run tests, from IDEs like Eclipse to build tools like Ant. This simple example gives you a taste of the power of JUnit and unit testing.
1.7. Summary
Every developer should perform some type of test to see if code works. Developers who use automatic unit tests can repeat these tests on demand to ensure that new code works and doesn’t break existing tests.
Simple unit tests aren’t difficult to create without JUnit, but as tests are added and become more complex, writing and maintaining tests becomes more difficult. JUnit is a unit testing framework that makes it easier to create, run, and revise unit tests.
In this chapter, we scratched the surface of JUnit by stepping through a simple test. JUnit has much more to offer.
In chapter 2 we take a closer look at the JUnit framework classes (different annotations and assertion mechanisms) and how they work together to make unit testing efficient and effective. We also walk through the differences between the old-style JUnit 3 and the new features in JUnit 4.