
4. Working with Images
Creating More Effective Rollovers 85
Building Three-State Rollovers 91
Triggering Rollovers from a Link 93
Making Multiple Links Change a Single Rollover 96
Working with Multiple Rollovers 99
Adding Links to Cycling Banners 106
Building Wraparound Slideshows 108
Cycling Images with a Random Start 113
One of the best (and most common) uses of JavaScript is to add visual interest to Web pages by animating graphics, and that’s what this chapter is all about. Making an image on a Web page change when the user moves the mouse over the image, thereby making the page react to the user, is one of the most common—and effective—tricks you can learn in JavaScript. This rollover, as it is called, is easy to implement yet has many applications, as you’ll see.
Rollovers are a great tool, but you can do much more than rollovers with JavaScript, such as automatically change images, create ad banners, build slideshows, and display random images on a page.
In this chapter, you’ll learn how to make JavaScript do all of these image tricks. Let’s get started.
Table 4.1. Just Enough HTML—Images
Creating Rollovers
The idea behind rollovers is simple. You have two images. The first, or original, image is loaded and displayed along with the rest of the Web page by the user. When the user moves the mouse over the first image, the browser quickly swaps out the first image for the second, or replacement, image, giving the illusion of movement or animation.
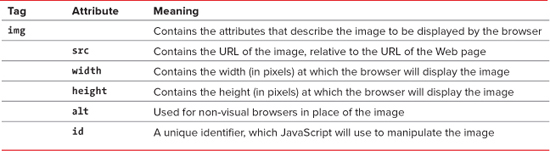
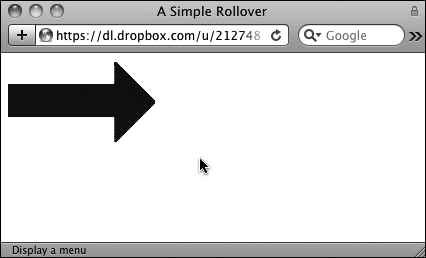
Listing 4.1 gives you the bare-bones rollover; the whole thing is done within a standard image link. First a blue arrow is loaded ![]() , and then it is overwritten by a red arrow when the user moves the mouse over the image
, and then it is overwritten by a red arrow when the user moves the mouse over the image ![]() . The blue arrow is redrawn when the user moves the mouse away.
. The blue arrow is redrawn when the user moves the mouse away.
![]() The first image, before the user moves the mouse over it.
The first image, before the user moves the mouse over it.
![]() When the mouse is over the image, the script replaces the first image with the second image.
When the mouse is over the image, the script replaces the first image with the second image.
Listing 4.1. Here’s the simplest way to do a rollover, within a link tag.
<!DOCTYPE html>
<html>
<head>
<title>A Simple Rollover</title>
<link rel="stylesheet" href="script01.css">
</head>
<body>
<a href="next.html" onmouseover= "document.images['arrow'].src= 'images/arrow_on.gif'" onmouseout= "document.images['arrow'].src= 'images/arrow_off.gif'"><img src= "images/arrow_off.gif" id="arrow" alt="arrow"></a>
</body>
</html>
Some styles get applied to elements on the page, and we’ve broken those styles out into a separate CSS file, as seen in Listing 4.2.
To create a rollover
1. <a href="next.html"
The link begins by specifying where the browser will go when the user clicks the image, in this case to the page next.html.
2. onmouseover="document.images['arrow'].src= 'images/arrow_on.gif'"
When the user moves the mouse over the image (the src of the arrow id), the replacement image arrow_on.gif, which is inside the images directory, is written to the document window.
3. onmouseout="document.images['arrow'].src= 'images/arrow_off.gif'">
Then, when the mouse moves away, the image arrow_off.gif is swapped back in.
4. <img src="images/arrow_off.gif" id="arrow" alt="arrow">
The image link defines the source of the original image for the page. We have included the alt attribute inside the image tag because alt attributes (which give non-graphical browsers a name or description of an image) are required if you want your HTML to be compliant with the W3C standards, and because using alt attributes helps make your page accessible to disabled users, such as visually impaired users who browse using screen readers.
Listing 4.2. This CSS file is used to style elements throughout many of the examples in this chapter.
body {
background-color: #FFF;
}
img {
border-width: 0;
}
img#arrow, img#arrowImg {
width: 147px;
height: 82px;
}
#button1, #button2 {
width: 113px;
height: 33px;
}
.centered {
text-align: center;
}
#adBanner {
width: 400px;
height: 75px;
}
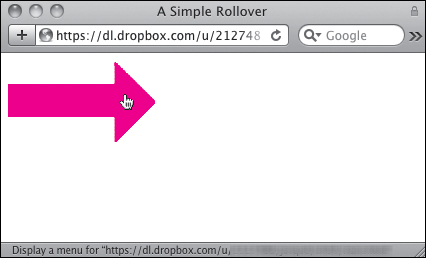
Creating More Effective Rollovers
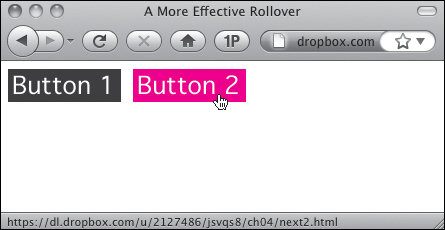
To make the illusion of animation work, you need to make sure that the replacement image appears immediately, with no delay while it is fetched from the server. To do that, you use JavaScript to place the images into variables used by your script, which preloads all the images into the browser’s cache (so that they are already on the user’s hard disk when they are needed). Then, when the user moves the mouse over an image, the script swaps out one variable containing an image for a second variable containing the replacement image. Listing 4.3 shows how it is done. The visible result is the same as in ![]() and
and ![]() from the previous exercise, but the apparent animation is smoother.
from the previous exercise, but the apparent animation is smoother.
Listing 4.3. The only JavaScript on this HTML page is the pointer to the external .js file.
<!DOCTYPE html>
<html>
<head>
<title>A More Effective Rollover</title>
<script src="script02.js"></script>
<link rel="stylesheet" href="script01.css">
</head>
<body>
<a href="next1.html"><img src="images/button1_off.gif" alt="button1" id="button1"></a>
<a href="next2.html"><img src="images/button2_off.gif" alt="button2" id="button2"></a>
</body>
</html>
To keep your JavaScript more manageable, we’ll extract the JavaScript code from the HTML page and put it in an external .js file, as in Listing 4.4 (see Chapter 2 for more about .js files).
Listing 4.4. This is a better way to do rollovers than in Listing 4.1, because it is much more flexible.
window.onload = rolloverInit;
function rolloverInit() {
   for (var i=0; i<document.images.length; i++) {
if (document.images[i].parentNode.tagName == "A") {
setupRollover(document.images[i]);
}
}
}
function setupRollover(thisImage) {
thisImage.outImage = new Image();
thisImage.outImage.src = thisImage.src;
thisImage.onmouseout = function() {
   this.src = this.outImage.src;
}
thisImage.overImage = new Image();
thisImage.overImage.src = "images/" + thisImage.id + "_on.gif";
thisImage.onmouseover = function() {
   this.src = this.overImage.src;
}
}
To create a better rollover
1. <script src="script02.js"></script>
This tag is in Listing 4.3, the HTML page. It uses the src attribute to tell the browser where to find the external .js file, which is where the JavaScript resides.
2. <a href="next1.html"><img src="images/button1_off.gif" alt="button1" id="button1"></a>
<a href="next2.html"><img src="images/button2_off.gif" alt="button2" id="button2"></a>
Still in Listing 4.3, these are two typical link tags for the buttons, with image tags embedded in them. The href attribute describes the destination of the link when the user clicks it. In the img tag, the src attribute provides the path to the image before the user rolls over it. The link tags also define the image’s alt text. Note that each of the two buttons also has an id attribute; as described in Chapter 1, the id must be unique for each object. The script uses the image’s id to make the rollover work.
3. window.onload = rolloverInit;
Moving to Listing 4.4, the window.onload event handler is triggered when the page has finished loading. The handler calls the rolloverInit() function.
This handler is used here to make sure that the script doesn’t execute before the page is done loading. That’s because referring to items on the page before the page has finished loading can cause errors if some of the page’s elements haven’t yet been loaded.
4. function rolloverInit() {
for (var i=0; i<document.images.length; i++) {
The rolloverInit() function scans each image on the page, looking to see if the tag around the image is an <a> tag, indicating that it is a link. The first of these two lines begins the function. The second begins a for...next loop that goes through all of the images. The loop begins by setting the counter variable i to 0. Then, each time the loop goes around, if the value of i is less than the number of images in the document, increment i by 1.
5. if (document.images[i].parentNode.tagName == "A") {
This is where we test to see if the tag surrounding the image is an anchor tag. We do it by looking at an object and seeing if the object’s value is A (the anchor tag). Let’s break that object apart a bit. The first part of the object, document.images[i], is the current image. Its parentNode property is the container tag that surrounds it, and tagName then provides the name of that container tag. So in English, you can read the part of the line in the parentheses as “For this particular image, is the tag around it an ‘A’?”
6. setupRollover(document.images[i]);
If the result of the test in step 5 is true, then the setupRollover function is called and passed the current image.
7. function setupRollover(thisImage) {
Take a minute to look at the whole function before we go through it line by line. Here’s the overview: this function adds two new properties to the image object that’s passed in. The new properties are outImage (the version of the image when you’re not on it) and overImage (the version of the image when you are on it), both of which are image objects themselves. Because they’re image objects, once they’re created, we can add their src property. The src for outImage is the current (off) image src. The src value for overImage is calculated based on the id attribute of the original image.
This line starts off the function with the image that was passed to it by the rolloverInit() function.
8. thisImage.outImage = new Image();
This line takes the image object that was passed in and adds the new outImage property to it. Because you can add a property of any kind to an object, and because properties are just objects themselves, what’s happening here is that we’re adding an image object to an image. The parentheses for the new image object are optional, but it’s good coding practice to include them; if needed, you can set properties of the new image object by passing certain parameters.
9. thisImage.outImage.src = thisImage.src;
Now we set the source for the new outImage to be the same as the source of thisImage. The default image on the page is always the version you see when the cursor is off the image.
10. thisImage.onmouseout = function() {
this.src = this.outImage.src;
}
The first line here starts off what’s called an anonymous function—that is, it’s a function without a name. We could name it (say, rollOut()), but as it’s only one line it’s not so necessary.
In this section, we’re telling the browser to trigger what should happen when the user moves the mouse away from the image. Whenever that happens, we want to set the image source back to the initial source value, that is, the outImage version of the image.
11. thisImage.overImage = new Image();
thisImage.overImage.src = "images/" + thisImage.id + "_on.gif";
In the first line, we create a new image object that will contain the overImage version of the image. The second line sets the source for overImage. It builds the name of the source file on the fly, concatenating "images/" with the id of the image (remember, in Listing 4.3, we saw that those ids were button1 and button2) and adding "_on.gif".
12. thisImage.onmouseover = function() {
this.src = this.overImage.src;
}
Here we have another anonymous function. This one tells the browser that when the user moves the cursor over the image, it should reset the current image’s source to that of the overImage version, as seen in ![]() and
and ![]() .
.
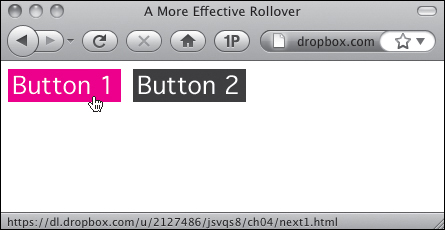
![]() You can also put multiple rollovers on the same page.
You can also put multiple rollovers on the same page.
![]() Hovering over the second rollover.
Hovering over the second rollover.
When you prepare your graphics for rollovers, make sure that all your GIF or PNG images are not transparent. If they are, you will see the image you are trying to replace beneath the transparent image—and that’s not what you want.
Both the original and the replacement images need to have identical dimensions. Otherwise, some browsers resize the images for you, and you probably won’t like the distorted result.
In the previous example, the rollover happened when you moved the cursor over the link; here, the rollover happens when you move the cursor over the image—that is, the onmouseover and onmouseout are now attached to the image, not the link. While these methods usually give the same effect, there’s one big difference: some older browsers (Netscape 4 and earlier, IE 3 and earlier) don’t support onmouseover and onmouseout on the img tag.
You might think that, because all of the tags on the HTML page are lowercase, tagName should be compared to a lowercase “a”. That’s not the way it works. tagName always returns an uppercase value.
Building Three-State Rollovers
A three-state rollover is one where the rollover has three versions. Besides the original image and the version that appears when the user places the cursor over the image, there is a third version of the image when the button itself is clicked, as shown in ![]() .
.
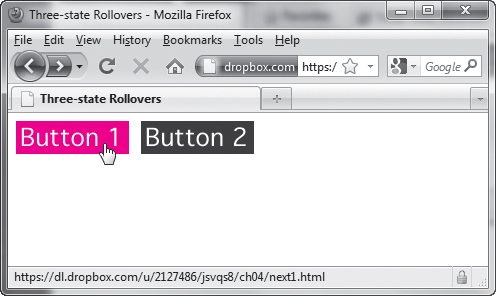
![]() When the button is clicked, you get a third image (hard to see in this grayscale image; check our companion Web site for the full effect).
When the button is clicked, you get a third image (hard to see in this grayscale image; check our companion Web site for the full effect).
Listing 4.5, the HTML file, looks almost exactly the same as Listing 4.3 from the previous task. In fact, the only differences are the document’s title and the name of the external JavaScript file that is being called. That’s it. This is an example of why putting all your JavaScript into an external file is so powerful; you can add functionality to your pages without having to rework your HTML pages.
Listing 4.5. By putting your JavaScript in an external file, the HTML for a three-state rollover is virtually identical to a two-state rollover.
<!DOCTYPE html>
<html>
<head>
<title>Three-state Rollovers</title>
<script src="script03.js"></script>
<link rel="stylesheet" href="script01.css">
</head>
<body>
<a href="next1.html"><img src="images/button1_off.gif" alt="button1" id="button1"></a>
<a href="next2.html"><img src="images/button2_off.gif" alt="button2" id="button2"></a>
</body>
</html>
In Listing 4.6, the external JavaScript file, there are only a few changes from Listing 4.4. Rather than go through the whole script again, we’ll just focus on the changes. Remember, the parts of the script that we’re covering are shown in red in the code.
To build a three-state rollover
1. thisImage.clickImage = new Image();
thisImage.clickImage.src = "images/" + thisImage.id + "_click.gif";
In the setupRollover() function, we now need to add a third image property for the click state. In the first line, we create a new image object that will contain the clickImage version of the image. The second line sets the source for clickImage. It builds the name of the source file on the fly, concatenating "images/" with the id of the image, and adding "_click.gif".
Listing 4.6. This script powers the three-state rollover.
window.onload = rolloverInit;
function rolloverInit() {
for (var i=0; i<document.images.length; i++) {
if (document.images[i].parentNode.tagName == "A") {
setupRollover(document.images[i]);
}
}
}
function setupRollover(thisImage) {
thisImage.outImage = new Image();
thisImage.outImage.src = thisImage.src;
thisImage.onmouseout = function() {
this.src = this.outImage.src;
}
thisImage.clickImage = new Image();
thisImage.clickImage.src = "images/" + thisImage.id + "_click.gif";
thisImage.onclick = function() {
  this.src = this.clickImage.src;
}
thisImage.overImage = new Image();
thisImage.overImage.src = "images/" + thisImage.id + "_on.gif";
thisImage.onmouseover = function() {
this.src = this.overImage.src;
}
}
2. thisImage.onclick = function() {
this.src = this.clickImage.src;
}
This tells the browser what to do when the user clicks the mouse on the image: in this case, we want to set the image source to its clickImage version.
Triggering Rollovers from a Link
In earlier examples, the user triggered the rollover by moving the mouse over an image. But you can also make a rollover occur when the user hovers over a text link, as in ![]() and
and ![]() . The HTML is an unexciting page with one link and one image, shown in Listing 4.7. We’ll do the rollover by modifying the script used in previous examples, as in Listing 4.8.
. The HTML is an unexciting page with one link and one image, shown in Listing 4.7. We’ll do the rollover by modifying the script used in previous examples, as in Listing 4.8.
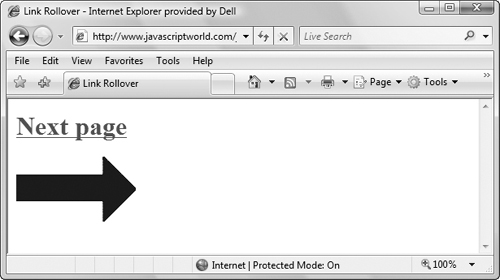
![]() The text link is the triggering device for this rollover.
The text link is the triggering device for this rollover.
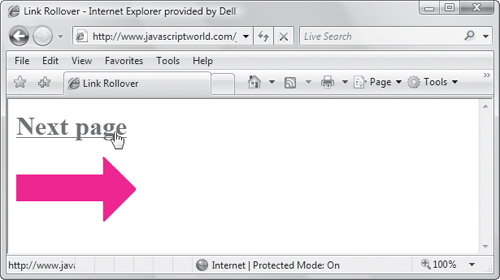
![]() When the user points at the link, the graphic below changes.
When the user points at the link, the graphic below changes.
Listing 4.7. This script shows the HTML for a rollover from a text link.
<!DOCTYPE html>
<html>
<head>
<title>Link Rollover</title>
<script src="script04.js"></script>
<link rel="stylesheet" href="script01.css">
</head>
<body>
<h1><a href="next.html" id="arrow">Next page</a></h1>
<img src="images/arrow_off.gif" id="arrowImg" alt="arrow">
</body>
</html>
To trigger a rollover from a link
1. function rolloverInit() {
for (var i=0; i<document.links.length; i++) {
After beginning the rolloverInit() function, we start a loop, much like previous examples in this chapter. But there we were looking for images (document.images.length), and here we’re looking for links (document.links.length). The loop begins by setting the counter variable i to zero. Every time around, if the value of i is less than the number of links in the document, increment i by 1.
2. var linkObj = document.links[i];
We create the linkObj variable and set it to the current link.
3. if (linkObj.id) {
var imgObj = document.getElementById(linkObj.id + "Img");
If linkObj has an id, then we check to see if there’s another element on the page that has an id that’s the same plus Img. If so, put that element into the new variable imgObj.
4. if (imgObj) {
setupRollover(linkObj,imgObj);
If imgObj exists, then call the setupRollover() function, passing it the link object and the image object.
Listing 4.8. Here is the JavaScript for a rollover from a text link.
window.onload = rolloverInit;
function rolloverInit() {
   for (var i=0; i<document.links.length; i++) {
var linkObj = document.links[i];
if (linkObj.id) {
   var imgObj = document.getElementById(linkObj.id + "Img");
if (imgObj) {
   setupRollover(linkObj,imgObj);
}
}
}
}
function setupRollover(thisLink,thisImage) {
   thisLink.imgToChange = thisImage;
thisLink.onmouseout = function() {
   this.imgToChange.src = this.outImage.src;
}
thisLink.onmouseover = function() {
   this.imgToChange.src = this.overImage.src;
}
thisLink.outImage = new Image();
thisLink.outImage.src = thisImage.src;
thisLink.overImage = new Image();
thisLink.overImage.src = "images/" + thisLink.id + "_on.gif";
}
5. function setupRollover(thisLink,thisImage) {
thisLink.imgToChange = thisImage;
The setupRollover() function begins with the link and image parameters that were passed to it in step 4. Then we add a new property, imgToChange, to the link object. JavaScript needs some way of knowing what image is to be changed when the link is moused over, and this is where it’s stored.
6. thisLink.onmouseout = function() {
this.imgToChange.src = this.outImage.src;
}
thisLink.onmouseover = function() {
this.imgToChange.src = this.overImage.src;
}
When the mouseover and mouseout are triggered, they’re slightly different from the previous examples in this chapter: now, this.imgToChange.src is being reset instead of this.src itself.
This technique is useful when you want to provide the user with a preview of what they will see if they click the link at which they are pointing. For example, say you have a travel site describing trips to Scotland, Tahiti, and Cleveland. On the left of the page could be a column of text links for each destination, while on the right could be a preview area where an image appears. As the user points at the name of a destination, a picture of that place appears in the preview area. Clicking the link takes the user to a page detailing their fabulous vacation spot.
Making Multiple Links Change a Single Rollover
Up to now, you’ve seen how mousing over a single image (or actually, the link associated with that image) can trigger a rollover effect. But you can also have several different images that trigger a rollover. This can be very useful when you have several images that you want to annotate. Rolling over each of the images makes the description of that image appear. In this example, we’ve done just this with images of three of Leonardo da Vinci’s inventions. As you roll over each image, the description of that image appears in a text box. The description itself is another image. Actually, it’s three images, one for each of the three inventions. ![]() shows Listing 4.9 (HTML), Listing 4.10 (CSS), and Listing 4.11 (JavaScript) in action. As with most of the scripts in this book, it builds on previous examples, so we’ll just explain the new concepts. There are just a few lines that are different between Listing 4.8 and Listing 4.11.
shows Listing 4.9 (HTML), Listing 4.10 (CSS), and Listing 4.11 (JavaScript) in action. As with most of the scripts in this book, it builds on previous examples, so we’ll just explain the new concepts. There are just a few lines that are different between Listing 4.8 and Listing 4.11.
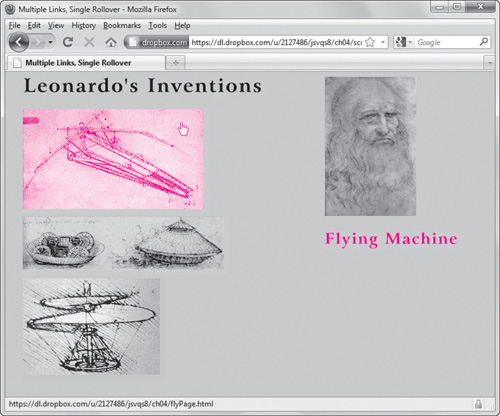
![]() This page has three interactive images, a flying machine, a tank, and a helicopter. When you roll over an image, its description appears under Leonardo’s face.
This page has three interactive images, a flying machine, a tank, and a helicopter. When you roll over an image, its description appears under Leonardo’s face.
Listing 4.9. Note that the links and images on this page all have unique ids.
<!DOCTYPE html>
<html>
<head>
<title>Multiple Links, Single Rollover</title>
<script src="script05.js"></script>
<link rel="stylesheet" href="script02.css">
</head>
<body>
<div id="captionDiv">
<img src="images/DaVinci.jpg" width="144" height="219" alt="DaVinci">
<img src="images/bg.gif" id="captionField" alt="Text Field">
</div>
<div id="inventionDiv">
<img src="images/leoText.gif" id="heading" alt="Leonardo's Inventions">
<a href="flyPage.html" class="captionField" id="flyer"><img src="images/flyer.gif" width="293" height="165" alt="Flying Machine" id="flyerImg"></a>
<a href="tankPage.html" class="captionField" id="tank"><img src="images/tank.gif" width="325" height="92" alt="Tank" id="tankImg"></a>
<a href="heliPage.html" class="captionField" id="helicopter"><img src="images/helicopter.gif" width="224" height="160" alt="Helicopter" id="helicopterImg"></a>
</div>
</body>
</html>
Listing 4.10. In this CSS file, we define the classes we reference in the HTML.
body {
background-color: #EC9;
}
img {
border-width: 0;
}
#captionDiv {
float: right;
width: 210px;
margin: auto 50px;
}
#captionField {
margin: 20px auto;
width: 208px;
height: 27px;
}
#inventionDiv {
width: 375px;
margin-left: 20px;
}
#heading {
margin-bottom: 20px;
width: 375px;
height: 26px;
}
To make multiple links change a single rollover
1. if (linkObj.className) {
var imgObj = document.getElementById(linkObj.className);
We can’t use the id of the rolled-over images to calculate the id of the changed image—that’s because an id has to be unique, and all of the rolled-over images have to come up with the same value for the changed image destination. Instead, we’re using the class attribute (because you can have multiple page elements sharing the same class). In this line, we’re looking for the className of the link object.
2. function setupRollover(thisLink,textImage) {
thisLink.imgToChange = textImage;
The setupRollover() function is passed the current link object (thisLink) and the image object, which we’re calling textImage. Note that when we passed these objects (which can also be referred to as variables) in, we called them linkObj and imgObj, respectively.
The rest of the script works the same way as the previous examples in this chapter.
Listing 4.11. This script shows you how to use multiple links to trigger a single rollover.
window.onload = rolloverInit;
function rolloverInit() {
for (var i=0; i<document.links.length; i++) {
var linkObj = document.links[i];
if (linkObj.className) {
   var imgObj = document.getElementById(linkObj.className);
if (imgObj) {
setupRollover(linkObj,imgObj);
}
}
}
}
function setupRollover(thisLink,textImage) {
   thisLink.imgToChange = textImage;
thisLink.onmouseout = function() {
this.imgToChange.src = this.outImage.src;
}
thisLink.onmouseover = function() {
this.imgToChange.src = this.overImage.src;
}
thisLink.outImage = new Image();
thisLink.outImage.src = textImage.src;
thisLink.overImage = new Image();
thisLink.overImage.src = "images/" + thisLink.id + "Text.gif";
}
Working with Multiple Rollovers
What if you want the image that triggers the rollover to also be a rollover itself? ![]() builds on the last example and shows how we’ve added this feature. When you roll over one of the invention images, it makes the description image appear, as before, but this time also swaps out the invention image for another image with a drop shadow. This gives the user visual feedback about what they’re pointing at (as if the mouse pointer isn’t enough!). Listing 4.12 is the HTML page (no changes except for the title and the name of the external JavaScript file being called), and Listing 4.13 shows the additions to the JavaScript from the previous example.
builds on the last example and shows how we’ve added this feature. When you roll over one of the invention images, it makes the description image appear, as before, but this time also swaps out the invention image for another image with a drop shadow. This gives the user visual feedback about what they’re pointing at (as if the mouse pointer isn’t enough!). Listing 4.12 is the HTML page (no changes except for the title and the name of the external JavaScript file being called), and Listing 4.13 shows the additions to the JavaScript from the previous example.

![]() When you roll over one of the images, a description appears and a drop shadow appears around the image itself.
When you roll over one of the images, a description appears and a drop shadow appears around the image itself.
Listing 4.12. This HTML is identical to Listing 4.9, except for the title and reference to the external script.
<!DOCTYPE html>
<html>
<head>
<title>Multiple Links, Multiple Rollovers</title>
<script src="script06.js"></script>
<link rel="stylesheet" href="script02.css">
</head>
<body>
<div id="captionDiv">
<img src="images/DaVinci.jpg" width="144" height="219" alt="DaVinci">
<img src="images/bg.gif" id="captionField" alt="Text Field">
</div>
<div id="inventionDiv">
<img src="images/leoText.gif" id="heading" alt="Leonardo's Inventions">
<a href="flyPage.html" class="captionField" id="flyer"><img src="images/flyer.gif" width="293" height="165" alt="Flying Machine" id="flyerImg"></a>
<a href="tankPage.html" class="captionField" id="tank"><img src="images/tank.gif" width="325" height="92" alt="Tank" id="tankImg"></a>
<a href="heliPage.html" class="captionField" id="helicopter"><img src="images/ helicopter.gif" width="224" height="160" alt="Helicopter" id="helicopterImg"></a>
</div>
</body>
</html>
Listing 4.13. This script handles the multiple rollovers.
window.onload = rolloverInit;
function rolloverInit() {
for (var i=0; i<document.links.length; i++) {
var linkObj = document.links[i];
if (linkObj.className) {
var imgObj = document.getElementById(linkObj.className);
if (imgObj) {
setupRollover(linkObj,imgObj);
}
}
}
}
function setupRollover(thisLink,textImage) {
thisLink.imgToChange = new Array;
thisLink.outImage = new Array;
thisLink.overImage = new Array;
thisLink.imgToChange[0] = textImage;
thisLink.onmouseout = rollOut;
thisLink.onmouseover = rollOver;
thisLink.outImage[0] = new Image();
thisLink.outImage[0].src = textImage.src;
thisLink.overImage[0] = new Image();
thisLink.overImage[0].src = "images/" + thisLink.id + "Text.gif";
var rolloverObj = document.getElementById(thisLink.id + "Img");
if (rolloverObj) {
thisLink.imgToChange[1] = rolloverObj;
thisLink.outImage[1] = new Image();
thisLink.outImage[1].src = rolloverObj.src;
thisLink.overImage[1] = new Image();
thisLink.overImage[1].src = "images/" + thisLink.id + "_on.gif";
}
}
function rollOver() {
for (var i=0;i<this.imgToChange.length; i++) {
this.imgToChange[i].src = this.overImage[i].src;
}
}
function rollOut() {
for (var i=0;i<this.imgToChange.length; i++) {
this.imgToChange[i].src = this.outImage[i].src;
}
}
To work with multiple rollovers
1. thisLink.imgToChange = new Array;
thisLink.outImage = new Array;
thisLink.overImage = new Array;
These lines were added because the script has more images to work with (two for each rollover). In each line, we’re creating a new property of thisLink, each of which is an array.
2. thisLink.imgToChange[0] = textImage;
In the previous task, imgToChange was an image, but in this task, it’s an array that will contain images. Here, textImage is stored in the first element of imgToChange.
3. thisLink.outImage[0] = new Image();
thisLink.outImage[0].src = textImage.src;
As previously, we need to store the out (off) version of the image, but this time it’s stored in the first element of the outImage array.
4. thisLink.overImage[0] = new Image();
thisLink.overImage[0].src = "images/" + thisLink.id + "Text.gif";
Similarly, the over (on) version of the image is calculated and stored in the first element of overImage.
5. var rolloverObj = document.getElementById(thisLink.id + "Img");
if (rolloverObj) {
Now we need to figure out if this rollover will trigger multiple images, not just an individual image. If that’s the case, there will be an element on the HTML page whose id is the same as this one, but with Img appended. That is, if we’re working on flyer, we’ll be checking to see if there’s a flyerImg element on the page. If there is, it’s saved in rolloverObj, and we should do the next three steps.
6. thisLink.imgToChange[1] = rolloverObj;
In the same way that we set imgToChange[0] above, we now set imgToChange[1] (the second element in the array) to the new rolloverObj. When the onmouseout and onmouseover event handlers are triggered, both images swap to their alternate versions, as we’ll see later.
7. thisLink.outImage[1] = new Image();
thisLink.outImage[1].src = rolloverObj.src;
This sets the second array element of outImage to the out (off) version of the image.
8. thisLink.overImage[1] = new Image();
thisLink.overImage[1].src = "images/" + thisLink.id + " _on.gif";
And here, the over (on) version of the image is calculated and stored in the second element of overImage.
If, for some reason, we wanted a third image to also change during this same rollover, we’d repeat steps 6–8 with the third image object.
9. for (var i=0; i<this.imgToChange.length; i++) {
this.imgToChange[i].src = this.overImage[i].src;
}
Here inside the rollOver() function is where the images get swapped. Because one or more images can be changed, we need to start by asking how many images we have stored—that’s the value of this.imgToChange.length. Here, the value is 2, because we want two images to change. We then loop through two times, setting the source of imgToChange[0] and then imgToChange[1] to their respective over values.
10. for (var i=0; i<this.imgToChange.length; i++) {
this.imgToChange[i].src = this.outImage[i].src;
}
This code in the rollOut() function is virtually the same as that in the previous step; the only difference is that we’re now resetting those images to their out source values.
What if you want some of the links on your page to trigger multiple rollovers, but others to be individual rollovers? No problem—you don’t even need to change a line of JavaScript. So long as the check in step 5 doesn’t find the alternate id on the page, no second element is stored, and the rollOver() and rollOut() loops only animate the initial image.
Creating Cycling Banners
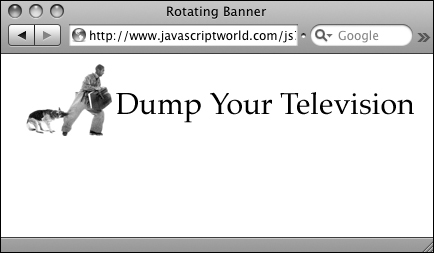
When you surf the Web, it’s common to see advertising banners that periodically switch between images. Some of these are animated GIF files, which are GIF files that contain a number of frames that play in succession; others are Flash animations. If you want to have a page that cycles through a number of GIFs (either animated or not), you can use JavaScript to do the job, as in Listing 4.15. This example uses three GIFs and cycles repeatedly through them, as shown in ![]() ,
, ![]() , and
, and ![]() . The simple HTML page is shown in Listing 4.14.
. The simple HTML page is shown in Listing 4.14.
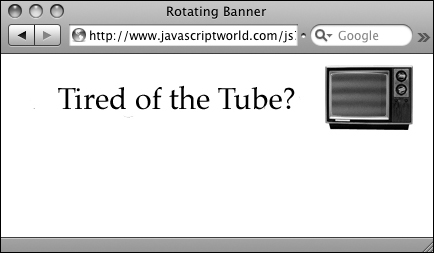
![]() The first image, which starts the cycling banner...
The first image, which starts the cycling banner...
![]() ...the second image...
...the second image...

![]() ...the final image. Once the page loads and the banner begins cycling, the animation continues with no user intervention required.
...the final image. Once the page loads and the banner begins cycling, the animation continues with no user intervention required.
To create cycling banners
1. var thisAd = 0;
Our script starts by creating thisAd, which is given its beginning value in this code.
2. function rotate() {
var adImages = new Array("images/reading1.gif","images/reading2.gif","images/reading3.gif");
We start off with a new function called rotate(). The next line creates a new array called adImages. In this case, the array contains the names of the three GIF files that make up the cycling banner.
3. thisAd++;
Take the value of thisAd, and add one to it.
4. if (thisAd == adImages.length) {
thisAd = 0;
This code checks to see if the value of thisAd is equal to the number of items in the adImages array; if it is, then set the value of thisAd back to zero.
5. document.getElementById("adBanner").src = adImages[thisAd];
The image on the Web that is being cycled has the id adBanner; you define the name as part of the img tag, as shown in Listing 4.14. This line of code says that the new sources for adBanner are in the array adImages, and the value of the variable thisAd defines which of the three GIFs the browser should use at this moment.
Listing 4.14. The HTML loads the first image in the cycling banner; the JavaScript handles the rest.
<!DOCTYPE html>
<html>
<head>
<title>Rotating Banner</title>
<script src="script07.js"></script>
<link rel="stylesheet" href="script01.
css">
</head>
<body>
<div class="centered">
<img src="images/reading1.gif" id="adBanner" alt="Ad Banner">
</div>
</body>
</html>
6. setTimeout(rotate, 3 * 1000);
This line tells the script how often to change GIFs in the banner. The built-in JavaScript command setTimeout() lets you specify that an action should occur on a particular schedule, always measured in milliseconds. In this case, the function rotate() is called every 3,000 milliseconds, or every 3 seconds, so the GIFs will cycle in the banner every three seconds.
You might be wondering why you would want to use JavaScript for a cycling banner, rather than just create an animated GIF. One good reason is that it lets you use JPEGs or PNGs in the banner, which gives you higher-quality images. With these higher-quality images, you can use photographs in your banners.
Unlike in some of the previous examples in this chapter, the images in this task are not pre-cached. Each downloads from the server the first time that it’s displayed. This is because you might have any number of images in your ad array, and it’s not polite to force users to download, for example, 100 images if they’re only going to see 2 or 3 of them.
Listing 4.15. You can use JavaScript to cycle between images in a banner.
window.onload = rotate;
var thisAd = 0;
function rotate() {
   var adImages = new Array("images/reading1.gif","images/reading2.gif","images/reading3.gif");
thisAd++;
if (thisAd == adImages.length) {
   thisAd = 0;
}
document.getElementById("adBanner").src = adImages[thisAd];
setTimeout(rotate, 3 * 1000);
}
Adding Links to Cycling Banners
Banners are often used in advertising, and you’ll want to know how to make a banner into a link that will take a visitor somewhere when the visitor clicks the banner. Listing 4.16 shows the HTML page, which differs from the last example only in that it adds a link around the img tag. Listing 4.17 shows a variation of the previous script. In this script, we’ll add a new array. This new array contains destinations that users will be sent to when they click the banner. In this case, the “Eat at Joe’s” banner takes you to negrino.com, “Drink more Java” goes to sun.com, and “Heartburn” goes to microsoft.com, as shown in ![]() . No editorial comments implied, of course.
. No editorial comments implied, of course.
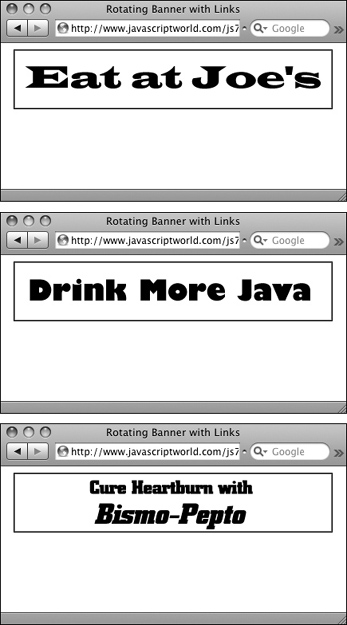
![]() Each of these three images is a link, and clicking each image takes you to one of three different Web sites.
Each of these three images is a link, and clicking each image takes you to one of three different Web sites.
To add links to cycling banners
1. window.onload = initBannerLink;
When the window finishes loading, trigger the initBannerLink() function.
Listing 4.16. The HTML needed for an ad banner.
<!DOCTYPE html>
<html>
<head>
<title>Rotating Banner with Links</title>
<script src="script08.js"></script>
<link rel="stylesheet" href="script01.css">
</head>
<body>
<div class="centered">
<a href="linkPage.html"><img src="images/banner1.gif" id="adBanner" alt="ad banner"></a>
</div>
</body>
</html>
2. if (document.getElementById("adBanner").parentNode.tagName == "A") {
document.getElementById("adBanner").parentNode.onclick = newLocation;
}
rotate();
This code, inside the initBannerLink() function, first checks to see if the adBanner object is surrounded by a link tag. If so, when the link is clicked, the newLocation() function will be called. Finally, the rotate() function is called.
Listing 4.17. This script shows how you can turn cycling banners into real, clickable ad banners.
window.onload = initBannerLink;
var thisAd = 0;
function initBannerLink() {
if (document.getElementById("adBanner").parentNode.tagName == "A") {
   document.getElementById("adBanner").parentNode.onclick = newLocation;
}

rotate();
}
function newLocation() {
   var adURL = new Array("negrino.com","sun.com","microsoft.com");
document.location.href = "http://www." + adURL[thisAd];
return false;
}
function rotate() {
var adImages = new Array("images/banner1.gif","images/banner2.gif","images/banner3.gif");
thisAd++;
if (thisAd == adImages.length) {
thisAd = 0;
}
document.getElementById("adBanner").src = adImages[thisAd];
setTimeout(rotate, 3 * 1000);
}
3. function newLocation() {
var adURL = new Array("negrino.com","sun.com","microsoft.com");
In the new function newLocation(), the adURL variable gets assigned the three constituents of a new array. Just the domain names need to go in here, because we’ll complete the URLs next.
4. document.location.href = "http://www." + adURL[thisAd];
return false;
Still inside newLocation(), we set the document.location.href object (in other words, the current document window) to the value of the text string http://www. (notice the period), plus the value of one item from adURL. Since adURL is an array, you need to specify a member of the array. That’s stored in thisAd, and the resulting string can be any of the three links, depending on when the user clicks. Last, it returns false, which tells the browser that it should not also load in the href. Otherwise, the browser would do both. We’ve handled everything within JavaScript, so the href doesn’t need to be loaded.
The adURL array needs to have the same number of array items as the adImages array for this script to work correctly.
Building Wraparound Slideshows
Slideshows on Web sites present the user with an image and let the user control the progression (either forward or backward) of the images. JavaScript gives the user the interactive control needed. Listing 4.18 shows the HTML needed, and the JavaScript in Listing 4.19 has what you need to add slideshows to your pages.
Listing 4.18. This HTML page creates a slideshow.
<!DOCTYPE html>
<html>
<head>
<title>Image Slideshow</title>
<script src="script09.js"></script>
<link rel="stylesheet" href="script01.css">
</head>
<body>
<div class="centered">
<h1>Welcome, Robot Overlords!</h1>
<img src="images/robot1.jpg" id="myPicture" width="200" height="400" alt="Slideshow">
<h2><a href="previous.html" id="prevLink"><<Previous </a> <a href="next.html" id="nextLink">Next >></a></h2>
</div>
</body>
</html>
Listing 4.19. This script builds a slideshow that the user can click through using links to control movement forward and back.
window.onload = initLinks;
var myPix = new Array("images/robot1.jpg","images/robot2.jpg","images/robot3.jpg");
var thisPic = 0;
function initLinks() {
   document.getElementById("prevLink").onclick = processPrevious;
   document.getElementById("nextLink").onclick = processNext;
}
function processPrevious() {
   if (thisPic == 0) {
      thisPic = myPix.length;
}
thisPic--;
document.getElementById("myPicture").src = myPix[thisPic];
return false;
}
function processNext() {
thisPic++;
if (thisPic == myPix.length) {
   thisPic = 0;
}
document.getElementById("myPicture").src = myPix[thisPic];
return false;
}
This script builds a slideshow that wraps around—that is, if you go past the end of the list you go back to the beginning and vice versa. ![]() shows the new slideshow.
shows the new slideshow.
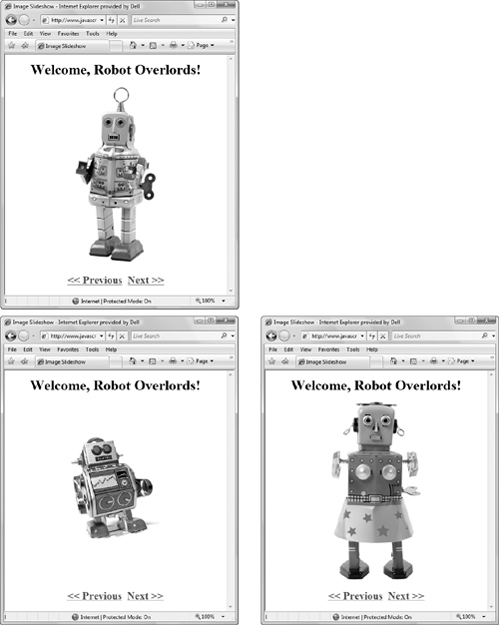
![]() Clicking the Previous or Next link calls the
Clicking the Previous or Next link calls the processPrevious() or processNext() function, respectively.
To build a wraparound slideshow
When the window finishes loading, trigger the initLinks() function.
2. function initLinks() {
document.getElementById("prevLink").onclick = processPrevious;
document.getElementById("nextLink").onclick = processNext;
}
This function sets up the onclick event handlers for the Previous and Next links.
3. function processPrevious() {
if (thisPic == 0) {
thisPic = myPix.length;
This function makes the slideshow run in the Previous direction. This first part checks to see if thisPic is equal to 0. If it is, the function gets the number of pictures in the myPix array.
4. thisPic--;
document.getElementById("myPicture").src = myPix[thisPic];
The first line reduces the value of thisPic by 1. The next line sets the src of myPicture to the element of the myPix array represented by the current value of thisPic.
5. thisPic++;
if (thisPic == myPix.length) {
thisPic = 0;
}
document.getElementById("myPicture").src = myPix[thisPic];
This code, inside the processNext() function, makes the slideshow run in the Next direction and is much like the processPrevious() function. The first thing it does is increment the value of thisPic by 1. Then it checks to see if the value of thisPic is the same as the number of items in the myPix array. If so, it sets thisPic back to 0. The next line sets the src of myPicture.
Displaying a Random Image
If your site is rich with graphics, or if you are displaying digital artwork, then you may want to have a random image from your collection appear when the user enters your site. Once again, JavaScript to the rescue! The extremely simple Listing 4.20 shows the required HTML, and Listing 4.21 provides the JavaScript. ![]() shows the result of the script, in this case images of a stuffed lion, tiger, and bear (oh, my!).
shows the result of the script, in this case images of a stuffed lion, tiger, and bear (oh, my!).
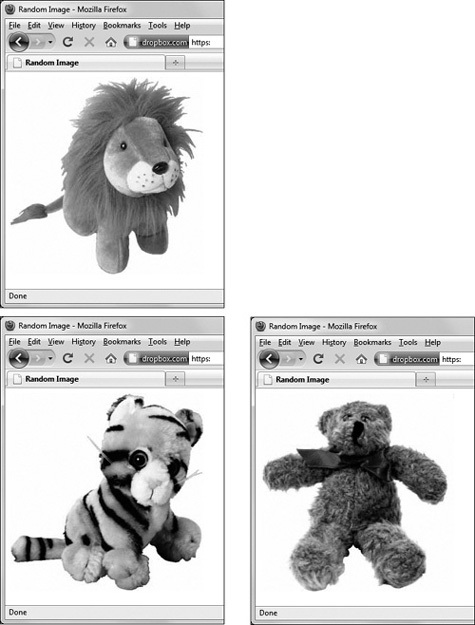
![]() Depending on the value of the random number generated by the script, the user is presented with the lion, the tiger, or the bear.
Depending on the value of the random number generated by the script, the user is presented with the lion, the tiger, or the bear.
To display a random image
1. var myPix = new Array("images/lion.jpg", "images/tiger.jpg", "images/bear.jpg");
Inside the function choosePic(), as is now familiar, build an array of three images, and stuff it into the variable myPix.
2. randomNum = Math.floor((Math.random() * myPix.length));
The variable called randomNum gets the value of a math expression that’s best read from the inside outwards. Math.random generates a random number between 0 and 1, which is then multiplied by myPix.length, which is the number of items in the array (in this case, it’s 3). Math.floor rounds the result down to an integer, which means that the number must be between 0 and 2.
3. document.getElementById("myPicture").src = myPix[randomNum];
This says that the source of the image myPicture is set based on the array myPix, and the value at this moment is dependent on the value of randomNum.
Listing 4.20. This simple HTML creates the page for a random image.
<!DOCTYPE html>
<html>
<head>
<title>Random Image</title>
<script src="script10.js"></script>
<link rel="stylesheet" href="script01.css">
</head>
<body>
<img src="images/spacer.gif" width="305" height="312" id="myPicture" alt="some image">
</body>
</html>
Listing 4.21. You can display random images on your page with this script, which uses JavaScript’s Math.random method to generate a random number.
window.onload = choosePic;
function choosePic() {
var myPix = new Array("images/lion.jpg", "images/tiger.jpg","images/bear.jpg");
var randomNum = Math.floor ((Math.random() * myPix.length));
document.getElementById("myPicture").src = myPix[randomNum];
}
Cycling Images with a Random Start
If you have a number of images that you want to display, you may not want to display them beginning with the same image each time the page is loaded. Listing 4.22 has the HTML, and Listing 4.23 combines the code used earlier for the cycling ad banners with the random image code.
Listing 4.22. There’s a spacer GIF in the HTML file, which is a placeholder until the ad banner appears.
<!DOCTYPE html>
<html>
<head>
<title>Rotating Random Banner</title>
<script src="script11.js"></script>
<link rel="stylesheet" href="script01.css">
</head>
<body>
<div class="centered">
<img src="images/spacer.gif" id="adBanner" alt="Ad Banner">
</div>
</body>
</html>
Listing 4.23. This script allows you to start your cycling image show with a random image.
window.onload = choosePic;
var adImages = new Array("images/reading1.gif","images/reading2.gif","images/reading3.gif");
var thisAd = 0;
function choosePic() {
thisAd = Math.floor((Math.random() * adImages.length));
document.getElementById("adBanner").src = adImages[thisAd];
rotate();
}
function rotate() {
thisAd++;
if (thisAd == adImages.length) {
thisAd = 0;
}
document.getElementById("adBanner").src = adImages[thisAd];
setTimeout(rotate, 3 * 1000);
}
To start images cycling from a random start
1. var adImages = new Array("images/reading1.gif","images/reading2.gif","images/reading3.gif");
As in previous examples, set up the array and the variable that contains the number of items in the array.
2. function choosePic() {
This function is similar to the choosePic() function in Listing 4.21. See that explanation for the details of how it works.
3. function rotate() {
This function is similar to the rotate() function in Listing 4.15. See that explanation for the details of how it works.