
After reading this chapter, you'll be able to
Use the Document Object Model to retrieve elements from a document.
Create new elements in a document.
Make changes to elements in a document.
Remove elements from a document.
The Document Object Model (DOM) provides a way to access and alter the contents of Hypertext Markup Language (HTML) documents. The DOM is a standard defined by the World Wide Web Consortium (W3C) and is implemented in various forms and with varying degrees of success by most Internet browsers.
Like many other standards, especially those related to Web programming, the DOM has evolved over the years. It has three specifications, known as levels in DOM-speak, with a fourth specification on the way.
The DOM is much more powerful than this chapter or even this book can convey, and there's much more to it than I'll attempt to cover. The DOM can be used for more than just JavaScript programming. Yet my particular focus (namely, JavaScript) pulls me toward writing about how JavaScript can be used with the DOM.
When I refer to the DOM in this chapter (and throughout this book, in fact), I lean heavily toward how it relates to the task at hand rather than the overall concepts or what might be possible with the DOM. For example, I'm going to concentrate on how the DOM represents HTML documents as trees. The DOM does so for HTML and Extensible Markup Language (XML) alike, but since this is a book about JavaScript, it's most important that I convey the DOM's relation to HTML.
For more information on the DOM, refer to the specification itself at the W3C site: http://www.w3.org/DOM/.
DOM Level 0 is also known as the legacy DOM. DOM Level 0 was implemented before other formal specifications of the DOM. Once DOM Level 1 was specified, the previous technology related to document scripting was codified (though not really in any formal way by any standards body) as the legacy DOM Level 0. Today, every major browser supports DOM Level 0 components for backwards compatibility. We don't want all those scripts we wrote back in 1998 to break!
The DOM Level 0 concentrated mainly on giving access to form elements, but it incorporated access to links and images. Forms and how to access them with the DOM are covered in Chapter 11. Rather than spending time on examples of DOM Level 0, I'll concentrate on DOM Levels 1 and 2, which are what you're more than likely going to be using when you program JavaScript.
Level 1 of the DOM was issued as a specification in 1998 and, like the legacy DOM, it too is supported, in various forms, by all the major browsers. Level 2 of the DOM was formally released in 2000. Support of Level 2 DOM varies within browsers. Truthfully, support of all DOM levels varies from browser to browser and from version to version.
Microsoft Windows Internet Explorer claims to support the DOM, but it does so differently than other browsers. As a result, you need to be aware that the DOM feature or function you're using or attempting to use in your JavaScript code might not work in Windows Internet Explorer or might work only in Windows Internet Explorer and nowhere else (and, no, that's not acceptable).
Where applicable, I'll point out the places where browsers implement the DOM differently and some workarounds for such events. Speaking of events, browsers diverge the most from each other in their implementation of the event model.
The DOM represents HTML documents in a tree-like structure or rather an uprooted tree-like structure because the root of the tree is on top. For example, consider the HTML document shown in Example 10-1, which will be used to show the tree structure.
Example 10-1. A Simple HTML Document
<html>
<head>
<title>Hello World</title>
</head>
<body>
<p>Here's some text.</p>
<p>Here's more text.</p>
<p>Link to the <a href="http://www.w3.org">W3</a></p>
</body>
</html>
Figure 10-1 shows the HTML from Example 10-1 when viewed in the tree structure of the DOM.

Many HTML elements can have attributes, such as the href attribute of the a element shown in Example 10-1. These attributes can be retrieved and set using the DOM, as you'll see later in this chapter.
When working with the DOM, there is a distinction between retrieving elements, setting elements and things related to elements, and removing or deleting elements. The methods for working with DOM elements reflect this distinction.
The elements within the tree structure are sometimes referred to as nodes or node objects. Nodes at the level below a given node are known as children. For example, in the structure shown in Figure 10-1, the body node has three child nodes, all p elements, while one of the p elements has a child of its own, an a element. The body node is said to be a parent of the p nodes. Any nodes below a given node are known as descendants of that node. The three p nodes in Figure 10-1 are known as siblings because they're on the same level.
As there are methods to work with elements of the DOM, there are also methods to work with nodes that reflect the parent/child relationship. Methods such as appendChild(), shown later in this chapter, are used to add nodes onto an existing parent.
Retrieving the elements of a document is a central part of using the DOM with JavaScript. This section examines two of the primary methods used to accomplish this: getElementById() and getElementsByTagName().
The getElementById() method is a workhorse method of the DOM. It retrieves a given element of the HTML document and returns a reference to it. The example from Example 10-1 could be modified to add an id attribute in the a element, like this:
<html>
<head>
<title>Hello World</title>
<body>
<p>Here's some text.</p>
<p>Here's more text.</p>
<p>Link to the <a id="w3link" href="http://www.w3.org">W3</a></p>
</body>
</html>
The a element could then be retrieved with the getElementById() method, as follows:
var a1 = document.getElementById("w3link");The reference for the element with the ID w3link would be placed inside the JavaScript variable a1.
All HTML elements can be given id attributes, making them all retrievable by JavaScript. In this example, the p elements could get IDs, thus making them retrievable using the getElementById() method too. Take a look at this code:
<html>
<head>
<title>Hello World</title>
<body>
<p id="sometext">Here's some text.</p>
<p id="moretext">Here's more text.</p>
<p id="linkp">Link to the <a id="w3link-id001" href="http://www.w3.org">W3</a></p>
</body>
</html>
These elements could then be retrieved in the same way, like so:
var p1 = document.getElementById("sometext");
var p2 = document.getElementById("moretext");
var plink = document.getElementById("linkp");
But what to do with those elements once you retrieve them? In the case of elements like a, you can access its attributes, such as the value of the href, as in this example, which you can find in the companion code as getelement.htm:
<html>
<head>
    <title>Get By Id</title>
    <script type = "text/javascript" >
    function checkhref() {
        var a1 = document.getElementById("w3link");
        alert(a1.href);
    }
    </script>
</head>
<body onload="checkhref()">
<p id="sometext-id001">Here's some text.</p>
<p id="moretext-id001">Here's more text.</p>
<p id="linkp-id001">Link to the <a id="w3link-id002" href="http://www.w3.org">W3</a></p>
</body>
</html>
When viewed, the page containing this code displays a dialog box showing the href attribute from the a element, like the one in Figure 10-2.

Later in this chapter, you'll see how to change elements and attributes.
A Note on the InnerHTML Property
One method for changing the text of elements is with the innerHTML property. The innerHTML property enables fast and simple access to the text in such elements as a p element. This property generally works well—so well, in fact, that it's difficult to skip it entirely in this book. So I won't.
The innerHTML property has been out of favor in many Web programming circles for some time. The problem with innerHTML is that it's not been formally defined as a standard by the W3C, so it's not necessarily supported in all browsers in the way that other DOM-specified objects are. However, with the sometimes hit-and-miss implementations of the actual specification, it's not hard to see why innerHTML is still used. The major browsers support innerHTML and they do so fairly consistently.
With all this in mind, I'll talk about innerHTML in this sidebar, but with the caveat that you should use it sparingly, maybe just for debugging purposes.
Take a look at this example, which is found in the companion code as innerhtml.htm:
<!DOCTYPE HTML PUBLIC "-//W3C//DTD HTML 4.01//EN"
"http://www.w3.org/TR/html4/strict.dtd">
<html>
<head>
    <title>Get By Id</title>
    <script type = "text/javascript" >
    function changetext() {
        var p1 = document.getElementById("sometext");
        alert(p1.innerHTML);
        p1.innerHTML = "Changed Text";
    }
    </script>
</head>
<body onload="changetext()">
<p id="sometext-id002">Here's some text.</p>
<p id="moretext-id002">Here's more text.</p>
<p id="linkp-id002">Link to the <a id="w3link-id003" href="http://www.w3.org">W3</a></p>
</body>
</html>
Within the function changetext(), the element with an ID of sometext is retrieved and a reference placed in the variable p1, as follows:
var p1 = document.getElementById("sometext");Next, the innerHTML property is called and sent to an alert() dialog box, shown here. Notice not only the alert() dialog box, but also the text of the first line in the background window:

When the user clicks OK, the next line of JavaScript executes, using the innerHTML property to change the text of the p element, as you see here:

With that, you've seen how to retrieve HTML with innerHTML and how to set text with it. Use it at your own risk, and don't be surprised if the JavaScript that uses it mysteriously stops working someday. Then again, maybe we'll all be lucky and innerHTML will be formalized into the standard.
The getElementById() method works well when you're retrieving one or just a few elements. When you need to retrieve more than one element at a time, however, the getElementsByTagName() method might be more appropriate.
The getElementsByTagName() method returns all the elements of the given tag in an array or list format. For example, to retrieve all of the images within a document, write the following code:
var images = document.getElementsByTagName("img");You could then examine the properties of the images variable by looping through it.
Here's an example with a table. This code changes the background color of each td element within the table when the user clicks the Click To Change Colors link. This code is found in the companion code as getbytagname.htm:
<!DOCTYPE HTML PUBLIC "-//W3C//DTD HTML 4.01//EN"
"http://www.w3.org/TR/html4/strict.dtd">
<html>
<head>
    <title>Tag Name</title>
    <script type = "text/javascript" >
    function changecolors() {
        var a1 = document.getElementsByTagName("td");
        for (var i = 0; i < a1.length; i++) {
            a1[i].style.background = "#aaabba";
        }
    }

    </script>
</head>
<body>
<table id="mytable" border="1">
<tr><td id="lefttd0">Left column</td><td id="righttd0">Right column</td></tr>
<tr><td id="lefttd1">Left column</td><td id="righttd1">Right column</td></tr>
<tr><td id="lefttd2">Left column</td><td id="righttd2">Right column</td></tr>
</table>
<a href="#" onclick="return changecolors();">Click to Change Colors</a>
</body>
</html>
Figure 10-3 shows how this page looks when viewed in a Web browser.
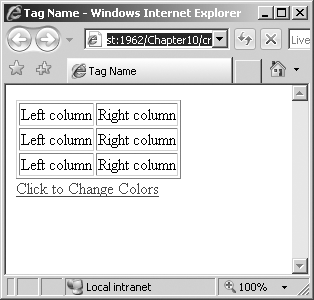
Clicking the link causes the table elements to change background color, as seen in Figure 10-4.

Examining the code, the JavaScript in the <head> portion of the page creates a function called changecolors():
function changecolors() {Inside that function, all td elements are retrieved using the getElementsByTagName() method. These elements are placed into the a1 array:
var a1 = document.getElementsByTagName("td");This array is then enumerated with a for loop. Within the for loop, the background style of each element is changed to #aaabba, a shade of blue:
for (var i = 0; i < a1.length; i++) {
    a1[i].style.background = "#aaabba";
}
The use of Cascading Style Sheets (CSS) and JavaScript is shown in Chapter 15.
The link itself calls the changecolors() function thanks to an onclick event:
<a href="#" onclick="return changecolors();">Click to Change Colors</a>
The onclick event, along with onload and other events, are covered in detail in Chapter 14.
A common question I've seen is how to color or shade every other row within a table. This too can be done with the help of JavaScript and some CSS, as discussed in Chapter 15.
The attributes of elements are both gettable and settable through JavaScript. This section looks at both tasks.
Sometimes, especially when first programming with JavaScript, you might not know what attributes are available. But you don't have to worry about that, thanks to a loop that calls the getAttribute() method. Here's a generic function to view all the attributes of a given element:
function showattribs(e) {
    var e = document.getElementById("braingialink");
    var elemList = "";
    for (var element in e) {
        var attrib = e.getAttribute(element);
        elemList = elemList + element + ": " + attrib + "
";
    }
alert(elemList);
}
A bit of JavaScript with the getElementById() method are all you need to invoke this function, as you'll see in this exercise.
Using Microsoft Visual Studio, Eclipse, or another editor, edit the file showattribs.htm in the Chapter 10 sample files folder.
Within the page, add the code shown below in bold type:
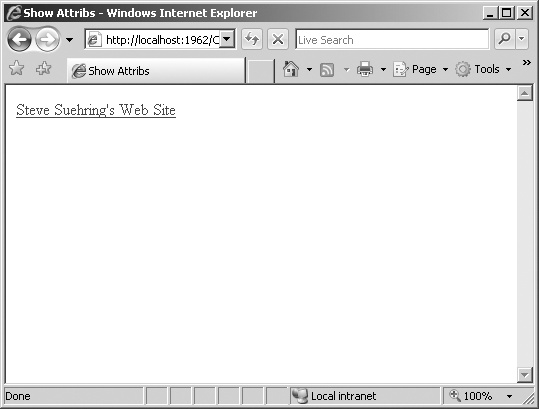
<!DOCTYPE HTML PUBLIC "-//W3C//DTD HTML 4.01//EN" "http://www.w3.org/TR/html4/strict.dtd"> <html> <head> <title>Show Attribs</title> <script type = "text/javascript">function showattribs(e) {var e = document.getElementById("braingialink");var elemList = "";for (var element in e) {var attrib = e.getAttribute(element);elemList = elemList + element + ": " + attrib + " ";}alert(elemList);}</script> </head> <body> <a onclick="showattribs()" href="http://www.braingia.org" id="braingialink">Steve Suehring's Web Site</a> <script type = "text/javascript" > </script> </body> </html>Save the code and view it in a Web browser. You'll see a page like this:
Click the link. When you do, the JavaScript function will execute. The function will retrieve the a element's attributes and loop through them, appending them onto a variable. Finally, that variable will display in an alert() dialog box, like the partial one shown here:

You've seen how the getAttribute() method retrieves the values in an attribute. You also can set attributes using the setAttribute() method.
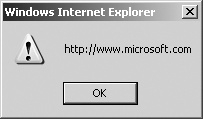
The setAttribute() method takes two arguments or parameters: the attribute to change and the intended value for that attribute. Here's an example of changing the href attribute, which can also be found in the companion code as setattrib.htm:
<!DOCTYPE HTML PUBLIC "-//W3C//DTD HTML 4.01//EN"
"http://www.w3.org/TR/html4/strict.dtd">
<html>
<head>
    <title>Set Attrib</title>

</head>
<body>
<a onclick="showattribs()" href="http://www.braingia.org" id="braingialink-id001">Steve Suehring's
Web Site</a>
<script type = "text/javascript" >
    var a1 = document.getElementById("braingialink");
    alert(a1.getAttribute("href"));
    a1.setAttribute("href","http://www.microsoft.com");
    alert(a1.getAttribute("href"));
</script>
</body>
</html>
When viewed in a Web browser, an alert() dialog box appears with the current value of the href, as shown in Figure 10-5.

When the dialog box clears, the setAttribute() method executes and the href attribute changes, as shown in Figure 10-6.
Elements can be added to a document by using the DOM. This section examines some ways to do just that.
At its most basic, the createElement() method of the document object can be used to create or add an element to a document. Here's some example code:
var newelement = document.createElement("p");The element within the variable newelement now has a reference to the new element. This element would then need to be appended or added to the document, though usually only after adding text to it. Adding an element onto a document is accomplished using the appendChild() method, as follows:
document.body.appendChild(newelement);
But what good is a p element if it doesn't have any text? The appendChild() element can help there, too, in conjunction with the createTextNode() method as follows:
newelement.appendChild(document.createTextNode("Hello World"));The entire three lines can be used any time after the body of the document has been declared. Here's the code in the context of a Web page, also found in the companion code as create.htm:
<!DOCTYPE HTML PUBLIC "-//W3C//DTD HTML 4.01//EN"
"http://www.w3.org/TR/html4/strict.dtd">
<html>
<head>
    <title>Create</title>

</head>
<body>
    <script type = "text/javascript" >
    var newelement = document.createElement("p");
    document.body.appendChild(newelement);
    newelement.appendChild(document.createTextNode("Hello World"));
    </script>
</body>
</html>
When viewed in a browser, the result is a simple p element containing the text "Hello World", as shown in Figure 10-7.

The previous example simply showed how to add an element. When doing so, it's quite common to set some attributes, such as the ID for that element, as well. This code expands upon the previous example to add an id attribute (you can find this code in the companion code as createid.htm):
<!DOCTYPE HTML PUBLIC "-//W3C//DTD HTML 4.01//EN"
"http://www.w3.org/TR/html4/strict.dtd">
<html>
<head>
    <title>Create</title>

</head>
<body>
    <script type = "text/javascript" >
    var newelement = document.createElement("p");
    newelement.setAttribute("id","newelement");
    document.body.appendChild(newelement);
    newelement.appendChild(document.createTextNode("Hello World"));
    </script>
</body>
</html>You can remove nodes from a document using the removeChild() method. This section offers an example of this procedure.
Recall the code from the previous section that was used to add an element. Expanding upon that by adding a few p elements will make it easier to work with the code in this example, so here goes:
<!DOCTYPE HTML PUBLIC "-//W3C//DTD HTML 4.01//EN"
"http://www.w3.org/TR/html4/strict.dtd">
<html>
<head>
    <title>Create</title>

</head>
<body>
    <script type = "text/javascript" >
    for (var i = 0; i < 3; i++) {
        var element = document.createElement("p");
        element.setAttribute("id","element" + i);
        document.body.appendChild(element);
        element.appendChild(document.createTextNode("Hello World, I'm Element " + i + "."));
    }
   </script>
</body>
</html>
When viewed in a Web browser, the document creates a page that looks like the one in Figure 10-8.

A few lines of code can now be added to remove one of the newly created elements. You can use removeChild() to remove any element from your documents, not just ones that you create. The two lines of code that will be added are:
var removeel = document.getElementById("element1");
document.body.removeChild(removeel);
For this example, we'll add the lines of code right after the code that creates the elements. In practice, you can place the call to removeChild() anywhere, so long as the element has already been created. Here's the final code with the new lines shown in bold type, which you can find within the companion code as removeel.htm:
<!DOCTYPE HTML PUBLIC "-//W3C//DTD HTML 4.01//EN"
"http://www.w3.org/TR/html4/strict.dtd">
<html>
<head>
    <title>Create</title>

</head>
<body>
    <script type = "text/javascript" >
    for (var i = 0; i < 3; i++) {
        var element = document.createElement("p");
        element.setAttribute("id","element" + i);
        document.body.appendChild(element);
        element.appendChild(document.createTextNode("Hello World, I'm Element " + i + "."));
    }
    var removeel = document.getElementById("element1");
    document.body.removeChild(removeel);
    </script>
</body>
</html>
Figure 10-9 shows the result. The elements are created, but then one is immediately removed.

Create a document that contains a paragraph of text that is appended or created using the DOM. Create a link right after this paragraph, linking to the site of your choice, also using the DOM. Make sure that all elements have id attributes.
Create a document with any elements or use an existing HTML document that contains id attributes in its elements. Retrieve two of those elements, make changes to them, and put them back into the document. The type of change you make will depend on the type of element that you choose. For example, if it's an a element, you might change the href; if it's a p element, you might change the text.
Create a document using the DOM that contains a table with at least two columns and two rows. Add text within the table elements.