
After reading this chapter you'll be able to
Understand how Asynchronous JavaScript and XML (AJAX) and Cascading Style Sheets (CSS) can be used together.
Understand more about the relationship between the Document Object Model (DOM), AJAX, and CSS.
Use AJAX and CSS to create and style a Hypertext Markup Language (HTML) table with Extensible Markup Language (XML) data.
Create an AJAX-based drop-down text box using CSS.
In the previous chapter, you saw how to use the xmlHttpRequest object to send, receive, and process requests and ultimately how to create an AJAX application. In this chapter, you'll see how to use CSS to display data retrieved with AJAX.
The relationship of JavaScript and CSS was covered in Chapter 15. In that chapter, you learned that it's possible to change document styles programmatically using JavaScript. In Chapter 17, you saw how to display XML data as an HTML table. And in Chapter 18, you saw how to create a live, searchable bookmarks Web page using some CSS and a lot of the DOM. This chapter shows how to use CSS to style the table from Chapter 17 and expand and retool the bookmark application from Chapter 18, again with the help of CSS and JavaScript.
Along the way, I hope to convey that AJAX is really pretty easy to use. Retrieving and parsing the information using xmlHttpRequest is the simple part; it's what you do with that data that matters. That's why CSS and the DOM matter! AJAX is where you put together all the JavaScript that you've learned throughout the book to create larger applications.
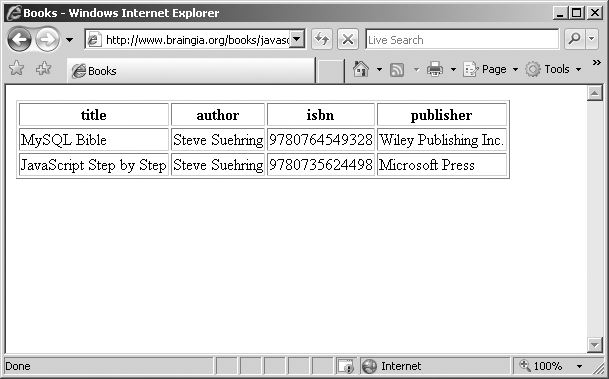
Chapter 17 presented an example where XML was retrieved and its data was used as part of an HTML table, as depicted in Figure 19-1.
The code to create that table was developed within Chapter 17 and expanded to show not only the data, but also the column headings. The code ended up as shown at the end of Chapter 17.

The code from Chapter 17 uses XML methods to obtain the data directly. The next exercise converts the code to retrieve the XML using xmlHttpRequest. Like the exercise in Chapter 18, this exercise requires that the XML file is stored on a Web server.
Using xmlHttpRequest to retrieve and display XML data
Use the books.xml file that you created in Chapter 17, or, if you didn't create one then or didn't save the file, create a file now called books.xml with the following data. Place this file on the same Web server as the HTML file that you create in the next step.
<books>
<book>
    <title>JavaScript Step by Step</title>
    <author>Steve Suehring</author>
    <isbn>9780735624498</isbn>
    <publisher>Microsoft Press</publisher>
</book>
<book>
    <title>MySQL Bible</title>
    <author>Steve Suehring</author>
    <isbn>9780764549328</isbn>
    <publisher>Wiley Publishing Inc.</publisher>
</book>
</books>
Using Microsoft Visual Studio, Eclipse, or another editor, edit the file ajaxbooks.htm in the Chapter 19 sample files folder.
Within ajaxbooks.htm, add the code shown below in bold type. Be sure to replace the Uniform Resource Locator (URL) YOUR SERVER HERE with the correct URL for your Web server. Note that only the function definition and first line of the displayData() function are changed from the version in Chapter 17.
<!DOCTYPE HTML PUBLIC "-//W3C//DTD HTML 4.01//EN" "http://www.w3.org/TR/html4/strict. dtd"> <html> <head> <title>Books</title> </head> <body> <div id="xmldata"></div> <script type="text/javascript">
function readyAJAX() {try {return new XMLHttpRequest();} catch(e) {try {return new ActiveXObject('Msxml2.XMLHTTP'),} catch(e) {try {return new ActiveXObject('Microsoft.XMLHTTP'),} catch(e) {return "A newer browser is needed.";}}}}var requestObj = readyAJAX();var url = "http://YOUR SERVER HERE/books.xml";requestObj.open("GET",url,true);requestObj.send();var AJAXresponse;requestObj.onreadystatechange = function() {if (requestObj.readyState == 4) {if (requestObj.status == 200) {AJAXresponse = requestObj.responseXML;displayData(AJAXresponse);]} else {alert(requestObj.statusText);}}}function displayData(response) {var xmlEl = response.getElementsByTagName("book");var table = document.createElement("table"); table.border = "1"; var tbody = document.createElement("tbody"); // Append the body to the table table.appendChild(tbody); var row = document.createElement("tr"); // Append the row to the body tbody.appendChild(row); for (colHead = 0; colHead < xmlEl[0].childNodes.length; colHead++) { if (xmlEl[0].childNodes[colHead].nodeType != 1) { continue; } var tableHead = document.createElement("th"); var colName = document.createTextNode(xmlEl[0].childNodes[colHead].nodeName); tableHead.appendChild(colName); row.appendChild(tableHead); } tbody.appendChild(row); // Create table row for (i = 0; i < xmlEl.length; i++) { var row = document.createElement("tr"); // Create the row/td elements for (j = 0; j < xmlEl[i].childNodes.length; j++) { // Skip it if the type is not 1 if (xmlEl[i].childNodes[j].nodeType != 1) { continue; } // Insert the actual text/data from the XML document. var td = document.createElement("td"); var xmlData = document.createTextNode(xmlEl[i].childNodes[j].firstChild.nodeValue); td.appendChild(xmlData); row.appendChild(td); } tbody.appendChild(row); } document.getElementById("xmldata").appendChild(table); } </script> </body> </html>View the page in a Web browser. You'll receive a page like this:
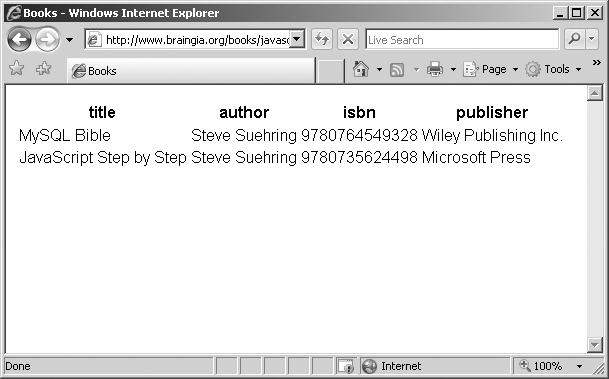
This exercise combined code from each of the last two chapters to show the retrieval and display of XML data using the xmlHttpRequest method associated with AJAX applications. Even though the original XML application shown in Chapter 17 is converted to use xmlHttpRequest, the table it displays is still rather ugly. This is where CSS styling comes into play.
The main function to display the table within the previous exercise is the displayData() function. It's within this function where CSS styles can be applied to make the table look more like a table you'd see in a more modern Web application.
One of the first things to do is to remove the border by removing the following line from near the top of the displayData() function:
table.border = "1";
Within the displayData() function, there are two primary loops, one to display the column headings and one to display the data itself. The first loop to display the column headings looks like this:
for (colHead = 0; colHead < xmlEl[0].childNodes.length; colHead++) {
    if (xmlEl[0].childNodes[colHead].nodeType != 1) {
        continue;
    }
    var tableHead = document.createElement("th");
    var colName = document.createTextNode(xmlEl[0].childNodes[colHead].nodeName);
    tableHead.appendChild(colName);
    row.appendChild(tableHead);
}
tbody.appendChild(row);
And the second loop that displays the actual data looks like this:
for (i = 0; i < xmlEl.length; i++) {
     var row = document.createElement("tr");
     // Create the row/td elements
     for (j = 0; j < xmlEl[i].childNodes.length; j++) {
         // Skip it if the type is not 1
         if (xmlEl[i].childNodes[j].nodeType != 1) {
             continue;
         }
         // Insert the actual text/data from the XML document.
         var td = document.createElement("td");
         var xmlData = document.createTextNode(xmlEl[i].childNodes[j].firstChild.nodeValue);
         td.appendChild(xmlData);
         row.appendChild(td);
     }
     tbody.appendChild(row);
}
Most of the changes made to the table's display will be made within these loops, and I'll highlight the changes as they're made.
Another item to change is the font. (I've always been partial to the Arial font myself.) This is changed using the fontFamily style property in JavaScript. This change needs to be made within each of the loops if you'd like to make all the text in the table have an Arial font. The loops now look like this (note the two new lines in bold):
for (colHead = 0; colHead < xmlEl[0].childNodes.length; colHead++) {
    if (xmlEl[0].childNodes[colHead].nodeType != 1) {
        continue;
    }
    var tableHead = document.createElement("th");
    var colName = document.createTextNode(xmlEl[0].childNodes[colHead].nodeName);
    tableHead.style.fontFamily = "Arial";
    tableHead.appendChild(colName);
    row.appendChild(tableHead);
}
tbody.appendChild(row);

for (i = 0; i < xmlEl.length; i++) {
    var row = document.createElement("tr");
    // Create the row/td elements
    for (j = 0; j < xmlEl[i].childNodes.length; j++) {
        // Skip it if the type is not 1
        if (xmlEl[i].childNodes[j].nodeType != 1) {
            continue;
        }

        // Insert the actual text/data from the XML document.
        var td = document.createElement("td");
        var xmlData = document.createTextNode(xmlEl[i].childNodes[j].firstChild.nodeValue);
        td.style.fontFamily = "Arial";
        td.appendChild(xmlData);
        row.appendChild(td);
    }
    tbody.appendChild(row);
}
The results of these changes and the removal of the table border yields a table that looks like the one shown in Figure 19-2.
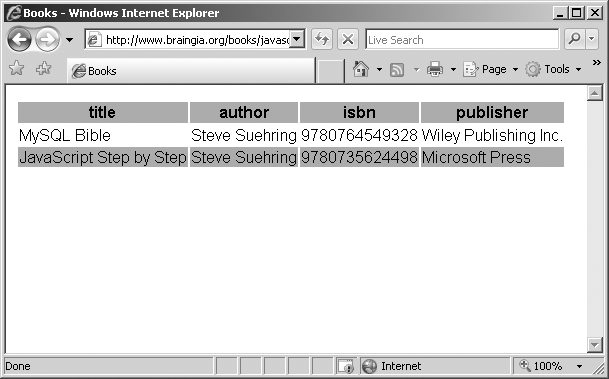
Some color would certainly help make the table more readable, especially when there are several or even several hundred or more rows of data. Changing every other row to a slightly different shade and changing the table heading to a different color entirely might also be helpful. Here's what the loops look like with the addition of backgroundColor style properties. Again, the changes are in bold.
for (colHead = 0; colHead < xmlEl[0].childNodes.length; colHead++) {
    if (xmlEl[0].childNodes[colHead].nodeType != 1) {
        continue;
    }
    var tableHead = document.createElement("th");
    var colName = document.createTextNode(xmlEl[0].childNodes[colHead].nodeName);
    tableHead.style.fontFamily = "Arial";
    tableHead.style.backgroundColor = "#aaabba";
    tableHead.appendChild(colName);
    row.appendChild(tableHead);
}
tbody.appendChild(row);

for (i = 0; i < xmlEl.length; i++) {
    var row = document.createElement("tr");
    // Create the row/td elements
    for (j = 0; j < xmlEl[i].childNodes.length; j++) {
        // Skip it if the type is not 1
        if (xmlEl[i].childNodes[j].nodeType != 1) {
            continue;
        }
        // Insert the actual text/data from the XML document.
        var td = document.createElement("td");
        var xmlData = document.createTextNode(xmlEl[i].childNodes[j].firstChild.nodeValue);
        if (i % 2) {
        td.style.backgroundColor = "#aaabba";
        }
        td.style.fontFamily = "Arial";
        td.appendChild(xmlData);
        row.appendChild(td);
   }
   tbody.appendChild(row);
}
This code uses the modulo operator (%) to shade every other row of the table data with the light gray background. There are only two data rows in this table, so only the second row gets the gray shading. The results from the addition of color are shown in Figure 19-3.
A variation of the bookmark application shown in Chapter 18 can be used to create a live drop-down box. Sometimes this is known as a suggest-as-you-type drop-down box, because as you type, commonly entered values are shown within a drop-down box below the text box, thus making it easier to complete your entry. Google Suggest is one such application.
Another implementation of this same principle is a drop-down box whereby common items (such as U.S. states) are shown as the visitor types. The key to this variation is that there is a certain relatively manageable subset of data that can reasonably be retrieved to populate the live drop-down box quickly. For example, retrieving a subset from a list of the 50 U.S. states is a manageable amount of data to provide in real time as the visitor is typing a query into a text box. Retrieving 1,000,000 database records, on the other hand, is not. One use of this application in business might be to retrieve a list of employees for a company directory.
Here's a demonstration of this application. It retrieves, using xmlHttpRequest, a list of the 50 states. When the letter w is entered, all the states that begin with that letter are retrieved, as shown in Figure 19-4.

Moving the mouse over the various states changes their background color, as shown in Figure 19-5, where I moved the mouse over Wisconsin (the mouse pointer is not visible in this screenshot).

Finally, clicking one of the state names causes it to move up into the text box. The result of this action is shown in Figure 19-6. From here, the form might be submitted, taking whatever action is appropriate for the application based on that input.

This code works the same as the bookmark application code from Chapter 18, insofar as the visitor can continue to type to narrow down or focus the search to their specific selection. Consider the case where the visitor typed the letter n. Doing so would reveal the 8 states that begin with the letter n. Further typing, say of the word new, would narrow that search down to 4 states, and typing more letters would narrow the results even more.
The code for this application is shown in Example 19-1.
Example 19-1. A Search Application
<!DOCTYPE HTML PUBLIC "-//W3C//DTD HTML 4.01//EN" "http://www.w3.org/TR/html4/
strict.dtd">
<html>
<head>
<title>State Search</title>
</head>
<body>
<form name="nameform" id="nameform-id002" action="" method="post">
Enter State: <input id="textname-id002" type="text" name="textname">
</form>
<div id="data-id004"></div>
<script type="text/javascript">

function textsearch() {
    var textName = document.getElementById("textname");
    var dataNode = document.getElementById("data");
    while (dataNode.hasChildNodes()) {
        dataNode.removeChild(dataNode.firstChild);
    }
    if (textName.value != "") {
        listName(textName.value);
    }
}
function readyAJAX() {
    try {
        return new XMLHttpRequest();
    } catch(e) {
        try {
             return new ActiveXObject('Msxml2.XMLHTTP'),
         } catch(e) {
             try {
                 return new ActiveXObject('Microsoft.XMLHTTP'),
             } catch(e) {
                 return "A newer browser is needed.";
             }
         }
    }
}
function listName(text) {
    var nameList = AJAXresponse.split(",");
    var pattern = "^" + text;
    var nameRegexp = new RegExp(pattern, "i");
    for (var i = 0; i < nameList.length; i++) {
        var existDiv = document.getElementById(nameList[i]);
        if (! existDiv) {
            if (nameList[i].match(nameRegexp)) {
                var displayDiv = document.getElementById("data");
                var newDiv = document.createElement("div");
                if (window.attachEvent) {
                    newDiv.attachEvent("onclick",function(e) {
                        document.forms["nameform"].textname.value =
                            e.srcElement.firstChild.nodeValue;});
                    newDiv.attachEvent("onmouseover",function(e) {
                        e.srcElement.style.background = "#FFFFFF"; });
                    newDiv.attachEvent("onmouseout",function(e) {
                        e.srcElement.style.background = "#aaabba"; });
                } else {
                    newDiv.addEventListener("click",function () {
                        document.forms["nameform"].textname.value =
                            this.firstChild.nodeValue; },false);
                    newDiv.addEventListener("mouseover",function() {
                        this.style.background = "#FFFFFF"; },false);
                    newDiv.addEventListener("mouseout",function() {
                        this.style.background = "#aaabba"; },false);
                }
                newDiv.setAttribute("id",nameList[i]);
                newDiv.style.background = "#aaabba";
                newDiv.style.color = "#000000";
                newDiv.style.border = "solid 1px";
                newDiv.style.display = "block";
                newDiv.style.width = "175px";
                newDiv.appendChild(document.createTextNode(nameList[i]));
                displayDiv.appendChild(newDiv);
            }
        }
    }
}

var requestObj = readyAJAX();
var url = "http://YOUR SERVER HERE/statelist.php";
requestObj.open("GET",url,true);
requestObj.send();
var AJAXresponse;
requestObj.onreadystatechange = function() {
    if (requestObj.readyState == 4) {
        if (requestObj.status == 200) {
            AJAXresponse = requestObj.responseText;
        } else {
            alert(requestObj.statusText);
        }
   }
}
if (window.attachEvent) {
    document.getElementById("textname").attachEvent("onkeyup",textsearch);
} else {
    document.getElementById("textname").addEventListener("keyup",textsearch,false);
}
</script>
</body>
</html>
Much of the code in Example 19-1 has been seen throughout this book.
The list of states is retrieved through an external function, statelist.php. This file returns a simple comma-separated list of states, like this:
Alabama,Alaska,Arizona,California,Colorado,Delaware,Florida,Georgia, …
These states are then split according to the comma delimiter and put into an array, like this:
var nameList = AJAXresponse.split(",");Some additions to recent applications from the last two chapters include the code to create small CSS-styled drop-down boxes that can be clicked. This code went into the listName() function that had been seen in Chapter 18. Event listeners and CSS styles are applied to the HTML DIV elements in the listName function, shown here with the additional code in bold.
function listName(text) {
    var nameList = AJAXresponse.split(",");
    var pattern = "^" + text;
    var nameRegexp = new RegExp(pattern, "i");
    for (var i = 0; i < nameList.length; i++) {
        var existDiv = document.getElementById(nameList[i]);
        if (! existDiv) {
            if (nameList[i].match(nameRegexp)) {
                var displayDiv = document.getElementById("data");
                var newDiv = document.createElement("div");
                if (window.attachEvent) {
                    newDiv.attachEvent("onclick",function(e) {
                        document.forms["nameform"].textname.value =
                            e.srcElement.firstChild.nodeValue;});
                    newDiv.attachEvent("onmouseover",function(e) {
                        e.srcElement.style.background = "#FFFFFF"; });
                    newDiv.attachEvent("onmouseout",function(e) {
                        e.srcElement.style.background = "#aaabba"; });
                } else {
                    newDiv.addEventListener("click",function () {
                        document.forms["nameform"].textname.value =
                            this.firstChild.nodeValue; },false);
                    newDiv.addEventListener("mouseover",function() {
                        this.style.background = "#FFFFFF"; },false);
                    newDiv.addEventListener("mouseout",function() {
                        this.style.background = "#aaabba"; },false);
             }
             newDiv.setAttribute("id",nameList[i]);
             newDiv.style.background = "#aaabba";
             newDiv.style.color = "#000000";
             newDiv.style.border = "solid 1px";
             newDiv.style.display = "block";
             newDiv.style.width = "175px";
             newDiv.appendChild(document.createTextNode(nameList[i]));
             displayDiv.appendChild(newDiv);
          }
       }
    }
}The next logical step in developing AJAX applications is to accept input from the user and do something with that input. Building an AJAX application is all about providing a highly interactive application based on user actions. Unfortunately, to do justice to this subject, I would need to delve into the creation of server-side applications that would handle that input, and that is beyond the scope of this beginner-level book focusing just on JavaScript. With some luck, I'll write another book on intermediate JavaScript or building JavaScript applications that will show both the JavaScript and the server aspects of AJAX.
But I hope that even with this limited coverage, I've been able to convey that the building of AJAX applications is really nothing more than providing friendly, interactive ways for visitors to use applications, and that a large part of this task involves the design surrounding the JavaScript, not xmlHttpRequest alone. The xmlHttpRequest object is merely a carrier or delivery method for getting data into the program. The layer on which xmlHttpRequest operates is well below the presentation layer upon which the page is built. Therefore, the user will never see the xmlHttpRequest processing in the background, only the design that you put on the front end of the application.
Create a submit event handler for the state example shown in this chapter such that the state submitted is displayed back to the user when she or he submits the form.
Create an application that uses xmlHttpRequest to return a list of names (such as an employee directory). You can use either plaintext or XML for the source data.
Congratulate yourself for completing the exercises in this book.