
After reading this chapter, you'll be able to
Understand both new and old methods for creating rollover images using JavaScript.
Preload images using JavaScript.
Create a slideshow of images.
Enhance image maps using JavaScript.
The term image rollover refers to changing an image when the mouse is moved over it, giving visual feedback to the visitor as to the location of the mouse on the screen. Though this technique has been largely supplanted by Cascading Style Sheets (CSS)–based solutions, you still can benefit from learning how it can be achieved using JavaScript.
Rollovers take advantage of certain events that relate to mouse movement on a computer. For rollovers, these primarily consist of onmouseover and onmouseout.
Note
Some of the examples in this chapter take advantage of the older, inline method of including onmouseover and onmouseout events right in with the Hypertext Markup Language (HTML). This method of coding is no longer recommended; these days, the separation of content from behavior is preferred instead. Therefore, I'll highlight newer ways to do things as well as the old, tried-and-true, works-almost-everywhere methods that have fallen out of favor with Web designers.
Additionally, the rollover effect can now be created, albeit with varying degrees of success, using CSS. This being a JavaScript book, I'm going to show only the JavaScript methods for creating rollovers.
At its most basic, simply placing onmouseover and onmouseout event handlers within the img tag creates the rollover effect. The handlers display images that differ only slightly from each other.
The following HTML creates a rollover effect using the old model:
<img id="home" name="img_home" src="box1.png" alt="Home"
onmouseover="window.document.img_home.src='box2.png'"
onmouseout="window.document.img_home.src='box1.png'">
The important parts of this img tag are the name, img_home, and the onmouseover and onmouseout events. The name enables the image to be accessed easily through the window.document object call, and the onmouseover and onmouseout events make the magic happen. When viewed in a Web browser, the image called box1.png is loaded, as shown in Figure 13-1.

When the mouse is moved over the graphic, the onmouseover event is fired and the source of the graphic is changed to box2.png with this code:
window.document.img_home.src='box2.png'
While the mouse is over the graphic, the image changes to the one shown in Figure 13-2.

When the mouse moves away from the graphic, the image changes back to box1.png, thanks to the onmouseout event, which calls this JavaScript:
window.document.img_home.src='box1.png'
The newer method for creating rollovers with JavaScript is to use the Document Object Model (DOM) along with the onload event of the window object. The onload event of the window object will be covered in further detail in Chapter 14. Using this model, when the onload event is called (at page load), a JavaScript function is called to populate the onmouseover and onmouseout events for all the images in the document.
The code that reproduces the same behavior as the previous examples is shown in Example 13-1.
Example 13-1. A Different Approach to Rollovers
function rollover() {
    var images = document.getElementsByTagName("img");
    for (var i = 0; i < images.length; i++) {
        images[i].onmouseover = mouseOver;
        images[i].onmouseout = mouseOut;
    }
}
function mouseOver() {
    this.src = "box2.png";
}

function mouseOut() {
    this.src = "box1.png";
}
This code, coupled with an onload event handler in the <body> tag, creates a simple mouseover effect. Here's what the <body> tag looks like:
<body onload="rollover();">
Even though the functionality is the same, the code in Example 13-1 is not very portable. We'll work to improve that shortly. For now, here's an explanation of the code as it exists in Example 13-1.
The first thing accomplished within the function is to retrieve all of the <img> elements using the getElementsByTagName() method of the document object. These are placed into a variable called images. Next, the code iterates through the images variable, which is really a list of all the images in the document. Within the loop, the onmouseover and onmouseout events are set to a function.
Up until this point, the code is remarkably portable and we won't work too hard to improve it. However, it goes wrong within the functions themselves. Within the mouseOver and mouseOut event handlers, the src attributes are hard-coded to box1.png and box2.png. This is fine if all we have is one image and its accompanying rollover, as in this example. However, once you have a menu full of images, as you would have in the real world, this code breaks. In addition, the this keyword is quirky when it is called from another function related to event handling. Therefore, we need to improve the script.
This example code does show the theory of how to implement rollovers. Loop through the images (or retrieve them by ID) and set their onmouseover and onmouseout events to their own functions, which in turn should set the src attribute to the name of the image to use for that event. Now it's your turn to make the function more portable so that you can use it in the future.
This exercise uses six images (three graphics, each of which has a default and a rollover image), but is written to support any number of images. I've included the images used in this exercise on the CD with the book so that you don't have to reinvent the wheel just to make this exercise work!
Using Microsoft Visual Studio, Eclipse, or another editor, edit the file rollover.htm in the Chapter 13 ollover sample files folder. This folder includes six images: home_default.png, home_over.png, about_default.png, about_over.png, blog_default.png, and blog_over.png.
Within the Web page, add the code shown below in bold type:
<!DOCTYPE HTML PUBLIC "-//W3C//DTD HTML 4.01//EN" "http://www.w3.org/TR/html4/strict.dtd"> <html> <head> <title>Rollover</title> <script type="text/javascript">
function rollover() {var images = document.getElementsByTagName("img");for (var i = 0; i < images.length; i++) {images[i].onmouseover = function() { this.src = this.id + "_over.png"; }images[i].onmouseout = function() { this.src = this.id + "_default.png"; }}}window.onload = rollover;</script> </head> <body> <p><img id="home-id001" name="img_home" src="home_default.png" alt="Home"></p> <p><img id="about" name="img_about" src="about_default.png" alt="About"></p> <p><img id="blog" name="img_blog" src="blog_default.png" alt="Blog"></p> </body> </html>View the page in a browser. You should see a page similar to this screenshot. If you run into problems, make sure that each of the images is located in the current directory, because that's where the <img> tag is looking for them.
Roll the mouse over the buttons one at a time. Each of them should change. Here's what the screen looks like when the mouse is over the "About" graphic:


This example shows a better rollover implementation. Like the previous example, this code creates a function and then calls it using the window.onload event. Also, like the previous example, this code gathers all the images into a variable called images and then loops through each one, adding an onmouseover and onmouseout event handler to each, as follows:
function rollover() {
    var images = document.getElementsByTagName("img");
    for (var i = 0; i < images.length; i++) {
        images[i].onmouseover = function() { this.src = this.id + "_over.png"; }
        images[i].onmouseout = function() { this.src = this.id + "_default.png"; }
    }
}
Where this example differs from Example 13-1 is in the removal of the definitions of the mouseOver() and mouseOut() functions. With this example, each image's ID is gathered with a call to this.id within an anonymous function. That name is then concatenated with the string "_over.png" and "_default.png" for their respective functions.
The this keyword will work in these examples, but it can become quite problematic when using more advanced event handlers, as you'll see in Chapter 14. Different browsers point the this keyword to different things. So while it's OK to use the this keyword as shown (it gets the desired results in all major browsers), be aware that when more advanced event handling is necessary, you shouldn't use it.
It's important with this example to make sure that the filenames and ID attributes match. For example, here's one of the <img> tags from the example:
<p><img id="about-id001" name="img_about" src="about_default.png" alt="About"></p>
Because the filenames are generated in the onmouseover and onmouseout event handlers based on the element ID's, the file names must be about_default.png and about_over.png for the About graphic, home_default.png and home_over.png for the Home graphic, and so on. That isn't to say that you can't use an entirely different naming convention—the important thing is that the naming convention that you use for your rollover graphics files must match what you have coded in the JavaScript.
Because the first thing that occurs within the rollover() function is that all the images on the page are gathered, there's a good chance that the images variable list will contain graphics and images that don't have a rollover action. Therefore, a further improvement on this script is to create a conditional to check whether or not the graphic should be a rollover. One of the simplest solutions is to refine the naming convention for rollover graphics to include the word rollover in the <img> tag's id attribute, like this:
<p><img id="rollover_about" name="img_about" src="about_default.png" alt="About"></p>
Then within the mouseOver() and mouseOut() functions, which are back because of the way that the onload event is called (within the body instead of within window.onload), the code checks if the id attribute contains the word rollover. If it does, then the code continues the rollover action; otherwise, it simply returns. Figure 13-3 shows an example page with four images, three of which have rollover behavior.

When the mouse is moved over any of the top three images on the page, the rollover image loads. However, because the ID of the last image doesn't contain the word rollover, it doesn't get an onmouseover or onmouseout event handler. Here's the full code (but note that we still have a little more improvement to make with this script before it's done). This code is included in the sample files in the rollover regexp folder. Note that even though the mouseOver() and mouseOut() functions are contained in this example, there's no reason why the code couldn't use anonymous functions instead of the named functions as shown in the example.
<!DOCTYPE HTML PUBLIC "-//W3C//DTD HTML 4.01//EN"
"http://www.w3.org/TR/html4/strict.dtd">
<html>
<head>
<title>Rollover</title>
<script type="text/javascript">
function rollover() {
    var images = document.getElementsByTagName("img");
    for (var i = 0; i < images.length; i++) {
        images[i].onmouseover = mouseOver;
        images[i].onmouseout = mouseOut;
    }
}
function mouseOver() {
    var roll = new RegExp ("rollover");
    if (this.id.match(roll)) {
        this.src = this.id + "_over.png";
    } else {
        return;
    }
}

function mouseOut() {
    var roll = new RegExp ("rollover");
    if (this.id.match(roll)) {
        this.src = this.id + "_default.png";
    } else {
        return;
    }
}

</script>
</head>
<body onload="rollover();">
<p><img id="rollover_home-id002" name="img_home" src="rollover_home_default.png"
alt="Home"></p>
<p><img id="rollover_about-id001" name="img_about" src="rollover_about_default.png"
alt="About"></p>
<p><img id="rollover_blog-id001" name="img_blog" src="rollover_blog_default.png"
alt="Blog"></p>
<p><img id="logo" name="img_logo" src="logo.png" alt="Braingia Logo"></p>
</body>
</html>
The differences between this code and the earlier code are slight and exist within the mouseOver() and mouseOut() custom functions. Within those functions, one of which is shown here as an example, a regular expression is built to look for the string rollover. This regular expression is then used with the match() method to determine if it occurs within the this.id attribute. If the string rollover appears within this.id, the rollover action is set, just as in the previous examples. If the string isn't found, then the function simply returns
function mouseOver() {
    var roll = new RegExp ("rollover");
    if (this.id.match(roll)) {
        this.src = this.id + "_over.png";
    } else {
        return;
    }
}You may have noticed an issue when you first began working with the rollover examples in the previous section. When the rollover image is first loaded, it can take a second to render. This delay occurs because the image has to be loaded through the Web server and network before it is displayed in the browser.
This isn't a huge issue—it's really more of an annoyance when using the application across a super-fast network connection. However in the real world, which is where most of your applications will likely reside, this lag is noticeable, especially for clients who may be running on slow dial-up connections. Luckily, you can preload the images using a bit of JavaScript. Doing so causes the image to load into the browser's cache and thus will be available almost immediately when the visitor moves the mouse over an image.
The basic premise behind preloading an image is to create an image object and then call the src() method on that object, pointing to the image you'd like to preload. What exactly you do with that object once you've called the src() method isn't important. JavaScript will make the call to that image asynchronously, so the rest of the script continues to execute while the image loads in the background.
The asynchronous nature of preloading does have an important implication when preloading multiple images: you must create a new image object for each image that you need to preload. If you have a batch of rollover images, as is often the case, each image needs its own object and src() method call. The final and best version of the rollover code incorporates preloading and also makes another slight optimization to call the mouseOver() and mouseOut() functions only when working with a rollover image. This is accomplished by moving the regular expression test into the main function. Example 13-2 shows the rollover script along with the HTML page for context. This code is included in the sample files in the rollover regexp preload folder.
Example 13-2. Preloading and Rollovers
<!DOCTYPE HTML PUBLIC "-//W3C//DTD HTML 4.01//EN"
"http://www.w3.org/TR/html4/strict.dtd">
<html>
<head>
<title>Rollover</title>
<script type="text/javascript">
function rollover() {
    var images = document.getElementsByTagName("img");
    var roll = new RegExp ("rollover");
    var preload = [];
    for (var i = 0; i < images.length; i++) {
        if (images[i].id.match(roll)) {
            preload[i] = new Image();
            preload[i].src = images[i].id + "_over.png";
            images[i].onmouseover = mouseOver;
            images[i].onmouseout = mouseOut;
        }
    }
}
function mouseOver() {
    this.src = this.id + "_over.png";
}

function mouseOut() {
    this.src = this.id + "_default.png";
}

</script>
</head>
<body onload="rollover();">
<p><img id="rollover_home-id001" name="img_home" src="rollover_home_default.png"
alt="Home"></p>
<p><img id="rollover_about-id002" name="img_about" src="rollover_about_default.png"
    alt="About"></p>
<p><img id="rollover_blog-id001" name="img_blog" src="rollover_blog_default.png"
alt="Blog"></p>
<p><img id="logo-id001" name="img_logo" src="logo.png" alt="Braingia Logo"></p>
</body>
</html>You can use JavaScript to create a slideshow effect where one image is swapped with another within the browser window. Frequently, the slideshow is done on a timed basis, where one image comes after another after a certain interval, maybe 5 seconds. A timed version of a slideshow will be demonstrated in Chapter 14. The version covered here is a visitor-controlled slideshow—that is, one where the visitor must click buttons to go forward and backward through the images.
There are actually several ways to implement slideshow-like functionality through JavaScript. One method might use a for loop to iterate through the images (in fact, the timed slideshow in Chapter 14 will do just that). Another slideshow variation, illustrated in this section, features cleanliness and simplicity.
Truthfully, most slideshows are rather simple in design, though admittedly I've seen some overly complex ones. Example 13-3 shows the slideshow in its first version, with just forward capability. I'll then discuss the major portions of the code in more detail.
Example 13-3. A Basic (but Slightly Incomplete) Slideshow
<!DOCTYPE HTML PUBLIC "-//W3C//DTD HTML 4.01//EN"
"http://www.w3.org/TR/html4/strict.dtd">
<html>
<head>
<title>Slideshow</title>
<script type="text/javascript">
var images = ['home_default.png','about_default.png','blog_default.png','logo.png'];
function nextimage() {
    var img = document.getElementById("slideimage");
    var imgname = img.name.split("_");
    var index = imgname[1];
    if (index == images.length - 1) {
         index = 0;
    } else {
        index++;
    }
    img.src = images[index];
    img.name = "image_" + index;
}

</script>
</head>
<body>
<p><img id="slideimage-id001" name="image_0" src="home_default.png" alt="Home"></p>
<form name="slideform">
<input type = "button" id="nextbtn" value = "Next" onclick="nextimage()">
</form>
</body>
</html>
First, let's discuss the HTML portion of this code because we can do it rather quickly. Here it is:
<p><img id="slideimage-id001" name="image_0" src="home_default.png" alt="Home"></p>
<form name="slideform">
<input type = "button" id="nextbtn-id001" value = "Next" onclick="nextimage()">
</form>
In this code, an image is displayed and its ID and name are set to specific values that will be used later in the JavaScript. Next, a form button is shown with an onclick action set to the nextimage() function, which has been defined in JavaScript. That's all there is to the HTML portion of this slideshow.
The JavaScript portion of the code is as follows:
var images = ['home_default.png','about_default.png','blog_default.png','logo.png'];
function nextimage() {
    var img = document.getElementById("slideimage");
    var imgname = img.name.split("_");
    var index = imgname[1];
    if (index == images.length - 1) {
        index = 0;
    } else {
        index++;
    }
    img.src = images[index];
    img.name = "image_" + index;
}
Within the JavaScript, an array of images is created. These images just contain the names, so the image files must be located in the same directory as the JavaScript being executed. (If not, then the image filenames within this array would need to include the appropriate path.)
The function nextimage() is called when the Next button is clicked. Within this function, the actual image from the <img> HTML tag is retrieved, thanks to the DOM. Next, the name attribute of that image is split so that the function can obtain the number from the name attribute. This number is then placed into the index variable.
The next portion of the code performs a conditional test that checks whether the index value equals the length of the images array minus 1. If this condition is true, then we've reached the end of the slideshow, so we'll set the index value back to 0 and start over. If we've not yet reached the end of the available images for the slideshow, then the code simply increments the index value by 1.
The final two lines of JavaScript set the src attribute to the new image and set its name appropriately so that the next time the code goes through the function, the current index can be determined.
You might think that adding a button to enable backward traversal through the slideshow should just be a matter of copying and pasting the code you just created to implement the Previous button's functionality. In most instances, you'd be right. However, there's the special case of trying to go backward from the first image. The need to contend with that scenario makes using a Previous button a bit more challenging.
This next exercise uses some of the graphics used for previous exercises and examples in this chapter. They may make the slideshow rather boring, so feel free to replace them with whatever other images you have handy. There's no special reason why I have four images for this example either, so feel free to use more. However, be sure to use at least three images so that you can fully test the backward and forward capabilities of JavaScript.
Using Visual Studio, Eclipse, or another editor, edit the file slideshow.htm in the Chapter 13slideshow sample files folder.
Within that page, add the code shown below in bold type:
<!DOCTYPE HTML PUBLIC "-//W3C//DTD HTML 4.01//EN" "http://www.w3.org/TR/html4/strict.dtd"> <html> <head> <title>Slideshow</title> <script type="text/javascript">
var images = ['home_default.png','about_default.png','blog_default.png','logo.png'];function nextimage() {var img = document.getElementById("slideimage");var imgname = img.name.split("_");var index = imgname[1];if (index == images.length - 1) {index = 0;} else {index++;}img.src = images[index];img.name = "image_" + index;}</script> </head> <body><p><img id="slideimage-id002" name="image_0" src="home_default.png" alt="Home"></p><form name="slideform"><input type = "button" id="nextbtn-id002" value = "Next" onclick="nextimage()"></form> </body> </html>View the page in a Web browser. You should see a page like this:
Click Next to scroll through all the images. Notice that the slideshow will wrap back to the first image once it gets to the end.
Now alter the code to add a Previous button (the new code is shown in bold type):
<!DOCTYPE HTML PUBLIC "-//W3C//DTD HTML 4.01//EN" "http://www.w3.org/TR/html4/strict.dtd"> <html> <head> <title>Slideshow</title> <script type="text/javascript"> var images = ['home_default.png','about_default.png','blog_default.png','logo.png']; function nextimage() { var img = document.getElementById("slideimage"); var imgname = img.name.split("_"); var index = imgname[1]; if (index == images.length - 1) { index = 0; } else { index++; } img.src = images[index]; img.name = "image_" + index; }function previmage() {var img = document.getElementById("slideimage");var imgname = img.name.split("_");var index = imgname[1];if (index == 0) {index = images.length - 1;} else {index--;}img.src = images[index];img.name = "image_" + index;}</script> </head> <body> <p><img id="slideimage-id003" name="image_0" src="home_default.png" alt="Home"></p> <form name="slideform"><input type = "button" id="prevbtn" value = "Previous" onclick="previmage()"><input type = "button" id="nextbtn-id003" value = "Next" onclick="nextimage()"> </form> </body> </html>View the page in a browser again. You'll see that there's now a Previous button.
Test the functionality of the page by using both buttons in any combination to move backward and forward.


This code added a new button within the HTML for the Previous function:
<input type = "button" id="prevbtn-id001" value = "Previous" onclick="previmage()">
The JavaScript added a new function called previmage() to go backward through the images:
function previmage() {
    var img = document.getElementById("slideimage");
    var imgname = img.name.split("_");
    var index = imgname[1];
    if (index == 0) {
        index = images.length - 1;
    } else {
        index--;
    }
    img.src = images[index];
    img.name = "image_" + index;
}
The code is strikingly similar to the nextimage() function, except for the conditional. If the index is 0, then we're at the first image and therefore the function needs to loop back to the last image. Otherwise, just go backward one index.
Image maps are images that have certain areas defined to behave in a certain way, such as linking to another document. Image maps are frequently used in maps to pick out the country or region in which the visitor resides. They also are used within menus, though less so with the advent of CSS.
Unfortunately, I'm not nearly a good enough artist to draw a map of the Earth. Instead, I created a wildly out-of-scale representation of a small bit of the night sky facing north from 44.52 degrees North, -89.58 degrees West, during the summer months. This graphic is included within the code for this chapter and is called nightsky_map_default.gif.
Within the illustration shown in Figure 13-4, there are four constellations: Ursa Minor, Cepheus, Draco, and Cassiopeia.
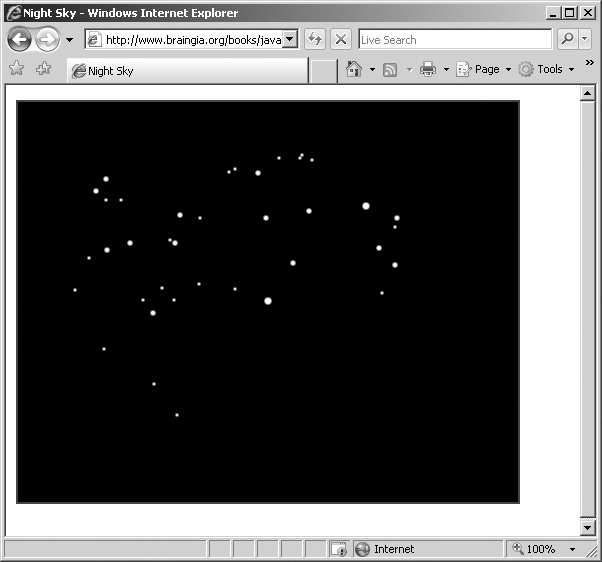
I've made this graphic into an image map so that when visitors click any of the constellations, they're taken to the Wikipedia page about that constellation. The code for this image map is shown in Example 13-4 (and is included in the sample files in the Chapter 13 ightsky folder).
Example 13-4. An Image Map for the Night Sky Graphic
<!DOCTYPE HTML PUBLIC "-//W3C//DTD HTML 4.01//EN"
"http://www.w3.org/TR/html4/strict.dtd">
<html>
<head>
<title>Night Sky</title>
<script type="text/javascript">
</script>
</head>
<body>
<p><img id="nightsky" name="nightsky" src="nightsky_map_default.gif" isMap useMap =
"#sky" alt="The Night Sky"></p>
<p><map name = "sky">
<area coords = "119,180,264,228" alt="Ursa Minor" shape="RECT"
 href="http://en.wikipedia.org/wiki/Ursa_Minor">
<area coords = "66,68,193,170" alt="Draco" shape="RECT"
 href="http://en.wikipedia.org/wiki/Draco">
<area coords = "36,170,115,246" alt="Draco" shape="RECT"
 href="http://en.wikipedia.org/wiki/Draco">
<area coords = "118,249,174,328" alt="Draco" shape="RECT"
 href="http://en.wikipedia.org/wiki/Draco">
<area coords = "201,47,298,175" alt="Draco" shape="RECT"
 href="http://en.wikipedia.org/wiki/Cepheus_(constellation)">
<area coords = "334,95,389,204" alt="Cassiopeia" shape="RECT"
 href="http://en.wikipedia.org/wiki/Cassiopeia_(constellation)">
</map></p>
</body>
</html>
This code creates a simple image map using pixel coordinates to create small rectangular shapes for each constellation and three rectangles to account for the constellation Draco's shape and tail. This code in and of itself is functional and creates a working image map. This map can be enhanced with JavaScript.
The onmouseover and onmouseout events are available for the <area> tag of image maps. Using these events and some JavaScript, you can improve the usability of the image map. For instance, when a visitor moves the mouse over one of the mapped areas, a new image could be loaded that highlights the constellation. This action is merely a variation of the image swapping seen earlier in the chapter. Example 13-5 shows the code (which is also included in the sample files in the Chapter 13 ightsky folder).
Example 13-5. An Image Map with JavaScript Functionality
<!DOCTYPE HTML PUBLIC "-//W3C//DTD HTML 4.01//EN"
"http://www.w3.org/TR/html4/strict.dtd">
<html>
<head>
<title>Night Sky</title>
<script type="text/javascript">
function loadconst() {
    var areas = document.getElementsByTagName("area");
    for (var i = 0; i < areas.length; i++) {
        areas[i].onmouseover = mouseOver;
        areas[i].onmouseout = mouseOut;
    }
}
function mouseOver() {
    document.getElementById("nightsky").src = "nightsky_map_" + this.id + ".gif";
}

function mouseOut() {
    document.getElementById("nightsky").src = "nightsky_map_default.gif";
}

</script>
</head>
<body onload="loadconst()">
<p><img id="nightsky-id001" name="nightsky" src="nightsky_map_default.gif" isMap useMap =
"#sky"
alt="The Night Sky"></p>
<p><map name = "sky">
<area id="ursaminor" coords="119,180,264,228" alt="Ursa Minor" shape="RECT"
 href="http://en.wikipedia.org/wiki/Ursa_Minor">
<area id="draco" coords="66,68,193,170" alt="Draco" shape="RECT"
 href="http://en.wikipedia.org/wiki/Draco">
<area id="draco-id001" coords="36,170,115,246" alt="Draco" shape="RECT"
 href="http://en.wikipedia.org/wiki/Draco">
<area id="draco-id001" coords="118,249,174,328" alt="Draco" shape="RECT"
 href="http://en.wikipedia.org/wiki/Draco">
<area id="cepheus" coords="201,47,298,175" alt="Draco" shape="RECT"
 href="http://en.wikipedia.org/wiki/Cepheus_(constellation)">
<area id="cassie" coords="334,95,389,204" alt="Cassiopeia" shape="RECT"
 href="http://en.wikipedia.org/wiki/Cassiopeia_(constellation)">
</map></p>
</body>
</html>
When the page is viewed in a Web browser, the visitor can move the mouse over each constellation and have its outline traced, as shown in Figure 13-5.
As indicated earlier, adding JavaScript to enhance the image map is really just a close offshoot of the rollover code used earlier in this chapter. One notable difference is the retrieval of the <area> elements rather than the <img> elements:
var areas = document.getElementsByTagName("area");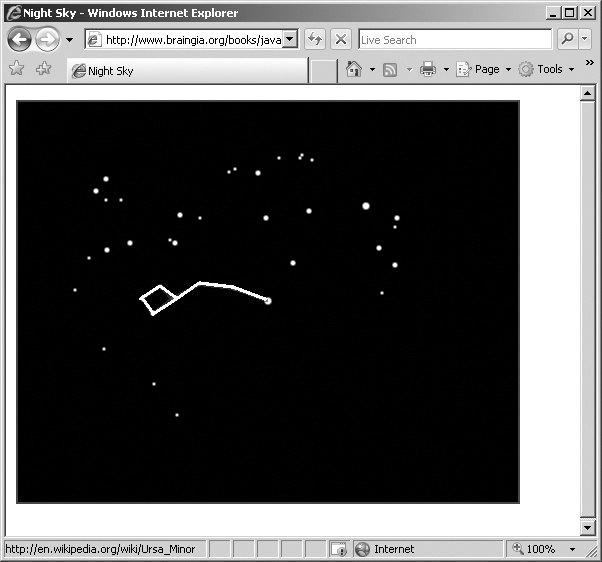
A second difference is how the mouseOver() and mouseOut() functions set the new image. In the previous rollover example, these were set using the this keyword. However, because there's only one image in the image map, that image's ID must be used to set the new src attribute. The rollover code achieves that for the mouseOver() function:
document.getElementById("nightsky").src = "nightsky_map_" + this.id + ".gif";An obvious improvement to this script would be to preload all the rollover images for the image map. (You'll soon be doing this in one of the chapter exercises.)
Note
The HTML used in this example isn't entirely valid according to the HTML 4.01 standard because the <area> tags for Draco all use the same id value. To make this HTML valid, each tag would need its own id value. However, this would complicate the JavaScript because each ID would need to be split or otherwise parsed to make sure that Draco's outline is loaded, or else three different images would need to be loaded or some other workaround found.
Create a preloaded rollover image, making sure to keep the JavaScript functions separate from the HTML.
Look at the slideshow example from earlier in this chapter. When a visitor reaches the end of the slides, he or she is automatically taken back to the beginning, which might be confusing. Therefore, add a prompt to ask the visitor whether he or she would like to start over from the first slide when reaching the end. If the answer is "Yes," return to the beginning; otherwise, stay on the current image.
Using the image map example from this chapter (or an image map of your own if you prefer), preload all the images used within the image map so that they don't need to be downloaded when the visitor moves the mouse over the different areas of the map.