After reading this chapter, you'll be able to
Understand the legacy event model.
Understand the W3C JavaScript event model.
Add event handlers to a Web page using JavaScript.
Open new windows with JavaScript.
Open new tabs in a Web browser.
Create a timer using JavaScript.
Event handling has been used a few times in earlier chapters to react to actions that a visitor might perform or that the document itself does when loaded. These events include the onmouseover() and onmouseout() events used in the previous chapter, along with the onload() and onclick() events used in other earlier chapters. These events match fairly well across all browsers, but you'll see that other events and event handling are less easy to implement. This section looks at events and their use in JavaScript programming.
The first challenge in understanding events is that there are two distinct models: the model used by Microsoft Windows Internet Explorer and the model defined by the World Wide Web Consortium (W3C). A third model, the legacy Document Object Model 0 (DOM 0) includes the events seen throughout earlier chapters. It is the most compatible model and is supported by all JavaScript-capable browsers. The competing W3C and Windows Internet Explorer event models will be discussed after a brief view of the DOM 0 event model.
The DOM 0 event model is by far the easiest and most compatible one to use for event handling in JavaScript. It is supported in all major Web browsers, and you've already seen in previous chapters how easy it is to work with.
So why not just use the DOM 0 event model everywhere? The reason is simple: it lacks the flexibility needed for more complex event handling. For example, the DOM 0 model can't handle multiple event actions on the same element. With that said, there's nothing wrong with using the legacy event model for simple scripts, as we've done throughout the book so far.
The DOM 0 event model includes several events that can be used on multiple Hypertext Markup Language (HTML) tags. Table 14-1 lists the event name along with its description.
Table 14-1. DOM 0 Events
Event Name | Description |
|---|---|
onblur() | The element has lost focus (that is, it is not selected by the user). |
onchange() | The element has either changed (such as by typing into a text field) or the element has lost focus. |
onclick() | The mouse has been clicked on an element. |
ondblclick() | The mouse has been double-clicked on an element. |
onfocus() | The element has gotten focus. |
onkeydown() | A keyboard key has been pressed down (as opposed to released) while the element has focus. |
onkeypress() | A keyboard key has been pressed while the element has focus. |
onkeyup() | A keyboard key has been released while the element has focus. |
onload() | The element has loaded (document, frameset, or image). |
onmousedown() | A mouse button has been pressed. |
onmousemove() | The mouse has been moved. |
onmouseout() | The mouse has been moved off of or away from an element. |
onmouseover() | The mouse has moved over an element. |
onmouseup() | A mouse button has been released. |
onreset() | The form element has been reset, such as when a form reset button is pressed. |
onresize() | The window's size has been changed. |
onselect() | The text of a form element has been selected. |
onsubmit() | The form has been submitted. |
onunload() | The document or frameset has been unloaded. |
The W3C has codified an event model that enables powerful event handling. This model is supported by later versions of all major browsers with the notable exception of Windows Internet Explorer. Since the standard event model and the Windows Internet Explorer event model differ, you must account for each within any JavaScript that intends to use this event style instead of the DOM 0 event model.
Conceptually, both models are similar in the process of event handling. The first step with both models is to register the event. Once the event is registered and gets triggered, the event's function is called. However, the location at which the event occurred is an important area where the models differ.
To understand the difference in event location, picture a document with a <body> element and another element within the body, say an <img>. If a visitor moves the mouse over the image, should the onmouseover() event be handled first within the <img>, or should it be handled first in the <body>? It's exactly this difference in locating where the event should be processed that creates some divergence in the W3C and Windows Internet Explorer models.
The W3C model supports two forms for locating where the event should be handled: Event Capture and Event Bubbling. With Event Capture, the search for a handler begins at the top level and proceeds downward. In the example given in the last paragraph, handling an event would first be done by the <body> and then proceed to the <img> element. On the other hand, with Event Bubbling, the element in which the event occurred is searched first for a handler and then the search proceeds upwards from there.
As previously stated, the W3C model—and therefore all browsers that adhere to it (in other words, all browsers except Windows Internet Explorer)—can use both types of event handling techniques. You'll shortly see how. With Windows Internet Explorer, however, only Event Bubbling is used.
With the W3C model, event registration takes place using the addEventListener() method. With the Windows Internet Explorer model, attachEvent() is used for this purpose. In practical terms, this means that you'll need to use each method within every script you write that uses events, choosing at runtime the one appropriate for the browser in which the script is running.
The basic structure of the addEventListener() method is:
addEventListener(event,function,capture/bubble);
The capture/bubble parameter is a boolean value, where true indicates that the event should use top-down capturing and false indicates that the event should use bubbling. Here's a typical call to the addEventListener() method for a submit button, specifying a function named myFunction(), which would be defined elsewhere, and using top-down event capturing:
window.addEventListener("submit",myFunction(),true);Performing that same thing using bubbling would be done like this:
window.addEventListener("submit",myFunction(),false);The attachEvent() method used in the Windows Internet Explorer model doesn't require the third argument because there's no decision whether to use capturing or bubbling. It's all bubbling with the Windows Internet Explorer model.
Here's an example of calling myFunction() on the submit event using attachEvent():
window.attachEvent("submit",myFunction());You might've noticed a subtle difference in the name of the event to which the event handlers were added—submit, as opposed to onsubmit in the DOM Level 0 model. Many of the events in the DOM Level 2 have changed their names. The names of several DOM Level 0 events and their W3C DOM Level 2 counterparts are shown in Table 14-2. (The Windows Internet Explorer model uses the DOM 0 names.)
Remember the rollover script from the previous chapter? Neither do I, so here it is again for reference:
<!DOCTYPE HTML PUBLIC "-//W3C//DTD HTML 4.01//EN" "http://www.w3.org/TR/html4/strict.dtd">
<html>
<head>
<title>Rollover</title>
<script type="text/javascript">
function rollover() {
var images = document.getElementsByTagName("img");
var roll = new RegExp ("rollover");
var preload = [];
for (var i = 0; i < images.length; i++) {
    if (images[i].id.match(roll)) {
        preload[i] = new Image();
        preload[i].src = images[i].id + "_over.png";
        images[i].onmouseover = function() { this.src = this.id + "_over.png"; }
        images[i].onmouseout = function() { this.src = this.id + "_default.png"; }
    }
}
}
window.onload = rollover;
</script>
</head>
<body>
<p><img id="rollover_home-id002" name="img_home" src="rollover_home_default.png"
alt="Home"></p>
<p><img id="rollover_about-id001" name="img_about" src="rollover_about_default.png"
alt="About"></p>
<p><img id="rollover_blog-id001" name="img_blog" src="rollover_blog_default.png"
alt="Blog"></p>
<p><img id="logo-id002" name="img_logo" src="logo.png" alt="Braingia Logo"></p>
</body>
</html>
The script to create image rollovers, similar to Example 13-2 in the previous chapter, uses DOM Level 0 to add functions directly to the onmouseover and onmouseout events. Altering this script to work with the newer DOM Level 2 event model means moving the location where you specify the event listener from the <body> element or the window.onload() event to a call to addEventListener() or attachEvent() (as appropriate). It also means getting rid of the this keyword, which just doesn't work in the newer model. Also changed are the mouseover and mouseout events. Example 14-1 contains the new code.
Example 14-1. DOM Level 2 Event Handling Rollovers
<!DOCTYPE HTML PUBLIC "-//W3C//DTD HTML 4.01//EN"
"http://www.w3.org/TR/html4/strict.dtd">
<html>
<head>
<title>Rollover</title>
<script type="text/javascript">

function moveOver(imgObj) {
    if (typeof window.addEventListener != "undefined") {
        imgObj.addEventListener("mouseover",function(){imgObj.src = imgObj.id +
"_over.png";}, false);
        imgObj.addEventListener("mouseout", function(){imgObj.src = imgObj.id +
"_default.png";}, false);
    } else {
        imgObj.attachEvent("onmouseover",function(){imgObj.src = imgObj.id +
"_over.png";});
        imgObj.attachEvent("onmouseout", function(){imgObj.src = imgObj.id +
"_default.png";});
    }
}

function rollover() {
var images = document.getElementsByTagName("img");
var roll = new RegExp ("rollover");
var preload = [];
for (var i = 0; i < images.length; i++) {
    if (images[i].id.match(roll)) {
        preload[i] = new Image();
        preload[i].src = images[i].id + "_over.png";
        moveOver(images[i]);
    }
}
}
if (typeof window.addEventListener != "undefined") {
    window.addEventListener("load",rollover,false);
} else {
    window.attachEvent("onload",rollover)
}
</script>
</head>
<body>
<p><img id="rollover_home-id002" name="img_home" src="rollover_home_default.png"
alt="Home"></p>
<p><img id="rollover_about-id001" name="img_about" src="rollover_about_default.png"
alt="About"></p>
<p><img id="rollover_blog-id001" name="img_blog" src="rollover_blog_default.png"
alt="Blog"></p>
<p><img id="logo-id003" name="img_logo" src="logo.png" alt="Braingia Logo"></p>
</body>
</html>
The code in Example 14-1 is strikingly similar to that of Example 13-2. The notable changes are inside of the for loop, which now looks like this:
for (var i = 0; i < images.length; i++) {
    if (images[i].id.match(roll)) {
        preload[i] = new Image();
        preload[i].src = images[i].id + "_over.png";
        moveOver(images[i]);
    }
}
Inside the loop, the images[i] variable, representing the current image, is passed to a new function called moveOver().
The moveOver() function accepts a single argument, the image object. Because the this keyword no longer can be used, the function must explicitly set its variables and attributes on each image object. Each of the events is also altered now to use addEventListener() or attachEvent() as appropriate for the browser. The function code looks like this:
function moveOver(imgObj) {
    if (typeof window.addEventListener != "undefined") {
        imgObj.addEventListener("mouseover",function(){imgObj.src = imgObj.id +
"_over.png";}, false);
        imgObj.addEventListener("mouseout", function(){imgObj.src = imgObj.id +
"_default.png"; }, false);
    } else {
        imgObj.attachEvent("onmouseover",function(){imgObj.src = imgObj.id + "_over.png";});
        imgObj.attachEvent("onmouseout", function(){imgObj.src = imgObj.id + "_default.
png";});
    }
}
Of course, the biggest change to the script was to add event listeners for both the W3C and the Windows Internet Explorer model, addEventListener() for the W3C model and attachEvent() for the Windows Internet Explorer model, as follows:
if (typeof window.addEventListener != "undefined") {
    window.addEventListener("load",rollover,false);
} else {
    window.attachEvent("onload",rollover)
}
The if conditional first tests to see if there is a method of the window object called addEventListener(). If there is, then the addEventListener() method is invoked with three arguments, load, rollover, and false. The load argument indicates on which event the listener should be added; the second argument, rollover, indicates the function to be executed for the event listener; and the final argument, false, indicates that event bubbling should be used for this listener.
If there's no addEventListener() method of the window, then the attachEvent() method is used. This method receives two arguments: onload() for the event, and rollover, the name of the function to be called.
Both the W3C and Windows Internet Explorer models include methods for removing event listeners. With the W3C model, this method is called removeEventListener() and expects the same three arguments as addEventListener():
removeEventListener(event,function,capture/bubble)
Removing the load event listener placed in Example 14-1 would look like this:
removeEventListener("load",rollover,false);The Windows Internet Explorer model uses detachEvent() for this same purpose:
detachEvent(event,function);
You also may find it necessary to stop event handling from propagating upward or downward after the initial event handler is executed. The stopPropagation() method is used for this purpose with the W3C model, while the cancelBubble() property is used to stop propagation with the Windows Internet Explorer model. You'll see an example of this behavior in the Opening, Closing, and Resizing Windows section later in this chapter.
Adding event listeners for each event that you need to handle would quickly become much too cumbersome for practical use. Therefore, it quickly becomes necessary to use a generic event handler for this purpose and couple it with the DOM's getElementsByTagName() method.
I had written a generic function for this purpose, but then I found an improved version written by John Resig. His original function and discussion can be seen at http://ejohn.org/projects/flexible-javascript-events/.
Throughout the remainder of this chapter, you'll see other examples of event handling properties and methods. Event handling is really part of the DOM and not of JavaScript. Therefore, you can find more information about events in DOM 2 at http://www.w3.org/tr/dom-level-2-events/. The Windows Internet Explorer event model is examined in http://msdn2.microsoft.com/en-us/library/ms533023.aspx.
JavaScript programming often requires browser detection—that is, detecting which browser a visitor to a Web site is using. Prior to the last few years, browser detection had largely been accomplished using the userAgent property of the navigator object. However, using the userAgent property is no longer recommended because visitors can so easily forge it and, in addition, it is incredibly difficult to maintain for every version of every browser.
I personally use five different browsers in various versions, and maintaining an up-to-date list of which browser supports which feature is too cumbersome even for just my browsers. Imagine what it's like trying to maintain JavaScript code that would account for every browser and every version of that browser within it! It's virtually impossible. And this doesn't even take into account when the browser sends a string that the visitor has completely made up (either for malicious or other purposes)!
With this in mind, I'm going to show the userAgent property only briefly and then show the newer and much better methods for determining if the JavaScript that you're using will work in the visitor's browser.
This section will also examine other properties of the navigator object that are indeed helpful, if not 100 percent reliable.
The userAgent property is available as part of the navigator object and shows information about the user's browser. Within your browser, simply enter:
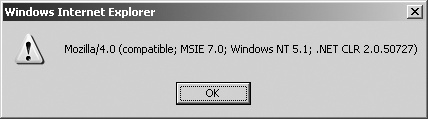
javascript:alert(navigator.userAgent);
If you're using Windows Internet Explorer 7, you might see an alert like the one in Figure 14-1.
Other browsers will report themselves differently. For instance, a version of Firefox reports itself as:
Mozilla/5.0 (Windows; U; Windows NT 5.1; en-US; rv:1.8.1.7) Gecko/20070914 Firefox/2.0.0.7
This string will change most of the time when a new version of a browser is released. If you tried to track each version of each browser that was released and then tried to track which version of each browser supported which feature of JavaScript, you'd be spending a lot of time (and possibly a lot of your employer's or client's time as well) maintaining that list.
A much better way to track what is and is not supported in the visitor's browser is a technique known as feature testing, discussed in the next section.
Using feature testing, sometimes referred to as object detection, the JavaScript program attempts to detect whether a given feature is supported within the browser visiting the Web page.
Luckily, you don't have to test whether every function and method you want to use are supported in the visitor's browser. The DOM Level 0 model and other legacy functions of JavaScript are so widely supported and their cross-browser implementations are so close that testing for these features isn't necessary. However, the page still must test whether JavaScript is available, because not all browsers and not all visitors have JavaScript support.
The typeof operator is the primary mechanism to implement feature testing. In general terms, the code is used as follows:
if (typeof featureName != "undefined") {
    // Do Something Fun With That Feature
}
To test for the existence of the getElementById() method, which would indicate the availability of the more advanced DOM interface, this code might be used:
if (typeof document.getElementById != "undefined") {
    alert("getelembyid is supported");
} else {
    alert("no getelembyid support");
}
You may be tempted to skip the use of typeof within the test, and you may see examples on the Web where a feature test looks like this:
if (document.getElementById) { ... }Unfortunately, this method of feature testing isn't as reliable as the typeof test. When typeof is not used, the method or property being tested might return 0 or false by default, which would make the test fail. Then it would appear that the browser doesn't support that method or property when it actually does. Therefore, testing using typeof is the safer, more reliable test.
Another way to accomplish this task that looks a bit cleaner uses the ternary operator to set a flag early in the code and use a standard if conditional later to check the flag, like so:
var getElem = (typeof document.getElementById == "function") ? true : false;
if (getElem) {
    // We know getElementById is supported,
    // so let's use it.
}One of the most discouraging problems I find when programming for the Web is the continuing presence of older browsers. It's becoming increasingly difficult to write Web pages that have any sort of modern look and feel and still display reasonably well in older browsers.
Backing up a bit, what defines an older browser? Ask three different Web designers and you'll likely get three different answers. To me, an older browser is one that is more than three years old, though I lean towards saying two years rather than three.
By my terms, then, Firefox 1.0 is an older browser, even though a Web page and almost every JavaScript code you'll write will probably display fine in that version of Firefox. A general rule that I've found is that any version of Internet Explorer or Netscape that is earlier than version 5 tends to have many, many quirks that a Web designer needs to take into account.
Considering the depressing fact that even older browsers than this are used sometimes, it's a good idea just to decide that your code might fail in these browsers, but you still can try to make it fail gracefully. However, even that may not always be possible.
I recently installed on my computer a copy of Netscape 3, which, if I remember correctly, was released in 1997. The browser had trouble with most JavaScript fed into it, and it also had problems displaying HTML and Cascading Style Sheets (CSS) on basic Web sites. This was to be expected because that version of Netscape was released well before many of the standards in use today were codified. The point is that no matter how hard you try, you'll likely never get your Web site to fail gracefully in really old versions of browsers. I recommend choosing a minimum browser level to support and designing for that target, keeping in mind that the later the minimum, the more visitors you'll be shutting out of the site. You want to strike a balance between being a welcoming site and being a cutting-edge site.
There are two primary techniques for keeping JavaScript away from older browsers: inserting HTML-style comments into the JavaScript and using the <noscript> </noscript> tags.
Using HTML comments around your JavaScript means surrounding them within <!— and —> marks, as in this example:
<script type = "text/javascript">
<!--Begin Comment
var helloelem = document.getElementById("hello");
alert(helloelem.innerHTML);
// End Comment-->
</script>
Unfortunately, not every browser will obey HTML comments, so you'll still see errors sometimes. It's becoming less and less common to see this style of commenting or protection in place. As the old browsers slowly get cycled out, this type of kludge isn't really necessary.
When you use the <noscript> </noscript> tag pair, whatever falls between the two tags will be displayed when no JavaScript support is detected in the browser.
Here's an example of <noscript>:
<noscript>
<p>This Web Page Requires JavaScript</p>
</noscript>
If visitors whose browsers don't accept JavaScript come to the Web page, they'll see whatever falls between the <noscript> </noscript> tag pair. In this example, it's the text "This Web Page Requires JavaScript". Note that execution or parsing of the remainder of the document does not stop at the end tag, so if you have other HTML within the page, it will still be displayed. This provides you with a good opportunity to fail gracefully by providing a text-only page or a site map link.
I recommend keeping the use of <noscript> to a minimum, and using it only for those applications where JavaScript is an absolute necessity, rather than when your JavaScript is just for providing behavioral aspects, such as rollovers. JavaScript can easily be overused and sometimes is used incorrectly, thus hindering the user experience rather than enhancing it. There's nothing worse than to have visitors come to your site only to have their browsers crash, lock up, or become otherwise unresponsive because of some unnecessary JavaScript widget.
The navigator object does provide some helpful information to the JavaScript programmer. Chapter 9, explored the navigator object in detail, including how to tell whether Java is enabled in the browser and showing all the properties of this object. Refer to Chapter 9 for this overview.
Note
Use the navigator object with caution. Sometimes what's reported using the navigator object might not be entirely accurate, or worse yet, the navigator object might not even be available at all if JavaScript isn't supported on the visitor's browser. So relying on it for the functionality of your page would definitely be a problem!
One of the most maligned uses of JavaScript is its ability to open, close, and resize browser windows. The act of opening a browser window in response to or as part of the onload event was one of the most frequent and annoying things that Internet advertisers did (and still do). Browsers like Mozilla Firefox, Opera, and others give their users the ability to block all these annoyances by default without sacrificing usability. Internet Explorer 6 with Service Pack 2 and later has that capability as well.
I have yet to see an automatic pop-up window that actually enhances the usability of a Web site without being intrusive. If you believe that your site requires a component that opens a new window, I recommend rethinking the navigation before creating that component. Not only will your visitors thank you due to your site's simplified navigation and more intuitive use, but your site will tend to work better because it will rely less on JavaScript, which might be disabled.
With all that said, your visitors sometimes might want to open new windows in response to events like the click of a mouse. For example, clicking a link might open a small side window that allows visitors to choose an option from a menu or that displays Help text about the various options.
The window object contains several methods helpful for opening, closing, and resizing browser windows. The open method, as you might guess, is used to open a new browser window. The basic syntax of the open() method is:
window.open(url, name, features)
The url parameter is a string representing the Uniform Resource Locator (URL) to load. If this parameter is left blank, then the page "about:blank" is opened. The name parameter is a string representing the name of the window to open. If a window with the same name is already open, then the URL is opened in that named window; otherwise a new window opens.
The features parameter is a string of comma-separated options representing the various features that the new window will have, such as, the window's height, width, and whether it will have a scrollbar. Table 14-3 lists some of the features available.
Table 14-3. Features Used Within the open() method of the window object
This list is not all-inclusive, though, because browsers support different features and feature names. See http://msdn2.microsoft.com/en-us/library/ms536651.aspx for information on Windows Internet Explorer and http://developer.mozilla.org/en/docs/dom:window.open for information on Firefox and the Mozilla family. Some browsers enable the user to control whether these options will have any effect. For example, attempting to hide the location bar from the new window will not work in Windows Internet Explorer 7 or in Firefox, depending on how the user has configured Firefox.
The close() method of the window object has no parameters. To use close(), simply call it like this:
window.close()
This method doesn't always work reliably, so you should never assume that the window was actually closed. At best you can hope it was.
I work with ICG Media, a Web consulting firm, and I've borrowed some of the code from their purchasing application for this example because it shows a good use of a small pop-up window.
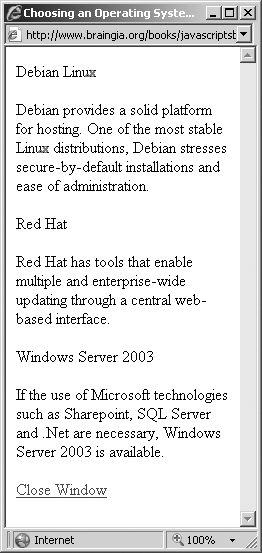
One of the questions you must consider when purchasing dedicated hosting is which operating system to install for the customer. The customer has three choices of operating system: Debian Linux, Red Hat Enterprise Linux, and Windows Server 2003. Figure 14-2 shows what that option page looks like (minus the layout and other elements from the ICG Media Web site).

When the "Which Should I Choose?" link is clicked, it opens a new window of a specific size that contains an explanation of each of the choices. This window is shown in Figure 14-3.
The code and markup for the main page is shown in Example 14-2.
Example 14-2. Opening a New Window of a Specific Size
<!DOCTYPE HTML PUBLIC "-//W3C//DTD HTML 4.01 Transitional//EN"
"http://www.w3.org/TR/html4/loose.dtd">
<html>
<head>
<title>Options</title>
<script type="text/javascript">
function openwin(e) {
    if (typeof window.open != "undefined") {
        var opened = window.open("http://www.braingia.org/books/" +
            "javascriptsbs/code/c14/os-help.htm","",
            "menubar=no,location=no,toolbar=no,resizable=yes," +
            "scrollbars=yes,status=no,width=240,height=480");
        if (typeof e.preventDefault != "undefined") {
            e.preventDefault();
            e.stopPropagation();
        }
        e.cancelBubble = true;
        return false;
    } else {
        return true;
    }
}
</script>
</head>
<body>
<form name="option" action="#" method="post">
<p id="ms"><a target="help"
    href="http://www.braingia.org/books/javascriptsbs/code/c14/os-help.htm"
    id="os-helplink">Which Should I Choose?</a></p>
<div>
<input type="radio" name="radiooptions" id="radio1-id001" value="debian">
Debian Linux 4 (Etch)<br/>
<input type="radio" name="radiooptions" id="radio2-id001" value="rhel">
Red Hat Enterprise5<br/>
<input type="radio" name="radiooptions" id="radio3-id001" value="win2003">
Microsoft WindowsServer 2003<br/>
</div>
</form>
<script type = "text/javascript">
var mslink = document.getElementById("os-helplink");
if (window.addEventListener) {
    mslink.addEventListener("click",openwin,false);
} else {
    mslink.attachEvent("onclick",openwin);
}
</script>
</body>
</html>
The code and markup for the newly opened explanation window is shown in Example 14-3.
Example 14-3. JavaScript and Markup for the Small Window
<!DOCTYPE HTML PUBLIC "-//W3C//DTD HTML 4.01//EN"
"http://www.w3.org/TR/html4/strict.dtd">
<html>
<head>
<title>Choosing an Operating System for Hosting</title>
<script type="text/javascript">
function closewin(e) {
    if (typeof window.close != "undefined") {
        window.close();
    }
}
</script>
</head>
<body>
<div>Debian Linux</div>
<p>Debian provides a solid platform for hosting. One of the most stable Linux
distributions,
Debian stresses secure-by-default installations and ease of administration.</p>
<div>Red Hat</div>
<p>Red Hat is a good choice for hosting with a Linux environment. Red Hat has tools
that
enable multiple and enterprise-wide updating through a central web-based interface.</p>
<div>Windows Server 2003</div>
<p>If the use of Microsoft technologies such as Sharepoint, SQL Server and .Net are
necessary, Windows Server 2003 is available.</p>
<p><a href="#" id="closeme">Close Window</a></p>
<script type = "text/javascript">
var oslink = document.getElementById("closeme");
if (window.addEventListener) {
    oslink.addEventListener("click",closewin,false);
} else {
    oslink.attachEvent("onclick",closewin);
}
</script>
</body>
</html>
Let's examine the code in both of these listings.
Example 14-2 includes a portion of the application's Web form and, more importantly for this discussion, it includes an <a> element:
<a target="help"
    href="http://www.braingia.org/books/javascriptsbs/code/c14/os-help.htm"
    id="os helplink">Which Should I Choose?</a>
The <a> element includes a target attribute that notably isn't part of the HTML or Extensible Hypertext Markup Language (XHTML) specifications, which is why the DOCTYPE must be transitional for this document. This attribute enables the link to open a new tab in modern browsers. We'll look more at the target attribute later, but for now, let's work on JavaScript. As you can see from the <a> element, there is no event handler within it and there is also a legitimate href attribute. Both of these are important for usability and accessibility, especially when JavaScript isn't available in the visitor's browser.
Within Example 14-2, the first portion of JavaScript within the <head> creates a function to open a new window, reproduced here for reference:
function openwin(e) {
    if (typeof window.open != "undefined") {
        var opened = window.open("http://www.braingia.org/books/" +
            "javascriptsbs/code/c14/os-help.htm","",
            "menubar=no,location=no,toolbar=no,resizable=yes," +
            "scrollbars=yes,status=no,width=240,height=480");
        if (typeof e.preventDefault != "undefined") {
            e.preventDefault();
            e.stopPropagation();
        }
        e.cancelBubble = true;
        return false;
    } else {
        return true;
    }
}
The function, called openwin(), accepts one argument, which will be the event. The first thing it does is to check whether window.open() is available. If it is, then the execution continues. If window.open() isn't available, then true is returned. The return value is ignored within DOM 2, but if true is returned, lower-level event handlers still can use it. In other words, if something goes wrong with DOM 2 event handling, the return value can allow the code to fail gracefully and the link will still work.
If window.open() is available, a new variable called opened is created and set to the return value from window.open(). The window.open() method is called with a specific URL that gives the location of the help file to be opened. No name is given to the new window. Finally, several features are requested with this new window, among them that the window should be resizable and have its scrollbars available. The window size is also set with the width and height options.
The window will be opened, but because the link contains an href attribute, it will be followed by the browser once it finishes processing the event. You'd like the function to be able to return false to prevent the default handling; but there are some conditions under which a browser will still follow the link. Therefore, to prevent both the new window and the existing window from ending up at the same URL, additional code is necessary. In effect, you must prevent the event handling from going further and prevent the default action from occurring. That's what the next portion of code within the openwin() function does:
if (typeof e.preventDefault != "undefined") {
    e.preventDefault();
    e.stopPropagation();
}
e.cancelBubble = true;
return false;
First, the code looks to see if a preventDefault() method of the current event is available. The existence of this method indicates that the browser supports the W3C model, and therefore it can be safely called to prevent the default action (sending the browser's current window to the href's URL). A call to stopPropagation() is also made to stop further event handling on the link.
If the preventDefault() method isn't available, then the browser is probably Windows Internet Explorer. Because cancelBubble() is safe to call with Windows Internet Explorer and other browsers, it gets called no matter what.
Finally, true is returned just in case none of these event handler methods is available, in which case the return value will cause the default action to occur.
Tip
Always include a valid href attribute in your links. This attribute will be used if JavaScript isn't available. Not only is its inclusion good practice, but it also enhances usability and accessibility of the page.
One last bit of JavaScript within the main page is located within the <body> of the page. That JavaScript adds an event listener to the <a> element:
var mslink = document.getElementById("os-helplink");
if (window.addEventListener) {
    mslink.addEventListener("click",openwin,false);
} else {
    mslink.attachEvent("onclick",openwin);
}
This code is the same format seen earlier in the chapter. This time, the click() (for W3C browsers like Firefox and Opera) and onclick() (for Windows Internet Explorer) events are used.
The new window contains mostly HTML, but it does contain one event within the Close Window link. That event handler is created with JavaScript in the <body>, as you've seen in other examples.
The main function to close the window is contained in this JavaScript:
function closewin(e) {
    if (typeof window.close != "undefined") {
        window.close();
    }
}
There's not much to this function that you haven't seen already. It is merely a call to window.close(), which accepts no arguments. The remainder of the code attempts to stop propagation of the event, which was discussed in the previous section and is of limited usefulness here anyway.
While it's possible to open new windows with little more than the window frame, as seen in Figure 14-4, I recommend against doing so except in exceptional cases like the menu example.
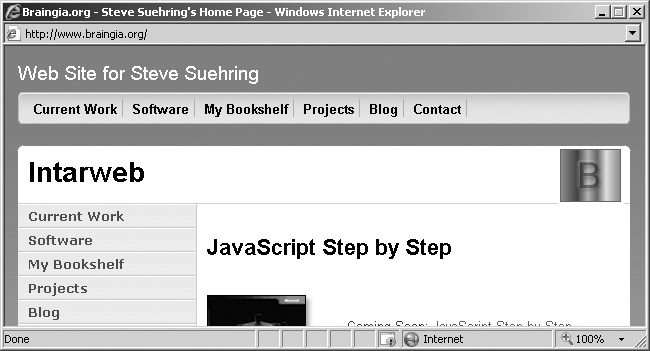
Figure 14-4. A window that does not have the menu bar or many of the other features expected in browser windows
Instead, any new windows opened should include the menus and navigational elements and the address bar. Firefox, and increasingly Windows Internet Explorer, don't allow JavaScript to disable things like resizing and the status bar and other user interface components. Those elements are important to enable the visitor to use the site and application in a way that works for them based on their needs rather than the developer's needs. Therefore, as a developer, you'll find it's best to include these and design the page and site in such a way that it won't be affected if user interface elements are used.
In fact, many times window.open() is no longer necessary. With the advent of tabbed browsing, window.open() has just about seen the end of its useful life. The upcoming section jumps well outside the realm of a JavaScript book to show how to open a new tab without any JavaScript.
Actually, no JavaScript is required to open a new tab, which is really what most developers are looking for anyway. The target attribute of <a> elements enables new tabs to be opened. Using the target attribute is recommended because it won't interfere with the visitor's experience in later browsers like Firefox and Windows Internet Explorer 7. You should be aware that the target attribute has been removed from the HTML and XHTML specifications, so any links using the target attribute will cause validation to fail unless you use a transitional DOCTYPE Definition, like this one:
<!DOCTYPE HTML PUBLIC "-//W3C//DTD HTML 4.01 Transitional//EN"
"http://www.w3.org/TR/html4/loose.dtd">
Here's an example of the target attribute in action:
<a target="Microsoft" href="http://www.microsoft.com" id="mslink">Go To Microsoft</a>
JavaScript also enables resizing of the browser window. However, browsers like Firefox include an option to prevent window resizing by JavaScript. For this reason I strongly recommend against resizing windows using JavaScript. It's fine to size them appropriately when opened with JavaScript, as shown earlier in the chapter, but resizing is unfriendly to the visitor and may cause accessibility problems. Therefore, I'll introduce you to the methods and properties only briefly. If you'd like more information on resizing or moving browser windows, refer to http://support.microsoft.com/kb/287171.
Chapter 9 included a section titled Getting Information About the Screen, which showed properties of the window's screen object, including availHeight and availWidth. These properties are sometimes used to assist with changing the size of a browser window. Other helpful properties and methods in the window object related to resizing and moving windows are listed in Table 14-4.
JavaScript includes functions called timers that (as you might guess) time events or delay execution of code by a given interval.
Four global functions are involved in JavaScript timers:
At their most basic, the two timer-related functions for setting the timer [setTimeout() and setInterval()] expect two arguments: the function to be called or executed, and the interval. With setTimeout(), the specified function will be called when the timer expires. With setInterval(), the specified function will be called each time the timer expires. The functions return an identifier that can be used to clear or stop the timer with the complementary clearTimeout() and clearInterval() functions.
Timer-related functions operate in milliseconds rather than seconds. Keep this in mind when using the functions. There's nothing worse than setting an interval of 1, expecting it to execute every second, only to find that it tries to execute 1,000 times a second.
Example 14-4 shows an example of the setTimeout() function set to show an alert after 8 seconds.
Example 14-4. An Example of setTimeout()
<!DOCTYPE HTML PUBLIC "-//W3C//DTD HTML 4.01//EN"
"http://www.w3.org/TR/html4/strict.dtd">
<html>
<head>
<title>timer</title>
<script type="text/javascript">
function sendAlert() {
    alert("Hello");
}
function startTimer() {
    var timerID = window.setTimeout(sendAlert,8000);
}
</script>
</head>
<body onload="startTimer();">
<p>Hello</p>
</body>
</html>
The example in Example 14-4 includes two functions, sendAlert() and startTimer(). The startTimer() function is called with the onload event of the page and has one line, to add a setTimeout() function. The setTimeout() function in this case calls another function called sendAlert() after 8 seconds (8,000 milliseconds).
The timerID variable contains an internal resource that points to the setTimeout() function call. This timerID variable could be used to cancel the timer, like this:
cancelTimeout(timerID);
The setTimeout() function can accept raw JavaScript code rather than a function call. However, a function call is the recommended approach. Choosing to include raw JavaScript code rather than a function call can result in JavaScript errors in some browsers.
Create a Web page that contains an onclick event handler connected to a link using a DOM 0 inline event. The event handler should display an alert stating "You Clicked Here".
Change the Web page created in Exercise 1 to use the newer style of event handling and connect the same click/onclick event to display the alert created in Exercise 1.
Create a Web page with a link to http://www.microsoft.com. Make that link open in a new tab.
Use the Web page created in Step 3 and create another link that opens a new window 250 pixels wide and 300 pixels high that links to http://www.braingia.org/.