
This section describes the HTML that will be displayed on the client and cause a servlet to run on the server. The most common way for a browser to invoke a servlet is via an HTML button that causes the entire form, with all the data the user typed in, to be sent over to the server.
There are about ten different GUI input types, but the most often used are text, radio, checkbox, and submit. For a complete list of all the input types and other attributes, do a web search on “HTML, form, guide.” To make it all line up nicely on the screen, everything inside a form is often put in an HTML table.
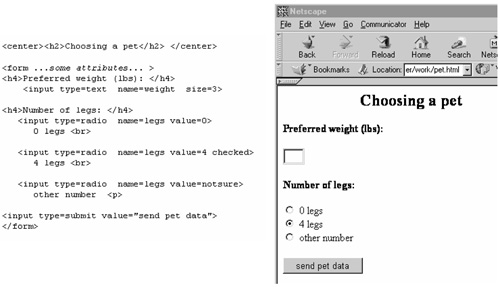
Figure 26-2 shows an example of an HTML form, some INPUT tags, and the web page they generate. You should create a web page with the HTML shown here, and confirm that you can browse it, enter data, and click the submit button.
Now we come to the question of how and where the browser sends the data from the form. The form tag will always have two attributes (omitted in Figure 26-2, for simplicity) that specify how and where the form data goes. These attributes are called “action” and “method.” There are also additional possible attributes, to give the whole form a name, and to say how the data should be encoded before it is sent to the server. The default values are fine for these. An example of a complete form tag would be
<form action="/servlet/petform" method="post">
-
The action attribute in a <FORM>gives the URL for the script or servlet that will process the data. It doesn't need to be a URL on the same server that served the form. It doesn't need to be a full URL. It can be a partial URL that is based on the URL of the page already being served.
-
The method attribute specifies the HTTP approach that the browser should use when sending over the data. The two possibilities are GET and POST.
In HTML, attributes may be enclosed in quotation marks. In XML (which we'll meet in Chapter 27) attributes must be enclosed in quotation marks. So you may as well get into the habit now.
Reams of pages have been written about using POST versus GET in an HTML form. Originally, GET was used to ask for a file from the server, and POST was used to send data to the server. Today, either can be used to transmit form data to a server-side application. The differences boil down to this:
-
POST passes the form data to the server as a series of fields in the body of the HTTP request. GET sends the data appended to the URL as a query string, like this
Since the GET data is actually added onto the end of the URL string, the user can bookmark it, and submit the same data later by going to the bookmark. This is why search engines often use GET. As it is part of the URL, the user can also see it and play around with it, which you may not want.
-
GET is limited to a small amount of text data that can be appended to the address (less than 255 characters). POST handles an arbitrary amount of text and binary data and it does not show up as part of the address URL. Many web servers log URLs. If you don't want your logs to contain sensitive user data (like account names and passwords), you must POST it.
-
GET responses can be cached anywhere along the way—by your browser, by your company's proxy server, or by the web server. With POST, the page request is required to go through all the caching layers to the server and extract the data again. So POST should be used when the servlet is counting accesses, or making a charge to see the page, or controlling who can see the page.
You will typically post form data to a servlet. The browser will send the data to the server according to the HTTP protocol. The HTTP protocol defines the contents of HTTP requests and responses. The user does not see all the text that makes up an HTTP request sent to the browser. All they see is the URL in the location field at the top of the browser. But the browser also assembles several other text strings, specifying extra administrative details that will help the server answer. These are known as “header fields.” All of this together forms the “HTTP request,” as shown in Figure 26-3.
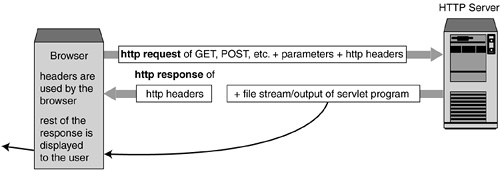
The browser sends requests, and the server sends back responses.
The header information, together with the HTML body forms the “HTTP response.” The browser consumes the headers, and displays the rest of the response on the screen for the user to read. Some of the HTTP headers defined in RFC2616 are shown in Table 26-3.
When you fill out and submit a form, your browser automatically adds on any necessary headers for the HTTP request. If you want to get more details on headers that can appear in an HTTP request or response, the best resource is RFC 2616 (the Internet standard for HTTP) available at www.rfc-editor.org. You will need this information if you craft an HTTP request or response by hand in a program.