
Figure 22-5 shows a frame to which we have added several controls. They are positioned automatically as we add them.
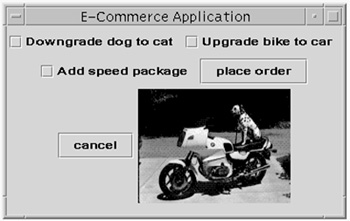
The code for this is on the CD in the directory containing all the other AWT programming material. The problem is the end result doesn't look very professional because nothing is neatly aligned. Solution: layout managers!
Layout Managers are classes that specify how components should be placed in a container. You choose a layout manager for a container with a call similar to the following invoked on the content pane:
setLayout( new FlowLayout() );
We'll look at six layout managers: the five that are part of AWT and a sixth one that comes with Swing. The first and most basic layout manager is FlowLayout.
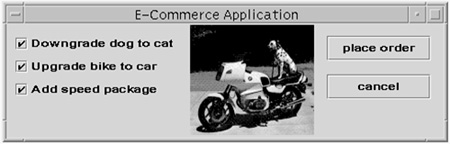
Figure 22-6 uses the same code as previously, but the FlowLayout was used and the JFrame was pulled out wide to the right.

A flow layout means that components are added left to right, keeping them centered in the container and starting a new line whenever necessary. When you resize the window, components might move to a new line. There are possible “left” and “right” arguments to the constructor to make the components be left- or right-justified instead of centered, as shown in the following example:
setLayout (new FlowLayout (FlowLayout.RIGHT));
Most of the layouts allow you to specify the gap in pixels between adjacent components by specifying the values to the constructor. One FlowLayout constructor uses the following code:
public FlowLayout(int align, int hgap, int vgap);
Our first example on the previous page was actually a FlowLayout, too. As we made the JFrame less wide, it folded the flowing line of components with the result seen there.
The following code sets a flow layout on a JFrame:
myJframe.getContentPane().setLayout( new FlowLayout() );
Some layout managers adjust their components to fit the container, and some layout managers just lay out components unchanged. FlowLayout doesn't change the sizes of contained components at all. The BorderLayout tells its enclosing container the size to allow for each control by invoking the preferredSize() methods of each control. Other layout managers (GridBagLayout and GridLayout) force the components to adjust their size according to the actual dimensions of the container.
Every component has methods to getMinimumSize(), getPreferredSize(), and getMaximumSize(). These methods inform layout managers how much they can adjust the size of a component to fit the layout. You can extend a component and override one or more of these methods to change the behavior. You can also use the setter versions of the methods, shown in Figure 22-10 with an example.
Next you'll see the code used to generate Figure 22-6 and the following two examples (commenting and uncommenting code as needed):
import java.awt.*;
import java.awt.event.*;
import javax.swing.*;
public class BorderDemo {
static JFrame jframe = new JFrame("E-Commerce Application");
public static void setupjframe() {
jframe.setSize(400,400);
jframe.setVisible(true);
// jframe.getContentPane().setLayout( new FlowLayout() );
jframe.getContentPane().setLayout( new BorderLayout(10,7) );
// jframe.getContentPane().setLayout( new GridLayout(3,2, 10, 7));
WindowListener l = new WindowAdapter() {
public void windowClosing(WindowEvent e){System.exit(0);}
};
jframe.addWindowListener(l);
}
public static void main(String[] args) {
setupjframe();
// JCheckBox jck1 = new JCheckBox("Downgrade dog to cat");
JCheckBox jck2 = new JCheckBox("Upgrade bike to car");
JCheckBox jck3 = new JCheckBox("Add speed package");
// p.add( jck1, "North" ); //max. 5 components
Container p = jframe.getContentPane();
p.add( jck2, "East" );
p.add( jck3, "South" );
JButton jb1 = new JButton("place order");
p.add( jb1, "North" );
JButton jb2 = new JButton("cancel");
p.add( jb2, "West" );
JLabel jl = new JLabel(new ImageIcon( "bmw.jpg"));
p.add(jl, "Center");
jframe.pack();
}
}
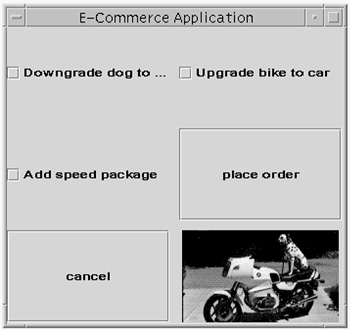
Figure 22-7 shows the same code with a one-line change to give it a grid (m-by-n) layout.
In the constructor, you specify the number of rows and columns, as shown in the following code:
int rows=7, cols=3;
setLayout( new GridLayout(rows, cols) );
This code creates seven lines on a grid that is three boxes wide.
Grid layouts are simple and somewhat rigid. One thing that always surprises and annoys programmers is the way the components change in size to match the grid size. Compare the size and shape of the buttons here with those in the previous layout. To avoid this, add a component to a panel, and add the panel to the container with the grid layout.
The following code sets a grid layout on a JFrame:
jframe.getContentPane().setLayout( new GridLayout(3,2, 10, 7) );
The “3, 2” are the 3 rows and 2 columns. The “10, 7” are the horizontal gap and the vertical gap in pixels to leave between components.
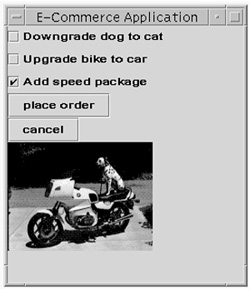
The third popular type of layout is BorderLayout. As the name suggests, you can put four components around the four edges of the Frame, with a fifth component taking any remaining space in the middle. The default layout for a Window and its subclasses Frame and JFrame is BorderLayout. You can set a border layout in a ContentPane with a line similar to the following:
You then add up to five widgets, specifying whether they go at the north (top), east (right), and so on. Figure 22-8 shows the same application with a one-line change to use BorderLayout. Note the size of the buttons.

It's obviously inconvenient to have a maximum of five widgets, and that brings us to the real way layouts are used. There probably isn't a single layout manager that will do exactly what you want. Instead, group related components onto panels, and then add the panels to a Frame, using another layout manager. We'll explain how this works using BoxLayout, introduced with Swing. The following code sets a border layout on a JFrame:
jframe.getContentPane().setLayout( new BorderLayout(10, 7) );
Again, the “10, 7” are the horizontal and vertical gaps. The following code is for a component to container with a Border Layout:
myFrame.getContentPane().add( myComponent, "East" );
The directions can be “North”, “South”, “East”, “West”, and “Center.”
There are two important points to note with BorderLayout. First, you have to set BorderLayout before adding components. Otherwise, you mysteriously see nothing (this isn't true, however, for the other two layout managers). Second, letter case is significant when setting the position. For example, you can't use “north” instead of “North.”
A fourth kind of layout manager is BoxLayout, named because of its ability to align a group of components horizontally or vertically, as Figure 22-9 shows.
The code to apply a BoxLayout to a container looks like this:
Container c = jframe.getContentPane();
c.setLayout( new BoxLayout(c, BoxLayout.Y_AXIS));
Note that unlike the other layout managers, this one takes the content pane as an argument as well as being invoked on the content pane. The second argument says whether to stack vertically (as here) or horizontally, BoxLayout.X_AXIS.
You add components exactly the same way as in the previous layout managers, as shown in the following example:
JButton jb1 = new JButton("place order");
p.add( jb1 );
For example, box layout gives us the ability to stack all the radio buttons on one panel, the Jbuttons on another panel, and add them to a Frame in three columns with grid layout or border layout. Let's try that.
Figure 22-10 shows the results of putting the three radio buttons on their own panel, putting the two buttons on their own panel, then adding the two panels and the Jlabel to the Frame with a border layout. This is already starting to look more normal. The size, shape, and positioning of the components won't fly all over the place when you resize the frame.
The following the important part of the code to produce these results:
JPanel p1 = new JPanel();
p1.setLayout( new BoxLayout(p1, BoxLayout.Y_AXIS));
JCheckBox jck1 = new JCheckBox("Downgrade dog to cat");
JCheckBox jck2 = new JCheckBox("Upgrade bike to car");
JCheckBox jck3 = new JCheckBox("Add speed package");
p1.add( jck1 );
p1.add( jck2 );
p1.add( jck3 );
JPanel p2 = new JPanel();
p2.setLayout( new BoxLayout(p2, BoxLayout.Y_AXIS));
JButton jb1 = new JButton("place order"); p2.add( jb1 );
JButton jb2 = new JButton("cancel"); p2.add( jb2 );
JLabel jl = new JLabel(new ImageIcon( "bmw.jpg"));
Container c2 = jframe.getContentPane();
c2.add(jl, "Center");
c2.add(p1, "West");
c2.add(p2, "East");
jframe.pack();
That layout can still be improved. You can do the following actions:
-
Move the radio buttons in from the edge of the panel. Do this by adding a border to the panel. The following code adds a ten-pixel border all around the component:
JPanel p1 = new JPanel();
p1.setBorder(BorderFactory.createEmptyBorder(10, 10, 10, 10)); -
Ensure the two buttons are the same length by setting the maximum size of the shorter button to the preferred (or regular) size of the longer button, as shown in the following example:
JButton jb2 = new JButton("cancel");
jb2.setMaximumSize( jb1.getPreferredSize() ); -
Add a bit of spacing between the buttons by adding a blank area, as shown in the following example:
p2.add(Box.createRigidArea(new Dimension(0, 15)));
Box is a helper class for BoxLayout. It has various methods to create space-fillers.
-
Finally, we can add a border around the panel on which the buttons are located, as shown in the following example:
JPanel p2 = new JPanel();
p2.setBorder(BorderFactory.createEmptyBorder(14, 14, 14, 14));
Put it all together and you have a pleasing and professional looking GUI, as Figure 22-10 shows.
The only new this is the BorderFactory.createEmptyBorder(14, 14, 14, 14)call. A factory is a class that can create other classes and return them to you. Here, it will send you some instance of a border class, possibly shared if you're using the same kind of border in two places. I've only scratched the surface of the many ways you can improve alignment and appearance in Swing. Although there are many more features available to the expert, the features we have reviewed will serve your basic needs.
AWT has a CardLayout manager. It does exactly the same thing as a tabbed pane, but without the finesse. There's no reason to use CardLayout now that we have tabbed panes.
The final kind of AWT layout manager is GridBagLayout, which is a variation of GridLayout. Rather than force you to fit components one per grid position, it allows you to let a component take up the space of several adjacent grid positions. It uses a series of constraints and weights to determine what goes where.
GridBagLayout is excessively complicated for what it does, and I recommend helping it fall into disuse by not bothering with it. If you really want to spend time on GridBagLayout, there is a tutorial about it online at java.sun.com/docs/books/tutorial/uiswing/layout/using.html.
JDK 1.4 introduced the SpringLayout class. It provides layouts that are similar to absolute positioning of Components, but also supports the helpful feature of resizing appropriately to changes in container size or component fonts (which absolute positioning does not support). SpringLayout is intended to be used by tool-builders who implement IDEs. It gives them a way to let programmers drag-and-drop components where they want them to show the preferred layout appearance by example. SpringLayout (like GridBagLayout) does its work using Constraints objects that specify preferred, maximum, minimum, and current values for where it is relative to its neighbors. You probably won't code SpringLayout explicitly in your programs.
Most of the use of GridBagLayout and SpringLayout comes from programmers who use IDEs. The layout code is generated automatically, and programmers don't have to wrangle it by hand (unless they later try to fix it up without the visual tool). It's just drag-and-drop-and-hope.
Layouts are useful and provide automatic component resizing when you resize the container. You probably won't find any one layout that does exactly what you want. The solution is to divide your Panels and Frames into subpanels, use an appropriate layout manager for each panel, and then display the different panels together in a single frame. You may then use borders and boxes to hone the results. Skilled programmers can write their own layout managers. AWT contains enough power for you to do that. You might consider it if you're trying to match the look and feel of some existing custom application. In Java, you can write your own look and feel, not just layout, if you care to go down that path.
Finally, you always have the option of setting a null layout manager and positioning controls at absolute coordinates using public void setLocation (int x, int y). It is almost always better to use a layout manager than to use absolute positions. It's less work for you, and the GUI will look better when run on different platforms. An absolute layout that looks good on one platform frequently looks terrible on another platform.