
Here is the code for a servlet that can process the HTML form that we created in the section How form data is sent to a URL on page 694. We're going to send a reply that suggests a suitable pet based on the weight and leg count the user submitted.
Make sure that your CLASSPATH has the servlet jar files in it, as shown in the following command, applicable to Windows:
Note: The example command is just one line, but is too wide to print that way in a book. The “-Dproperty=value” option defines a property with that value to the compiler system. The “java.ext.dirs” property is the pathname to a directory of jar files (in this case the Tomcat jar files) that you want to be available to the compiler or run-time. The servlet library is not part of the JDK standard edition. It is part of the Enterprise Edition. It is also bundled with Tomcat.
import javax.servlet.*;
import javax.servlet.http.*;
import java.io.*;
import java.text.*;
import java.util.*;
public class PetServlet extends HttpServlet {
private String recommendedPet(int weight, int legs) {
if (legs ==0) return "a goldfish";
if (legs ==4) {
if (weight<20) return "a cat";
if (weight<100) return "a dog";
}
return "a house plant";
}
public void doPost(HttpServletRequest req,
HttpServletResponse resp )
throws ServletException, IOException {
// get the input field values
int petWeight = 0, petLegs = 0;
try {
petWeight = Integer.parseInt(req.getParameter("weight"));
petLegs = Integer.parseInt(req.getParameter("legs"));
} catch (NumberFormatException nfe) {
petWeight=petLegs=-1; // indicates that we got an invalid number
}
resp.setContentType("text/html");
PrintWriter out = resp.getWriter();
out.println(" <html> <body> <h1>Recommended Pet</h1> <p>");
out.println("You want a " + petLegs + "-legged pet weighing "
+ petWeight + "lbs.");
String pet = recommendedPet(petWeight, petLegs);
out.println("<P> We recommend getting <b>" + pet );
out.println("</b> <hr> </body> </html> ");
out.close();
}
}
Note the line that says “resp.setContentType("text/html").” It is putting some standard information in the HTML headers that are sent back to the browser. We have to provide the minimal set of headers for the HTTP response. If you are going to set any headers, make sure you do it before you start writing the content of the response. A common content type is “text/plain” for ordinary character files, and “text/html” for HTML files. It refers to the MIME encoding of the strings that follow.
MIME encoding is a way of turning arbitrary binary files into ASCII and labelling what the data represents. MIME was developed so that binary files like JPEG images could be mailed around more easily, and it is equally useful for HTTP transactions. MIME is an abbreviation for “Multipurpose Internet Mail Exchange,” and is laid down in RFCs 1521 and 1522 if you want to look it up. In this example you don't need to set any other headers.
There are two versions of HTTP: 1.0 and 1.1. If you use any contemporary browser you get support for 1.1, which is good, but a few people out there are not using modern browsers. Among other improvements, HTTP 1.1 allows clients to send more requests to the server on the same socket that it just used. That saves time if you're getting some more content on the same web page, e.g., if you are displaying some HTML with image files. Normally, the client knows when it has got all the content because the server ends by breaking the socket connection. But if the server tells the client how many bytes are in the current response body, the client can count them as they arrive and will know when the server has sent everything and is ready for another request on this socket.
So it's good practice to set a header giving the length of the content part of each response when you know it. You can do that by assembling all the content in a ByteArrayOutputStream before sending it. ByteArrayOutputStream grows automatically as needed. Write everything to a ByteArrayOutputStream. After you have written all the data, call the size() methodof the ByteArrayOutputStream to find out how much you wrote, and do a setContentLength(). Finish up by doing a response.getOutputStream() and passing that as an argument to the ByteArrayOutputStream's writeTo() method. You don't have to copy anything anywhere. The code fragment that follows illustrates this approach. Needless to say, you must have completely finished writing any headers before you start writing the content of the response.
ByteArrayOutputStream ba = null;
private void writeBytes(String s) throws IOException {
byte buf[] = s.getBytes();
ba.write(buf);
}
public void service(HttpServletRequest req,
HttpServletResponse resp )
throws ServletException, IOException {
resp.setContentType("text/html");
// How to calculate content length
ba = new ByteArrayOutputStream();
writeBytes("<P> some text <HR> ");
resp.setContentLength(ba.size());
OutputStream out = resp.getOutputStream();
ba.writeTo(out);
out.close();
}
}
First, always close the output stream when you are not going to write any more to it.
Second, examine your exception handling, and try to express any problem in terms of an appropriate HTML status code if there is one. The HTML status codes are static int constants that can be found in javax.servlet.http.HttpServletResponse. For example, 404 is the dreaded “requested resource is not available”.
Third, each servlet container has some way to log unexpected situations. Find out what that way is for your web server, and write log records as part of running each servlet.
Now compile and run this servlet. You can put this first example source file anywhere, but for simplicity and convenience I recommend that you put the source file and its class file in the same directory along with the examples that come with Tomcat. If you do this, no other configuration of Tomcat is needed. Tomcat configuration is still not quite as easy as it should be.
Apache and Tomcat are great web-serving engines: free, open source, widely used. Their weakness is that the information needed to configure them is not very accessible. Every web server is going to have its own configuration rules, and some are easier than others. Make sure you have set the environment variables listed at the beginning of this chapter. Then complete the example by compiling the source file in the directory specified in the following examples, setting up the HTML, starting the Tomcat server, and finally browsing the URL for this servlet.
Set up all the pathnames according to Table 26-6. This re-uses the existing Tomcat examples directory, and you can get away with minimal extra configuration
Table 26-6. Pathnames to execute your servlet
|
Purpose |
Value |
|---|---|
|
%TOMCAT_HOME% environment variable |
|
|
Servlet source file |
|
|
When compiling, your CLASSPATH must include (the path may differ on non-Windows platforms) |
%TOMCAT_HOME%commonlib*.jar |
|
Command to compile the servlet |
javac -Djava.ext.dirs=%TOMCAT_HOME%commonlib |
|
Form HTML file |
|
|
HTML tag that invokes the servlet |
|
|
Browse this URL to run |
The petform.html file will contain these lines:
<html> <body>
<b>Choose a Pet</B>
<P>
<form action=servlet/PetServlet method=post>
<h4> preferred weight: </h4>
<input type=text name=weight size=3>
<h4> number of legs: </h4>
<input type=radio name=legs value=0>
0 legs <br>
<input type=radio name=legs value=4 checked>
4 legs <br>
<input type=radio name=legs value=notsure checked>
other number <p>
<input type=submit value="send pet data" >
</form>
You do need to add eight lines to the file $TOMCAT_HOMEwebappsservlets-examplesWEB-INFweb.xml . That file describes the URL-to-Java program mapping in XML form. Just use your favorite text editor, and find the helloworld phrase:
<servlet>
<servlet-name>HelloWorldExample</servlet-name>
<servlet-class>HelloWorldExample</servlet-class>
</servlet>
Copy those lines, and change it to our servlet name, PetServlet:
<servlet>
<servlet-name>PetServlet</servlet-name>
<servlet-class>PetServlet</servlet-class>
</servlet>
Do a similar thing a little later in the file, inserting these (different) lines:
<servlet-mapping>
<servlet-name>PetServlet</servlet-name>
<url-pattern>/servlet/PetServlet</url-pattern>
</servlet-mapping>
Be very, very careful to use the correct pathnames. If you get even one character in one of the names wrong, the example won't work, and Tomcat will give you a not very helpful 404 error.
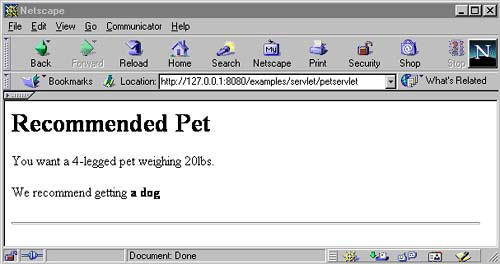
The petservlet produces a result in the browser as shown in Figure 26-4.
To help deploy all the files to your application server, in a real system you'll create a Web Archive (WAR) of your JSPs. In this sample pet system, we'll leverage the existing file and directories for the bundled demos.
A war file is just like a jar file of your compiled servlet code, along with a WEB-INF directory and a web.xml file that describes the application to Tomcat. You can use the jar tool that comes with the JDK to create it. The file format is the same, but a different extension name was chosen to highlight the different uses of a .jar and a .war file. You write the configuration XML, and move the war file into the webapps directory. It is deployed when the servlet container restarts.
-
A .jar file contains a set of classfiles that can be placed in a classpath. It might also be double-clickable, containing everything including a GUI needed to run an application.
-
A .war file contains servlet and JSP class files that can only be run in the context of a web server. It will also hold a web.xml file that maps servlet pathnames used in the browser to Java servlet programs in the server filesystem.
The Tomcat configuration files use XML, which is a human-readable form that looks a bit like lots of new HTML markup tags. Chapter 27 has more information on XML. You will find that you need to stop and start Tomcat again so that it can pick up changes in your servlets. It is possible to change the configuration file so that it always looks for a newer version classfile before running a servlet. This is called making the servlet reloadable, but there is a large performance cost to this feature, so if you enable it, you want to turn it off again once development is complete.