In Chapter 1, Sharpening the Saw we set up OpenVAS for vulnerability scanning. Nmap does a great job of reporting ports and services but lacks the ability to scan for vulnerabilities. OpenVAS will find the vulnerabilities and produce a report of the systems. OpenVAS updates their vulnerability list weekly so it is best to update OpenVAS before running a scan. To do this on Kali, run the following commands from the terminal window:
root@kalibook : ~ # OpenVAS-nvt-sync
This will run the vulnerability updates for OpenVAS. The first time you run it you will see the information in the following screenshot asking to migrate to using Rsync to update the vulnerabilities. Enter y and hit the Enter key. The update will start. The first time this is run, it will take quite a while, because it has to give you the entire list of plugins and tests available. In subsequent runs of the update command, it only adds the new or changed data, and is far faster:

Update command
You will also need to run the following command:
root@kalibook : ~ # OpenVAS-scapdata-sync
After this updates, we are ready to go. Now let's fire up the OpenVAS service. Go to the OpenVAS and click on Start button. A terminal window will open and you will see the related services starting. Once they are started, you can close this window and go to the following link: https://localhost:9392.
Tip
When would you not use OpenVAS?
On some company networks there are scanning services in place that you can use to scan for vulnerabilities. There is no sense in doing it twice, unless you suspect that the official company scanning tool is not configured properly for the scope of the search, or has not been updated to include searches for the most recent vulnerabilities. Scanning services such as Qualys, Nexpose, and Nessus are great scanning tools and accomplish the same task as OpenVAS. All the above services will export their data in XML format, which can be imported later into tools such as Metasploit.
Now log into the OpenVAS web interface with the password that you chose in Chapter 1, Sharpening the Saw. Normally, the user is admin. To run your first scan, just enter the network subnet or the single IP address of the machine to be scanned in the scan text box and start the scan by clicking the Start Scan button. The little geeky girl wizard will set up several normal parameters for you and run the scan. You can also set up custom scans and even schedule jobs to run at a given date and time:

Setup custom scans and schedule jobs
Once the scan is started, you will get the following screen. You will see it marked Requested in a minute or so, and the screen will refresh. Now you will see the progress bar start. Depending on how large a network you are scanning, you can either go get a cup of coffee, go have a meal, come back tomorrow, or leave for the weekend. This will take a while. A good thing to note is you do not need to stay close by to click a Next button throughout this process:

Completion of the scanning
Now that the scan has completed, you will see a screen like the following one. Go to the Scan Management tab and then to Reports in the drop-down menu. This will take you to the Reports page:

Reports page
The Reports page will give you the results of the scan with the vulnerabilities sorted from the highest severity to the lowest:
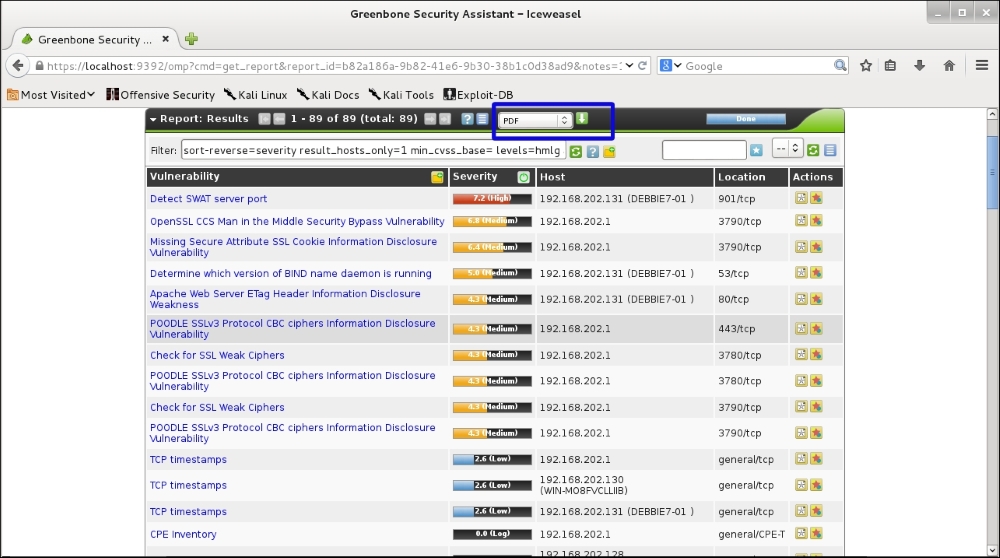
Results of the scan on the reports page
From here, you can generate a report in various formats. Pick the format needed and click the green down arrow button:

You can then download the report. You can edit it to have your company logo and any required company information that is not already in the document:
