
6. Working with Tables
In presentations, you’ll often find it useful to portray data in tables. A table’s rows and columns make it easy to present complex information in a simple way. Examples of such data would be quarterly financial results, a performance comparison of two or more products, or sometimes even a simple list.
Keynote provides an excellent set of tools for creating and formatting tables and their contents. These tools allow you to make even dry financial data visually interesting. Using object builds, you can also make parts of your table animate onto the screen, allowing you to build your points one step at a time. You’ll find more information about using animation in tables in Chapter 8.
In this chapter, you’ll learn how to use Keynote to create and modify a table, and ensure that tables and their content look the way you intend.
Creating a Table
Tables consist of rows and columns. Rows are the horizontal divisions of the table; columns are the vertical divisions. A row and a column intersect to form a cell, which is where you put the contents of a table. You can put text, but not graphics, into a cell.
When you add a table to a slide, Keynote automatically creates a table with five rows and four columns. Of these, the top row is the header row, and the left column is the header column. A header row or column is formatted differently from the rest of the table to highlight the information in the headers (the exact formatting is specified by the theme designer). You usually put labels in the header row and column, to help people more easily understand your table. Some table layouts include footer rows, which are handy for displaying things like column totals. After the table is added, you can modify the table and its contents by changing the number of rows and columns, formatting the text, modifying table and cell borders, and changing the size of the table.
You’re probably familiar with using tables in word processors, such as Microsoft Word or Pages. Using tables in Keynote is similar, with one important caveat: tables in presentations should be simpler than tables that you would use in a printed document. Too much information in a table can overwhelm the audience.
1. In the Slide Navigator, switch to the slide where you want the table.
2. Tap the Media button in the toolbar, and then tap the Tables button in the resulting popover.
The popover shows four different table layouts ![]() . Swiping right or left in the popover shows you different color schemes for these layouts.
. Swiping right or left in the popover shows you different color schemes for these layouts.
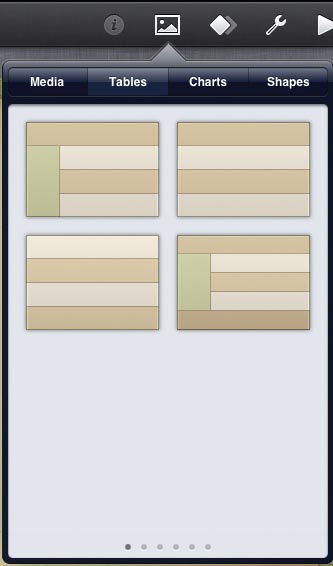
![]() Choose the slide layout and color scheme you want for your table.
Choose the slide layout and color scheme you want for your table.
3. Tap the layout you want.
The table appears on the slide ![]() .
.
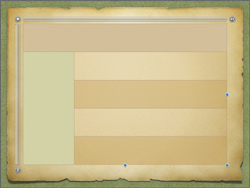
![]() Here’s our slide with its brand-new table.
Here’s our slide with its brand-new table.
Tip
Because you want to leave enough room on the slide for the table, you’ll probably want to choose a slide layout such as Blank or Title & Blank.
Tip
If you created a presentation in Keynote ’09 and you have images or other graphics within a table, they will be eliminated upon import into Keynote for iPad. Color or gradient fills will be preserved, however.
Selecting Table Elements
To work effectively with a table, you’ll need to know how to select its elements. You can select an entire table, one or more rows and columns, an individual cell, or multiple cells.
Keynote gives you controls to select table elements ![]() . At the upper-left corner is the table position handle, which allows you to drag the whole table around on the slide. The gray bar at the top of the table is the column selection bar and the gray bar at the left of the table is the row selection bar. The controls at the ends of these selection bars allow you to increase or decrease the number of rows or columns in the table.
. At the upper-left corner is the table position handle, which allows you to drag the whole table around on the slide. The gray bar at the top of the table is the column selection bar and the gray bar at the left of the table is the row selection bar. The controls at the ends of these selection bars allow you to increase or decrease the number of rows or columns in the table.

![]() In this table, the header row extends across the entire top of the table, and the header column is the light green column on the left.
In this table, the header row extends across the entire top of the table, and the header column is the light green column on the left.
Tap once anywhere in the table.
Selection handles will appear at the right and bottom edges of the table, which you can use to resize the table ![]() .
.
To select one or more cells:
With no part of the table selected, double-tap in the cell that you wish to select. If any part of the table is selected, tap once on the cell you want.
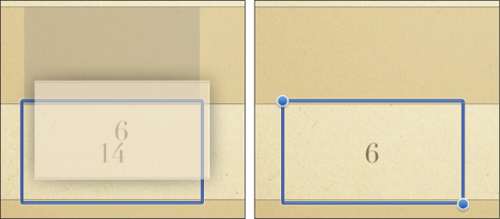
The border of the selected cell is highlighted in blue, with selection handles at two corners of the cell ![]() . You can drag these handles up, down, left, or right to make the selection bigger, covering more cells
. You can drag these handles up, down, left, or right to make the selection bigger, covering more cells ![]() .
.
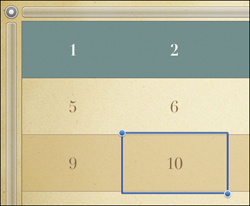
![]() A selected cell has selection handles at its upper-left and lower-right corners.
A selected cell has selection handles at its upper-left and lower-right corners.
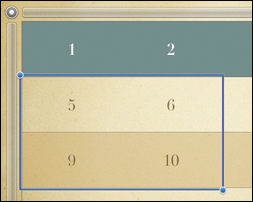
![]() Dragging the cell selection handles extends the selection to additional cells.
Dragging the cell selection handles extends the selection to additional cells.
Tip
Keynote ’09 lets you merge and split table cells, but you can’t with Keynote for iPad.
To select an entire row or column:
1. Tap inside a table to select it.
The row selection bar and the column selection bar appear.
2. To select a row, tap the row selection bar next to the row. The entire row will be outlined in blue ![]() .
.
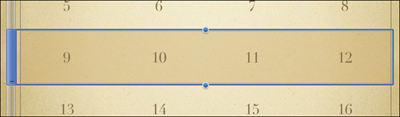
![]() Use the row selection bar to select an entire row.
Use the row selection bar to select an entire row.
or
To select an entire column, tap the column selection bar above the column. The column will be outlined in blue ![]() .
.
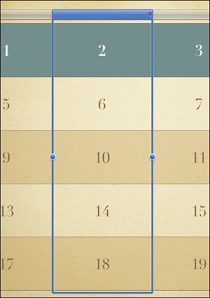
![]() Tap in the column selection bar to select an entire column.
Tap in the column selection bar to select an entire column.
Tip
Once you have selected a single row or column, you can use the selection handles to grow the selection to additional rows or columns.
To add or remove rows or columns:
1. Tap inside a table to select it.
2. To change the number of rows in a table, tap the button below the row selection bar ![]() .
.

![]() Tap the up or down buttons to change the number of rows in the table.
Tap the up or down buttons to change the number of rows in the table.
or
To change the number of columns in a table, tap the button to the right of the column selection bar ![]() .
.
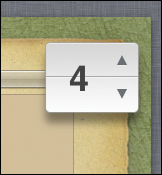
![]() Tap the up or down buttons to change the number of columns in the table.
Tap the up or down buttons to change the number of columns in the table.
3. Tap the up or down arrows in the control you’re using to increase or decrease the rows or columns.
Tip
Note that increasing the number of rows or columns within a table doesn’t change the size of the table; to do that you’ll need to use the table’s selection handles.
To type in a cell:
Double-tap inside a cell. A text insertion point will start blinking inside the cell; begin typing. If there is already text inside the cell and you double-tap on it, the text will be selected and the Edit popover will appear. Any text you type will replace the text that already appears in the cell ![]() .
.

![]() If there is any text in a cell, double-tapping selects the text. Otherwise, it simply places in insertion point in the cell.
If there is any text in a cell, double-tapping selects the text. Otherwise, it simply places in insertion point in the cell.
Working with Table Elements
You can resize tables horizontally or vertically, and also make columns wider and rows taller. If you need to, you can move rows, columns, or even individual cells. When you have table elements you need to delete, you can easily do that, too.
To resize an entire table:
1. Tap anywhere in a table to select it.
The selection handles will appear at the right and bottom edges of the table.
2. Drag one of the selection handles. To widen the table, drag the handle on the right edge of the table; to make the table taller, drag the handle on the bottom edge of the table; and to make the table grow in both directions simultaneously, drag the handle at the bottom-right corner of the table.
To resize rows or columns:
1. Tap inside a table to select it.
The row selection bar and the column selection bar appear.
2. Select a row by tapping the row selection bar next to the row. The entire row will be outlined in blue.
or
Select a column by tapping the column selection bar above the column. The column will be outlined in blue.
3. To resize the row, drag the handle at the bottom edge of the blue bar at the left edge of the row ![]() .
.
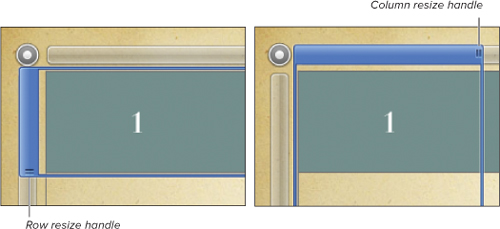
![]() Drag the row or column resize handles to change those element’s size.
Drag the row or column resize handles to change those element’s size.
or
To resize the column, drag the handle at the right edge of the blue bar at the top of the column ![]() .
.
1. Tap inside a table to select it.
The row selection bar and the column selection bar appear.
2. Tap the row or column selection bar.
The row or column highlights.
3. Touch and hold the blue part of the selection bar next to the selected row or column, and then drag it to the new position in the table ![]() .
.

![]() Drag the blue bar in the row or column selection bar to move the element (left) to its destination (right).
Drag the blue bar in the row or column selection bar to move the element (left) to its destination (right).
Tip
By default, most Keynote table styles have alternating row colors turned on. When you move a row, the moved row preserves the color alternation.
To move cells:
1. Slow double-tap a cell to select it.
2. Touch and hold the cell, and then drag it to the new position ![]() .
.
![]() While you’re moving a cell you see a ghost image of it (left) and when the move is complete the original cell is empty (right).
While you’re moving a cell you see a ghost image of it (left) and when the move is complete the original cell is empty (right).
The moved cell replaces the contents (if any) of the destination cell, and leaves a blank cell behind.
To delete elements:
1. Slow double-tap to select the element, whether it’s a row, column, or a cell with content. To select an entire table, slow double-tap the table position handle.
The Edit popover appears.
2. Tap Delete.
Formatting and Styling Tables
Once you have the layout of your table set to your liking, you can begin working on the table’s look, including the formatting of the text within the table. One limitation in Keynote is that all the text in a table must be the same font and font size. But you can style text in other ways.
If you want to apply alignment to the contents of a single cell, or group of cells, you must select the cell or cells first, and there are separate controls for horizontal and vertical alignment.
To set table formatting options:
1. Tap inside a table to select it.
2. Tap the Info button in the toolbar. If the Table pane isn’t visible in the resulting popover, tap the Tables button.
3. Tap Table Options. The Table Options pane appears ![]() .
.

![]() Use the Table Options pane for items affecting the entire table.
Use the Table Options pane for items affecting the entire table.
4. Do one or more of the following:
• Turn the Table Border off (it is on by default).
• Turn Alternating Rows off (they are on by default). This refers to alternating light and dark row colors.
• Tap Grid Options to display the different table line options ![]() . Then turn the different options on or off.
. Then turn the different options on or off.
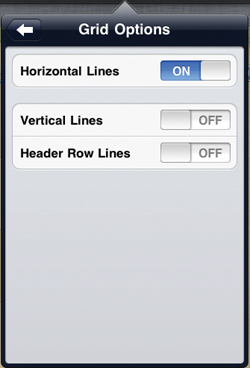
![]() You can turn lines in the table on or off using Grid Options.
You can turn lines in the table on or off using Grid Options.
• Change the Text Size or Table Font. The choices in Text Size are Tiny, Small, Medium, Large, and Extra Large. The Table Font choices include all the fonts on your iPad.
To change the number of header rows or columns:
1. Tap inside a table to select it.
2. Tap the Info button in the toolbar. If the Headers pane isn’t visible in the resulting popover, tap the Headers button. The Headers pane appears ![]() .
.
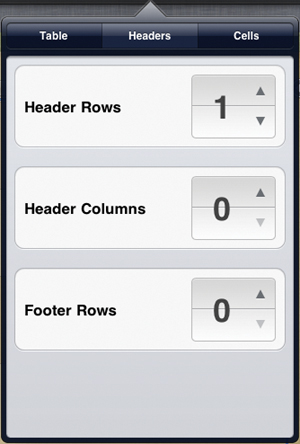
![]() Change the number of header rows, header columns, or footer rows.
Change the number of header rows, header columns, or footer rows.
3. Tap the up or down arrows to change the number of Header Rows, Header Columns, or Footer Rows.
To change the formatting of text in cells:
1. Slow double-tap a cell to select it.
2. (Optional) Drag the selection handle to extend the selection to multiple cells.
3. Tap the Info button in the toolbar. If the Cells pane isn’t visible in the resulting popover, tap the Cells button. The Cells pane appears ![]() .
.
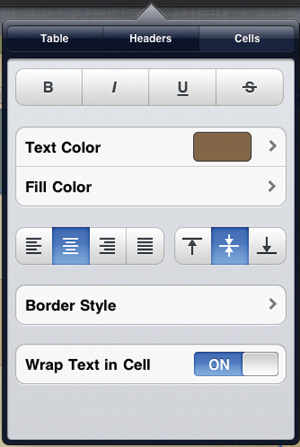
![]() Style the text within tables in the Cells pane.
Style the text within tables in the Cells pane.
Most of the options in this pane are the same as the text formatting options anywhere else in Keynote. Refer to Chapter 4 for information on the text styling, text color, and alignment controls. The Fill Color option leads you to a color picker that can change the background color of the selected cells. The Border Style option leads you to a pane with different border options ![]() . Finally, the Wrap Text in Cell option, which is on by default, allows you to make text stretch across multiple cell boundaries.
. Finally, the Wrap Text in Cell option, which is on by default, allows you to make text stretch across multiple cell boundaries.
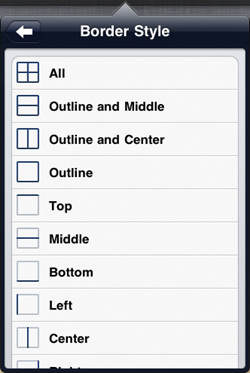
![]() Use the Border Style pane to turn on or off borders for individual cells.
Use the Border Style pane to turn on or off borders for individual cells.