1. Keynote for iPad Overview
Welcome to Keynote for iPad! Keynote, one of the mobile versions of the iWork productivity suite from Apple, is an exciting program that can help you create compelling presentations with a minimum of effort. Keynote’s gorgeous themes, superior text handling, attractive animations, and excellent graphics capabilities allow you to deliver your ideas with maximum visual impact.
This visual punch doesn’t come at the price of complexity; it’s easy to build a Keynote presentation, whether you’re a novice speaker or a polished presenter. But don’t be fooled into thinking that because Keynote for iPad is easy to use and running on a mobile device, it lacks power; there’s a lot of substance behind that pretty face.
In this chapter, you’ll learn how to install and start Keynote, see an overview of the program’s workspace, learn the parts of a Keynote slide, and ask the program for help. Let’s get started with Keynote.
Installing and Starting the App
Installing Keynote is as simple as installing any other app on your iPad. After just a few clicks of the mouse or taps on your iPad’s screen, you’ll be done.
To purchase and install Keynote via iTunes:
1. In iTunes, click the iTunes Store icon in the sidebar.
The iTunes store appears.
2. In the Search Store field at the upper-right corner of the window, type “Keynote” and press Return.
3. If needed, scroll the screen until you see Keynote listed under iPad Apps.
4. Click Keynote. The app’s description appears ![]() .
.
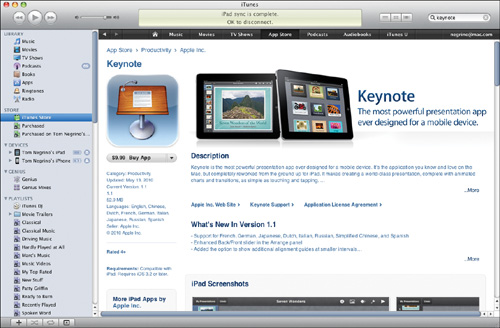
![]() Click the Buy App button to purchase Keynote and download it to iTunes on your computer.
Click the Buy App button to purchase Keynote and download it to iTunes on your computer.
5. Click the Buy App button.
The iTunes Store asks you to sign in (if you haven’t already done so) and then downloads the Keynote app.
6. Connect your iPad to your computer.
The iPad appears in the Devices section of the iTunes sidebar.
7. Click to select your iPad in the Devices section of the iTunes sidebar and then click the Sync button at the lower-right corner of the iTunes window.
After the sync is complete, Keynote appears on one of your iPad’s Home screens ![]() .
.
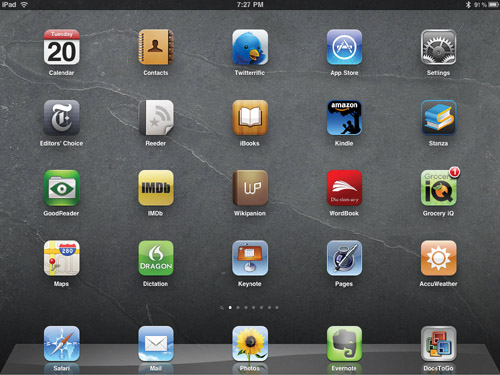
![]() After you install Keynote, it appears on one of your iPad’s Home screens (in this case it’s in the bottom row of applications, just above the applications in the iPad’s Dock).
After you install Keynote, it appears on one of your iPad’s Home screens (in this case it’s in the bottom row of applications, just above the applications in the iPad’s Dock).
To purchase and install Keynote from the App Store on the iPad:
1. Tap the App Store icon on your iPad.
2. In the Search field at the upper-right corner of the window, type “Keynote” and press Return.
Keynote will appear as one of the found items.
3. Tap Keynote. The app’s description appears.
4. Tap the button showing the app’s price.
The button changes to say Buy App.
5. Tap the Buy App button.
The App Store will ask you to sign in with your password (if you haven’t already done so) and then downloads Keynote, which then appears on one of your iPad’s Home screens ![]() .
.
To start Keynote:
Tap the Keynote icon on your iPad’s screen.
The app opens ![]() . There is a Get Started presentation already loaded that tells you a little about how to use Keynote.
. There is a Get Started presentation already loaded that tells you a little about how to use Keynote.

![]() To get a quick feel for Keynote, tap the Get Started presentation and then look through its slides.
To get a quick feel for Keynote, tap the Get Started presentation and then look through its slides.
Exploring the Keynote Workspace
The Keynote workspace is made up of one window with a number of sections ![]() . Let’s look at the pieces one by one.
. Let’s look at the pieces one by one.
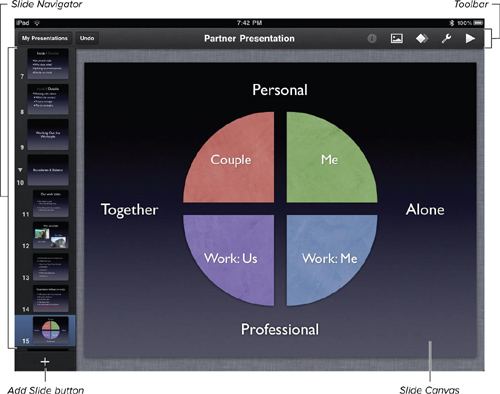
![]() The Keynote user interface is made up of three main areas : Slide Navigator, Slide Canvas, and Toolbar.
The Keynote user interface is made up of three main areas : Slide Navigator, Slide Canvas, and Toolbar.
The Slide Canvas
This is the main Keynote document window; it’s where you’ll edit your slide text and place graphics, tables, and charts.
The Slide Navigator
The Slide Navigator is the pane at the left edge of the document window. It shows thumbnails of your slides. The background of the selected slide in the Slide Navigator is highlighted. At the bottom of the Slide Navigator is the Add Slide button, which will be covered in Chapter 3.
You can organize and group slides in this view by dragging slide thumbnails to the right so they are indented in the list, as shown in ![]() . The parent slide of a group of indented slides has a disclosure triangle; tapping the triangle allows you to hide or show the indented slides. This makes it easier to organize the presentation, especially with longer shows. You can also drag the parent slide to another place in the presentation, and the indented slides move along with it.
. The parent slide of a group of indented slides has a disclosure triangle; tapping the triangle allows you to hide or show the indented slides. This makes it easier to organize the presentation, especially with longer shows. You can also drag the parent slide to another place in the presentation, and the indented slides move along with it.
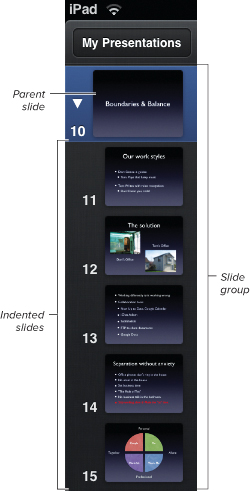
![]() The Slide Navigator shows thumbnails of the slides in your presentation, with the currently selected slide highlighted. The Slide Navigator also allows you to group slides together, with the slides in a group, appearing indented in the list.
The Slide Navigator shows thumbnails of the slides in your presentation, with the currently selected slide highlighted. The Slide Navigator also allows you to group slides together, with the slides in a group, appearing indented in the list.
Another thing you can do in the Slide Navigator is skip slides; skipped slides won’t appear when you give the presentation, and will “collapse” in the Slide Navigator, appearing as a line. You’ll learn more about grouping and skipping slides in Chapter 3.
The Toolbar
Like most programs, Keynote has a toolbar, which provides the tools you need to open, create, edit, and play presentations ![]() . It has the following items:
. It has the following items:

![]() Use the controls in Keynote’s Toolbar to make changes to the current presentation.
Use the controls in Keynote’s Toolbar to make changes to the current presentation.
• The My Presentations button leaves the main Keynote workspace and opens the My Presentations view, which shows you all the presentations you have in Keynote ![]() (see the following page). You also use this view to create, rename, delete, and export presentations. More about this view in Chapter 2.
(see the following page). You also use this view to create, rename, delete, and export presentations. More about this view in Chapter 2.
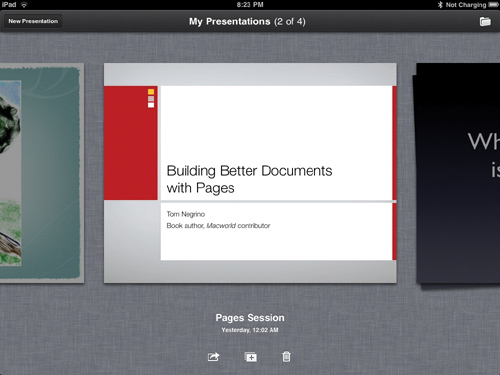
![]() Swiping right or left in the My Presentations view allows you to switch between different presentations.
Swiping right or left in the My Presentations view allows you to switch between different presentations.
• Tap the Undo button to undo the last action. You can tap it multiple times to undo your changes in sequence.
• The Title of your presentation appears in the middle of the toolbar.
• The Info button allows you to modify an item that you have selected on the Slide Canvas. When you tap the button, a popover appears (on the iPad, a popover serves the same purpose as a dialog in a Mac or Windows program). The popover displays appropriate choices, depending on the selected item; if you select a text box, the popover will be different than if you select a graphic ![]() .
.
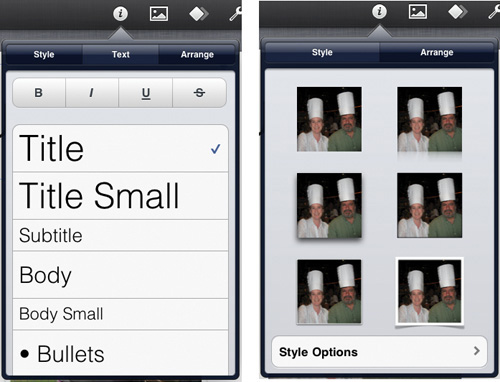
![]() The popover you get when you tap the Info button in the toolbar changes, depending on what you have selected in the Slide Canvas. Selected text gives you a very different popover (left) than a selected graphic (right).
The popover you get when you tap the Info button in the toolbar changes, depending on what you have selected in the Slide Canvas. Selected text gives you a very different popover (left) than a selected graphic (right).
• The Media button produces a popover that gives you access to your Photo Libraries that you have synced to your iPad from iTunes, and also allows you to insert tables, charts, and graphic shapes on your slides.
• When you tap the Transitions and Animations button, Keynote shifts into a mode that allows you to add transitions between slides, or animate slide objects (such as text, graphic, table, and chart items). You’ll learn more about using slide transitions and animations in Chapter 8.
• The Tools button gives you access to a variety of miscellaneous features, including finding and replacing text, turning on slide numbers, and the like. I’ll be covering the items in the Tools popover throughout the book.
• Finally, the Play button plays your presentation full-screen on your iPad. If you have a Dock to video adapter cable, the presentation will also play on an external screen or a video projector.
Anatomy of a Slide
To make it easier to create your slides, Keynote provides placeholders on its slides, into which you can put text or graphics. These placeholders are arranged into preset slide layouts, and every slide in your presentation is based on one of these layouts. In Keynote for iPad, there are eight kinds of slide layouts from which to choose; more detail on the layout types coming up in Chapter 3. Besides the slide layout, each presentation also has a single theme, which provides its visual look, including things like the slide’s background image and the style and color of the text you put on the slides.
Figure ![]() shows a newly-created slide against the Slide Canvas. To make things easier to see, I’ve selected all three of the placeholders on the slide. Placeholders are part of the design of the theme, and you can think of them as slots for text, graphics, or movies that show you where the object will be added. Let’s go into detail on each of the three placeholders on this slide and the slide background.
shows a newly-created slide against the Slide Canvas. To make things easier to see, I’ve selected all three of the placeholders on the slide. Placeholders are part of the design of the theme, and you can think of them as slots for text, graphics, or movies that show you where the object will be added. Let’s go into detail on each of the three placeholders on this slide and the slide background.
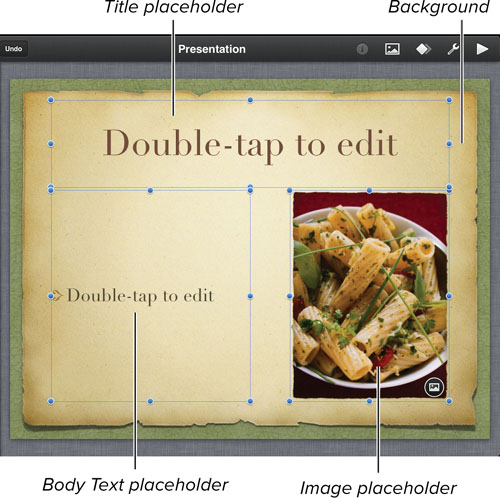
![]() In addition to this slide’s background image, there are three placeholders on this slide: two for text and one for an image.
In addition to this slide’s background image, there are three placeholders on this slide: two for text and one for an image.
• The Title text placeholder is included on five of the eight available slide layouts (the Blank, Bullets, and Photo layouts don’t need a title). The title is the main heading for each slide.
• A slide’s Body Text is contained in one or more text boxes. The body text can be bulleted or numbered lists, a caption for an image, or plain text.
• An Image placeholder is a frame into which you can place an image or movie from the Photo Albums you previously synced to your iPad ![]() .
.
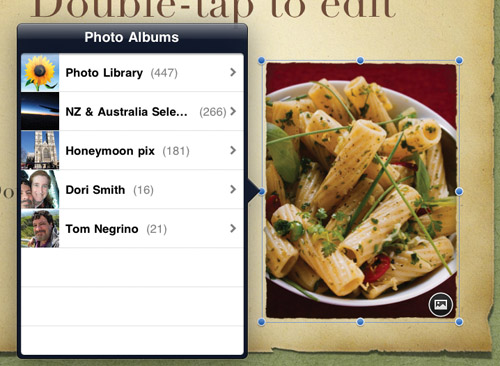
![]() When you tap the Image button inside an Image placeholder, the Photo Albums popover appears, allowing you to select an image on your iPad.
When you tap the Image button inside an Image placeholder, the Photo Albums popover appears, allowing you to select an image on your iPad.
• The Background is an image that is part of the theme.
Changing the Canvas Magnification
You can zoom into (or out of) the action by using the Pinch gesture. This is the gesture where you touch two fingers to the screen and pinch them together (to zoom out) or spread them apart (to zoom in). The four available magnifications are 50% ![]() ; Fit, the normal view, which fills up most of the Slide Canvas and leaves only a little of the canvas visible in the background; Full Screen, which makes the Keynote interface go away and lets the slide take up the entire iPad screen (this is especially useful as a quick preview of how the slide will look during your presentation); and 200%, which lets you zoom in on a slide’s details.
; Fit, the normal view, which fills up most of the Slide Canvas and leaves only a little of the canvas visible in the background; Full Screen, which makes the Keynote interface go away and lets the slide take up the entire iPad screen (this is especially useful as a quick preview of how the slide will look during your presentation); and 200%, which lets you zoom in on a slide’s details.

![]() To get a bird’s eye view of your slide, zoom out to the 50% view.
To get a bird’s eye view of your slide, zoom out to the 50% view.
To zoom in on a slide:
In the Slide Canvas, touch two fingers to the screen and spread them apart. If you want a higher magnification level, repeat the gesture.
To zoom out on a slide:
In the Slide Canvas, touch two fingers to the screen and pinch them together. If you want a lower magnification level, repeat the gesture.
Tip
When you touch your fingers to the screen, make sure that you don’t tap and select one of the items in the slide. It’s easy to accidentally select and move a slide item. If you do, just tap the Undo button to put the misplaced item back where it belongs.
Getting On-Screen Help
Keynote comes with its own Help files, which are read in Safari. When you access Help, Safari launches and shows you the Help file. If you have an active connection on your iPad, Safari loads up-to-date versions from Apple’s Web site. If you don’t have Internet connectivity, Keynote uses the version of the Help files stored within the program.
To access the Help files:
1. Tap the Tools button in the toolbar.
The Tools popover appears ![]() .
.
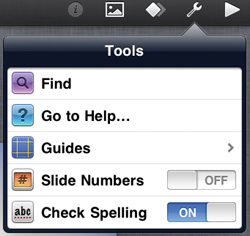
![]() Tap the Go to Help item in the Tools popover to bring up Keynote’s on-screen help files.
Tap the Go to Help item in the Tools popover to bring up Keynote’s on-screen help files.
2. Tap the Go to Help item.
Safari loads and displays the Help files ![]() .
.
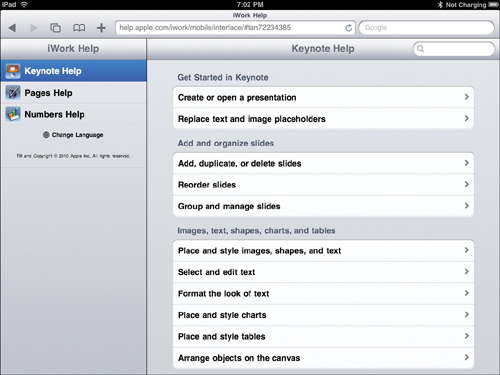
![]() On the iPad, Safari launches, showing you the help file.
On the iPad, Safari launches, showing you the help file.
Tip
The Help files cover all three of the iWork programs: Keynote, Pages, and Numbers. So if you have more than one program, you can check information about any of them before you leave Safari and return to your iWork.
Tip
Because the Help files are on the Web, if you have another computer handy, you can work on your iPad and still consult the Help files without leaving the particular iWork program you’re using. Just use this URL in your computer’s browser: http://help.apple.com/iwork/safari/interface/. The files may not look quite the same as on the iPad depending on what browser you’re using ![]() .
.
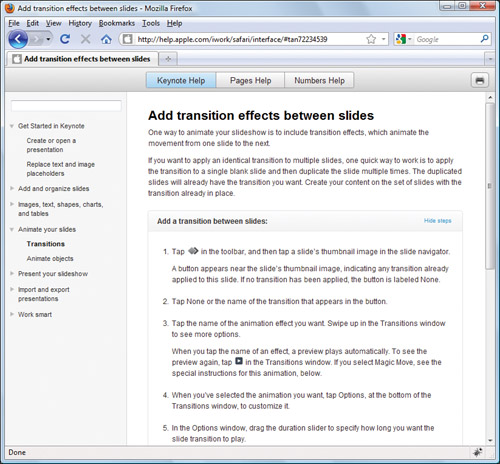
![]() You can also view the help file in any Web browser on a computer. In this case, it looks a bit different because I’m using Firefox for Windows.
You can also view the help file in any Web browser on a computer. In this case, it looks a bit different because I’m using Firefox for Windows.
Tip
You can use Internet Explorer on Windows to view the help files, but they look best in Safari or Firefox for Windows.