Once you’ve got your iPhone in your pocket, you’ve become a roving photographer, able to catch the essence of life around you. From finding action on the street to catching the hue in flowers, you’ll find that the camera will take pictures of remarkable quality if you follow the tips in this chapter. I’ve peppered the chapter with some samples of what you can do with the great apps available for the iPhone. The camera apps are covered in greater detail in Chapters 7, 8, and 9.
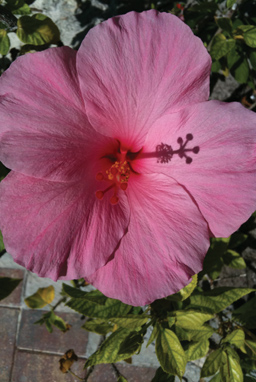
Flowers are a perfect match for the iPhone’s macro lens. The lens will give you a sharp image as close as 2.5 inches away from a subject. And the iPhone will refocus as you get closer to the subject, something other camera phones don’t do.
However, don’t expect to get a good flower shot with an iPhone the first time. You really have to get about 10 shots of a flower at all different angles to get one compelling shot out of the bunch. Figure 5.1 is the best out of a set of about 10 photos I shot. The light is just right— there are no blown color highlights nor solid black shadows. The petals are silky smooth.

Figure 5.1. You have to experiment to find just the right type of light to get a killer flower photo.
Many times in gardens and in front of homes, there are pots filled with flowers. Capturing such flowers among a compelling background makes for a great image. In Figure 5.2, a pot of flowers is the main subject. The setting—the bricks upon which the pot sits and the modern Florida home background—adds to the beauty of the photo.

To get this shot, I took several images of the home from different angles and different positions. The one in which the pot of flowers is the focal point turned out to be the best. Also of interest is the framing. You only see the trunks of the palm trees. Their lines add strength to the photo. (Vertical lines are symbols of strength.)
Sometimes flowers can produce fascinating shadows. In Figure 5.3, the pistil of a hibiscus is casting a strong shadow on the petals. It’s the first thing that catches your eye when you see the photo (which is quite detailed because of the iPhone’s macro lens). You even have to study the picture a bit to find the actual pistil because it blends in with the petals. The iPhone 3GS does a great job of photographing flowers in the sunlight.
Sketching in Photoshop Mobile
You can turn a photograph into a sketch using Photoshop Mobile. All you do is open PS Mobile, pull up the flower you want sketched (say, a flower like you see in Figure 5.4), and then navigate to the Sketch option in the top menu bar. To vary your sketch, you slide your finger across the screen. When you’re finished tweaking your flower (playing around with moving your finger across the screen), navigate to Save and Exit, and voilà, you have a sketched flower like the one you see in Figure 5.5. The nice thing about PS Mobile is that the program doesn’t reduce the resolution of the tweaked photo, making it a prime candidate for blowing up and hanging on your wall. For a complete how-to on the app, see Chapter 9.


The iPhone’s lens (focal length 37mm equivalent) permits you to fit giant buildings into your frame. Keep it in portrait mode to fit in tall buildings and in landscape mode to fit in wide buildings.
The first thing you want to do to get a compelling architecture shot is to keep the sun behind you. It’s best if the sun is cast upon the building you are shooting. Figure 5.6 shows a building shot lit by the sun. Note that the sky is blue behind the building. That only happens when the sun is on the other side of the sky from where you are shooting.
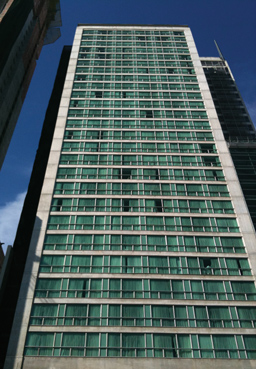
You can vary your architecture shots in the following ways, still remembering to shoot so that the sun is cast upon the building to get that much-needed blue sky in the shot.
You’ll want to get a good balance of contrast between building and sky when the sky has beautiful clouds. To get a picture evenly exposed, you can tap around on the iPhone 3GS and tilt/angle/move your camera on the iPhone 3G. If you tap on the sky to expose your photo on the 3GS, you’ll get a dark building below. If you tap on the building, you’ll get an overexposed sky, as shown in Figure 5.7.
To get better contrast in your entire frame, building and sky, tap on a place that’s neither too light (like the sky) nor too dark (like the building). In Figure 5.8, I tapped the roof of the building so that both the sky and the building would be exposed better. When the sky is as compelling as the one you see in the figure, you’ll want to tap around so that it is exposed correctly, while watching that the building doesn’t get underexposed. If you’re using an iPhone 3GS, you can tilt and turn the camera to get the best overall exposure.
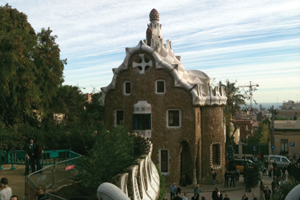
Figure 5.8. You’ll get a more evenly exposed photo if you tap an area where the light is neither light nor dark.
Just as with any camera, when you tilt the iPhone upward when taking a photo, you’ll get converging lines in the frame. In Figure 5.9, you can see how the columns in the frame lean in toward each other. This happens because of the orientation of the lens with respect to the building. (The camera was tilted upward to take the picture.) Because you’ll probably be tilting your camera upward when you’re taking a photo of a building, all the lines that building makes will converge into each other as you move up the frame (unless you photograph the building from above, in which case the lines will converge into each other as you move down the frame).

One way to avoid converging lines is to shoot architecture from a distance, as shown in Figure 5.10. When you’re a bit away from the building you are photographing, you don’t have to tilt your camera.

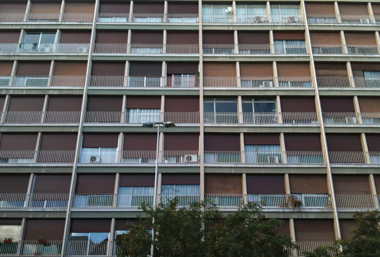
Sometimes it’s just not possible to keep lines from converging in a photo. Finding a place to photograph buildings so that lines don’t converge in the frame can be a challenge. The building in Figure 5.11 was shot from across the street, some distance away from the structure. The iPhone still created converging lines in the frame. In this photo, though, the lines are compelling because they repeat and offer a pattern in which the middle line is straight up and down, and the lines to the left and right of that line fall toward to it. Adding to the interest of this photo is that each balcony contains an interesting vignette, which keeps you looking around the frame to see what’s there.
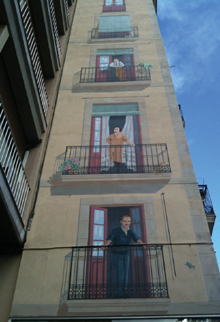
Finally, there are times when converging lines serve the iPhone photographer well. In Figure 5.12, two buildings are joined at a line that connects one building whose face contains murals of people on balconies and the side of a building that contains empty balconies. If the image contained only the mural as it was seen straight on without converging lines, it wouldn’t have been nearly as interesting as seeing the perspective of the images as they get smaller as you go up in the frame, with the empty balconies on one side and the blue sky on the other.
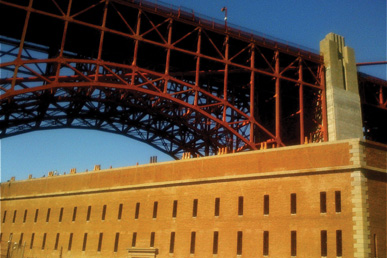
If you frame two structures of similar designs, you’re bound to bore your viewer. Contrast usually provides the human eye with a vivid experience. A building of mundane architecture can be made more interesting by including another structure or building of different, more elaborate design.
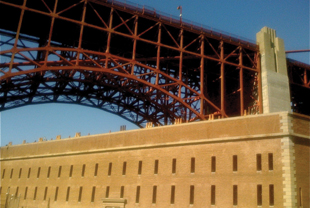
In Figure 5.13, the bottom part of the Golden Gate Bridge has been framed with one of the buildings beside it. The curves and vertical and diagonal lines of the bridge’s steel work contrast with the tan building’s nondescript design. Also impressive is the negative space—the color and shape of the sky above and below the bridge, the top a triangle of darker blue and the bottom a semicircle of lighter blue.
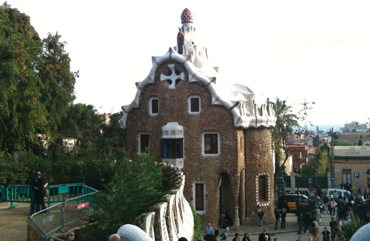
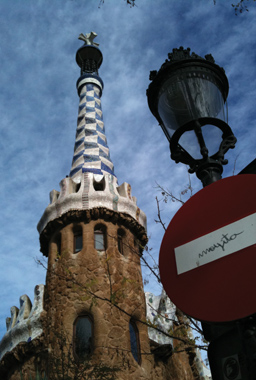
In Figure 5.14, the tower at Park Güell is framed with a lamp that has a red sign attached to it with some graffiti on it. If only the tower was included, the shot would look like any tourist took it, but frame it with the stylized lamppost, and you have yourself the beginning of a work of art. Add the bit of graffiti as shown in the shot, and you’re telling a story about how man’s markings can range from the artful and complex (the tower and lamp) to the simple and juvenile (the red sign tagged with someone’s name).
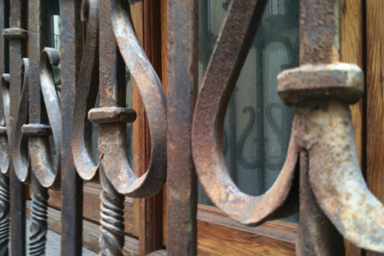
Finally, there is the issue of framing architectural elements—isolating them, if you will, examining shape, texture, and form. If you see something up high on a building that you’d like to isolate in a frame, you’re out of luck. The iPhone doesn’t have a zoom lens, and unless you’re Spider-Man, you’re not likely to get a picture of an exterior building up high. But this doesn’t mean you can’t take close-up art shots of architectural elements. Figure 5.15 shows a thick iron fence set against wooden doors. It’s a nice picture, to be sure. It’s the added element—the reflection of the thick iron—that really makes the shot. If you look around, you can not only take beautiful close-up shots of architecture (as long as you can get your iPhone near the element), but you can also usually find that something extra that will make your picture a “Wow!” photo.
Post-Processing: Increasing Individual Color Saturation
If you look at Figure 5.13, you’ll find that the colors are dull. You can change this by tweaking the saturation in either PS Mobile if you’re post-processing on your iPhone or Photoshop/Elements if you’re post-processing on your computer. The contrast in Figure 5.16 has been deepened by increasing the saturation of the reds in Photoshop (Image > Adjustments > Hue/Saturation; choose Reds from the Edit menu). In PS Mobile, tap on Saturation (it’s part of a drop-down menu of the second icon at the top of the screen) and slide your finger to the right (positive numbers will appear at the top of the screen) until you reach the saturation that you like.
Invert with Pixel Perfect
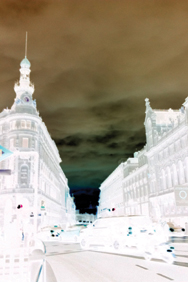
Pixel Perfect can invert your images to create dramatic results. Figure 5.17 shows an unevenly exposed architectural image before applying the Invert option in Pixel Perfect. The image has a dramatic sky but also has a foreground that is too dark. It also has blasting highlights where the sun is setting in the background. You can change the color of the image at the same time as you enhance the contrast so the shot becomes dramatic by using the Invert option in Pixel Perfect. Figure 5.18 shows a stunningly surreal inverted image of Figure 5.17. The blown highlights have been converted to dark shades of black and blue, and the sky has changed to a uniquely Martian-like shade with an eerie red glow. This is highly contrasted with the white buildings and streets that illuminate the foreground.
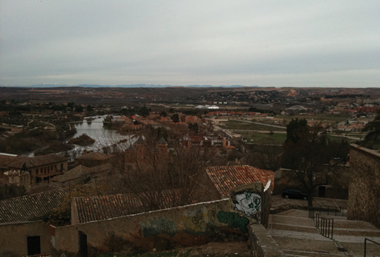
If you’re looking to fit vast landscapes into the frame using your iPhone, consider yourself lucky. The iPhone lens allows you to include a good amount of scenery in your frame. Figure 5.19 shows you just how much you can pack in—a wide stone balcony in the foreground, two large buildings in the middle ground, and several other buildings and a landscape in the background. Not bad for a tiny camera phone!
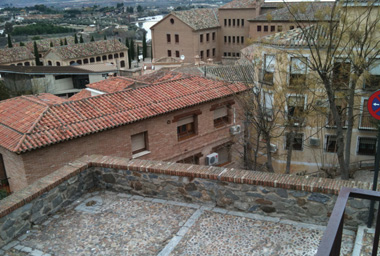
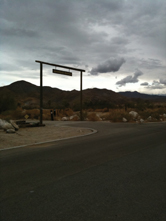
The Rule of Thirds covered in Chapter 3 is also used in landscapes. Most of the time, photographers fill the frame with two-thirds land and one-third sky, as shown in the landscape of Toledo, Spain, in Figure 5.20. This rule can also apply when the sky doesn’t extend fully from the left to the right of the frame, as shown in Figure 5.21.
You have to work with the iPhone to get a compelling landscape. The first thing to be aware of is that you can’t home in on an area without using a Crop tool, which will ultimately give you a lower resolution.
The iPhone takes excellent landscape shots if you have ample light and if the sun is behind you, as in the mid-morning photo of the Panama Canal you see in Figure 5.22.

In this image, the entire frame is sharp regardless of where you tap on the iPhone 3GS, because the tap focus doesn’t work when you’re taking a landscape.
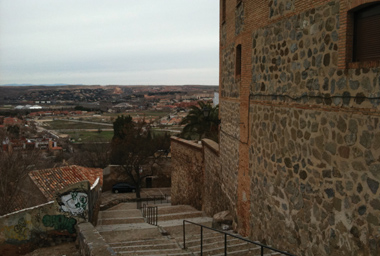
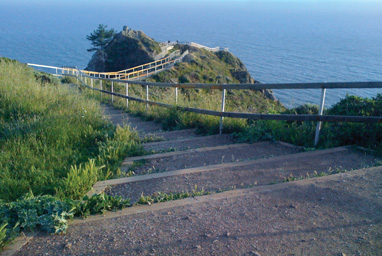
Many times when you look at an image, the first thing that happens is your eye wants to find the focal point. In Figure 5.23, the winding stairs lead to figures, which act as a focal point in the image. If the figures were not there, your eyes would be led to the outlook at the end of the stairs, which would then be the focal point of the image.
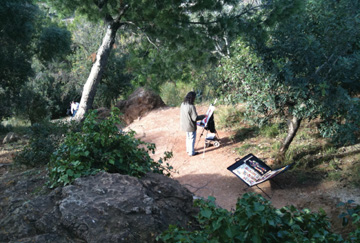
You can frame a landscape around an element in a photo to make it a focal point. Figure 5.24 shows greenery around a painter. Also helping the composition is the fact that the sun is shining where the painter is painting.
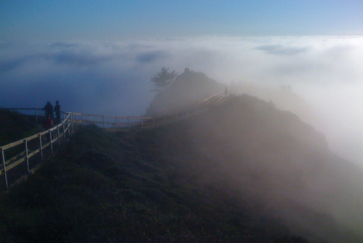
Finally, think about incorporating the weather into your landscape by photographing in the fog—a weather event that can make a shot moody or mysterious, as shown in Figure 5.25.
It’s no secret that landscapes are more compelling during sunrise or sunset. There are a few tricks for using your iPhone to get a truly killer shot.
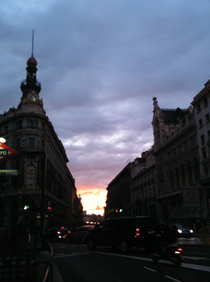
No matter how hard you try, an iPhone will not catch the sun in anything but the color white. (The same goes for any area of bright light.) It doesn’t matter if the sun appears yellow or red on the horizon, it still will blow the highlights all the way to the color white. With this being the case, the best way to catch a colorful sunset or sunrise is when the sun has just slipped below or has not quite come up on the horizon, like the sunset shown in Figure 5.26. Figure 5.27 shows you the blown highlights that you get when you include the sun in the frame during sunset.


Note
The three ways to get the most color out of an iPhone sunset or sunrise photo are to shoot in another part of the sky at sunrise or sunset when all of the colors appear, to wait until the sun is just below the horizon, or to shoot at sunrise or sunset when the sun is blocked by clouds.
Ghosts as Subjects
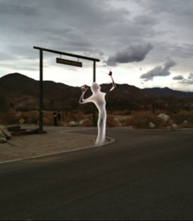
The Ghost Capture app is perfect for almost any landscape photo. The app inserts a ghost in your image. You can choose the type of ghost you want from a small selection that the app offers. You also can control the transparency of the ghost with a slider. You can move the ghost around with your index finger. You can change the ghost’s size by stretching or compressing it with your thumb and index finger. You can rotate the ghost by twirling your thumb and index finger. Figure 5.28 shows a landscape shot before I put in the ghost. Figure 5.29 shows the ghost inserted into the shot. Just as you place a main subject/object following the Rule of Thirds, you can place a focal point in the same way. Figure 5.29 does not follow this rule; however, it approximates it by having the ghost placed just off center in the frame, instead of one-third from either edge of the frame. Note that the resolution is very small—just 280×320 pixels, tiny by even Internet standards. The program shrinks the image dramatically after you save the image to your Camera Roll.
Still-life photography captures the essence of a man-made vignette of objects that can be found almost anywhere. Usually you’ll take these pictures up close. Because the iPhone does well with close-up shots, you’ll have a great time capturing still lifes. Figure 5.30 shows just how well an iPhone can take a close-up image through a store window.

In many circumstances the iPhone actually does better with still lifes than a dSLR camera does. The iPhone camera’s wide aperture sharpens items in a still life more than many dSLR cameras with kit lenses can. (More expensive lenses remedy that problem.)
Window displays can offer many surprises. They can contain one or more still lifes. These displays can contain varying colors, shapes, and textures. Figure 5.31 contains a variety of colors, shapes, and textures. From the cellophane wrap to the rainbow colors and shapes that can fit snugly into the mouth, the entire picture looks scrumptious.

Closely related to still lifes is found art. You can find art almost anywhere you look, but you have to be discriminating about what you find. Skilled photographers find art by looking up close for things that, when photographed, look like a painting or some other form of art.
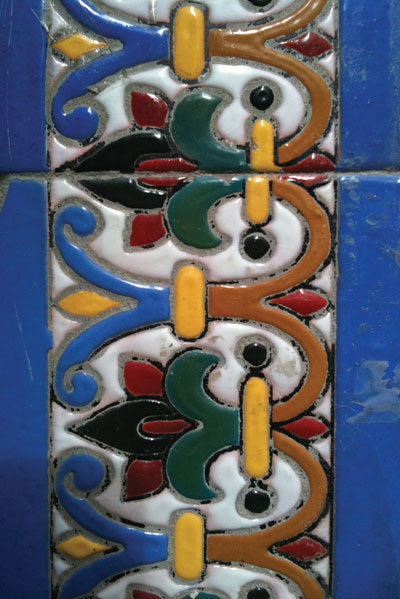
To find found art, you have to be a careful observer, looking in every nook and cranny around you. In Figure 5.32, what looks like a drawing was found in a door on a street in Toledo, Spain. The natural wood patterns in the door resemble an abstract drawing of a pair of dancers. There are circular patterns that frame the figures. The colors in the found art vary from white, to shades of brown, to black.

Figure 5.32. Because the iPhone does well photographing up close, it’s a natural for photographing found art.
In Figure 5.33, I found a plaque embedded in the sidewalk with tiny interesting images molded into it.

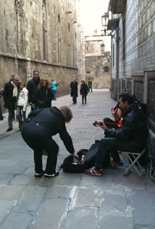
Street photography is a favorite pastime for many. The iPhone lets you capture scenes and events quickly. To be a good street photographer, you have to watch the events around you. They can be simple events that capture a given, such as someone sitting in a streetcar, or more complicated narratives. When you’re out and about, be on the lookout for scenes that tell a story, such as that shown in Figure 5.34, where a woman is giving money to street musicians.
Or look for a scene like Figure 5.35, where a woman is shopping at a flea market. In the latter image, you’d be surprised by how close you can get to a subject with an iPhone without being recognized as a photographer. It’s easy to be mistaken for someone who is doing some other task on the iPhone when you’re taking a picture.

If you do find something interesting going on in the street, don’t take one picture—take many. Scenes change quickly, and one mundane scene can get interesting really quickly.
The image in Figure 5.36 shows a boy sitting on a bench—cute but not too thrilling. In Figure 5.37, another boy gets his attention—an overall better picture because it creates an interesting narrative.


If you put the camera near the ground, you can increase the perspective of your shot. In Barcelona, Spain, there is a wide pedestrian walkway called Las Ramblas. You can find many interesting street photography shots on a walk down this pathway. In Figure 5.38, the iPhone was set very close to the ground to take the picture. The perspective is enhanced by that simple action. This is called getting a worm’s-eye view of a scene (the view a worm would get from the ground).
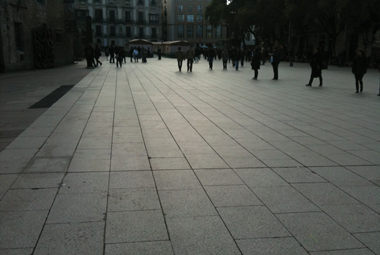
Figure 5.38. You get a worm’s-eye view of the world when the picture is taken with the camera close to ground.
The TiltShift App
One five-star app has to be TiltShift. It can add Gaussian or lens blur to your image almost anywhere you want. It works by moving one or two fingers on the screen. The amount of blur is controlled by a red ellipse. (There are other types of controls, but this one most closely emulates the way a lens would blur a photo.) The inside of the ellipse corresponds to what’s sharp in the photo; outside of the ellipse is where the blur occurs. When you move one finger across the screen, the ellipse moves. Use two fingers, and you can control the size of the ellipse. Figure 5.39 shows an image before the TiltShift app was applied. Figure 5.40 shows the image after the ellipse was manipulated so that it was oriented to include only the people at the counter, thus keeping them sharp while the rest of the frame is blurred (with a lens blur). Finally, you can control the amount of blur with a slider. The best thing about the app is that you have a choice of resolutions in which to save, including the original resolution of the photo.