
Now that we've covered the basic concepts of how to create a Runtime geodatabase, let's discuss how this actually works in the app. In this section, we'll cover how to create a feature table; adding, updating, and deleting features; and selecting and committing your edits.
The basic workflow includes the following steps:
- Create the feature table. If you are using a feature service, you will access the service via its feature table. If you're using an offline service, you will access it from the Runtime geodatabase that was sync enabled.
- Create a
FeatureLayerclass from the feature table and add it to the map. - Edit the layer (add, update, or delete features).
- Commit your edits. If you're using a feature service, apply the edits. If you're using an offline service, synchronize the edits back to the feature service.
You've already seen code for step 1 in this list of tasks. For example, when we worked with the parking meters layer, we opened up the Runtime geodatabase using this code:
private async void CreateFeatureLayers()
{
    var gdb = await Geodatabase.OpenAsync(this.GDB);

    foreach (var table in gdb.FeatureTables)
    {
        var flayer = new FeatureLayer()
        {
            ID = table.Name,
            DisplayName = "Parking Meters",
            FeatureTable = table
        };
        this.mapView.Map.Layers.Add(flayer);
    }
}
This code opens the offline geodatabase, iterates over all the FeatureTables property, creates FeatureLayers, and finally adds them to the map. The first class to note is Geodatabase. This is a simple class but it does something very important. It allows us to open a Runtime geodatabase using a path. It has a property on it called FeatureTables that allows us to get all FeatureTables in the Runtime geodatabase. With the FeatureTable class, we can create layers and add them to the map.
Let's also take a look at an online service:
public async void CreateOnlineFeatureService()
{
    // create a new geodatabase feature service table; point to a
    // feature service layer end point
    var table = new ServiceFeatureTable();
    table.ServiceUri = "http://sampleserver6.arcgisonline.com/arcgis/rest/services/Military/FeatureServer/2";

    // initialize the feature table; use the map view's spatial
    // reference for the optional "sr_override" argument
    await table.InitializeAsync(this.mapView.SpatialReference);

    // if the table was initialized successfully, create a new
    // feature layer for the table and add it to the map
    if (table.IsInitialized)
    {
        var lyr = new FeatureLayer
        {
            ID = "Units",
            DisplayName = "Units",
            FeatureTable = table
        };

        this.mapView.Map.Layers.Add(lyr);
    }
}
Instead of having to open the Geodatabase class, as with offline data, we simply created the ServiceFeatureTable object directly, initialized it, and then created a FeatureLayer class. The end result is the same: we now have a feature service we can make edits to. If you look at the second layer in this feature service, you will note that it comes with UniqueValueRender that uses the MIL-STD-2525C symbology already established. As a result, a user could start making edits to this layer immediately and it will use this renderer when features are added to the FeatureLayer class.
By default, a feature service will only retrieve 1,000 records at a time, so you may not see all of the features in the feature service. You can alter this by changing MaxRecordCount on FeatureService to an acceptable number. Keep in mind, however, that the more features you pull across the Web, the slower your app will be. One very important step you can make when creating the feature service is to set a scale dependency on it so that it only renders the layer at the intended scale of its use. If the layer doesn't need to be seen beyond 1:100,000, make sure it doesn't show up beyond that scale. This will not only make the map more readable, it will also improve performance.
In this section, we'll discuss how to add, edit, delete, and select features in a FeatureLayer class. Before we go over these topics, let's turn our attention to the Editor object.
To edit features in ArcGIS Runtime, you must use the Editor class. This class is of such importance that it is directly available on the MapView object. You can access this object like this:
Editor editor = this.mapView.Editor;
With the Editor object, you can request a point using RequestPointAsync, request other geometry types (Point, Polyline, Polygon, Enveloper, Rectangle, Freehand, Arrow, Triangle, Ellipse, Circle, or LineSegment) using RequestShapeAsync, and edit geometry with EditGeometryAsync. All three of these methods can be called from an MVVM Light RelayCommand. See here for an example:
// wait for user to draw the shape
var geometry = await this.mapView.Editor.RequestShapeAsync(DrawShape.Polygon, symbol);
Once the method is invoked, these methods expect you to do something on the map, such as click on a single point or click on multiple locations for a polygon. The RequestShapeAsync method expects an enumeration of the type of geometry to draw. Also, note that we provided a symbol so that we can see the polygon after we've added it. Lastly, in order to draw a point, you simply have to click on the map once. To add a polyline or polygon, you have to click on the map once for each point that makes it up, and then for the final point of the polyline or polygon, you need to double-click on the map. If you use the LineSegment option, you will need to click-drag-release (touch-drag-release) on the map to create a line that only has two vertices.
Although the Editor object comes out of the box ready for you to work with the map, you can also configure how it works. To configure the Editor object, use Esri.ArcGISRuntime.Controls.EditorConfiguration. This object allows you configure the editor to support certain operations. For example, you can tell the Editor object to allow for adding, deleting, or moving vertices (points) on a multipart feature such as a polyline using AllowAddVertex, AllowDeleteVertex, and AllowMoveVertex, respectively. The following screenshot shows an example of vertices along a polyline geometry:

As you can see in the preceding screenshot, the vertices have been given a unique symbol. The Vertex symbol is set to a solid blue square. The Polyline symbol is yellow. The MidVertex symbol is a white circle. The SelectedVertex symbol is a red circle.
You can also allow the user to rotate geometry or not using AllowRotateGeometry. Here's an example of turning on the ability to add vertices and setting the symbology for the Editor object:
// Create a new EditorConfiguration which allows for the changing of
// the various MarkerSymbols (SelectedVertexSymbol, VertexSymbol, and
// MidVertexSymbol).
Esri.ArcGISRuntime.Controls.EditorConfiguration editorConfiguration =
    new Esri.ArcGISRuntime.Controls.EditorConfiguration();

editorConfiguration.AllowAddVertex = true;

// Set the EditorConfiguration.MidVertexSymbol
SimpleMarkerSymbol midVertexSymbol = simpleMarkerSymbol;
editorConfiguration.MidVertexSymbol = midVertexSymbol;

// Set the EditorConfiguration.VertexSymbol to the SimpleMarkerSymbol
SimpleMarkerSymbol vertexSymbol = simpleMarkerSymbol;
editorConfiguration.VertexSymbol = vertexSymbol;

// Set the EditorConfiguration.SelectedVertexSymbol
Esri.ArcGISRuntime.Symbology.SimpleMarkerSymbol selectedVertexSymbol = simpleMarkerSymbol;
editorConfiguration.SelectedVertexSymbol = selectedVertexSymbol;

// Set the Editor.EditorConfiguration to the custom editorConfiguration.
this.mapView.Editor.EditorConfiguration = editorConfiguration;While creating a new geometry, you may need to navigate with the map or vice versa. For example, you may need to pan or zoom while digitizing a polygon. The Editor object has a few properties and commands that allow you to effectively deal with this scenario:
|
Name |
Usage |
|---|---|
|
|
This property indicates whether you are in the middle of an edit or sketch. |
|
|
This property indicates whether the |
|
|
This command prevents the |
|
|
This command allows the |
The IsActive property is an indispensable property when trying to edit. For example, if you have an event handler such as MapViewTapped that performs similar to Identify, or shows an overlay, it will be necessary to cancel this event; otherwise, an error can occur when doing something like adding a polyline using RequestShapeAsync:
private async void AssociatedObject_MapViewTapped(object sender,
    MapViewInputEventArgs e)
{

    MapView mapView = sender as MapView;

    if (mapView.Editor.IsActive)
        return;

    // do something when tapped

}While editing or measuring, RequestShapeAync can be used to track sketch progress. By using IProgress<GeometryEditStatus>, you can track progress such as the length of a polyline as you click from one point to another. Capturing the progress requires a two-step process:
- Declare an instance of
Progress<GeometryEditStatus>. This object accepts anActiondelegate, which you can use to respond to the sketch. - Pass the
Progressinstance as a parameter toRequestShapeAsync:// Track progress of the sketch var progress = new Progress<GeometryEditStatus>(OnStatusUpdated); // create a Simple Fill Symbol SimpleFillSymbol sfs = new SimpleFillSymbol(); sfs.Style = SimpleFillStyle.Null; sfs.Outline = new SimpleLineSymbol() { Color = System.Windows.Media.Colors.Blue, Style = SimpleLineStyle.Dash }; // Obtain the rectangle using a SimpleFillSymbol and track the progress Geometry geometry = await myEditor.RequestShapeAsync(DrawShape.Rectangle, sfs, progress);
If you use this code, it will now show a rectangle with a dashed blue line. The GeometryEditStatus delegate (OnStatusUpdated) captures the current state of the sketch using the NewGeometry property, as shown here:
private void OnStatusUpdated(GeometryEditStatus status)
{
    var polyline = status.NewGeometry as Polyline;
}
With the polyline, you can report the length of it as you move the mouse. Also, with GeometryEngine, you can convert the length to its geodesic equivalent.
To add a new feature to the map, you'd use code similar to the following code, which adds a parking meter to the map:
public async void AddPoint()
{
    // get a point from the user
    var mapPoint = await this.mapView.Editor.RequestPointAsync();
    // open the local geodatabase
    var gdb = await Geodatabase.OpenAsync(this.GDB);

    // open the table and create a new feature using its schema
    FeatureTable gdbTable;

    foreach (FeatureTable table in gdb.FeatureTables)
    {
        gdbTable = table;

        var newFeature = new GeodatabaseFeature(gdbTable.Schema);

        // assign the point from the user as the feature's geometry
        newFeature.Geometry = mapPoint;

        // get the attributes from the feature
        // (a Dictionary<string, object>) and set some values
        var attributes = newFeature.Attributes;
        attributes["POST_ID"] = "123456";

        // add the new feature to the table, the OID of the new
        // feature is returned
        var recNo = await gdbTable.AddAsync(newFeature);

        break;
    }


    await this.mapView.SetViewAsync(mapPoint, this.mapView.Scale + 1);
}
This code first requests MapPoint asynchronously from the map, opens the Runtime geodatabase, iterates over the FeatureTables property so that it can create GeodatabaseFeature using the same attributes of the layer's attributes (gdbTable.Schema), sets the geometry of newFeature with Map, sets an attribute, adds the feature to the table, and finally zooms to the newly added feature. The two most important things happening here are that the new feature is created in the following ways:
- Using the geometry of where the user clicks. It's not a feature unless it has geometry.
- Using the schema of the table. This is necessary because you want the new feature to have the same attribute scheme as the
FeatureLayerclass.
The other important thing that happens here is that the attribute is set using the syntax of a generic dictionary. In a professional app, we would prompt the user for the values to enter based on the table's fields, instead of hardcoding the value as we did in this example.
Typically, before you update or delete a feature, you need to have your user select the feature so that they can perform some operation. Selection is the process of placing a feature into a selected state so that you can do something with it, such as changing its attributes or moving it. To select features, you will need to perform one of the following tasks:
- Use a hit test, which allows the user to click on a feature and return the ID, which can then be passed to
FeatureLayer.SelectFeatures. - Query or find them and return their IDs.
Here is an example that selects an individual parking meter on the map:
private async void AssociatedObject_MapViewTapped(object sender, MapViewInputEventArgs e)
{
    MapView mapView = sender as MapView;

    // get the location tapped on the map
    var mapPoint = e.Location;

    // Get the second layer
    FeatureLayer featureLayer = (FeatureLayer)mapView.Map.Layers[1];

    // Get possible features
    var foundFeatures = await featureLayer.HitTestAsync(mapView,
        new Rect(e.Position, new Size(10, 10)), 1);

    featureLayer.SelectFeatures(foundFeatures);
}
The HitTestAsync method returns the list of IDs of the features found when the user taps on the map. It only returns the IDs of the features in the second FeatureLayer class. Then, these IDs are passed to SelectFeatures and the features are highlighted on the map like so:
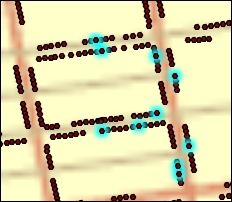
This approach is fine if you want to select features individually, but if you want to drag a rectangle on the map and select objects in bulk, you would use code similar to the following code in Map:
public async void SelectByRectangle()
{
    try
    {
        FeatureLayer featureLayer =
            (FeatureLayer)this.mapView.Map.Layers[1];

        featureLayer.ClearSelection();// Clear the selection

        // Get the Editor associated with the MapView. The Editor
        // enables drawing and editing graphic objects.
        Editor editor = this.mapView.Editor;

        // Get the Envelope that the user draws on the Map. Execution
        // of the code stops here until the user is done drawing the
        // rectangle.
        Geometry geometry = await
            editor.RequestShapeAsync(DrawShape.Rectangle);
        Envelope envelope = geometry.Extent;

        if (envelope != null)
        {
            // Get the lower-left MapPoint (real world coordinates)
            // from the Envelope the user drew on the Map and then
            // translate it into
            // a Microsoft Point object.
            MapPoint mapPoint1 = new MapPoint(envelope.Extent.XMin,
                envelope.YMin);
            System.Windows.Point windowsPoint1 =
                this.mapView.LocationToScreen(mapPoint1);

            // Get the upper-right MapPoint (real world coordinates)
            // from the Envelope the user drew on the Map and then
            // translate it into
            // a Microsoft Point object.
            MapPoint mapPoint2 = new MapPoint(envelope.Extent.XMax,
                envelope.YMax);
            System.Windows.Point windowsPoint2 =
                this.mapView.LocationToScreen(mapPoint2);

            // Create a Windows Rectangle from the Windows Point
            // objects.
            System.Windows.Rect windowsRect = new
                System.Windows.Rect(windowsPoint1, windowsPoint2);

            // Get the FeatureTable from the FeatureLayer.
            FeatureTable featureTable =
                featureLayer.FeatureTable;

            // Get the number of records in the FeatureTable.
            long count = featureTable.RowCount;

            // Use the FeatureLayer.HitTestAsync Method to retrieve
            // the FeatureLayer IDs that are within or cross the
            // envelope that was drawn on the Map by the user. It is
            // important to note that by passing in the variable
            // count (which is the maximum number of features in the
            // FeatureLayer), you are able to select up to the number
            // of features in the FeatureLayer. If you were to leave
            // off this optional last parameter then the HitTestAsync
            // would only return one record!
            long[] featureLayerRowIDs = await
                featureLayer.HitTestAsync(this.mapView, windowsRect,
                 System.Convert.ToInt32(count));

            if (featureLayerRowIDs.Length > 0)
            {
                // We have at least one record in the FeatureLayer
                // selected.

                // Cause the features in the FeatureLayer to
                // highlight (cyan) in the Map.
                featureLayer.SelectFeatures(featureLayerRowIDs);

            }
        }
    }
    catch (System.Threading.Tasks.TaskCanceledException)
    {
        // This exception occurred because the user has already
        // clicked the button but has not drawn a rectangle on the
        // Map yet.
          Messenger.Default.Send<NotificationMessage>(new
          NotificationMessage(
             "Drag a rectangle across the map to select some
             features."));    }
    catch (System.Exception ex)
    {
        // We had some kind of issue. Display to the user so it can

    // be corrected.
    Messenger.Default.Send<NotificationMessage>(new
        NotificationMessage(ex.Message));
    }
}
As shown in the left-hand screenshot, the user will drag a box, and then once completed, all parking meters within the box are now in a selected state in the right-hand image:
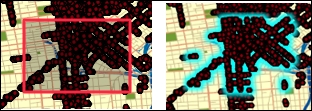
Dragging and selection
To update features, use the
UpdateAsync method on
GeodatabaseFeatureTable. The following example illustrates how to do this:
public async void UpdateSelectedFeaturesAsync()
{
    // create a list of the record IDs to update
    var idList = new List<long> { this.lastAddedOid };

    // query the table for the features with the specified IDs
    var updateFeatures = await gdbTable.QueryAsync(idList);

    // get the first GeodatabaseFeature (should be one or zero)
    var feature = updateFeatures.FirstOrDefault();
    if (feature == null) { return; }

    // update the feature's geometry with a new point
    feature.Geometry = newPoint;

    // update one of the attribute values
    feature.Attributes["comments"] = "point updated to last known
        location";

    // commit the updated feature to the GeodatabaseTable
    await gdbTable.UpdateAsync(feature);

}
In this example, we have a private member variable that keeps a list of features added to the map. We then query for the features, get the first one, update its geometry and attributes, and finally update the feature using UpdateAsync.
Deleting features from
GeodatabaseFeatureTable is easy to accomplish with DeleteAsync. This method has several overloads, which allow you to specify a single feature ID or a list of features using IEnumerable<long>. If you graphically select features using a rectangle, as we did earlier, you can return the selected feature IDs using FeatureLayer.SelectedFeatureIDs, and then call DeleteAsync with the IDs.
Once you've made edits, you now need to allow your users to commit their changes to the feature service or Runtime geodatabase. Whether the app is fully connected or not determines the commit process you will follow. In situations where two users are working on the same feature, the user that edits the feature last will have their edits seen. In other words, it's possible to overwrite each other's work.
While fully connected using a feature service, you can apply edits and other users will see your edits immediately. If you call ApplyEditsAsync on the feature service's ServiceFeatureTable, your edits will be sent to the server. The ApplyEditsAsync method has a parameter called rollbackOnFailure. When this parameter is set to true, all features must successfully make it to the server, or the syncing process will fail. If it is set to false, individual features can make it to the server without the process failing. You can use AddedFeaturesCount, UpdatedFeaturesCount, and DeletedFeatureCount to get counts on the number of features added, updated, and deleted, respectively.
The ApplyEditsAsync method returns a FeatureEditResult object that contains a set of properties about individual features, which were attempted to be sent to the server. The results include the following properties: AddResults, UpdateResults, and DeleteResults. Each of these properties returns a read-only list of FeatureEditResultItems, which provides the Object ID, Global ID, success flag, and error details (if any occurred) of the edited features. The global ID is a unique GUID of the feature in which the edit was attempted. Here's some example code:
var table = (ArcGISFeatureTable)layer.FeatureTable;
string message = null;
try
{
    if (!table.HasEdits)
        return;
    if (table is ServiceFeatureTable)
    {
        var serviceTable = (ServiceFeatureTable)table;
        // Pushes accumulated edits back to the server.
        var saveResult = await serviceTable.ApplyEditsAsync();
        if (saveResult != null && saveResult.AddResults != null
            && saveResult.AddResults.All(r => r.Error == null &&
            r.Success))
            message = string.Format("Saved {0} features",
                    saveResult.AddResults.Count);
    }
}
catch (Exception ex)
{
    message = ex.Message;
}
In this code sample, we first cast the layer's FeatureTable to ArcGISFeatureTable, check to see whether any edits were made, get the service's table, and then apply the edits. With the results, we check to see there are any AddResults property that contain the object ID, global ID, success flag, and any error details. If errors occur during the commit process, you can deal with them accordingly. You can find a complete list of error codes for feature services at http://resources.arcgis.com/en/help/arcgis-rest-api/#/Apply_Edits_Feature_Service/02r3000000nv000000/.
As we showed earlier in this chapter, in the Generating a Runtime geodatabase using the ArcGIS Runtime API section, you will need to generate a Runtime geodatabase in order to work offline. When users are ready to commit their edits, you will need to provide them with a means to call GeodatabaseSyncTask, which will take their edits to the Runtime geodatabase and send them to the feature service. This synchronization process can send and receive edits. For example, if you have 20 users making edits to a Runtime geodatabase and the fourth user makes edits and then syncs them, all other users will see these edits once they sync their edits (even if they didn't make any edits themselves). As with working exclusively online, the last person to edit a feature will have the last say on where that feature is located and its attributes.
To use GeodatabaseSyncTask, you must perform the following steps:
- Create a
System.IProgressobject so that you can track the progress of the sync process. - Set up a
callbackmethod to report on progress, so that users know if the process succeeds or fails. - Create or obtain the
syncparameters. - Create
GeodatabaseSyncTask. - Call the
SyncGeodatabaseAsyncmethod onGeodatabaseSyncTaskusing thecallbackandsyncparameters in the earlier steps.
Let's look at an example of syncing with GeodatabaseSyncTask:
// Synchronizing Local and Online data...
var tcs = new TaskCompletionSource<GeodatabaseStatusInfo>();
Action<GeodatabaseStatusInfo, Exception> completionAction = (info,
    ex) =>
{
    if (ex != null)
        tcs.SetException(ex);
        tcs.SetResult(info);
};

var syncProgress = new Progress<GeodatabaseStatusInfo>();
syncProgress.ProgressChanged += (sndr, sts) => {
    this.secondaryStatus =
    sts.Status.ToString(); };

var syncTask = new GeodatabaseSyncTask(new
    Uri(this.featureService));
var gdbTable = layer.FeatureTable as GeodatabaseFeatureTable;
await syncTask.SyncGeodatabaseAsync(gdbTable.Geodatabase,
    completionAction,
    null,
    TimeSpan.FromSeconds(3),
    syncProgress,
    CancellationToken.None);

await tcs.Task;
If you recall from learning .NET, a TaskCompletionSource instance is a factory method for creating delayed tasks, ones that won't actually be scheduled until some user-supplied timeout has occurred. In this example, the time is 3 seconds, which is how often GeodatabaseSyncTask will check the server when it executes. A Progress object is also created with GeodatabaseStatusInfo. The Progress object is set to a property called secondaryStatus. Then, the GeodatabaseSyncTask API starts with the supplied URL. Next, SyncGeodatabaseAsync is awaited with all of the supplied parameters.
The GeodatabaseStatusInfo object can also report GeodatabaseName, LastUpdateTime, ResultUri, Status, and SubmissionTime. The ResultUri property is the Runtime geodatabase name we saw earlier when we downloaded directly from the feature service. See here for an example: http://localhost/was/rest/directories/arcgisoutput/sf_parking_meters_MapServer/_ags_data{4106EEFA33BB4A399AE3773F8FC14C3D}.geodatabase. Status includes the following values during the download process: Unknown, Pending, InProgress, ExportAttachments, ExportChanges, ExportingData, ExportingSnapshot, ImportChanges, ImportAttachments, ProvisioningGeodatabase, UnregisteringGeodatabase, Completed, CompletedWithErrors, and Failed. Two other very useful properties of GeodatabaseStatusInfo are LastUpdatedTime and SubmissionTime. These two properties allow you to keep track of when users submit edits, and can be used to keep metrics on your app's usage. This can be very helpful in sizing your ArcGIS Server and its configuration.
Once this task completes, all of the edits are sent to the feature service. You should refresh the map when completed so that the user can see that their layer has been sent back to the server. You will also want the user to see the feature service as it stands after your commit, so that they get a sense of other edits made (if any).
Once the syncing process has completed, you can unregister the Runtime geodatabase using UnregisterGeodatabaseAsync. This method in effect tells ArcGIS Server that it is no longer being used by a particular user's Runtime geodatabase.
With feature services, it's possible to attach images, text files, audio, video, and so on, to individual features, as shown here in ArcGIS Online:
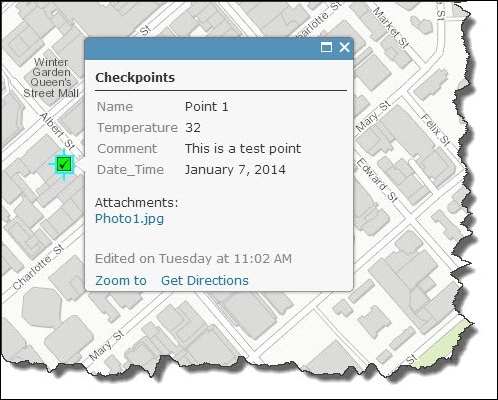
With attachments, your users can take photos with their devices, and then attach them to individual features. For example, if your user is a biologist, they could take snapshots or videos of birds and attach them to the location where the species was sighted. Or, with another example, a utility field crew member could capture the location of transformers and include a photo of them.
To enable attachments, the feature service must have this capability turned on. If the data was created with ArcGIS Desktop, it can be enabled using the Catalog window or with ArcCatalog, by following the instructions available at https://desktop.arcgis.com/en/desktop/latest/manage-data/editing-attributes/enabling-attachments-on-a-feature-class.htm. If you have a hosted feature service with attachments, you can enable them by simply clicking on the layer in ArcGIS Online, as shown here:

The following file types are supported: 7Z, AIF, AVI, BMP, DOC, DOCX, DOT, ECW, EMF, EPA, GIF, GML, GTAR, GZ, IMG, J2K, JP2, JPC, JPE, JPEG, JPF, JPG, JSON, MDB, MID, MOV, MP2, MP3, MP4, MPA, MPE, MPEG, MPG, MPV2, PDF, PNG, PPT, PPTX, PS, PSD, QT, RA, RAM, RAW, RMI, SID, TAR, TGZ, TIF, TIFF, TXT, VRML, WAV, WMA, WMF, WPS, XLS, XLSX, XLT, XML, and ZIP.
It's important to understand that attachments are by default not included when you download a Runtime geodatabase from a feature service. To include attachments, make sure to set GenerateGeodatabaseParameters.ReturnAttachment to true. You can also get a feature table of FeatureLayer and check whether it has attachments using HasAttachments. See here:
// get all feature layers from the map
var featureLayers = mapView.Map.Layers.OfType<FeatureLayer>();
// loop thru all feature layers, see if they support attachments
foreach (var lyr in featureLayers)
{
    var table = lyr.FeatureTable as ArcGISFeatureTable;
    if (table == null) { continue; }

    var hasAttachments = table.HasAttachments;
    // ... do something with attachments ...
}
Once you know that a feature table supports attachments, you can find information about the features in question using
QueryAttachmentAsync on ArcGISFeatureTable. First, you will need to either iterate over the features or select one of them so that you can obtain its ID. An ID is passed into QueryAttachmenAsync. See here:
// Performs hit test on layer to select feature.
var features = await layer.HitTestAsync(MyMapView, e.Position);
if (features == null || !features.Any())
    return;
var featureID = features.FirstOrDefault();
layer.SelectFeatures(new long[] { featureID });

var tableToQuery = (ArcGISFeatureTable)layer.FeatureTable;
var attachments = await
    tableToQuery.QueryAttachmentsAsync(featureID);
This code segment could be placed in a MapViewTapped event handler. It simply gets the first feature found in this Hit Test, gets the layer's table, and then returns any attachments. Once you have the attachments, you will need to do something with this, such as show them in a list so that users can view or edit them. See here:
// check if any were found
if (attachments.Infos != null && attachments.Infos.Any())
{
    foreach (var info in attachments.Infos)
    {
        // ... process each attachment result ...
    }
}If attachments are found, you can find information about them using the AttachmentInfo object. This class provides properties such as the filename, ID, content type, and size in bytes. As returning the attachment data can be an expensive and time-consuming operation, the attachment is not by default included with AttachmentInfo.
Once you have the AttachmentInfo object, you can iterate over the attachments and do something with them, such as display an image or play a sound. See here:
foreach (var info in attachments.Infos)
{
    // find image attachments: "image/jpeg", "image/png", etc.
    if (info.ContentType.Contains(@"image/"))
    {
       // do something with the image
    }
}Now that you have attachments, you can further evaluate the feature service to determine if it supports adding (CanAddAttachment), updating (CanUpdateAttachment), and deleting (CanDeleteAttachment). Once you know what the feature service is set up to do, you can apply an attachment by simply calling ApplyAttachmentEditsAsync on the ServiceFeatureTable object. If your workflow requires the ability to revert changes, you can call ClearEdits. This will discard any edits made on the table. This will not only remove the attachments, but will also remove any feature edits.
To add an attachment, call AddAttachmentAsync on ArcGISFeatureTable. This method requires a .NET stream representing the data, a filename, and a target feature ID. This edit operation will be in-memory until calling ApplyAttachmentEditsAsync. A new feature can be added provided that the following conditions are met:
- The feature service supports attachments.
- The size of the file must be less than the size ArcGIS Server is set up to handle. The default size is 2 GB.
- It must be one of the supported files listed earlier.
Here is an example of adding an attachment:
var table = (ArcGISFeatureTable)layer.FeatureTable;
var file = GetFile();
if (file == null) return;

AttachmentResult addResult = null;
using (var stream = file.OpenRead())
{
    addResult = await table.AddAttachmentAsync(featureID, stream,
        file.Name);
}
// save edits
We obtain the layer's feature table, read in a file as a stream, and then call AddAttachmentAsync.
Deleting attachments is very similar to adding. Just pass in some feature IDs:
DeleteAttachmentResult deleteResult = null;
deleteResult = await table.DeleteAttachmentsAsync(featureID,
    new long[] { info.ID });
if (deleteResult != null && deleteResult.Results != null &&
    deleteResult.Results.Count > 0)
{
    var result = deleteResult.Results[0];
    if (result.Error != null)
    message = string.Format("Delete attachment [{0}] of feature [{1}]
            failed.
 {2}", info.ID, featureID, result.Error.Message);
    // save edits
}
We pass in the ID of the attachment with Info.ID, along with the feature ID to DeleteAttachmentsAsync. After that, we check the result to see if it worked correctly, and then capture a message to present to the user.
Lastly, updating an attachment is very similar to deleting; here, you pass in the attachment IDs:
AttachmentResult updateResult = null;
using (var stream = file.OpenRead())
{
    updateResult = await table.UpdateAttachmentAsync(featureID,
        info.ID, stream, file.Name);
}
if (updateResult != null)
{
    if (updateResult.Error != null)
        message = string.Format("Update on attachment [{0}]
        of feature [{1}] failed.
 {2}", info.ID, featureID,
            updateResult.Error.Message);
    // save edits
}