
Your BeagleBone Black won't be able to access the Internet with the default network-over-USB configuration, but there are a couple ways that you can connect your BeagleBone to the Internet.
The simplest option is to connect the BeagleBone to your network using an Ethernet cable between your BeagleBone and your router or a network switch. When the BeagleBone Black boots with an Ethernet connection, it will use DHCP to automatically request an IP address and register on your network.
Once you have your BeagleBone registered on your network, you'll be able to log in to your router's interface from your web browser (usually found at http://192.168.1.1 or http://192.168.2.1) and find out the IP address that was assigned to your BeagleBone. Refer to your router's manual for more information. The current BeagleBone Black Debian images are configured to use the hostname beaglebone, so it should be pretty easy to find in your router's client list. If you are using a network on which you have no way of accessing this information through the router, you could use a tool such as Fing (http://www.overlooksoft.com) for Android or iPhone to scan the network and list the IP addresses of every device on it.
Since this method results in your BeagleBone being assigned a new IP address, you'll need to use the new address to access the Getting Started pages and the Cloud9 IDE.
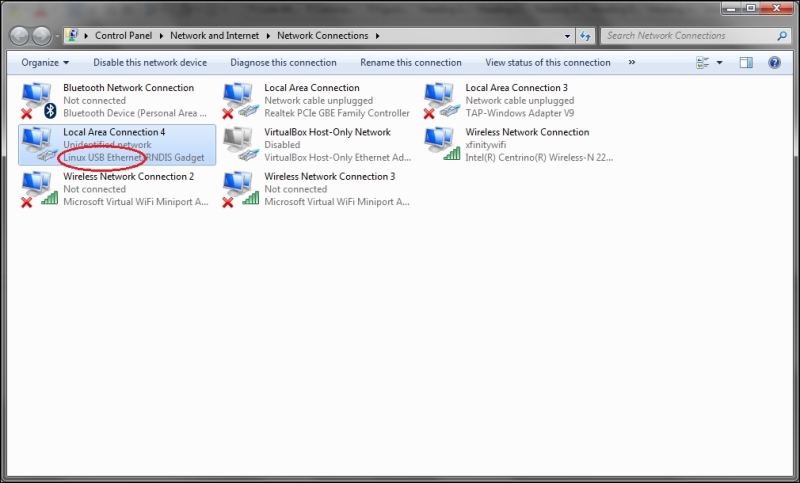
If you don't have access to an Ethernet connection, or it's just more convenient to have your BeagleBone connected to your computer instead of your router, it is possible to forward your Internet connection to your BeagleBone over the USB network. On Windows, open your Network Connections window by navigating to it from the Control Panel or by opening the start menu, typing ncpa.cpl, and pressing Enter. Locate the Linux USB Ethernet network interface and take note of the name; in my case, its Local Area Network 4. This is the network interface used to connect to your BeagleBone:
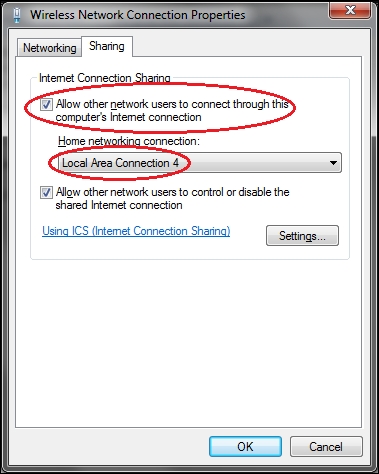
First, right-click on the network interface that you are accessing the Internet through, in my case, Wireless Network Connection, and select Properties. On the Sharing tab, check Allow other network users to connect through this computer's Internet connection, and select your BeagleBone's network interface from the dropdown:
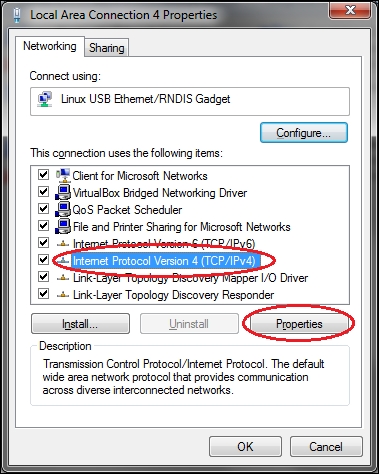
After pressing OK, Windows will assign the BeagleBone interface a static IP address, which will conflict with the static IP address of http://192.168.7.2 that the BeagleBone is configured to request on the USB network interface. To fix this, you'll want to right-click the Linux USB Ethernet interface and select Properties, then highlight Internet Protocol Version 4 (TCP/IPv4) and click on Properties:
Select Obtain IP address automatically and click on OK;

Your Windows PC is now forwarding its Internet connection to the BeagleBone, but the BeagleBone is still not configured properly to access the Internet. The problem is that the BeagleBone's IP routing table doesn't include 192.168.7.1 as a gateway, so it doesn't know the network path to the Internet. Access a Cloud9 or SSH terminal, and use the route tool to add the gateway, as shown in the following command:
# route add default gw 192.168.7.1
Your BeagleBone should now have Internet access, which you can test by pinging a website:
root@beaglebone:/var/lib/cloud9# ping -c 3 graycat.io
PING graycat.io (198.100.47.208) 56(84) bytes of data.
64 bytes from 198.100.47.208.static.a2webhosting.com (198.100.47.208): icmp_req=1 ttl=55 time=45.6 ms
64 bytes from 198.100.47.208.static.a2webhosting.com (198.100.47.208): icmp_req=2 ttl=55 time=45.6 ms
64 bytes from 198.100.47.208.static.a2webhosting.com (198.100.47.208): icmp_req=3 ttl=55 time=46.0 ms

--- graycat.io ping statistics ---
3 packets transmitted, 3 received, 0% packet loss, time 2002ms
rtt min/avg/max/mdev = 45.641/45.785/46.035/0.248 ms
The IP routing will be reset at boot up, so if you reboot your BeagleBone, the Internet connection will stop working. This can be easily solved by using Cron, a Linux tool for scheduling the automatic running of commands. To add the correct gateway at boot, you'll need to edit the crontab file with the following command:
# crontab –e
This will open the crontab file in nano, which is a command line text editor. We can use the @reboot keyword to schedule the command to run after each reboot:
@reboot /sbin/route add default gw 192.168.7.1
Press Ctrl + X to exit nano, then press Y, and then Enter to save the file. Your forwarded Internet connection should now remain after rebooting.