
We've looked at a few different types of LED displays, but because of the large size and spacing of their pixels they tend to be poor at conveying much information. When you want to display text, one of the simplest ways to do so is with a character LCD (liquid crystal display). These are rectangular displays typically consisting of 1, 2, or 4 lines of 8, 16, or 20 characters each, and are commonly used in radios and other low-cost electronics. Each character is typically made up of a matrix of 5 x 8 pixels, which is enough resolution to display any of the ASCII characters, along with some additional symbols.
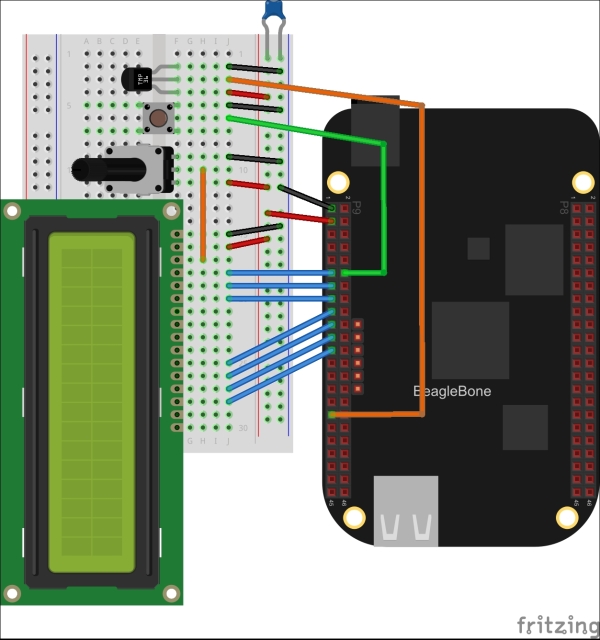
For this example, I'm using a 2 x 16 character LCD. It will work with different sizes, but with a width of less than 16 characters, some of the text will be cut off. Character LCDs usually require a 5 V supply, but some companies such as SparkFun sell 3.3 V versions. Either version will work with the BeagleBone, just make sure to hook it up to the correct power supply. We'll also hook up a tactile switch and a TMP36 temperature sensor.
For this circuit, you will need:
- Breadboard
- 1x 16 x 2 character LCD
- 1x potentiometer (value not critical, 1 kΩ - 10 kΩ recommended)
- 1x tactile switch
- 1x TMP36 temperature sensor
- 1x 0.1µF capacitor
- Jumper wires
In this example, the LCD is used to display the CPU and TMP36 temperatures, the percentage of CPU and memory resources currently being used, and the number of network packets that have been sent and received. That's way too much information to display on the screen all at once, so the button is used to cycle through three different views. We're using PyBBIO here because it includes a library to control character LCDs:
from bbio import *
from bbio.libraries.LiquidCrystal import LiquidCrystal
import psutil, threading

tmp36 = AIN4
button = GPIO0_20

RS_PIN = GPIO0_30
RW_PIN = GPIO0_31
EN_PIN = GPIO1_16
D4_PIN = GPIO0_5
D5_PIN = GPIO0_13
D6_PIN = GPIO0_3
D7_PIN = GPIO1_17
lcd = LiquidCrystal(RS_PIN, RW_PIN, EN_PIN, D4_PIN, D5_PIN, D6_PIN, D7_PIN)

screen = 0

def get_external_temp_c():
    v = inVolts(analogRead(tmp36))
    return (v - 0.75) * 100.0 + 25

def get_cpu_temp_c():
        with open('/sys/class/hwmon/hwmon0/device/temp1_input', 'r') as f:return int(f.read()) / 1000

def poll_button():
    while True:
        global screen
        if (digitalRead(button) == LOW):
            screen = (screen+1) % 3
            while(digitalRead(button) == LOW): delay(10)
        delay(50)

def setup():
    lcd.begin(16, 2) # (columns, rows)
    pinMode(button, INPUT, PULLUP)
    t = threading.Thread(target=poll_button)
    t.daemon = True
    t.start()

def loop():
    if (screen == 0):
        line1 = "Ext temp : {}C".format(get_external_temp_c())
        line2 = "CPU temp : {}C".format(get_cpu_temp_c())
    elif (screen == 1):
        line1 = "CPU : {}%".format(psutil.cpu_percent())
        line2 = "Mem : {}%".format(psutil.virtual_memory()[2])
    else:
        net_info = psutil.net_io_counters()
        line1 = "eth0  up : {}".format(net_info[2])
        line2 = "eth0 dwn : {}".format(net_info[3])
    lcd.clear()
    lcd.home()
    lcd.prints(line1)
    lcd.goto(0, 1) # go to column 0, row 1
    lcd.prints(line2)
    delay(500)

run(setup, loop)
Note how the button input is being received. It is utilizing the method described in Chapter 5, User Input, in which the button is ignored until it is released, but it does so in a separate thread in order to avoid interfering with the LCD drawing. This could be done in the same thread without blocking the LCD drawing by using global flags to track the state of the button, but we might as well take advantage of the parallelization tools Python provides to keep the code straightforward.