
NED is a network description language that is used to create the topology of networks in OMNeT++. The OMNeT++ IDE lets you create your topology either graphically or using NED. If you choose to create your network topologies using the graphical editor, the coinciding NED source code will also be generated for you. The choice to use the graphical editor over the NED language is purely yours.
Let's look at some basic NED to get started. We will start by looking at how to define the most basic component—the Network component:
package book.simulations; /* Package is a mechanism to organize
                          the various classes and files. My
                          simulation project inside of OMNeT++ is
                          called "Book" and this NED file is found
                          in the "simulations" folder of the
                          project. */

networkMy_Network // This is simply defining a Network component
                     called
{
   "My_Network"
}
The text after the // and in between /* */ are the comments that explain what the syntax means. Graphically, this NED produces just an empty network called My_Network.
Let's consider this network topology. We have three standard hosts and a large Local Area Network (LAN) connected via two routers, as shown in the following screenshot:
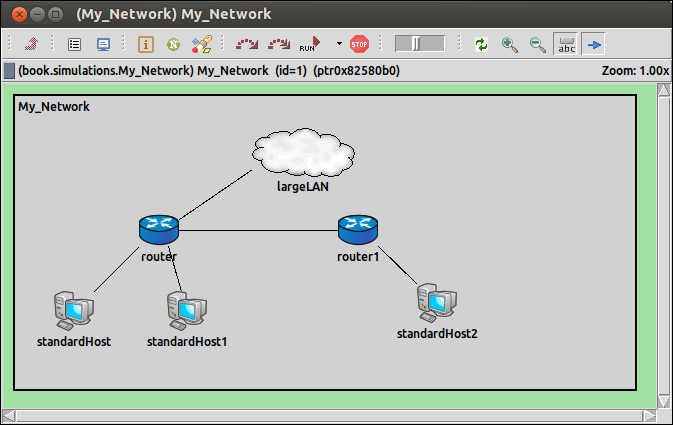
Let's now look at the corresponding NED code that belongs to this topology:
package book.simulations;

/*
Similar to JAVA syntax, the NED file needs to include modules that are to be used to define the network topology. Since we are using INET, many of the imports are from the INET library.
*/
import inet.applications.httptools.HttpServer;
import inet.examples.ethernet.lans.LargeLAN;
import inet.examples.httptools.socket.tenserverssocket
                                     .ethernetline;
import inet.examples.mobileipv6.fiberline;
import inet.nodes.ethernet.Eth100G;
import inet.nodes.inet.Router;
import inet.nodes.inet.StandardHost;
import ned.DatarateChannel;


network My_Network
{
@display("bgb=620,293");

/* @display is just used to describe the appearance of the topology, such as locations of components and other appearance attributes. */

submodules: //Define submodules that belong in our Network object.
standardHost: StandardHost {
@display("p=59,215");
        }
        standardHost1: StandardHost {
@display("p=172,215");
        }
router: Router {
@display("p=144,134");
        }
largeLAN: LargeLAN {
@display("p=288,56;is=l");
        }
        router1: Router {
@display("p=343,134");
        }
        standardHost2: StandardHost {
@display("p=422,207");
        }
connections:

/* Define what connections exist in our Network object. In the first line below, we can see that "standardHost" uses an Ethernet connection to connect to "router" using the "ethernetline" channel./*

standardHost.ethg++ <-->ethernetline<-->router.ethg++;
router.pppg++ <-->DatarateChannel<--> standardHost1.pppg++;
router.ethg++ <-->fiberline<-->largeLAN.ethg;
router.ethg++ <-->fiberline<--> router1.ethg++;
router1.ethg++ <--> Eth100G <--> standardHost2.ethg++;
}
When getting to grips with OMNeT++, I found it very useful to create my network topologies using the graphical editor found inside the IDE. Once I added a new object to my topology, I would check the coinciding NED source code to see what changes had been made. I would recommend doing this too, because it is easier to see exactly what attributes are set for your submodules in the source code instead of having to navigate hidden menus in order to see the attributes.
Let's add some more details to the first submodule standardHost :StandardHost that was defined previously:
standardHost: StandardHost {
@display("p=59,215");
IPForward = true; //Turn IP forwarding on
numTcpApps = 5; //Set the number of TCP Apps on this node to 5
        }
These added details are very easy to see in the NED source code. However, to set and view these attributes in the IDE, you must right-click on the standardHost object and select Parameters.... Now you will see a form similar to the one shown in the following screenshot:
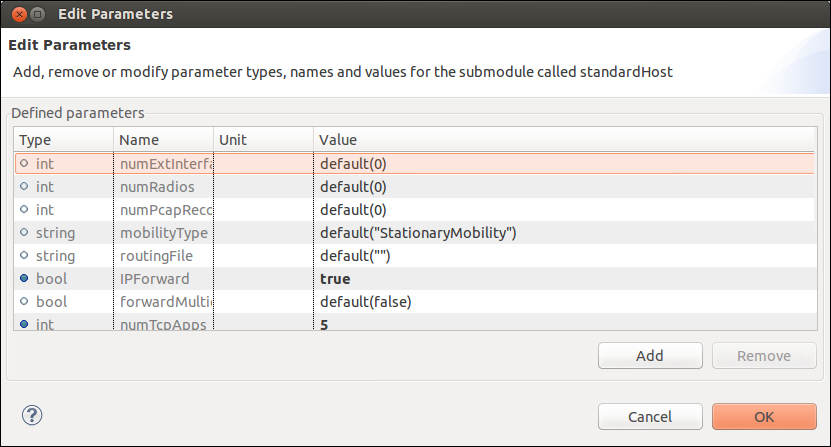
This is a much longer way to change settings, but I must admit that it feels easier. The benefit with NED is that you can see the parameters for submodules much more easily. The benefit of using the Edit Parameters form is that you can see all the parameters that belong to the submodule you are observing and their default values.