Now that you know how to create a new project inside OMNeT++, let's make a simulation from scratch. We will use the INET framework to save time and to get the simulation up and running as quickly as possible. To continue, you must first include INET as explained earlier.
This simulation will be simple, yet accurate. The simulation will contain five computers, all talking to a server via a router.
Start by creating an empty project with the src and simulations folders. I'm calling my simulation HelloWorld. With your new project open, the first step should be to create your network.
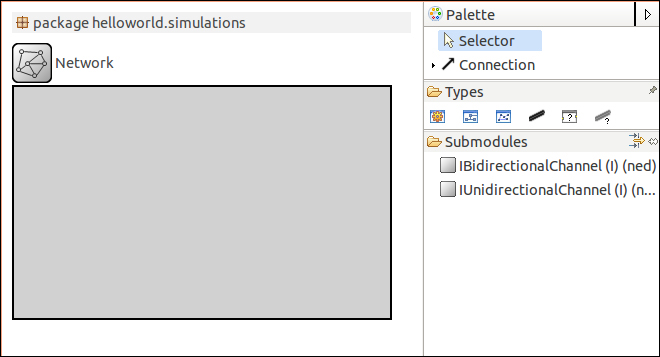
- Navigate to the simulations folder and open package.ned. Now click on Network under Types in the Palette explorer and then click to the left on the opened Design tab. Alternatively, you could just start using the Source tab and add:
network Network
{

}
If the following is what you see in the Design tab, it means that you've done it correctly:
- Now, open the omnetpp.ini file under the simulations folder. The first thing to do is select the network to simulate. The network I just created is simply called Network and the package it belongs to is helloworld.simulations. With omnetpp.ini opened in the Form tab, select General from the left-hand side. Here you can select the network that you wish to simulate. Mine looks like the following:

- If you're not sure what to enter for Network to simulate:, just check the
package.nedsource and look at the first line. The first line of mypackage.nedsource looks like the following:package helloworld.simulations;
- You can also clear the Network to simulate: textbox, tap Ctrl + Space bar and a list of available networks to select will appear.
Alternatively, you can do this by just using the Source tab instead of the Form view. As the network has already been selected, select the Source tab, and the following is what you will see:
[General]
network = helloworld.simulations.Network
- Let's now add the following four nodes to the network: a client, a server, a router, and a server. Going back to the Design view of your network topology, search for the following components from the Palette and add them to the network:
- StandardHost x 2
- A router
FlatNetworkConfigurator
The purpose of the
FlatNetworkConfiguratorsubmodule is to configure IPv4 addresses for the nodes to make up a "flat" network. The twoStandardHostsubmodules will act as a client and server respectively. I've renamed theStandardHostsubmodules accordingly. The following is what your network topology should look like: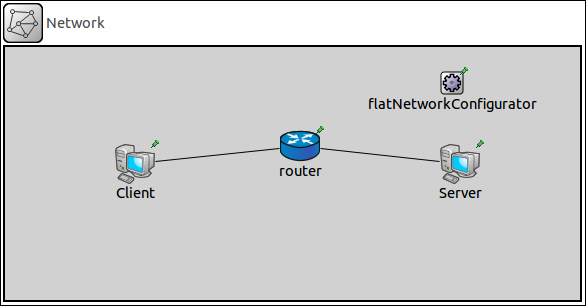
- If you look at the source for this topology, you will see that I've decided to use Ethernet connections between these components. This suggests that the network is a LAN, as shown in the following code snippet:
package helloworld.simulations; import inet.examples.httptools.socket.tenserverssocket.ethernetline; import inet.networklayer.autorouting.ipv4.FlatNetworkConfigurator; import inet.nodes.inet.Router; import inet.nodes.inet.StandardHost; @license(LGPL); // // TODO documentation // network Network { @display("bgb=575,253"); submodules: Client: StandardHost { @display("p=130,117"); } router: Router { @display("p=295,99"); } Server: StandardHost { @display("p=455,117"); } flatNetworkConfigurator: FlatNetworkConfigurator { @display("p=447,36"); } connections: Client.ethg++ <--> router.ethg++; router.ethg++ <--> Server.ethg++; } - Remember not to pay too much attention to the
@display()tags as they just indicate where I have placed those submodules in the Network component. Note that the following license declaration is added in the code:@license(LGPL);
Lesser General Public License (LGPL) means that the code is allowed to be copied and distributed, but changing it is not allowed. This license is added by default and can simply be removed or changed if you wish. I've kept it purely for the sake of this guide.
- Now let's get the nodes of this network talking to each other. In order to do this, we must create configurations for the submodules in the
omnetpp.inifile. This basic configuration will get the simulation running smoothly:[General] network = helloworld.simulations.Network **.Client.numTcpApps = 1 **.Client.tcpApp[0].typename = "TCPBasicClientApp" **.Client.tcpApp[0].connectAddress = "Server" **.Client.tcpApp[0].connectPort = 80 **.Client.tcpApp[0].thinkTime = 0s **.Client.tcpApp[0].idleInterval = 0s **.Server.numTcpApps = 1 **.Server.tcpApp[0].typename = "TCPEchoApp" **.Server.tcpApp[0].localPort = 80 **.ppp[*].queueType = "DropTailQueue" **.ppp[*].queue.frameCapacity = 10
- This code is reasonably pragmatic, and you can see that the client is a basic TCP client application that talks to the server, which is a TCP echo application listening on port 80. The last two lines configure the network interface cards in the network.
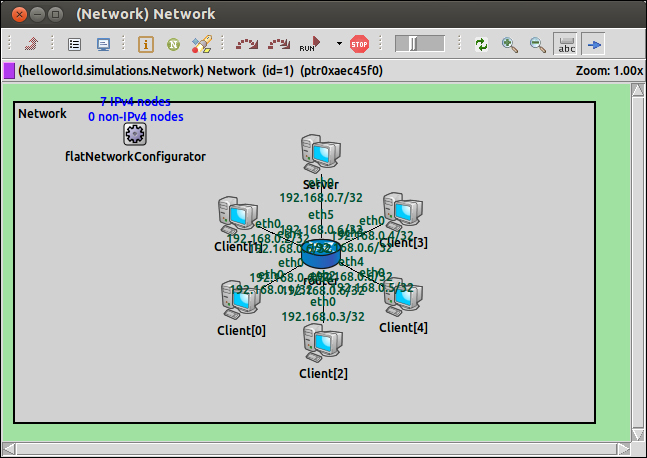
- You will now be able to run this simulation. You can use the same method that you learnt earlier. The following is what you will see when running the network:
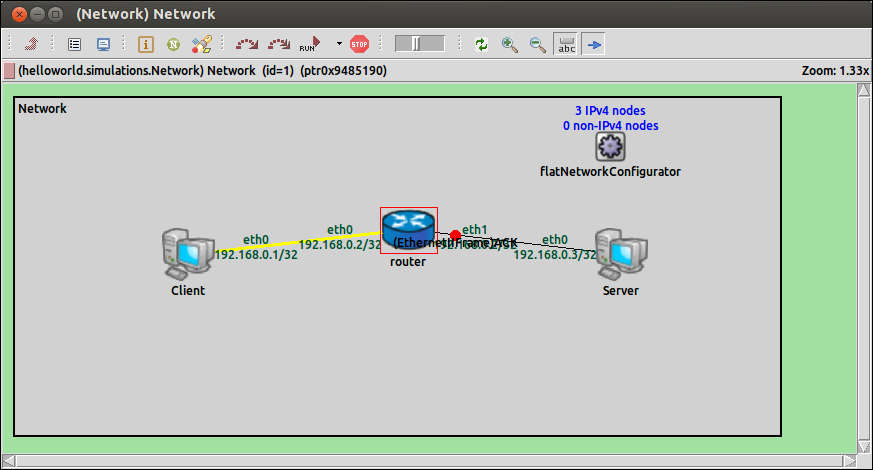
- You will see that everything is running as we configured it in the
omnetpp.inifile. Let's now add four other client nodes to the Network topology. This is as easy as adding the first client node; simply add them from the Palette and name them accordingly. The Network topology should now look like the following: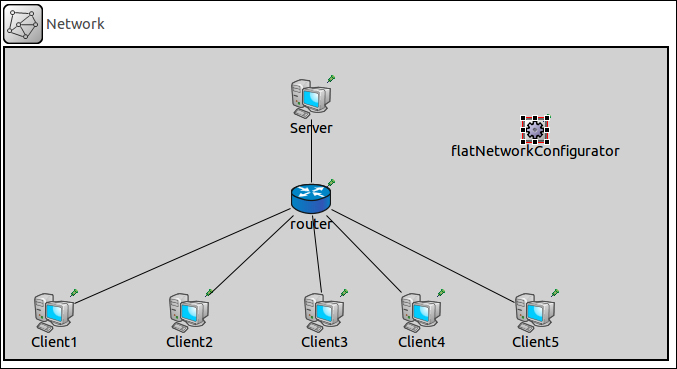
The source for this new network topology is as follows:
package helloworld.simulations;

import inet.examples.httptools.socket.tenserverssocket.ethernetline;
import inet.networklayer.autorouting.ipv4.FlatNetworkConfigurator;
import inet.nodes.inet.Router;
import inet.nodes.inet.StandardHost;


@license(LGPL);
//
// TODO documentation
//
network Network
{
    @display("bgb=662,311");
    submodules:
        Client1: StandardHost {
            @display("p=49,265");
        }
        router: Router {
            @display("p=306,151");
        }
        Server: StandardHost {
            @display("p=306,51");
        }
        flatNetworkConfigurator: FlatNetworkConfigurator {
            @display("p=530,82");
        }
        Client2: StandardHost {
            @display("p=184,265");
        }
        Client3: StandardHost {
            @display("p=319,265");
        }
        Client4: StandardHost {
            @display("p=416,265");
        }
        Client5: StandardHost {
            @display("p=530,265");
        }
    connections:
        Client1.ethg++ <--> ethernetline <--> router.ethg++;
        Client2.ethg++ <--> ethernetline <--> router.ethg++;
        Client3.ethg++ <--> ethernetline <--> router.ethg++;
        Client4.ethg++ <--> ethernetline <--> router.ethg++;
        Client5.ethg++ <--> ethernetline <--> router.ethg++;
        router.ethg++ <--> ethernetline <--> Server.ethg++;
}
This will be a good time to introduce the method of using arrays to organize similar nodes better; for example, there are five clients that all share the same parameters and are of the same submodule type.
Let's first add a
parameterssection to our code and add an integer variable just below the instance where the network is first declared, as shown in the following code snippet:network Network { parameters: int n;This variable will store the number of clients on the network. This is done by removing all five of the client definitions from the source code and replacing it with only one as follows:
Client[n]: StandardHost { } - The code is now much tidier and easier to read. Tidy code will make larger projects much easier to manage. The last thing that needs to be changed is in the
connectionssection; first delete all the lines in that section that start withClient. Now write the following in theconnectionssection:for i=0..n-1 { Client[i].ethg++ <--> ethernetline <--> router.ethg++; }The following is the updated Network topology source code:
package helloworld.simulations; import inet.examples.httptools.socket.tenserverssocket.ethernetline; import inet.networklayer.autorouting.ipv4.FlatNetworkConfigurator; import inet.nodes.inet.Router; import inet.nodes.inet.StandardHost; @license(LGPL); // // TODO documentation // network Network { parameters: int n; @display("bgb=662,311"); submodules: Client[n]: StandardHost { } router: Router { @display("p=306,151"); } Server: StandardHost { @display("p=306,51"); } flatNetworkConfigurator: FlatNetworkConfigurator { @display("p=530,82"); } connections: for i=0..n-1 { Client[i].ethg++ <--> ethernetline <--> router.ethg++; } router.ethg++ <--> ethernetline <--> Server.ethg++; } - Now add the following line anywhere in the
omnetpp.inifile:*.n = 5
This sets the number of client nodes to
5. When you run the simulation again, the following is what you'll see:
- You can now set any number of client nodes you wish and try out different values to see what's possible. The following is what the network looks like with the value of
nset to200: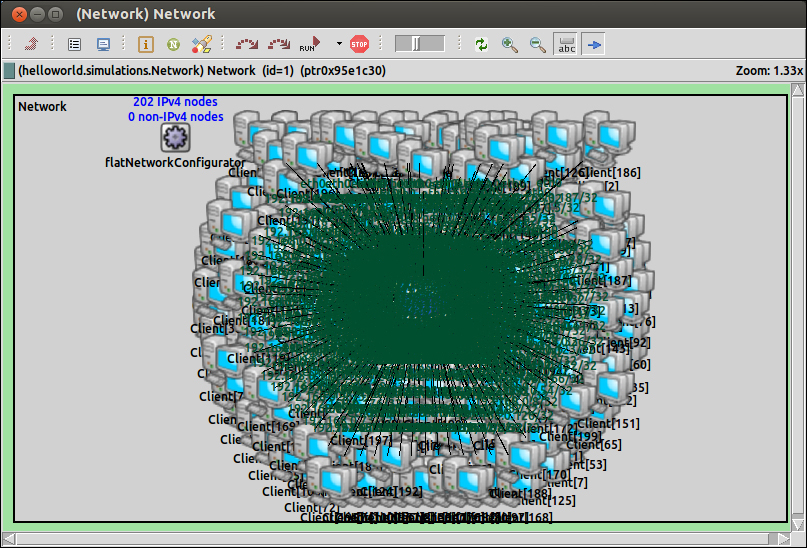
This looks overwhelming; however, it still runs and the simulation's output log still gives the same insight into the simulation. Note that with this many nodes in the simulation, it will take much longer to run, depending on the processor speed you have available.
- The following is the code of an INET example Network topology which also makes use of arrays:
package inet.examples.inet.nclients;

import inet.networklayer.autorouting.ipv4.IPv4NetworkConfigurator;
import inet.nodes.inet.Router;
import inet.nodes.inet.StandardHost;
import ned.DatarateChannel;


network NClients2
{
    parameters:
        int numRouters;
        int hostsPerRouter;
    types:
        channel ethernetline2 extends DatarateChannel
        {
            delay = 0.1us;
            datarate = 100Mbps;
        }
        channel gigabitline2 extends DatarateChannel
        {
            delay = 0.1us;
            datarate = 1Gbps;
        }
    submodules:
        configurator: IPv4NetworkConfigurator;
        r[numRouters]: Router;
        cli[numRouters*hostsPerRouter]: StandardHost {
            parameters:
                @display("i=device/laptop_vs");
        }
        srv: StandardHost {
            parameters:
                @display("i=device/server_l");
        }
    connections:
        for i=0..numRouters-1, for j=0..hostsPerRouter-1 {
            cli[i*hostsPerRouter+j].pppg++ <--> ethernetline2 <--> r[i].pppg++;
        }
        for i=0..numRouters-2 {
            r[i].pppg++ <--> gigabitline2 <--> r[i+1].pppg++;
        }
        r[numRouters-1].pppg++ <--> ethernetline2 <--> srv.pppg++;
}
The preceding code can be found at
inet/examples/inet/nclients/NClients2.ned.
At the moment, the simulation that we have just created only uses one configuration; this is the one under General in the omnetpp.ini file. Let's add two scenarios that the simulation can use. Scenario 1 will have five client nodes, whereas scenario 2 will have ten client nodes. The following is what the updated omnetpp.ini file looks like:
[Config Scenario_One]

*.n = 5

[Config Scenario_Two]

*.n = 10

[General]
network = helloworld.simulations.Network

**.Client*.numTcpApps = 1
**.Client*.tcpApp[0].typename = "TCPBasicClientApp"
**.Client*.tcpApp[0].connectAddress = "Server"
**.Client*.tcpApp[0].connectPort = 80
**.Client*.tcpApp[0].thinkTime = 0s
**.Client*.tcpApp[0].idleInterval = 0s


**.Server.numTcpApps = 1
**.Server.tcpApp[0].typename = "TCPEchoApp"
**.Server.tcpApp[0].localPort = 80

**.ppp[*].queueType = "DropTailQueue"
**.ppp[*].queue.frameCapacity = 10
When you try to run your simulation now, you will be presented with a new dialog box asking you which configuration to select to run:
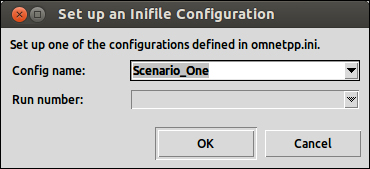
Click the OK button to continue to your simulation.
Let's now look at a more sophisticated example of using multiple scenarios:
[Config inet__inet]
description = "inet_TCP <---> inet_TCP"
# setting TCP stack implementation
**.srv*.tcpType = "TCP"
**.cli*.tcpType = "TCP"
#**.srv.numPcapRecorders = 1
#**.srv.pcapRecorder[0].pcapFile = "results/inet_srv.pcap"

[Config lwip__lwip]
description = "TCP_lwIP <---> TCP_lwIP"
# setting TCP stack implementation
**.srv*.tcpType = "TCP_lwIP"
**.cli*.tcpType = "TCP_lwIP"
#**.srv.numPcapRecorders = 1
#**.srv.pcapRecorder[0].pcapFile = "results/lwip_srv.pcap"

[Config lwip__inet]
description = "TCP_lwIP <---> inet_TCP"
# setting TCP stack implementation
**.srv*.tcpType = "TCP_lwIP"
**.cli*.tcpType = "TCP"

[Config inet__lwip]
description = "inet_TCP <---> TCP_lwIP"
# setting TCP stack implementation
**.srv*.tcpType = "TCP"
**.cli*.tcpType = "TCP_lwIP"

[General]
network = NClients
#debug-on-errors = true
tkenv-plugin-path = ../../../etc/plugins

sim-time-limit = 1000000s

# number of client computers
*.n = 4

# tcp apps
**.cli[*].numTcpApps = 1
**.cli[*].tcpApp[*].typename = "TelnetApp"
**.cli[*].tcpApp[0].localAddress = ""

**.cli[*].tcpApp[0].localPort = -1
**.cli[*].tcpApp[0].connectAddress = "srv"
**.cli[*].tcpApp[0].connectPort = 1000

**.cli[*].tcpApp[0].startTime = exponential(5s)
**.cli[*].tcpApp[0].numCommands = exponential(10)
**.cli[*].tcpApp[0].commandLength = exponential(10B)
**.cli[*].tcpApp[0].keyPressDelay = exponential(0.1s)
**.cli[*].tcpApp[0].commandOutputLength = exponential(40B)
**.cli[*].tcpApp[0].thinkTime = truncnormal(2s,3s)
**.cli[*].tcpApp[0].idleInterval = truncnormal(3600s,1200s)
**.cli[*].tcpApp[0].reconnectInterval = 30s
**.cli[*].tcpApp[0].dataTransferMode = "object"

**.srv.numTcpApps = 1
**.srv.tcpApp[*].typename = "TCPGenericSrvApp"
**.srv.tcpApp[0].localAddress = ""
**.srv.tcpApp[0].localPort = 1000
**.srv.tcpApp[0].replyDelay = 0

# NIC configuration
**.ppp[*].queueType = "DropTailQueue" # in routers
**.ppp[*].queue.frameCapacity = 10    # in routers

# turn on throughput stat
**.channel.throughput.result-recording-modes=+last
The preceding code can be found at inet/examples/inet/nclients/omnetpp.ini.
There are different ways to control the flow of your simulation inside the simulation environment using the following toolbar:

From left to right, the displayed buttons perform the following:
- Run Until next event in the module.
- Fast Run install the next event in the module.
- Run.
- Select Run, Fast Run, Express Run, or Run Until.
- Stop.
The following is a screenshot of a network simulation to remind you where this toolbar can be found:
The following table describes the flow types available when running a network simulation:
|
Flow Type |
Description |
|---|---|
|
This runs the simulation normally, allowing you to visualize what is happening. | |
|
This runs the simulation much faster, doing 1000 events or more every other second. | |
|
This runs the simulation at top speed, doing 100,000 events or more every other second. | |
|
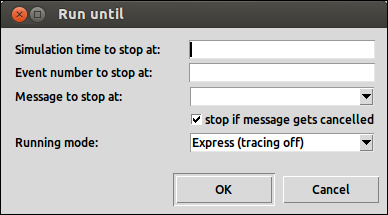
This allows you to run the simulation to a certain time or event in the simulation. |
Selecting Run Until will display the following dialog box to tell the simulation when to stop: