
5. Going the Rest of the Way Offline with Background Sync
In Chapter 4, “Resource Caching,” I showed multiple ways to use service workers and the browser cache to cache web app resources, including application data. That approach works well, because the browser is great at fetching resources and displaying them. All we did was add a manager in the middle to enable our code to control what’s cached and what isn’t. In this chapter, we take app resource caching to the next level, using service workers to enable offline mode in a web app.
We do this using the PWA News app’s Feedback page, shown in Figure 5.1. This page currently displays randomly generated feedback from imaginary site visitors. As we work through the concepts in this chapter, we’ll add an input form to the page to capture visitor sentiment and use the service workers background sync capabilities to ensure that the feedback is delivered to the server when the browser has a network connection to the server.

Figure 5.1 PWA News Feedback Page
The version of the app used in this chapter is a little different than the one from previous chapters. In this version, I added the ability to submit sentiment to the server and update the graph shown in the figure. In the coding examples for this chapter, we’ll make that functionality work even when the browser is offline, uploading recorded sentiment when the browser goes back online.
Introducing Background Sync
Background sync is a feature of service workers that enables web apps to ensure that user actions aren’t lost even if the browser loses network connectivity or the user switches to another app or closes the browser or the current tab. By user actions, I mean things such as:
Sending an email.
Subscribing to a newsletter.
Sending a chat message.
Submitting a form.
These actions are essentially any data created or updated in the web app that must be sent to the server. The ability to fire and forget application actions and know they’ll complete whenever the app (or the browser running the app) regains network connectivity is one of the most powerful mobile app features enabled by PWAs. Web apps do this using service workers.
Developers have two options for implementing this functionality. The first option uses the background sync process described in this chapter, and the other uses the browser’s ability to send data between a service worker and a web app, as described in Chapter 7, “Passing Data between Service Workers and Web Applications.” The difference between these two approaches is that background sync accommodates scenarios in which service workers can’t send the data to the server immediately; instead, the service worker retries the action whenever the browser comes back online (described later). The options described in Chapter 7 enable a web app to pass data between the two entities (the web app and the service worker) and is really only useful for real-time operations.
To make background sync work, web apps share data with service workers through a local database shared by both processes:
The service worker and the web app both open the same local database. The web app writes action data to the database. The service worker reads action data from the database, then deletes the action data once it’s successfully processed.
When the web app invokes background sync to process an action, it writes the action’s data to the database and then fires off a sync event to the service worker to process the action.
When the service worker’s sync event listener receives the event, code in the event listener reads the action data from the local database and does whatever it needs to do with the data.
If the browser (and therefore the service worker) has network connectivity and can perform the action immediately, it does so. If the action succeeds, the service worker deletes the action’s data from the local database. If it fails, it leaves the data there for the service worker to try again the next time the sync event fires.
If the browser doesn’t have network connectivity, the browser queues up the event to try it again later.
This can’t go on forever. After some time, the action must be allowed to pass on to greener pastures. In this case, the browser warns the service worker that it’s done trying to complete the action and the service worker must remove the data from the queue.
Figure 5.2 illustrates the process, highlighting the roles the browser and service worker play in the process.
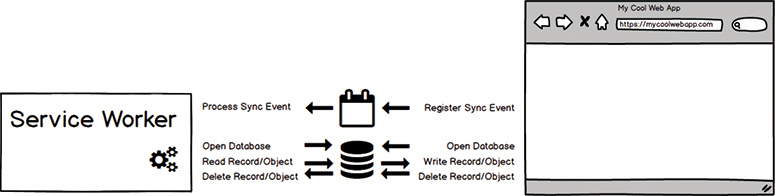
Figure 5.2 Service Worker Background Sync Overview
To trigger a sync, a web app registers a sync event using the following code:
navigator.serviceWorker.ready.then(reg => {
  reg.sync.register('doThatSyncThing');
});
The call to navigator.serviceWorker.ready returns the current service worker’s registration object (reg in the example) that the code uses to register the sync event.
You can also register a sync event inside of a service worker using the following code:
self.registration.sync.register('doThatSyncThing');
Passed to the register method is an event tag identifying the sync event to the service worker. You can use as many event tags as you want in your app; all that matters is that your service worker has code ready to recognize and process the events (through their tags) as they come in.
The browser keeps track of all registered sync events for the service worker and fires the service worker’s sync event listener repeatedly until the sync event resolves. How a browser manages processing sync events varies depending on the browser, but in general it works like this:
If the browser is online, the sync event fires immediately, and the service worker attempts to complete the action.
If the action fails, the browser waits a while before trying again. It should implement an exponential backoff strategy whereby easy subsequent retry occurs after a longer delay.
If the browser status changes from offline to online, the browser tries again.
Eventually, the browser gives up, since it knows it’s likely never going to complete the action—how long that takes is up to the browser.
Inside the service worker, an event listener listens for the sync event, then executes the code associated with the event tag passed with the sync event:
self.addEventListener('sync', event => {
  if (event.tag == 'doThatSyncThing') {
    // do something...

  }
});
Tags play an interesting role in this process. In general, an app uses tags in a way that enables them to group actions together. For example, a chat app may use something like the following:
AddContact
DeleteMessage
SendMessage
SetStatus
Then, in the service worker, the app processes each type of event using separate blocks of code. When the app registers a sync event, and there’s already a sync event queued up with the same tag, the browser’s SyncManager doesn’t add a new event to the queue using the duplicate tag; it sees that there’s already an event registered with that tag and ignores the new one, assuming the service worker code processing the event will deal with all queued data for that particular event.
Earlier I mentioned that the browser will eventually give up on processing a sync event after it tried a bunch of times without success. When this happens, it stops processing that event until another sync event fires with the same tag. To protect itself from the impact of this, a web app could generate a unique tag for each event, as shown here:
navigator.serviceWorker.ready.then(reg => {
  reg.sync.register('doThatSyncThing-1');
});
Then, when processing events, the service worker processes all events that match the specific pattern, as shown here:
self.addEventListener('sync', event => {
  if (event.tag.startsWith('doThatSyncThing')) {
    // do something...

  }
});
Like everything else with service workers, background sync makes heavy use of promises, so if you didn’t feel comfortable with promises in the previous chapter, you should probably sharpen your promises skills now before continuing.
Offline Data Sync
Service workers don’t offer capabilities for managing offline data in web apps. Service workers run in the browser but don’t run all the time, and this limitation prohibits their use for real background data synchronization. The browser wakes the service worker up only when there’s work for it to do, using the event interfaces shown in previous chapters. Unfortunately, there is no option for data events or timer events in service workers (today anyway; apparently, Google has periodic background sync1 as a feature, but it’s not mainstream).
1. https://www.chromestatus.com/feature/5689383275462656
If your app requires data synchronization, you should use one of the many sync software development kits (SDKs) available in the market, such as the ones from Amazon,2 Couchbase,3 and Firebase.4 Don’t write your own—it’s been done many times already by people smarter than both of us.
2. https://aws.amazon.com/appsync/
4. https://firebase.google.com/
There is, in some cases, a simple workaround for this limitation. The PWA News app pulls data from a server process, and users can’t make any updates to the news data, so a service worker–based sync process can be easily implemented. The approach uses browser push and the poke-and-pull method (illustrated in Figure 5.3):
Update the service worker so it creates a local database to host the news data and populates it on activation.
Modify the web app so it looks for its news data in the database rather than getting it from the server.
Update the server process so it sends a push notification (the poke) to the app whenever there’s new news data available. Push notifications are covered in Chapter 6, “Push Notifications.”
Add a push event listener to the service worker so it requests a news update from the server (the pull) whenever it receives a specific push notification from the server.
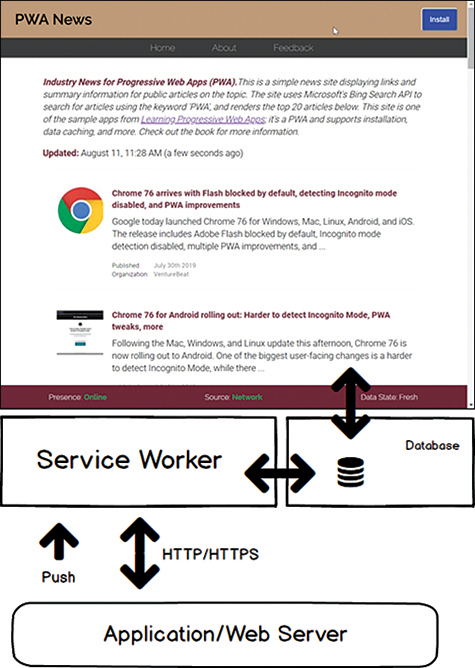
Figure 5.3 Service Worker-Based Poke and Pull
The code in the web app that loads the news data from the local database must have a fallback process that pulls the data from the server when it runs on a browser that doesn’t support service workers. Remember, PWAs are progressively enhanced web apps, so they must work even when service workers aren’t supported.
Is the poke-and-pull method the best approach for this app? No, probably not. But, for certain types of apps, it is a reasonable approach. For example, many chat apps are built this way, using push notifications or web sockets to let client applications know about new data.
Choosing a Sync Database
As I showed in an earlier section, browsers don’t provide a direct mechanism for a web app to send data to service workers for background sync. You must create a shared store accessible by both the web app and the service worker. The web app queues data to the store then notifies the service worker to pick it up and process it via the sync event.
There are many different ways you can implement this cache store in your web apps, but Google recommends, and pretty much all background sync examples on the Internet use, the browser’s IndexedDB5 database. The reason, described in Live Data in the Service Worker6 and Offline Storage for Progressive Web Apps7 is that IndexedDB is asynchronous and available to service workers. Other available options have limitations (synchronous instead of asynchronous, limits in data types, etc.). With that in mind, we’ll use an IndexedDB database for the PWA News sync queue.
5. https://developer.mozilla.org/en-US/docs/Web/API/IndexedDB_API
6. https://developers.google.com/web/ilt/pwa/live-data-in-the-service-worker
7. https://developers.google.com/web/fundamentals/instant-and-offline/web-storage/offline-for-pwa
I’m not going to provide a detailed primer on IndexedDB; there’s a lot of good material available online that I’m not inclined to duplicate. I will, however, share some core examples here to get us both on the same page before we jump into enhancing the PWA News app for background sync. If you’re already familiar with IndexedDB, feel free to skip ahead to the next section.
IndexedDB provides an outdated approach to asynchronous operation. Instead of using the modern promise approach, it uses callbacks to handle asynchronous operations. This approach leads quickly to the callback hell described in Chapter 4. To help developers avoid this problem, the community responded with several promise-based wrappers around the IndexedDB API; you can use these libraries to simplify the readability of your IndexedDB code. For this book, I decided not to arbitrarily point you to a third-party library and instead to show you the old-school callback hell way to interact with an IndexedDB database, but in the enhancements to the PWA News application, I’ll implement a promise-based approach.
Create Database
To create an IndexedDB database, a web app must execute the following code:
var theDB = window.indexedDB.open(DATABASE_NAME, 1);
This creates a theDB object pointing to an open database. If the database doesn’t exist when this code executes, the browser creates the database. Service workers don’t have access to the browser’s window object, so to create/open an IndexedDB database, use the following code:
var theDB = self.indexedDB.open(DATABASE_NAME, 1);
We want code that runs in both locations, because both the web app and the service worker must open the database, so we’ll use the latter example for the PWA News app.
Remember, there are no promises here, so to report or act on database operation success or failure, you must create callback functions. For IndexedDB operations, the two you’ll care the most about are the onsuccess and onerror callbacks:
theDB.onsuccess = function (event) {
  console.log('Open Success');
  // get a handle to the database
  let db = event.target.result;

};
theDB.onerror = function (event) {
  console.log('Open Error');

};
The onsuccess callback gets an event object you can use to get a handle to the database object, as shown in the example. If you keep a reference to the theDB object, you can also access the database later from
let db = theDB.result;
The database object also supports other callback options:
theDB.onclose = function (event) {
  console.log('Closing database');

}

theDB.abort = function (event) {
  console.log('Aborting...');

}
You may have noticed that I passed a number to the call to the IndexedDB open method. That parameter specifies the version number for the database. When you open an IndexedDB database, the browser checks the version number you provided against an existing database; if they’re different, as will be the case when you create a new database, the browser fires the onupgradeneeded callback. This callback gives the app an opportunity to make any database changes required by the new version.
theDB.onupgradeneeded = function (event) {
  console.log('Database upgrade needed');
  // do something interesting

}
Create Store
IndexedDB groups related data into stores;8 you’ll need at least one store to manage data for an application. The database’s onupgradeneeded callback is the perfect place to create it:
8. https://developer.mozilla.org/en-US/docs/Web/API/IDBObjectStore
const STORE_NAME = 'my-store';
theDB.onupgradeneeded = function (event) {
  console.log('Database upgrade needed');
  // does the store already exist?
  if (!db.objectStoreNames.contains(STORE_NAME)) {
    // no? Then create it
    console.log('creating store');
    var storeOptions = { keyPath: "idx", autoIncrement: true };
    var theStore = db.createObjectStore(STORE_NAME, storeOptions);
  } else {
    console.log('Store already exists');
  }
}
As you can probably tell from the name, IndexedDB is an indexed database, so you can create multiple indexes in a store and use them to more easily locate objects in the store. In this example, I simply created an index called idx that the IndexedDB engine automatically increments for me. This gives the app a unique identifier it can use to locate and work with every object in the store.
Add Data
Using the previous examples as a base, an app adds a data object to a store by executing the following code:
// get a handle to the db
let db = theDB.result;
let transaction = db.transaction([STORE_NAME], "readonly");
// get a handle to the store
let store = transaction.objectStore(STORE_NAME);
// finally, add the record
let request = add({ key1: 'value1', key2: 'value2' });
That’s a lot of intermediate variables, right? Well, you can simplify this using the following:
// get a handle to the db
let db = theDB.result;
let request = db.transaction([STORE_NAME], "readwrite")
  .objectStore(STORE_NAME)
  .add({ key1: 'value1', key2: 'value2' });

request.onsuccess = function (event) {
  console.log('Add successful');

};
request.onerror = function (event) {
  console.error('Add failure');

}
And, of course, we have the standard callback functions for success and failure.
IndexedDB is a transactional database system, so an app must make database updates through transactions that you can later abort using the transaction object’s abort method. IndexedDB is also an indexed object store, so in this last example, the code added an object to the store.
To see the results of this code, you must use the browser’s developer tools, as shown in Figure 5.4. In this figure, I opened the developer tools, then selected the Application tab across the top. Next, I expanded the IndexedDB option in the left navigator. Chrome doesn’t automatically refresh the contents of this pane, so I had to right-click on IndexedDB and select Refresh IndexedDB before I could see my database and store.

Figure 5.4 Chrome Developer Tools: IndexedDB Data
In the figure, you can see the generated key plus the data object associated with the key. Notice that the code didn’t include the idx object in the call to add, but IndexedDB added it there automatically for you.
Delete Objects
To delete an object from an IndexedDB store, an app needs the index for the object and the following code:
// get a handle to the db
let db = theDB.result;
let idx = 3;

let request = db.transaction([STORE_NAME], "readwrite")
  .objectStore(STORE_NAME)
  .delete(idx);

// success!
request.onsuccess = function (event) {
  console.log('Item ${idx} deleted');

}

// ugh, error
request.onerror = function (event) {
  console.log('Unable to delete item ${idx}');

}
Iterating through Data Using Cursors
To loop through objects in a store, IndexedDB uses cursors. A web app opens a cursor and, if the cursor is not null, uses it to retrieve the data object from the store:
// get a handle to the db
let db = theDB.result;
var request = db.transaction([STORE_NAME], "readonly")
  .objectStore(STORE_NAME)
  .openCursor();

// success!
request.onsuccess = function (event) {
  // get a handle to the cursor
  var cursor = event.target.result;
  // do we have a valid cursor?
  if (cursor) {
    // get the object value from the cursor
    item = cursor.value;
    // do something with the item's data

    // Move onto the next item in the object store
    cursor.continue();
  } else {
    // no valid cursor, so must be at the end
  }
};

// ugh, error
request.onerror = function (event) {
  console.error(request.error);
  // do something with the error

}
In the example, item points to the object {key1: "value1", key2: "value2", idx: 1}. The app accesses object values through item.key1, item.key2, and item.idx.
When the app’s done processing the data accessible through the cursor, it makes a call to cursor.continue, which moves the cursor to the next object in the store. This creates a loop where the cursor moves through all the store objects until it’s done, at which point the code drops into the else clause to wrap up the process.
This is basically everything you need to know about IndexedDB to add background sync to the PWA News app. In the following sections, we’ll take the PWA News app’s existing process of directly POSTing user sentiment data to the server and update it to use service worker background sync instead. I’ll fill in all the details about how background sync works through the code we add to the PWA News app.
Preparing to Code
The work we do in this chapter revolves around the code for the server app available in the book’s GitHub repository at https://github.com/johnwargo/learning-pwa-code. I provided complete instructions for how to download the code and configure your development environment in the section “Preparing to Code” in Chapter 3, “Service Workers.” If you haven’t already completed those steps, go there and complete them before picking up here again.
Open a terminal window and navigate the terminal into the cloned project’s learning-pwa-codechapter-05pwa-news folder. This folder contains the Chapter 5 version of the PWA News server application (which has all the code changes you were supposed to make in Chapter 4).
Install all the dependencies required by the application by executing the following command:
npm install
This command uses the Node Package Manager (npm) to install Node.js modules used by the server.
If you ran the copy-config command during the setup process in Chapter 3, you’re good. Skip ahead to running the npm command after the next paragraph. If not, copy the config.ts file from learning-pwa-codechapter-03app to learning-pwa-codechapter-05pwa-newsapp. This copies the configuration file holding the Bing API key you used in Chapter 3. With the file copied, execute the following command:
tsc
This compiles the server’s .ts files (including the copied config.ts file) into the .js files you see in the project root folder. You’ll see some errors and warnings from the code’s references to some of the objects in the code, but you should be OK if it all worked in Chapter 3.
With all the parts in place, it’s time to start the server. In the terminal window, execute the following command:
npm start
If everything’s set up properly in the code, the server will respond with the following text in the terminal:
[email protected] start D:learning-pwa-codechapter-05pwa-news
node ./bin/www
At this point, you’re all set—the server is up and running and ready to serve content. If you see an error message, you must dig through any reported errors and resolve them before continuing.
To see the web app in its current state, open Google Chrome or a browser that supports service workers and navigate to:
http://localhost:3000
After a short delay, the server should render the app as shown in Figure 3.1. At this point, you’re ready to code.
Enhancing the PWA News Application
The PWA News app’s Feedback page displays a chart showing visitor sentiment for the site. There’s also a select dropdown and a button that visitors can use to submit their feedback about the site. At this point in our chapter progression, the app’s service worker has code to cache all app resources, including the feedback page, so the app will run using cached data even when the device running the app is outside of network coverage. What the app can’t do, which we’ll fix in this chapter, is accept visitor feedback when offline. We’ll use background sync and some complicated code writing to accomplish this goal. Ready?
For the rest of this chapter, we’ll work with the web app code found in the book’s GitHub repository’s chapter-05pwa-newspublic folder.
Preparing the Service Worker for Background Sync
Start by opening the project’s publicsw.js file; the service worker doesn’t know anything about sync events, so we’re going to fix that first. At the bottom of the file, add the following code:
self.addEventListener('sync', event => {
  // process the Submit Feedback action items
  if (event.tag == 'feedback') {
    console.log('SW: Processing Feedback sync');

  } else {
    console.log(`SW: Unrecognized sync event: (${event.tag})`);
  }
});
This code registers the event listener for the sync event discussed earlier in the chapter. It doesn’t do anything right now except log the event; we’ll add code later to act on feedback requests. For now, we just need a place in the service worker to validate the changes we’ll make next in the feedback page.
Updating the Web App to Use Background Sync
Now we need to implement changes to the web app’s Feedback page so it uses background sync to upload visitor sentiment to the server.
Open the project’s publicjsfeedback.js file. If you look toward the bottom of the file, you’ll find the following code:
function submitFeedback(event) {
  console.log('submitFeedback()');
  // get the selected item from the form
  var theSelect = document.getElementById("sentiment");
  let selectedSentiment = theSelect.options[theSelect.selectedIndex].value;
  console.log(`Selected Sentiment: ${selectedSentiment}`);
  // do we have a sentiment value? We should.
  if (selectedSentiment) {
    // post it to the server using fetch
    postFeedback(selectedSentiment);
  }
}
This is the function that starts the process of sending visitor feedback to the server. The code checks to see that there’s a sentiment value selected on the page, then calls the file’s postFeedback function to POST it to the server using fetch. There should always be one value selected on the form, but I prefer to make few assumptions when it comes to user input.
Now, replace the call to postFeedback with the following code:
if ('serviceWorker' in navigator && 'SyncManager' in window) {
  // yes, save the feedback to the database

  } else {
  // service worker or background sync not supported
  // so we'll do this the old-fashioned way
  postFeedback(selectedSentiment);
}
This is an if statement that checks to see if the browser supports service workers and the SyncManager. If they are supported, IndexedDB should be available as well, and we can create a database and use background sync to submit visitor sentiment to the server. You could also check for indexedDB if you wanted to be completely thorough.
This code moves the call to postFeedback to the else clause of the if statement. It is our fallback to regular operation when a visitor uses a browser that doesn’t support service workers. If you omit this fallback, users on older browsers will curse you because their sentiment never seems to make it to the server no matter how many times they click the button.
The last piece of this is to add the code that opens the local IndexedDB database and writes the selected sentiment value to the store. Now, the code we’re about to add refers to functions that don’t exist yet, so don’t panic when your integrated development environment (IDE) or editor starts to complain about some of the code. Add the following code inside the if clause of the if/then statement we just added a minute ago; I’m hoping it’s clear what the code does, but I’ll explain it anyway on the other side.
openIDB()
  .then(db => {
    queueFeedback(db, selectedSentiment)
      .then(() => {
        console.log('submitFeedback: Successfully queued feedback');
      })
      .catch(error => {
        console.error(error);
        Swal.fire('Sync Error', error, 'error');
      })
  })
All right, what’s happening here is that we’re calling a function called openIDB (which we haven’t written yet), and when the promise it returns resolves, we’re calling another function called queueFeedback (another function we haven’t written yet) that adds the selected sentiment value to the database we just opened. Both functions return promises, so that’s why there are so many thens and catches in the code. The call to openIDB returns a handle to the database that was just created or opened. The code then passes that value to the call to queueFeedback so it doesn’t have to figure out where it’s writing its stuff.
Here’s the complete listing for the new submitFeedback function:
function submitFeedback() {
  // the user tapped the Share Sentiment button
  console.log('submitFeedback()');
  // get the selected item from the form
  var theSelect = document.getElementById("sentiment");
  let selectedSentiment = theSelect.options[theSelect.selectedIndex].value;
  // do we have a sentiment selected? we should
  if (selectedSentiment) {
    console.log(`submitFeedback: '${selectedSentiment}' selected`);
    // is IndexedDB supported?
    if ('serviceWorker' in navigator && 'SyncManager' in window) {
      // yes, save the feedback to the database
       openIDB()
        .then(db => {
          queueFeedback(db, selectedSentiment)
            .then(() => {
              console.log('submitFeedback: Successfully queued feedback');
            })
            .catch(error => {
              console.error(error);
              Swal.fire('Sync Error', error, 'error');
            })
        })
    } else {
      // service worker or sync not supported
      // so do this the old-fashioned way
      postFeedback(selectedSentiment);
    }
  }
};
The call to Swal refers to SweetAlert2,9 an open source library for generating visually pleasant alert dialogs in web apps. The first quoted string is the title for the alert dialog. The second parameter (error) is the error message returned from the call to queueFeedback, and the final 'error' tells SweetAlert2 to display an error dialog.
9. https://sweetalert2.github.io/
The complete feedback code for this example is in the project folder’s publicchapter-codefeedback-5.js file.
With that code in place, it’s time to start writing the code that interacts with the local IndexedDB database. If you remember the description of how the sync process works, both the web app and the service worker access the database at different times. The web app accesses the database with write capabilities when it queues up the sentiment value for processing. The service worker accesses the database with read and write capabilities when it processes the queue of sentiment data. The service worker requires read and write access because it uses read to read the data from the store and write when it deletes the value after successful processing.
If you’re thinking the way I do about the code I just described, you probably realized that both processes probably run some of the same code to do what they do. To minimize typing the same code in both the web app and service worker, we’re going to put all of it in the same file and access it from both processes. Add a new file to the project called publicjsdb.js, then open it for editing.
At the top of the file, add the following constants:
// IndexedDB DB and Store Properties
const DB_NAME = 'pwa-news';
const DB_VERSION = 1;
const STORE_NAME = 'feedback-store';
The module code references the store name in several places, so I moved the value into a constant so I wouldn’t have to type it everywhere. I pulled the database version into a constant here because I may change this value with every app version, and I wanted the value in an easy place to find later. It’s used only once, but putting it at the top of the file makes it very easy to change later. Finally, I moved the database name into a constant here just because; I had everything else here, so it made sense to have the database name here as well.
Next, add the openIDB function, shown next, to the new file. The function uses the concepts described earlier in the chapter to open the IndexedDB database and return the database object to the calling function so it can use it later to interact with the open database.
function openIDB() {
  // open the indexedDB database used by the app
  return new Promise((resolve, reject) => {
    // open the feedback database
    var theDB = self.indexedDB.open(DB_NAME, DB_VERSION);

    // success, callback
    theDB.onsuccess = function (event) {
      console.log('openIDB: Successfully opened database');
      // success, return the db object result
      resolve(event.target.result);
    };

    // define the database error callback
    theDB.onerror = function (event) {
      let msg = `Database error ${theDB.error}`;
      console.error(`openIDB: ${msg}`);
      Swal.fire('Database Error', msg, 'error');
      // reject the promise, we failed
      // include the error message with the failure
      reject(msg);
    };

    theDB.onupgradeneeded = function (event) {
      console.log('openIDB: Database upgrade needed');
      // get a handle to the database
      var db = event.target.result;
      // does the store already exist?
      if (!db.objectStoreNames.contains(STORE_NAME)) {
        // no? Then create it
        console.log(`openIDB: Creating store ${STORE_NAME}`);
        // first create the configuration options for the store
        var storeOptions = { keyPath: "idx", autoIncrement: true };
        // then create the store
        var theStore = db.createObjectStore(STORE_NAME, storeOptions);
      };
    };
  });
};
When you open an IndexedDB database, and it doesn’t already exist, the act of opening it creates it for you.
In the onupgradeneeded callback, the code checks to see if the store we need already exists and creates it if it’s not already there.
The last piece of this is the code that follows. It takes the selected sentiment and stores it in the database inside the feedback-store store. Like the generic example shown earlier, this function adds a data object (in this case, { timestamp: Date.now(), sentiment: feedback }) to the store, then registers the sync event that tells the service worker there’s data there for it to process. I added a timestamp to the data object thinking I might display the submission date in the console as the service worker processed each queued feedback item. I never got around to doing that, but if you want, it’s there for you to use in your version of the app.
Add the following function to the project’s db.js file:
function queueFeedback(db, feedback) {
  console.log('queueFeedback()');
  return new Promise((resolve, reject) => {
    let request = db.transaction([STORE_NAME], "readwrite")
      .objectStore(STORE_NAME)
      .add({ timestamp: Date.now(), sentiment: feedback });

    request.onsuccess = function (event) {
      console.log('queueFeedback: Successfully added feedback');
      navigator.serviceWorker.ready.then(reg => {
        console.log('queueFeedback: Registering sync event');
        // fire off the sync request
        // to the service worker
        reg.sync.register('feedback')
          .then(() => {
            // tell the user
            Swal.fire({
              type: 'info',
              title: 'Request Queued',
              text: 'Your sentiment rating was queued for ' +
                'submission to the server.',
              footer: 'Please refresh the page.'
            });
            // and resolve the promise
            resolve();
          })
          .catch(() => {
            // I can't think of why this would happen
            reject();
          })
      });
    };
    request.onerror = function (event) {
      // unable to create transaction
      reject(db.error);
    };
  });
};
The complete service worker code for this example is in the project folder’s publicchapter-codedb.js file.
Finally, we need the Feedback page to load this new JavaScript file. Open the project’s publicfeedback.html and add the following lines to the bottom of the page’s body section, along with the other script tags.
<!-- Add the indexedDB module -->
<script src='js/db.js'></script>
Save your changes to both files and refresh the Home page, then switch to the Feedback page. Remember, the service worker loads from the project’s index.html file but reigns over all pages of the app. You must refresh the Home page to load the updates to the service worker, then switch to the Feedback page to load the other half of our code changes.
Select one of the sentiments from the dropdown field and click the Share Sentiment button. The app should immediately display the queue dialog shown in Figure 5.5. At this point, we think we queued some data for processing by the service worker—let’s check.
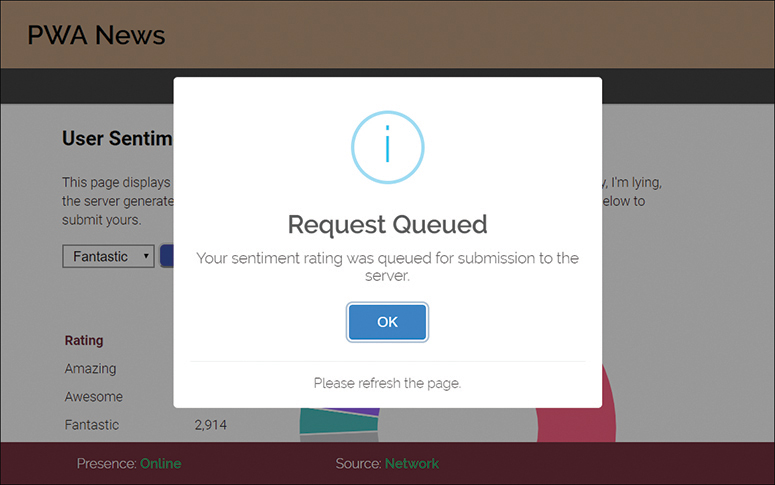
Figure 5.5 Submitting Feedback
Open the browser’s developer tools and switch to the Application tab. In the left navigator, expand the IndexedDB option and refresh the content. You should see the feedback data queued up, as shown in Figure 5.6.

Figure 5.6 Feedback Data Queued for Processing by the Service Worker
The data is still there because we haven’t added any code to the service worker to process it; we’ll do that in the next section.
Finishing the Service Worker
Our final step is to complete the enhancements to the service worker so it knows how to process the feedback queue. In this section, we
Add a reference to the new
db.jsfile in the service worker.Finish the code in the service worker’s
syncevent listener.Add two functions to the project’s
db.jsfile.
Open the project’s publicsw.js file and add the following lines of code to the top of the file:
// the server feedback API endpoint
const FEEDBACK_URL = `${self.location.origin}/api/sentiment`;
This service worker will use this constant to connect to the server when processing feedback.
Next, add the following line to the install event listener before the call to skipWaiting():
self.importScripts('./js/db.js');
Remember, the service worker runs in a separate process from the web application, so it doesn’t know you’ve already loaded the database library in the feedback page. You must explicitly load it in the service worker as well.
The result should look like this:
self.addEventListener('install', event => {
  // fires when the browser installs the app
  // here we're just logging the event and the contents
  // of the object passed to the event. the purpose of this event
  // is to give the service worker a place to set up the local
  // environment after the installation completes.
  console.log(`SW: Event fired: ${event.type}`);
  console.dir(event);
  self.importScripts('./js/db.js');
  // Force service worker activation
  self.skipWaiting();
});
All right, now it’s time to tell the service worker how to process the queued feedback. The code we’re about to work through is probably the most complicated code we’ve looked at so far. To explain it as cleanly as I can, I’ve identified the high-level steps in Table 5.1.
Table 5.1 Service Worker Queue Processing
Step |
Method |
Description |
1 |
|
Instruct the service worker to stay active (not shut down) until everything completes. |
2 |
|
Get the feedback items from the data store. |
3 |
|
Loop through each of the feedback items. |
4 |
|
POST the data to the server. |
5 |
|
Delete processed feedback from the data store. |
Everything the service worker does here is asynchronous, so I’m using promises everywhere. Update the existing sync event listener in the project’s service worker; I’ll explain the code after you’re done reading it:
self.addEventListener('sync', event => {
  console.log('SW: Sync event fired');
  if (event.tag === 'feedback') {
    console.log('SW: Processing Feedback sync');
    event.waitUntil(
      getFeedbackItems()
        .then(data => {
          return Promise.all(
            // loop through the items array
            data.items.map(function (feedbackItem) {
              // update the server if you can
              return fetch(FEEDBACK_URL, {
                method: 'post',
                headers: { 'Content-Type': 'application/json' },
                body: JSON.stringify({
                  sentiment: feedbackItem.sentiment
                })
              })
                .then(() => {
                  // successfully posted,
                  // so whack the record at idx
                  return deleteFeedback(data.db, feedbackItem.idx)
                })
                .catch(error => {
                  // ruh roh, something went wrong
                  console.error(`SW: Sync Error: ${error}`);
                })
            })
          );
        }));
  } else {
    // this should never happen
    console.log(`SW: Unrecognized sync event (${event.tag})`);
  }
});
Here’s what the code does:
We don’t want the browser to shut down the service worker until it’s done processing the queue, so the code starts with a call to
event.waitUntil()that instructs the browser’sSyncManagerto wait until we’re done.waitUntilexpects a promise, sogetFeedbackItemscreates one (we’ll add that code in a minute) then gets to work.getFeedbackItemsconnects to the database and builds an array of all the feedback items, then returns it as the result of the promise.The code loops through the feedback item array. It uses
Promise.all()to say it’s about to make a bunch of promises, and it will resolve (success) if they all succeed or reject (failure) if one fails.Inside that
Promise.all(), it uses thearray.map()method to execute a function against each element in the array.The
mapmethod makes a call tofetch()to POST the data to the server for each item in the array. Thefetchmethod returns a promise, so that makesPromise.all()happy.When the POST completes successfully, the code calls
deleteFeedback(), which deletes the processed item from the store (we’ll add that code in a minute). Oh, anddeleteFeedbackreturns a promise too.
The result is that if the feedback item is successfully uploaded to the server (using fetch), the processed item is deleted from the store. That was a lot of code to accomplish that simple act, wasn’t it?
The reason promises are so important here is because promises give the code an easy way to filter results back up through the cascading method calls I just explained. If just one part of the process fails, for whatever reason, we want everything left in place for the next time the service worker wakes up to process the queue. Promises give us an easy way to manage that.
The complete service worker code for this example is in the project folder’s publicchapter-codesw-5.js file.
Most browser developer tools provide a way to send sync messages to a service worker directly from the browser (rather than having to do it via code). In Google’s Chrome browser, open the developer tools, switch to the Application tab, then select the Service worker panel, as shown in Figure 5.7. Look for the Sync input field highlighted in the figure. Enter the sync tag, then click the Sync button to send the tag to the sync event listener in the service worker.
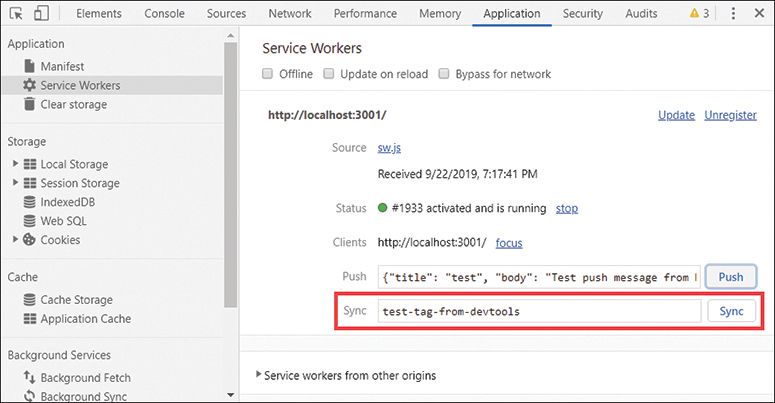
Figure 5.7 PWA News Feedback Page
With the service worker all sorted out, open the project’s public/js/db.js file. At the bottom of the file, add the following function:
function getFeedbackItems() {
  console.log('DB: getFeedbackItems()');

  // will hold the array of feedback items
  let items = [];

  return new Promise((resolve, reject) => {
    // yes, save the feedback to the database
    openIDB()
      .then(db => {
        let request = db.transaction([STORE_NAME], "readonly")
          .objectStore(STORE_NAME)
          .openCursor();

        // success!
        request.onsuccess = function (event) {
          // get a handle to the cursor
          var cursor = event.target.result;
          // do we have a valid cursor?
          if (cursor) {
            // add the feedback item to the array
            items.push(cursor.value);
            // move onto the next item in the object store
            cursor.continue();
          } else {
            // no valid cursor, so must be at the end
            resolve({ db: db, items: items });
          }
        };

        // ugh, error
        request.onerror = function (event) {
          console.error(request.error);
          reject(request.error);
        }
      })  // openIDB()
      .catch(error => {
        console.error(request.error);
        reject(request.error);
      }); // openIDB()
  });
};
The getFeedbackItems function
Creates a promise (of course).
Opens the IndexedDB database.
Opens a cursor in the
feedback-storestore.Loops through each object in the store using the cursor.
Adds each object to the
itemsarray.Returns the database object and
itemsarray.
The code returns the database object so the next function we’ll add can use it. It simplifies the code by not forcing me to create an ugly global variable to hold the database object.
Finally, add the following function to the bottom of the db.js file:
function deleteFeedback(db, idx) {
  console.log(`DB: deleteFeedback: Processing index ${idx}`);

  return new Promise((resolve, reject) => {
    // create a transaction
    let request = db.transaction([STORE_NAME], "readwrite")
      .objectStore(STORE_NAME)
      .delete(idx);

    // success!
    request.onsuccess = function (event) {
      console.log(`DB: deleteFeedback: Item ${idx} deleted`);
      resolve(idx);
    }
    // ugh, error
    request.onerror = function (event) {
      console.log(`DB: deleteFeedback: Unable to delete item ${idx}`);
      console.error(transaction.error);
      reject(transaction.error);
    }
  });
};
The deleteFeedback function
Gets the database object and the index of the feedback item being deleted as parameters passed to the function.
Creates a promise (of course).
Using the database object, creates a transaction for managing the changes to the data store.
Deletes the selected item (using its index as a pointer to the feedback item being deleted).
The complete service worker code for this example is in the project folder’s publicchapter-codedb.js file.
At this point, we’re done with code changes. Save all the changes to the files, switch to the browser, and refresh the Home page. Remember, the service worker loads from the project’s index.html file but reigns over all pages of the app. You must refresh the Home page to load the updates to the service worker, then switch to the Feedback page to load the other half of our code changes.
Go ahead and submit a new feedback, then switch to the Developer Tools console page. You should see your queued-up feedback items processing, as shown in Figure 5.8.
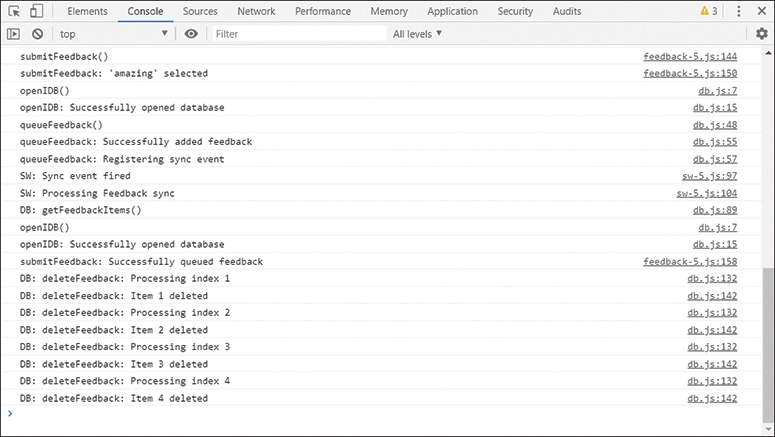
Figure 5.8 Chrome Developer Tools Console Output Showing Feedback Queue Processing
Try taking the application offline and submitting some feedback. When you turn the network connection back on, the service worker should wake up and immediately process the queued items.
We just went through a lot of code and generated a lot of promises, but we now have a version of the PWA News site that works as expected online or offline.
Dealing with Last Chances
Early on, I mentioned that if background sync fails, then the browser will retry it again later. What I didn’t say, and what is not documented, is how many times the browser will retry until it gets it right. I heard somewhere that browsers use an internal exponential backoff algorithm to control how frequently they retry. Looking around to understand this better, I came across an article titled Chrome, the Background Sync API and Exponential Backoff, which looks at this specific question.
Thinking about this problem, you’d think the browser would retry 5, 10, or 20 times before abandoning a sync event, but it turns out that browsers such as Chrome retry the sync only twice before abandoning it. To quote a line from Kevin Kline’s character in A Fish Called Wanda: “Disappointed!”
For our simple PWA News Feedback page, trying to deliver the data only three times isn’t a big deal. For a more transactional app such as a chat app or banking app, I really want more. The good news is that the browser’s SyncManager at least tells you when it’s about to abandon your request. The following listing contains a quick copy and paste of the event object passed to the service worker’s sync event listener. In there you should see the lastChance property. It’s false now, because it was grabbed from a first pass at processing the sync event.
bubbles: false
cancelBubble: false
cancelable: false
composed: false
currentTarget: ServiceWorkerGlobalScope {clients: Clients, registration:
  ServiceWorkerRegistration, onactivate: null, onfetch: null, oninstall: null, ...}
defaultPrevented: false
eventPhase: 0
isTrusted: true
lastChance: false
path: []
returnValue: true
srcElement: ServiceWorkerGlobalScope {clients: Clients, registration:
  ServiceWorkerRegistration, onactivate: null, onfetch: null, oninstall: null, ...}
tag: "feedback"
target: ServiceWorkerGlobalScope {clients: Clients, registration:
  ServiceWorkerRegistration, onactivate: null, onfetch: null, oninstall: null, ...}
timeStamp: 0
type: "sync"
_ _proto_ _: SyncEvent
When the browser’s SyncManager has had enough with this sync event, it switches lastChance to true so you’ll know what’s coming next and can act the way that makes the most sense for your app.
In the service worker, you could do something like this:
// is this the last time the browser will
// process this event?
if (event.lastChance) {
  console.warn(`SW: ${event.tag.toUpperCase()} sync last chance`);
}
This just throws a warning to the console, but the user will never see that, and it doesn’t actually do anything. Do you remember earlier when I mentioned that you could register a sync event inside of the service worker? Well, that is one way to keep this sync event alive. If your code learns that the SyncManager is about to abandon this sync event and there’s still data to process, simply resubmit the background sync using
self.registration.sync.register('feedback')
This is a little dangerous in that it forces the service worker to process the event forever, but hey, it works.
So, in our current service worker example, the preceding code would go into the sync event listener:
self.addEventListener('sync', event => {
  console.log('SW: Sync event fired');
  // is this the last time the browser will
  // process this event?
  if (event.lastChance) {
    console.warn(`SW: ${event.tag.toUpperCase()} sync last chance`);
  }
  if (event.tag === 'feedback') {
    console.log('SW: Processing Feedback sync');
    event.waitUntil(
      getFeedbackItems()
        .then(data => {
          return Promise.all(
            // loop through the items array
            data.items.map(function (feedbackItem) {
              // update the server if you can
              return fetch(FEEDBACK_URL, {
                method: 'post',
                headers: { 'Content-Type': 'application/json' },
                body: JSON.stringify({
                  sentiment: feedbackItem.sentiment
                })
              })
                .then(() => {
                  // successfully posted,
                  // so whack the record at idx
                  return deleteFeedback(data.db, feedbackItem.idx)
                })
                .catch(error => {
                  // ruh roh, something went wrong
                  console.error(`SW: Sync Error: ${error}`);
                  if (event.lastChance) {
                    // do something to handle the last event
                    // warn the user, submit the event again
                    self.registration.sync.register('feedback');
                  }
                })
            })
          );
        }));
  } else {
    // this should never happen
    console.log(`SW: Unrecognized sync event (${event.tag})`);
  }
});
All right, back to this exponential fallback algorithm. Because the referenced article was a little old, I thought things might have changed in the browser, so using the article’s code as a starting point, I embellished it a bit and ran it in the browser to see how the browser manages fallback. Trust, but verify, right? You can find my complete code listing in learning-pwa-codechapter-05fallback-test.
What I did to test this code was load it in the browser, then stop the server process running in the terminal window. What I learned is highlighted in Figure 5.9.
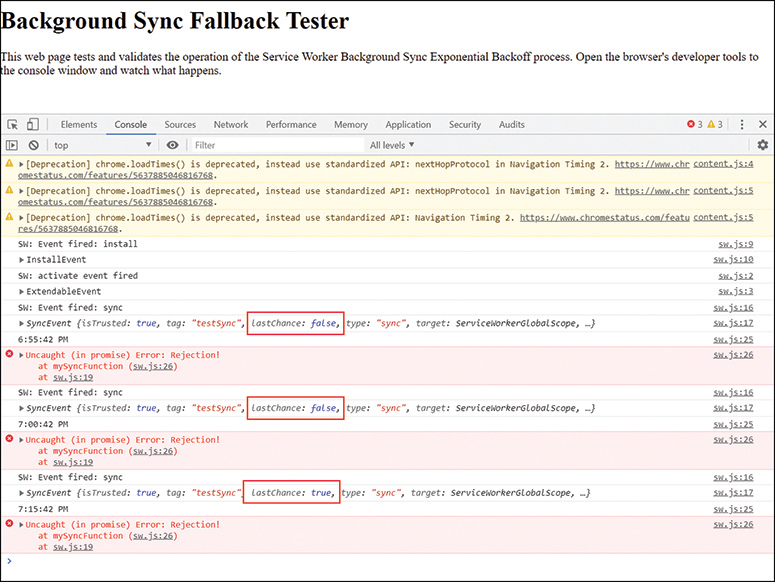
Figure 5.9 Chrome Background Sync Fallback Results
When the SyncManager detects that it can’t complete processing a sync event, it waits 5 minutes and tries again. If the retry fails, the SyncManager waits 15 minutes and tries it again, but this time it switches the lastChance property from false to true. That’s not a very sophisticated algorithm; I can’t imagine a PhD over at Google spent a lot of time on that one.
Anyway, that’s a limitation of background sync you must be aware of and accommodate in your apps. If the data is important, you’re going to have to force the browser to retry the sync more than twice using the strategy I presented in this section.
Wrap-Up
We covered a lot of code in this chapter, and you learned a lot about background sync. Our PWA News app is feature complete; it works while online and offline using resource and data caching plus background sync for data submission. I hope you had as much fun reading this chapter as I had writing it.
In the next chapter, we dig into the last real PWA topic covered in the book: browser notifications.