
Related lists are powerful tools in ServiceNow, both for displaying data, and for doing work. They show up below a form, and can display any records you'd like, that are in some way associated to the one you're viewing in the form.
There are multiple ways to associate one record to another, including a custom-defined relationship that you can create using javascript. The simplest and most common way of relating two records though, we've already done. It's with a Reference field!
To understand how related lists work, you first must understand a key component of ServiceNow: Keys!
See what I did there?
In a database, it is important to be able to differentiate one record from another, with some key piece of information. This is a unique value that resides in a database column. This column is referred to as the primary key for that table. In ServiceNow, the primary key is called the Sys ID, stored in the database column sys_id. This is a 32-character alphanumeric value that is unique in the entire database. No two records (no matter the table) should ever share a Sys ID.
A Reference field is a database column that is meant to accept the primary key (Sys ID) from another record, often in another table. In this way, the two records are related. This is known as a one-to-many, or a parent-child relationship. In fact, there is one field on the Task table which our Virtual War Room table inherited, that's called Parent, and is designed for exactly this type of relationship; though we aren't using it in this case.
When we created the Major incident Reference field on the Virtual War Room table, we created a relationship between records in the Incident table, and records in the Virtual War Room table. We can easily see the related incident from the virtual war room form, by looking at the Major incident field; but what if we want to see any related virtual war rooms, from the incident form? For that, we need to use a related list.
- To get started, navigate to the Incident table. Don't save your changes to the virtual war room ticket.
a. Try navigating there by typing incident.list into the application navigator text filter box, and pressing Enter!
- Click on any Incident record in that list to open the Incident form for that record.
- Right-click on the header for that form, and go to Configure | Related Lists
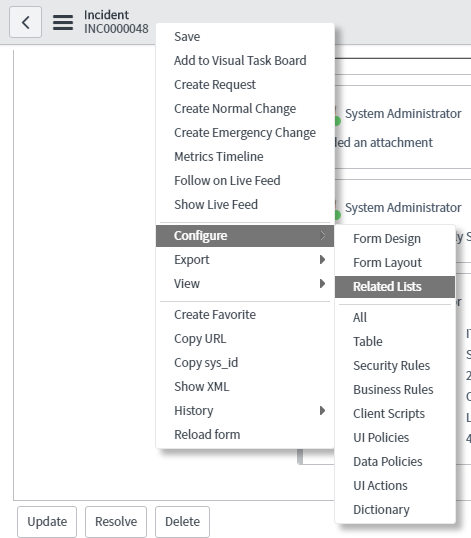
- Scroll down in the Available box, until you see Virtual War Room | Major incident, then double-click on it, and click Save.
You should now see the virtual war rooms related list at the bottom of the incident form, and it should be empty. That means that this particular Incident doesn't have any virtual war rooms associated with it. Let's go ahead and fix that by clicking the blue New button under that related list.
You should be taken to a new record form for the Virtual War Room table, and the Major incident field should be auto-populated with the number of the incident we were just on. Be aware that although you can make the Number field unique in the incident table so that there can be no duplicates, it is not the primary key. That's the Sys ID.
Just like we've done before, fill out the virtual war room record with any old information. You should notice that the Short description field has also auto-populated with the short description of the incident. Let's see what happens if we change the value of a field that is derived from another record. Go ahead and add the word testing to the end of the short description.
Once you've finished filling out some info and changing the short description, right-click on the header and click Save.
When the form reloads, you'll see a reference icon to the right of the Major incident field; it'll look like a lower-case letter "i" inside a circle. ![]() Click on that icon to be taken to the incident that we were on previously, and scroll to the bottom. You should now see our newly created virtual war room! This is because there's now a record in the Virtual War Room table that matches the default query for this related list, which you can see just to the right of the filter icon.
Click on that icon to be taken to the incident that we were on previously, and scroll to the bottom. You should now see our newly created virtual war room! This is because there's now a record in the Virtual War Room table that matches the default query for this related list, which you can see just to the right of the filter icon.
This is all great, and you can imagine the myriad of uses for the functionality of related lists, but we will only be using virtual war rooms on major incidents, and those are pretty rare. Luckily, we can control when related lists show up easily! To see how, right-click on the list column header row in the related list, and go to Configure | List Control.
On the right side of the list control form, you can choose which roles are required to see the New or Edit buttons, the filter, or even links in the related list. On the left side, you can see several options for omitting the new button altogether, omitting the edit button, and other components. The option we're interested in though, is the Omit if empty checkbox. Tick that box, and click Submit to return to the incident form.
Now, when visiting an incident that doesn't have a virtual war room associated with it, you won't see the related list!