
As you may have noticed while building the blueprints, the only two blueprints that can possibly hold logic were the Character type blueprint called madScientist and the Actor type blueprint called levelLayout. The first one will hold the logic for the controller and anything related to the player, while the second will hold the logic for the level movement/generation of collectables and score updating.
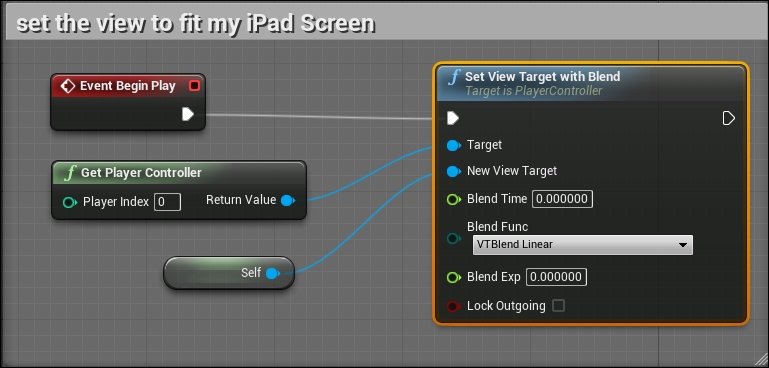
- On Event Begin Play, I will be using View Target With Blend to set the current camera view as the main camera for this level.
- Then, add a custom event called addScore to be the one that will control the Collectables Score variable of type int that holds the score result. Next, use the resultant final score to be displayed by the UI Score text object using the Set Text node and pass the Collectables Score value as a string using the Int to String conversion node.

- Now on the Tick event, which takes place in every frame, we will be checking whether the Collectables Score value is less than 100 or not. Because if the value is more than 100, I'll consider the player victorious and then play the level again using the Open Level node (or show a win screen as in Chapter 4, Advanced Game Content Generation with a Fruit Chopper Game). However, if the player's score is still less than 100, it means the level should keep running by checking whether the Blocks parent transform Relative Location on the Y-axis is more than -3400 (which is the full loop of the four blocks the level is made of).
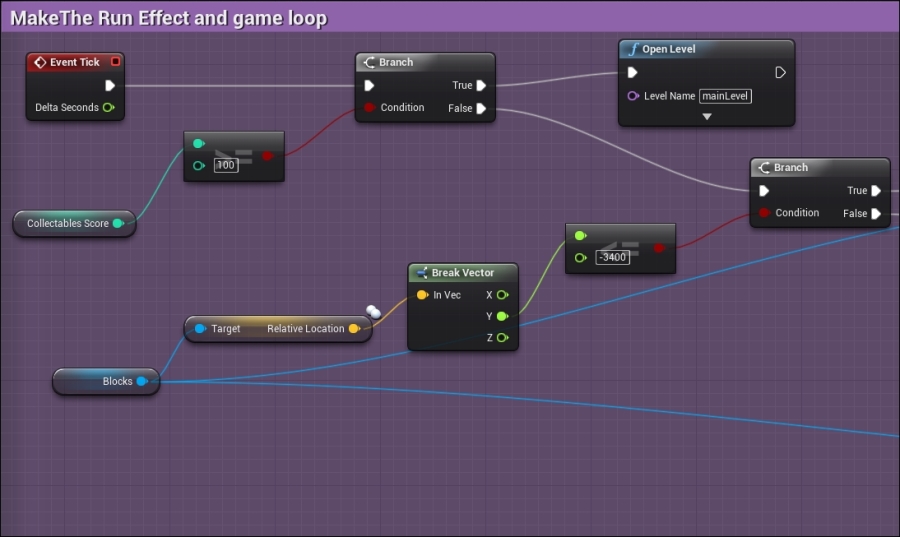
- However, if Relative Location on the y axis is less than -3400, it means that the level is finished and I need to reset the position to the default one (which was 0 on the Y-axis), show all of the collectables again using a custom event called Show Collectables, and finally, start moving the level again using Add Relative Location and adding a small value to the Y-axis. I managed to make a float variable for this small value and called it Runner Speed because changing this value will change the overall speed of the level, and it can be used later for game design purposes to increase the speed over time or over the player's performance.
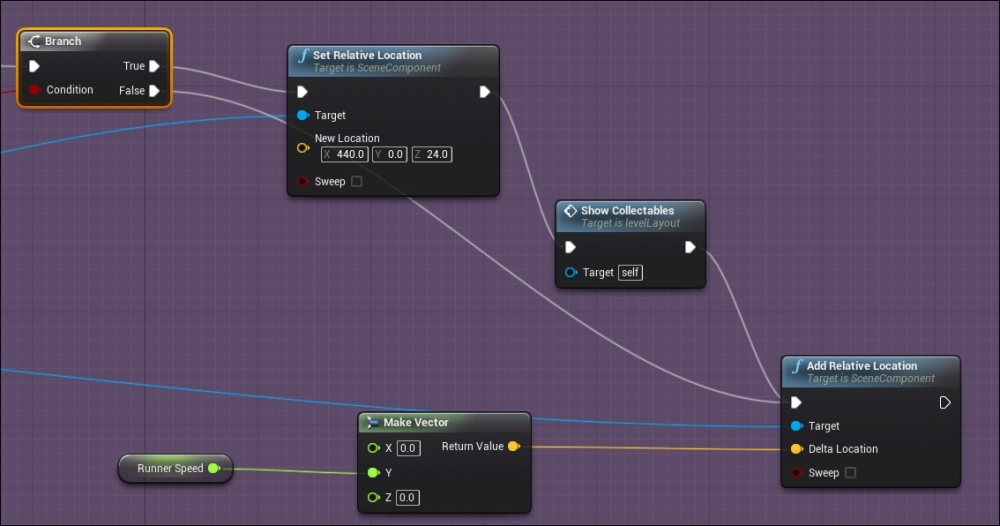
However, if Relative Location on the y axis value is not less, it means the camera is still showing new parts to the player, so I keep using Add Relative Location to move the Blocks transform object.
- The Show Collectables event is very simple, as I used a reference to all of the collectables I have in the level and applied a node called Set Visibility to them and marked its New Visibility variable to True. Now I make sure that when the level starts to loop, it will reset the visibility of the collected items to show them again and again make them available to be collected. (The pooling theory for better performance in Chapter 8, iOS Debugging and Optimization). We can also use a
forloop during runtime to look for those collectables and reset them, but having a reference for them before starting the level is a faster way than looking for them during runtime.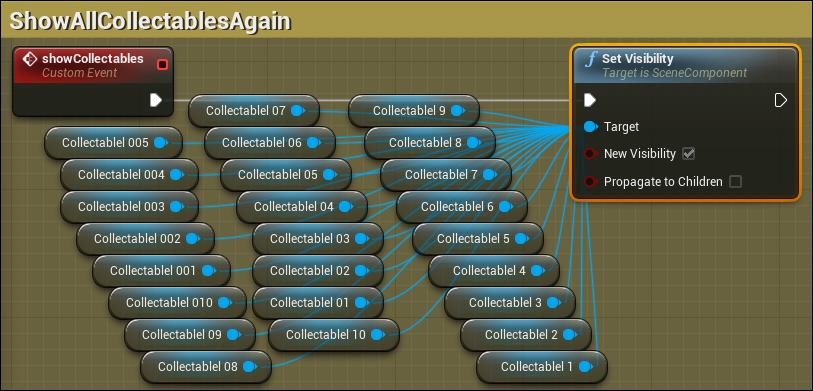
- Using the Space Bar actions and the Input Touch actions is the easiest way to set up a controller for the game quickly. As the game does not require on screen joysticks, or for the player to tap on a specific area, both of those functions will work fine to simulate the player pressing or tapping the screen. And as we are using the Character class to control the player's character, we have direct access to a function called Jump, which will cause the player to jump with the specified force in the Movement component.

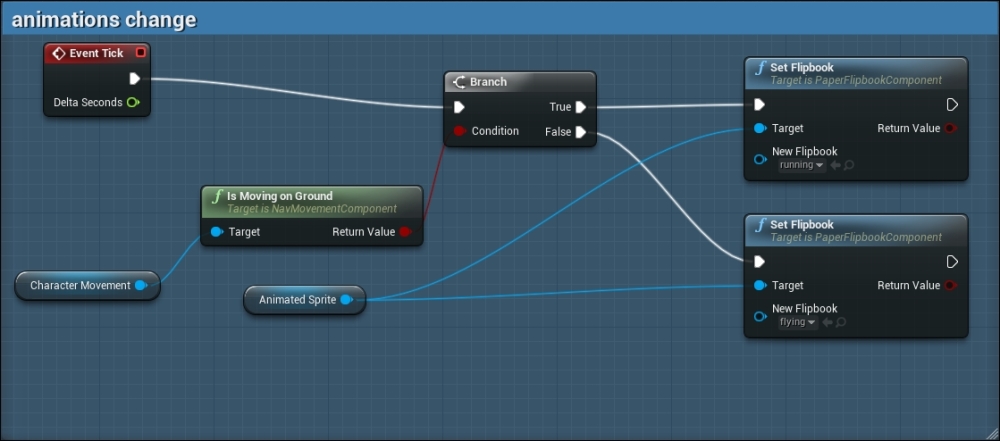
- On Event Tick, we can check every frame to know whether the Character Movement component of the Character class is moving on the ground, and using the returned Boolean value to control whether we will display a running animation or in air idle animation. Using the Set Flipbook node, we can easily control which animation is displayed for which Target flipbook animated component.
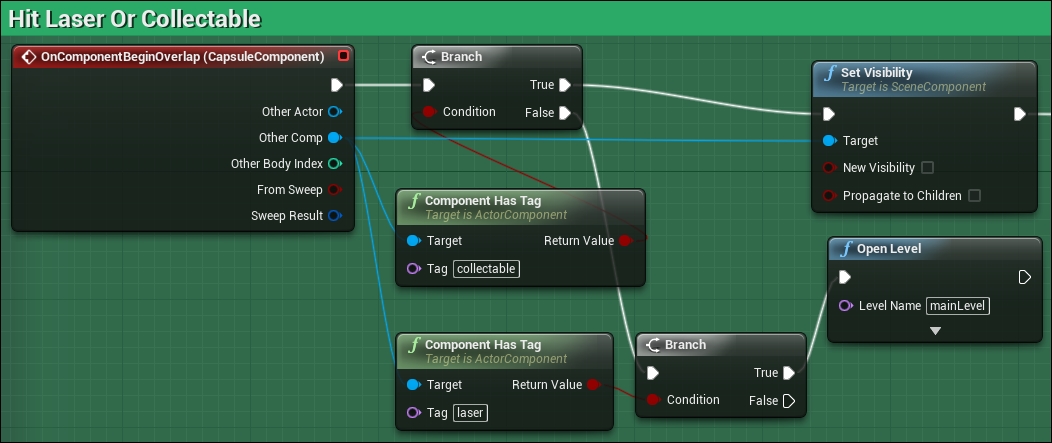
- To be able to detect overlap events with the other components of other actors (the collectables and laser are components of the levelLayout actor blueprint), you will use the OnComponentBeginOverlap node, which is meant to detect the overlap of other actors or components with the current component, that is, the CapsuleComponent in this case.
- I used two Branch nodes (if statements) to detect whether the overlap was with Component Has Tag of collectable or Component Has Tag of laser. And based on the result, I execute several steps. If Component Has Tag of laser, I will use an Open Level node to reopen the level again, or in other words, restart the level (you can also show a lose screen as we did in Chapter 4, Advanced Game Content Generation with a Fruit Chopper Game).
However, if OnComponentBeginOverlap has overlapped with Component Has Tag of collectable, then I'll set the visibility of the other component (the collectable) to False (to hide it. I don't like the idea of destroying an instantiating object as it is never a good idea for game performance; we call it Pooling.)
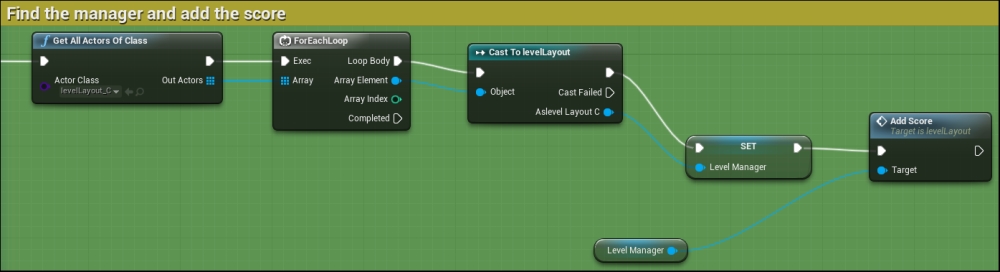
- After hiding the collectable item, it is time to add points to the score in order to reward the player. There is a custom event called Add Score inside the levelLayout blueprint, which is responsible for adding the score, so to be able to call this blueprint, we have to search for it first and then give the call.
- Using Get All Actors Of Class, we can get a reference to all of the actor classes inside the current level. And as we use the levelLayout class one time only inside the level, it will return an array of one element only. By casting a variable called Level Manager, we can save that returned reference and then call the Add Score function on it.
- Now if you drop the levelLayout blueprint inside the level view, and tweak the position of the Player Start element, you have a fully functional endless runner level. Click on Play or deploy to a device, it's up to you.
