
Chapter 3
Building Your Profile
In This Chapter
![]() Determining your contact settings
Determining your contact settings
![]() Crafting your summary information
Crafting your summary information
![]() Adding a position to your profile
Adding a position to your profile
![]() Including your education information in your profile
Including your education information in your profile
![]() Putting additional information in your profile
Putting additional information in your profile
![]() Viewing your profile
Viewing your profile
![]() Setting your Web profile URL and public view
Setting your Web profile URL and public view
![]() Updating your contact settings
Updating your contact settings
After you register with LinkedIn and work to build your network by looking outward, it's time to look inward by focusing on your profile. Think of your LinkedIn profile as your personal home page to the professional world: This profile exists to give anyone a complete picture of your background, qualifications, and skills as well as paint a picture of who you are beyond the numbers and bullet points.
In this chapter, I walk you through all the different sections of your profile and explain how to update them and put the right information in a concise and appealing manner. I take you through adding information at each stage so you can update your profile now or down the road (say, when you finish that amazing project or get that spiffy promotion you've been working toward).
 At any time, you can go to www.linkedin.com and click the Profile link in the top navigation bar to access your LinkedIn profile to view or make changes.
Determining the Contact Settings for Your Profile
Before you dive right in and start updating your profile, stop and think about what kind of profile you want to construct and show to the world. Specifically, think about how you want to use LinkedIn. For example, some people just want to add to their network, but others are actively looking for a job. You can have many reasons for using LinkedIn, and you can identify yourself through setting up your contact settings on LinkedIn. The settings you choose mainly depend on how you plan to use LinkedIn. You can always go back and update your contact settings as your situation changes.
You can select from eight main contact settings in your LinkedIn profile. Each describes a type of opportunity that lets other people know how to approach you on the site:
- Career opportunities: You're looking to augment your skill set so you can advance your career, or you want to network with people who could approach you with a career opportunity now or in the future.
- Expertise requests: You're available to provide expertise on your main subject areas to someone with a question or opportunity.
- Consulting offers: You're open to receiving offers for consulting work.
- Business deals: You're open to doing a business deal, either for your main job or an entrepreneurial venture. Deals here could range from supplier/vendor requests, launching a new line of products, or doing a joint venture.
- New ventures: You're interested in participating in a new company as an employee, co-owner, financier, or anything else.
- Personal reference requests: You're open to providing references for your first-degree connections. (Read what defines a first-degree connection in Chapter 1.)
- Job inquiries: You're open to receiving job offers or interests.
- Requests to reconnect: You're interested in old friends, colleagues, and classmates and wouldn't mind if such folks sent a request to connect with you on LinkedIn.
After you select your settings, they appear as a bulleted list on your profile. In addition, they help determine (and potentially block) the type of communication that you receive on LinkedIn. For example, if you aren't interested in job inquiries, you shouldn't receive any direct solicitations to apply for a job.
Adding Your Summary and Basic Information to LinkedIn
Your LinkedIn profile Summary section, which appears in the top third of your profile, should give any reader a quick idea of who you are, what you've accomplished, and most importantly, what you're looking for on LinkedIn. Some people think of their summary as their “elevator pitch,” or their 30-second introduction of themselves that they tell to any new contact. Other people think of their summary as simply their resume summary, which gives a high-level overview of their experience and job goals. Each summary is as individual as the person writing it, but there are right ways and wrong ways to prepare and update your summary. You should always keep in mind what your professional or career goals are, and what kind of image, or brand, you are trying to portray in support of those goals, because those goals should give you direction on how to write your summary.
LinkedIn divides the Summary section into two distinct parts:
- Your professional experience and goals: This is typically a one-paragraph summary of your current and past accomplishments and future goals. See the next section, “Writing your summary first,” for more on how to construct the right paragraph for this part.
- Your specialties in your industry of expertise: This is a list of your specific skills and talents. It is separate from your professional experience in that this section allows you to list specific job skills (for example, contract negotiation or writing HTML software code) as opposed to the daily responsibilities or accomplishments from your job that you would list in the professional experience and goals paragraph.
Other core elements of your LinkedIn profile are stored in the Basic Information section. Be sure to polish these elements so they reflect well on you:
- Your name: Believe it or not, defining your name properly can positively or negatively affect your LinkedIn activity. Because people are searching for you to connect to you, it's important that LinkedIn knows any sort of variations, nicknames, maiden names, or former names that you may have held, so be sure you correctly fill in your First, Last, and Former/Maiden name fields. Also, LinkedIn allows you to choose a display name of your first name and last initial, in case you want to keep your name private from the larger LinkedIn community outside of your connections.
 You can also include your middle name in the First Name field, which is highly recommended if you have a common name (for example, John Smith) so people can find the “right you” when searching.
 - Your professional headline: Think of this as your job title. It is displayed below your name on LinkedIn, in search results, in connections lists, and on your profile. Therefore, you want a headline that grabs people's attention. Some people put their job titles; other people add some colorful adjectives and include two or three different professions. For example, I use “Author, LinkedIn for Dummies; Co-Promoter, So Cal Comic Con” indicating two of my main professions. Your headline changes only when you update the headline field, so if you add a new position to your profile, your headline doesn't update to show that addition. You have to decide what changes are worth reflecting in your headline.
 Don't overload your headline with too many titles, keywords, or unrelated job skills. Although the headline does not have to be a complete sentence, it should read well and make sense. You're not scoring points with a Google search here — that's what your entire profile is for.
 - Your primary location and industry of experience: As location becomes a more important element when networking online, LinkedIn wants to know your main location (in other words, where you hang your hat . . . if you wear a hat) so it can help identify connections close to you. Then, LinkedIn provides a list of industries you can choose from to indicate your main industry affiliation.
Writing your summary first
Before you update your summary on LinkedIn, I advise writing it out, using a program like Microsoft Word so that you can easily copy and paste it. This allows you to organize your thoughts, decide the right order of your statements, and pick and choose the most important statements to put in your summary.
Of course, the goals of your summary should be the same as your goals for using LinkedIn. After all, your summary is the starting point for most people when they read your profile. As you write your summary, keep these points in mind:
- Be concise. Remember, this is a summary, not a 300-page memoir of your life. Most summaries are one paragraph long, with a separate paragraph to list your skills and/or specialties. Give the highlights of what you've done and are planning to do. Save the detailed information for when you add your individual employment positions to your profile.
- Pick three to five of your most important accomplishments. Your profile can have lots of detail regarding your jobs, skill sets, education, and honors, but your summary needs to reflect the three to five items throughout your career that you most want people to know. Think of it this way: If someone were introducing you to another person, what would you want this new person to know about you right away?
Depending on your goals for LinkedIn, the accomplishments you put in your summary might not be your biggest accomplishments overall. For example, if you're trying to use LinkedIn to get a new job, your summary should include accomplishments that matter most to an employer in your desired field.
- Organize your summary in a who, what, goals format. Typically, the first sentence of your summary should be a statement of who you are currently, meaning your current profession or status; for example, “Software project manager with extensive experience in Fortune 500 firms.” The next few sentences should focus on what you've done so far in your career, and the end of your summary should focus on your goals.
- Use the right keywords in your summary. Keywords are especially important if you're looking for a new job or hoping to pick up some consulting work. Although you should use a few keywords in your professional experience paragraph, you should really use all the appropriate keywords for skills you've acquired when you write the Specialties section of your summary. Potential employers scan that section looking for the right qualifications first, before making any contact. If you're unsure what keywords are the most important, scan the profiles of people in your industry, see what articles they are posting, or look at job opportunity postings in your field to see what employers want when they hire personnel with your title.
- Be honest with your specialties, but don't be shy. Your Specialties section is your opportunity to list any skill or trade you feel you've learned and demonstrated with some ability. Some people stuff their Summary section with the buzzworthy skills for their industry (even if the person doesn't know those skills at all) in hopes of catching a potential employer's eye. Typically, a prospective employer can detect this resume skill padding during the interview phase, which wastes everybody's time. Conversely, however, some people don't list a skill here unless they feel they're an expert at it. You should list any skill or specialty that you believe puts you above the level of a novice or pure beginner.
If you need help coming up with your various summary sections, click the See Examples link below each section header to see examples provided by LinkedIn, or you can view profiles of other people in similar industries. Reach out to your LinkedIn network or find people in your industry or field for help.
Updating your LinkedIn profile's Summary and Basic Information sections
When you have an idea of what you want to put in your profile's Summary and Basic Information sections, it's time to go into LinkedIn and plug that data into the correct fields. When you're ready, follow these steps:
- Go to LinkedIn and log in:
- Click the Profile link in the top navigation bar.
You're taken to the profile page, as shown in Figure 3-1.
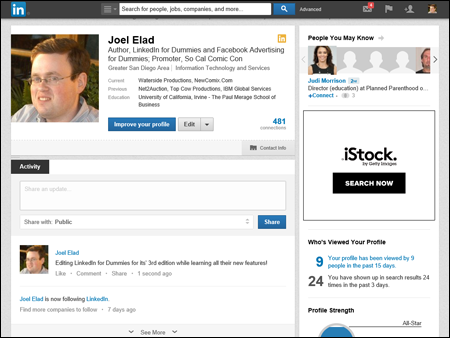
Figure 3-1: Bring up your LinkedIn profile page.
- Click the Edit button, then scroll down to the Summary section and click the Add Summary link below the Summary section header.
You see the Professional Summary page, as shown in Figure 3-2.
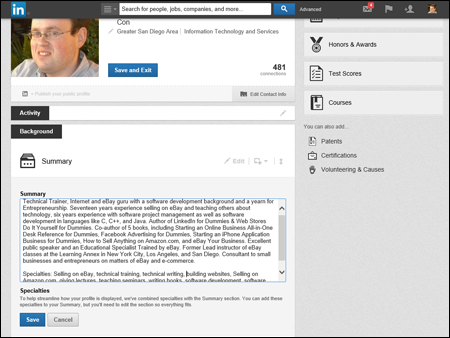
Figure 3-2: Update your profile's Summary section here.
- In the Summary text box, enter a paragraph or two that sums you up professionally (as discussed in the previous section).
You're limited to 2,000 characters, but keep your text concise and focused.
- In the same box, enter your skills and/or specialties as a separate list, as shown in Figure 3-2.
Separate each item with a comma and don't put any punctuation after the last item in your list. You don't need to press Enter/Return between skills.
- Click the blue Save button to save your summary.
You're taken back to your profile page. Next, you need to update the Basic Information section of your LinkedIn profile.
- Click the Edit link (it looks like a pencil) next to your name to update your name.
You now see the Edit Your Profile Name box, as shown in Figure 3-3.
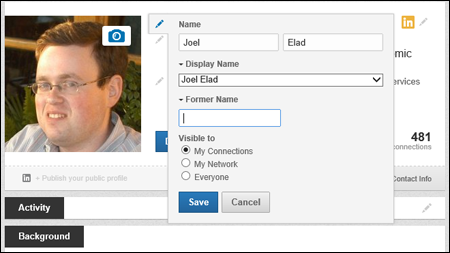
Figure 3-3: Define your name on LinkedIn.
- In the Edit Your Profile Name box, double-check your name and add any maiden or former name in the text box provided. Decide whether you want your display and former/maiden names visible to just your connections, your extended network, or everyone on LinkedIn. When you're done, click the blue Save button.
If you want to maintain a higher level of privacy for your profile, you can choose the Display Name option by clicking the drop-down arrow next to the Display Name box so only your first name and last initial appear on your public profile. If you select that option, your first-degree connections see your full name, but the general public sees only your first name and last initial, such as Joel E. for me.
- Click the Edit link next to your headline to enter your professional headline ( your main job title).
You can put any job title here, but make sure it conveys your main role as you want others to see it. (See the previous sections for what to include in your headline.) When you're done, click the blue Save button.
- Click the Edit link next to your Location and Industry line to update your location and select the industry you most associate with your career.
You can choose from more than 140 designations, so take a few moments to scan the list. Note that some of the industries listed are more specific than others. You want to pick the best match possible. For example, if you create custom graphics for Web sites, you could select Internet as your industry, but an even better choice would be Online Media.
- Click the Save and Exit button.
You're taken back to your profile page.
You've now covered the core of your LinkedIn profile. In the next sections, you find out about the other essential elements to include in your profile, namely your current/past experience and education.
Adding a Position to Your LinkedIn Profile
One of the most important aspects of your LinkedIn profile is the list of positions you've held over the years, including your current job. This list is especially important if you're using LinkedIn to find a new or different career or to reconnect with past colleagues. Hiring managers want to see your complete history to know what skills you offer, and past colleagues can't find you as easily through LinkedIn if the job they knew you from isn't on your profile. Therefore, it's critical to make sure you have all the positions posted on your profile with the correct information, as long as that fits with the brand or image you want to portray to the professional world.
For a company in LinkedIn's directory, you need to fill in the following fields:
- Company name (and display name, if your company goes by more than one name)
- Your job title while working for the company
- The time period you worked for the company
- Description of your job duties
If your company is not listed in LinkedIn's directory, you need to fill in the industry and Web site for the company when you're adding your position to your LinkedIn profile.
Use your resume when completing this section, because most resumes include all or most of the information required.
To add a position to your LinkedIn profile, follow these steps:
- Go to LinkedIn and log in. Hover your mouse over the Profile link in the top navigation bar, then click Edit Profile from the drop-down list that appears.
This step takes you to your profile page. Scroll down your profile until you see the Experience header, shown in Figure 3-4.
- Click the Add a Position link to the right of the Experience header.
You see an expanded Experience section with all the necessary text boxes, as shown in Figure 3-5.
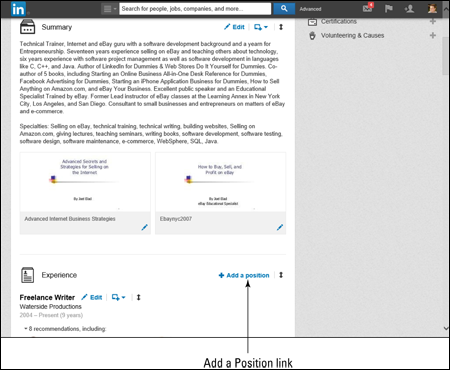
Figure 3-4: Start at your Experience section within your profile.
- In the text boxes provided, enter the information about your position, including company, title, location, time period, and job description.
When you type in your company name, LinkedIn checks that name against its Company pages of thousands of companies from its records, and you see suggested company names while you type. (An example is shown in Figure 3-6.) If you see your company name in that list, click the name, and LinkedIn automatically fills in all the company detail information for you.
After entering the company name, enter your title, job location, the time period when you worked there, and a description of your position.
- Click the Save button.
This adds the newly entered position into your profile, and you're taken back to your profile page.
- Repeat Steps 2–4 for any additional position you want to enter.
To edit a position you already listed, click the Edit link next to that record in the Experience section instead of clicking the Add a Position link.

Figure 3-5: Enter your job information here.
The Experience section isn't just for paid full-time employment. You can add position information for any contract work, nonprofit volunteer assignments, board of director membership, or other valid work experience that added to your skill set. If you've written a book, maintain a blog, or have a regular magazine column, you might want to list that as a separate position.
If you have most of the information that LinkedIn asks for a given position but you're missing a few details in the description, go ahead and add what you have. (You must provide a job title, company, and time period to save the position in your profile.) You can fill in any missing information later. In addition, if you make your profile public (as discussed later in the section “Setting your profile URL and public view”), make sure any position information you enter is something you don't mind the whole world — including past employers — seeing on your profile.
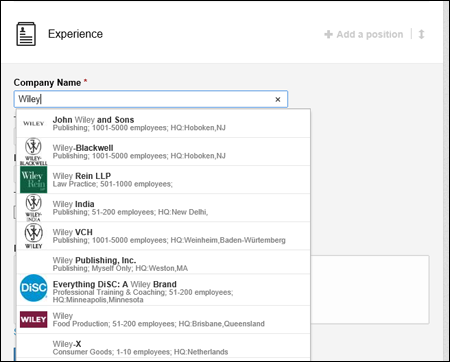
Figure 3-6: LinkedIn checks its Company pages for your company listing.
Reporting Your Education on Your Profile
After you document your past and current jobs, it's time to move on to the next part of your profile: education. After all, besides at your jobs, where else are you going to meet and stay in touch with so many people? At school, of course! Your Education section says a lot about you, especially to potential employers and to former schoolmates who are looking to reconnect with you.
When you signed up with LinkedIn, you might have been asked to provide your basic education information. Maybe you have more than one school to list, or perhaps you didn't create a full listing for the schools you put down upon registration. In either case, you can go back to make sure that your profile is up to date and lists all your education.
Some people ask how much education to list on their profiles. Although you could theoretically go all the way back to preschool or kindergarten, most people start with high school or undergraduate college. This is up to you, but keep in mind that the more items you list, the greater the opportunity that your past schoolmates can locate and contact you.
This section isn't limited to high school, undergraduate, and post-graduate education. You should also list any vocational education, certification courses, and any other stint at an educational institution that matters to your career or personal direction.
When you're ready to update or add your education information, follow these steps:
- Go to LinkedIn and log in. Hover your mouse over the Profile link in the top navigation bar, then click Edit Profile from the drop-down list that appears.
- Scroll down your profile until you see the Education header. Click the Add education link.
You see an expanded Education section with all the necessary text boxes, as shown in Figure 3-7.
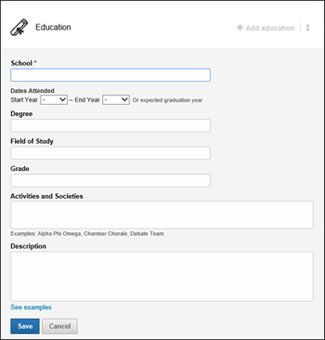
Figure 3-7: Enter your school information into the Education section of your profile.
- In the School text box, start entering the school name you wish to add to your profile.
As you're typing, LinkedIn displays a drop-down list of schools, as shown in Figure 3-8.
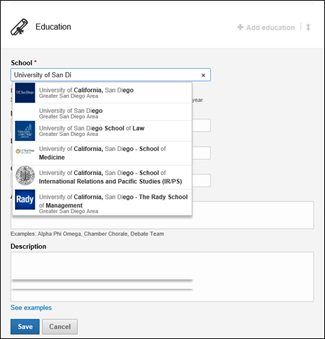
Figure 3-8: Pick your school from the list provided.
- Look through the alphabetized list to find your school and select it. If your school name doesn't appear, just finish typing the name of your school in the text box.
- Complete the degree information about your education.
This includes filling in your degree type, fields of study (if applicable), grade you received (optional), and the years you attended this institution. For your degree type, you can either provide an abbreviation (BS, BA, and so on) or write the entire degree name (Masters of Science, Doctorate, and so on). The Field of Study text box is optional, but if you had a specific major or emphasis, this is where to put that information. Finally, for dates attended, if you're still attending this institution, simply fill in your expected graduation date. If you are an older worker and concerned about age discrimination, you can leave the dates of attendance blank; this is optional information.
- Scroll down to the Activities and Societies text box and fill it in.
Enter any extracurricular activities you participated in while attending this school. Also list any clubs or organizations you belonged to (including any officer positions you held in those clubs) and any societies you joined or were given membership to, such as honor societies, fraternities, or sororities.
Decide if listing these activities will support or enhance your overall professional goals and brand image. Make sure to list any activities, like current alumni organization activities, that apply to your situation today.Separate each activity with a comma.
- Scroll down to the Description text box and enter any additional information about your education experience.
Enter any awards or honors received from this school, as well as any special events or experiences that didn't fit in the Activities and Societies box, such as studying abroad, events you organized, or committees that you served on at this school. You can separate each item with a period if you want.
- When you're done entering information, scroll down and click the Save button.
This step adds the newly entered education listing into your profile, and you're taken back to your profile page.
- Repeat Steps 2–8 for any additional education listings you want to enter.
To edit an existing education record, click the Edit link next to that record in the Education section, instead of the Add Education link.
Completing the Contact Info and Additional Information for Your Profile
Whenever you meet someone, the most common questions you ask are, “So, what do you do?” and “Where did you go to school?” However, there's more to you than your jobs and education, and LinkedIn has two sections, Contact Info and Additional Information, to tie your LinkedIn profile to your other Internet and real-life identities.
These sections allow you to provide lots of information in these areas:
- Web sites: LinkedIn allows you to add up to three different Web site links, which point from your LinkedIn profile to whatever Web site(s) you designate, such as your personal Web site, your company Web site, a blog, an RSS feed, or any other promotional mechanisms you use online.
Adding a link from your LinkedIn profile to your other Web sites helps boost search engine rankings for those pages. Those rankings are partially determined by the quantity and quality of Web pages that link to them, and LinkedIn is a high-quality site as far as the search engines are concerned. Note: You must make your profile public to receive these benefits. You can find out more about your public setting later in the chapter, in the section “Setting your profile URL and public view.”
- Twitter: You can link your Twitter and LinkedIn accounts so that your Twitter updates show up on your LinkedIn profile, and your LinkedIn network activity can be tweeted to your Twitter followers automatically.
- Interests: Highlight your extracurricular activities to allow potential contacts to see what they have in common with you (favorite hobbies or sports) and give potential employers a glimpse into what else interests you outside a job.
- Groups and Associations: Illustrate what organizations you belong to and what formal activities you do in your spare time. Many people use this section to highlight charity work, networking groups they belong to, or affiliations with religious or political groups.
These items are completely optional for you to complete, but a strong, well-rounded profile usually helps you in your career or networking goals because it gives you more opportunities to connect with someone (“Hey, Joel's a big travel fan. So am I!”) or allows people to identify with your situation.
When you're ready to update the rest of the information on your profile, simply follow these steps:
- Go to LinkedIn and log in. Click the Profile link in the top navigation bar.
- On your profile page, click the Edit button. Click the Edit Contact Info link below your profile picture, name, and headline.
You see an Expanded contact information section, as shown in Figure 3-9, where you can update your contact information, including e-mail, phone, IM, and physical address. Click the Edit link (the pencil icon) to add the appropriate information.
If you want to update your Twitter setting, click the Edit link next to the Twitter header to bring up the Twitter Settings page, as shown in Figure 3-10, to add or edit your Twitter account that's connected with LinkedIn.
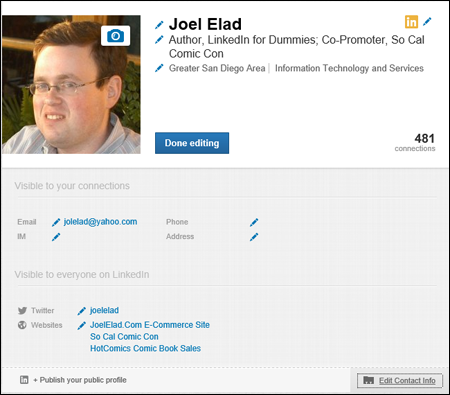
Figure 3-9: Update your contact information here.
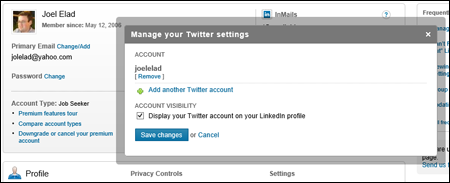
Figure 3-10: This page is where you define your Twitter account to be referenced.
- Under Websites, in the drop-down lists on the left, select short descriptions for the sites you intend to display.
You can pick from the predefined list of descriptions (My Company, My Website, and so on). Or, you can pick Other, as shown in Figure 3-11; in the blank text box that appears, type in a brief custom description for your Web site link (like My E-Commerce Site or the name of your activity).
This description appears as a link on your profile — the reader doesn't see the site's URL.
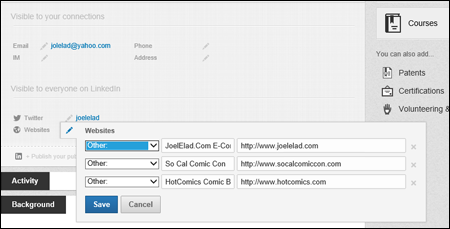
Figure 3-11: You can give custom names to your Web site links.
Search engines look at the text used in these links when calculating rankings. So if there are certain keywords you want to include to rank your site higher, include them in the link text. For example, you might want to say “Springfield Toastmasters” rather than “My Toastmasters Club.” - Still in the Websites section, in the text boxes to the right, enter the URLs of the Web sites you want to list on your profile, corresponding to the correct descriptions on the left.
You can add up to three URLs to your LinkedIn profile, so use them wisely.
This might seem obvious, but, well, people are going to be able to click those links and check out your Web sites. Sure, that's the point, but do you remember that hilarious yet embarrassing picture of yourself you added to your personal site, or that tirade you posted in your blog about a co-worker or tough project? Before you link to a site from your LinkedIn profile, scour it and make sure you won't end up scaring off or offending your contacts. - Scroll down your profile until you get to the Additional Info section, as shown in Figure 3-12. Click the Edit icon to complete the Interests text box.
Use this section to tell the world a little more about you besides your jobs and education. Make sure to separate each interest with a comma.
You probably want to omit any interests that a potential employer wouldn't like to see. For example, if you work in the entertainment industry, talking about how you love to download pirated movies will not make any hiring manager happy. Talk instead about how you love to watch licensed content from approved sources like iTunes or Amazon Unbox!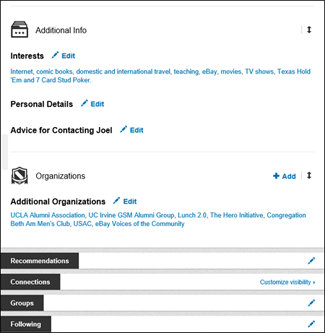
Figure 3-12: Edit your Interests and Additional Organizations here.
- When you're done, click the Save button. Scroll down and click the Edit link next to Additional Organizations to fill in your other groups and associations.
Here you can list your groups not listed under any school, such as any charity groups, religious organizations, alumni associations, and rotary clubs.
- Click the Save button.
This step updates your Additional Information section in your profile, and you're taken back to your profile page.
LinkedIn is continuing to add lots of exciting sections for you to use to highlight all of your achievements and skills. If you edit your profile, you see a list of recommended sections you can add to your profile, as shown in Figure 3-13. Simply click each section and fill in the appropriate information.
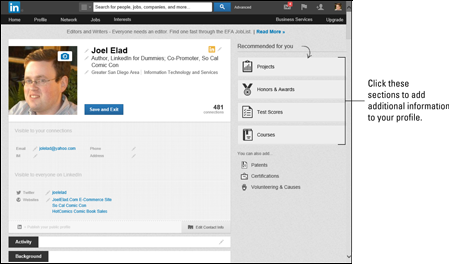
Figure 3-13: See what other sections of information you can add to your LinkedIn profile.
Reviewing Your LinkedIn Profile
After you go through the various sections of your LinkedIn profile and add the critical information, review your profile to make sure it appears exactly the way you want other people to see it, as well as decide how much information is visible to the public and what others on LinkedIn can contact you about.
Viewing your profile as others see it
While you're updating your LinkedIn profile, take a minute to view your profile to see how it is displayed on the computer screen when anyone clicks to view it. The easiest way is to click the Profile link from the top navigation bar, to see your profile, as shown in Figure 3-14.
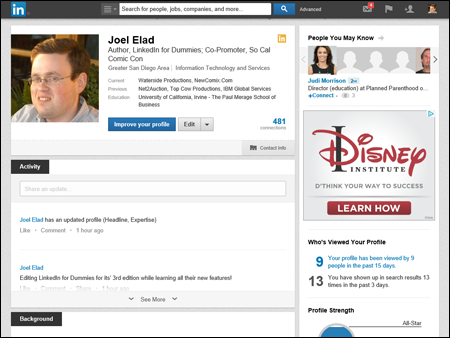
Figure 3-14: View your LinkedIn profile in action.
Setting your profile URL and public view
After you fully update your LinkedIn profile, your next goal is probably to share it with the entire world, not just your LinkedIn network. The best way to accomplish this is to set up your profile so that your full profile is available for public viewing.
Setting your profile to full public view gives you several advantages:
- Anyone looking for you has a better chance of finding you because of the increased information tied to your name.
- When you make your profile public, it gets indexed in both the Google and Yahoo! search databases. This makes your online identity accessible and controlled by your access to LinkedIn.
- You give increased exposure to any companies, projects, or initiatives that you're working on by having that credit published on your LinkedIn profile.
When you're ready to set your profile to Public, just follow these steps:
- Go to LinkedIn and log in. Hover your mouse over the Profile link in the top navigation bar, and click Edit Profile.
You arrive at your profile page. Below your photo, headline, and name, look for the Publish Your Public Profile link as shown in Figure 3-15.
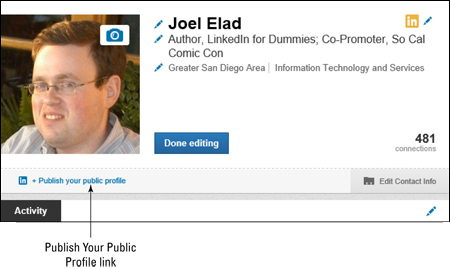
Figure 3-15: Edit your LinkedIn profile settings.
- Click the Publish Your Public Profile link.
This step takes you to the Public Profile settings page, as shown in Figure 3-16.
- (Optional ) To set a custom URL for your LinkedIn profile, click the Customize Your Public Profile URL link and fill in the text box that appears.
You can type anywhere between 5 and 30 numbers or letters, but don't include any spaces, symbols, or special characters. When you're done, click the Set Custom URL button to save your changes.
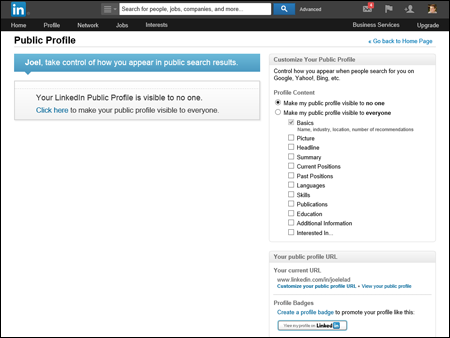
Figure 3-16: Create a customized URL for your LinkedIn profile.
Keep in mind it's much easier to point people to www.linkedin.com/in/joelelad/ than to www.linkedin.com/5a6e4b/. Keep your URL changes to a minimum (preferably, just set it once and leave it) so that everyone knows how to get to your profile, especially search engines. (If you change your custom URL later, the previous custom URL is no longer valid.) Otherwise, you'll have different versions of your profile with different URLs in different places on the Internet. - Scroll down the Profile Content section on the page and determine what parts of your LinkedIn profile you want available for public viewing.
Pick which sections of your LinkedIn profile are public. To reveal a section on your public profile, simply select the check box next to that section, as shown in Figure 3-17. Your basic information is already selected for you by default, but you can decide whether to add your education, positions, groups, or any other indicated section. As you add sections, the preview of your profile page on the left side of the page is updated.
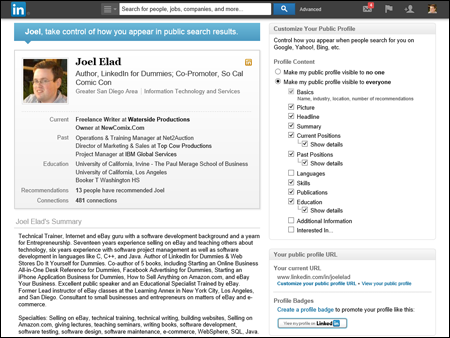
Figure 3-17: Decide what to add to your public LinkedIn profile, and the preview shows the changes instantly.
- Your changes are automatically saved as you select each section.
Click the Go Back to Home Page link (at the top right of the page, as shown in Figure 3-16) to go back to your main LinkedIn page, or click any of the links in the top navigation bar to go about your business.
Whenever you're editing your public profile settings, you can scroll down and click the View Your Public Profile link to open a new browser window and see your public profile.
Checking your contact settings
You definitely want to make sure that you select the correct contact settings for your LinkedIn profile. After all, if you're looking for a new job, for example, you want to make sure the option for Career Opportunities has been checked. (I go into plenty of detail about the eight main contact settings in the earlier section “Determining the Contact Settings for Your Profile.”)
When you're ready to check your contact settings, just follow these steps:
- Go to LinkedIn and log in. Hover your mouse over the Account & Settings button (a small version of your picture) in the top right corner of the screen, then click the Review link next to Privacy & Settings.
Your browser presents you with your Account Settings page.
- From the headers in the bottom left of your screen, click Communications. Then, in the middle of the screen, click the Select the Types of Messages You're Willing to Receive link.
This opens up a Types of Messages box, as shown in Figure 3-18.
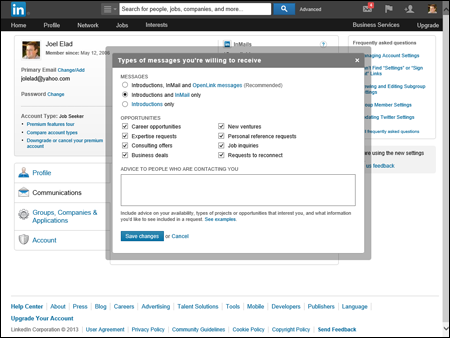
Figure 3-18: Update your contact settings for your profile.
- Select your option(s) under the Messages header for what types of messages you wish to accept.
If you wish to receive mail through all of LinkedIn's different communication systems, select the Introductions, InMail, and OpenLink Messages option, so that people can contact you through any of those three methods.
If you only want to receive InMail e-mails from people who aren't direct connections in your network, but not anyone who's using LinkedIn's OpenLink system, select the Introductions and InMail Only option.
Otherwise, select the Introductions Only option to block anyone sending you InMail. Your first-degree connections can always send you a message through LinkedIn. (This is different from the InMail e-mails you can send any LinkedIn user, which you find out about in Chapter 5.)
- Select the correct options in the Opportunities section.
The items you select here appear as a bulleted list in your profile and limit (or allow) the ways in which other LinkedIn members can contact you. If you don't want to receive any InMail or introductions from other LinkedIn users, you can deselect those check boxes, and no options to contact you are displayed on your profile.
- (Optional ) To give advice on how people can contact you, fill in that information in the indicated text box.
For example, if you require a few pieces of information from someone before you add him to your network, you can indicate that in this text box. You can also indicate whether this is a good time to contact you, or what projects or subject areas you're involved in.
- Click the Save Changes button.
You're taken back to your Account settings page.