Chapter 17
Automating Your Mix
In This Chapter
![]() Planning your automation
Planning your automation
![]() Adding and editing automation
Adding and editing automation
![]() Automating MIDI events
Automating MIDI events
![]() Recording live automation
Recording live automation
Imagine The Beatles standing around a mixing board with Sir George Martin, each lending a hand to pull faders up and down without stopping, hoping to get the perfect mix take. That’s how mixing was done before mechanical faders brought hardware automation to modern mixing boards.
With software automation, you have even greater and more flexible control over your mix. Automation can help you first stabilize your mix and then design an exciting mix. In this chapter, you find out how to add interest to your mix and automate your own mix blueprint.
Turning Your Mix Into a Performance with Automation
Every track, channel strip, and plug-in is capable of being automated. Automation is best to add after the mix is stable. If you’re still arranging or editing your project, having automation on a track can get in the way of your workflow because you have more things to focus on as you edit. And if your mix isn’t stable, the mixing you do affects the automation as well. For these reasons, it’s a good idea to use project and track notes to jot down any automation ideas you may want to try later.
After your mix is stable, take a pass through the project, focusing on each of the core mixing concepts described in Chapter 16. Automate the levels, panning, EQ changes, effects, and dynamics. If you plan your automation this way, the final result will be an elevated and interesting mix.
Choosing Your Automation Mode
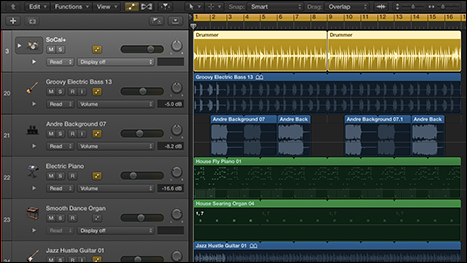
To automate a track, you need to display the track’s automation in the tracks area. Choose Mix⇒Show Automation or press A. The track headers will sport an automation icon and additional parameters, as shown in Figure 17-1. To enable automation for a track, click the automation icon in the track header.

Figure 17-1: Track automation in the tracks area.
After you’ve enabled automation on a track, you can choose between the following four automation modes on the menu:
- Read: Automation is played back but not recorded.
- Touch: Automation is recorded during playback while the parameter is being touched; when the parameter is released, it returns to the previous value. Touch mode is useful when you’re automating a temporary change in the parameter that you want to return to the previous value.
- Latch: Automation is recorded during playback while the parameter is being touched; after the parameter is released, automation stops at that last touched value. Latch mode is useful when you’re automating a parameter to a new value that you want to keep.
- Write: Automation is recorded during playback, and existing automation is erased as the playhead passes over it. Write mode is useful when you want to simultaneously record and erase automation.
Adding Automation to Your Tracks
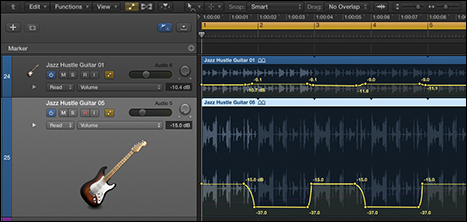
After you enable automation, adding it to your track is as simple as clicking a location on a region with the pointer tool. A control point is added with the current parameter’s value, as shown in Figure 17-2.

Figure 17-2: Track automation control points.
The parameter you automate is chosen in the automation parameter drop-down menu on the track header. You can display multiple lanes of automation by clicking the disclosure triangle to the left of the automation parameters. You can quickly add an automation point at the playhead position for the volume, pan, and sends by choosing Mix⇒Create Automation⇒Create 1 Automation Point Each for Volume, Pan, and Sends.
Adjusting automation points
The fastest way to adjust automation points is to select them with the pointer tool and drag them up, down, left, or right. You can select multiple points by Shift-clicking them. You can delete selected points by pressing Delete.
To create smooth curves between automation points, use the automation curve tool. Drag left, right, up, or down on the automation line with the automation curve tool to create automation curves. You can temporarily switch from the pointer tool to the automation curve tool by holding down Shift-Control while dragging the automation line.
Moving regions with or without automation
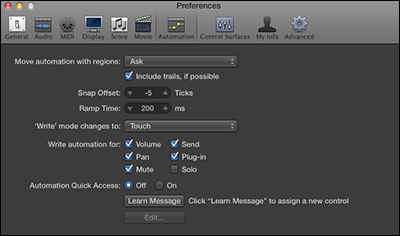
You may end up needing to make an edit to a track or to your song arrangement after you’ve started automating your mix. Moving regions with automation can cause complications if you don’t do it right. That’s why Logic Pro’s default state is to ask you whether you really want to move regions that have automation. You can change this behavior in the automation system preferences, shown in Figure 17-3. Choose Logic Pro X⇒Preferences⇒Automation to open the automation preferences, and then choose the default behavior from the Move Automation with Regions menu. You can choose the default behavior also on the Mix⇒Move Automation with Regions menu.

Figure 17-3: The automation preferences.
Editing automation with MIDI draw
You can automate MIDI regions in multiple ways. In addition to adding automation points in the tracks area, you can use MIDI draw to automate MIDI controller events. Here’s how to use MIDI draw in the tracks area:
- Turn off automation in the tracks area by clicking the automation icon.
You can’t simultaneously edit automation data and MIDI draw data.
- Select a MIDI track, choose View⇒MIDI Draw, and then choose a MIDI parameter.
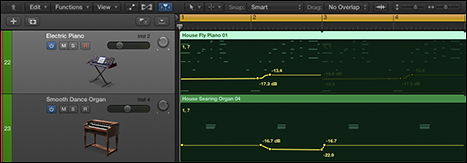
The MIDI draw lane is overlaid on the MIDI region, as shown in Figure 17-4. You can edit the automation points by using MIDI draw, as described in Chapter 15.

Figure 17-4: MIDI draw in the tracks area.
Recording Live Automation
The most precise way to automate your mix is by inputting automation data in the tracks area or by using MIDI draw on MIDI regions, as you learn in this chapter. But when automation was created on hardware mixing consoles, the automation was performed in real time as the project was playing. Recording live automation is an enjoyable experience because you get to perform along with your track, and perhaps create some magic along the way. Here’s how to record live automation:
- Choose an automation mode on the tracks you want to automate.
You can choose Touch, Latch, or Write, as described in the “Choosing Your Automation Mode” section, previously in this chapter.
- Play your project and adjust the parameters you want to automate.
Automation data is added to the tracks.
- When you’ve finished automating, stop the project and set the track’s automation mode to Read.

 To get all that you can from this chapter, you must have Show Advanced Tools selected in Advanced Preferences. Choose Logic Pro X⇒Preferences⇒Advanced Tools and select all the available options.
 You can also turn on automation and select automation mode from the automation slot in the mixer.