
Chapter 2
Examining Logic Pro Projects
In This Chapter
![]() Starting and finishing projects
Starting and finishing projects
![]() Discovering some timesaving workflow tips
Discovering some timesaving workflow tips
![]() Backing up and securing your projects
Backing up and securing your projects
![]() Sharing your projects for collaboration
Sharing your projects for collaboration
Logic Pro projects are similar to any computer file types, except they’re larger in scope than files such as text documents. You might be shocked to see an entire chapter about a file type, but there’s so much more you can do with Logic Pro projects than you can with other file types that you’ll soon understand how important they are to the creative process.
Projects are flexible. When disk space is a concern, for example, you can save only the assets you want to keep. You can create project templates to speed up your workflow and set up Logic Pro exactly how you want to work. Each project contains global settings of the entire project as well as different snapshots of the project, such as different arrangements, mixes, or treatments. For example, you can create an alternate version of your project if the producer calls for a version without a vocal (for when the performer needs to sing live on TV to a backing track).
In this chapter, I cover naming conventions to keep all your projects organized, tips and tricks to speed up your workflow, strategies for archiving and backing up your work, and much more.
Starting Your Project
A project is the file type that you work with in Logic Pro. The file extension of a Logic Pro project is .logicx. The project file contains MIDI events, parameter settings, and information about the audio and video in your project.
To get the big picture of your project and how it relates to Logic Pro, the hierarchy goes like this:
Project⇒Tracks⇒Regions⇒Events
Your project contains tracks. Your tracks contain regions. Your regions contain events. The File menu is where you do most of your project-level work.
To start an empty default Logic Pro project, choose File⇒New or press Shift+![]() +N. A New Tracks dialog window opens, as shown in Figure 2-1. At the top of the screen, choose the type of track you would like to begin working with and then click Create.
+N. A New Tracks dialog window opens, as shown in Figure 2-1. At the top of the screen, choose the type of track you would like to begin working with and then click Create.
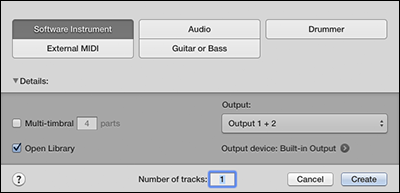
Figure 2-1: The New Tracks dialog is where you choose your first track.
A more advanced and customized way to start a new project is to choose File⇒New from Template (![]() +N). The Project Chooser window opens, as shown in Figure 2-2. You can select a premade project template, a recent project, or your own customized project template. I show you how to create a customized orchestral template in Chapter 12. Click Details (on the left) to display even more options for your new project, such as the tempo, time and key signatures, and audio input and output.
+N). The Project Chooser window opens, as shown in Figure 2-2. You can select a premade project template, a recent project, or your own customized project template. I show you how to create a customized orchestral template in Chapter 12. Click Details (on the left) to display even more options for your new project, such as the tempo, time and key signatures, and audio input and output.
 You can change any project option, but you should stick to a single sample rate. The default sample rate, 44.1 kHz, is used for CD quality audio and is the choice I recommend to all beginners. The 48 kHz sample rate is often used in video projects. Using higher sample rates depends on your hardware capabilities and project needs.
After you start your project, you’re ready to begin recording, arranging, editing, and mixing. It’s a dream come true.
Choose a custom startup action to tell Logic Pro what to do when you launch it. If you’re the prolific type, you can create a new project every time you launch the app. If you, like me, are a mere mortal, you might want to open the most recent project on startup. Choose Logic Pro X⇒Preferences⇒General and select the Project Handling tab, as shown in Figure 2-3. Then select your startup action. Logic Pro is kind enough to ask you what to do when it starts. But it won’t take food and drink orders. I’ve tried.
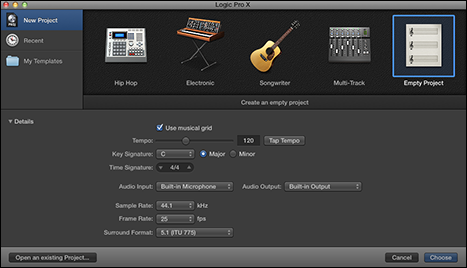
Figure 2-2: Choose customizable project templates here.
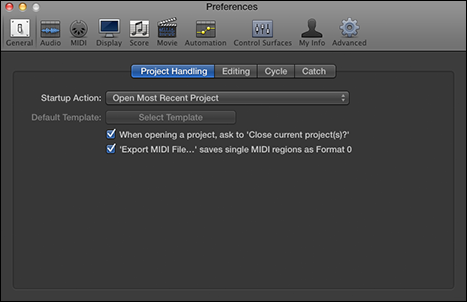
Figure 2-3: Customize your startup action.
Opening a project
You can open a project in several ways. You can click a project file in Finder, which will launch Logic Pro and open the project. If another project is open, Logic Pro will ask if you want to close the project. More than one project can be open simultaneously, so it’s not necessary to close the current project. To switch between open projects, choose Window on the main menu and then select the project in the list at the bottom of the menu.
You can open a project also from the File menu. Choose File⇒Open or press ![]() +O and a dialog will open allowing you to navigate to the location of your project in Finder. Choose File⇒Open Recent instead to see a list of your recent projects.
+O and a dialog will open allowing you to navigate to the location of your project in Finder. Choose File⇒Open Recent instead to see a list of your recent projects.
Logic Pro can also open MIDI files, AAF files (Advanced Authoring Format files used by digital audio workstations such as Pro Tools), XML files (used by Final Cut Pro X), and GarageBand projects. It can also open projects created with earlier versions of Logic Pro.
If this is your first time launching Logic Pro X, you can open a demo project from the Help menu. Choose Help⇒Logic Pro Demo Project and a project by a chart-topping band will give you something to explore.
Saving a project
When you create your project, it is autosaved in the Logic folder under the temporary name Untitled.logicx. (You can get to the Logic folder in Finder by navigating to Users⇒USERNAME⇒Music⇒Logic.)
To save your project manually, choose File⇒Save. In the Save dialog that appears, name your project and choose a location or keep the default location, which is the Logic folder. You can choose to organize your project as a package or a folder. A package saves your project as a single file that includes all project assets. A folder saves the project file and saves its assets in subfolders.
You can also choose to copy specific file types into your project. It’s a good idea to copy your audio files into the project, but you might not want to copy samples due to their potentially large file size. The benefit to saving a project without assets is that you conserve hard drive space. The downside is that it can be easy to mistakenly delete assets the project depends on. Hard drive space is inexpensive, so it makes sense to include all assets in your project folder. By doing so, organizing, moving, and archiving projects will be easier.
I find saving projects as packages is the simplest approach. You can view the contents of packages (all package file types, including Pages, Keynote, and Numbers files) by Ctrl-clicking the package in Finder and choosing Show Package Contents. All your audio files and assets will be in the Finder window that opens.
If you want to save the project with a different name or in a different location, choose Save As on the File menu. If you want to create a copy of the project, choose Save a Copy As on the File menu.
Closing a project
When you’re ready to close your project, choose File⇒Close Project. If you’ve made any changes since you last saved your project, Logic Pro asks if you want to save the project. If you don’t want to keep those changes, select Don’t Save from the Save dialog.
Don’t confuse the Close Project command with the Close command. Both are on the File menu. The Close command simply closes the currently focused window. However, if your project has only one window open, which is often the case, using the Close command will also close your current project.
Naming and renaming a project
It’s a good idea to have a naming convention and stick with it. When I’m saving a project that doesn’t yet have a title, my file-naming convention is to use the date, key signature, harmonic mode, and tempo, followed by any other useful descriptors such as the musical genre, song section, and version numbers. For example:
2014-01-01 C Mixolydian 120bpm funk verse 1
Naming your file this way enables you to match projects based on mode and tempo. If you eventually come up with a title for your project, use the Save As command (described earlier) or just rename the project file in Finder. Or you can use the Rename function by choosing File⇒Project Management⇒Rename.
Augmenting Your Project
Projects are so basic to your workflow that you may take them for granted after a while. But you can do several cool things at the project level that will make your time with Logic Pro more productive.
Saving time with project templates
When you create a project (see earlier in this chapter), you see Project Chooser, where you can begin a project from a premade template. These default templates are excellent starting places. You can also create your own project templates.
How can you save time with templates? If you’re recording several songs with a band and each song has a similar setup or you’re a film composer and use the same orchestra setups for all your scores, you could create a project template once and use it over and over again. (You find out how to create an orchestral template in Chapter 12.)
To save a template, set up your project how you want it and then choose File⇒Save as Template. Project templates are saved in a special folder located at Users⇒USERNAME⇒Music⇒Audio Music Apps⇒Project Templates.
I love using templates and I’ve saved dozens of them. I have genre-based templates, templates that include my favorite third-party software, and templates that I’ve created from analyzing popular hits (and not-so-popular guilty pleasures). Templates are excellent productivity tools.
Autosave your hard work
When I was in high school, I spent an entire evening sequencing a popular song in one of the first Apple MIDI sequencers. I spent hours hunched over a computer keyboard instead of doing my homework, completely focused, with no bathroom breaks, until the electricity went out. I hadn’t saved the project even once.
Even though I was crushed, I jumped back in, and sequencing was much easier the second time around. I also developed a habit of pressing ![]() +S that I still have to this day. You might even find my left hand “air-saving” while I’m away from the computer. It’s a habit I’m happy to have.
+S that I still have to this day. You might even find my left hand “air-saving” while I’m away from the computer. It’s a habit I’m happy to have.
Fortunately for you, Logic Pro X autosaves your work. If Logic Pro should crash, when you reopen the project, it will ask you to choose an autosaved version or the last manually saved version. However, even though the program autosaves, get in the habit of saving your work after every important change you make.
Recover from problems with project backups
What would you do if your computer was stolen or ruined? Barring the financial considerations of buying a new computer, could you recover quickly? If I were to lend you my own computer, could you rebound and save the game? If you couldn’t, please pay attention, for the sake of your music.
I’m a backup fanatic. I back up all my computers using Apple Time Capsule, built-in Time Machine software, and a few rotating external drives. I also back up my entire computer offline using Amazon S3 cloud storage. But wait, there’s more. I sync my current projects using Dropbox so I can work on them at multiple computers.
Logic Pro X also creates project backups every time you save your project. As long as you have Show Advanced Tools selected in the Advanced Preferences pane (see Chapter 1), you can revert to an earlier saved version of your project. Every time you save your project, a backup is made. You can revert to these backups by choosing File⇒Revert To. A list of your time-stamped project backups allows you to go back in time to a previously saved project. This feature saves you when you try things out that you don’t like or make mistakes while working.
Create options with project alternatives
You can create alternative projects within a project. This feature saves you from creating new projects or copies of projects every time you want to try something new. The downside of creating copies of projects is that if you don’t do it properly and you delete audio from one project that’s being used in another project, you might lose that file in the first project. If everything is self-contained, you can try things out until your mad genius is content. Also, if you create two projects and want to A/B them, switching back and forth means all the plug-ins have to be reloaded each time, which can take enough time that your ear can’t tell the difference between the two.
To create a project alternative, choose File⇒Alternatives⇒New Alternative. You can rename and remove the alternatives by choosing File⇒Alternatives⇒Edit Alternative. As shown in Figure 2-4, each project alternative is time-stamped, which helps you know which project is the most recent and which is the original.
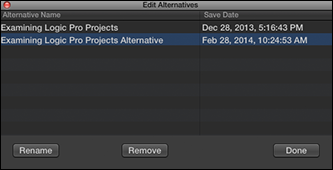
Figure 2-4: Rename and remove project alternatives.
Following are some examples of project alternatives you might want to try:
- Arrangements: Create project alternatives with different lengths for advertising, such as 10, 15, 30, and 60 seconds. Create an alternative with a short intro geared towards music industry professionals. Or try different instrumentations. Or if your band has a prima donna who needs to be louder than everyone else, let that band member hear the louder version while the rest of the band hears the version you so expertly crafted. Or perhaps you want to hear how the project would sound with a song section in a different place.
- Singers: A secret in the song-pitching business is that female listeners often prefer to hear a male singer on a demo. With project alternatives, you can record a female singer on the version you want the public to hear but record a male singer when sending the demo to potential clients or artists.
- Mixes: You can create a project alternative with a loud vocal and one with a soft vocal. Or create an alternative without the vocal, in case the singer needs to perform the song to a backing track. (See Chapter 19 for information on the different alternate mixes you should produce.)
Customizing Your Project Settings
Similar to the Logic Pro X Preferences, your project has its global settings that you can adjust. You get to the project settings shown in Figure 2-5 by choosing File⇒Project Settings.
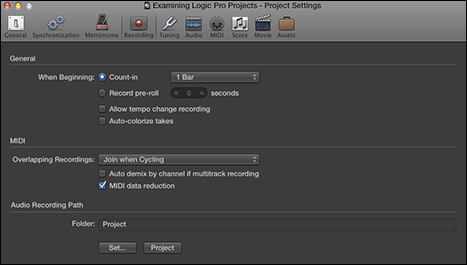
Figure 2-5: Set global settings for your project.
Here’s a description of the Preferences panes you can choose at the top of the Project Settings window:
- General: Set the grid to display bars and beats or time. Selecting bars and beats stores tempo information in the audio files you create. Storing the tempo in files is useful if you’ll use the assets in other projects that recognize the data. Using the Time setting also changes the primary ruler to display time instead of bars and beats.
- Synchronization: Sync your project to an external device or control your project from an external device.
- Metronome: This window is where you control the internal metronome sound generator, uniquely called Klopfgeist. You can also control an external click via MIDI if you prefer to use a different sound. When you don’t want to hear the metronome while recording, select Only During Count-In, which is useful when the sound gets in the way of the prerecorded media you’re listening to.
- Recording: Adjust the number of bars or seconds that play before you begin recording. The MIDI settings give you several options for recordings that overlap. You can create take folders, join the regions, or create new tracks. (These settings are covered in depth in Chapter 7.) You can also set the audio recording path in this window.
- Tuning: If you play with a lot of live instruments, such as piano, you might need to detune the software instruments that accompany the acoustic instruments to make their pitch match. You can also experiment with several alternate scale types, though most people stick with Equal Tempered.
- Audio: The sample rate is important to set here — 44.1 kHz is common for CD quality audio, and 44.8 kHz is common for video projects. (Sample rates are described in detail in Chapter 5.) You can adjust the automatic management and naming of channel strips. If you plan on mixing in surround sound, you can choose your surround format. You can adjust the Pan Law, which helps compensate for the fact that sounds get louder if they’re in both speakers equally.
- MIDI: The Input Filter tab on this Preferences pane gives you some useful options if your external MIDI device is sending a lot of extra data that you don’t need. For example, aftertouch (pressure applied to a keyboard key while it is being held down) and system exclusive data can add a lot of data, and if you’re not using those features, turning them off makes editing in the list editor much easier because it’s not filled with extraneous data.
- Score: If the MIDI tracks in your project will be printed for musicians to play, you can adjust the settings here. This pane has many settings, and most are for professional notation. If you plan on printing a lead sheet, quick parts, or guitar tablature, you may need to check out these settings. Otherwise, the default settings are often all you need.
- Movie: If you import a movie into your project to compose a film score, Movie Start is a useful setting because movies don’t often start at 0. You can also adjust the volume if it’s getting in the way of your work, and you can have the movie follow the tempo.
- Assets: When you select every option in this pane, all your assets are copied (not moved, but copied) into the project folder or package. Selecting every option is the safest way to go because all your assets are in one place, but you might not want to go this route if you’re concerned about your hard drive space.
After you adjust your project settings the way you like, save your project as a template (choose File⇒Save as Template). That way, when you start a new project, you won’t have to repeat your work. Project templates save you time and give your clicking finger relief so you can use it for more creative pursuits.
Import settings and content from other projects
What if you’ve already started a project but have another project that’s set up the way you want? Importing settings from other projects into your current project is a breeze. Choose File⇒Project Settings⇒Import Project Settings. A dialog asks you to find the project from which you want to import settings. Select the project, choose Import, and the window in Figure 2-6 appears, displaying the settings you can import into your project. Select the project settings you want to copy and click Import.
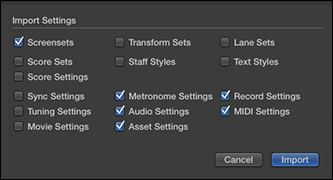
Figure 2-6: Copy settings from other projects.
If you want to import track content (the audio and MIDI regions) and channel strip settings from another project, you use another project import option. Choose File⇒Import⇒Logic Projects. In the dialog that appears, select the project from which you want to import and then click Import.
The all files browser opens on the right side of the main window and displays the track import view, as shown in Figure 2-7. Track content, plug-ins, effects sends (see Chapter 16), I/O (input/output) settings, and automation are shown for every track.
Decide what you want to import by selecting the check boxes. You can also bring in markers and other global track content. When you’re ready to import, click Add to import the content into the current project or click Replace to import the data and replace the content of the currently selected track. Replace mode works on only a single track at a time.
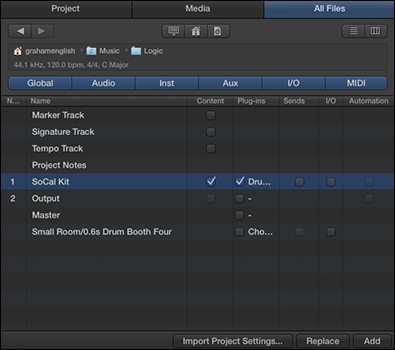
Figure 2-7: The track import view of the all files browser.
The Import Project Settings button gives you the same dialog as File⇒Project Settings⇒Import Project Settings does. As you can see, you can import information into your current project in several ways.
Another way to get to the projects import function is to use the all files browser and navigate to a Logic project. Choose View⇒Show Browsers or press the F key. Click the All Files tab of the browser, select the project from which you want to import, and double-click the project or click the Import button at the bottom of the browser. The browser displays the track import view, and you can choose what you would like to import into your current project.
Export your project for collaboration
You might want to export your project for several reasons. Perhaps you want to collaborate with other artists or you want to work on your project in a different software application. You can also export portions of your project for use in other projects. To export regions, MIDI selections, tracks, and the entire project, begin by choosing File⇒Export.
Exporting regions
To export a region and add it to your Apple loop library, choose File⇒Export⇒Region to Loop Library. The dialog shown in Figure 2-8 appears. Name your file, choose the loop type, select the scale and genre, and add other tags and instrument descriptors. Click Create to export your Apple loop and add it to the loop library.
If you simply want to export the region to your hard drive as an audio file, choose File⇒Export⇒Region as Audio File. In the dialog that appears, select the file location, audio file format, and bit depth.
Exporting MIDI selections
You can export a selection of MIDI tracks as a MIDI file by choosing File⇒Export⇒Selection as MIDI File. Selecting more than one MIDI region will result in a single MIDI file.
Exporting tracks
To export your tracks for use in a different audio application, such as Pro Tools, choose File⇒Export⇒All Tracks as Audio Files. In the dialog that appears, select the audio format, the bit depth, and other options that will determine how the tracks are processed before they are exported. If your exported audio tracks will be mixed in another application, it’s best to select the Bypass Effect Plug-ins and Include Volume/Pan Automation options.
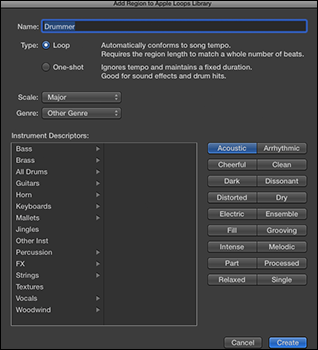
Figure 2-8: The Add Region to Apple Loops Library window.
If you’re collaborating with a Pro Tools user, add an empty MIDI track to your project and export it separately. That way, if you have marker data, it will be exported along with the tempo information, and your Pro Tools user will have a marker and tempo map to import with the audio files. The Pro Tools user will thank you and treat you like a hero!
Exporting projects
Exporting a project as an AAF (Advanced Authoring Format) file is another option for collaborating with Pro Tools users. Choose File⇒Export⇒Project as AAF File. All the used regions will be exported, including their track and position references and volume automation.
To export a project as a Final Cut Pro XML file, choose File⇒Export⇒Project to Final Cut Pro XML. Software instruments and automation data are exported as audio, but MIDI tracks are ignored.
You can export your MIDI score as a MusicXML file if you want to edit the notation in a program such as Sibelius or Finale or in a music optical character recognition (OCR) application such as SmartScore or PhotoScore. Cubase and Sonar can also import MusicXML files. Select the MIDI you want to export, open the score editor by choosing Window⇒Open Score Editor, and then choose File⇒Export⇒Score as MusicXML.
Tidying Up Your Project
When you work on your projects, you’ll probably try lots of things, record takes that don’t make the mix, and basically add a bunch of audio and MIDI data that doesn’t need to be there when it comes time to share or archive your project. You should give your project a spring-cleaning to get it ready for the next season in its life. If you plan to send your project to a collaborator or archive it because it’s finished, you’ll appreciate the following useful tools in the File⇒Project Management menu:
- Clean Up: Deletes unused files, backups, and media browser files, as shown in Figure 2-9. This function is safe to use because it deletes only unused data. However, it deletes media you may have shared with the media browser, so sharing with the media browser isn’t the best strategy if you want your media to be available for other projects or other applications in the future.
- Consolidate: Creates a copy of all the assets you select and includes them in the project, as shown in Figure 2-10. If you haven’t been including assets in your project up until now, this is your chance to pull everything into your project. This function is useful also when you want to share the project for collaboration because the Logic Pro user you’re sharing with might not have the same samples or content installed.
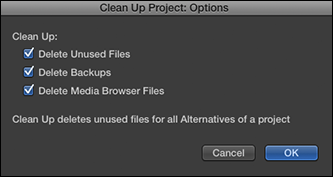
Figure 2-9: Delete unused project data.
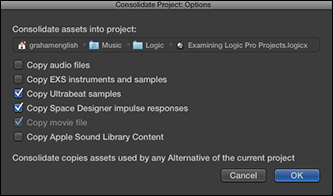
Figure 2-10: The consolidate function copies and includes all used assets in the project.
- Rename: Opens a dialog asking you to select your new project name. (This function is similar to using the File⇒Save As command.)
- Show in Finder: Opens a Finder window with your project selected. Use this function when you need to get to your project file quickly.
Now that your project is nice and tidy, it’s important to think about protecting it for the future. A good backup strategy can save you from downtime and avoidable, life-shortening stress. Hard drives fail, so back up your project files on CD or DVD and consider using a service that allows you to back up offsite. Also, because Logic Pro X will probably not be the final version of this amazing software, export your tracks as audio files so that you can import them into a version of Logic Pro down the line. Your future self will thank you.